Page 329 of 513

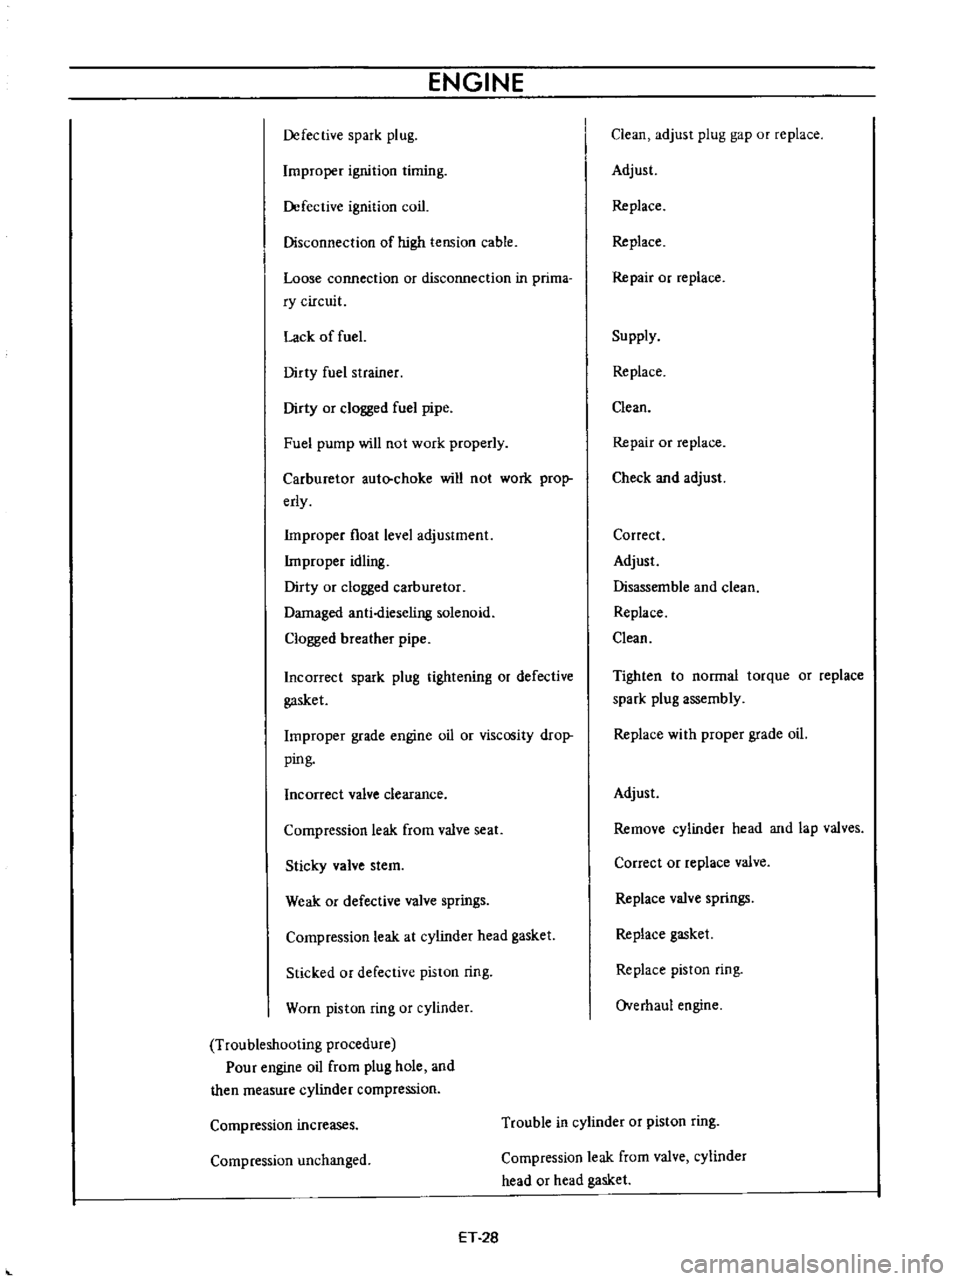
ENGINE
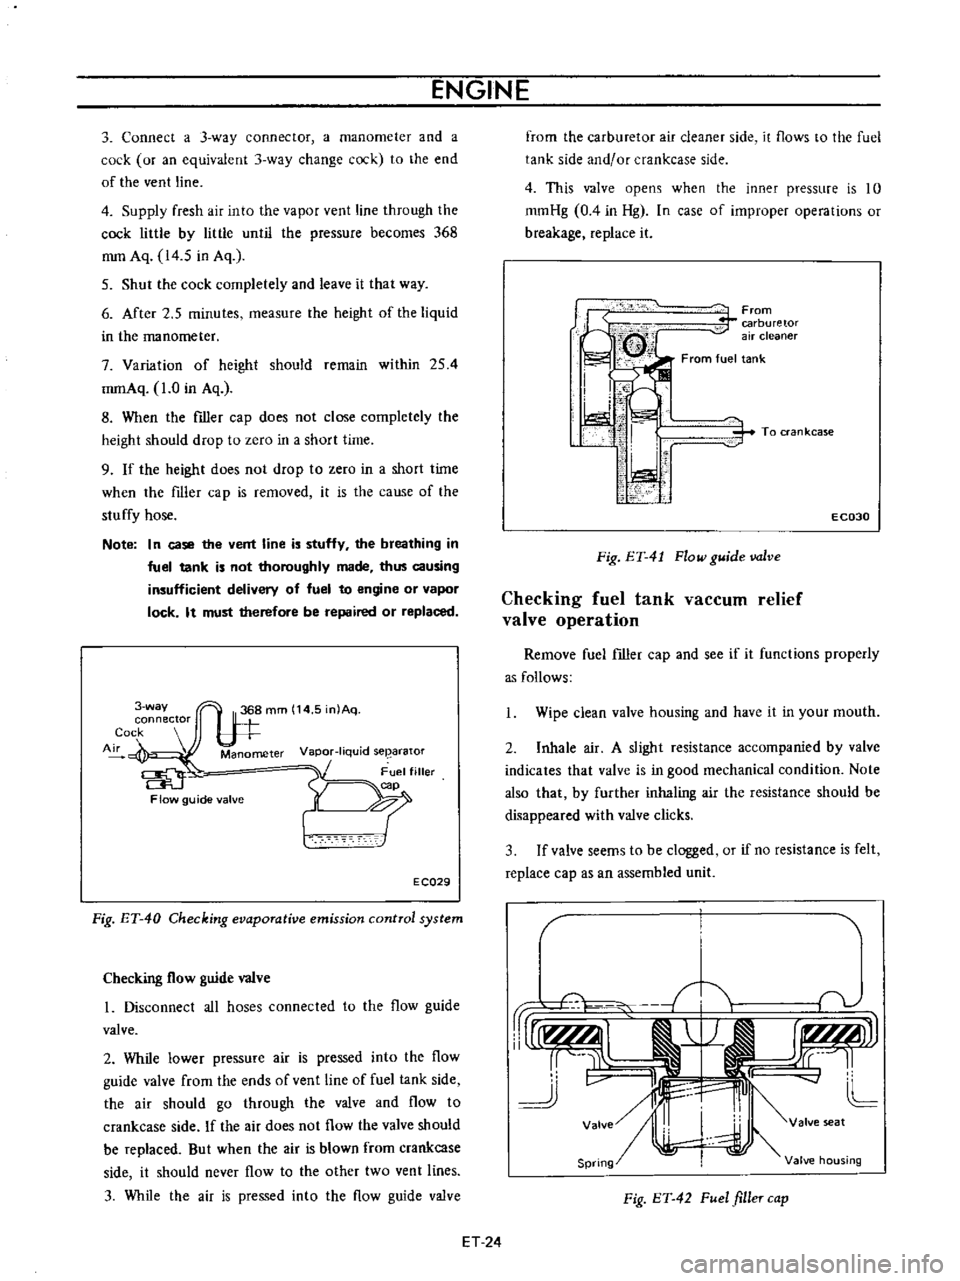
3
Connect
a
3
way
connector
a
manometer
and
a
cock
or
an
equivalent
3
way
change
cock
to
the
end
of
the
vent
line
4
Supply
fresh
air
into
the
vapor
vent
line
through
the
cock
little
by
little
until
the
pressure
becomes
368
mm
Aq
14
5
in
Aq
5
Shut
the
cock
completely
and
leave
it
that
way
6
After
2
5
minutes
measure
the
height
of
the
liquid
in
the
manometer
7
Variation
of
height
should
remain
within
254
mmAq
1
0
in
Aq
8
When
the
filler
cap
does
not
close
completely
the
height
should
drop
to
zero
in
a
short
time
9
If
the
height
does
not
drop
to
zero
in
a
short
time
when
the
filler
cap
is
removed
it
is
the
cause
of
the
stuffy
hose
Note
In
case
the
vent
line
is
stuffy
the
breathing
in
fuel
tank
is
not
thoroughly
made
thus
causing
insufficient
delivery
of
fuel
to
engine
or
vapor
lock
It
must
therefore
be
repaired
or
replaced
3
way
connector
Cock
Air
Manometer
Vapor
liquid
seearator
Flow
guide
valve
E
CQ29
Fig
ET
40
Checking
evaporative
emission
control
system
Checking
flow
guide
valve
I
Disconnect
all
hoses
connected
to
the
flow
guide
valve
2
While
lower
pressure
air
is
pressed
into
the
flow
guide
valve
from
the
ends
of
vent
line
of
fuel
tank
side
the
air
should
go
through
the
valve
and
flow
to
crankcase
side
If
the
air
does
not
flow
the
valve
should
be
replaced
But
when
the
air
is
blown
from
crankcase
side
it
should
never
flow
to
the
other
two
vent
lines
3
While
the
air
is
pressed
into
the
flow
guide
valve
from
the
carburetor
air
cleaner
side
it
flows
to
the
fuel
tank
side
and
or
crankcase
side
4
This
valve
opens
when
the
inner
pressure
is
10
mmHg
0
4
in
Hg
In
case
of
improper
operations
or
breakage
replace
it
From
carburetor
air
cleaner
From
fuel
tank
i
I
I
ti
i
i
1
1
i
To
ran
kcase
E
C030
Fig
ET
41
Flow
guide
valve
Checking
fuel
tank
vaCCUID
relief
valve
operation
Remove
fuel
filler
cap
and
see
if
it
functions
properly
as
follows
Wipe
clean
valve
housing
and
have
it
in
your
mouth
2
Inhale
air
A
slight
resistance
accompanied
by
valve
indicates
that
valve
is
in
good
mechanical
condition
Note
also
that
by
further
inhaling
air
the
resistance
should
be
disappeared
with
valve
clicks
3
If
valve
seems
to
be
clogged
or
if
no
resistance
is
felt
replace
cap
as
an
assembled
unit
T
1i
v
rUr1f
AlI
j
r
I
r
tLMJJl
rr
L
cc
11
J
v
II
4J
L
Valve
I
valve
seat
Spring
Valve
housing
Fig
ET
42
Fuel
filler
cap
ET
24
Page 330 of 513

EMISSION
CONTROL
AND
TUNE
UP
SERVICE
DATA
AND
SPECIFICATIONS
Valve
clearance
Hot
Intake
Exhaust
mm
in
rom
in
rom
in
kg
lb
0
35
0
014
0
35
0
014
10
to
15
0
394
to
0
591
10
22
Fan
belt
tension
Tightening
torque
Cold
Cylinder
head
bolts
kg
m
ft
lb
1st
turn
2nd
turn
Re
tightening
torque
Hot
Manifold
nuts
Carburetor
nuts
4
0
to
4
5
29
to
33
5
5
to
6
0
40
to
43
6
0
to
6
5
43
to
47
0
9
to
I
4
6
5
to
10
0
5
to
1
0
3
6
to
7
2
1
5
to
2
0
II
to
14
Spark
plugs
Oil
capacity
of
engine
including
oil
ftIter
Maximum
L
US
gal
Imp
gal
L
US
gal
Imp
gal
3
3
U
14
2
3
Ii
Minimum
Water
capacity
of
cooling
system
Without
heater
L
US
gal
Imp
gal
With
heater
L
US
gal
Imp
gal
4
2
1
U
4
9
I
4
11
12
5
to
14
5
I78
to
206
350
Compression
pressure
at
rpm
kg
em
psi
Battery
specific
gravity
Permissible
value
Fully
charged
value
at
200C
680F
Frigid
climates
Tropical
climates
Other
elima
tes
Over
1
22
Over
1
18
Over
1
20
1
28
1
23
1
26
Ignition
timing
degree
Distributor
50
B
T
D
C
Condenser
capacity
mm
in
degrees
IlF
Micro
Farad
0
45
to
0
55
0
018
to
0
022
49
to
55
0
22
5
Point
gap
Dwell
angle
Condenser
insulation
resistance
Mil
Mega
ohms
ET
25
Page 331 of 513

ENGINE
Spark
plugs
Cap
mm
in
0
8
to
0
9
0
03110
0
035
Idle
CO
ldie
speed
Manual
transmission
rpm
rpm
1
5
to
5
800
1
5
to
5
650
in
D
position
Automatic
transmission
Dash
pot
Setting
engine
speed
rpm
1
900
to
2
000
Throttle
opener
at
sea
level
Setting
vacuwn
pressure
Manual
transmission
Automatic
transmission
Setting
engine
speed
no
load
Servo
diaphragm
full
stroke
rpm
mm
in
500
to
540
19
7
to
21
3
480
to
520
18
9
to
20
5
1
650
to
1
850
5
0
1969
mmHg
in
Hg
mmHg
in
Hg
Theono
switch
Temperature
rises
from
low
to
high
oC
0
F
above
5
41
Flow
guide
valve
Opera
ting
pressure
mmHg
in
Hg
10
0
4
TROUBLE
DIAGNOSES
AND
CORRECTIONS
Troubles
Possible
causes
Remedies
CANNOT
CRANK
ENGINE
OR
SLOW
CRANKING
Improper
grade
oiL
Replace
with
proper
grade
oiL
Discharged
battery
Charge
battery
Defective
battery
Replace
Loosen
fan
belt
Adjust
Trouble
in
charge
system
Inspect
charge
system
Wiring
connection
trouble
in
starting
circuit
Correct
Defective
starter
switch
Repair
or
replace
Defective
starter
motor
Repair
or
replace
ET
26
I
Page 332 of 513

EMISSION
CONTROL
AND
TUNE
UP
Trouble
shooting
procedure
on
starting
circuit
Switch
on
the
starting
motor
with
light
put
on
When
light
goes
off
or
dims
considerably
a
Check
battery
b
Check
cable
for
connection
c
Check
starter
motor
When
light
stays
bright
a
Check
wiring
connection
between
battery
and
starter
motor
b
Check
starter
switch
c
Check
starter
motor
ENGINE
WILL
CRANK
NORMALLY
BUT
WILL
NOT
START
In
this
case
following
trouble
causes
may
exist
In
the
most
causes
ignition
system
or
fuel
system
is
in
trouble
Ignition
system
in
trouble
Fuel
system
in
trouble
Valve
mechanism
does
not
work
properly
Low
compression
Check
spark
plug
first
in
accordance
with
the
following
procedure
Disconnect
high
tension
cable
from
one
spark
plug
and
hold
it
about
10
rom
0
4
in
away
from
the
engine
metal
part
and
crank
the
engine
Good
spark
occurs
a
Check
spark
plug
b
Check
ignition
timing
Check
fuel
system
d
Check
cylinder
compression
No
spark
occurs
Check
the
current
flow
in
primary
circuit
Very
high
current
Inspect
primary
circuit
for
short
Check
breaker
point
for
operation
Low
or
no
current
Check
for
loose
terminal
or
disconnection
in
primary
circuit
Check
for
burned
points
Ignition
system
in
trouble
Burned
distributor
point
Repair
or
replace
Improper
point
gap
Adjust
Defective
capacitor
Replace
Rotor
cap
and
rotor
leak
Replace
ET
27
ti
Page 333 of 513

ENGINE
Defective
spark
plug
Improper
ignition
timing
Defective
ignition
coil
Disconnection
of
high
tension
cable
Loose
connection
or
disconnection
in
prima
ry
circuit
Lack
of
fuel
Dirty
fuel
strainer
Dirty
or
clogged
fuel
pipe
Fuel
pump
will
not
work
properly
Carburetor
auto
choke
will
not
work
prop
erly
Improper
float
level
adjustment
Improper
idling
Dirty
or
clogged
carburetor
Damaged
anti
dieseling
solenoid
Clogged
breather
pipe
Incorrect
spark
plug
tightening
or
defective
gasket
Improper
grade
engine
oil
or
viscosity
drop
ping
Incorrect
valve
clearance
Compression
leak
from
valve
seat
Sticky
valve
stem
Weak
or
defective
valve
springs
Compression
leak
at
cylinder
head
gasket
Sticked
or
defective
piston
ring
Worn
piston
ring
or
cylinder
Troubleshooting
procedure
Pour
engine
oil
from
plug
hole
and
then
measure
cylinder
compression
Clean
adjust
plug
gap
or
replace
Adjust
Replace
Replace
Repair
or
replace
Supply
Replace
Clean
Repair
or
replace
Check
and
adjust
Correct
Adjust
Disassemble
and
clean
Replace
Clean
Tighten
to
normal
torque
or
replace
spark
plug
assembly
Replace
with
proper
grade
oil
Adjust
Remove
cylinder
head
and
lap
valves
Correct
or
replace
valve
Replace
valve
springs
Replace
gasket
Replace
piston
ring
Overhaul
engine
Compression
increases
Trouble
in
cylinder
or
piston
ring
Compression
unchanged
Compression
leak
from
valve
cylinder
head
or
head
gasket
ET
28
Page 334 of 513

IMPROPER
ENGINE
IDLING
Fuel
system
in
trouble
Low
compression
Others
Ignition
system
in
trouble
Engine
idle
too
fa
t
ENGINE
POWER
NOT
UP
TO
NORMAL
4
w
compression
Ignition
system
in
trouble
Fuel
system
in
trouble
EMISSION
CONTROL
AND
TUNE
UP
Clogged
or
damaged
carburetor
jets
Incorrect
carburetor
adjustment
idle
speed
idle
mixture
Clogged
air
cleaner
Defective
gaskets
of
manifolds
or
carburetor
insulator
Improper
float
level
adjustment
Incorrect
valve
clearance
Extremely
low
revolution
Incorrect
basic
ignition
timing
Incorrect
automatic
teinperature
control
air
cleaner
Defect
or
malfunction
of
ignition
system
spark
plug
high
tension
cable
breaker
point
ignition
coil
etc
Trouble
in
throttle
link
and
cable
Incorrect
throttle
opener
adjustment
Trouble
in
PCV
valve
Trouble
in
automatic
choke
Defect
or
malfunction
of
ignition
system
spark
plug
high
tension
cable
breaker
point
ignition
coil
etc
Incorrect
ignition
timing
Defective
spark
plugs
Defective
distributor
points
Malfunction
of
choke
system
Clogged
fuel
pipe
ET
29
Clean
or
replace
Adjust
idle
speed
mixture
Replace
element
Replace
gasket
Adjust
Previously
mentioned
Adjust
Adjust
idie
rpm
Adjust
ignition
timing
Adjust
automatic
temperature
control
air
cleaner
Adjust
or
replace
ignition
system
Check
throttle
link
and
cable
Adjust
throttle
opener
Replace
PCV
valve
Adjust
automatic
choke
Adjust
or
replace
ignition
system
Previously
mentioned
Adjust
Clean
adjust
or
replace
plugs
Dress
or
replace
points
Check
con
denser
Adjust
Clean
Page 335 of 513

Air
intake
system
in
trouble
Overheating
Overcooling
Others
NOISY
ENGINE
Car
knocking
Car
knock
when
coasting
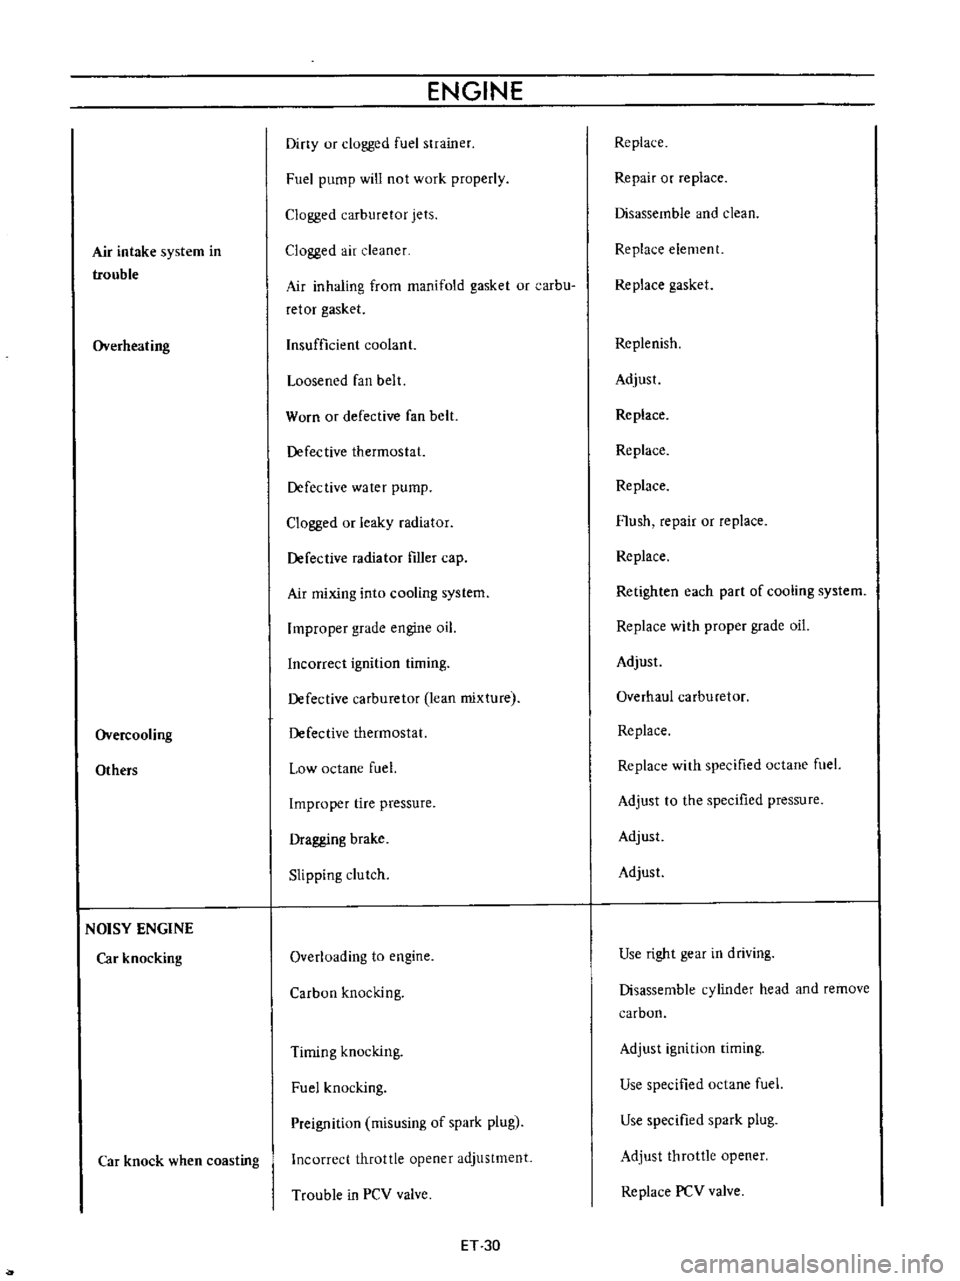
ENGINE
Diny
ur
clogged
fuel
strainer
Fuel
pump
will
not
work
properly
Clogged
carburetor
jets
Clogged
air
cleaner
Air
inhaling
from
manifold
gasket
or
carbu
retor
gasket
Insufficient
coolant
Loosened
fan
belt
Worn
or
defective
fan
belt
Defective
thermostat
Defective
water
pump
Clogged
or
leaky
radiator
Defective
radiator
filler
cap
Air
mixing
into
cooling
system
Improper
grade
engine
oil
Incorrect
ignition
timing
Defective
carburetor
lean
mixture
Defective
thermostat
Low
octane
fuel
Improper
tire
pressure
Dragging
brake
Slipping
clutch
Overloading
to
engine
Carbon
knocking
Timing
knocking
Fuel
knocking
Preignition
misusing
of
spark
plug
Incorrect
throttle
opener
adjustment
Trouble
in
PCV
valve
ET
30
Replace
Repair
or
replace
Disassemble
and
clean
Replace
element
Replace
gasket
Replenish
Adjust
Replace
Replace
Replace
Flush
repair
or
replace
Replace
Retighten
each
part
of
cooling
system
Replace
with
proper
grade
oil
Adjust
Overhaul
carburetor
Replace
Replace
with
specified
octane
fuel
Adjust
to
the
specified
pressure
Adjust
Adjust
Use
right
gear
in
driving
Disassemble
cylinder
head
and
remove
carbon
Adjust
ignition
timing
Use
specified
octane
fuel
Use
specified
spark
plug
Adjust
throttle
opener
Replace
PCV
valve
Page 336 of 513

EMISSION
CONTROL
AND
TUNE
UP
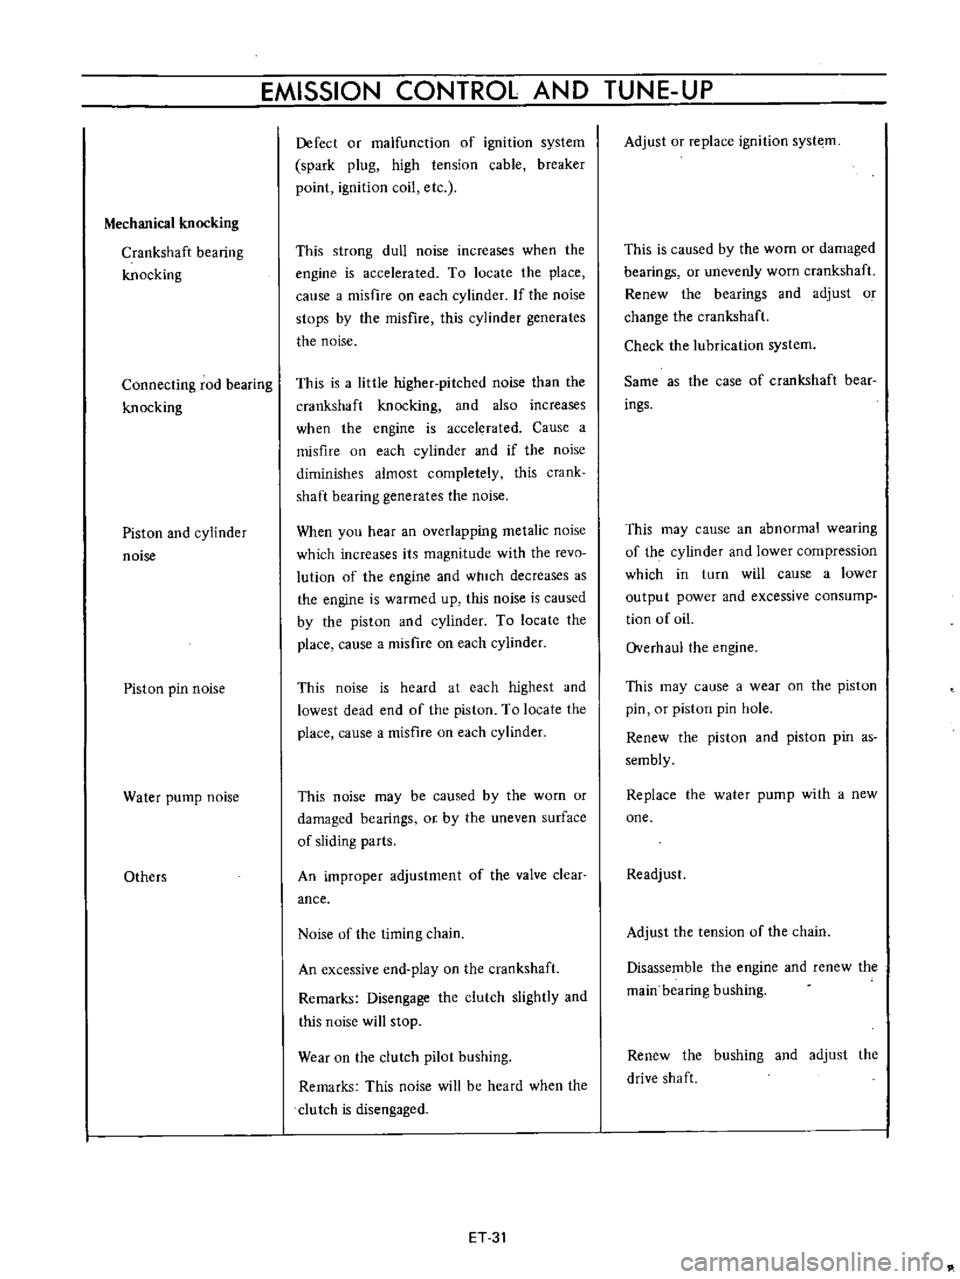
Mechanical
knocking
Crankshaft
bearing
knocking
Connecting
rod
bearing
knocking
Piston
and
cylinder
noise
Piston
pin
noise
Water
pump
noise
Others
Defect
or
malfunction
of
ignition
system
spark
plug
high
tension
cable
breaker
point
ignition
coil
etc
This
strong
dull
noise
increases
when
the
engine
is
accelerated
To
locate
the
place
calise
a
misfire
on
each
cylinder
If
the
noise
stops
by
the
misfire
this
cylinder
generates
the
noise
This
is
a
little
higher
pitched
noise
than
the
crankshaft
knocking
and
also
increases
when
the
engine
is
accelerated
Cause
a
misfire
on
each
cylinder
and
if
the
noise
diminishes
almost
completely
this
crank
shaft
bearing
generates
the
noise
When
you
hear
an
overlapping
metalic
noise
which
increases
its
magnitude
with
the
revo
lution
of
the
engine
and
which
decreases
as
the
engine
is
warmed
up
this
noise
is
caused
by
the
piston
and
cylinder
To
locate
the
place
cause
a
misfire
on
each
cylinder
This
noise
is
heard
at
each
highest
and
lowest
dead
end
of
the
piston
To
locate
the
place
cause
a
misfire
on
each
cylinder
This
noise
may
be
caused
by
the
worn
or
damaged
bearings
or
by
the
uneven
surface
of
sliding
parts
An
improper
adjustment
of
the
valve
clear
ance
Noise
of
the
timing
chain
An
excessive
end
play
on
the
crankshaft
Remarks
Disengage
the
clutch
slightly
and
this
noise
will
stop
Wear
on
the
clutch
pilot
bushing
Remarks
This
noise
will
be
heard
when
the
clutch
is
disengaged
ET
31
Adjust
or
replace
ignition
syste
m
This
is
caused
by
the
wom
or
damaged
bearings
or
unevenly
worn
crankshaft
Renew
the
bearings
and
adjust
o
change
the
crankshaft
Check
the
lubrication
system
Same
as
the
case
of
crankshaft
bear
ings
This
may
cause
an
abnormal
wearing
of
the
cylinder
and
lower
compression
which
in
turn
will
cause
a
lower
output
power
and
excessive
consump
tion
of
oiL
Overhaul
the
engine
This
may
cause
a
wear
on
the
piston
pin
or
piston
pin
hole
Renew
the
piston
and
piston
pin
as
sembly
Replace
the
water
pump
with
a
new
one
Readjust
Adjust
the
tension
of
the
chain
Disassemble
the
engine
and
renew
the
main
bearing
bushing
Renew
the
bushing
and
adjust
the
drive
shaft