Page 441 of 513

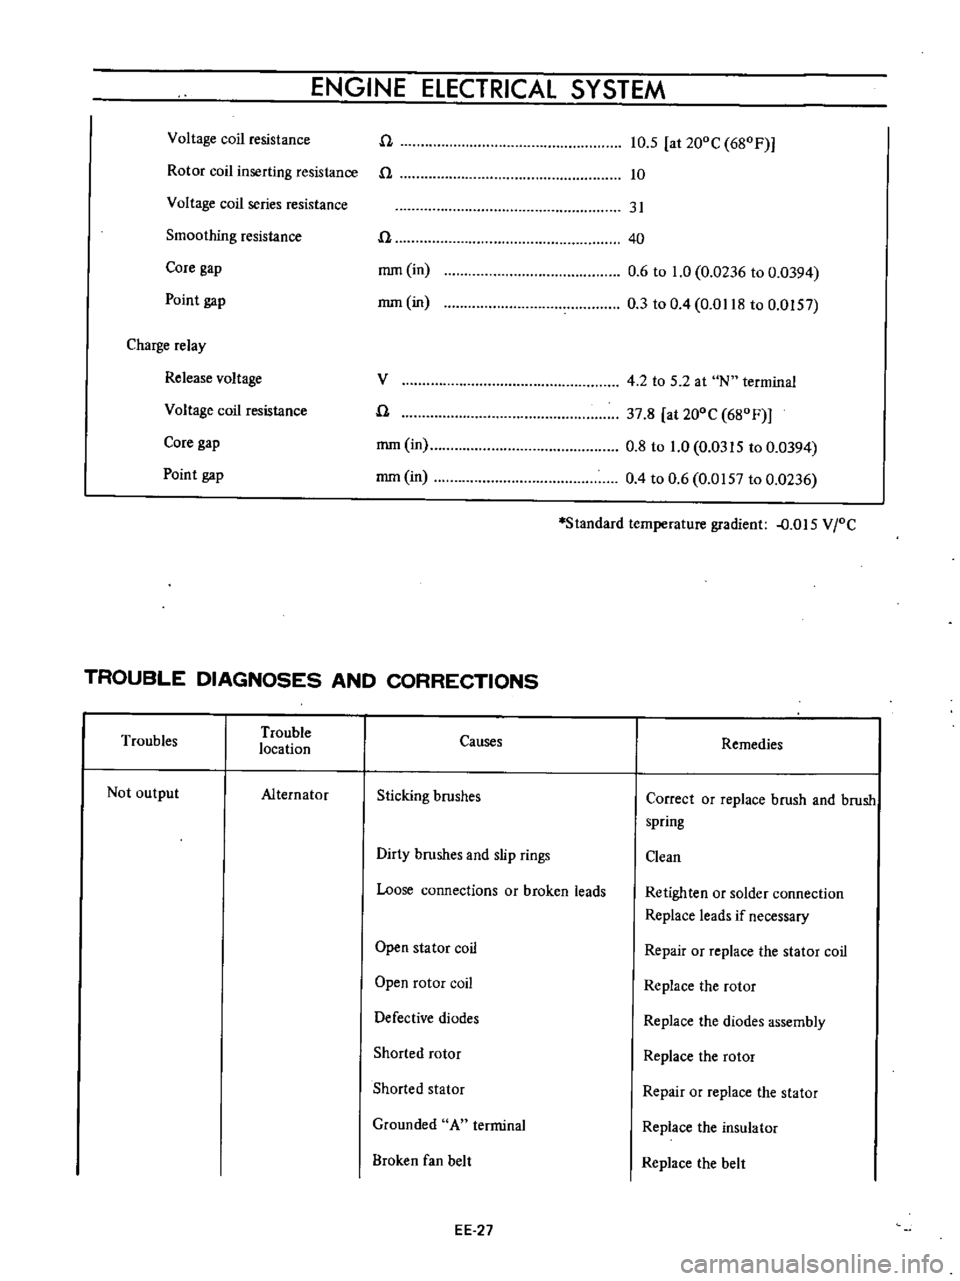
ENGINE
ElECTRICAL
SYSTEM
EE127
Fig
EE
45
Brush
wear
limit
Spring
pressure
test
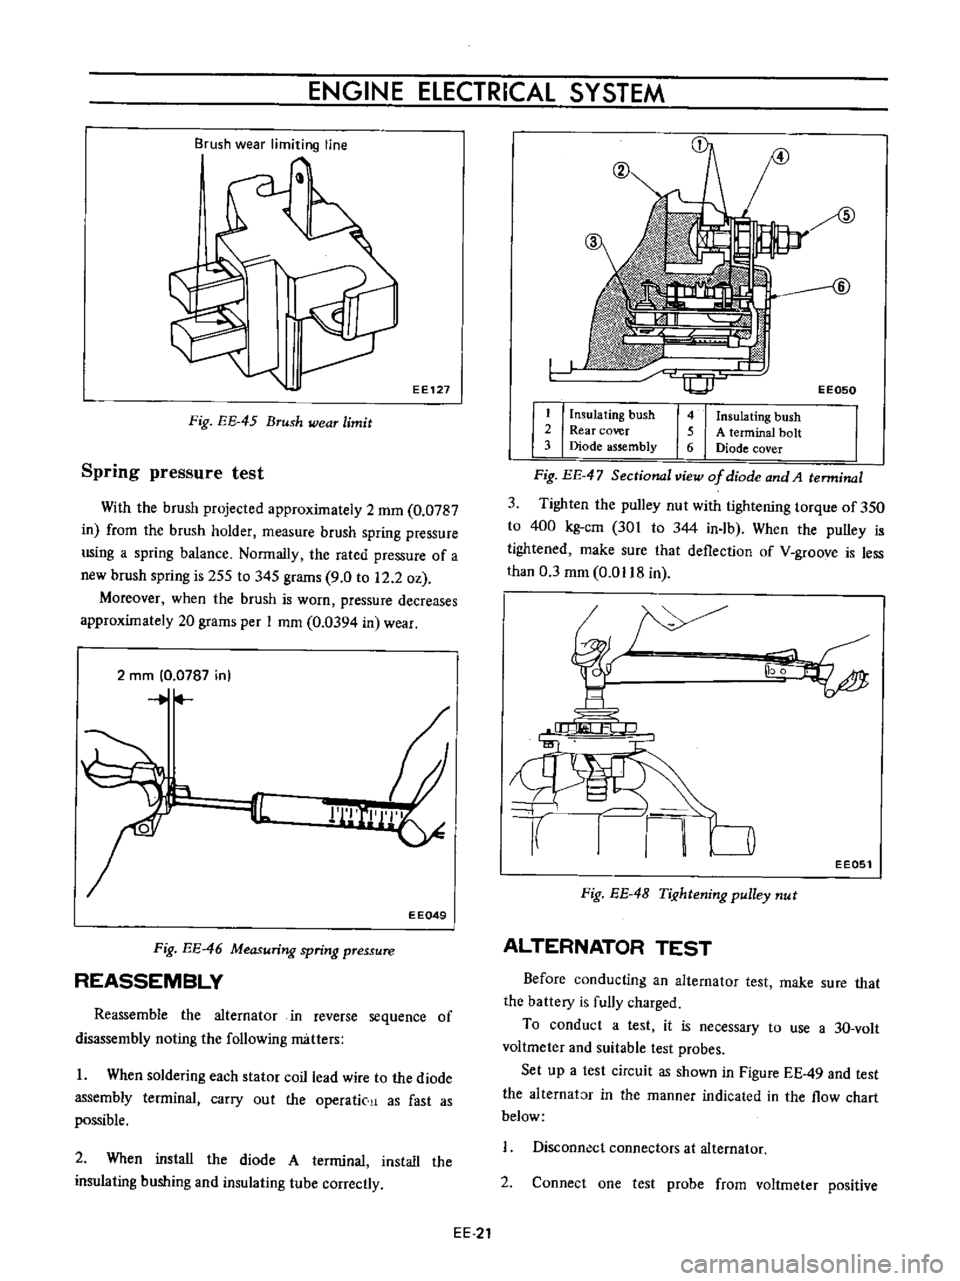
With
the
brush
projected
approximately
2
mm
0
0787
in
from
the
brush
holder
measure
brush
spring
pressure
using
a
spring
balance
Normally
the
rated
pressure
of
a
new
brush
spring
is
255
to
345
grams
9
0
to
12
2
oz
Moreover
when
the
brush
is
worn
pressure
decreases
approximately
20
grams
per
I
mm
0
0394
in
wear
2
rnm
0
0787
in
r
II
EEQ49
Fig
EE
46
Measuring
spring
pressure
REASSEMBLY
Reassemble
the
alternator
in
reverse
sequence
of
disassembly
noting
the
following
matters
I
When
soldering
each
stator
coil
lead
wire
to
the
diode
assembly
terminal
carry
out
the
operatic
as
fast
as
possible
2
When
install
the
diode
A
terminal
install
the
insulating
bushing
and
insulating
tube
correctly
EE
21
EE050
I
Insulating
bush
2
Rear
cover
3
Diode
assembly
4
Insulating
bush
5
A
terminal
bolt
6
Diode
cover
Fig
EE
47
Sectional
view
of
diode
and
A
terminal
3
Tighten
the
pulley
nut
with
tightening
torque
of
350
to
400
kg
cm
301
to
344
in
Ib
When
the
pulley
is
tightened
make
sure
that
deflection
of
V
groove
is
less
than
0
3
mm
0
0118
in
EE051
Fig
EE
4B
TiJ
htening
pulley
nut
ALTERNATOR
TEST
Before
conducting
an
alternator
test
make
sure
that
the
battery
is
fully
charged
To
conduct
a
test
it
is
necessary
to
use
a
3D
volt
voltmeter
and
suitable
test
probes
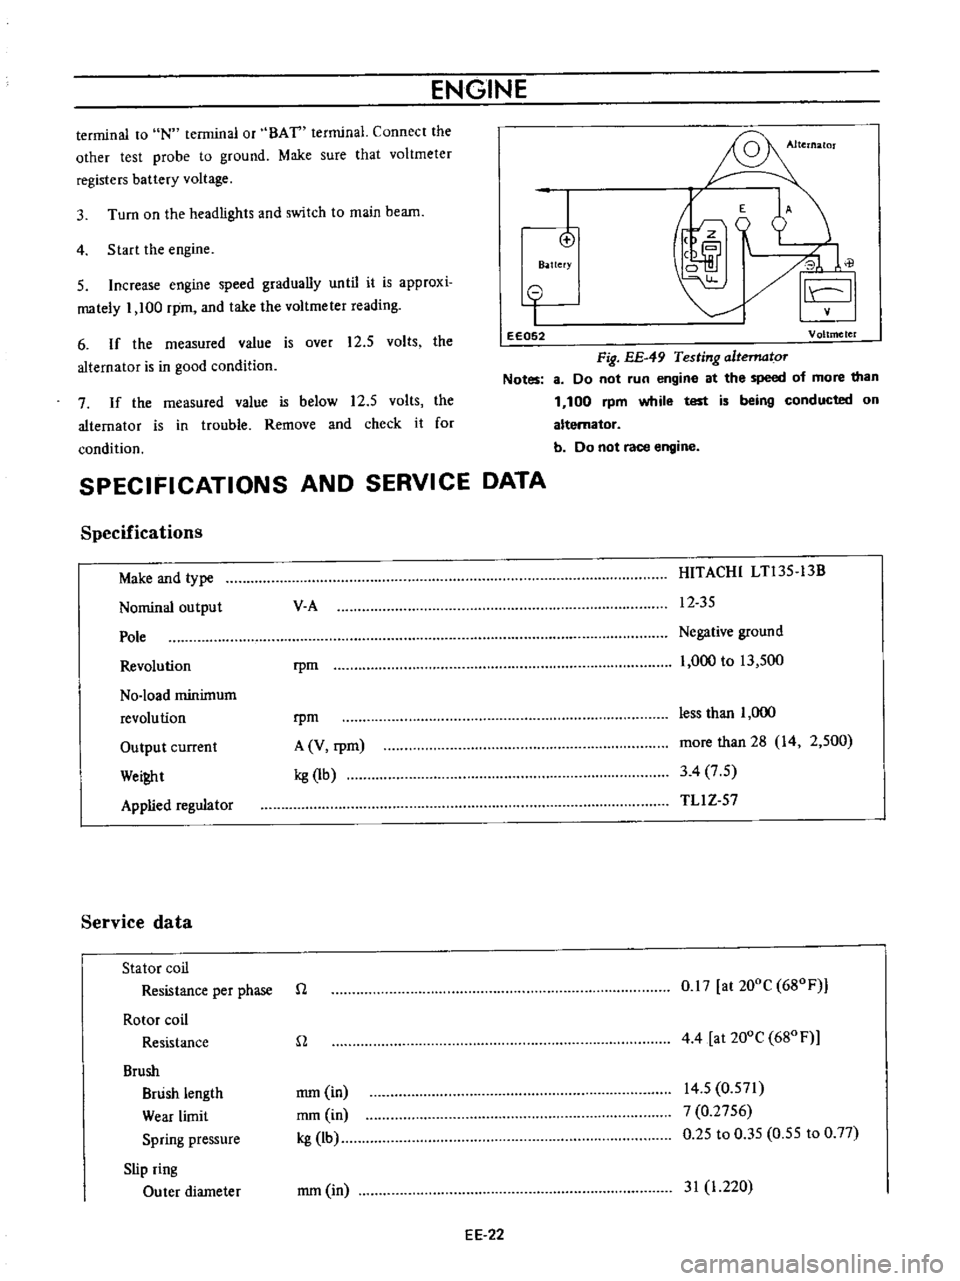
Set
up
a
test
circuit
as
shown
in
Figure
EE
49
and
test
the
alternator
in
the
manner
indicated
in
the
flow
chart
below
Disconn
ct
connectors
at
alternator
2
Connect
one
test
probe
from
voltmeter
positive
Page 442 of 513

ENGINE
terminal
to
IN
terminal
or
BAT
terminal
Connect
the
other
test
probe
to
ground
Make
sure
that
voltmeter
registers
battery
voltage
4
Start
the
engine
3
Turn
on
the
headlights
and
switch
to
main
beam
I
o
B
ttefY
E
A
J
0
il
I
5
Increase
engine
speed
gradually
until
it
is
approxi
mately
1
100
rpm
and
take
the
voltmeter
reading
6
If
the
measured
value
is
over
12
5
volts
the
alternator
is
in
good
condition
o
I
eE052
Voltmeter
Fig
EE
49
Testing
altematoT
Notes
8
Do
not
run
engine
at
the
speed
of
more
than
1
100
rpm
while
test
is
being
conducted
on
alternator
b
Do
not
race
engine
7
If
the
measured
value
is
below
12
5
volts
the
alternator
is
in
trouble
Remove
and
check
it
for
condition
SPECIFICATIONS
AND
SERVICE
DATA
Specifications
Make
and
type
Nominal
output
Pole
Revolution
No
load
minimum
revolution
Output
current
Wei
t
Applied
regulator
Service
data
Stator
coil
Resistance
per
phase
Rotor
coil
Resistance
Brush
Brush
length
Wear
limit
Spring
pressure
Slip
ring
Outer
diameter
V
A
HITACHI
LTl35
13B
12
35
rpm
Negative
ground
1
000
to
13
500
rpm
A
V
rpm
kg
1b
less
than
1
000
more
than
28
14
2
500
3
4
7
5
TLl
Z
57
n
0
17
at
200C
680F
n
4
4
at
200e
680
F
mm
in
mm
in
kg
lb
14
5
0
571
7
0
2756
0
25
to
0
35
0
55
to
0
77
mm
in
31
1
220
EE
22
Page 443 of 513

Charge
relay
SPECIFICATIONS
AND
SERVICE
DATA
TROUBLE
DIAGNOSES
AND
CORRECTIONS
ENGINE
ElECTRICAL
SYSTEM
Reduction
limit
Repair
limit
Repair
accuracy
mm
in
mm
in
mm
in
REGULATOR
CONTENTS
DESCRIPTiON
MEASUREMENT
OF
REGULATING
VOLTAGE
ADJUSTMENT
Voltage
regu
lator
EE
23
EE
24
EE
25
EE
25
DESCRIPTION
I
0
0394
0
3
0
0118
0
05
0
0197
EE
26
EE
26
EE
27
1
I
T
r
@
V
The
regulator
basically
consists
of
a
voltage
regulator
and
a
charge
relay
The
voltage
regulator
has
two
sets
of
contact
points
a
lower
set
and
upper
set
to
control
altemator
voltage
An
armature
plate
placed
between
the
two
sets
of
contacts
moves
upward
or
downward
or
vibrates
The
lower
contacts
when
closed
complete
the
field
circuit
direct
to
ground
and
the
upper
contacts
when
closed
complete
the
field
circuit
to
ground
through
a
resistance
field
coil
and
produces
alternator
output
The
charge
relay
is
similar
in
construction
to
the
voltage
regulator
When
the
upper
contacts
are
closed
ignition
warning
lamp
goes
on
I
Point
gap
2
Lower
contact
3
Armature
4
Core
gap
5
Yoke
gap
6
Connecting
spring
7
Yoke
8
Adjusting
screw
9
Locle
nut
10
Adjust
spring
11
Coil
12
3mmCO
1181
n
dia
screw
13
4
mm
0
1575
in
dia
screw
14
Contact
set
15
Upper
contact
Regulator
model
Applied
alternator
a
Construction
of
voltage
regulator
TLlZ
57
LTl35
13B
I
Point
gap
10
Lock
ut
2
Charge
elay
antact
Ii
Adjust
spring
3
Connecting
sprinl
12
Coil
4
Armature
i3
3
mm
0
1181
dia
5
Core
gap
screw
6
Yoke
gap
14
4mm
O
1575
n
dia
7
Yoke
crew
8
Adju
ting
screw
15
Contact
set
9
Voltap
e
ree
ulaloT
contact
b
Cons
rue
ion
of
charg
relay
Fig
EE
5J
Structural
view
Fig
EE
50
View
of
removing
cover
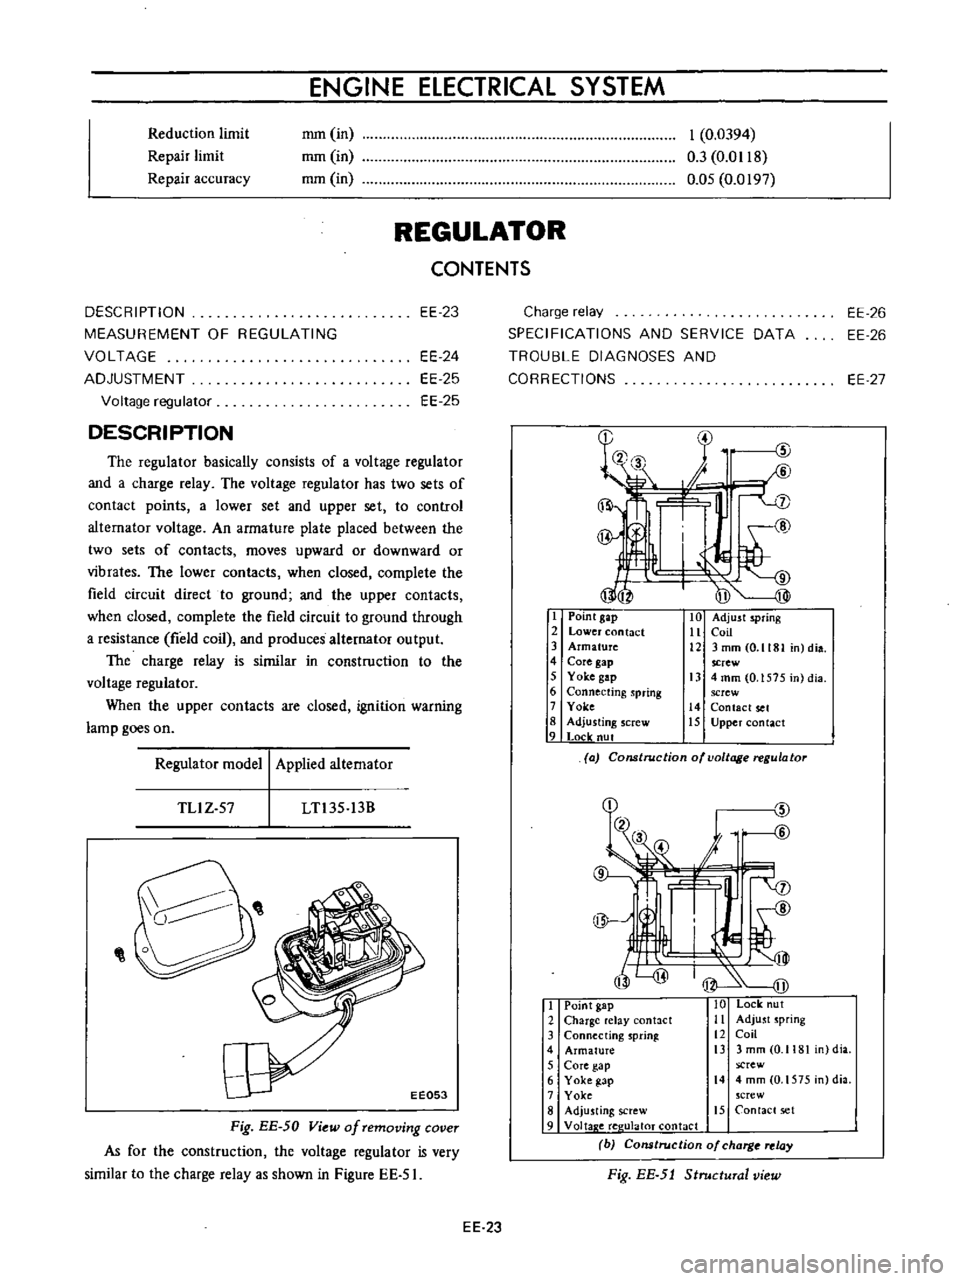
As
for
the
construction
the
voltage
regulator
is
very
similar
to
the
charge
relay
as
shown
in
Figure
EE
51
EE
23
Page 444 of 513

ENGINE
MEASUREMENT
OF
REGULATING
VOLTAGE
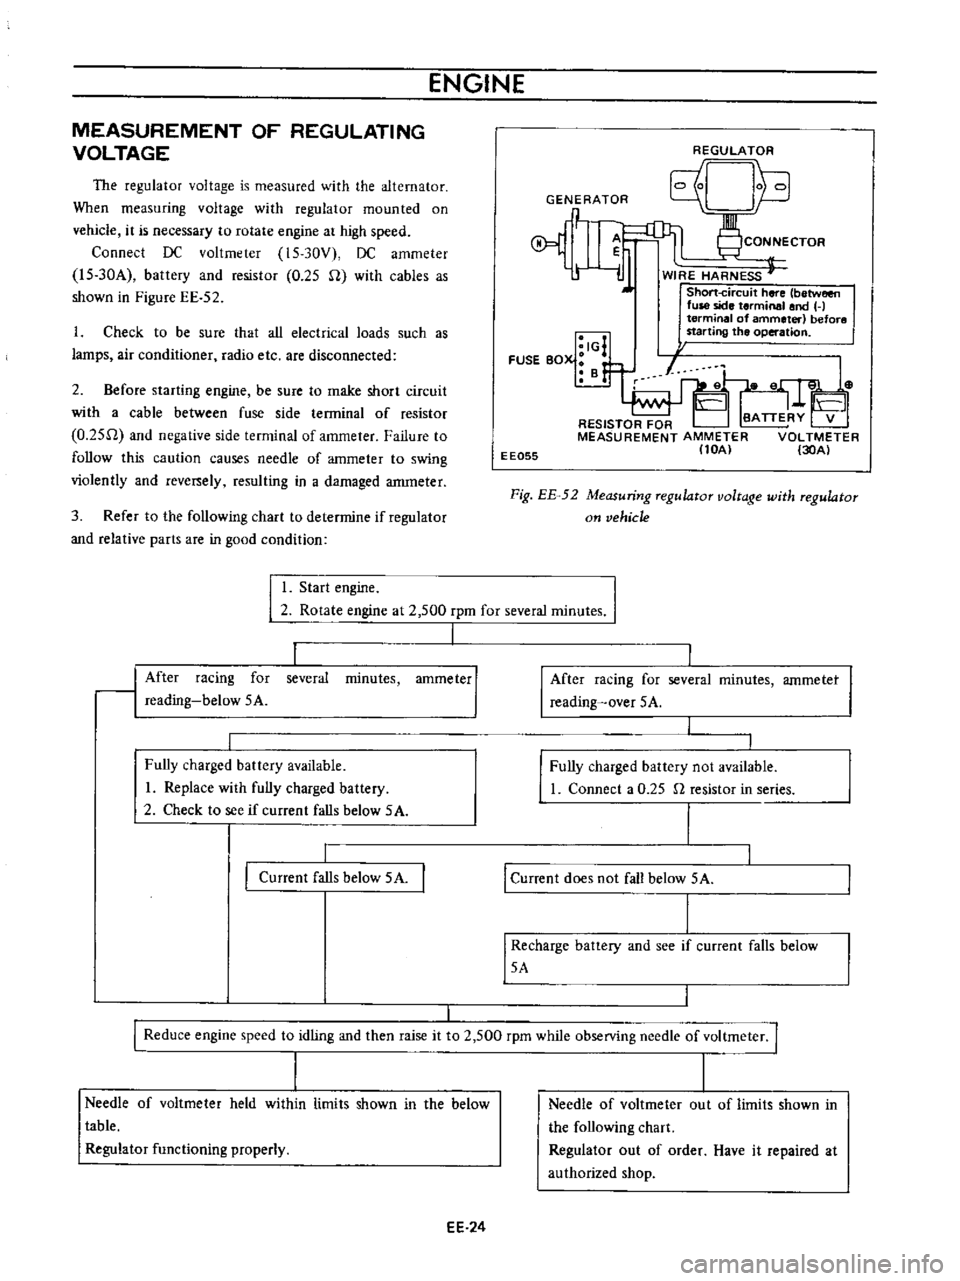
The
regulator
voltage
is
measured
with
the
alternator
When
measuring
voltage
with
regulator
mounted
on
vehicle
it
is
necessary
to
rotate
engine
at
high
speed
Connect
DC
voltmeter
15
30V
DC
ammeter
l5
30A
battery
and
resistor
0
25
U
with
cables
as
shown
in
Figure
EE
52
1
Check
to
be
sure
that
all
electrical
loads
such
as
lamps
air
conditioner
radio
etc
are
disconnected
2
Before
starting
engine
be
sure
to
make
short
circuit
with
a
cable
between
fuse
side
terminal
of
resistor
O
25U
and
negative
sIde
terminal
of
ammeter
Failure
to
follow
this
caution
causes
needle
of
ammeter
to
swing
violently
and
rever
ely
resulting
in
a
damaged
anuneter
3
Refer
to
the
following
chart
to
determine
if
regulator
and
relative
parts
are
in
good
condition
REGULATOR
Unh
GENERATOR
q
P
1
CONNECTOR
r
l
ij
WIRE
HARNESS
J
Short
circuit
here
between
fuse
side
terminal
and
H
terminal
of
ammeter
before
starting
the
operation
I
I
I
IG
FUSE
BOX
B
f
EE055
Fig
EE
52
Measuring
regulator
voltage
with
regulator
on
vehicle
I
Start
engine
I
2
Rotate
engine
at
2
500
rpm
for
several
minutes
I
1
minutes
ammeter
I
After
racing
for
reading
below
5A
several
Fully
charged
battery
available
I
Replace
with
fully
charged
battery
2
Check
to
see
if
current
falls
below
5A
Current
falls
below
5A
I
After
racing
for
several
reading
over
5A
minutes
ammetet
I
Fully
charged
battery
not
available
1
Connect
a
0
25
n
resistor
in
series
I
Current
does
not
fall
below
5A
I
Recharge
battery
and
see
if
current
falls
below
5A
I
I
Reduce
engine
speed
to
idling
and
then
raise
it
to
2
500
rpm
while
observing
needle
of
voltmeter
I
I
I
Needle
of
voltmeter
held
within
limits
shown
in
the
below
table
Regulator
functioning
properly
EE
24
Needle
of
voltmeter
out
of
limits
shown
in
the
following
chart
Regulator
out
of
order
Have
it
repaired
at
authorized
shop
Page 445 of 513

ENGINE
ElECTRICAL
SYSTEM
Ambient
temperature
Rated
regulating
voltage
roC
OF
V
10
14
14
6
to
15
6
0
32
14
45
to
15
45
10
50
14
3
to
15
3
20
68
14
15
to
15
15
30
86
14
0
to
15
0
40
104
13
85
to
14
85
Note
8
Do
not
measure
voltage
immediately
after
driv
ing
Do
this
while
regulator
is
cold
b
To
measure
voltage
raise
engine
speed
gradual
ly
from
idling
to
rated
speed
c
Voltage
may
be
approximately
O
3V
higher
than
the
rated
for
two
to
three
minutes
after
engine
is
started
or
more
specifically
when
regulator
becomes
self
heated
Measurements
should
then
be
made
within
one
minute
after
starting
engine
or
when
regulator
is
cold
d
The
regulator
is
of
a
temperature
compensating
type
Before
measuring
voltage
be
sure
to
meas
ure
surrounding
temperature
and
correct
measure
ments
according
to
the
table
in
the
left
hand
side
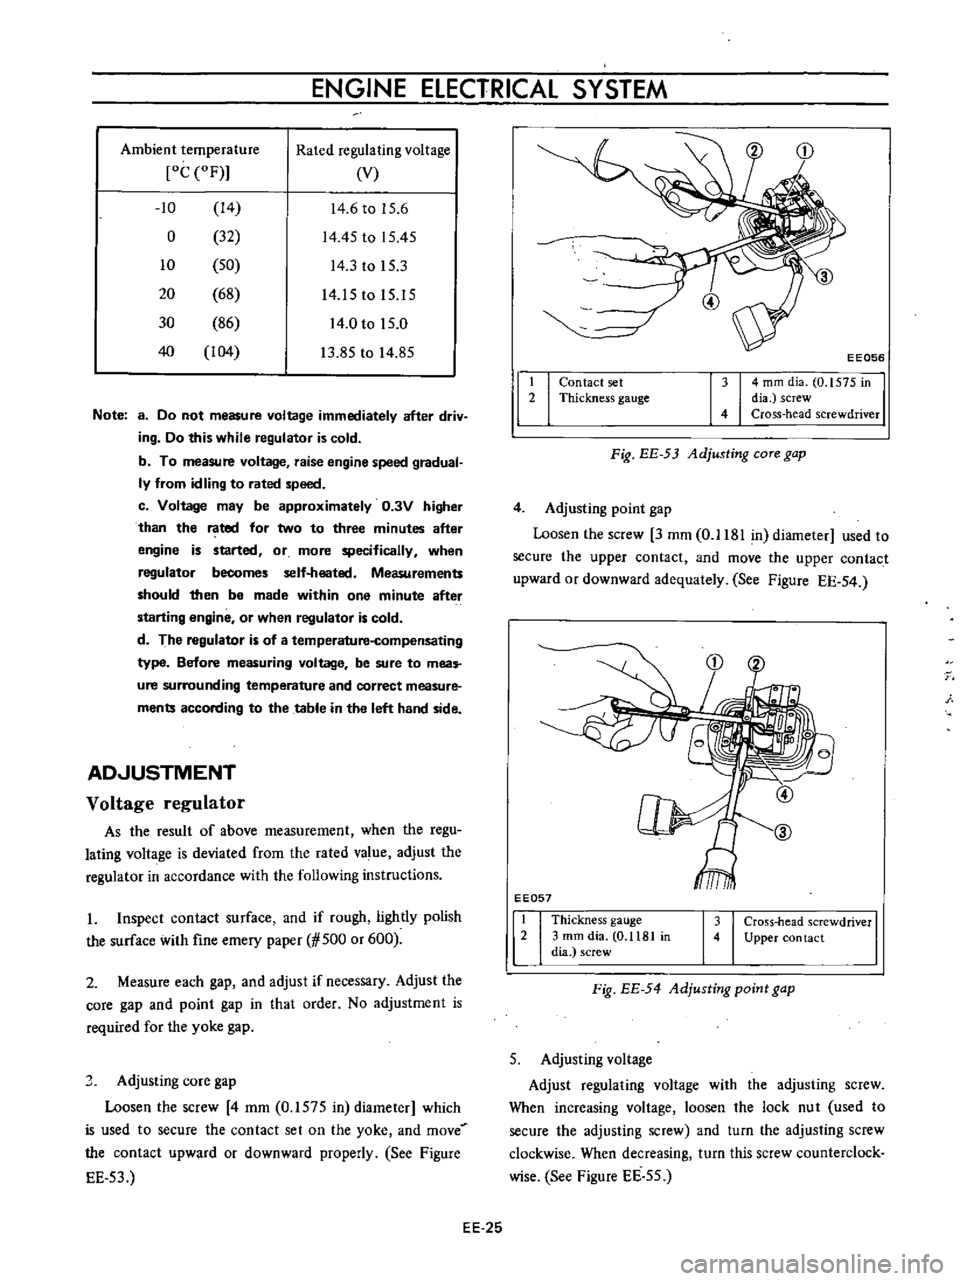
ADJUSTMENT
Voltage
regulator
As
the
result
of
above
measurement
when
the
regu
lating
voltage
is
deviated
from
the
rated
value
adjust
the
regulator
in
accordance
with
the
following
instructions
I
Inspect
contact
surface
and
if
rough
lightly
polish
the
surface
with
fine
emery
paper
500
or
600
2
Measure
each
gap
and
adjust
if
necessary
Adjust
the
core
gap
and
point
gap
in
that
order
No
adjustment
is
required
for
the
yoke
gap
J
Adjusting
core
gap
Loosen
the
screw
4
mm
0
1575
in
diameter
which
is
used
to
secure
the
contact
set
on
the
yoke
and
move
the
contact
upward
or
downward
properly
See
Figure
EE
53
t
2
I
I
EE056
4
mm
dia
0
1575
in
dia
screw
Cross
head
screwdriver
Contact
set
Thickness
gauge
Fig
EE
53
Adjusting
COTe
gap
4
Adjusting
point
gap
Loosen
the
screw
3
mm
0
1181
in
diameter
used
to
secure
the
upper
contact
and
move
the
upper
contact
upward
or
downward
adequately
See
Figure
EE
54
EE057
1
Thickness
gauge
2
3
mm
dia
0
1181
in
dia
screw
3
Cross
head
screwdriver
4
Upper
con
tact
Fig
EE
54
Adjusting
point
gap
5
Adjusting
voltage
Adjust
regulating
voltage
with
the
adjusting
screw
When
increasing
voltage
loosen
the
lock
nut
used
to
secure
the
adjusting
screw
and
turn
the
adjusting
screw
clockwise
When
decreasing
turn
this
screw
counterclock
wise
See
Figure
EE
55
EE
25
Page 446 of 513

ENGINE
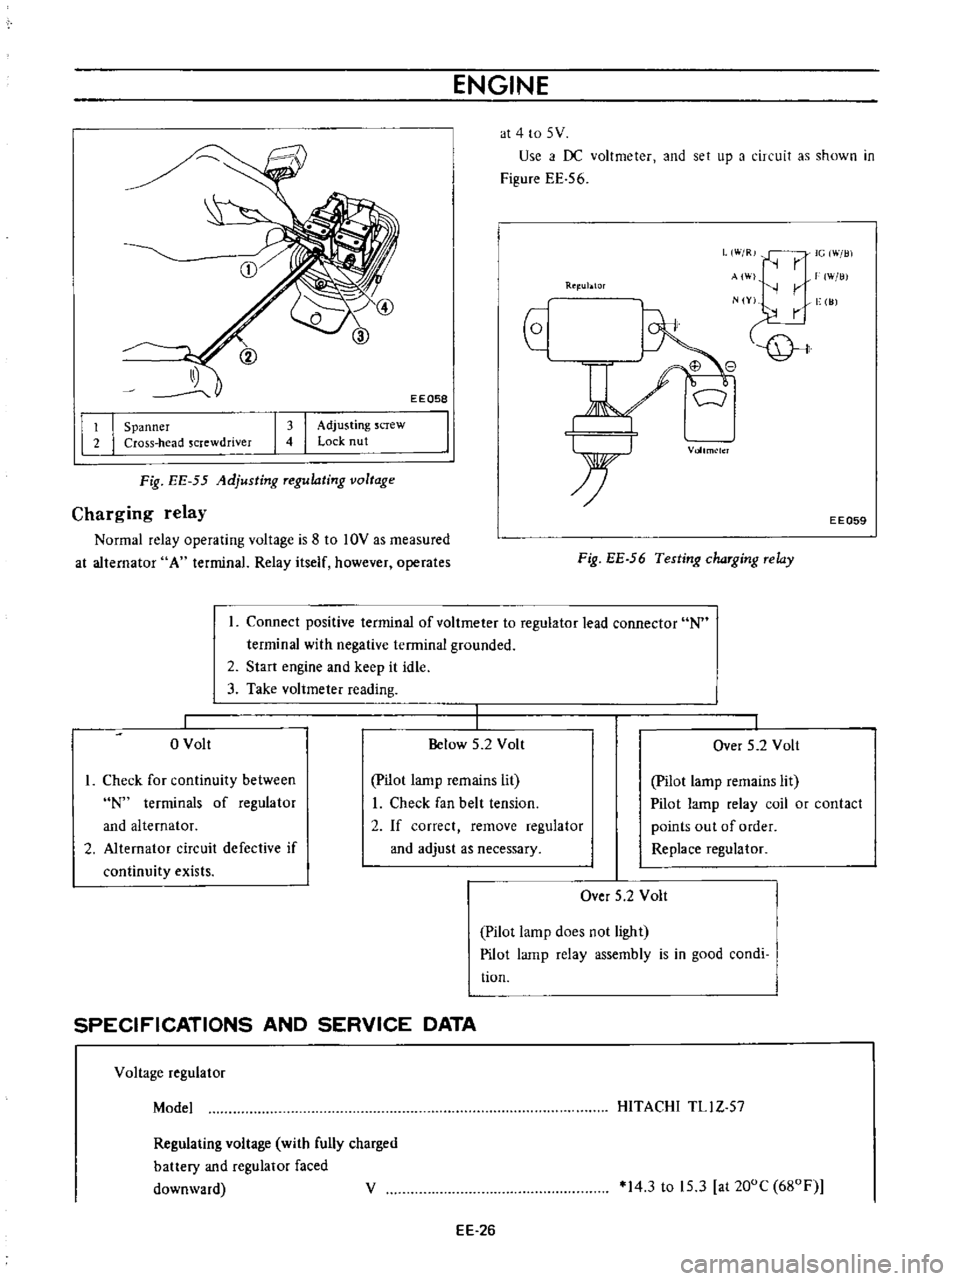
at
4
to
5
V
Use
i
f
DC
voltmeter
and
set
up
a
circuit
as
shown
in
Figure
EE
56
EEQ58
L
W
R
IG
Will
r
AI
W
lli
r
N
Y
vge
I
JJ
Rtl
ublOr
I
I
Spanner
Cross
head
screwdriver
I
I
Adjusting
screw
Lock
nut
Vollm
lcl
Fig
EE
55
Adjusting
Tegulating
voltage
Charging
relay
Normal
relay
operating
voltage
is
8
to
10V
as
measured
at
alternator
A
terminal
Relay
itself
however
operates
EE059
Fig
EE
56
Testing
chaTging
Telay
Connect
positive
terminal
of
voltmeter
to
regulator
lead
connector
N
terminal
with
negative
terminal
grounded
2
Start
engine
and
keep
it
idle
3
Take
voltmeter
reading
o
Volt
Below
5
2
Volt
I
Over
5
2
Volt
I
Check
for
continuity
between
N
terminals
of
regulator
and
alternator
2
Alternator
circuit
defective
if
continuity
exists
pilot
lamp
remains
lit
I
Check
fan
belt
tension
2
If
correct
remove
regulator
and
adjust
as
necessary
Pilot
lamp
remains
lit
Pilot
lamp
relay
coil
or
contact
points
out
of
order
Replace
regulator
Over
5
2
Volt
Pilot
lamp
does
not
light
Pilot
lamp
relay
assembly
is
in
good
condi
tion
SPECIFICATIONS
AND
SERVICE
DATA
Voltage
regulator
Model
HITACHI
TLl
Z
57
Regulating
voltage
with
fully
charged
battery
and
regulator
faced
downward
V
14
3
to
15
3
at
200C
680F
EE
26
Page 447 of 513

ENGINE
ELECTRICAL
SYSTEM
Rotor
coil
inserting
resistance
n
n
10
5
at
20DC
68DF
10
Voltage
coil
resistance
Core
gap
Point
gap
rnm
in
mm
in
31
40
0
6
to
1
0
0
0236
to
0
0394
0
3
to
0
4
0
0118
to
0
0157
Voltage
coil
series
resistance
Smoothing
resistance
n
Charge
relay
Release
voltage
Voltage
coil
resistance
V
4
2
to
5
2
at
N
terminal
n
37
8
at
20DC
68DF
mm
in
0
8
to
1
0
0
0315
to
0
0394
mm
in
0
4
to
0
6
0
0157
to
0
0236
Core
gap
Point
gap
Standard
temperature
gradient
D
015
VIDC
TROUBLE
DIAGNOSES
AND
CORRECTIONS
Troubles
Trouble
location
Causes
Remedies
Not
output
Alternator
Sticking
brushes
Correct
or
replace
brush
and
brush
spring
Dirty
brushes
and
slip
rings
Clean
Loose
connections
or
broken
leads
Retighten
or
solder
connection
Replace
leads
if
necessary
Open
stator
coil
Repair
or
replace
the
stator
coil
Open
rotor
coil
Replace
the
rotor
Defective
diodes
Replace
the
diodes
assembly
Shorted
rotor
Replace
the
rotor
Shorted
stator
Repair
or
replace
the
stator
Grounded
A
terminal
Replace
the
insulator
Broken
fan
belt
Replace
the
belt
EE
27
Page 448 of 513

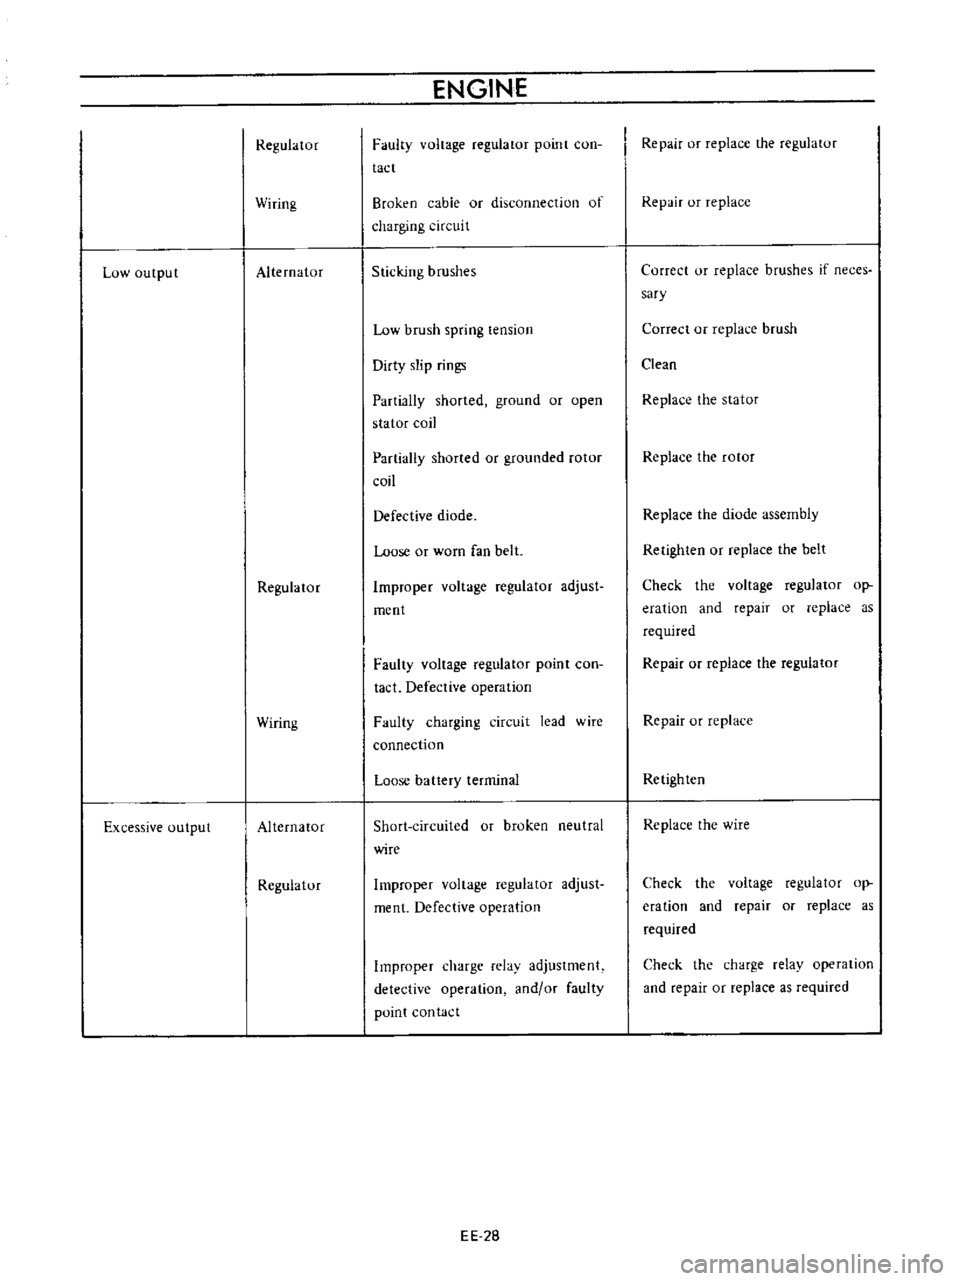
Low
output
Excessive
output
Regulator
Wiring
Alternator
Regula
tor
Wiring
Alternator
Regulatur
ENGINE
Faulty
voltage
regulator
point
con
tact
Broken
cable
or
disconnection
of
charging
cireui
t
Sticking
brushes
Low
brush
spring
tension
Dirty
slip
rings
Partially
shorted
ground
or
open
stator
coil
Partially
shorted
or
grounded
rotor
coil
Defective
diode
Loose
or
worn
fan
belt
Improper
voltage
regulator
adjust
ment
Faulty
voltage
regulator
point
con
tact
Defective
operation
Faulty
charging
circuit
lead
wire
connection
Loose
battery
terminal
Short
circuited
or
broken
neutral
wire
Improper
voltage
regulator
adjust
ment
Defective
operation
Improper
charge
relav
adjustment
detective
operation
and
or
faulty
point
contact
EE
28
Repair
or
replace
the
regulatur
Repair
or
replace
Correct
or
replace
brushes
if
neces
sary
Correct
or
replace
brush
Clean
Replace
the
stator
Replace
the
rotor
Replace
the
diode
assembly
Retighten
or
replace
the
belt
Check
the
voltage
regulator
op
eration
and
repair
or
replace
as
required
Repair
or
replace
the
regulator
Repair
or
replace
Retighten
Replace
the
wire
Check
the
voltage
regulator
op
eration
and
repair
or
replace
as
required
Check
the
charge
relay
operation
and
repair
or
replace
as
required