Page 393 of 513
ENGINf
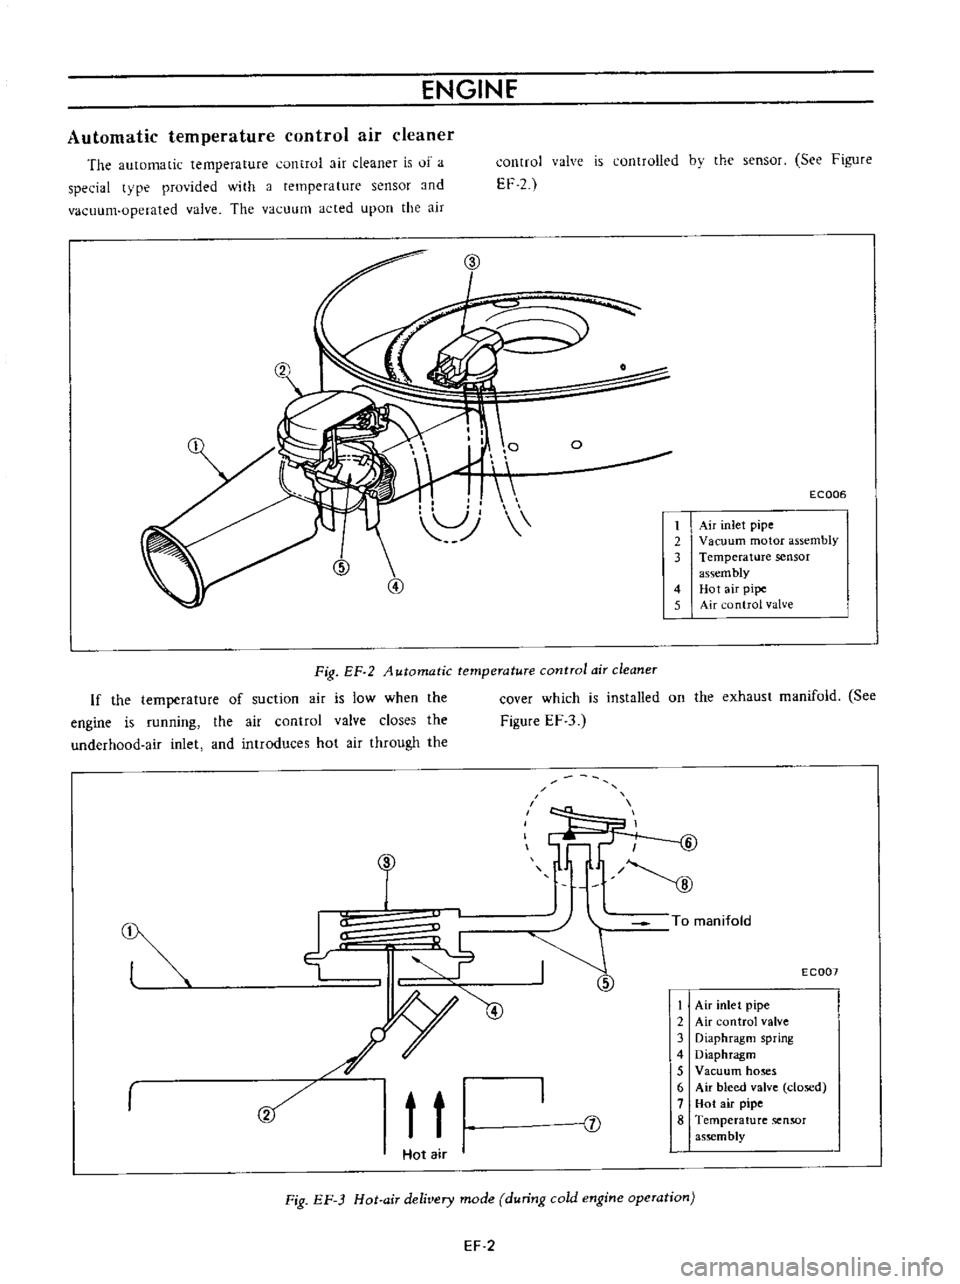
Automatic
temperature
control
air
cleaner
The
automatic
temperature
cuntrol
air
cleaner
is
of
a
special
tvpe
provided
with
a
temperature
sensor
and
vacuum
operated
valve
The
vacuum
acted
upon
the
air
2
I
control
valve
is
controlled
bv
the
sensor
See
Figure
EF
2
J
o
ECQ06
Air
inlet
pipe
2
Vacuum
motor
assembly
3
Temperature
sensor
assem
bly
4
Hot
air
pipe
5
Air
ontrol
valve
Fig
EF
2
Automatic
temperature
control
air
cleaner
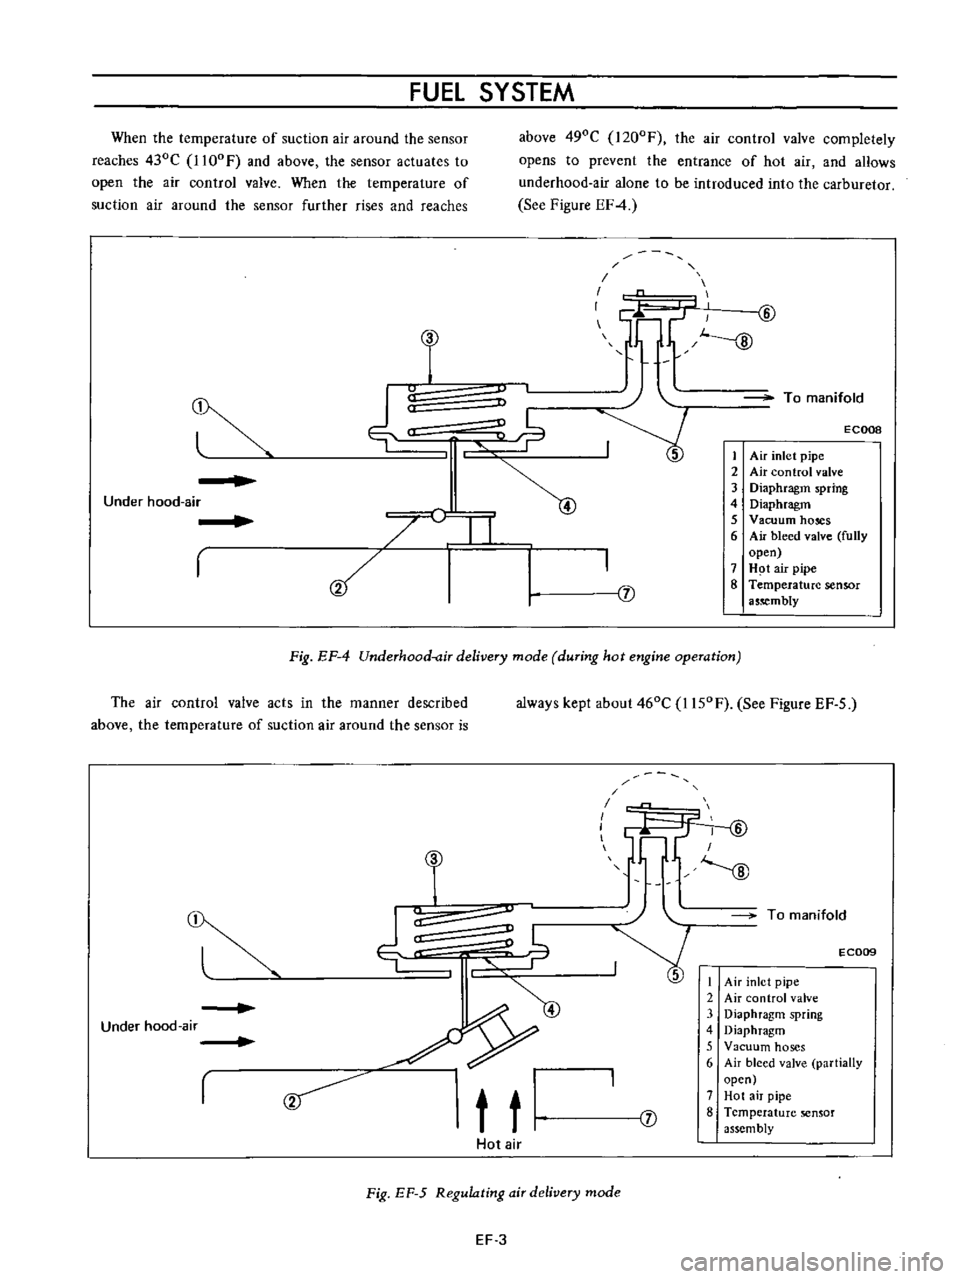
If
the
temperature
of
suction
air
is
low
when
the
engine
is
running
the
air
control
valve
closes
the
underhoad
air
inlet
and
introduces
hot
air
through
the
j
I
a
0
Ej
If
f
7
@
t
t
1
Hot
air
I
cover
which
is
installed
on
the
exhaust
manifold
See
Figure
EF
3
I
@
To
manifold
EC007
J
I
Air
inlet
pipe
2
Air
control
valve
3
Diaphragm
spring
4
Diaphragm
5
Vacuum
ho
s
6
Air
bleed
valve
closed
7
Hot
air
pipe
8
Temperature
sensor
as
mbly
Fig
EF
3
Hot
air
delivery
mode
during
cold
engine
operation
EF
2
Page 394 of 513

FUEL
SYSTEM
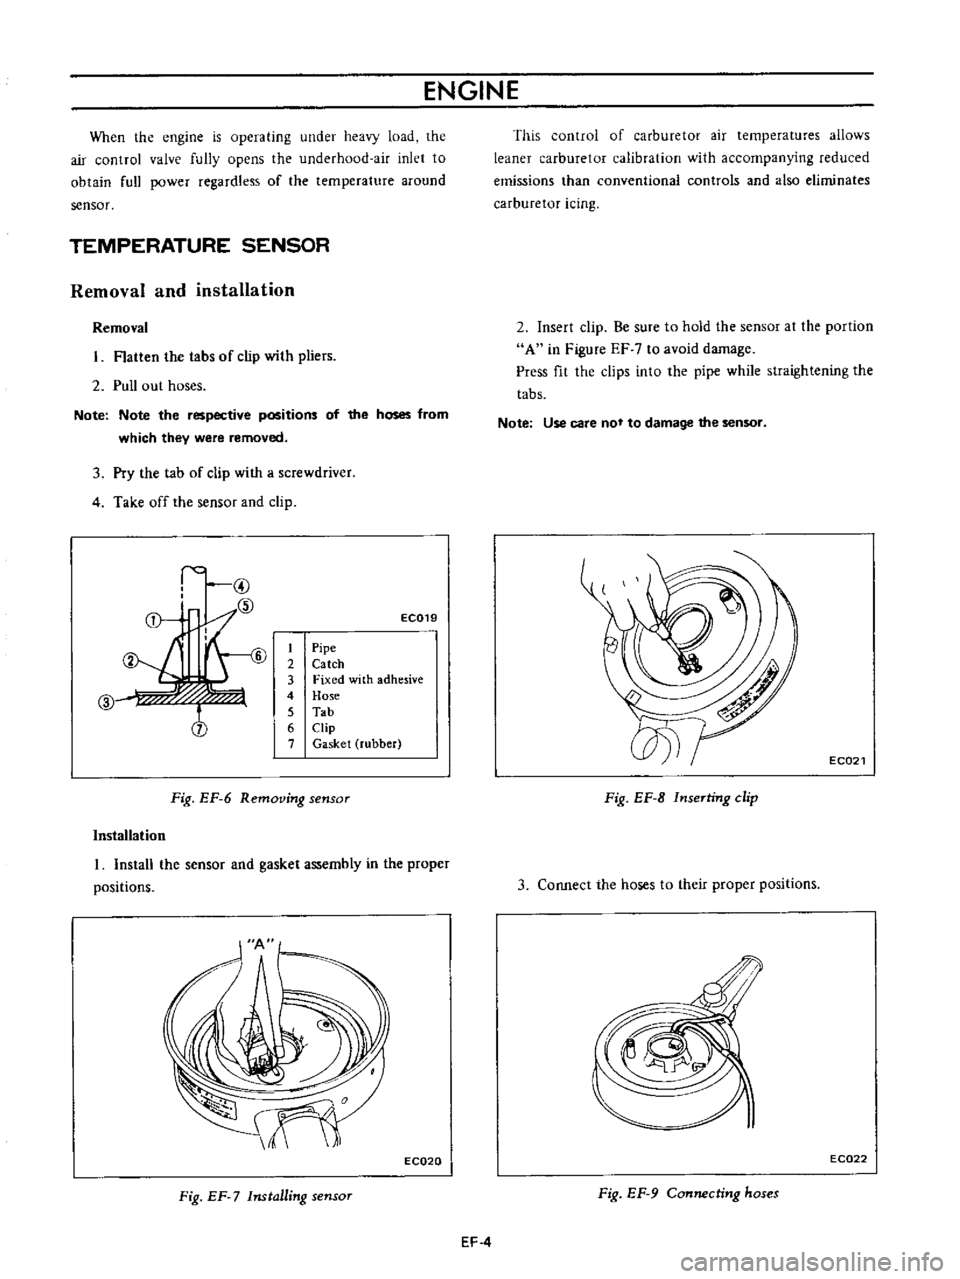
When
the
temperature
of
suction
air
around
the
sensor
reaches
430C
1l00F
and
above
the
sensor
actuates
to
open
the
air
control
valve
When
the
temperature
of
suction
air
around
the
sensor
further
rises
and
reaches
above
490C
I200F
the
air
control
valve
completely
opens
to
prevent
the
entrance
of
hot
air
and
aHows
underhood
air
alone
to
be
introduced
into
the
carburetor
See
Figure
EF4
u
C
I
1f1
lL
GJ
J
To
manifold
ECOOB
j
1
Air
inlet
pipe
2
Air
control
valve
3
Diaphragm
spring
4
Diaphragm
5
Vacuum
hoses
6
Air
bleed
valve
fully
open
7
H
t
air
pipe
8
Temperature
sensor
a5
mbly
Under
hood
air
I
I
Fig
EF
4
Underhood
air
delivery
mode
during
hot
engine
operation
The
air
control
valve
acts
in
the
manner
described
above
the
temperature
of
suction
air
around
the
sensor
is
always
kept
about
460C
I150F
See
Figure
EF
5
r
9
t
t
T
I
I
I
fY
ID
I
J
To
manifold
E
C009
I
Air
inlet
pipe
2
Air
control
valve
3
Diaphragm
spring
4
Diaphragm
5
Vacuum
hoses
6
Air
bleed
valve
partially
open
7
Hot
air
pipe
8
Temperature
sensor
assembly
Under
hood
air
J
Hot
air
Fig
EF
5
Regulating
air
delivery
mode
EF
3
Page 395 of 513

ENGINE
When
the
engine
is
operating
under
heavy
load
the
air
control
valve
fully
opens
the
underhood
air
inlet
to
obtain
full
power
regardless
of
the
temperature
around
sensor
TEMPERATURE
SENSOR
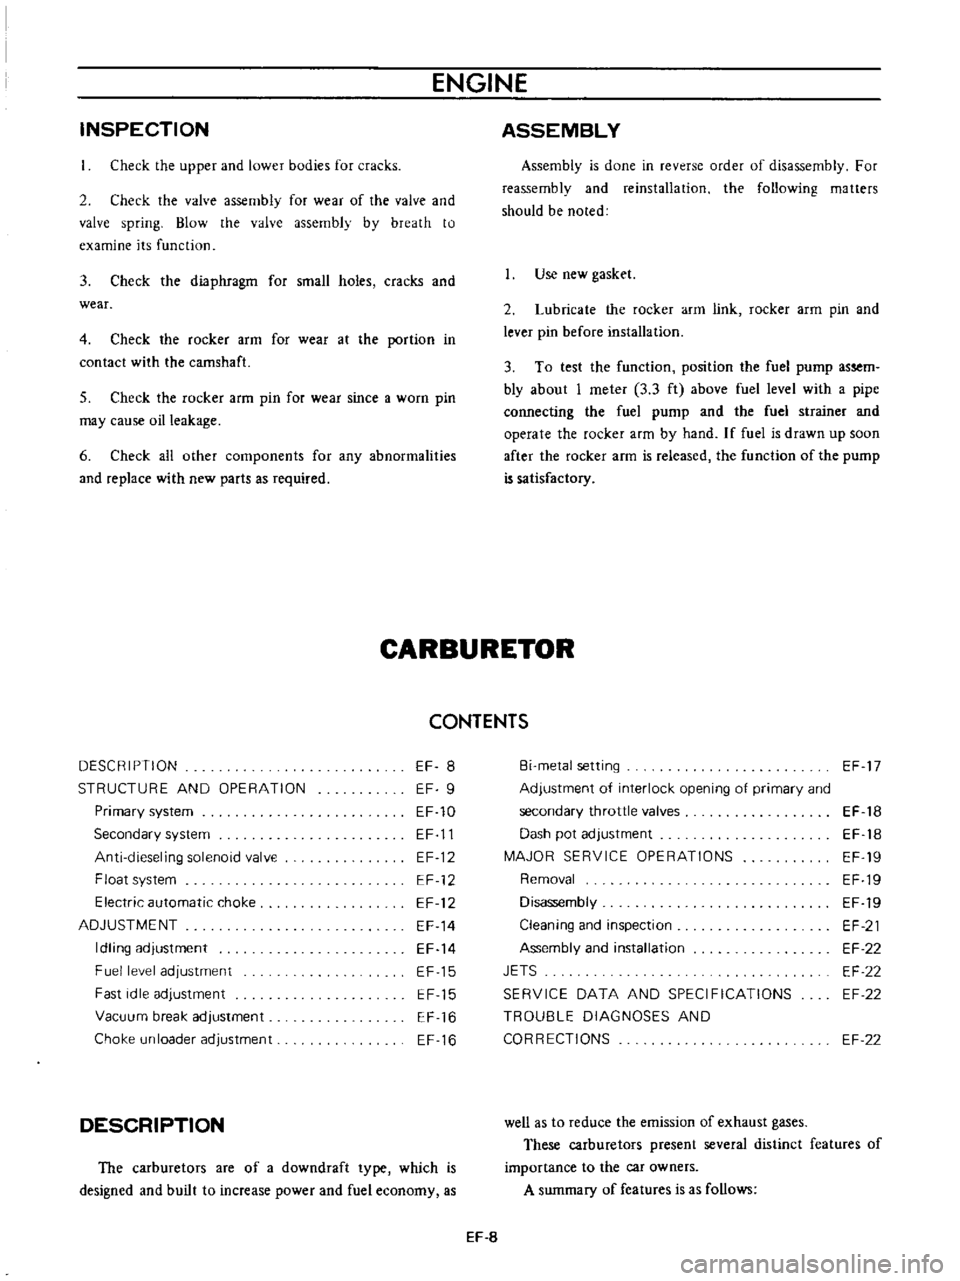
Removal
and
installation
Removal
Hatten
the
tabs
of
clip
with
pliers
2
Pull
out
hoses
Note
Note
the
respective
positions
of
the
hoses
from
which
they
were
removed
3
Pry
the
tab
of
clip
with
a
screwdriver
4
Take
off
the
sensor
and
clip
I
@
f
6
7
CID
f
j
EC019
1
Pipe
2
Catch
3
Fixed
with
adhesive
4
Hose
5
Tab
6
Clip
7
Gasket
rubber
Fig
EF
6
Removing
sensor
Installation
I
Install
the
sensor
and
gasket
assembly
in
the
proper
positions
EC020
Fig
EF
7
Installing
sensor
This
control
of
carburetor
air
temperatures
allows
leaner
carburetor
calibration
with
accompanying
reduced
emissions
than
conventional
controls
and
also
eliminates
carburetor
icing
2
Insert
clip
Be
sure
to
hold
the
sensor
at
the
portion
A
in
Figure
EF
7
to
avoid
damage
Press
fit
the
clips
into
the
pipe
while
straightening
the
tabs
Note
Use
care
not
to
damage
the
sensor
EC021
Fig
EF
B
InseTting
clip
3
COIUlect
the
hoses
to
their
proper
positions
EC022
Fig
EF
9
Connecting
hoses
EF
4
Page 396 of 513

FUEl
SYSTEM
FUEL
STRAINER
DESCRIPTION
The
fuel
strainer
is
of
a
cartridge
type
It
uses
paper
element
as
strainer
element
which
can
be
checked
for
condition
from
outside
This
strainer
cannot
be
cleaned
Replace
the
strainer
at
the
specified
service
interval
or
if
it
becomes
clogged
or
restricted
REMOVAL
Disconnect
inlet
and
outlet
fuel
lines
from
fuel
strainer
and
remove
fuel
strainer
Note
Before
disconnecting
fuel
lines
use
a
container
to
receive
the
remaining
fuel
in
lines
r
@
I
I
Il
QY
I
I
I
elementl
3
Cover
@
EF005
Fig
EF
10
Sectional
view
of
caTtridge
type
fuel
stTaineT
FUEL
PUMP
CONTENTS
DESCRIPTION
FUEL
PUMP
TESTING
Static
pressure
test
Capacity
test
EF
5
EF
6
EF
6
EF
6
DESCRIPTION
The
fuel
pump
transfers
gasoline
from
the
tank
to
the
carburetor
in
sufficient
quantity
to
meet
engine
require
ments
at
any
speed
or
load
The
fuel
pump
is
of
the
diaphragm
type
REMOVAL
AND
DISASSEMBLY
INSPECTION
ASSEMBLY
EF
7
EF
B
EF
B
The
fuel
pump
consists
of
a
body
rocker
arm
and
link
assembly
fuel
diaphragm
fuel
diaphragm
spring
seal
inlet
and
outlet
valves
The
fuel
diaphragm
consists
of
specially
treated
rubber
which
is
not
affected
by
gasoline
held
together
with
two
metal
discs
and
a
pull
rod
EF
5
Page 397 of 513

ENGINE
FUEL
PUMP
TESTING
A
fuel
pump
is
operating
properly
when
its
pressure
is
within
specifications
and
its
capacity
is
equal
to
the
engine
5
requirements
at
all
speeds
Pressure
and
cap
lcity
must
be
determined
by
two
tests
with
the
pump
mounted
on
the
engine
Be
sure
that
there
is
gasoline
in
the
tank
when
conducting
these
tests
Fig
EF
11
Schematic
view
of
fuel
pump
Static
pressure
test
The
static
pressure
test
is
conducted
as
follows
Disconnect
the
carburetor
fuel
line
at
the
carburetor
2
Install
the
necessary
adapter
and
tee
fitting
to
the
fuel
line
and
attach
a
suitable
pressure
gauge
Start
and
run
engine
at
varying
speeds
4
The
reading
on
the
gauge
is
the
static
fuel
pressure
and
this
should
remain
within
the
following
limits
0
18
kgJcm2
2
61b
sq
in
Pressure
below
the
lower
limit
indicates
extreme
wear
on
one
part
or
a
small
amount
of
wear
on
each
working
part
They
also
indicate
a
ruptured
diaphragm
worn
warped
dirty
or
gumming
valves
and
seats
or
weak
diaphragm
return
spring
Pressure
above
the
upper
limit
indicates
an
excessively
strong
diaphragm
that
is
too
tight
This
condition
requires
removal
of
the
fuel
pump
as
sembly
for
replacement
or
repair
Capacity
test
The
capacity
test
is
used
only
when
the
static
pressure
is
within
specifications
The
capacity
test
is
conducted
as
follows
1
Disconnect
the
fuel
pipe
at
the
carburetor
2
Place
a
suitable
container
at
the
end
of
the
pipe
3
Start
the
engine
and
run
at
1
000
rpm
4
The
pump
should
deliver
450
cc
I
V
S
p
of
fuel
in
one
minute
or
less
EF
6
Page 398 of 513

FUEL
SYSTEM
If
no
gasoline
or
only
a
little
flows
from
open
end
of
pipe
the
fuel
pipe
is
clogged
or
the
pump
is
malfunction
ing
Before
removing
the
pump
remove
the
gas
tank
cap
disconnect
both
inlet
and
outlet
pipes
and
blow
through
them
with
an
air
hose
to
make
sure
that
they
are
clear
This
will
eliminate
possible
clogged
gas
strainer
in
the
fuel
tank
Reconnect
the
pipes
to
the
pump
and
retest
flow
REMOVAL
AND
DISASSEMBLY
Remove
the
fuel
pump
assembly
by
unscrewing
two
mounting
nuts
and
disassemble
in
the
following
order
1
Separate
the
upper
body
and
the
lower
body
by
unscrewing
the
body
set
screws
2
Take
off
the
cap
and
the
cap
gasket
by
removing
the
cap
screw
3
Unscrew
the
elbow
and
the
connector
4
Take
off
the
valve
retainer
by
unscrewing
two
valve
retainer
screws
Two
valves
are
easily
removed
@
@
GS
5
To
remove
the
diaphragm
diaphragm
spring
lower
body
seal
washer
and
lower
body
seal
from
the
lower
body
press
down
the
diaphragm
counter
to
the
force
of
the
diaphragm
spring
and
while
doing
this
cant
the
diaphragm
so
that
the
rectangular
part
in
the
lower
end
of
the
pull
rod
is
unhooked
from
the
rocker
arm
link
Fig
EF
jJ
StructuTe
of
fuel
pump
EF
7
j
i
I
of
4
Fig
EF
12
Pull
Tad
Temoval
r1
r
f
i
t
1
2
3
4
5
6
7
B
9
10
tt
t2
t3
t4
15
t6
t7
tB
t9
20
2t
22
23
24
Valve
assem
bly
Packing
Retainer
Screw
Cap
Gasket
Screw
Washer
spring
Rocker
arm
Rocker
pin
Rocker
arm
spring
Spacer
Diaphragm
assembly
Retainer
Diaphragm
spring
Washer
spring
Nut
Washer
plain
Gasket
Spacer
Complete
body
lower
Connector
inlet
Connector
outlet
Page 399 of 513

ENGINE
INSPECTION
Check
the
upper
and
lower
bodies
for
cracks
2
Check
the
valve
assembly
for
wear
of
the
valve
and
valve
spring
Blow
the
valve
assembly
by
breath
to
examine
its
function
3
Check
the
diaphragm
for
small
holes
cracks
and
wear
4
Check
the
rocker
arm
for
wear
at
the
portion
in
contact
with
the
camshaft
5
Check
the
rocker
arm
pin
for
wear
since
a
worn
pin
may
cause
oil
leakage
6
Check
all
other
components
for
any
abnormalities
and
replace
with
new
parts
as
required
ASSEMBLY
Assembly
is
done
in
reverse
order
of
disassembly
For
reassembly
and
reinstallation
the
following
matters
should
be
noted
Use
new
gasket
2
Lubricate
the
rocker
arm
link
rocker
arm
pin
and
lever
pin
before
installation
3
To
test
the
function
position
the
fuel
pump
assem
bly
about
I
meter
3
3
ft
above
fuel
level
with
a
pipe
connecting
the
fuel
pump
and
the
fuel
strainer
and
operate
the
rocker
afm
by
hand
If
fuel
is
drawn
up
soon
after
the
rocker
arm
is
released
the
function
of
the
pump
is
satisfactory
CARBURETOR
CONTENTS
DESCRIPTION
STRUCTURE
AND
OPERATION
EF
8
EF
9
EF
10
EF
11
EF
12
EF
12
EF
12
EF
14
EF
14
EF
15
EF
15
EF
16
EF
16
Primary
system
Secondary
system
Anti
dieseling
solenoid
valve
Float
system
Electric
automatic
choke
ADJUSTMENT
Idling
adjustment
Fuel
level
adjustment
Fast
idle
adjustment
Vacuum
break
adjustment
Choke
un
loader
adjustment
DESCRIPTION
The
carburetors
are
of
a
downdraft
type
which
is
designed
and
built
to
increase
power
and
fuel
economy
as
Bi
metal
setting
Adjustment
of
interlock
opening
of
primary
and
secondary
throttle
valves
Dash
pot
adjustment
MAJOR
SERVICE
OPERATIONS
Removal
Disassembly
Cleaning
and
inspection
Assembly
and
installation
JETS
SERVICE
DATA
AND
SPECIFICATIONS
TROUBLE
DIAGNOSES
AND
CORRECTIONS
EF
17
EF
18
EF
18
EF
19
EF
19
EF
19
EF
21
EF
22
EF
22
EF
22
EF
22
well
as
to
reduce
the
emission
of
exhaust
gases
These
carburetors
present
several
distinct
features
of
importance
to
the
car
owners
A
summary
of
features
is
as
follows
EF
8
Page 400 of 513

FUEl
SYSTEM
Secondary
throttle
valve
is
operated
by
throttle
lever
The
high
power
and
good
acceleration
are
gained
with
combination
of
the
auxiliary
valve
2
Accelerating
pump
gives
excellent
acceleration
3
The
power
valve
mechanism
is
of
a
vacuum
actuated
boost
type
and
improves
high
speed
driving
4
The
throttle
opener
control
system
Refer
to
Section
ET
incorporates
a
servo
diaphragm
The
servo
dia
phragm
helps
open
the
throttle
valve
at
a
decreasing
speed
so
as
to
reduce
the
emission
of
hydrocarbons
to
a
minimum
5
An
anti
dieseling
solenoid
is
used
as
a
means
of
preventing
dieseling
When
the
ignition
key
is
turned
off
the
fuel
passage
involved
in
the
slow
system
is
closed
and
the
fuel
supply
is
shut
down
completely
6
In
the
choke
mechanism
an
electric
automatic
choke
is
used
to
automatically
control
the
choke
valve
operation
during
the
warm
up
of
the
engine
7
The
carburetor
for
automatic
transmission
is
equipped
with
so
called
dash
pot
that
is
it
makes
smooth
decelerating
without
engine
stall
at
any
operating
condi
tion
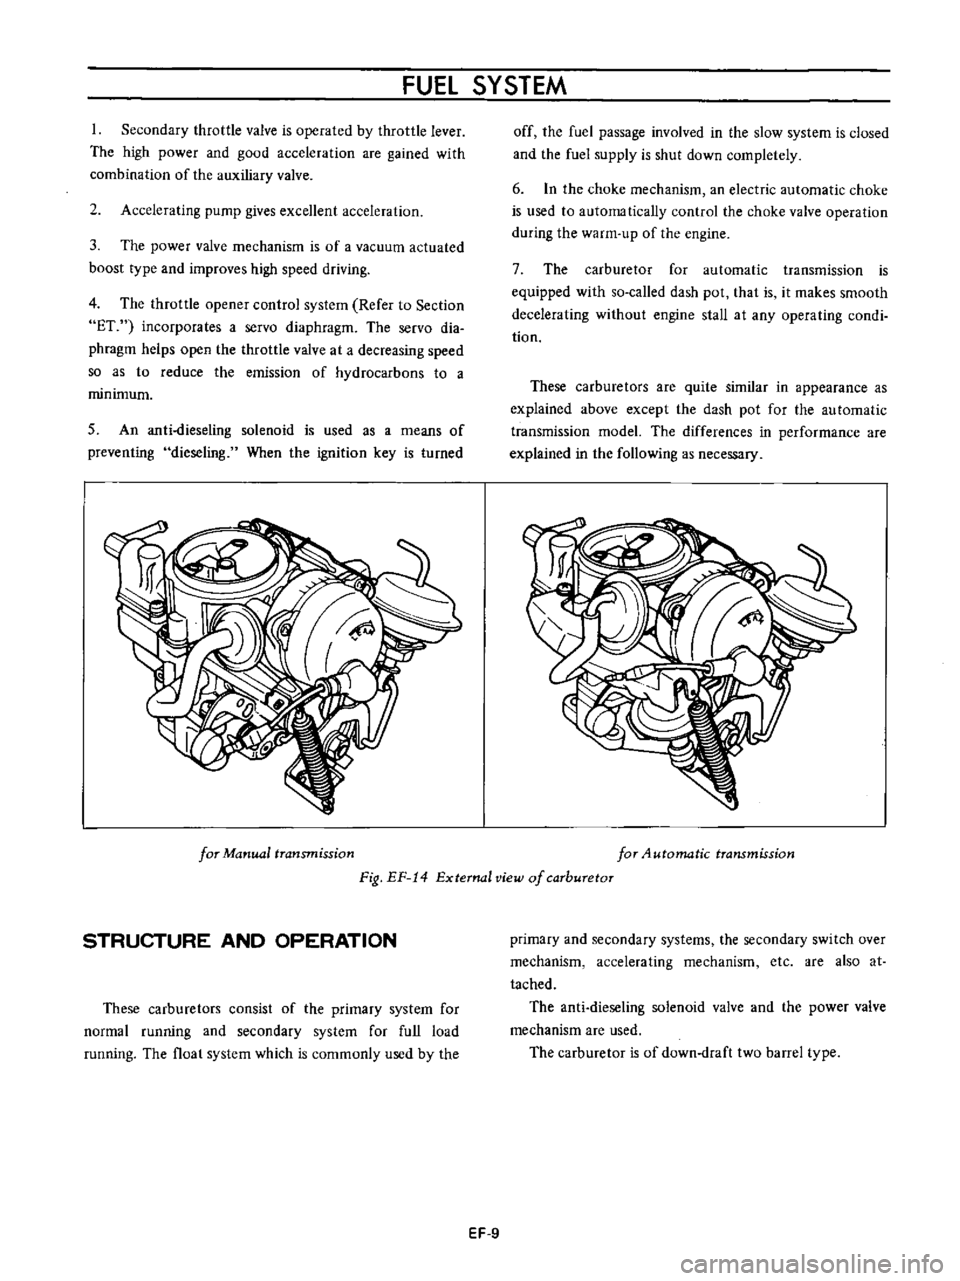
These
carburetors
are
quite
similar
in
appearance
as
explained
above
except
the
dash
pot
for
the
au
tomatic
transmission
model
The
differences
in
performance
are
explained
in
the
following
as
necessary
for
Manual
transmission
for
4utomatic
transmission
Fig
EF
14
External
view
of
carburetor
STRUCTURE
AND
OPERATION
These
carburetors
consist
of
the
primary
system
for
normal
running
and
secondary
system
for
full
load
running
The
float
system
which
is
commonly
used
by
the
primary
and
secondary
systems
the
secondary
switch
over
mechanism
accelerating
mechanism
etc
are
also
at
tached
The
anti
dieseling
solenoid
valve
and
the
power
valve
mechanism
are
used
The
carburetor
is
of
down
draft
two
barrel
type
EF
9