1973 DATSUN B110 relay
[x] Cancel search: relayPage 232 of 513

BODY
INSTRUMENT
PANEL
CONTENTS
REMOVAL
BF
42
REMOVAL
Fig
BF
88
Removing
instrument
panel
Note
There
are
two
types
of
instrument
panel
square
type
and
round
type
However
both
of
them
are
removed
and
reinstalled
in
the
same
manner
Disconnect
the
battery
cable
at
the
battery
terminal
2
Disconnect
the
wiring
harness
connector
units
Disconnect
the
instrument
harness
from
the
engine
compartment
harness
Disconnect
the
instrument
harness
from
the
turn
signal
switch
Disconnect
the
instrument
harness
frorn
the
body
harness
Disconnect
the
instrumen
t
harness
connected
to
the
door
switch
stop
lamp
switch
flasher
unit
and
passing
light
relay
option
REINSTALLATION
BF
43
Note
When
disconnecting
the
wiring
harness
recom
mend
to
use
tags
for
identifying
their
relationship
3
Disconnect
cables
for
radio
antenna
and
speaker
4
Remove
the
package
tray
the
shell
cover
and
turn
signal
switch
Note
Work
may
be
carried
out
without
removing
die
steering
wheel
However
it
is
recommended
to
remove
the
steering
wheel
50
that
work
can
be
carried
out
more
easily
5
Disconnect
the
speedometer
cable
from
the
speedometer
unit
6
Disconnect
the
heater
control
cable
at
the
heater
side
Fig
BF
89
Removing
imtrument
panel
Ii
BF
42
Page 247 of 513
BODY
PASSING
LIGHT
SWITCH
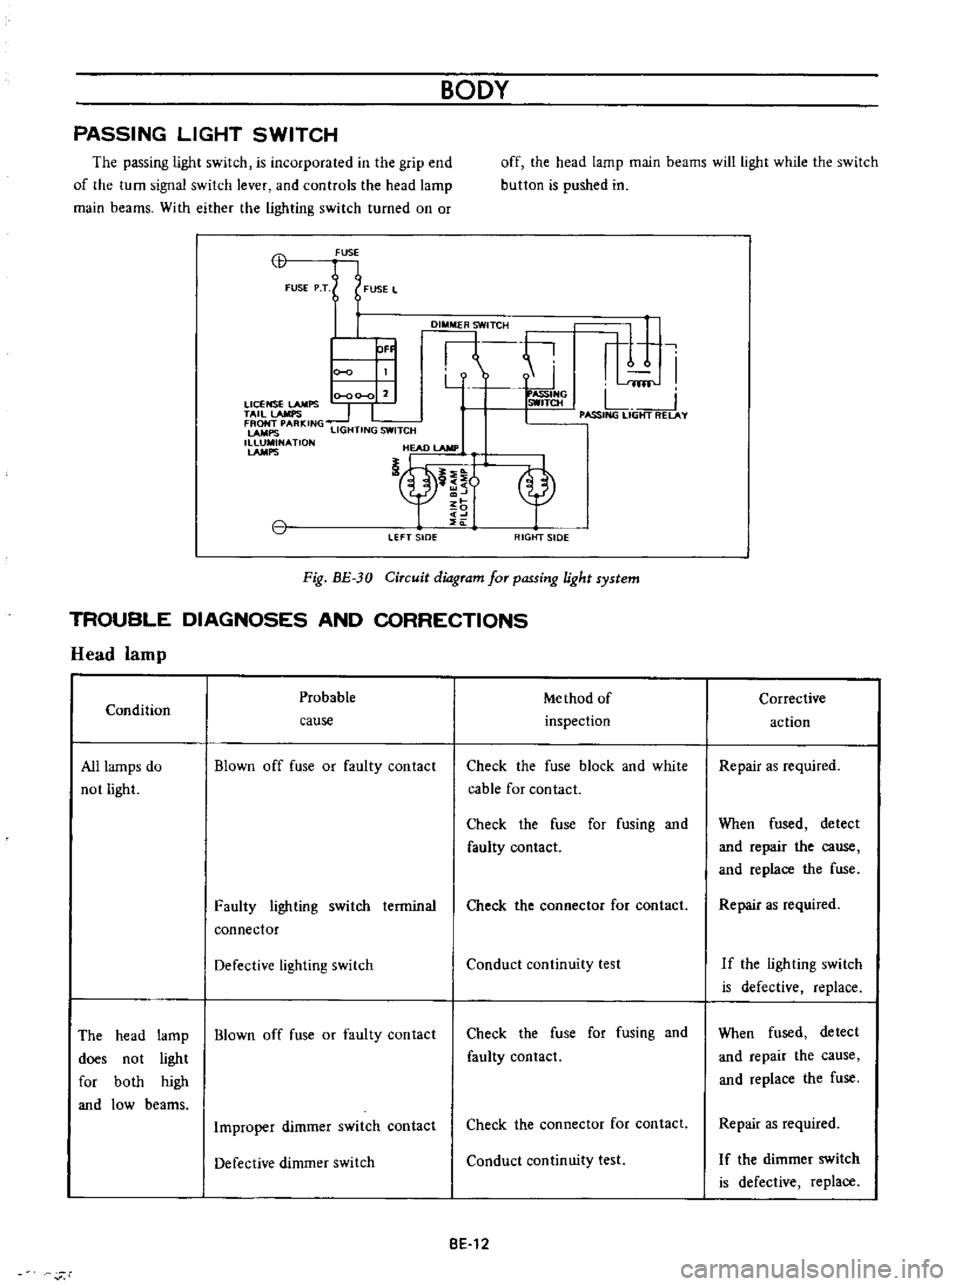
The
passing
light
switch
is
incorporated
in
the
grip
end
of
the
turn
signal
switch
lever
and
controls
the
head
lamp
main
beams
With
either
the
lighting
switch
turned
on
or
off
the
head
lamp
main
beams
will
light
while
the
switch
button
is
pushed
in
CB
FUSE
FUSE
P
T
FUSE
L
DI
TCH
ti
r
1
I
Y
fflf
0
00
0
2
ASSIHG
LICENSE
LAMPS
SWITCH
L
TAil
lAMPS
1
I
I
PASSING
LIGHT
RELAY
FRONT
PARKING
LAMPS
LIGHTING
SWITCH
1
NATlON
HEAD
lAMP
nt
OF
LEFT
sIDe
RIGtfT
SIDE
Fig
BE
30
Circuit
diagram
for
passing
light
system
TROUBLE
DIAGNOSES
AND
CORRECTIONS
Head
lamp
Probable
Me
thod
of
Condition
inspection
cause
All
lamps
do
not
light
Blown
off
fuse
or
faulty
contact
Check
the
fuse
block
and
white
cable
for
contact
Check
the
fuse
for
fusing
and
faulty
contact
Faulty
lighting
switch
terminal
connector
Check
the
connector
for
contact
Defective
lighting
switch
Conduct
continuity
test
The
head
lamp
Blown
off
fuse
or
faulty
contact
does
not
light
for
both
high
and
low
beams
Check
the
fuse
for
fusing
and
faulty
contact
Improper
dimmer
switch
contact
Check
the
connector
for
contact
Defective
dimmer
switch
Conduct
continuity
test
BE
12
r
Corrective
action
Repair
as
required
When
fused
detect
and
repair
the
cause
and
replace
the
fuse
Repair
as
required
If
the
ligh
ting
swi
tch
is
defective
replace
When
fused
detect
and
repair
the
cause
and
replace
the
fuse
Repair
as
required
I
f
the
dimmer
switch
is
defective
replace
Page 251 of 513
9HORN
r
I
01
8ATTERY
HI
IGI
s
ILl
C
iORN
BODY
FUSE
H
S
HORN
BUTTON
BGI
J
H
B
S
Il
I
n6lm
I
L
J
L
HORN
RELAY
Fig
BE
3l
Circuit
diagram
for
hom
syrtem
HORN
Removal
Remove
the
connector
loosen
the
fixing
nut
in
the
horn
center
and
remove
the
horn
unit
Adjustment
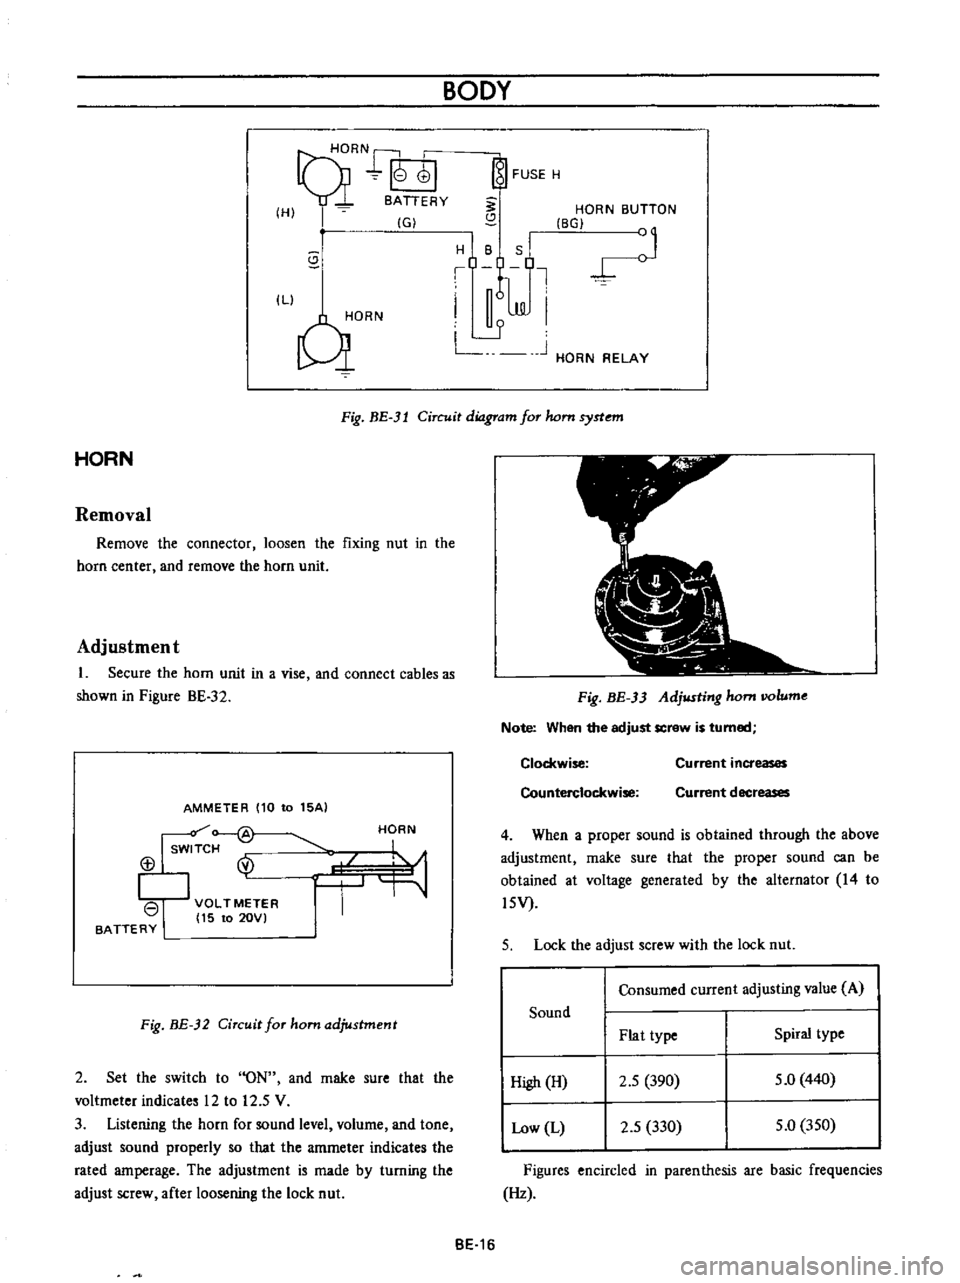
1
Secure
the
horn
unit
in
a
vise
and
connect
cables
as
shown
in
Pigure
BE
32
AMMETER
110
to
15AI
Isw
f
@
113
I
VOLTMETER
I
15
to
20VI
BATTERY
HORN
Fig
BE
32
Circuit
for
ham
adjustment
2
Set
the
switch
to
ON
and
rnake
sure
that
the
voltmeter
indicates
12
to
12
5
V
3
Listening
the
horn
for
sound
level
volurne
and
tone
adjust
sound
properly
so
that
the
amrneter
indicates
the
rated
amperage
The
adjustment
is
made
by
turning
the
adjust
screw
after
loosening
the
lock
nut
Fig
BE
33
Adjusting
hom
IIOlume
Note
When
the
adjust
screw
is
turned
Clockwise
Counterclockwise
Current
increases
Current
decreases
4
When
a
proper
sound
is
obtained
through
the
above
adjustment
rnake
sure
that
the
proper
sound
can
be
obtained
at
voltage
generated
by
the
alternator
14
to
l5V
5
Lock
the
adjust
screw
with
the
lock
nut
Consumed
current
adjusting
value
A
Sound
Plat
type
Spiral
type
High
H
2
5
390
5
0
440
Low
L
2
5
330
5
0
350
Figures
encircled
in
parenthesis
are
basic
frequencies
Hz
BE
16
Page 252 of 513
BODY
ELECTRICAL
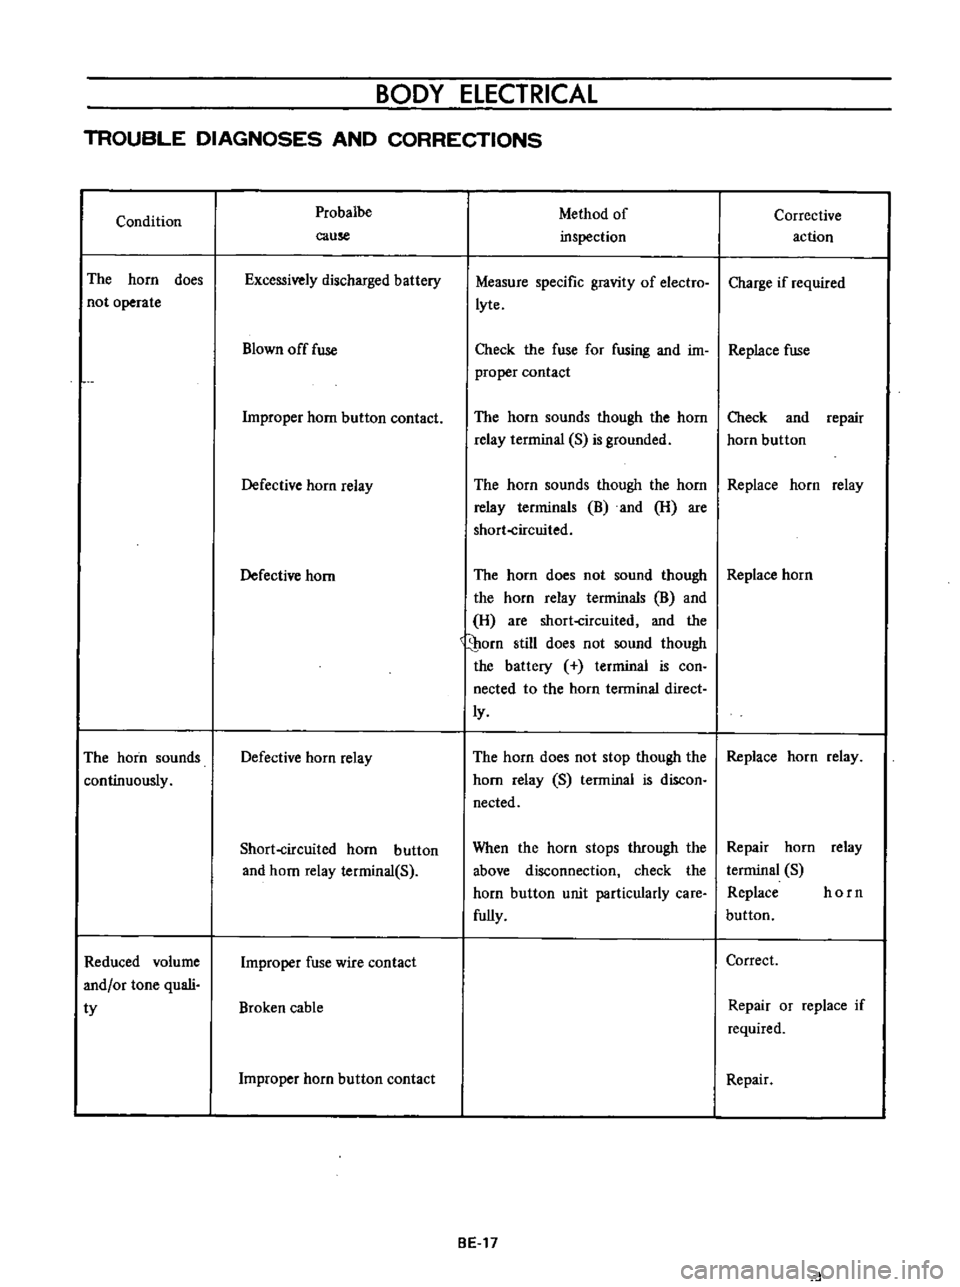
TROUBLE
DIAGNOSES
AND
CORRECTIONS
Condition
The
horn
does
not
operate
The
horn
sounds
continuously
Reduced
volume
and
or
tone
quali
ty
Probalbe
cause
Excessively
discharged
battery
Blown
off
fuse
Improper
horn
button
contact
Defective
horn
relay
Defective
horn
Defective
horn
relay
Short
circuited
horn
button
and
horn
relay
terminal
S
Improper
fuse
wire
contact
Broken
cable
Improper
horn
button
contact
Method
of
inspection
Measure
specific
gravity
of
electro
lyte
Corrective
action
Charge
if
required
Check
the
fuse
for
fusing
and
im
Replace
fuse
proper
contact
The
horn
sounds
though
the
horn
relay
terrninal
S
is
grounded
Check
and
repair
horn
button
The
horn
sounds
though
the
horn
Replace
horn
relay
relay
terrninals
B
and
H
are
short
circuited
The
horn
does
not
sound
though
Replace
horn
the
horn
relay
terminals
B
and
H
are
short
circuited
and
the
porn
still
does
not
sound
though
the
battery
terminal
is
con
nected
to
the
horn
terminal
direct
ly
The
horn
does
not
stop
though
the
Replace
horn
relay
horn
relay
S
terminal
is
discon
nected
When
the
horn
stops
through
the
above
disconnection
check
the
horn
button
unit
particularly
care
fully
BE
17
Repair
horn
relay
terminal
S
Replace
horn
button
Correct
Repair
or
replace
if
required
Repair
d
Page 256 of 513

BODY
ElECTRICAL
When
the
ignition
switch
is
set
to
ON
the
ignition
wa
rning
circuit
is
closed
and
current
flows
flows
from
the
ignition
switch
to
the
warning
lamp
bulb
and
ground
through
the
regulator
When
the
engine
is
started
and
the
generator
comes
into
operation
the
generator
output
current
opposes
the
current
flowing
from
the
warning
lamp
in
effect
it
breaks
the
warning
circuit
ground
connection
and
the
lamp
goes
out
l
r
hffi
u
z
Ignition
switch
I
Q
6
I
0
c
M
1
E
8
ca
i
L
g
PI
lot
c
P
I
j
co
rt
0
relay
E
0
5
y
y
1
N
N
3
Alternator
Regulator
Fig
BE
41
Circuit
of
ignition
warning
system
HAND
BRAKE
WARNING
LAMP
This
lamp
functions
both
hand
brake
warning
larnp
and
BULB
SPECIFICATIONS
service
brake
line
pressure
differential
warning
lamp
When
a
difference
between
front
and
rear
brake
line
pressures
reaches
the
rated
range
13
to
17
kgfcm2
185
to
242
lb
sq
in
the
ground
circuit
for
the
warning
lamp
is
closed
and
the
warning
lamp
lights
IGNITION
SWITCH
WARNING
LAMP
L
E
WARNING
SWITCH
1
SERVICE
BRAKE
LINE
PRESSU
R
E
DIFFERENTIAL
WARNING
J
SWITCH
Fig
BE
42
Circuit
diagram
for
brake
warning
system
tern
Specifications
Square
type
meter
Round
type
meter
Meter
illumination
larnp
VoW
12
3
4
2
12
1
7
3
Turn
signal
pilot
lamp
VoW
12
3
4
2
12
1
7
2
Head
lamp
main
high
beam
VoW
12
3
4
I
12
17
1
pilot
lamp
Ignition
warning
lamp
VoW
123
4
I
12
17
1
Oil
pressure
warning
lamp
VoW
12
3
4
1
12
1
7
1
Hand
brake
warning
lamp
VoW
12
1
7
1
for
U
S
A
CANADA
Clock
illumination
lamp
VoW
123
4
I
12
17
2
Figure
encircled
in
parentheses
indicates
number
of
bulbs
used
BE
21
Page 268 of 513
BODY
ELECTRICAL
Distributor
Secure
ground
of
ignition
coil
Secure
contact
of
carbon
electric
pole
and
rotor
Eliminate
excessive
tip
on
the
rotor
pole
or
cap
pole
by
scrubbing
with
a
screwdriver
Check
stagger
between
rotor
and
stator
Charging
system
Sound
of
alternating
current
pre
sents
Alternator
Install
a
0
5
l
F
capacitor
on
charging
terminal
A
Note
Do
not
use
capacitor
ex
cessively
If
capacity
is
used
ex
cessively
the
alternator
coil
will
be
broken
When
the
accelerator
pedal
is
de
pressed
or
released
noise
presents
Regulator
Install
a
0
5
l
F
capacitor
on
A
terrninal
of
the
voltage
regulator
Supplement
equipment
When
engine
starts
noise
presents
Noise
still
presents
even
after
stopping
the
engine
Operative
noise
of
ther
rnometer
and
fuel
gauge
Install
0
1
l
F
capacitor
between
terminal
and
ground
wire
Note
If
a
capacitor
having
ex
cessive
capacity
is
used
indi
cation
of
meter
will
be
devi
ated
Noise
presents
when
horn
is
blown
Horn
Install
a
0
5
IF
capacitor
on
the
horn
relay
terminal
or
horn
switch
Noise
presents
when
turn
signal
lamps
are
operated
Flasher
unit
Install
a
0
5
l
F
capacitor
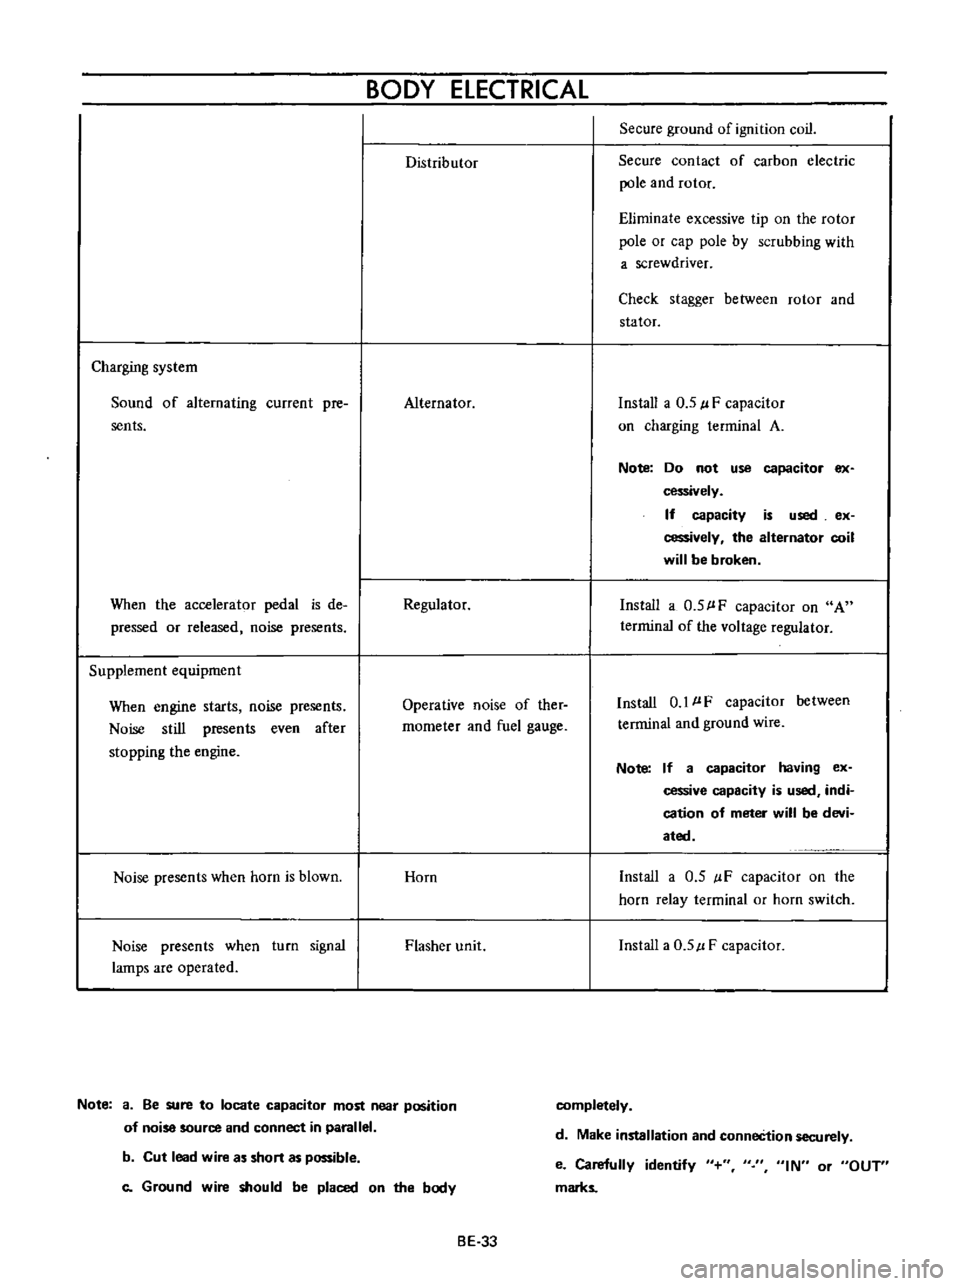
Note
a
Be
sure
to
locate
capacitor
most
near
position
of
noise
source
and
connect
in
parallel
completely
d
Make
installation
and
conneCtion
securely
b
Cut
lead
wire
as
short
as
possible
c
Ground
wire
should
be
placed
on
the
body
e
Carefully
identify
marks
IN
or
OUT
BE
33
Page 404 of 513
FUEl
SYSTEM
l
I
@
1J
w
I
I
I
I
1
1
1
t
2
3
4
5
6
7
8
9
10
tt
12
Hi
metal
Heater
Bi
metal
cover
Fast
idle
earn
Bi
metal
Bi
metal
index
mark
Choke
shaft
lever
Choke
valve
Unloader
tang
Vacuum
diaphragm
Throttle
valve
Fast
idle
adjusting
screw
j
@
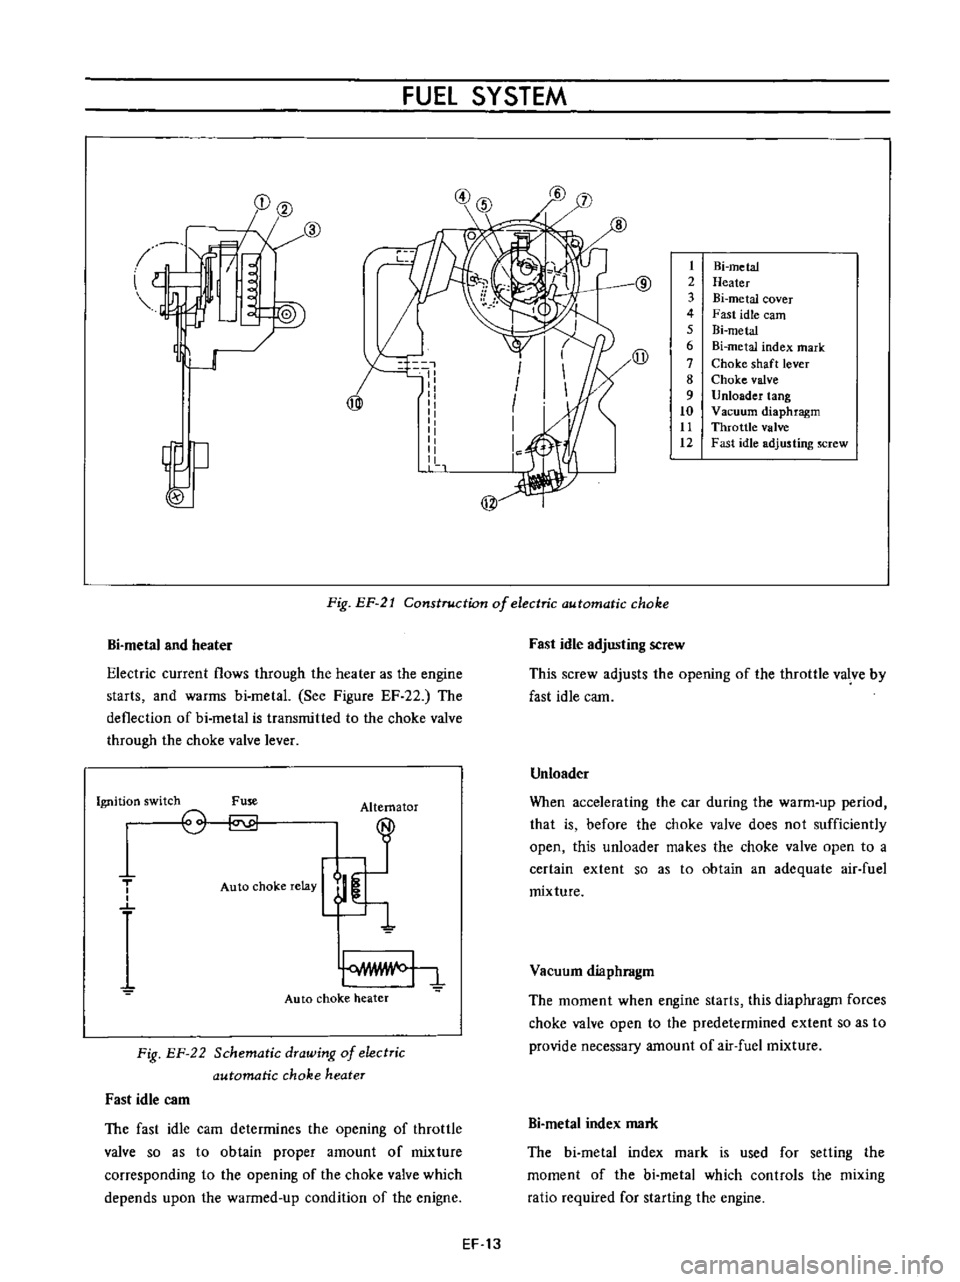
Fig
EP
21
Construction
of
electric
automatic
choke
Bi
metal
and
heater
Electric
current
flows
through
the
heater
as
the
engine
starts
and
warms
bi
metal
See
Figure
EF
22
The
deflection
of
bi
metal
is
transmitted
to
the
choke
valve
through
the
choke
valve
lever
Ignition
switch
Fuse
Alternator
T
o
o
Auto
choke
relay
Auto
choke
heater
Fig
EF
22
Schematic
drawing
of
electric
automatic
choke
heater
Fast
idle
C3m
The
fast
idle
cam
determines
the
opening
of
throttle
valve
so
as
to
obtain
proper
amount
of
mixture
corresponding
to
the
opening
of
the
choke
valve
which
depends
upon
the
warmed
up
condition
of
the
enigne
Fast
idle
adjusting
screw
This
screw
adjusts
the
opening
of
the
throttle
valve
by
fast
idle
cam
Unloader
When
accelerating
the
car
during
the
warm
up
period
that
is
before
the
choke
valve
does
not
sufficiently
open
this
unloader
makes
the
choke
valve
open
to
a
certain
extent
so
as
to
obtain
an
adequate
air
fuel
mixture
Vacuum
diaphragm
The
moment
when
engine
starts
this
diaphragm
forces
choke
valve
open
to
the
predetermined
extent
so
as
to
provide
necessary
amount
of
air
fuel
mixture
Bi
metaI
index
mark
The
bi
metal
index
mark
is
used
for
setting
the
moment
of
the
bi
metal
which
controls
the
mixing
ratio
required
for
starting
the
engine
EF
13
Page 443 of 513
Charge
relay
SPECIFICATIONS
AND
SERVICE
DATA
TROUBLE
DIAGNOSES
AND
CORRECTIONS
ENGINE
ElECTRICAL
SYSTEM
Reduction
limit
Repair
limit
Repair
accuracy
mm
in
mm
in
mm
in
REGULATOR
CONTENTS
DESCRIPTiON
MEASUREMENT
OF
REGULATING
VOLTAGE
ADJUSTMENT
Voltage
regu
lator
EE
23
EE
24
EE
25
EE
25
DESCRIPTION
I
0
0394
0
3
0
0118
0
05
0
0197
EE
26
EE
26
EE
27
1
I
T
r
@
V
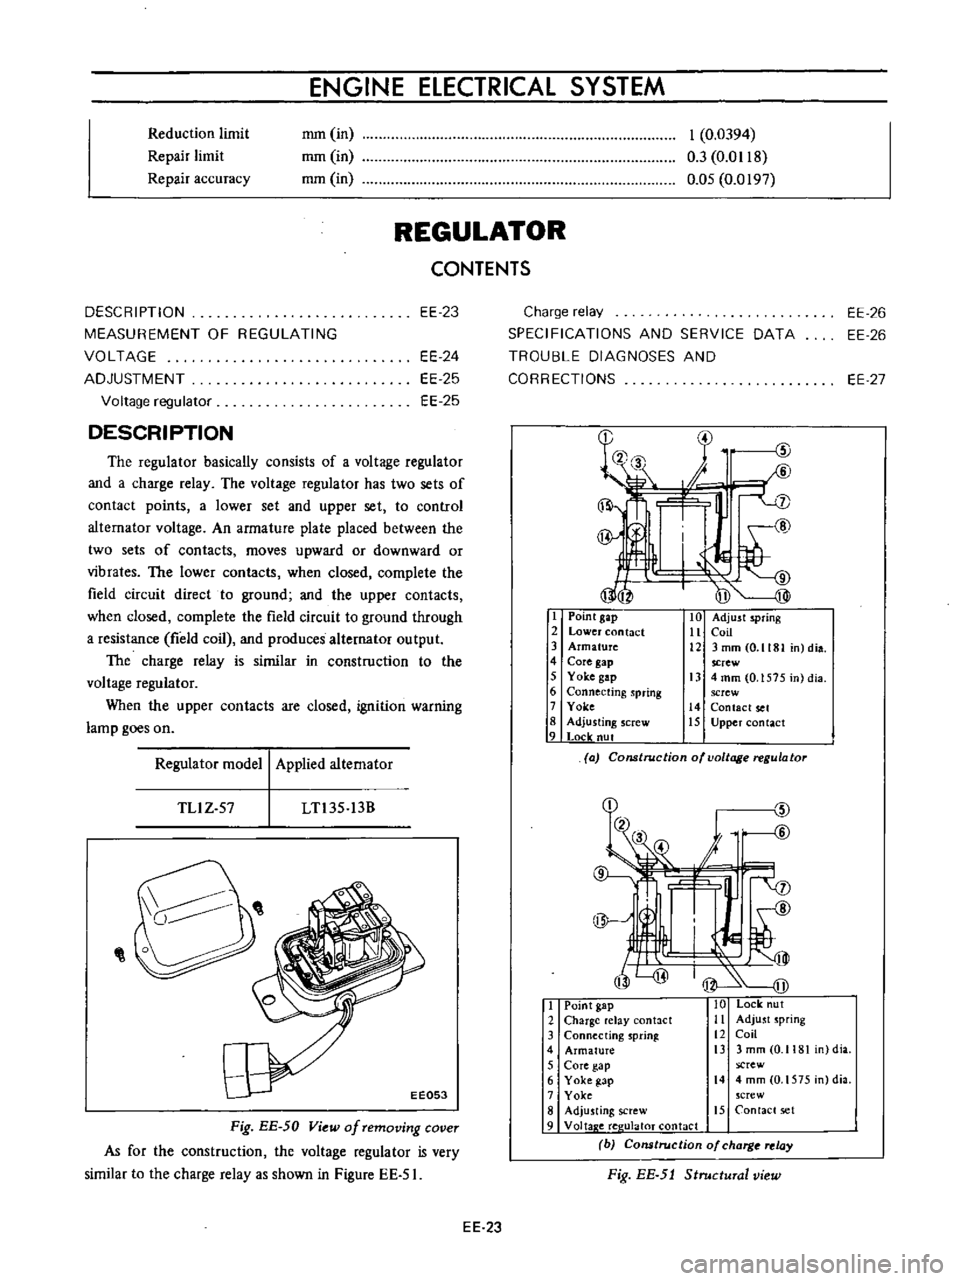
The
regulator
basically
consists
of
a
voltage
regulator
and
a
charge
relay
The
voltage
regulator
has
two
sets
of
contact
points
a
lower
set
and
upper
set
to
control
altemator
voltage
An
armature
plate
placed
between
the
two
sets
of
contacts
moves
upward
or
downward
or
vibrates
The
lower
contacts
when
closed
complete
the
field
circuit
direct
to
ground
and
the
upper
contacts
when
closed
complete
the
field
circuit
to
ground
through
a
resistance
field
coil
and
produces
alternator
output
The
charge
relay
is
similar
in
construction
to
the
voltage
regulator
When
the
upper
contacts
are
closed
ignition
warning
lamp
goes
on
I
Point
gap
2
Lower
contact
3
Armature
4
Core
gap
5
Yoke
gap
6
Connecting
spring
7
Yoke
8
Adjusting
screw
9
Locle
nut
10
Adjust
spring
11
Coil
12
3mmCO
1181
n
dia
screw
13
4
mm
0
1575
in
dia
screw
14
Contact
set
15
Upper
contact
Regulator
model
Applied
alternator
a
Construction
of
voltage
regulator
TLlZ
57
LTl35
13B
I
Point
gap
10
Lock
ut
2
Charge
elay
antact
Ii
Adjust
spring
3
Connecting
sprinl
12
Coil
4
Armature
i3
3
mm
0
1181
dia
5
Core
gap
screw
6
Yoke
gap
14
4mm
O
1575
n
dia
7
Yoke
crew
8
Adju
ting
screw
15
Contact
set
9
Voltap
e
ree
ulaloT
contact
b
Cons
rue
ion
of
charg
relay
Fig
EE
5J
Structural
view
Fig
EE
50
View
of
removing
cover
As
for
the
construction
the
voltage
regulator
is
very
similar
to
the
charge
relay
as
shown
in
Figure
EE
51
EE
23