1973 DATSUN B110 engine overheat
[x] Cancel search: engine overheatPage 61 of 513
AUTOMATIC
TRANSMISSIO
N
Trouble
IA
BCD
IE
F
G
H
IIJ
K
L
1M
NO
P
1m
n
q
riB
t
u
v
w
x
y
No
shock
at
changing
from
I
to
7
5
@
@
I
1
2
3
4
1
6
I
2
range
or
engine
extremely
races
Failure
to
change
from
3rd
to
2nd
1
2
4
5
7
16
3
I
@@
@
by
turning
lever
into
I
range
Engine
brake
does
not
operate
in
I
2
4
5
3
@
J
I
range
Gear
change
from
1st
to
2nd
or
from
2nd
to
3rd
in
I
I
2
@
range
Does
not
change
from
2nd
1
2
456
7
3
@
@
to
1st
in
I
range
Large
shock
changing
from
2nd
1
2
4
3
IDI
to
1st
in
I
range
Vehicle
will
move
when
changing
into
P
range
or
parking
gear
does
not
1
@
disengage
by
turning
off
P
range
Transmission
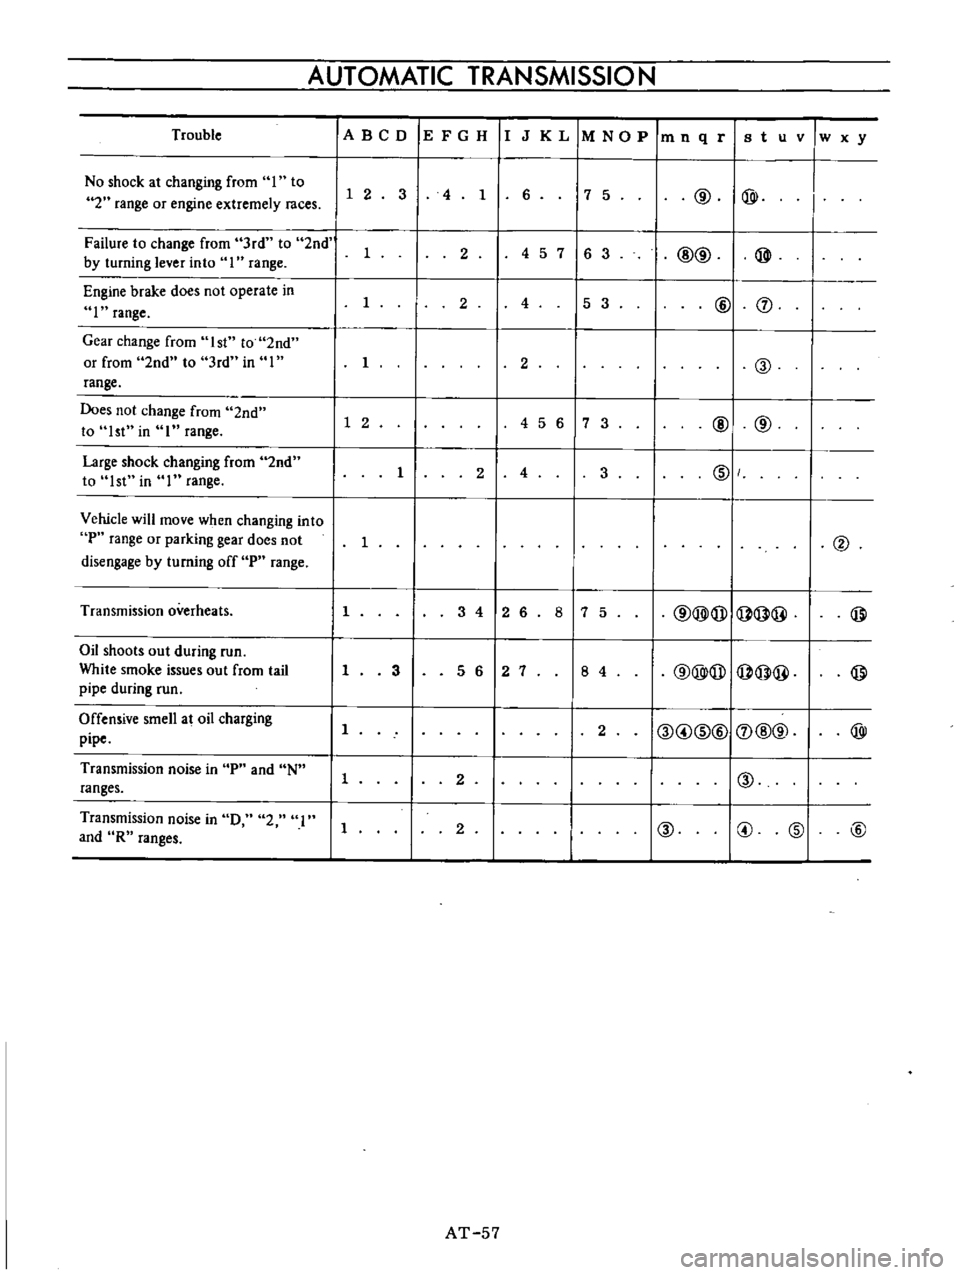
overheats
1
3
4
12
6
8
7
5
@@@I@@
@
Oil
shoots
out
during
run
@@@
@@
@
White
smoke
issues
out
from
tail
1
3
5
6
2
7
8
4
pipe
during
run
Offensive
smell
at
oil
charging
11
2
I@
@
ID@I
J
@@
@
pipe
Transmission
noise
in
P
and
N
1
2
I
I@
ranges
Transmission
noise
in
0
2
I
1
2
@
@
@
@
and
R
ranges
AT
57
Page 62 of 513
CHASSIS
Trouble
shooting
guide
for
3N71B
Automatic
Transmission
Order
Test
item
Checking
Oil
level
gauge
2
Downshift
solenoid
3
ManuaIlinkage
4
Inhibitor
switch
5
Engine
idling
rpm
6
Vacuum
pressure
of
vacuum
pipe
7
Operation
in
each
range
8
Creep
of
vehicle
Stall
lest
Oil
pressure
before
testing
2
Stall
test
3
Oil
pressure
after
testing
Road
test
Slow
acceleration
Ist
2nd
2nd
3rd
2
Quick
acceleration
Ist
2nd
2nd
3rd
3
Kick
down
operation
3rd
2nd
or
2nd
1st
Procedure
Check
gauge
for
oil
level
and
leakage
before
and
after
each
test
Check
by
sound
whether
solenoid
operates
when
depressing
accelerating
pedal
fully
with
ignition
key
ON
Check
changing
conditions
into
P
R
N
D
2
and
I
ranges
by
moving
selector
lever
Check
whether
starter
operates
in
N
and
tp
ranges
only
and
whether
reverse
lamp
operates
in
R
range
only
Check
whether
idling
rpm
meet
standard
Checking
whether
vacuum
pressure
is
more
than
450
mmHg
in
idling
and
whether
it
decreases
with
increasing
rpm
Check
whether
transmission
engages
positively
by
shifting
N
o
D
N
2
N
I
and
N
R
range
while
idling
with
brake
applied
Check
whether
there
is
any
creep
in
D
2
I
and
R
ranges
2
1
and
R
range
Measure
line
pressures
in
D
while
idling
Measure
engine
rpm
and
line
pressure
in
D
2
I
and
R
ranges
during
fullthrallIe
operation
Notes
a
Temperature
of
torque
converter
oil
used
in
test
should
be
from
600
to
lOOoC
1400
to
2120F
i
e
sufficiently
warmed
up
but
not
overheated
b
For
cooling
oil
between
each
stall
test
for
D
2
1
and
R
ranges
idle
engine
i
e
rpm
at
about
1
200
rpm
for
more
than
1
minute
in
P
range
Measurement
time
must
not
be
more
than
5
secon
Same
as
the
item
I
Check
vehicle
speeds
and
engine
rpm
in
shifting
up
1st
2nd
range
and
2nd
J
3rd
range
while
running
with
lever
in
D
range
and
engine
vacuum
pressure
of
about
200
mmHg
Same
as
the
item
1
above
except
with
engine
vacuum
pressure
of
0
mmHg
i
e
in
position
just
before
kick
down
Check
whether
the
kick
down
operates
and
measure
the
time
delays
while
running
at
30
40
50
60
70
km
h
19
25
31
38
44
MPH
in
D
range
AT
58
Page 335 of 513
Air
intake
system
in
trouble
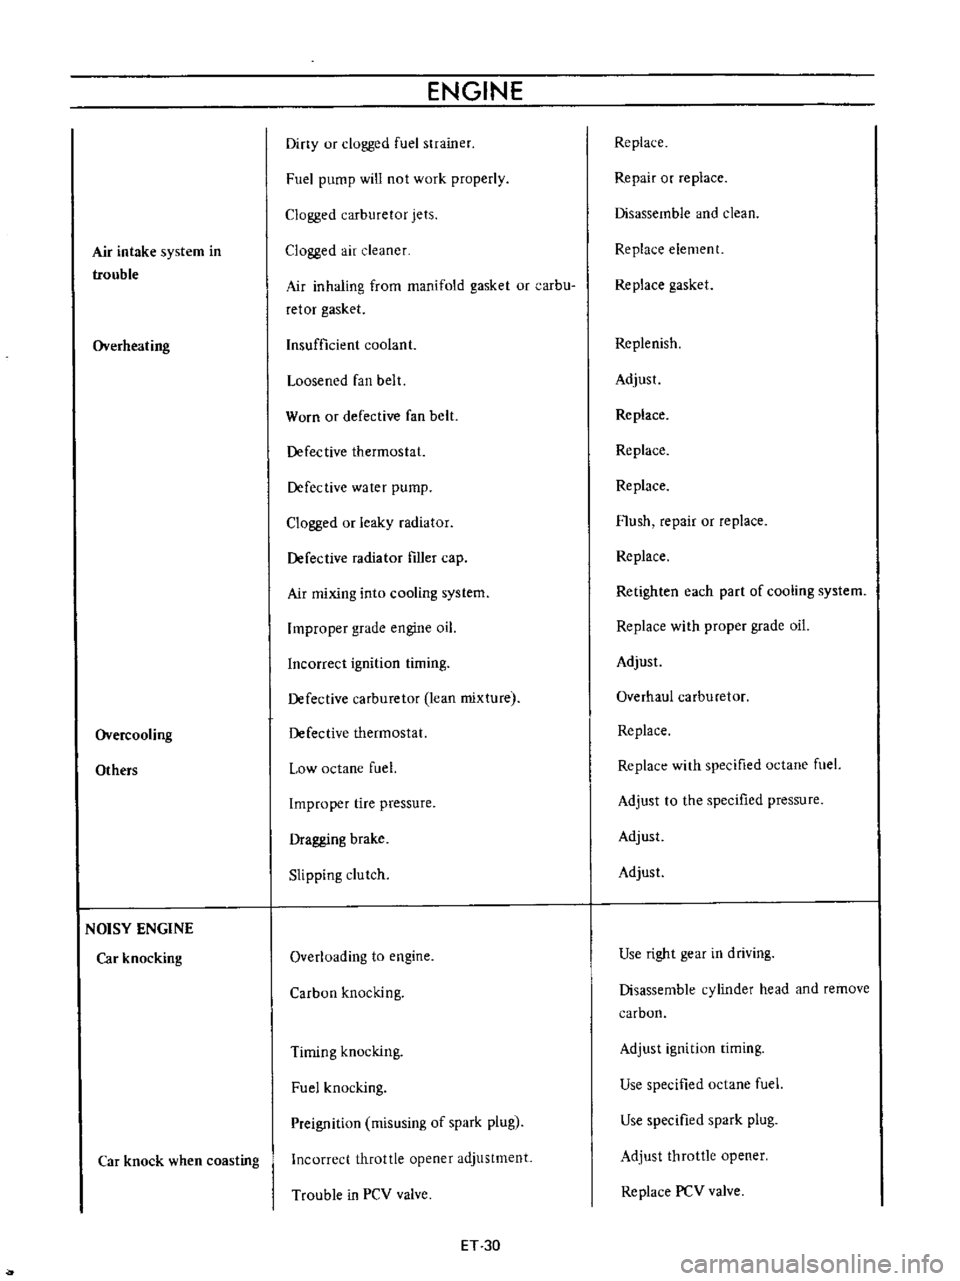
Overheating
Overcooling
Others
NOISY
ENGINE
Car
knocking
Car
knock
when
coasting
ENGINE
Diny
ur
clogged
fuel
strainer
Fuel
pump
will
not
work
properly
Clogged
carburetor
jets
Clogged
air
cleaner
Air
inhaling
from
manifold
gasket
or
carbu
retor
gasket
Insufficient
coolant
Loosened
fan
belt
Worn
or
defective
fan
belt
Defective
thermostat
Defective
water
pump
Clogged
or
leaky
radiator
Defective
radiator
filler
cap
Air
mixing
into
cooling
system
Improper
grade
engine
oil
Incorrect
ignition
timing
Defective
carburetor
lean
mixture
Defective
thermostat
Low
octane
fuel
Improper
tire
pressure
Dragging
brake
Slipping
clutch
Overloading
to
engine
Carbon
knocking
Timing
knocking
Fuel
knocking
Preignition
misusing
of
spark
plug
Incorrect
throttle
opener
adjustment
Trouble
in
PCV
valve
ET
30
Replace
Repair
or
replace
Disassemble
and
clean
Replace
element
Replace
gasket
Replenish
Adjust
Replace
Replace
Replace
Flush
repair
or
replace
Replace
Retighten
each
part
of
cooling
system
Replace
with
proper
grade
oil
Adjust
Overhaul
carburetor
Replace
Replace
with
specified
octane
fuel
Adjust
to
the
specified
pressure
Adjust
Adjust
Use
right
gear
in
driving
Disassemble
cylinder
head
and
remove
carbon
Adjust
ignition
timing
Use
specified
octane
fuel
Use
specified
spark
plug
Adjust
throttle
opener
Replace
PCV
valve
Page 338 of 513
EMISSION
CONTROL
AND
TUNE
UP
Othm
POOR
FUEL
CONSUMPTION
See
the
explanation
of
the
power
decrease
Othe
TROUBLE
IN
OTHER
FUNCfIONS
Decreased
oil
pressure
Excessive
wear
on
the
sliding
parts
Damaged
or
seized
piston
rings
Worn
piston
ring
groove
and
rings
Fatigue
ofvalve
oil
seal
lip
Worn
valve
stem
Inadequate
quality
of
engine
oiL
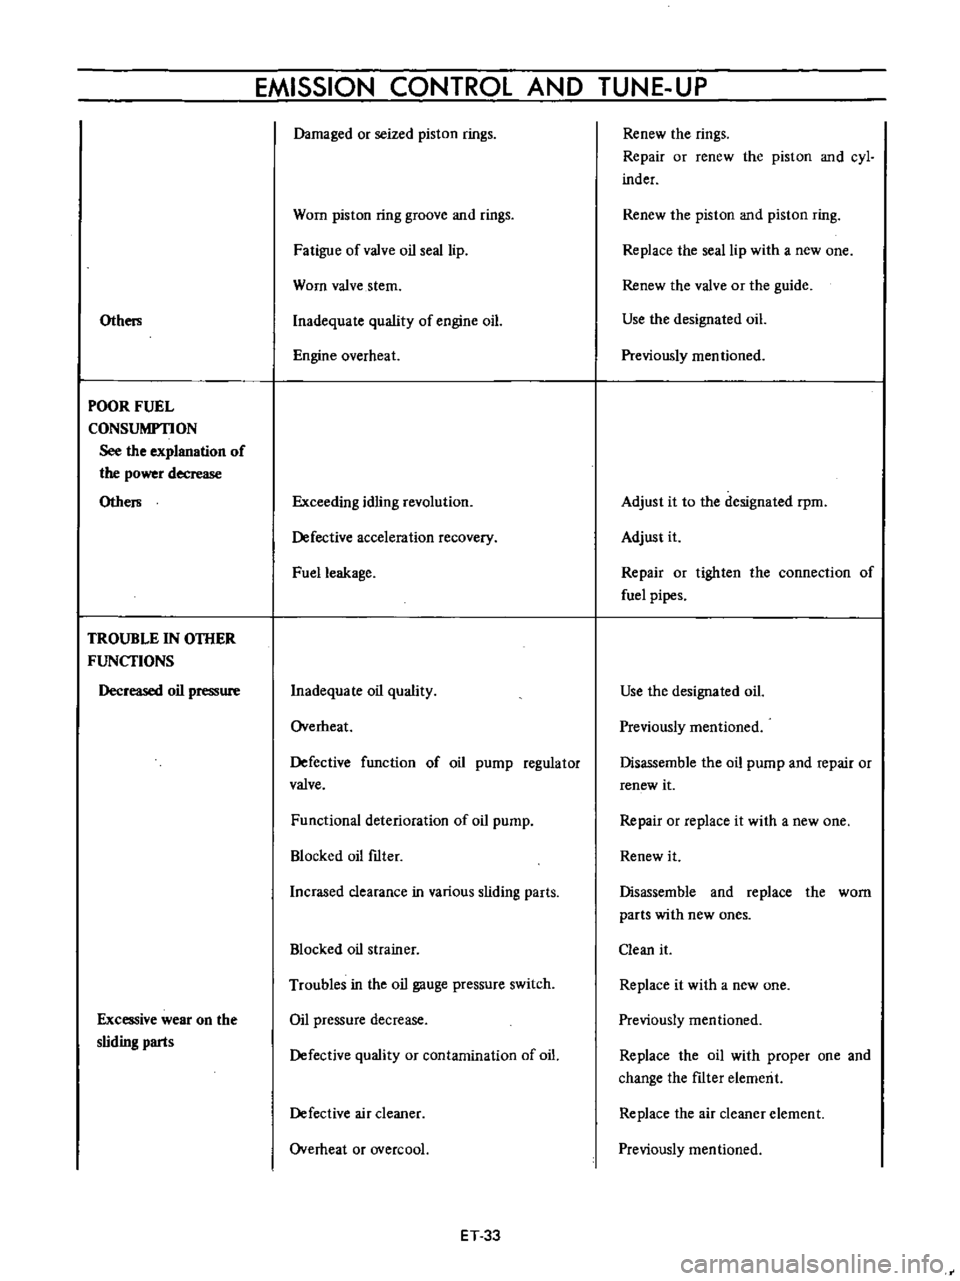
Engine
overheat
Exceeding
idling
revolution
Defective
acceleration
recovery
Fuel
leakage
Inadequa
Ie
oil
quality
Overheat
Defective
function
of
oil
pump
regulator
valve
Functional
deterioration
of
oil
pump
Blocked
oil
ftIter
nerased
clearance
in
various
sliding
parts
Blocked
oil
strainer
Troubles
in
the
oil
gauge
pressure
switch
Oil
pressure
decrease
Defective
quality
or
contamination
of
oil
Defective
air
cleaner
Overheat
or
overcoal
ET
33
Renew
the
rings
Repair
or
renew
the
piston
and
cyl
inder
Renew
the
piston
and
piston
ring
Replace
the
seal
lip
with
a
new
one
Renew
the
valve
or
the
guide
Use
the
designated
oiL
Previously
mentioned
Adjust
it
to
the
designated
rpm
Adjust
it
Repair
or
tighten
the
connection
of
fuel
pipes
Use
the
designated
oil
Previously
mentioned
Disassemble
the
oil
pump
and
repair
or
renew
it
Repair
or
replace
it
with
a
new
one
Renew
it
Disassemble
and
replace
the
worn
parts
with
new
ones
Clean
it
Replace
it
with
a
new
one
Previously
mentioned
Replace
the
oil
with
proper
one
and
change
the
ftIter
elemerit
Replace
the
air
cleaner
element
Previously
mentioned
Page 339 of 513
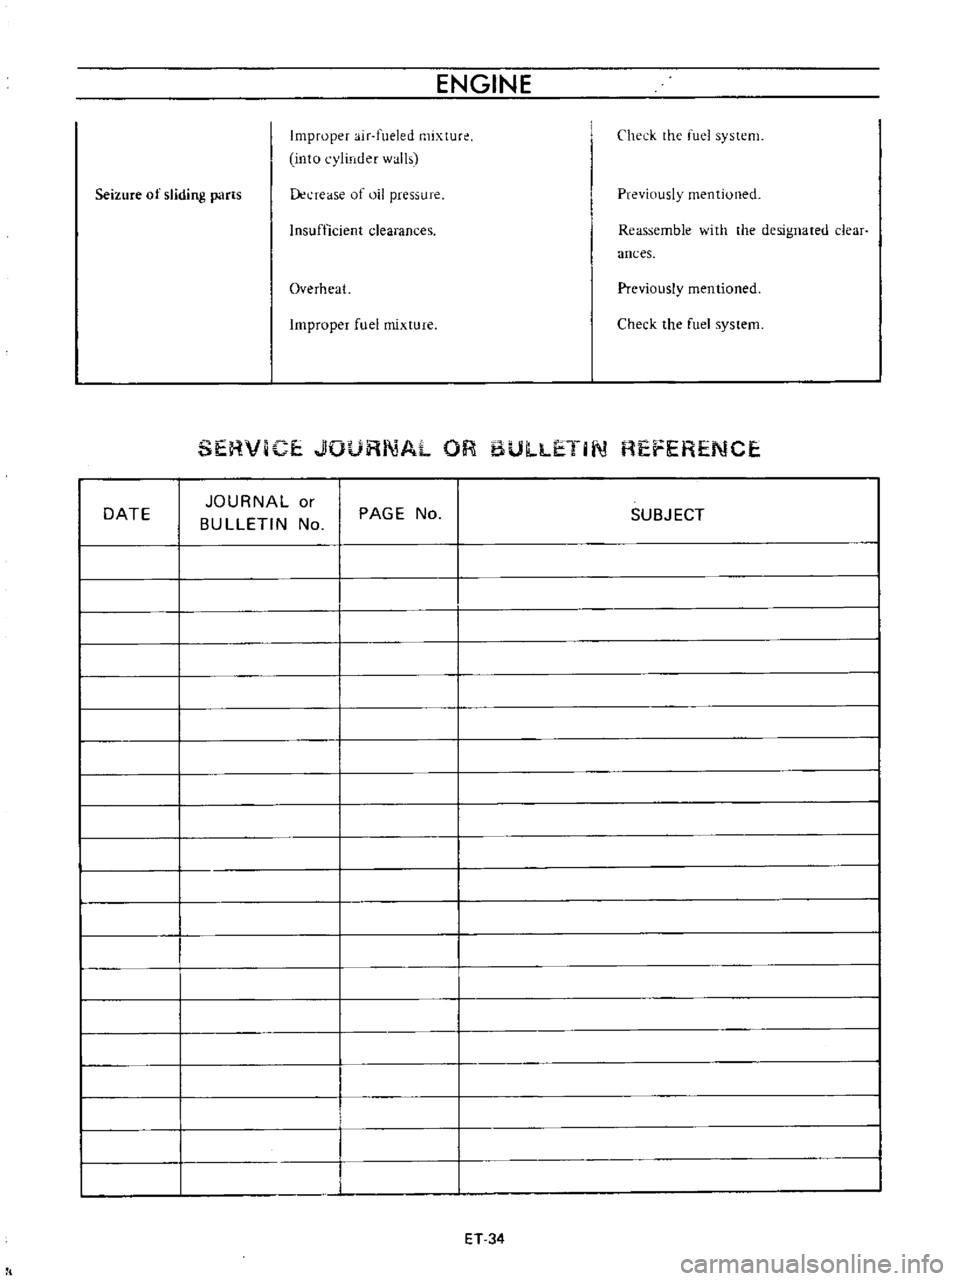
ENGINE
Improper
air
fueled
mixtur
into
cylinder
walls
Check
the
fuel
system
Seizure
of
sliding
parts
Lkl
rease
of
oil
pressure
Previously
mentioned
Insufficient
clearances
Reassemble
with
the
designated
clear
ances
Overheat
Previously
mentioned
Improper
fuel
mixture
Check
the
fuel
system
SERViCE
JOURNAL
OR
6UU
ETIi
l
REFERENCE
DATE
JOURNAL
or
BULLETIN
No
PAGE
No
SUBJECT
ET
34
1t
Page 379 of 513
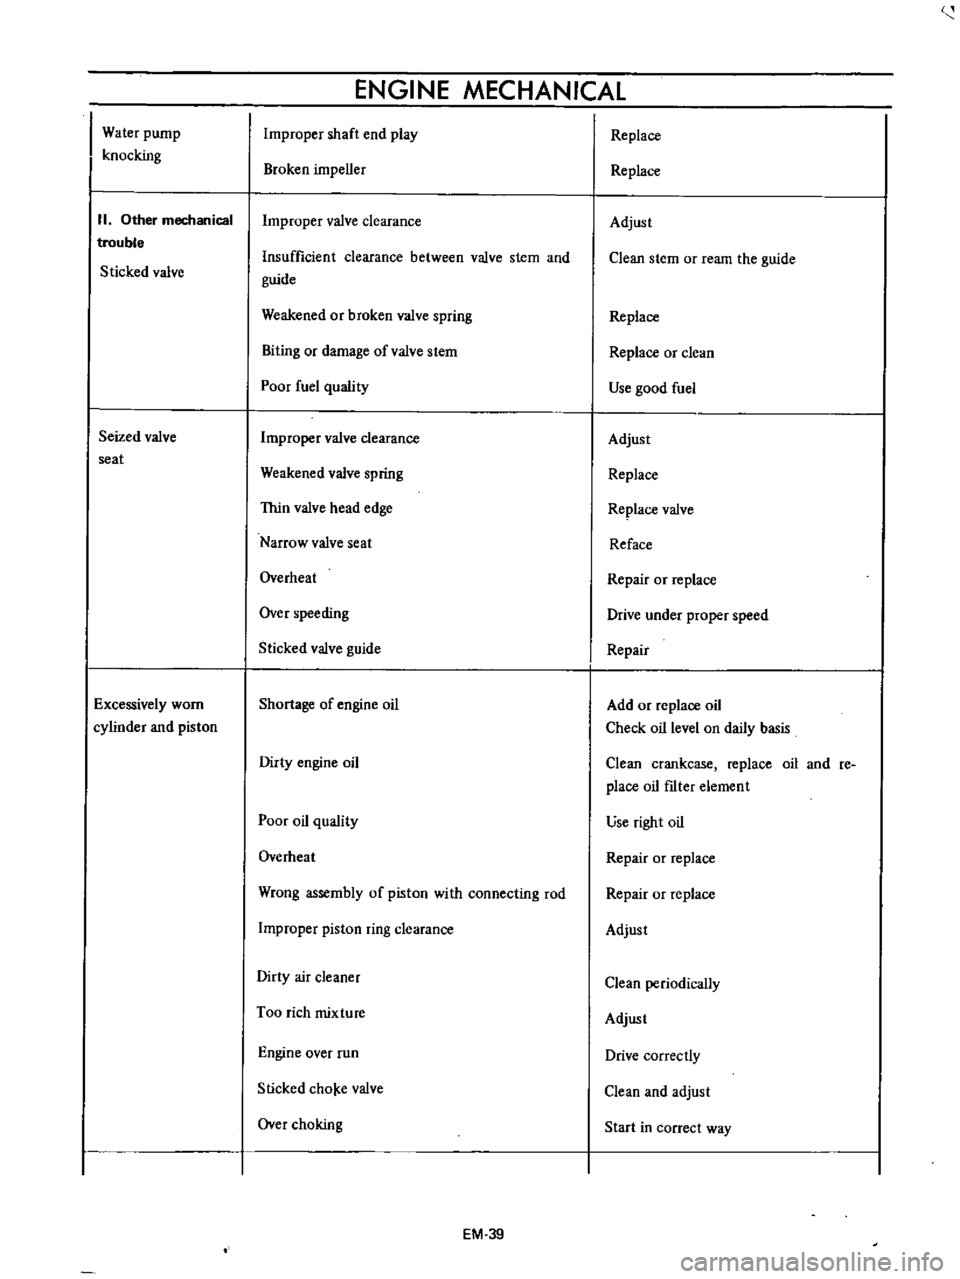
Water
pump
knocking
II
Other
mechanical
trouble
Sticked
valve
Seized
valve
seat
Excessively
worn
cylinder
and
piston
ENGINE
MECHANICAL
Improper
shaft
end
play
Broken
impeller
Improper
valve
clearance
Insufficient
clearance
between
valve
stem
and
guide
Weakened
or
broken
valve
spring
Biting
or
damage
ofvalve
stem
Poor
fuel
quality
Improper
valve
clearance
Weakened
valve
spring
Thin
valve
head
edge
Narrow
valve
seat
Overheat
Over
speeding
Sticked
valve
guide
Shortage
of
engine
oil
Dirty
engine
oil
Poor
oil
quality
Overheat
Wrong
assembly
of
piston
with
connecting
rod
Improper
piston
ring
clearance
Dirty
air
cleaner
Too
rich
mixture
Engine
over
run
Slicked
cho
e
valve
Over
choking
EM
39
Replace
Replace
Adjust
Clean
stem
or
ream
the
guide
Replace
Replace
or
clean
Use
good
fuel
Adjust
Replace
Replace
valve
Reface
Repair
or
replace
Drive
under
proper
speed
Repair
Add
or
replace
oil
Check
oil
level
on
daily
basis
Clean
crankcase
replace
oil
and
re
place
oil
fIlter
element
use
right
oil
Repair
or
replace
Repair
or
replace
Adjust
Clean
periodically
Adjust
Drive
correctly
Clean
and
adjust
Start
in
correct
way
Page 457 of 513
ENGINE
ElECTRICAL
SYSTEM
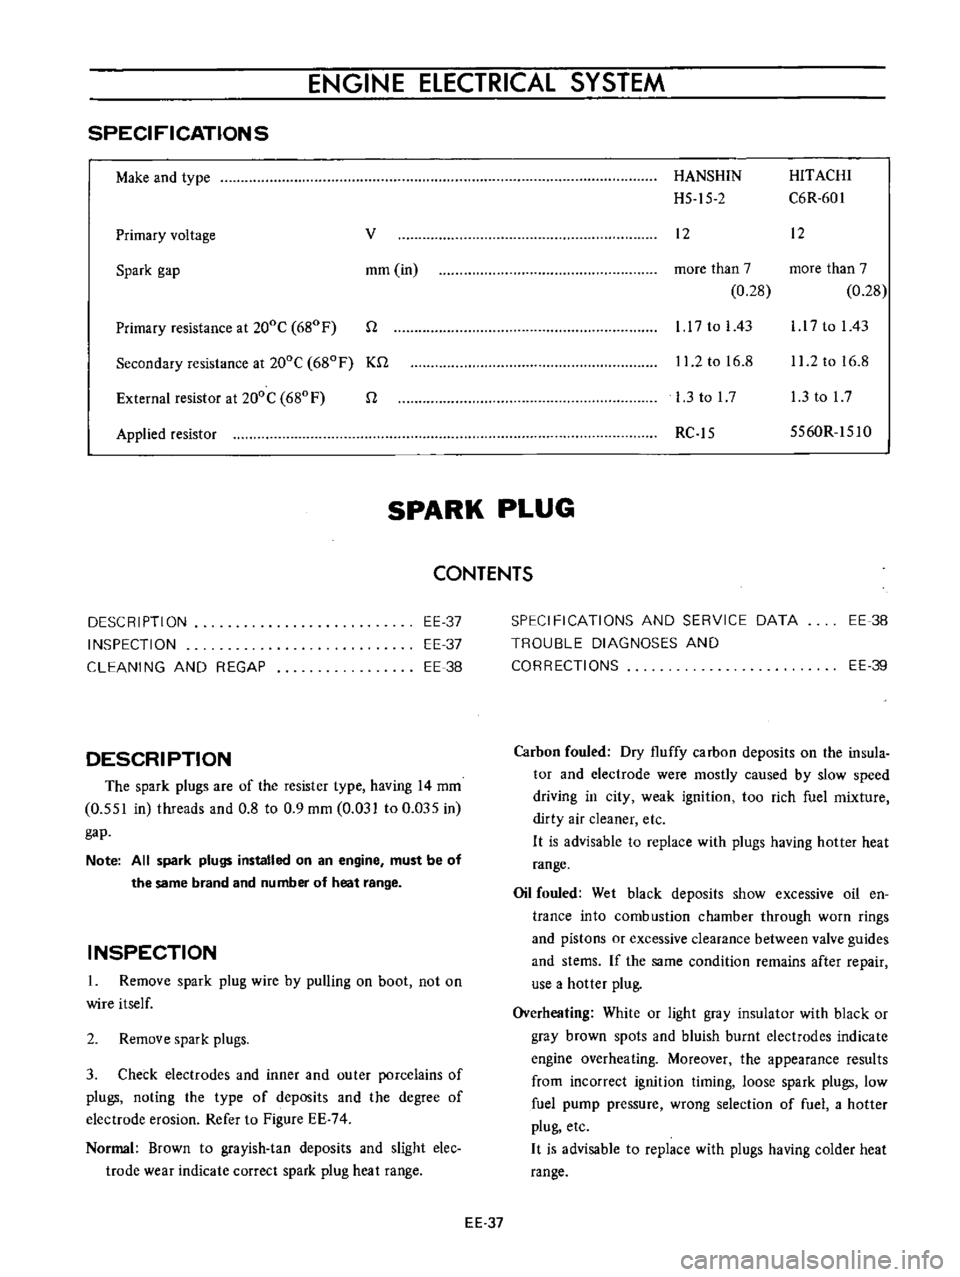
SPECIFICATIONS
Make
and
type
Primary
voltage
v
Spark
gap
mm
in
Primary
resistance
at
200C
680
F
n
Secondary
resistance
at
200C
680F
Kn
External
resistor
at
200C
680
F
n
Applied
resistor
HANSHIN
HITACHI
H5
15
2
C6R
601
12
12
more
than
7
more
than
7
0
28
0
28
1
17
to
I
43
l
l
7
to
I
43
11
2
to
16
8
11
2
to
16
8
l
3tol7
l
3tol7
RC
15
5560R
151O
SPARK
PLUG
CONTENTS
DESCRIPTION
INSPECTION
CLEANING
AND
REGAP
EE
37
EE
37
EE
38
DESCRIPTION
The
spark
plugs
are
of
the
resister
type
having
14
mm
0
551
in
threads
and
0
8
to
0
9
mm
0
031
to
0
Q35
in
gap
Note
All
spark
plugs
installed
on
an
engine
must
be
of
the
same
brand
and
number
of
heat
range
INSPECTION
1
Remove
spark
plug
wire
by
pulling
on
boot
not
on
wire
itself
2
Remove
spark
plugs
3
Check
electrodes
and
inner
and
outer
porcelains
of
plugs
noting
the
type
of
deposits
and
the
degree
of
electrode
erosion
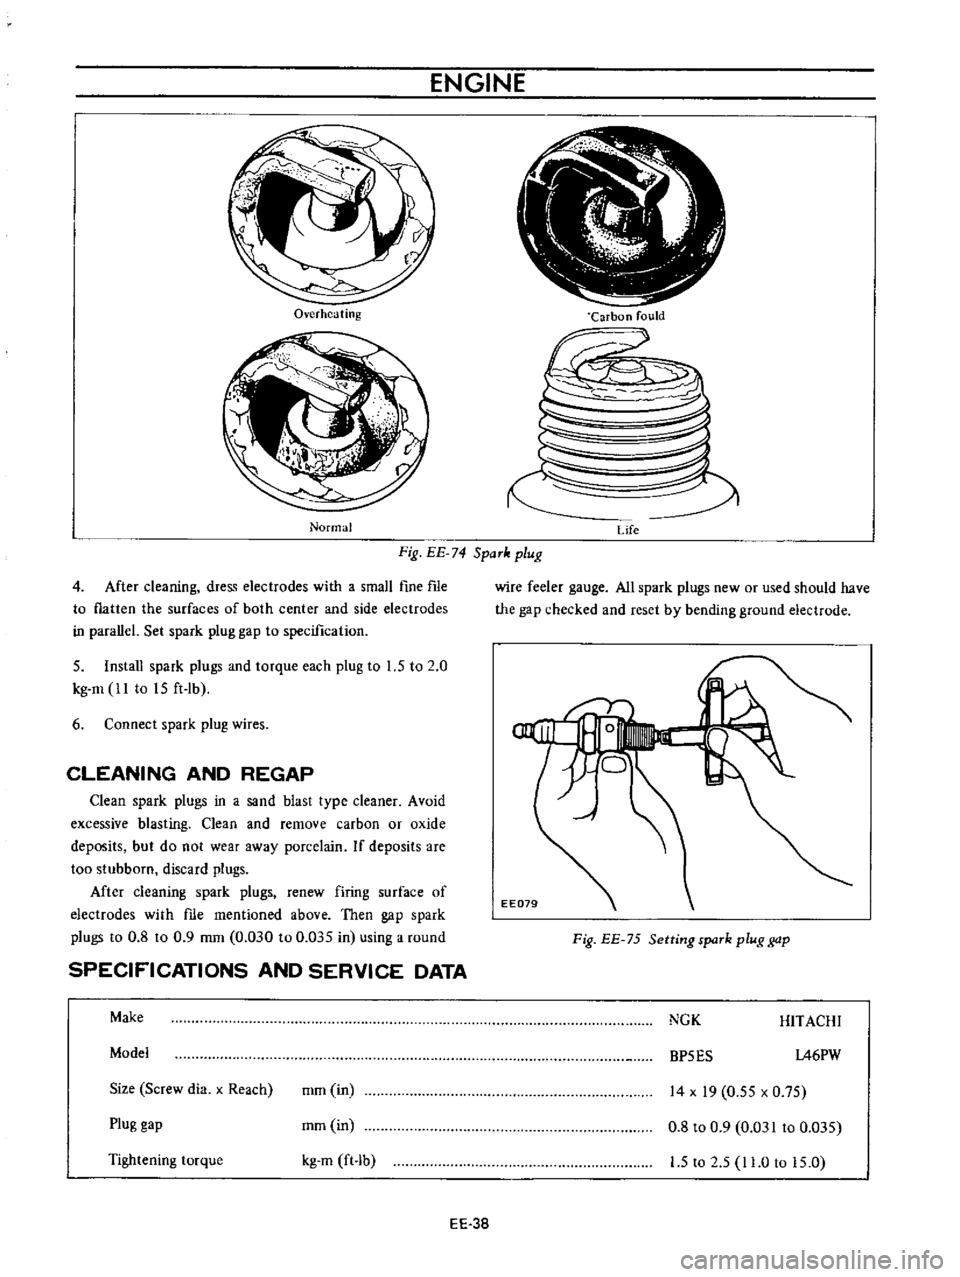
Refer
to
Figure
EE
74
Normal
Brown
to
grayish
tan
deposits
and
slight
elec
trode
wear
indicate
correct
spark
plug
heat
range
SPECIFICATIONS
AND
SERVICE
DATA
TROUBLE
DIAGNOSES
AND
CORRECTIONS
EE
38
EE
39
Carbon
fouled
Dry
fluffy
carbon
deposits
on
the
insula
tor
and
electrode
were
mostly
caused
by
slow
speed
driving
in
city
weak
ignition
too
rich
fuel
mixture
dirty
air
cleaner
etc
H
is
advisable
to
replace
with
plugs
having
hotter
heat
range
Oil
fouled
Wet
black
deposits
show
excessive
oil
en
trance
into
combustion
chamber
through
worn
rings
and
pistons
or
excessive
clearance
between
valve
guides
and
stems
If
the
same
condition
remains
after
repair
use
a
hotter
plug
Overheating
White
or
light
gray
insulator
with
black
or
gray
brown
spots
and
bluish
burnt
electrodes
indicate
engine
overheating
Moreover
the
appearance
results
from
incorrect
ignition
timing
loose
spark
plugs
low
fuel
pump
pressure
wrong
selection
of
fuel
a
hotter
plug
etc
H
is
advisable
to
replace
with
plugs
having
colder
heat
range
EE
37
Page 458 of 513
ENGINE
Overheating
Normal
Carbon
fould
Fig
EE
74
SpaTk
plug
Life
4
After
cleaning
dress
electrodes
with
a
small
fine
fIle
to
flatten
the
surfaces
of
both
center
and
side
electrodes
in
parallel
Set
spark
plug
gap
to
specification
5
Install
spark
plugs
and
torque
each
plug
to
1
5
to
2
0
kg
m
ll
to
15
ft
lb
6
Connect
spark
plug
wires
CLEANING
AND
REGAP
Clean
spark
plugs
in
a
sand
blast
type
cleaner
Avoid
excessive
blasting
Clean
and
remove
carbon
or
oxide
deposits
but
do
not
wear
away
porcelain
If
deposits
are
too
stubborn
discard
plugs
Mter
cleaning
spark
plugs
renew
firing
surface
of
electrodes
with
me
mentioned
above
Then
gap
spark
plugs
to
0
8
to
0
9
mm
0
030
to
0
035
in
using
a
round
SPECIFICATIONS
AND
SERVICE
DATA
Make
Model
Size
Screw
dia
x
Reach
mm
in
Plug
gap
mm
in
Tightening
torque
kg
m
ft
b
EE
38
wire
feeler
gauge
All
spark
plugs
new
or
used
should
have
the
gap
checked
and
reset
by
bending
ground
electrode
Fig
EE
75
Setting
spaTk
plug
gap
NGK
HITACHI
BP5ES
1A6PW
14
x
19
0
55
x
0
75
0
8
to
0
9
0
031
to
0
035
1
5
to
2
5
11
0
to
15
0