Page 137 of 390
Page 138 of 390

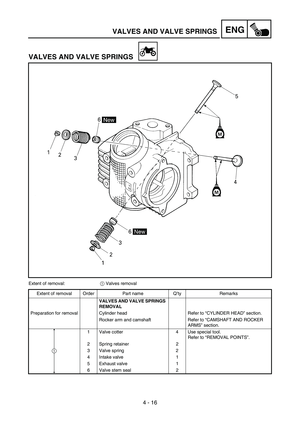
3 - 4
INSP
ADJENGINE/THROTTLE CABLE ADJUSTMENT/
AIR FILTER CLEANING
EC350000
ENGINE
THROTTLE CABLE ADJUSTMENT
1. Check:
Throttle grip free play a
Out of specification → Adjust.
Throttle grip free play
a:
3 ~ 5 mm (0.12 ~ 0.20 in)
2. Adjust:
Throttle grip free play
AIR FILTER CLEANING
NOTE:
Proper air filter maintenance is the biggest key
to preventing premature engine wear and
damage.
CAUTION:
Never run the engine without the air filter
element in place; this would allow dirt and
dust to enter the engine and cause rapid
wear and possible engine damage.Throttle grip free play adjustment steps:
NOTE:
Before adjusting the throttle cable free play,
the engine idle speed should be adjusted.
Loosen the locknut 1 on throttle cable.
Turn the adjuster 2 in or out until the
specified free play is obtained.
Turning in
→ Free play is increased.
Turning out
→ Free play is decreased.
Tighten the locknut.
WARNING
After adjusting, turn the handlebar to
right and left and make sure that the
engine idling does not run faster.
Page 139 of 390

INSP
ADJ
MOTEUR/REGLAGE DU CABLE DES GAZ/
NETTOYAGE DU FILTRE A AIR
MOTOR/GASZUG EINSTELLEN/LUFTFILTER REINIGEN
MOTEUR
REGLAGE DU CABLE DES GAZ
1. Contrôler:
Jeu de la poignée des gaz a
Hors spécifications → Régler.
Jeu de la poignée des gaz a:
3 à 5 mm (0,12 à 0,20 in)
2. Régler:
Jeu de la poignée des gaz
NETTOYAGE DU FILTRE A AIR
N.B.:
Un bon entretien du filtre à air est la meilleure
façon d’éviter l’usure prématurée et l’endommage-
ment du moteur.
ATTENTION:
Ne jamais faire tourner le moteur lorsque l’élé-
ment du boîtier de filtre à air n’est pas en place.
Des saletés et des poussières pourraient pénétrer
dans le moteur et provoquer son usure rapide et
l’endommager. Etapes du réglage du jeu de la poignée des
gaz:
N.B.:
Avant de régler le jeu du câble des gaz, régler le
régime de ralenti du moteur.
Desserrer le contre-écrou 1 du câble des gaz.
Visser ou dévisser le dispositif de réglage 2
jusqu’à obtention du jeu spécifié.
Visser → Le jeu augmente.
Dévisser → Le jeu diminue.
Serrer le contre-écrou.
AVERTISSEMENT
Après le réglage, tourner le guidon vers la
droite et vers la gauche et contrôler que le
régime de ralenti du moteur ne change pas.
3 - 4
MOTOR
GASZUG EINSTELLEN
1. Kontrollieren:
Gaszugspiel a am Gasdrehgriff
Nicht nach Vorgabe → Korrigieren.
Gaszugspiel a am Gasdrehgriff:
3–5 mm (0,12–0,20 in)
2. Einstellen:
Gaszugspiel am Gasdrehgriff
LUFTFILTER REINIGEN
HINWEIS:
Sachgemäße Luftfilter-Wartung ist ausschlag-
gebend im Schutz vor frühzeitigen Motorschä-
den und -verschleiß.
ACHTUNG:
Der Motor darf unter keinen Umständen mit
ausgebautem Luftfilter betrieben werden,
da ungefilterte Ansaugluft zu erhöhtem
Verschleiß und Motorschäden führen kann. Gaszugspiel einstellen:
HINWEIS:
Vor dem Einstellen des Gaszugspiels sollte
sichergestellt werden, dass die Leerlauf-
drehzahl richtig eingestellt ist.
Die Sicherungsmutter 1 am Gaszug
lockern.
Die Einstellmutter 2 verdrehen, bis das
vorgeschriebene Spiel erreicht ist.
Hineindrehen → Spiel wird größer.
Herausdrehen → Spiel wird kleiner.
Die Sicherungsmutter festziehen.
WARNUNG
Nach der Einstellung sollte der Lenker
bei laufendem Motor beidseitig bis zum
Anschlag gedreht und dabei sicherge-
stellt werden, dass die Leerlaufdrehzahl
sich nicht verändert.
Page 140 of 390
3 - 5
INSP
ADJ
AIR FILTER CLEANING
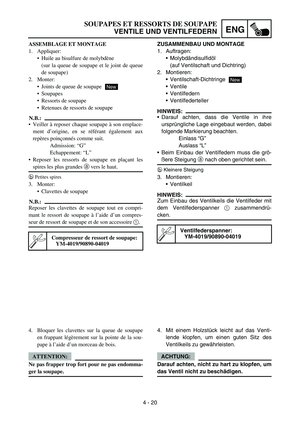
1. Install:
Air scoop (right) 1
2. Install:
Air filter case cover 1
3. Clean:
Air filter element
Clean them with solvent.
NOTE:
After cleaning, remove the remaining solvent
by squeezing the element.
CAUTION:
Do not twist the element when squeezing
the element.
Leaving too much of solvent in the ele-
ment may result in poor starting.
4. Inspect:
Air filter element
Damage → Replace.
5. Apply:
Foam-air-filter oil or engine mixing oil
To the element.
NOTE:
Squeeze out the excess oil. Element should be
wet but not dripping.
6. Install:
Air filter element 1
NOTE:
Align the projection a on the air filter case with
the hole b in the air filter element.
7. Install:
Air filter case cover
8. Install:
Air scoop (right)
Page 141 of 390

INSP
ADJNETTOYAGE DU FILTRE A AIR
LUFTFILTER REINIGEN
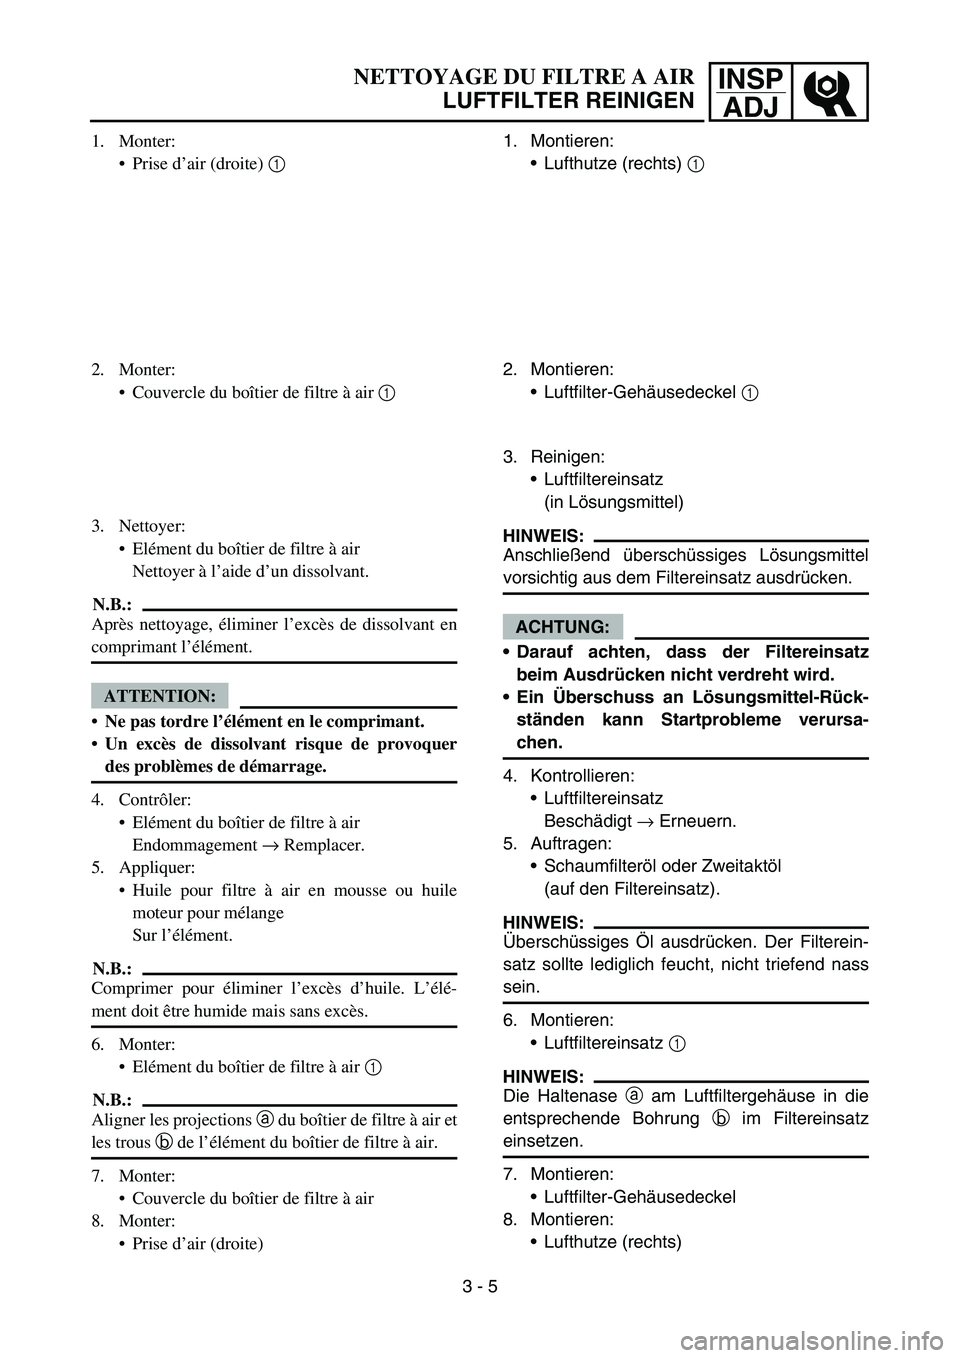
1. Monter:
Prise d’air (droite) 1
2. Monter:
Couvercle du boîtier de filtre à air 1
3. Nettoyer:
Elément du boîtier de filtre à air
Nettoyer à l’aide d’un dissolvant.
N.B.:
Après nettoyage, éliminer l’excès de dissolvant en
comprimant l’élément.
ATTENTION:
Ne pas tordre l’élément en le comprimant.
Un excès de dissolvant risque de provoquer
des problèmes de démarrage.
4. Contrôler:
Elément du boîtier de filtre à air
Endommagement → Remplacer.
5. Appliquer:
Huile pour filtre à air en mousse ou huile
moteur pour mélange
Sur l’élément.
N.B.:
Comprimer pour éliminer l’excès d’huile. L’élé-
ment doit être humide mais sans excès.
6. Monter:
Elément du boîtier de filtre à air 1
N.B.:
Aligner les projections a du boîtier de filtre à air et
les trous b de l’élément du boîtier de filtre à air.
7. Monter:
Couvercle du boîtier de filtre à air
8. Monter:
Prise d’air (droite)
3 - 51. Montieren:
Lufthutze (rechts) 1
2. Montieren:
Luftfilter-Gehäusedeckel 1
3. Reinigen:
Luftfiltereinsatz
(in Lösungsmittel)
HINWEIS:
Anschließend überschüssiges Lösungsmittel
vorsichtig aus dem Filtereinsatz ausdrücken.
ACHTUNG:
Darauf achten, dass der Filtereinsatz
beim Ausdrücken nicht verdreht wird.
Ein Überschuss an Lösungsmittel-Rück-
ständen kann Startprobleme verursa-
chen.
4. Kontrollieren:
Luftfiltereinsatz
Beschädigt → Erneuern.
5. Auftragen:
Schaumfilteröl oder Zweitaktöl
(auf den Filtereinsatz).
HINWEIS:
Überschüssiges Öl ausdrücken. Der Filterein-
satz sollte lediglich feucht, nicht triefend nass
sein.
6. Montieren:
Luftfiltereinsatz 1
HINWEIS:
Die Haltenase a am Luftfiltergehäuse in die
entsprechende Bohrung b im Filtereinsatz
einsetzen.
7. Montieren:
Luftfilter-Gehäusedeckel
8. Montieren:
Lufthutze (rechts)
Page 142 of 390

3 - 6
INSP
ADJ
ENGINE OIL LEVEL INSPECTION
1. Start the engine, warm it up for several
minutes, and then turn off the engine and
wait for five minutes.
2. Place the machine on a level place and
hold it up on upright position by placing the
suitable stand under the engine.
3. Remove:
Dipstick 1
4. Check:
Oil level
Oil level should be between maximum a
and minimum b marks.
Oil level is low → Add oil to proper level.
NOTE:
When inspecting the oil level, do not screw the
dipstick into the oil tank. Insert the gauge
lightly.
(For USA and CDN)
CAUTION:
Do not add any chemical additives.
Engine oil also lubricates the clutch and
additives could cause clutch slippage.
Do not allow foreign material to enter the
crankcase.
Recommended oil:
At –10 °C (10 °F) or higher È:
Yamalube 4 (10W-30) or SAE
10W-30 type SE/SF/SG motor
oil
At 5 °C (40 °F) or higher É:
Yamalube 4 (20W-40) or SAE
20W-40 type SE/SF/SG motor
oil010 30 50 70
90110
130
-20
-10010
20 30 40
50
È
É
˚C ˚F
ENGINE OIL LEVEL INSPECTION
Page 143 of 390

INSP
ADJCONTROLE DU NIVEAU D’HUILE MOTEUR
MOTORÖLSTAND KONTROLLIEREN
CONTROLE DU NIVEAU D’HUILE
MOTEUR
1. Mettre le moteur en marche, le laisser chauffer
pendant quelques minutes, puis couper le
moteur et attendre cinq minutes.
2. Placer la moto sur un sol plan et la maintenir à
la verticale en plaçant un support adéquat sous
le moteur.
3. Déposer:
Jauge 1
4. Vérifier:
Niveau d’huile
Le niveau d’huile doit se situer entre les repè-
res de niveau maximum a et minimum b.
Niveau d’huile bas → Remettre à niveau.
N.B.:
Pour contrôler le niveau d’huile, ne pas revisser la
jauge dans le réservoir. Insérer légèrement la jauge.
(USA et CDN)
ATTENTION:
Ne pas ajouter d’additifs chimiques. L’huile
moteur lubrifie également l’embrayage et les
additifs pourraient le faire patiner.
Ne pas laisser entrer de corps étrangers dans
le carter moteur.
Huile recommandée:
A –10 °C (10 °F) ou plus È
:
Yamalube 4 (10W-30) ou huile
moteur SAE 10W-30 de type SE/
SF/SG
A 5 °C (40 °F) ou plus É
:
Yamalube 4 (20W-40) ou huile
moteur SAE 20W-40 de type SE/
SF/SG
3 - 6MOTORÖLSTAND KONTROLLIEREN
1. Den Motor anlassen, einige Minuten lang
warm laufen lassen, dann abstellen und
fünf Minuten warten.
2. Das Motorrad auf einem ebenen Unter-
grund abstellen, am Motor aufbocken und
in gerader Stellung halten.
3. Demontieren:
Messstab 1
4. Kontrollieren:
Ölstand
Der Ölstand sollte sich zwischen den
Minimal- und Maximalstand-Markierun-
gen b und a befinden.
Ölstand niedrig → Öl bis zum empfohle-
nen Stand auffüllen.
HINWEIS:
Bei der Ölstandkontrolle den Messstab nicht
wieder einschrauben. Den Messstab lediglich
zurückstecken.
(USA und CDN)
ACHTUNG:
Keine Additive beimischen! Da das
Motoröl auch zur Schmierung der Kupp-
lung dient, können Zusätze zu Kupp-
lungsrutschen führen.
Darauf achten, dass keine Fremdkörper in
das Kurbelgehäuse gelangen.
Empfohlene Ölsorte:
Bei mindestens –10 °C (10 °F)
È:
Yamalube 4 (10W-30) oder
SAE 10W-30 Motoröl der API-
Klasse SE/SF/SG
Bei mindestens 5 °C (40 °F)
É:
Yamalube 4 (20W-40) oder
SAE 20W-40 Motoröl der API-
Klasse SE/SF/SG
Page 144 of 390

3 - 7
INSP
ADJ
ENGINE OIL REPLACEMENT
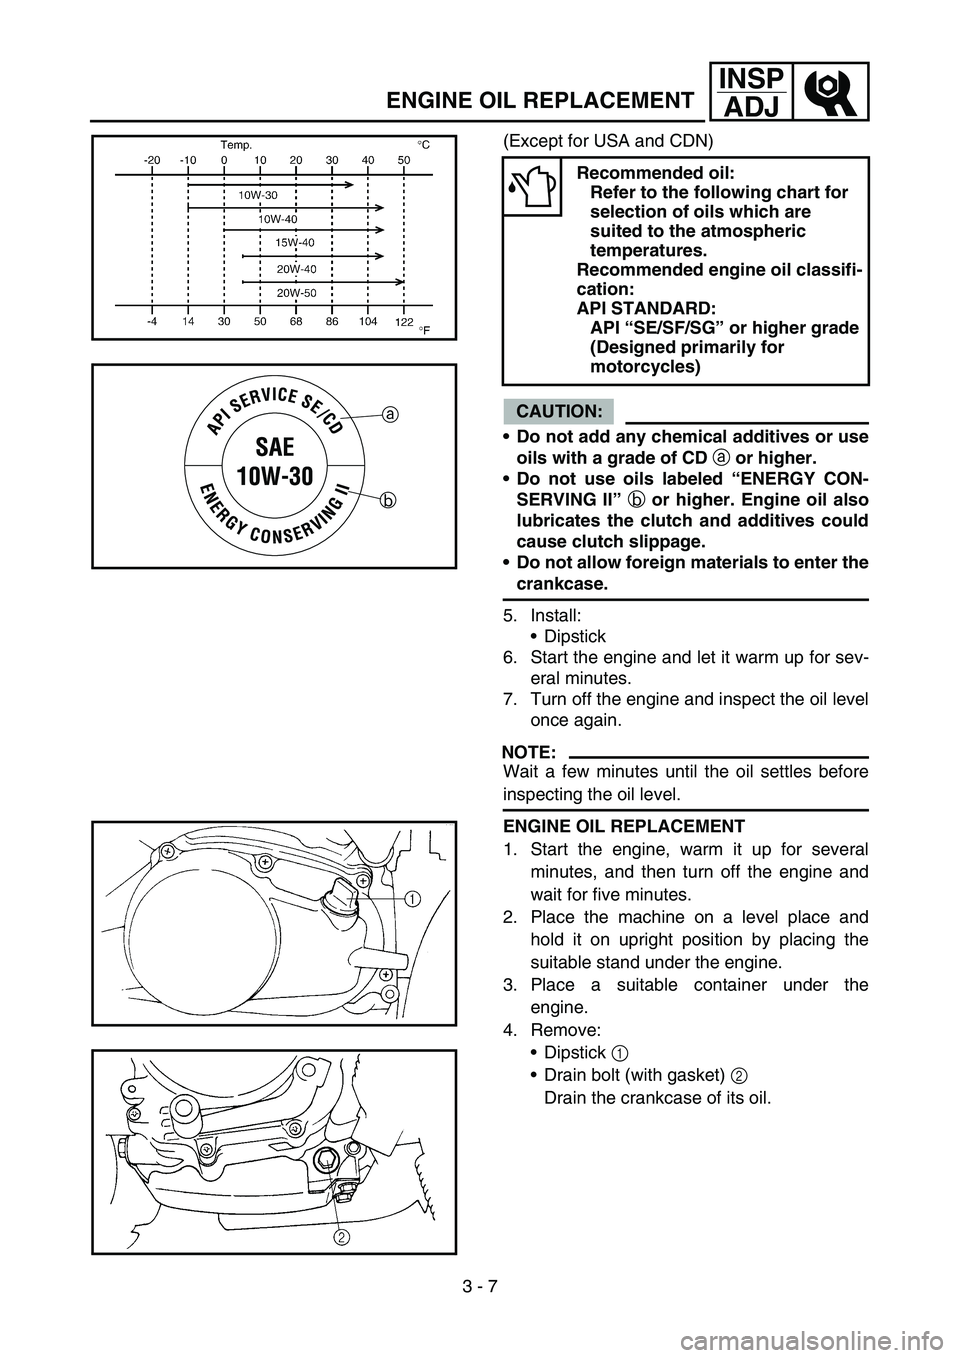
(Except for USA and CDN)
CAUTION:
Do not add any chemical additives or use
oils with a grade of CD
a or higher.
Do not use oils labeled “ENERGY CON-
SERVING II”
b or higher. Engine oil also
lubricates the clutch and additives could
cause clutch slippage.
Do not allow foreign materials to enter the
crankcase.
5. Install:
Dipstick
6. Start the engine and let it warm up for sev-
eral minutes.
7. Turn off the engine and inspect the oil level
once again.
NOTE:
Wait a few minutes until the oil settles before
inspecting the oil level.
Recommended oil:
Refer to the following chart for
selection of oils which are
suited to the atmospheric
temperatures.
Recommended engine oil classifi-
cation:
API STANDARD:
API “SE/SF/SG” or higher grade
(Designed primarily for
motorcycles)
a
b
ENGINE OIL REPLACEMENT
1. Start the engine, warm it up for several
minutes, and then turn off the engine and
wait for five minutes.
2. Place the machine on a level place and
hold it on upright position by placing the
suitable stand under the engine.
3. Place a suitable container under the
engine.
4. Remove:
Dipstick 1
Drain bolt (with gasket) 2
Drain the crankcase of its oil.