Page 185 of 413

03-13-06
Specifications
03-13-06
TORQUE LIMITS-FRONT SUSPENSION
LINCOLN CONTINENTAL
Description
Brace-Front Suspension to Sidemember (Model 74A Only)
Drag Strut
to
Strut Bracket Assembly
Lower Arm Assembly to Front Crossmember
-
(Attach Bracket)
Lower Arm Assembly to No. 2 Crossmember
Drag Strut
to
Lower Arm Assembly
Wheel Spindle to Lower Arm Ball Joint
Front Wheel Spindle to Upper Arm Ball Joint Assembly
Upper Arm Inner Shaft
to
Upper Arm
Upper Arm and Shaft Assembly to No. 2 Crossmember
Shock Absorber Bracket Assembly to No. 2 Crossmember Bracket
Shock Absorber Assembly to No. 2 Crossmember Assembly (Top End)
Shock Absorber Assembly Lower Arm Spring Seat Reinforcement Assembly
Upper Ball Joint
to
Control Arm
Stabilizer Bar Assembly
to
Underbody
Stabilizer Bar
to
Lower Arm
Jounce Bumper Assembly
to
Strut (Lower Arm)
Front Splash Shield to Spindle
Caliper to Spindle
FtLbs
90-110
70-90
55-75
110-140
70-90
70-90
55-75
25-35
100-125
40-55
20-30
20-30
21-29
20-30
5-10
22-28
9-14
100-140
TORQUE LIMITS-REAR SUSPENSION
FORD, MERCURY, METEOR
Description
Shock Absorber
to
Frame (Upper Attachment)
Upper Arm to Axle Bracket (Nut)
Track Bar to Axle Track Bar Stud
Track Bar Stud to Axle
Track Bar
to
Frame (Bolt Torque)
Track Bar Stud to Axle Bracket (Nut)
Wheel Lug Nut
Brake Backing Plate and Bearing Retainer to Axle-All Cars except those with 240
or
302 CID Engines
Brake Backing Plate and Bearing Retainer to Axle-All Cars with 240
or
302 CID Engines
Shock Absorber to Axle (Lower Attachment)
Bumper Assembly
to
Frame
Lower Arm to Axle-Bolt
Lower Arm to Axle-Nut
Upper Arm
to
Frame-BoU
Upper Arm
to
Frame-Nut
Lower Arm
to
Frame-Bolt
Lower Arm
to
Frame-Nut
Bumper Assembly to No. 4 Crossmember
Universal Joint
U-Bolt
Nut
Air Leveling Compressor
to
Apron
Height Control Valve to Bracket
Height Control Valve Bracket to No. 4 Crossmember
FtLbs
20-28
90-100
80-105
100-130
80-105
80-105
70-115
50-70
20-30
50-35
9-13
90-120
70-90
90-120
70-90
90-120
70-90
9-13
10-15
10-13
17-25
9-13procarmanuals.com
Page 186 of 413

03-13-07
Specifications
03-13-07
TORQUE LIMITS-REAR SUSPENSION
MONTEGO, FALCON, FAIR LANE, MUSTANG AND COUGAR
Description
Spring Shackle Bars to Body and Spring
Shock Absorber
to
Upper Mounting Bracket
Shock Absorber to Spring Clip Plate
Spring to Axle U-Bolt Nut
Wheel Lug Nut 5-Lug Wheel
Spring to Spring Front Hanger
•
Bolt
Spring to Spring Front Hanger
•
Nut
Universal Joint U-Bolt Nut -Std. Trans.
Universal Joint U-Bolt Nut -Auto. Trans.
Mont
ego,
Falcon, Fair lane
15-22
20-28
20-28
35-50
70-115
90-120
40-60
6-11
10-15
Mustang and Cougar
15-22
20-28
20-28
35-50
70-115
60-85
40-60
6-11
10-15
TORQUE LIMITS-REAR SUSPENSION
LINCOLN CONTINENTAL
Description
Brake Backing Plate Bearing Retainer to Axle
Spring Center Bolt
Spring Front Bracket Assembly to Rear Floor Sidemember Assembly
Spring Front Eye Stud and Washer Assembly to Spring Front Hanger Bracket
Spring U-Bolt
Spring Assembly
to
Spring Shackle Assembly
to
Spring Rear Bracket Assembly
to
Rear Floor Sidemember Assembly
Shock Absorber Upper Attaching Bracket
to
Body Crossmember
Shock Absorber Assembly
to
Shock Absorber Upper Attaching Bracket
Shock Absorber Assembly to Axle
Axle Bumper Bracket
to
Underbody
Pinion Bumper Assembly to Axle Carrier
Ft Lbs
30-55
15-20
70-90
76-106
45-65
34-59
34-59
40-67
20-30
20-28
30-45
10-15
18-25
TORQUE LIMITS-REAR SUSPENSION
THUNDERBIRD, CONTINENTAL.MARK
III
Description
Shock Absorber
to
Frame (Upper Attachment)
Upper Arm
to
Axle (Front)
Track Bar to Axle Track Bar Stud
Track Bar Stud to Axle
Track Bar
to
Frame (Bolt Torqe)
Wheel Lug Nut
Brake Backing Plate and Bearing Retainer
to
Axle
Shock Absorber to Axle (Lower Attachment)
Bumper Assembly to Frame
Lower Arm
to
Axle - Bolt
Lower Arm
to
Axle- Nut
Upper Arm
to
Frame -Bolt
Upper Arm
to
Frame
•
Nut
Lower Arm
to
Frame • Bolt
Lower Arm to Frame
-
Nut
Bumper Assembly to No. 4 Crossmember
Ft-Lbs
20-28
70-90
80-105
100-130
70-90
70-115
50-75
50-85
Self-Tapping
90-120
70-80
90-120
70-90
90-120
70-90
Self-Tappingprocarmanuals.com
Page 187 of 413

03-13-08
Specifications
03-13-08
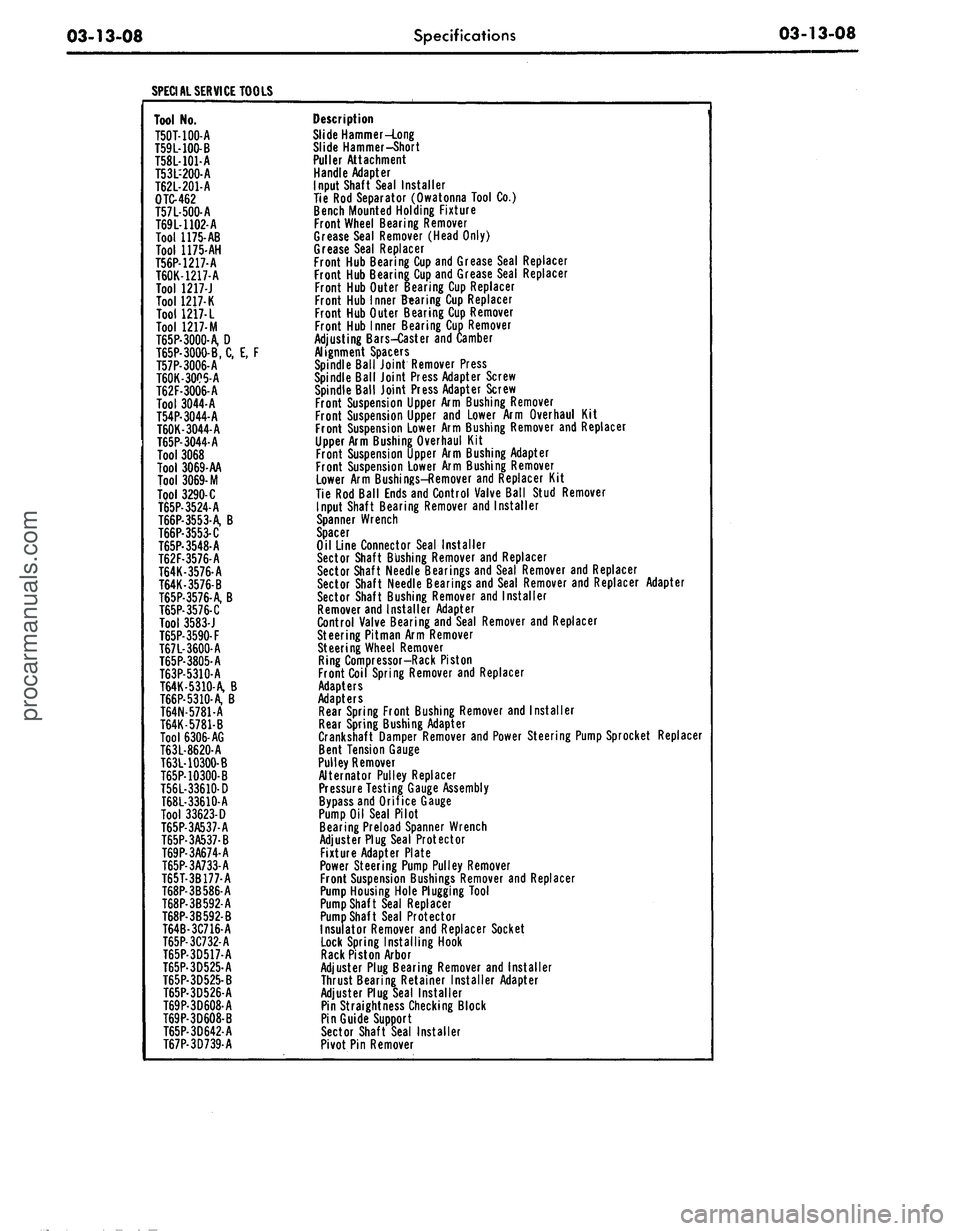
SPECIAL SERVICE TOOLS
Tool No.
T50T-100-A
T59L-100-B
T58L-101-A
T53L-200-A
T62L-201-A
OTC-462
T57L-500-A
T69L-1102-A
Tool 1175-AB
Tool 1175-AH
T56P-1217-A
T60K-1217-A
Tool 1217-J
Tool 1217-K
Tool
1217- L
Tool 1217-M
T65P-3000-A, D
T65P-3000-B, C, E, F
T57P-3006-A
T60K-3005-A
T62F-3006-A
Tool 3044-A
T54P-3044-A
T60K-3044-A
T65P-3044-A
Tool 3068
Tool 3069-AA
Tool
3069-
M
Tool 3290-C
T65P-3524-A
T66P-3553-A, B
T66P-3553-C
T65P-3548-A
T62F-3576-A
T64K-3576-A
T64K-3576-B
T65P-3576-A, B
T65P-3576-C
Tool 3583-J
T65P-3590-F
T67L-3600-A
T65P-3805-A
T63P-5310-A
T64K-5310-A, B
T66P-5310-A, B
T64N-5781-A
T64K-5781-B
Tool 6306-AG
T63L-8620-A
T63L-10300-B
T65P-10300-B
T56L-33610-D
T68L-33610-A
Tool 33623-D
T65P-3A537-A
T65P-3A537-B
T69P-3A674-A
T65P-3A733-A
T65T-3B177-A
T68P-3B586-A
T68P-3B592-A
T68P-3B592-B
T64B-3C716-A
T65P-3C732-A
T65P-3D517-A
T65P-3D525-A
T65P-3D525-B
T65P-3D526-A
T69P-3D608-A
T69P-3D608-B
T65P-3D642-A
T67P-3D739-A
Description
Slide Hammer-Long
Slide Hammer-Short
Puller Attachment
Handle Adapter
Input Shaft Seal Installer
Tie Rod Separator (Owatonna Tool Co.)
Bench Mounted Holding Fixture
Front Wheel Bearing Remover
Grease Seal Remover (Head Only)
Grease Seal Replacer
Front Hub Bearing Cup and Grease Seal Replacer
Front Hub Outer Bearing Cup Replacer
Front Hub Inner Bearing Cup Replacer
Front Hub Outer Bearing Cup Remover
Front Hub Inner Bearing Cup Remover
Adjusting Bars-Caster and Camber
Alignment Spacers
Spindle Ball Joint Remover Press
Spindle Ball Joint Press Adapter Screw
Front Suspension Upper Arm Bushing Remover
Front Suspension Upper and Lower Arm Overhaul Kit
Front Suspension Lower Arm Bushing Remover and Replacer
Upper Arm Bushing Overhaul Kit
Front Suspension Upper Arm Bushing Adapter
Front Suspension Lower Arm Bushing Remover
Lower Arm Bushings-Remover and Replacer Kit
Tie Rod Ball Ends and Control Valve Ball Stud Remover
Input Shaft Bearing Remover and Installer
Spanner Wrench
Spacer
Oil Line Connector Seal Installer
Sector Shaft Bushing Remover and Replacer
Sector Shaft Needle Bearings and Seal Remover and Replacer
Sector Shaft Needle Bearings and Seal Remover and Replacer Adapter
Sector Shaft Bushing Remover and Installer
Remover and Installer Adapter
Control Valve Bearing and Seal Remover and Replacer
Steering Pitman Arm Remover
Steering Wheel Remover
Ring Compressor-Rack Piston
Front Coil Spring Remover and Replacer
Adapters
Adapters
Rear Spring Front Bushing Remover and Installer
Rear Spring Bushing Adapter
Crankshaft Damper Remover and Power Steering Pump Sprocket Replacer
Bent Tension Gauge
Pulley Remover
Alternator Pulley Replacer
Pressure Testing Gauge Assembly
Bypass and Orifice Gauge
Pump Oil Seal Pilot
Bearing Preload Spanner Wrench
Adjuster Plug Seal Protector
Fixture Adapter Plate
Power Steering Pump Pulley Remover
Front Suspension Bushings Remover and Replacer
Pump Housing Hole Plugging Tool
Pump Shaft Seal Replacer
Pump Shaft Seal Protector
Insulator Remover and Replacer Socket
Lock Spring Installing Hook
Rack Piston Arbor
Adjuster Plug Bearing Remover and Installer
Thrust Bearing Retainer Installer Adapter
Adjuster Plug Seal Installer
Pin Straightness Checking Block
Pin Guide Support
Sector Shaft Seal Installer
Pivot Pin Removerprocarmanuals.com
Page 188 of 413

04-01-01
General Axle Service
04-01-01
GROUP
4
PART
4-1
PAGE
General Axle Service 04-01-01
PART 4-2
Rear Axle
—
Removable Carrier Type ... 04-02-01
PART
4-3
Rear Axle
—
Integral CarrierType
(Except Ford Light Duty WER) 04-03-01
PART 4-4
Rear Axle
—
Ford
Light-Duty (WER)
PART
4-5
Soecifications
PAGE
04-04-01
04-05-01
PART
4-1
General Axle Service
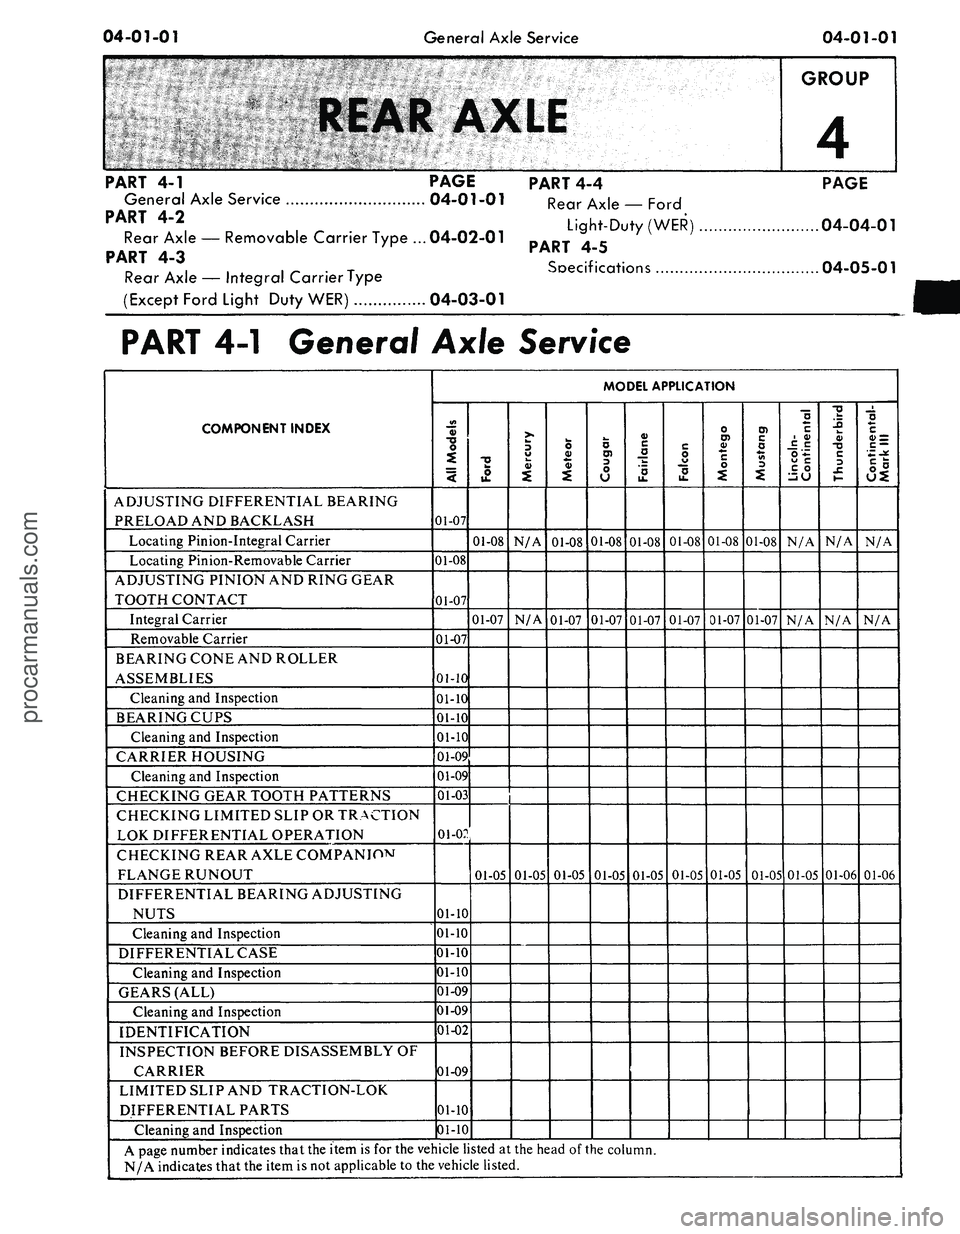
COMPONENT INDEX
ADJUSTING DIFFERENTIAL BEARING
PRELOAD AND BACKLASH
Locating Pinion-Integral Carrier
Locating Pinion-Removable Carrier
ADJUSTING PINION AND RING GEAR
TOOTH CONTACT
Integral Carrier
Removable Carrier
BEARING CONE AND ROLLER
ASSEMBLIES
Cleaning
and
Inspection
BEARING CUPS
Cleaning
and
Inspection
CARRIER HOUSING
Cleaning
and
Inspection
CHECKING GEAR TOOTH PATTERNS
CHECKING LIMITED SLIP
OR
TRACTION
LOK DIFFERENTIAL OPERATION
CHECKING REAR AXLE COMPANIOM
FLANGE RUNOUT
DIFFERENTIAL BEARING ADJUSTING
NUTS
Cleaning
and
Inspection
DIFFERENTIAL CASE
Cleaning
and
Inspection
GEARS (ALL)
Cleaning
and
Inspection
IDENTIFICATION
INSPECTION BEFORE DISASSEMBLY
OF
CARRIER
LIMITED SLIP AND TRACTION-LOK
DIFFERENTIAL PARTS
Cleaning
and
Inspection
MODEL APPLICATION
All
Models
01-07
01-08
01-07
01-07
01-10
01-10
01-10
01-10
01-09
01-09
01-03
01-02
01-10
01-10
01-10
01-10
01-09
01-09
01-02
01-09
01-10
01-10
Ford
01-08
01-07
01-05
Mercury
N/A
N/A
01-05
Meteor
01-08
01-07
01-05
Cougar
01-08
01-07
01-05
Fairlane
01-08
01-07
01-05
Falcon
01-08
01-07
01-05
Montego
01-08
01-07
01-05
Mustang
01-08
01-07
01-05
Lincoln-
Continental
N/A
N/A
01-05
Thunderbird
N/A
N/A
01-06
Continental-
Mark
III
N/A
N/A
01-06
A page number indicates that the item
is for
the vehicle listed
at the
head
of
the column.
N/A indicates that the item
is not
applicable
to
the vehicle listed.
procarmanuals.com
Page 189 of 413

04-01-02
General Axle Service
04-01-02
COMPONENT INDEX
MODEL APPLICATION
o
3
I
i
Ji
LUBRICANT LEVEL CHECK
01-10
PINION RETAINER
01-10
Cleaning and Inspection
01-10
SHIM AND BACKLASH CHANGES
01-03
Integral Carrier
Removable Carrier
01-04
N/A
01-04
01-04
01-04
01-04
01-04
01-04
N/A
N/A
N/A
U-JOINT FLANGE
01-10
Cleaning and Inspection
01-10
A page number indicates that the item is for the vehicle listed at the head of the column.
N/A indicates that the item is not applicable to the vehicle listed.
1
COMMON ADJUSTMENTS
AND
REPAIRS
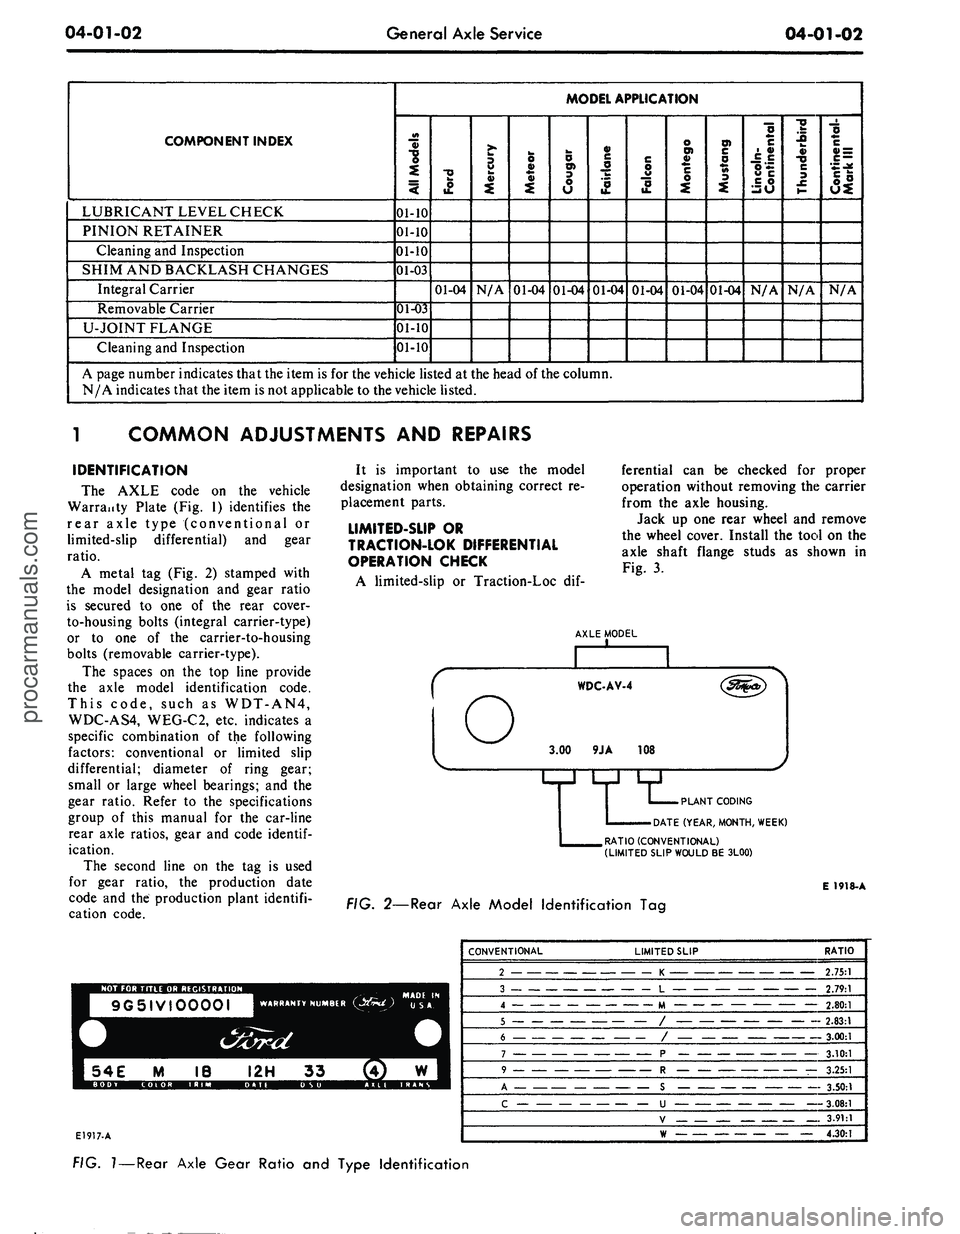
IDENTIFICATION
The AXLE code on the vehicle
Warranty Plate (Fig. 1) identifies the
rear axle type (conventional or
limited-slip differential) and gear
ratio.
A metal tag (Fig. 2) stamped with
the model designation and gear ratio
is secured to one of the rear cover-
to-housing bolts (integral carrier-type)
or to one of the carrier-to-housing
bolts (removable carrier-type).
The spaces on the top line provide
the axle model identification code.
This code, such as WDT-AN4,
WDC-AS4, WEG-C2, etc. indicates a
specific combination of the following
factors: conventional or limited slip
differential; diameter of ring gear;
small or large wheel bearings; and the
gear ratio. Refer to the specifications
group of this manual for the car-line
rear axle ratios, gear and code
identif-
ication.
The second line on the tag is used
for gear ratio, the production date
code and the production plant identifi-
cation code.
It is important to use the model
designation when obtaining correct re-
placement parts.
LIMITED-SUP
OR
TRACTION-LOK DIFFERENTIAL
OPERATION CHECK
A limited-slip or Traction-Loc dif-
ferential can be checked for proper
operation without removing the carrier
from the axle housing.
Jack up one rear wheel and remove
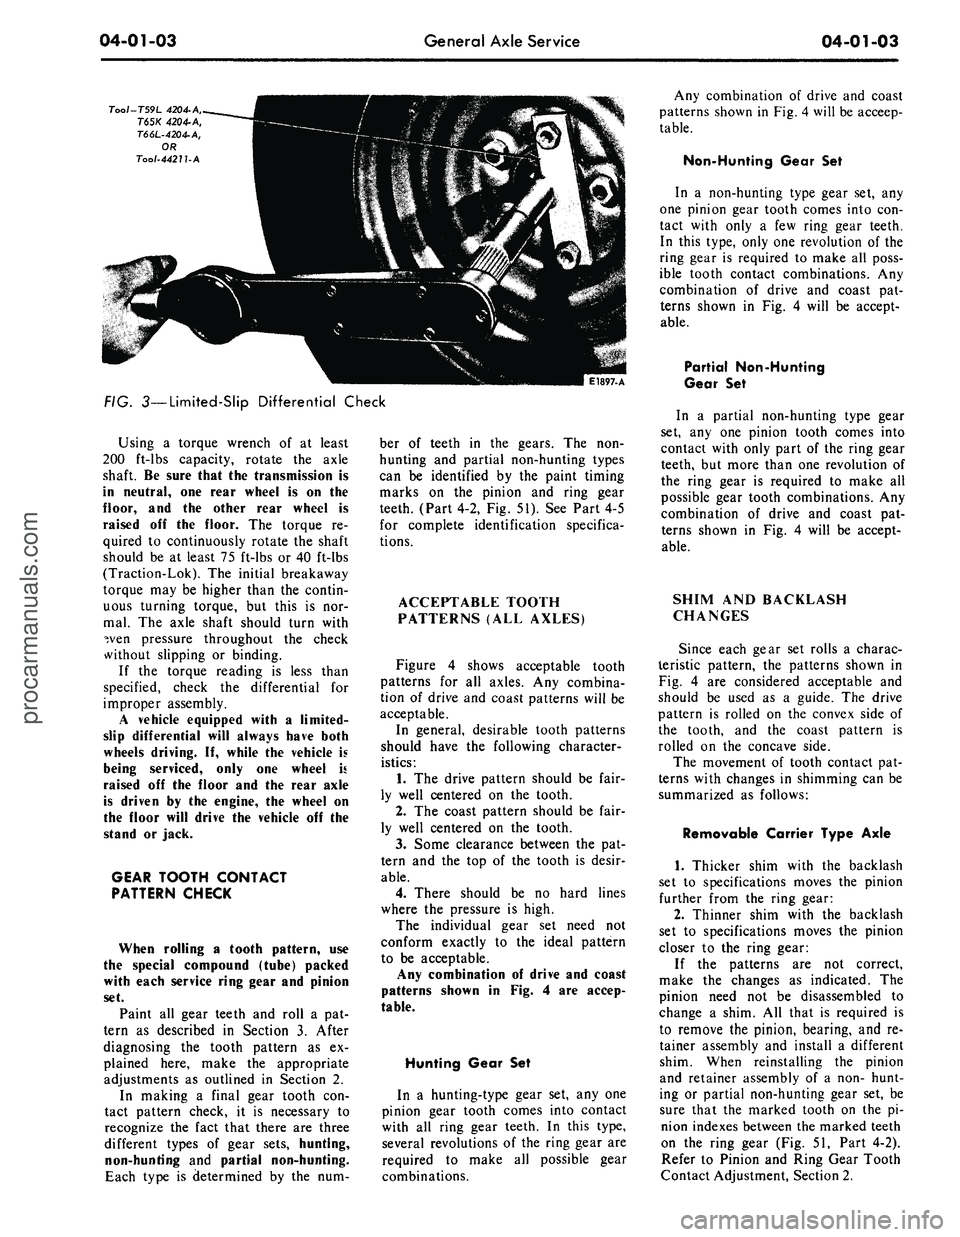
the wheel cover. Install the tool on the
axle shaft flange studs as shown in
Fig. 3.
AXLE MODEL
PLANT CODING
DATE (YEAR, MONTH, WEEK)
RATIO (CONVENTIONAL)
(LIMITED SLIP WOULD
BE
3L00)
E 1918-A
FIG.
2—Rear
Axle Model Identification
Tag
NOT
FOR
TITLE
OR
REGISTRATION
9G5IVI0000I
WARRANTY NUMBER
E1917-A
CONVENTIONAL
2
3
4
.
5
6
7
A
c
LIMITED SLIP
K
L
M
/
/
p
_ —
R
— —
c
—
u
V
RATIO
2.75:1
2.79:1
— 2.80:1
2.83:1
-
3.00:1
3.10:1
—
3.25:1
3.50:1
3.08:1
3.91:1
— 4.30:1
FIG.
1
— Rear Axle Gear Ratio
and
Type Identificationprocarmanuals.com
Page 190 of 413

04-01-03
General Axle Service
04-01-03
Tool-759L 4204-A,
T65K 4204-
A,
T66L-4204-A,
OR
Tool-44211-A
E1897-A
FIG. 3—Limited-Slip Differential Check
Using
a
torque wrench
of at
least
200 ft-lbs capacity, rotate
the
axle
shaft.
Be
sure that
the
transmission
is
in neutral,
one
rear wheel
is on the
floor,
and the
other rear wheel
is
raised
off the
floor.
The
torque
re-
quired
to
continuously rotate
the
shaft
should
be at
least
75
ft-lbs
or 40
ft-lbs
(Traction-Lok).
The
initial breakaway
torque
may
be
higher than
the
contin-
uous turning torque,
but
this
is nor-
mal.
The
axle shaft should turn with
^ven pressure throughout
the
check
without slipping
or
binding.
If
the
torque reading
is
less than
specified, check
the
differential
for
improper assembly.
A vehicle equipped with
a
limited-
slip differential will always have both
wheels driving.
If,
while
the
vehicle
is
being serviced, only
one
wheel
is
raised
off the
floor
and the
rear axle
is driven
by the
engine,
the
wheel
on
the floor will drive
the
vehicle
off the
stand
or
jack.
GEAR TOOTH CONTACT
PATTERN CHECK
When rolling
a
tooth pattern,
use
the special compound (tube) packed
with each service ring gear
and
pinion
set.
Paint
all
gear teeth
and
roll
a pat-
tern
as
described
in
Section
3.
After
diagnosing
the
tooth pattern
as ex-
plained here, make
the
appropriate
adjustments
as
outlined
in
Section
2.
In making
a
final gear tooth
con-
tact pattern check,
it is
necessary
to
recognize
the
fact that there
are
three
different types
of
gear sets, hunting,
non-hunting
and
partial non-hunting.
Each type
is
determined
by the num-
ber
of
teeth
in the
gears.
The non-
hunting
and
partial non-hunting types
can
be
identified
by the
paint timing
marks
on the
pinion
and
ring gear
teeth. (Part 4-2,
Fig. 51).
See
Part
4-5
for complete identification specifica-
tions.
ACCEPTABLE TOOTH
PATTERNS (ALL AXLES)
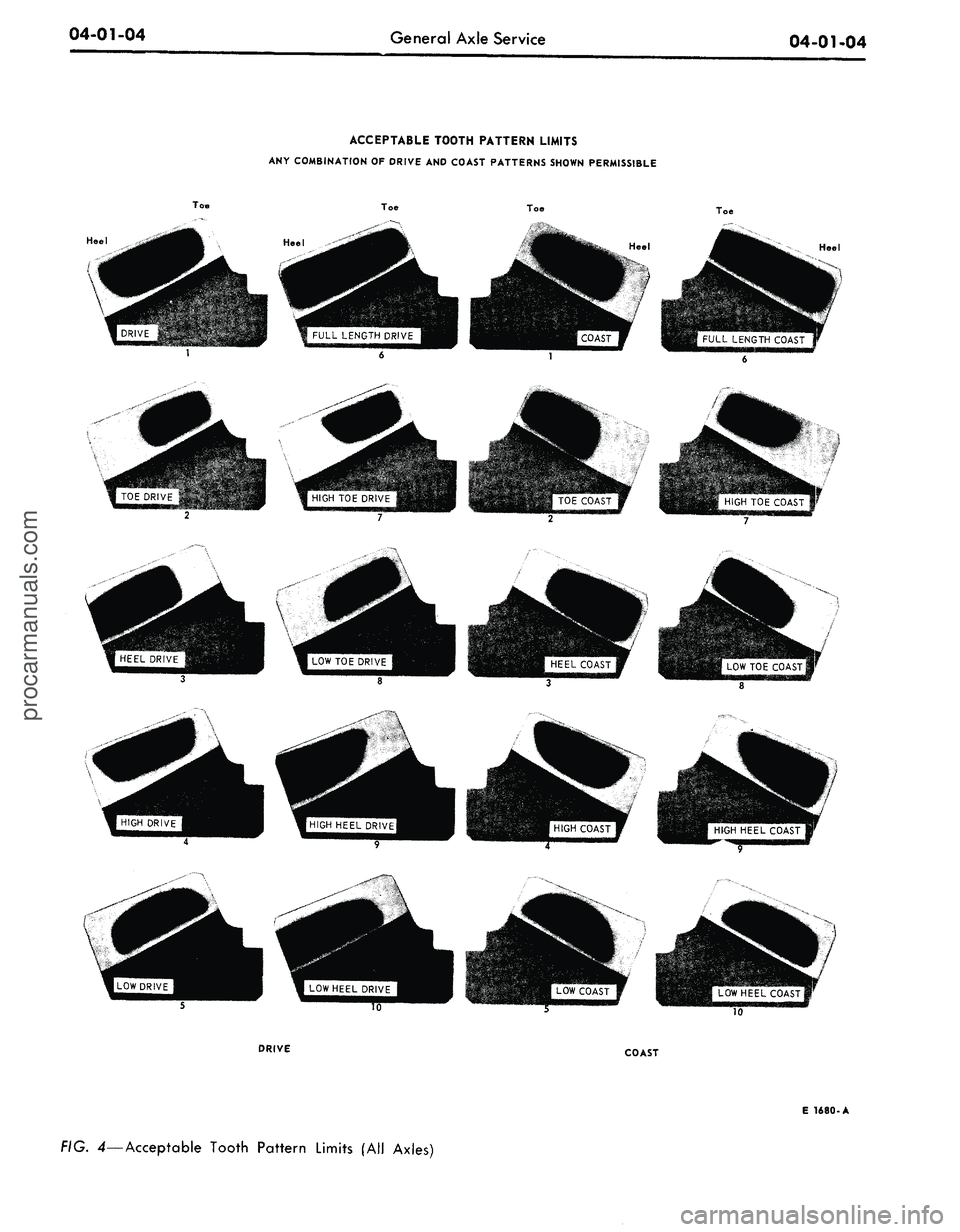
Figure
4
shows acceptable tooth
patterns
for all
axles.
Any
combina-
tion
of
drive
and
coast patterns will
be
acceptable.
In general, desirable tooth patterns
should have
the
following character-
istics:
1.
The
drive pattern should
be
fair-
ly well centered
on the
tooth.
2.
The
coast pattern should
be
fair-
ly well centered
on the
tooth.
3.
Some clearance between
the pat-
tern
and the top of the
tooth
is
desir-
able.
4.
There should
be no
hard lines
where
the
pressure
is
high.
The individual gear
set
need
not
conform exactly
to the
ideal pattern
to
be
acceptable.
Any combination
of
drive
and
coast
patterns shown
in Fig. 4 are
accep-
table.
Hunting Gear
Set
In
a
hunting-type gear
set, any one
pinion gear tooth comes into contact
with
all
ring gear teeth.
In
this type,
several revolutions
of
the
ring gear
are
required
to
make
all
possible gear
combinations.
Any combination
of
drive
and
coast
patterns shown
in
Fig.
4
will
be
acceep-
table.
Non-Hunting Gear
Set
In
a
non-hunting type gear
set, any
one pinion gear tooth comes into
con-
tact with only
a few
ring gear teeth.
In this type, only
one
revolution
of
the
ring gear
is
required
to
make
all
poss-
ible tooth contact combinations.
Any
combination
of
drive
and
coast
pat-
terns shown
in Fig. 4
will
be
accept-
able.
Partial Non-Hunting
Gear
Set
In
a
partial non-hunting type gear
set,
any one
pinion tooth comes into
contact with only part
of
the
ring gear
teeth,
but
more than
one
revolution
of
the ring gear
is
required
to
make
all
possible gear tooth combinations.
Any
combination
of
drive
and
coast
pat-
terns shown
in Fig. 4
will
be
accept-
able.
SHIM
AND
BACKLASH
CHANGES
Since each gear
set
rolls
a
charac-
teristic pattern,
the
patterns shown
in
Fig.
4 are
considered acceptable
and
should
be
used
as a
guide.
The
drive
pattern
is
rolled
on the
convex side
of
the tooth,
and the
coast pattern
is
rolled
on the
concave side.
The movement
of
tooth contact
pat-
terns with changes
in
shimming
can
be
summarized
as
follows:
Removable Carrier Type Axle
1.
Thicker shim with
the
backlash
set
to
specifications moves
the
pinion
further from
the
ring gear:
2.
Thinner shim with
the
backlash
set
to
specifications moves
the
pinion
closer
to the
ring gear:
If
the
patterns
are not
correct,
make
the
changes
as
indicated.
The
pinion need
not be
disassembled
to
change
a
shim.
All
that
is
required
is
to remove
the
pinion, bearing,
and re-
tainer assembly
and
install
a
different
shim. When reinstalling
the
pinion
and retainer assembly
of a
non-
hunt-
ing
or
partial non-hunting gear
set, be
sure that
the
marked tooth
on the pi-
nion indexes between
the
marked teeth
on
the
ring gear
(Fig.
51,
Part
4-2).
Refer
to
Pinion
and
Ring Gear Tooth
Contact Adjustment, Section
2.procarmanuals.com
Page 191 of 413
04-01-04
General Axle Service
04-01-04
ACCEPTABLE TOOTH PATTERN LIMITS
ANY COMBINATION
OF
DRIVE AND COAST PATTERNS SHOWN PERMISSIBLE
Toe
Toe
Toe
Toe
Heel
Heel
LOW HEEL COAST
MM
DRIVE
COAST
FIG. 4—Acceptable Tooth Pattern Limits
(All
Axles)
E 1680-Aprocarmanuals.com
Page 192 of 413

04-01-05
General Axle Service
04-01-05
Integral Carrier Type Axle
1.
Thinner shim with
the
backlash
set
to
specifications moves
the
pinion
farther from
the
ring gear.
2.
Thicker shim with
the
backlash
set
to
specifications moves
the
pinion
closer
to the
ring gear.
If
the
patterns
are not
correct,
make
the
changes
as
indicated.
The
differential case
and
drive pinion will
have
to be
removed from
the
carrier
casting
to
change
a
shim. When
re-
installing
the
pinion
and
ring gear
of a
non-hunting
or
partial non-hunting
gear
set, be
sure that
the
marked
tooth
on the
pinion indexes between
the marked teeth
on the
ring gear
(Fig.
51,
Part
4-2).
Refer
to
Pinion
and Ring Gear Tooth Contact Adjust-
ment, Section
2.
REAR AXLE COMPANION
FLANGE RUNOUT CHECK
ALL AXLES EXCEPT
THUNDERBIRD
AND
CONTINENTAL MARK
III
1.
Raise
the
vehicle
on a
hoist that
supports
the
rear axle (twin-post
hoist).
2.
Remove
the
driveshaft assembly
(Group
5).
3.
Check
the
companion flange
damage
to the
universal joint bearing
locating lugs.
If the
universal joint
bearing locating lugs
on the
compan-
ion flange
are
shaved (worn)
or dam-
aged, replace
the
companion flange
(Fig.
5).
PROPERLY SEATED
CUP SHAVES LUG
E 1621-A
FIG. 5—Checking Companion
Flange
4.
The
rear axle companion flange
runout
is
checked with
a
modified uni-
versal joint (checking tool)
a
dial indi-
cator with
1.000
inch minimum travel,
and
a
cup-shaped dial indicator adapt-
er tool
(Fig. 6). To
fabricate
the
checking tool, modify
a
universal joint
assembly
by
removing
two
bearing
cups that are opposite each other, and
cuttting
or
grinding
off
one
of
the uni-
versal joint bearing flanges (Fig. 6).
5.
Install
the
cup-shaped adapter
on
the dial indicator stem. Install
the
dial
indicator
on the
pinion retainer
or pi-
nion nose bumper bracket. Position
the indicator
to
allow
an
indication
at
the ends
of the
universal joint bearing
cups
and the
remaining exposed jour-
nal
of the
cross-shaft.
6. Turn
the
companion flange
so
that
the
dial indicator cup-type adapt-
er rests
on the
machined surface
of
the bearing
cup (Fig. 6).
Rotate
the
companion flange side-to-side slightly
to obtain
a
reading indicating that
the
bearing
cup
surface
is
perpendicular
to
the indicator cup-type adapter. This
will
be the
point
at
which
the
dial
in-
dicator
cup is
closest
to the
center
of
companion flange rotation.
It is
also
the point
at
which
the
dial indicator
hand will reverse direction
as
the com-
panion flange
is
turning.
Set the
dial
indicator
to
zero.
oo/-6565,
Used
'With Bracket From
Too!-4201-C
MOUNT HERE
Tool-4201-C
E
1622-
A
FIG. 6—Flange Bearing
Cup
Run-out Check—Typical
7.
Carefully retract
the
dial indica-
tor stem
and
rotate
the
companion
flange 180 degrees
to
position
the ma-
chined surface
of the
opposite univer-
sal bearing under
the
dial indicator
adapter tool. Again, slightly rotate
the
flange side-to-side
to
position
the
bearing perpendicular
to the
dial indi-
cator adapter. Again, this
is the
point
at which
the
indicator hand will
rev-
erse direction
as the
flange
is
rotated.
Record
the
flange bearing
cup
runout
reading obtained from
the
indicator
(Fig.
7).
Rotate
the
companion flange
90
degrees
and
position
the
dial indicator
adapter
on the
machined
end of the
exposed journal
(Fig. 8). Be
sure
the
end surface
of the
exposed journal
is
perpendicular
to the
indicator
cup-
type adapter. This requires that
the
cross-shaft
be
moved fore
and aft on
the flange bearing cups. Note
the
point
at
which
the
indicator hand rev-
erses direction. Rotate
the
flange
as-
sembly side-to-side until
the
cross-
shaft
is
perpendicular
to the
pinion
shaft axis,
and the
indicator hand
re-
verses direction. Zero the dial indicator
and check the zero point again by
Tool-6565, Used
With Bracket
Fro
Tool-4201 -C
MOUNT HERE —
Too/-4207-C
E 1624-A
FIG. 8—Cross Shaft Runout
Check—Typical
INDICATOR
READING
1
2
3
Average
FLANGE
BEARING CUP
RUNOUT—INCH
0.C04
0.002
0.003
0.003
DRIVESHAFT UNIVERSAL
CROSS-SHAFT
RUNOUT—INCH
0.005
0.004
0.003
0.004
FIG. 7—Flange Bearing
Cup and
Cross Shaft Runout Averaging
Chart—Typical Readingsprocarmanuals.com