2006 LAND ROVER FRELANDER 2 key
[x] Cancel search: keyPage 2503 of 3229
Publi s hed: 11-May-2011
Body Repairs - General Information - Body Repairs
Des cript ion and Operat ion
General Information
Introduction
The body plays a s ignificant role in the i ncreas i ng trend of ever more rapi dl y changing model vari ant s . The differentcus t omer groups are s t rongly i nfl uenced by t he des i gn and s hape of t he body. At t he s ame t ime the s t abi li ty of t he bodyplays t he mos t important part i n ensuring pas senger and driver s afet y. Light weight cons truct ion, alt ernat ive mat erial s,compos i te materi als , plas ti cs and appropriat e joi ning proces ses are all des ign feat ures t hat charact eris e modern LandRover vehicle bodies .
In terms of manufacturing t echnology, modern s afet y cell bodi es can be produced al mos t wit hout any probl ems . LandRover guarant ee high qualit y s t andards by ens uri ng t hat mechanical s t rength propert ies are tried and t es ted i n numerouscomput er s imulat ions , crash tes t s, by t es ti ng materials and by employing s ophi s ti cated manufacturing t echnologies . In theevent of repai rs i t is vi tal t hat t he producti on qual it y s tandards are uphel d. This requires a well -equipped works hop, andplaces part icul ar emphas is on the qual ifi cat ions of t he works hop technicians. Up-to-date knowledge of currentmanufacturing t echnologies and conti nuous t rai ni ng on new repai r met hods and t echniques are vit al for high-quali ty bodyrepairs . The model -s peci fi c repair manuals and the general repair t echni ques provi de val uabl e s upport when undertakingbody repairs.
Always follow the repair ins t ructi ons publi s hed in t his manual. Fail ure t o obs erve this i nst ructi on can res ult i n s eri ousimpai rment of vehi cle s afet y. Al l s pecified s afet y requi rements must be met aft er the work has been carri ed out.
Vehicle design
T he body
The Freelander 2 body is manufact ured l ike a convent ional monocoque. Two monos i des are welded t o t he floor, roof andbulkheads , creati ng a s t rong, si ngl e s truct ure. Dual Phas e (DP), and Bake Hardened (BH), s t eel s are us ed i n t he s ide panelrei nforcements . DP s t eel i s als o us ed for t he rear of t he front si de member, for added st rength in front and s ide impacts .The roof s truct ure can accommodate a roof openi ng panel . W hen a s unroof is not fit ted, t he outer roof panel i s a s i ngl elarge s teel pres si ng wi th s t yled s wages to add st rengt h and prevent boomi ng.
The s afety of the driver and the pas s engers is paramount for every body des ign. There are two key safety as pect sin the body:
Safet y pas s enger cellCrumpl e zones
Safet y pas s enger cell
Stable pill ars , rocker panel and door profil es.Side i mpact protecti on in the doors .Doors are desi gned to open even i n t he event of ext reme deformati on.
Crumpl e zone
Dynamic abs orpti on of deforming forces .Prot ect ion of t he pass enger cell .
Vehicle Design
Page 2723 of 3229

Contents
3
R
Quick start
QUICK START ................................................... 7
Filling station information
FILLING STATION INFORMATION................... 33
Introduction
SYMBOLS GLOSSARY .................................... 35
LABEL LOCATIONS ......................................... 35
HEALTH AND SAFETY ..................................... 36
DATA RECORDING.......................................... 37
DISABILITY MODIFICATIONS ......................... 37
PARTS AND ACCESSORIES ............................ 37
Keys and remote controls
USING THE KEY .............................................. 40
GENERAL INFORMATION ON RADIO
FREQUENCIES ................................................ 40
USING THE REMOTE CONTROL ..................... 41
Locks
LOCKING AND UNLOCKING ............................ 44
Alarm
ARMING THE ALARM ..................................... 45
DISARMING THE ALARM ............................... 46
Seats
SITTING IN THE CORRECT POSITION ............ 47
MANUAL SEATS ............................................. 48
ELECTRIC SEATS ............................................ 49
HEAD RESTRAINTS ........................................ 51
REAR SEATS................................................... 51
HEATED SEATS............................................... 53
Seat belts
PRINCIPLE OF OPERATION ............................ 54
SEAT BELT REMINDER ................................... 55
FASTENING THE SEAT BELTS ........................ 56
SEAT BELT HEIGHT ADJUSTMENT................. 56
USING SEAT BELTS DURI NG PREGNANCY .... 57
Supplementary restraints system
PRINCIPLE OF OPERATION ............................ 58
AIRBAG WARNING LAMP ............................... 61
DISABLING THE PASSENGER AIRBAG ........... 62
AIRBAG SERVICE INFORMATION ................... 63
Child safety
CHILD SEATS ................................................. 64
BOOSTER CUSHIONS ..................................... 66
ISOFIX ANCHOR POINTS................................ 67
CHILD SAFETY LOCKS ................................... 69
Steering wheel
ADJUSTING THE STEERING WHEEL .............. 70
AUDIO CONTROL ........................................... 70
Lighting
LIGHTING CONTROL ...................................... 72
FRONT FOG LAMPS........................................ 72
REAR FOG LAMPS.......................................... 73
ADJUSTING THE HEADLAMPS....................... 73
HEADLAMP LEVELLING ................................. 73
HAZARD WARNING FLASHERS...................... 74
ADAPTIVE FRONT LIGHTING SYSTEM (AFS) . 74
DIRECTION INDICATORS ............................... 75
INTERIOR LAMPS .......................................... 76
APPROACH LAMPS ........................................ 76
CHANGING A BULB ........................................ 77
BULB SPECIFICATION CHART ........................ 86
Wipers and washers
WINDSCREEN WIPERS .................................. 87
RAIN SENSOR ................................................ 87
WINDSCREEN WASHERS............................... 88
HEADLAMP WASHERS................................... 88
REAR WINDOW WIPER AND WASHERS ........ 89
ADJUSTING THE WINDSCREEN WASHER JETS .
89
CHECKING THE WIPER BLADES .................... 90
CHANGING THE WIPER BLADES.................... 90
Windows and mirrors
ELECTRIC WINDOWS ..................................... 93
EXTERIOR MIRRORS ..................................... 94
ELECTRIC EXTERIOR MIRRORS .................... 95
INTERIOR MIRROR ........................................ 96
Instruments
INSTRUMENT PANEL OVERVIEW .................. 97
Information displays
TRIP COMPUTER ........................................... 99
INFORMATION MESSAGES ............................ 99
Page 2727 of 3229
7
Quick start
R
Quick startQUICK START
Remote control
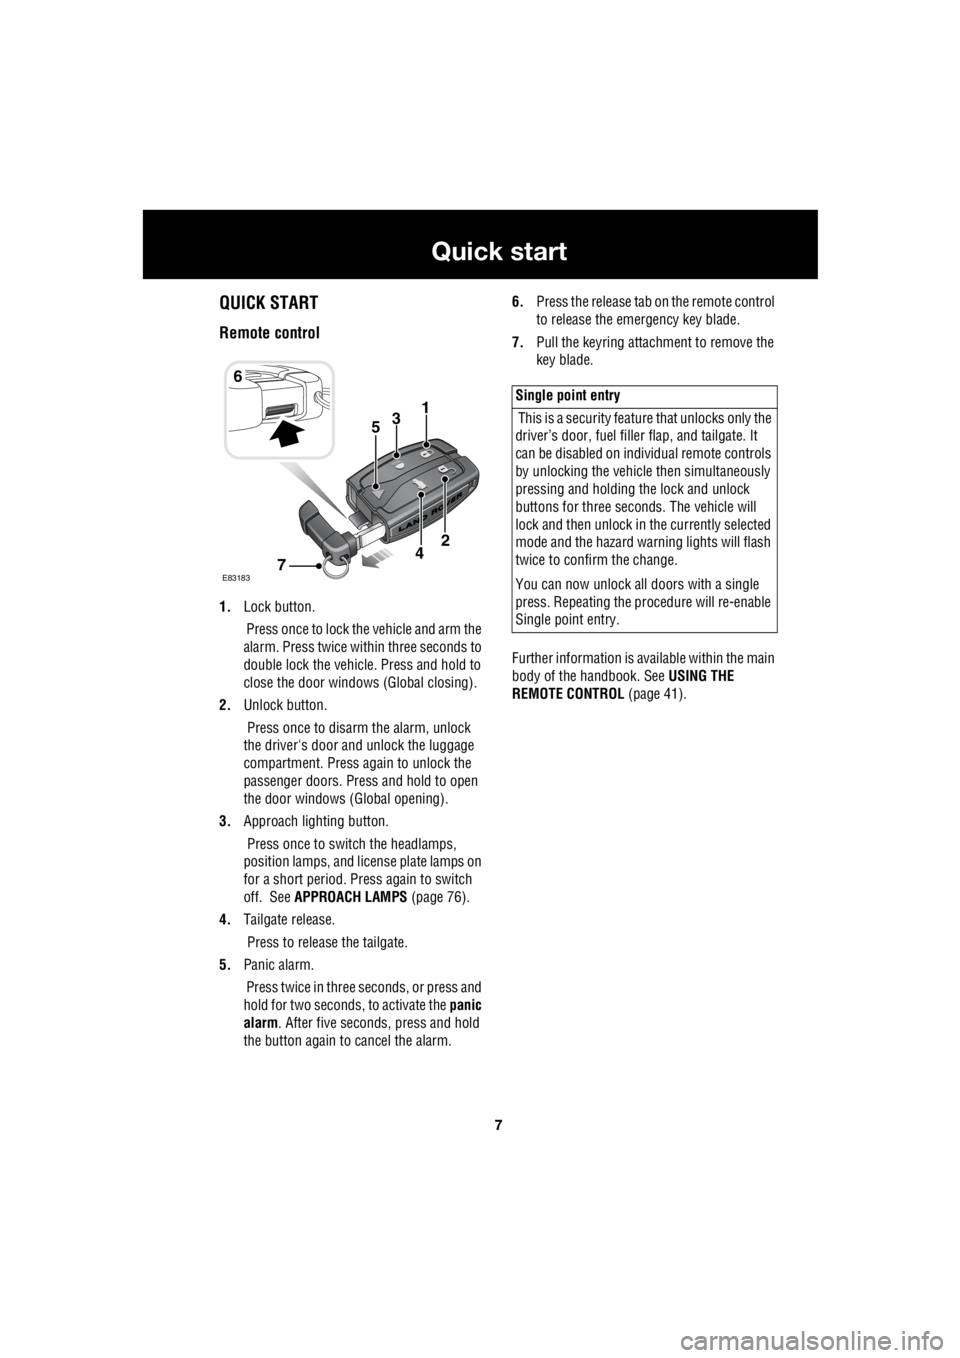
1. Lock button.
Press once to lock the vehicle and arm the
alarm. Press twice within three seconds to
double lock the vehicle. Press and hold to
close the door windows (Global closing).
2. Unlock button.
Press once to disarm the alarm, unlock
the driver's door and unlock the luggage
compartment. Press again to unlock the
passenger doors. Press and hold to open
the door windows (Global opening).
3. Approach lighting button.
Press once to switch the headlamps,
position lamps, and license plate lamps on
for a short period. Press again to switch
off. See APPROACH LAMPS (page 76).
4. Tailgate release.
Press to release the tailgate.
5. Panic alarm.
Press twice in three seconds, or press and
hold for two seconds, to activate the panic
alarm . After five seconds, press and hold
the button again to cancel the alarm. 6.
Press the release tab on the remote control
to release the emergency key blade.
7. Pull the keyring attachment to remove the
key blade.
Further information is available within the main
body of the handbook. See USING THE
REMOTE CONTROL (page 41).
6
31
E83183
2
74
5
Single point entry
This is a security feature that unlocks only the
driver’s door, fuel fille r flap, and tailgate. It
can be disabled on indi vidual remote controls
by unlocking the vehicle then simultaneously
pressing and holding th e lock and unlock
buttons for three sec onds. The vehicle will
lock and then unlock in the currently selected
mode and the hazard wa rning lights will flash
twice to confirm the change.
You can now unlock all doors with a single
press. Repeating the pr ocedure will re-enable
Single point entry.
Page 2733 of 3229
13
Quick start
R
Seat belts and Child restraints
A warning indicator on the
instrument pack will illuminate to
alert you that the driver's or front
passenger's seat be lt is unbuckled.
Child seats
It is important to remember that the child's
weight, rather than age, determines the type of
seat that is required. See CHILD SEATS
(page 64).
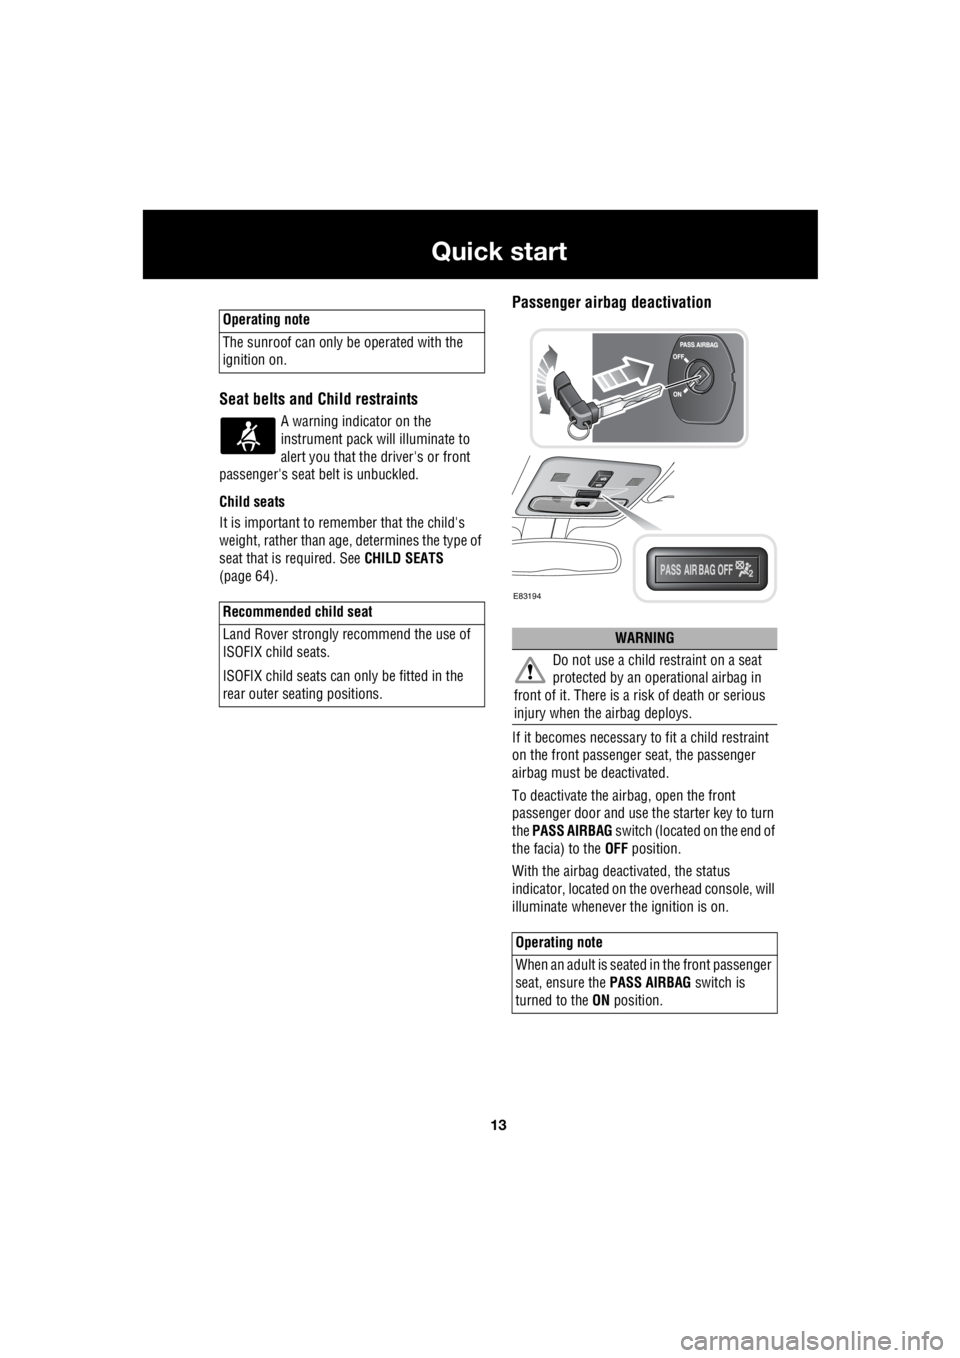
Passenger airbag deactivation
If it becomes necessary to fit a child restraint
on the front passenger seat, the passenger
airbag must be deactivated.
To deactivate the airbag, open the front
passenger door and use the starter key to turn
the PASS AIRBAG switch (located on the end of
the facia) to the OFF position.
With the airbag deactivated, the status
indicator, located on the overhead console, will
illuminate whenever the ignition is on.
Operating note
The sunroof can only be operated with the
ignition on.
Recommended child seat
Land Rover strongly recommend the use of
ISOFIX child seats.
ISOFIX child seats can only be fitted in the
rear outer seating positions.
WARNING
Do not use a child restraint on a seat
protected by an oper ational airbag in
front of it. There is a ri sk of death or serious
injury when the airbag deploys.
Operating note
When an adult is seated in the front passenger
seat, ensure the PASS AIRBAG switch is
turned to the ON position.
E83194
Page 2752 of 3229
32
Quick start
L
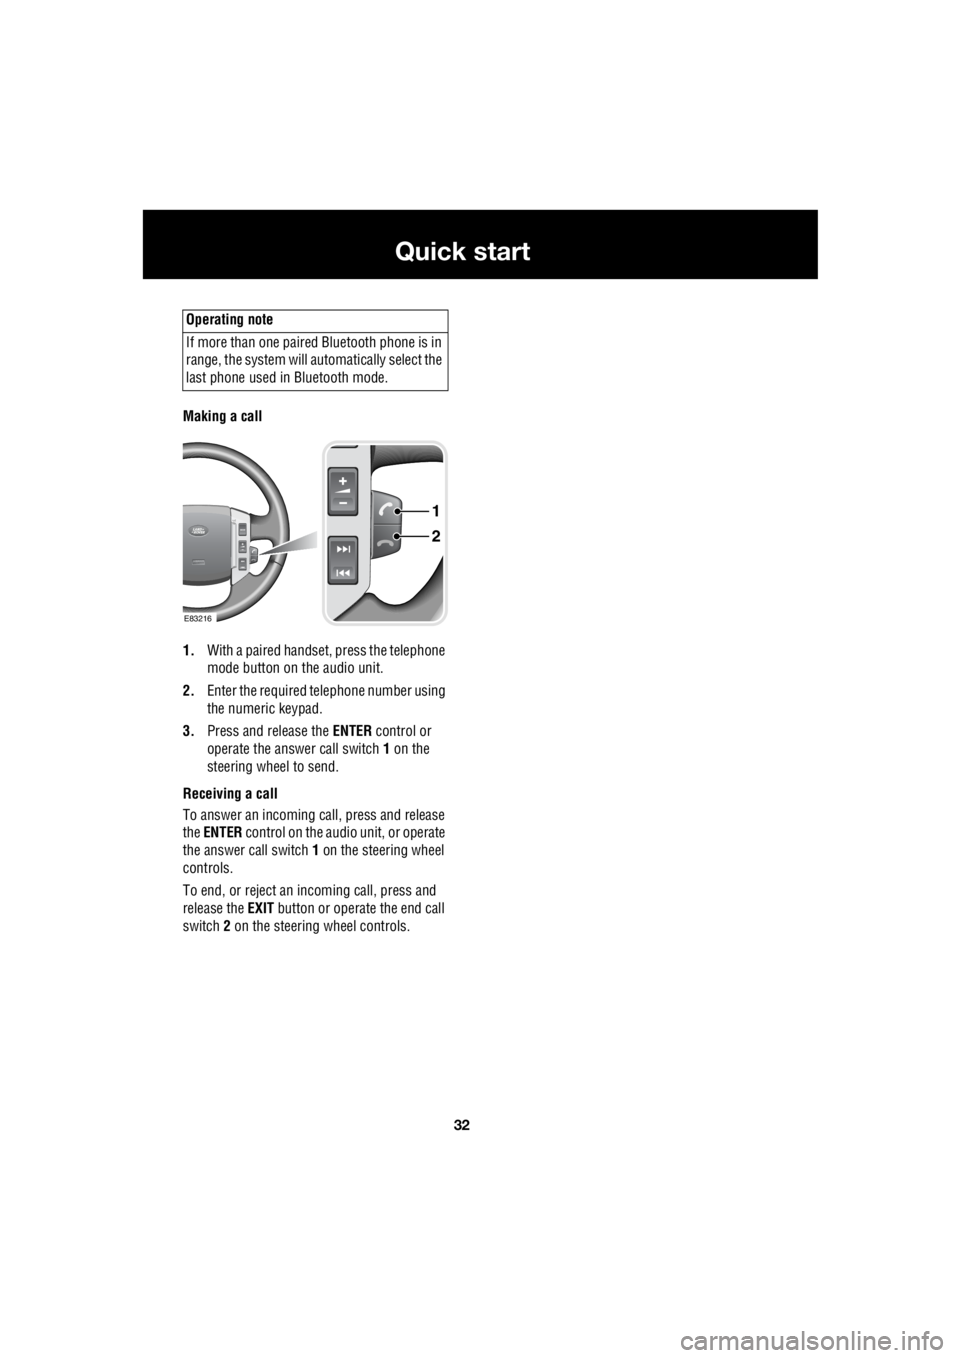
Making a call
1. With a paired handset, press the telephone
mode button on the audio unit.
2. Enter the required te lephone number using
the numeric keypad.
3. Press and release the ENTER control or
operate the answer call switch 1 on the
steering wheel to send.
Receiving a call
To answer an incoming call, press and release
the ENTER control on the audio unit, or operate
the answer call switch 1 on the steering wheel
controls.
To end, or reject an incoming call, press and
release the EXIT button or operate the end call
switch 2 on the steering wheel controls.
Operating note
If more than one paired Bluetooth phone is in
range, the system will automatically select the
last phone used in Bluetooth mode.
1
2
E83216
Page 2760 of 3229
Keys and remote controls
40
L
Keys and remote controlsUSING THE KEY
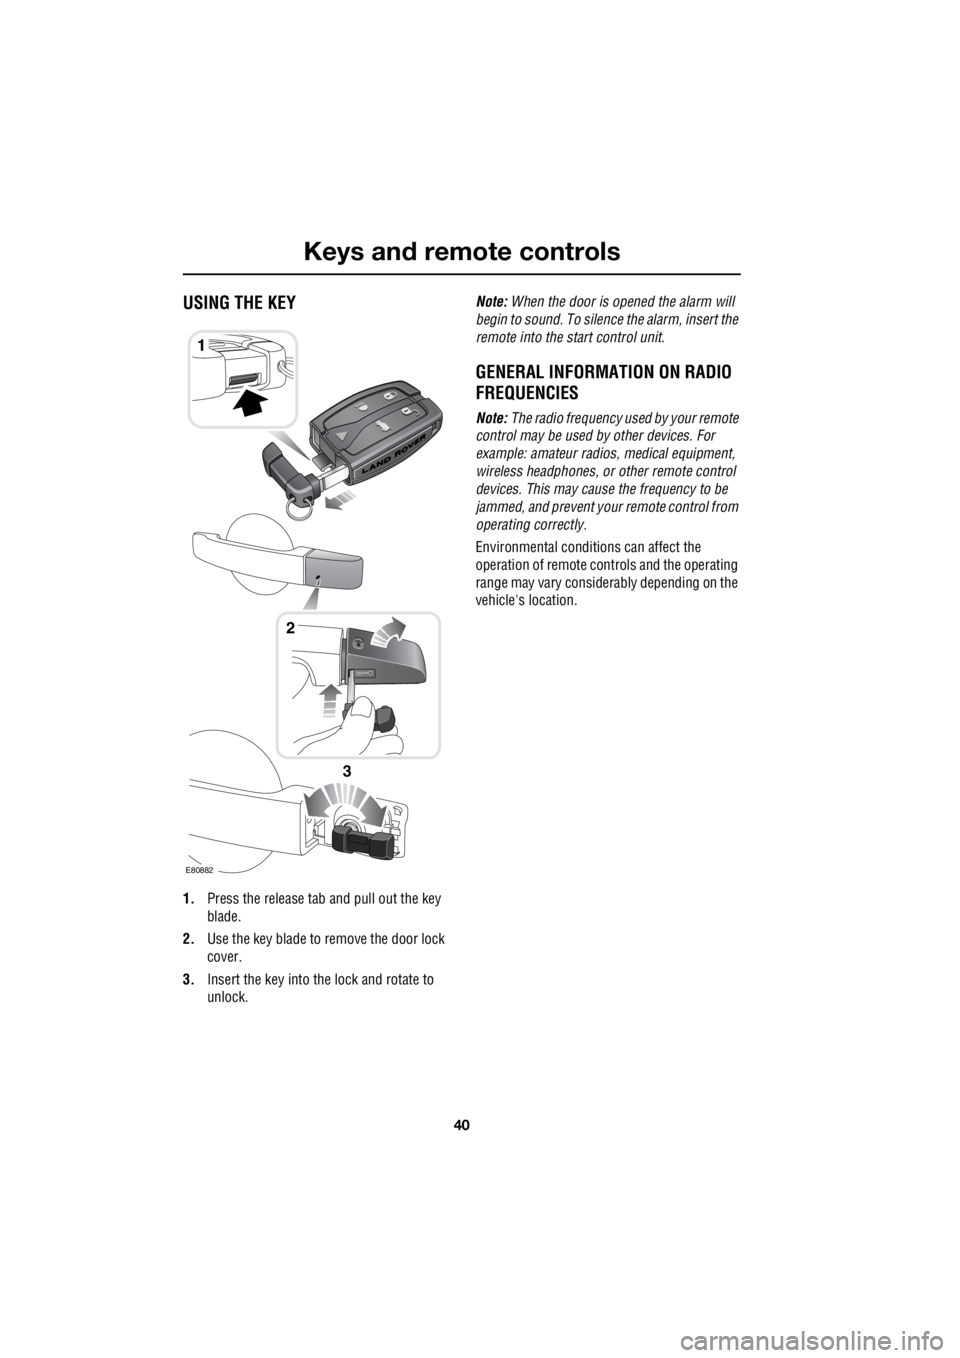
1. Press the release tab and pull out the key
blade.
2. Use the key blade to remove the door lock
cover.
3. Insert the key into the lock and rotate to
unlock. Note:
When the door is opened the alarm will
begin to sound. To silenc e the alarm, insert the
remote into the start control unit.
GENERAL INFORMATION ON RADIO
FREQUENCIES
Note: The radio frequency used by your remote
control may be used by other devices. For
example: amateur radios , medical equipment,
wireless headphones, or other remote control
devices. This may cause the frequency to be
jammed, and prevent your remote control from
operating correctly.
Environmental conditions can affect the
operation of remote cont rols and the operating
range may vary considerably depending on the
vehicle's location.
1
E80882
2
3
Page 2761 of 3229
41
Keys and remote controls
R
USING THE REMOTE CONTROL
Remote control
Note: The operational range of the remote
control will vary considerably depending on
atmospheric conditions and interference from
other transmitting devices.
The vehicle is supplied with two remote
controls, but up to six can be programmed to
the vehicle at any one time.
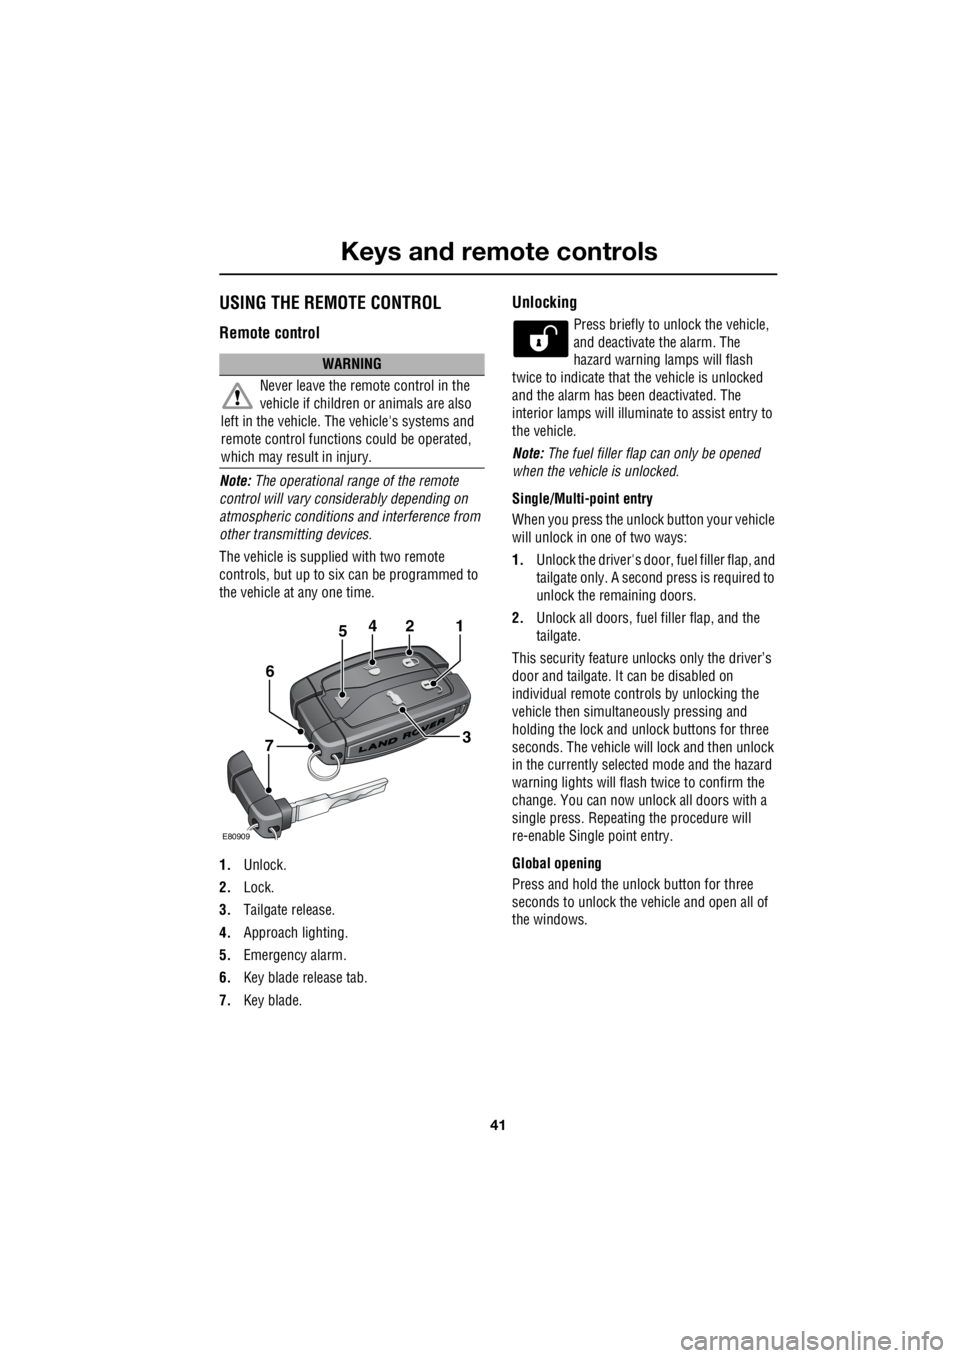
1. Unlock.
2. Lock.
3. Tailgate release.
4. Approach lighting.
5. Emergency alarm.
6. Key blade release tab.
7. Key blade.
Unlocking
Press briefly to unlock the vehicle,
and deactivate the alarm. The
hazard warning lamps will flash
twice to indicate that the vehicle is unlocked
and the alarm has been deactivated. The
interior lamps will illuminate to assist entry to
the vehicle.
Note: The fuel filler flap can only be opened
when the vehicle is unlocked.
Single/Multi- point entry
When you press the unlock button your vehicle
will unlock in one of two ways:
1. Unlock the driver's door, fuel filler flap, and
tailgate only. A second press is required to
unlock the remaining doors.
2. Unlock all doors, fuel filler flap, and the
tailgate.
This security feature unlocks only the driver’s
door and tailgate. It can be disabled on
individual remote controls by unlocking the
vehicle then simultaneously pressing and
holding the lock and unlock buttons for three
seconds. The vehicle will lock and then unlock
in the currently selected mode and the hazard
warning lights will flas h twice to confirm the
change. You can now unlock all doors with a
single press. Repeating the procedure will
re-enable Single point entry.
Global opening
Press and hold the unlock button for three
seconds to unlock the ve hicle and open all of
the windows.
WARNING
Never leave the remote control in the
vehicle if children or animals are also
left in the vehicle. The vehicle's systems and
remote control functions could be operated,
which may result in injury.
2
E80909
451
3
6
7
Page 2762 of 3229
Keys and remote controls
42
L
Single and double locking
The vehicle can be locked in two ways.
Single locking
Single locking secures the vehicle and prevents
the doors being opened from outside of the
vehicle. The doors can be unlocked and opened
from inside the vehicle.
Double locking
Double locking secures the vehicle and
prevents the doors being opened from inside
or outside of the vehicle. The doors can not be
unlocked or opened from inside the vehicle.
This provides additional security if the vehicle
is left unattended. The vehicle cannot be
opened by breaking a window and operating
the door locks from inside the vehicle.
Locking
Press briefly to single lock the
vehicle, and partially activate the
alarm. The hazard warning lamps
will flash to indicate that the vehicle is locked.
A second press within three seconds will
double lock the vehicle and fully arm the alarm.
The hazard warning lamps will flash again to
indicate the enhanced lock/alarm state.
Note: The fuel filler flap can only be opened
when the vehicle is unlocked. Global closing
Press and hold the lock button for three
seconds to single lock the vehicle, fully arm the
alarm, and close all of the windows.
Note: For safety reasons, th e sunroof does not
close automatically. It sh ould be closed in the
normal way before exiting the vehicle.
Automatic relocking
If a door, or the tailgate, are not opened within
one minute of unlocking the vehicle, doors will
lock again automatically.
Approach lighting
When approaching the vehicle
during darkness press to switch on
the approach illumination. Press
again to turn the approach lamps off.
The approach ill umination period
set at the factory is thirty seconds.
This can be configured by a Land
Rover Dealer/Authorised Repairer to provide
illumination lasting between Zero and 120
seconds.
WARNING
Never double lock the vehicle with
people, children, or pets inside. In the
event of an emergency th ey would be unable to
escape, and the emergency services would be
unable to release them quickly.
WARNING
Ensure that no children, pets, or
obstructions are in any open aperture
before operating globa l closing. Safety
mechanisms are in place to prevent serious
injury, however, inju ries can still occur.