Page 2763 of 3229
43
Keys and remote controls
R
Tailgate
Press briefly to release the tailgate.
Emergency alarm
Press and hold for three seconds, or
press twice within three seconds, to
activate the horn and the hazard
lamps.
Once active for more than five seconds the
alarm can be cancelled by pressing the button
and holding for three seconds, or pressing
twice within three seconds.
Note: The horn and hazard lamps will switch
off automatically after two minutes and forty
five seconds.
Remote battery
The remote control batteries are recharged
when the remote is docked and the engine is
running. For this reas on it is recommended
that each remote is used periodically. This will
ensure that the batteries are kept charged and
ready for use.
Page 2766 of 3229
Alarm
46
L
DISARMING THE ALARM
When the vehicle is unlocked using
the remote control, the alarm is
automatically disabled. The hazard
lamps will flash twice to indicate that the alarm
is disabled.
Disarming when the unlock button fails
to work
If, when pressed, the unlock button fails to
operate the vehicle can still be unlocked and
the alarm disabled. To unlock the vehicle :-
1. Unlock the drivers door using the key
blade.
2. Dock the remote control.
Note: When the drivers door is unlocked using
the key, the alarm will sound until the remote is
docked.
Deactivating the alarm when triggered
If the alarm has been triggered it can be
deactivated by pressi ng the remote unlock
button, or by docking the remote control.
Page 2782 of 3229
Supplementary restraints system
62
L
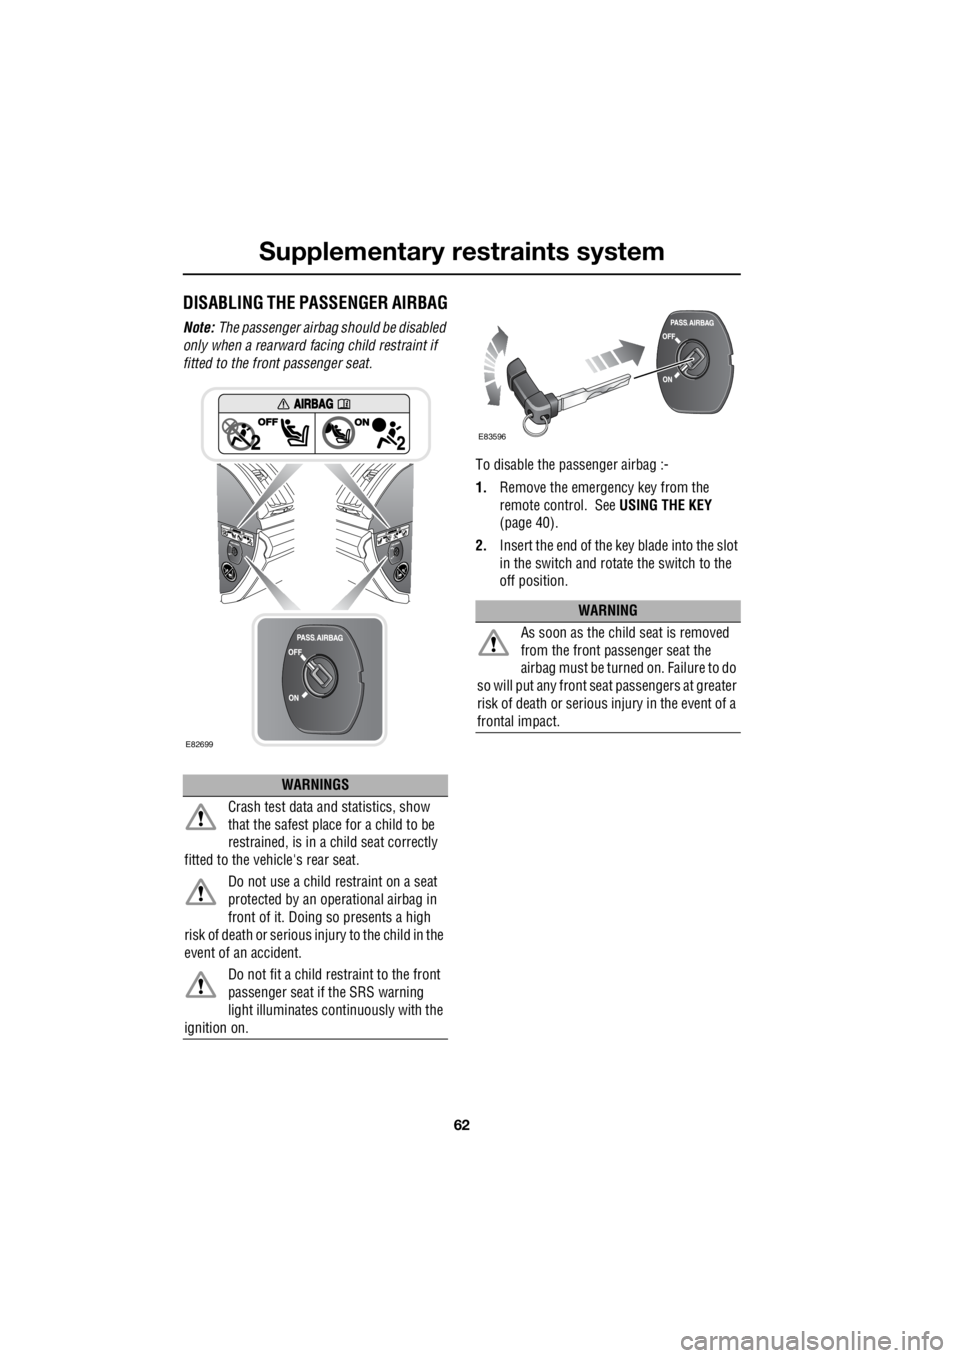
DISABLING THE PASSENGER AIRBAG
Note: The passenger airbag should be disabled
only when a rearward fa cing child restraint if
fitted to the front passenger seat.
To disable the passenger airbag :-
1. Remove the emergency key from the
remote control. See USING THE KEY
(page 40).
2. Insert the end of the key blade into the slot
in the switch and rotate the switch to the
off position.
WARNINGS
Crash test data and statistics, show
that the safest place for a child to be
restrained, is in a child seat correctly
fitted to the vehicle's rear seat.
Do not use a child restraint on a seat
protected by an ope rational airbag in
front of it. Doing so presents a high
risk of death or serious injury to the child in the
event of an accident.
Do not fit a child restraint to the front
passenger seat if the SRS warning
light illuminates co ntinuously with the
ignition on.
E82699
WARNING
As soon as the child seat is removed
from the front passenger seat the
airbag must be turned on. Failure to do
so will put any front seat passengers at greater
risk of death or serious injury in the event of a
frontal impact.
E83596
Page 2789 of 3229
69
Child safety
R
Tether anchorages are provided at each rear
outboard seating position.
Note: A tether anchorage is provided for the
centre seat position, but should only be used
when a non- ISOFIX child seat with a tether is
used in this seating position.
CHILD SAFETY LOCKS
Child safety locks are fitted to the rear doors to
allow you to prevent accidental opening of the
doors when the vehicle is in motion.
If children are to be carried in the rear seat
positions, it is recomme nded that the rear door
interior handles are disabled.
Note: For convenience the rear door interior
handles should be re-e nabled when carrying
adult passengers in th e rear seat positions.
To change the child lock settings :-
1. Open the door to access the child safety
lock.
2. Insert the emergency key into the slot, and
rotate a quarter of a turn to enable, or
disable the interior door handle as
required.
E83601
1
2
Page 2834 of 3229
Starting the engine
114
L
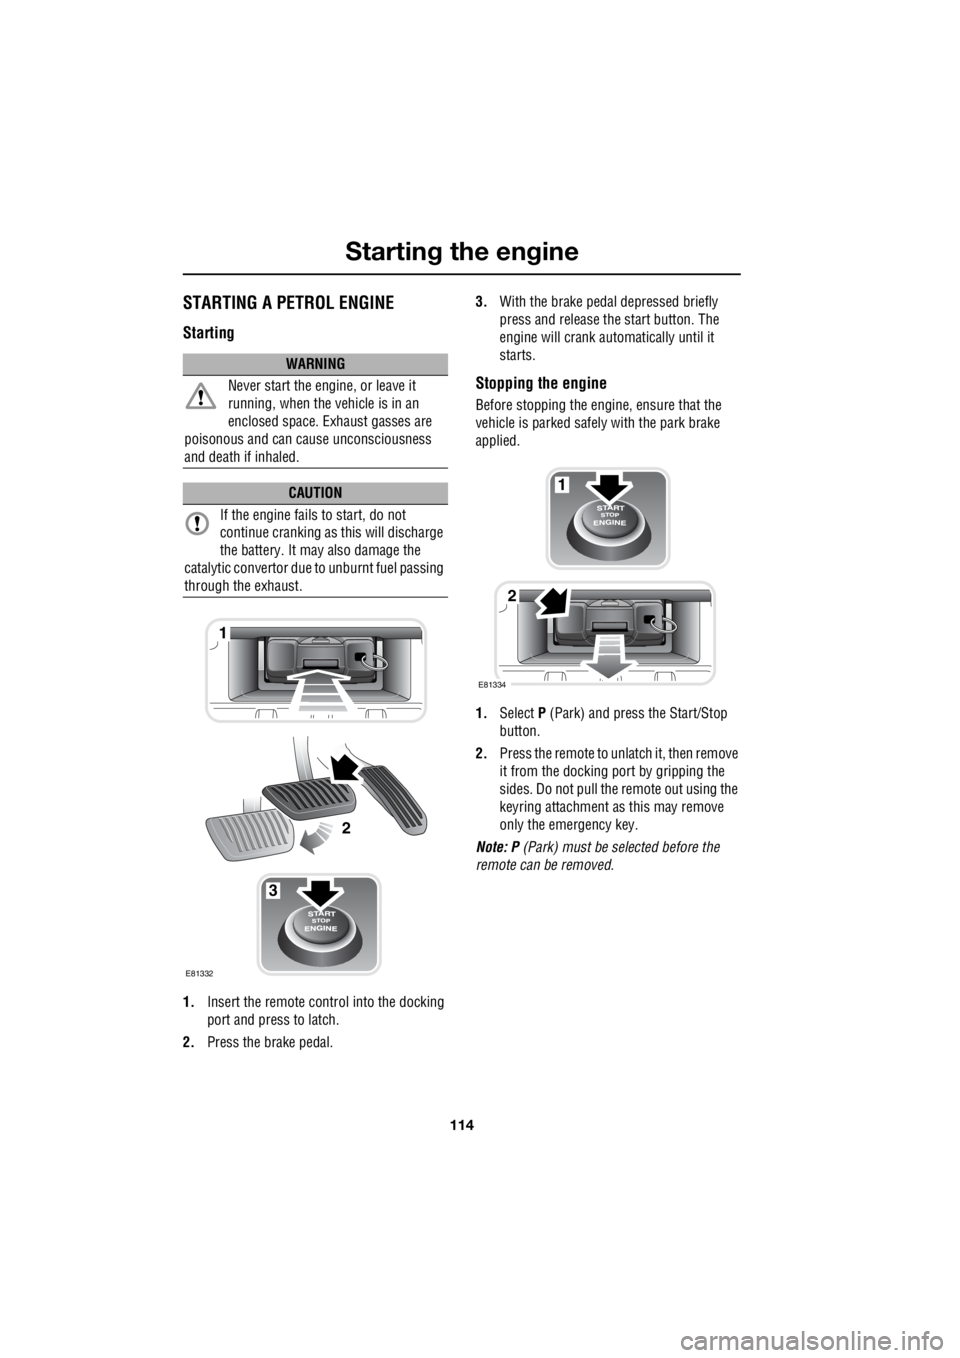
STARTING A PETROL ENGINE
Starting
1. Insert the remote control into the docking
port and press to latch.
2. Press the brake pedal. 3.
With the brake peda l depressed briefly
press and release the start button. The
engine will crank auto matically until it
starts.
Stopping the engine
Before stopping the engine, ensure that the
vehicle is parked safely with the park brake
applied.
1. Select P (Park) and press the Start/Stop
button.
2. Press the remote to unlatch it, then remove
it from the docking port by gripping the
sides. Do not pull the remote out using the
keyring attachment as this may remove
only the emergency key.
Note: P (Park) must be selected before the
remote can be removed.
WARNING
Never start the engine, or leave it
running, when the vehicle is in an
enclosed space. Exhaust gasses are
poisonous and can cau se unconsciousness
and death if inhaled.
CAUTION
If the engine fails to start, do not
continue cranking as this will discharge
the battery. It may also damage the
catalytic conver tor due to unburnt fuel passing
through the exhaust.
3
1
2
E81332
1
2
E81334
Page 2836 of 3229
Starting the engine
116
L
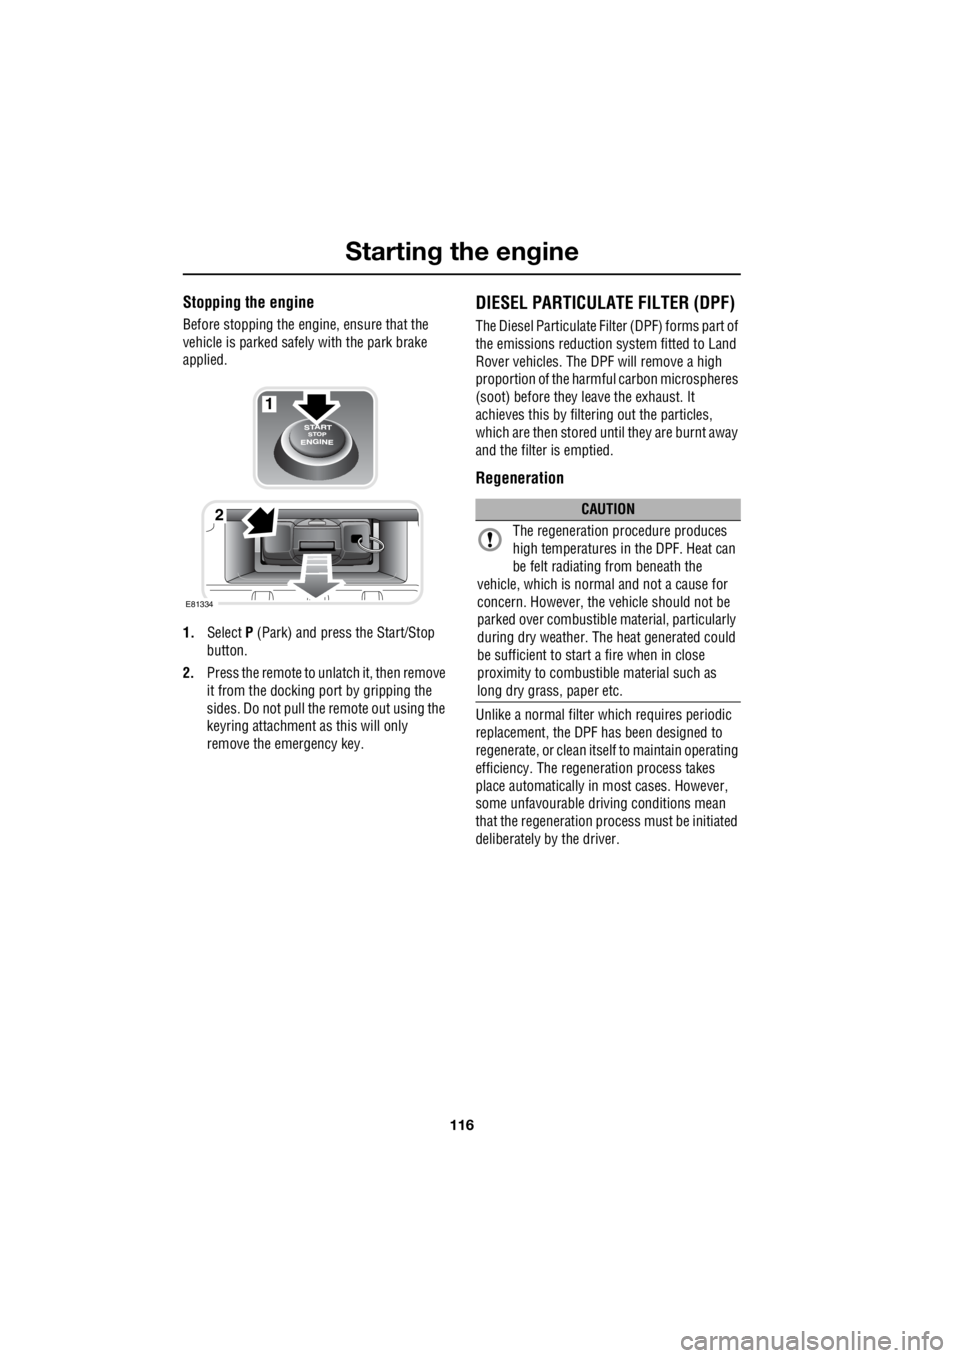
Stopping the engine
Before stopping the engine, ensure that the
vehicle is parked safely with the park brake
applied.
1. Select P (Park) and press the Start/Stop
button.
2. Press the remote to unlatch it, then remove
it from the docking port by gripping the
sides. Do not pull the remote out using the
keyring attachment as this will only
remove the emergency key.
DIESEL PARTICULATE FILTER (DPF)
The Diesel Particulate Filt er (DPF) forms part of
the emissions reduction system fitted to Land
Rover vehicles. The DPF will remove a high
proportion of the harmful carbon microspheres
(soot) before they leave the exhaust. It
achieves this by filter ing out the particles,
which are then stored until they are burnt away
and the filter is emptied.
Regeneration
Unlike a normal filter which requires periodic
replacement, the DPF has been designed to
regenerate, or clean itse lf to maintain operating
efficiency. The regene ration process takes
place automatically in most cases. However,
some unfavourable driving conditions mean
that the regeneration proc ess must be initiated
deliberately by the driver.
1
2
E81334
CAUTION
The regeneration procedure produces
high temperatures in the DPF. Heat can
be felt radiating from beneath the
vehicle, which is normal and not a cause for
concern. However, the vehicle should not be
parked over combustible material, particularly
during dry weather. The heat generated could
be sufficient to start a fire when in close
proximity to combustibl e material such as
long dry grass, paper etc.
Page 2877 of 3229
157
Maintenance
R
MaintenanceGENERAL INFORMATION
Regular systematic maintenance is the key to
ensuring the continued re liability and efficiency
of your vehicle.
Maintenance is the owne r's responsibility and
you must ensure that owner maintenance
operations, oil services, inspections and brake
fluid and coolant changes are carried out when
required and according to the manufacturer's
recommendations.
The routine maintenance requirements for your
vehicle are shown in the Service Portfolio book.
Most of this necessar y workshop maintenance
requires specialised knowledge and
equipment, and should preferably be entrusted
to a Land Rover Dealer/Authorised Repairer.
Service intervals
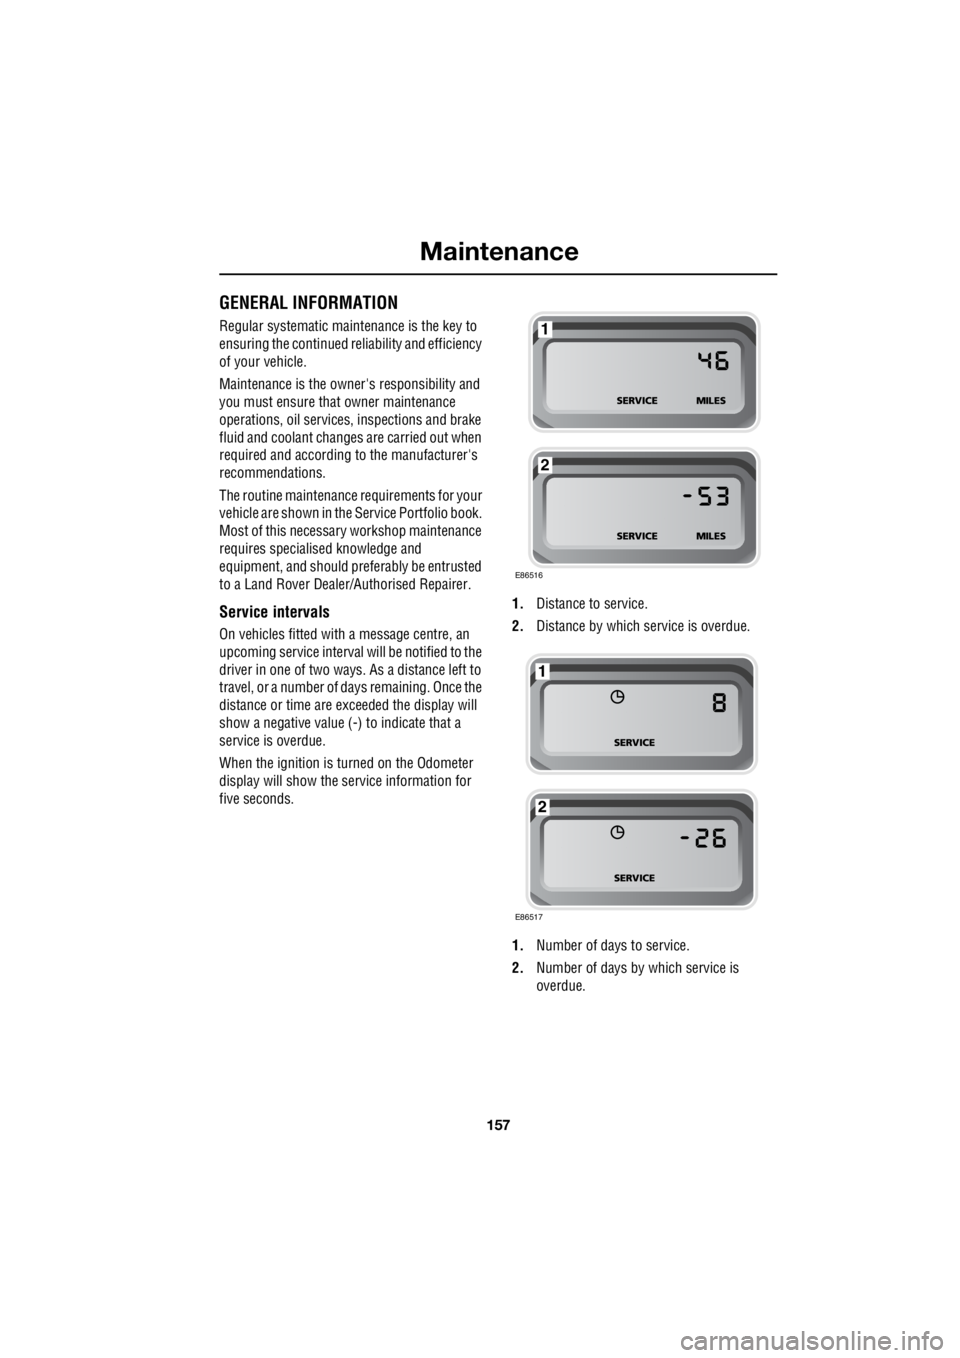
On vehicles fitted with a message centre, an
upcoming service interval will be notified to the
driver in one of two ways. As a distance left to
travel, or a number of da ys remaining. Once the
distance or time are ex ceeded the display will
show a negative value (-) to indicate that a
service is overdue.
When the ignition is turned on the Odometer
display will show the service information for
five seconds. 1.
Distance to service.
2. Distance by which service is overdue.
1. Number of days to service.
2. Number of days by which service is
overdue.
E86516
1
2
E86517
1
2
Page 2939 of 3229
219
Audio unit overview
R
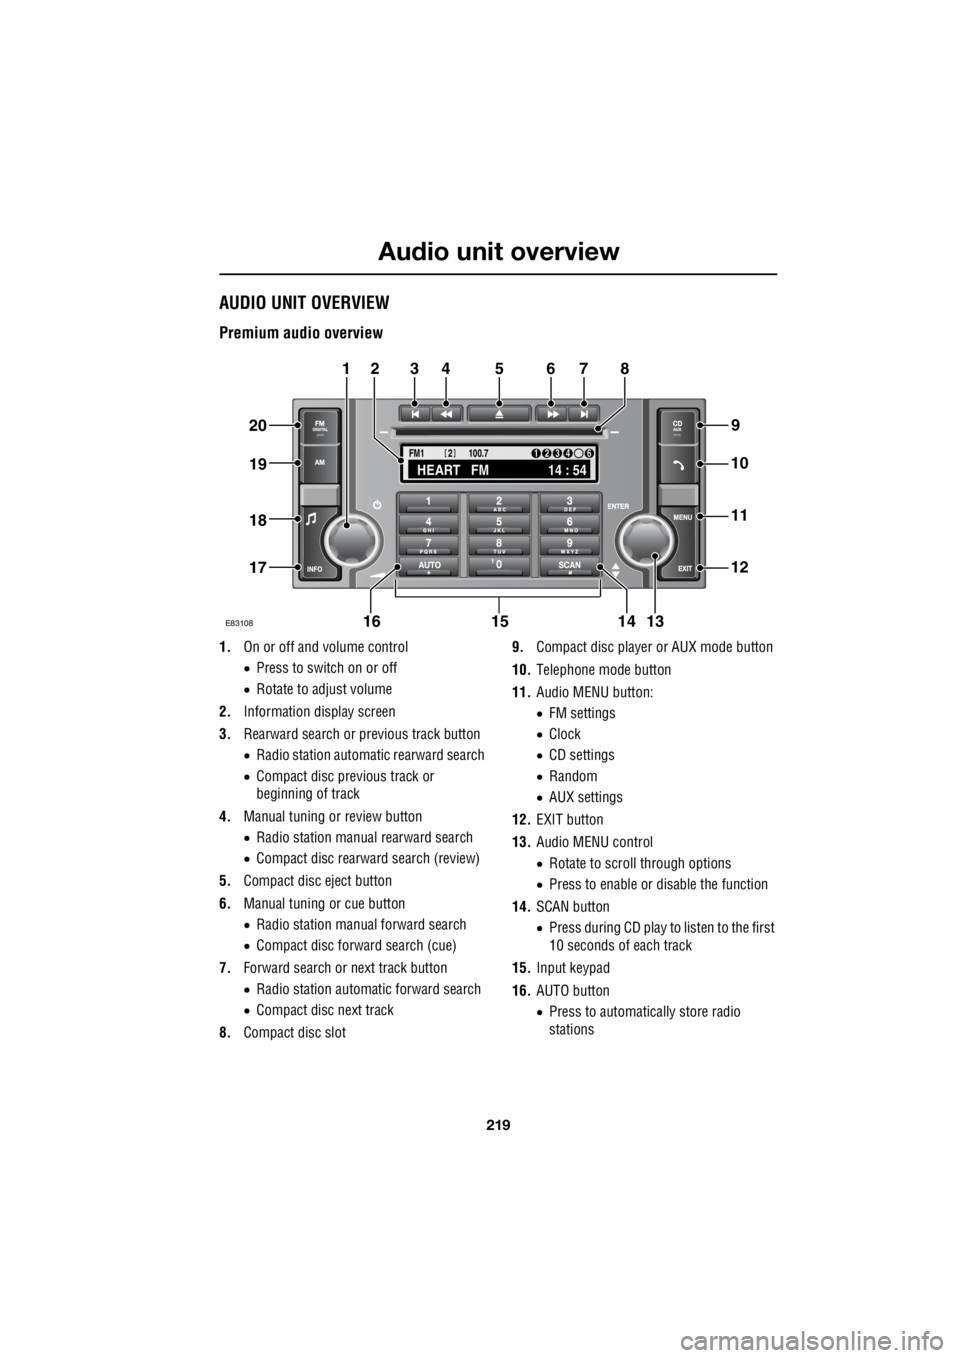
Audio unit overviewAUDIO UNIT OVERVIEW
Premium audio overview
1. On or off and volume control
• Press to switch on or off
• Rotate to adjust volume
2. Information display screen
3. Rearward search or previous track button
• Radio station automatic rearward search
• Compact disc previous track or
beginning of track
4. Manual tuning or review button
• Radio station manual rearward search
• Compact disc rearward search (review)
5. Compact disc eject button
6. Manual tuning or cue button
• Radio station manual forward search
• Compact disc forward search (cue)
7. Forward search or next track button
• Radio station automatic forward search
• Compact disc next track
8. Compact disc slot 9.
Compact disc player or AUX mode button
10. Telephone mode button
11. Audio MENU button:
• FM settings
• Clock
• CD settings
• Random
• AUX settings
12. EXIT button
13. Audio MENU control
• Rotate to scroll through options
• Press to enable or disable the function
14. SCAN button
• Press during CD play to listen to the first
10 seconds of each track
15. Input keypad
16. AUTO button
• Press to automatically store radio
stations
TA
NEWSPTY100.7
FM1
14 : 54
HEART FM
1234 6
2
E83108
34567
9
21
11
12
10
13141516
17
18
19
20
8