Page 209 of 416

Global sear
ch Global sear
chove rview
Yo u can use theglobal sear chinthe home screen
and in the notifications.
The global sear chprov ides sear chresults forthe
fo llowing categories and their sub-categories:
R Navigation
R Media
R Telephone, social media
R User inter face and Digi tal Operating Instruc‐
tions
R Internet
This enables youto sear chfor cities, roads and
to urist att ractions wi th the navigation sy stem, for
ex ample.
% Yo
u can also sear chforth re e-word addresses
(/ page 221).
When you enter a 3 wordaddress in the
gl obal sear ch, separate each of thewo rds
with a space or a full stop.
During the entry process the most likely sugges‐
tions are shown beneath the sear chfield. When
yo u enter "S", "Stuttgart", "S teak" and "Sandra"
are shown, forex ample. If you select "Stuttgart",
yo ure ceive the suggestions "S tarbuc ks", "S teak"
and "City railw ay",forex ample.
The sear chresults in the list are shown, sor ted
according tocatego ry. Next tothe category is the
number of results. You will be shown the best
re sults from each categor y.Ad ditional results can
be found af ter selecting there spective categor y.
If yo u con firm an ent rywith OK, all categories
and the number of results will be shown in a sum‐
mar y.After selecting a category you can select
th e sear chresults within the categor y.When you
select a sear chresult the de tailed view opens. In
th e de tailed view you can choose whe ther and
which actions youwa nttocar ryout with the
re spective sear chresult. Forex ample, you can
st art route guidance or place a call tosomebody.
The actions are named cor responding ly.
The sear chcan be car ried out with thefo llowing
input me thods:
R Entering characters using the on-screen key‐
board
R Entering characters with handwriting recogni‐
tion
R Dictation function Using the
global sear ch
Multimedia sy stem:
4 © #
Select ªSearch .
or #
Call up the notifications (/ page 206). #
Select Search . #
Ente rth e sear chterm into the sear chfield.
Use thech aracter input function
During the entry process theth re e most likely
suggestions are of fere d beneath the sear ch
fi eld.
In the list on theright, theto p two sear ch
re sults are shown for each categor y.
% Alternati
vely, you can use theo dictation
function forth e sear ch. #
Toaccept a suggestion: selectthe sugges‐
tion.
The thre e most likely suggestions are of fere d. #
Continue the sear chor accept a suggestion. #
Toaccept the second sear ch result:select
th e sear chresult.
An action starts or a list is shown. #
Select a sear chresult or an action in the list. #
Toshow all categories: selectOK. #
Toshow sear ch results for a categor y:
select a categor y. #
Toshow details: select a searchresult. #
Tostart an action: select an action.
Af ter selection of an action, a track is pla yed
back or thero ute toa destination is calcula‐
te d, forex ample. Entering
characters Using
thech aracter input function &
WARNING Risk of distraction from infor‐
mation sy stems and communications
equipment
If yo u operate information and communica‐
tion equipment integ rated in theve hicle when
driving, you will be distracted from the tra ffic
situation. This could also cause youto lose
control of theve hicle. #
Only operate this equipment when the
traf fic situation permits. #
Ifyo u cannot be sure of this, stop the
ve hicle whilst paying attention toroad MBUX multimedia sy
stem 207
Page 210 of 416

and traf
fic conditions and ope rate the
equipment with theve hicle stationar y. Yo
u must obse rveth e legal requirements forthe
country in whi chyou are cur rently driving when
ope rating the multimedia sy stem.
Character entry can be carried out with these
cont rol elements:
R Touch Control
R Touchsc reen (media display)
Character entry take s place bycursor control
when using theTo uch Control.
Character input can be star ted with a control ele‐
ment and resumed with ano ther. #
When theke yboard is shown, en terth ech ar‐
acters on the cont rol element byswiping and
pressing or bytapping (touchscreen). or #
Write thech aracter on theto uchsc reen.
Examples of character ent ry:
R Renaming a favo rite
R Entering a de stination address in the naviga‐
tion sy stem
R Ente ring a web address
Entering characters on theto uchscreen
Requ irements:
R An online connection is requiredfor some
functions.
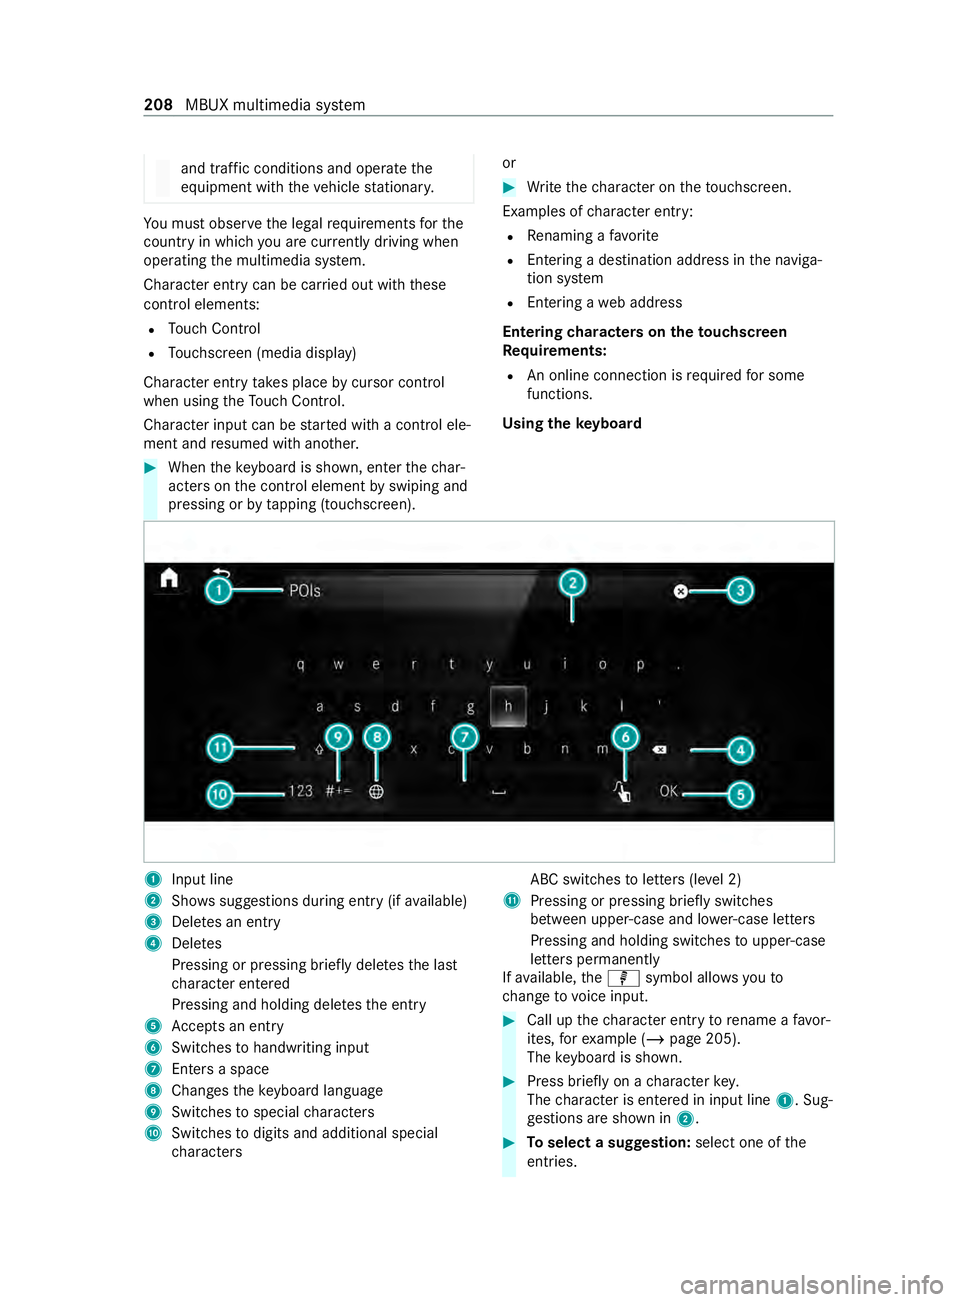
Using theke yboard 1
Input line
2 Showssuggestions during entry (if available)
3 Deletes an entry
4 Deletes
Pressing or pressing brief lydele testh e last
ch aracter entered
Pressing and holding dele testh e entry
5 Accepts an entry
6 Switches tohandwriting input
7 Enters a space
8 Changes theke yboard language
9 Switches tospecial characters
A Swit ches todigits and additional special
ch aracters ABC swit
ches toletters (le vel 2)
B Pressing or pressing brief lyswitches
between upper-case and lo wer-case letters
Pressing and holding switches toupper-case
letters permanent ly
If av ailable, thep symbol allo wsyouto
ch ange tovoice input. #
Call up thech aracter ent ryto rename a favo r‐
ites, forex ample (/ page 205).
The keyboard is shown. #
Press brief lyon a character key.
The character is entered in input line 1. Sug‐
ge stions are shown in 2. #
Toselect a suggestion: select one ofthe
entri es. 208
MBUX multimedia sy stem
Page 211 of 416

#
Ifav ailable, display additional suggestions
with 0047 or0048. #
Resume character input. #
Toenter an alternative character: press
and hold a character. #
Select thech aracter. #
Toend character input: presstheG but‐
to n.
% The
available editing functions depend on the
editing task, the language set and thech arac‐
te r le vel.
Using handwriting input 1
Input line
2 Showssuggestions during entry
3 Dele tes an entry
4 Dele tes
Pressing or pressing brief lydele testh e last
ch aracter entered
Pressing and holding dele testh e entry
5 Enters a space
6 Switches toinput using theke yboard
7 Accepts an entry
8 Writes characters on the dr awing sur face
If av ailable, thep symbol allo wsyouto
ch ange tovoice input. #
Call up thech aracter ent ryto rename a favo r‐
ites, forex ample (/ page 205). #
When theke yboard is displa yed, select v. #
Write thech aracter with one finger on the
to uchsc reen.
The character is entered in input line 1. Sug‐
ge stions are shown in 2. #
Toselect a suggestion: select one ofthe
entri es. #
Ifav ailable, display additional suggestions
with 0047 or0048. #
Resume character input. The letters can be
written next toeach other or abo veeach
ot her. #
Toend character input: presstheG but‐
to n.
Setting the keyboard forch aracter entry
Multimedia sy stem:
4 Settings 5
System 5
Controls
5 Keyboards and Handwriting #
Confirm Select keyboards.
Select theke yboard language in the list. Sy
stem settings Display
Configuring display settings
Multimedia sy
stem:
4 © 5
Settings 5
System
5 Designs & Display
Styl es #
Select Classic ,Sport orProgressive .
Display brightness #
Select Display Brightness . #
Select a brightness value. MBUX multimedia sy
stem 209
Page 212 of 416

Switching
the display off/on #
Off: select Display Off . #
On: press a button, 002B,forex ample.
Displ aydesign #
Select Day/Night Design. #
Select Automatic, Day Design orNight
Design. Time and date
Setting the time and date automatical
ly
Multimedia sy stem:
4 © 5
System 5
Time and Date #
Deactivate 0053Manual Time Adjustment.
The time and date are set automatically for
th e selected time zone and summer time
option.
% The cor rect time is requ ired forth efo llowing
functions:
R Route guidance with time-dependent traf‐
fi c guidance.
R Calculation of expected time of ar riva l.
Setting the time zone
Requ irements:
R For setting the time zone manuall y:the
Automatic Time Zone function is activated.
Multimedia sy stem:
4 © 5
Settings 5
System
5 Time and Date
Setting the time zone manually #
Select Time Zone: .
The list of countries is displa yed.
% If
th ere are se veral time zones available in a
countr y,these will be shown af terth e coun‐
try is selected. #
Select a count ryand, if requ ired, a time zone.
The time zone set is displa yed af terTime
Zone:.
Setting the time zone automatically #
Activate Automatic Time Zone. Setting the time and date
form at
Multimedia sy stem:
4 © 5
Settings 5
System
5 Time and Date 5
Set Format #
Set the date and time form at003B.
Setting the time and da temanually
Re quirements:
R The Manual Time Adjustment function is
switched on.
R For setting the date manuall y:no GPS is
ins talled in theve hicle.
Multimedia sy stem:
4 © 5
Settings 5
System
5 Time and Date
Setting the time (without time zone) #
Select Set Time. #
Set a time.
Setting the time (with time zone) #
Select Set Time.
If a time zone is set the time is set automatically
using the time zone. The time can be adjus tedby
a maximum of plus or minus 60 minutes. #
Adjust the time using the slide cont rol.
Setting the da te #
Select Set Date . #
Set a da te.
% In
vehicles with GPS, a date cannot be set
eve n wi thactive manual time adjustments.
The date is then set automatically thro ugh
th e selected time zone. Blue
tooth ® Information about Blu
etoo th®
Bl ue tooth ®
tech nology is a standard for short-
ra nge wi reless data transfer up toappr oximately
32.8 ft(10 m). 210
MBUX multimedia sy stem
Page 213 of 416

Yo
u can use Blue tooth®
to connect your mobile
phone tothe multimedia sy stem and use thefo l‐
lowing functions, forex ample:
R Hands-free sy stem with access tothefo llow‐
ing options:
- Call lists (/ page249)
R Inte rn et connection (/ page 254)
R Trans ferring business cards (vCards) into the
ve hicle
Blue tooth ®
is a regis tere d trademark of Blue tooth
Special Interest Group (SIG) Inc.
% Internet connection via Blu etoo th®
is not
av ailable in all countries.
Ac tivating/deactivating Blue tooth ®
Multimedia sy stem:
4 © 5
Settings 5
System
5 Wi-Fi & Bluetooth #
Toswitch on Blue tooth ®
:select Connect
via Bluetooth. #
Activate Bluetooth. #
Toswitch off Blue tooth ®
:select Settings . #
Deactivate Bluetooth. Wi
-Fi Wi
-Fi connection overview
Yo u can use Wi-Fi toestablish a connection with
a Wi -Fi network and toaccess the Internet or
ot her network devices.
The following connection options are available:
R Wi-Fi connection
The Wi-Fi connection is es tablished toaWi -Fi-
capable device, e.g. tothe cus tomer's mobile
phone or tablet PC.
R Multimedia sy stem as a Wi-Fi hotspot
Using this function, a tablet PC or no tebook
can be connected, forex ample.
To establish a connection, you can use thefo llow‐
ing me thods:
R WPS PIN
The connection toa secure Wi-Fi network is
made via a PIN.
R WPS PBC
The connection toa secure Wi-Fi network is
made bypressing a button (push button).
R Security key The connection
toa secure Wi-Fi network is
made via a secu rity key.
Setting up Wi-Fi
Requ irements:
R The device tobe connected supports one of
th eth re e means of connection described.
Multimedia sy stem:
4 © 5
Settings 5
System (System)
5 Wi-Fi & Bluetooth
Switching on Wi-Fi #
Select Wi-Fi.
The Wi-Fi is switched on and you can connect
th e multimedia sy stem with extern al hot‐
spots.
Swit ching off Wi-Fi #
Select Settings . #
Deactivate Wi-Fi.
If Wi-Fi is deactivated, communication via Wi-
Fi to all devices is inter rupte d. This also
means that a connection tothe communica‐
tion module cann otbe es tablished. Then
some functions such as dynamic route guid‐
ance with Live Traf fic Information are not
av ailable.
Connecting the multimedia sy stem with a
new device via Wi-Fi
This function is available if a communication
module is not ins talled.
The type of connection es tablished must be
selected on the multimedia sy stem and on the
device tobe connected.
% The connection procedure may dif
fer depend‐
ing on the device. Follow the instructions that
are shown in the displa y.Fu rther information
(see the manufacturer's operating instruc‐
tions). #
Select Internet Settings . #
Select Connect via Wi-Fi. #
Select Add Hotspot.
Connecting using a security key #
Select the options 0048ofthe desired Wi-Fi
networ k. #
Select Connect Using Security Key . #
Have the security key displa yed on the device
to be connected (see the manufacturer's
operating instructions). MBUX multimedia sy
stem 211
Page 214 of 416

#
Enter this security key on the multimedia sys‐
te m. #
Confirm the entry with¡.
% All devices support a security
key as a means
of connection.
Connecting using a WPS PIN #
Select the options 0048ofthe desired Wi-Fi
networ k. #
Select Connect via WPS PIN Input.
The multimedia sy stem generates an eight-
digit PIN. #
Enter this PIN on the device tobe connected. #
Confirm the entry.
Connecting using a but ton#
Select the options 0048ofthe desired Wi-Fi
networ k. #
Select Connect via WPS PBC .#
Select "Connect via WPS PBC" in the options
on the device tobe connected (see the manu‐
fa cturer's ope rating instructions). #
Press the WPS button on the device tobe
connected. #
Select Continue inthe multimedia sy stem.
Ac tivating automatic connection #
Select Connect via Wi-Fi. #
Select the options 0048ofthe desired Wi-Fi
networ k. #
Activate Permanent Internet Connection .
Connecting with a known Wi-Fi #
Select Connect via Wi-Fi. #
Select a Wi-Fi networ k.
The connection is es tablished again.
Setting up a Wi-Fi hotspot
Multimedia sy stem:
4 © 5
Settings 5
System (System)
5 Wi-Fi & Bluetooth
Configuring the multimedia sy stem as a Wi-Fi
hotspot
The type of connection es tablished depends on
th e device tobe connected. The function must be
suppor tedby the multimedia sy stem and bythe
device tobe connected. The type of connection
es tablished must be selected on the multimedia
sy stem and on the device tobe connected. #
Select Vehicle Hotspot. #
Select Connect Device to Vehicle Hotspot.
Connecting using WPS PIN generation #
Select Connect via WPS PIN Generation . #
Enter the PIN shown in the media display on
th e device tobe connected and con firm.
Connecting using WPS PIN entry #
Select Connect via WPS PIN Input. #
Enterth e PIN that is shown on theex tern al
device's display on the multimedia sy stem.
Connecting using a button #
Select Connect via WPS PBC. #
Press the push button on the device tobe
connected (see the manufacturer's operating
instructions). #
Select Continue.
Connecting using a security key #
Select Connect Device to Vehicle Hotspot .
A secu rity key is displa yed. #
Select theve hicle from the device tobe con‐
nected. It will be shown with theDIRECT-MB
Hotspot 12345 network name. #
Ente rth e security key which is shown in the
media display on the device tobe connected. #
Confirm the entry.
Connecting using NFC #
Select Connect via NFC. #
Activate NFC on the mobile device (see the
manufacturer's operating instructions). #
Bring the mobile device into the NFC area of
th eve hicle (/ page245). #
Selec tFinished.
The mobile device is now connected tothe
multimedia sy stem hotspot via NFC.
Generating a new security key: #
Select Vehicle Hotspot. #
Select Generate Security Key.
A connection will be es tablished with the
newly crea ted security key. #
Tosave a security key:select Save.
When a new security key is sa ved, all existing
Wi -Fi connections are then disconnected. If
th eWi -Fi connections are being re-es tab‐
lished, the new security key must be en tere d. 212
MBUX multimedia sy stem
Page 215 of 416
Sy
stem language Note
s onthe sy stem language
This function allo wsyouto determ ine the lan‐
guage forth e menu displa ysand the navigation
messages. The selected language af fects the
ch aracters available for entr y.The navigation
announcements are not available in all languages.
If a language is not available, the navigation
announcements will be in Engl ish.
Setting the sy stem language
Multimedia sy stem:
4 © 5
Settings 5
System
5 Language #
Set the language.
% If
yo u are using Arabic map data, thete xt
information can also be shown in Arabic on
th e navigation map. Todo so, select
Page 216 of 416

Changing
the PIN #
Select Change Settings. #
Enterth e cur rent PIN. #
Select Change PIN. #
Set a new PIN.
Ac tivating PIN pr otection for data export #
Select Change Settings. #
Confirm wi th the PIN. #
Select Protect Data Export. #
Activate or deacti vate the function.
Un blocking the PIN #
Consult an authorized Mercedes-Benz Center
and ha vethe PIN pr otection reset. Software update
Information on software updates
A software update
consists of thre esteps:
R Downloading or copying of the data requ ired
fo r ins tallation
R Installation of the update
R Activation of the update byrestarting the sys‐
tem
The multimedia sy stem pr ovides a message when
an update is available.
Depending on the source, you can per form vari‐
ous updates:
Software update Source of
the
update Up
date type
Interne tN avigation map, sys‐
te m updates, Digital
Operator's Manual
External storage
medium, e.g. USB
fl ash drive Na
vigation maps Ad
vantages of updating software
Software updates ensure your vehicle's tech nol‐
ogy is al ways up-to-date.
In order tocons tantly impr ovethequ ality of our
services you will receive futu reupdates foryo ur
multimedia sy stem, the Mercedes PRO connect
services and your vehicle's communication mod‐
ule. These will con veniently be sent to you via the
mobile phone connection in your vehicle and, in many cases, ins
talled automaticall y.Yo u can
monitor thest atus of your updates at any time via
th e Mercedes PRO por tal and find information
about po tential inno vations.
Yo ur advantages at a glance:
R Con veniently receive software upda tes via the
mobile phone network
R The long-term quality and availability of
Mercedes PRO connect is guaranteed
R Keep your multimedia sy stem and communi‐
cation module up-to-date
Fu rther information about software updates can
be found at https://www.mercedes.pro
Pe rforming a software upda te
Re quirements:
R For online updates: an Internet connection
is es tablished (/ page 254).
R For automatic online updates: your vehicle
has a permanently ins talled communication
module.
Multimedia sy stem:
4 Settings 5
System 5
Software Update
Au tomatically #
Activate Automatic Online Update .
The upda tes will be downloaded and ins talled
automaticall y.
The cur rent status of the updates is dis‐
pla yed.
Manually #
Deactivate Automatic Online Update. #
Select an update from the list and start the
update.
Ac tivating the so ftwa reupdate #
Restart the sy stem.
The modifications from the software update
will be active.
Important sy stem upda tes
Impor tant sy stem updates may be necessary for
th e security of your multimedia sy stem's data.
Please ins tallth ese updates, or else the security
of your multimedia sy stem cann otbe ensured.
% If automatic software updates are activated,
th e sy stem updates will be downloaded auto‐
matically (/ page214). 214
MBUX multimedia sy stem