Page 81 of 416

#
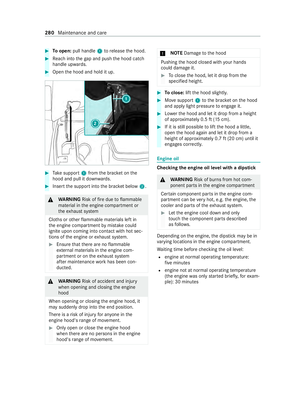
Toopen: press cup holder 1or2. #
Fold out the cup holder. #
Toclose: slide cup holder 1or2 back in
until it engages. Asht
ray and cigar ette lighter Using asht
rays While driving
#
Place the closed ashtr ayin a cup holder in
th e windshield stowage compartments while
driving. #
Check that the ashtray is seated securely.
% Do not place
the ashtray in the center con‐
sole cup holders. It cann otsit securely here.
Opening #
Fold co ver1 upwards. Using
the cigar ette lighter in the center con‐
sole &
WARNING ‑ Risk of fire and injury from
hot cigar ette lighter
Yo u can burn yourself if youto uch the hot
heating element or the soc ket of the cigar ette
lighter.
In addition, flammable materials may ignite if:
R you drop the hot cigar ette lighter
R ach ild holds the hot cigar ette lighter to
objects, forex ample #
Always hold the cigar ette lighter bythe
knob. #
Always make sure that the cigar ette
lighter is out of reach of children. #
Never lea vechildren unat tended in the
ve hicle. Re
quirements:
R The ignition is switched on #
Press in cigar ette lighter 1.
The cigar ette lighter will pop out when the
heating element is red-hot. Seats and
stowage 79
Page 82 of 416

Soc
kets Using
12V so ckets in the center console Re
quirements:
R Only devices with a maximum po wer con‐
sum ption of 180 W (15 A) may be connected.
12 V so cket insto wage compa rtment #
Open the lid of thestow age compartment in
th e center console (/ page77). #
Fold up co ver1 ofthe soc ket. #
Inse rtthe plug of the device.
12 V so cket in lo wer control panel #
Lift up co ver1 ofthe soc ket. #
Inse rtthe plug of the device. Using
12V so cket on the driver's seat #
Fold up co ver1 ofthe soc ket. #
Inse rtthe plug of the device. Using
the11 5 V soc ket in the lo wer control
panel &
DANG ER Risk of fata l injury due todam‐
aged connecting cables or soc kets
If a suitable device is connected, the11 5 V
soc ket will be car rying a high voltage. If the
connecting cable or the11 5 V soc ket is pulled
out of the trim or is damaged or wet,you
could receive an electric shoc k. #
Only use dry and damage-free connect‐
ing cables. #
When the ignition is switched off,
ensure that the11 5 V soc ket is dr y. #
Ifth e11 5 V soc ket is dama ged or gets
pulled out of the paneling, immediately
ha ve the soc ketch ecked or replaced at
a qu alified specialized workshop. #
Never plug the connecting cable into a
11 5 V soc ketth at is damaged or has
been pulled out of the trim. &
DANG ER Risk of fata l injury due toincor‐
re ct handling of the soc ket
Yo u could receive an electric shock:
R ifyo ure ach into the soc ket.
R ifyo u insert unsuitable devices or objects
into the soc ket. #
Do not reach into the soc ket. 80
Seats and stowage
Page 83 of 416
#
Only connect suitable devices tothe
soc ket. Re
quirements:
R The devices must be equipped with a suitable
plug which con form sto thest andards spe‐
cific tothe count ryyou are in.
R Only devices up toa maximum of 150wa tts
are pe rmitted.
R Do not use multiple soc ket outlets. #
Open flap 3. #
Insert the plug of the device into 115 V soc ket
1 .
When the on-board electrical sy stem voltage
is suf ficient, indicator la mp2lights up.
If yo u will not be using the11 5 V po wer soc ket,
ke ep theflap closed. Using soc
kets in the cargo co mpartment Re
quirements:
R Only devices with a maximum po wer con‐
sum ption of 180 W (15 A) may be connected. #
Fold up co ver1 ofthe soc ket. #
Inse rtthe plug of the device. Charging a mobile phone using
the USB
soc ket in the rear #
Place the mobile phone in stowage compart‐
ment 1and connect it toUSB port 2to
ch arge. Seats and
stowage 81
Page 84 of 416

Wire
lessly charging the mobile phone and
coupling with theex terior antenna Note
s on wireless charging of the mobile
phone &
WARNING Risk of inju rydue toobjects
being stowed incor rectly
If yo u do not adequately stowobjects in the
ve hicle interior, they could slip or be tossed
around and thereby strike vehicle occupants.
In addition, cup holders, open stowage
spaces and mobile phone brac kets cannot
al wa ys restra in the objects they contain in the
eve nt of an accident.
The reis a risk of injur y,particular lyin the
eve nt of sudden braking or a sudden change
in direction. #
Alwaysstow objects in such a wayth at
th ey cannot be tossed about in these or
similar situations. #
Always make sure that objects do not
project from stowage spaces, parcel
nets or stowage nets. #
Close the loc kable stow age spaces
before starting a journe y. #
Stow and secure objects that are heavy,
hard, poin ted, sharp-edged, fragile or
to o lar geinthe cargo compartment. Comply with
the instructions for loading theve hi‐
cle. &
WARNING Risk offire from placing
objects in the mobile phone stowage
compartment
There is a risk of fire , in particular, if you
place more than one mobile phone in the
mobile phone stowage compartment. #
Apart from a mobile phone, do not
place any other objects in the mobile
phone stowage compartment, especially
th ose made of me tal. *
NO
TEDama getoobjects caused byplac‐
ing them in the mobile phone stowage
compartment If objects are placed in
the mobile phone
stow age compartment, they may be dama ged
by electromagnetic fields. #
Do not place credit cards, storage
media or other objects sensitive toelec‐
tromagnetic fields in the mobile phone
stow age compartment. *
NO
TEDama getothe mobile phone stow‐
age compartment caused byliquids If liquids enter
the mobile phone stowage
compartment, the compartment may be dam‐
aged. #
Ensure that no liquids enter the mobile
phone stowage compartment. Obse
rveth efo llowing no tes on wireless charging:
R The charging function is only available when
th e drive sy stem has been star ted.
R In some cases, it may not be possible to
ch arge small mobile phones at everyposition
of the mobile phone recep tacle.
R It may not be possible tocharge large mobile
phones that do not rest inthe mobile phone
re cep tacle.
R The mobile phone can warm up during the
ch arging process. This depends on the appli‐
cations (apps) cur rently running.
R For more ef ficient charging, the pr otective
case should be remo ved from the mobile
phone. Pr otective cases designed for wireless
ch arging are an exception.
R When charging, the mat should be used if
possible. Charging
the mobile phone in the front wire‐
lessly Requ
irements:
R The mobile phone must be suitable for wire‐
less charging. A list of compatible mobile
phones can be found at:
http://www.mercedes-benz.com/connect 82
Seats and stowage
Page 85 of 416

#
Open theflap of stowage compartment 1
abo vethe media displa y. #
Place the mobile phone as cent rally as possi‐
ble with the display facing up wards on the
mar ked sur face of mat 2.
When thech arging symbol is shown in the
multimedia sy stem, the mobile phone is being
ch arge d.
Malfunctions during charging are shown in
th e multimedia sy stem displa y.
% The mat can be
remo vedfo r cleaning, e.g.
with clean, luk ewarmwater. Installing or
removing the floor mats &
WARNING Risk of accident due to
objects in the driver's foot we ll
Objects in the driver's foot we ll may impede
pedal tr avel or block a depressed pedal.
This jeopardizes the operating and road
saf ety of theve hicle. #
Stow all objects in theve hicle securely
so that they cannot getinto the driver's
fo ot we ll. #
Always ins tallth efloor mats securely
and as prescribed in order toensure
th at there is alw ays suf ficient room for
th e pedals. #
Do not use loose floor mats and do not
place floor mats on top of one ano ther. #
Toinstall: press pushbuttons 1onto hold‐
ers 2. #
Toremo ve: pull thefloor mats off holders
2. Seats and
stowage 83
Page 86 of 416

Exterior lighting
Note
s onchanging the lights when driving
abroad Ve
hicles with halogen or static LED head‐
lamps: Changing the headlamps is not neces‐
sar y.The legal requ irements will also be fulfilled
in countries with left and right-hand traf fic. In
fo rm ation about lighting sy stems and your
re sponsibility The
vehicle's various lighting sy stems are only
aids. The vehicle driver is responsible for adjust‐
ing theve hicle's lighting tothe pr evailing light,
visibilit y,statutory conditions and traf fic condi‐
tions. Light switch
Operating the light switch
#
00470060 Activates or deacti vates parking
lights and license plate and instrument light‐
ing. #
00480058 Activates or deacti vates automatic
driving lights/daytime running lights (p refer‐
re d light switch position). #
00490058 Activates or deacti vates low beam/
high beam. #
4 Activates or deacti vatesfo g light. #
5 005E Activates or deacti vatesre ar fog
light. #
6Applies or releases the electric parking
brake(/ page143)
% If
yo u hear a warning tone when exiting the
ve hicle, the light may still be on. %
The turn signal light,
the high beam and the
high-beam flasher are operated with the com‐
bination switch (/ page 85).
% Leaving
thest anding lights on for se veral
hours drains the batter y.
If th e battery charge isvery low, thest anding
lights will swit choff automatically toenable
th e next vehicle start.
Au tomatic driving lights function &
WARNING Risk of accident when the low
beam is switched off in poor visibility
When the light switch is set to0058 ,th e low
beam may not be switched on automatically if
th ere is fog, snow or other causes of poor vis‐
ibility such as spr ay. #
In such cases, turn the light switch to
0058 . The automatic driving lights are only an aid.
Re
sponsibility forve hicle lighting rests with you.
Tu rn the light switch from 0058to0058 immedi‐
ately in theev ent of fog, snow or spr ay. Other‐
wise, the driving light is temp orarily inter rupte d.
To switch the automatic driving lights on:
R Turn the light switch tothe0058 position.
Switch the po wer supply on: the parking
lamps will automatically switch on or off
depending on the brightness of the ambient
light.
The daytime running la mps are switched on
when the engine is running. The pa rking
lamps and the low beam also switch on or off
depending on the brightness of the ambient
light.
When the low beam is switched on, the0058
indicator lamp on the instrument clus ter will
also switch on.
Switching fog light and rear fog light on or off
Re quirements:
R The light switch is in the0058 or0058 posi‐
tion.
R The po wer supply or the engine has been
switched on. #
Toswitch thefo g light on or off: press but‐
to n7. #
Toswitch there ar fog light on or off: press
button 6. 84
Light and vision
Page 87 of 416

Comply with
the count ry-specific regulations for
using there ar fog lamp. Operating
the combination light switch 1
High beam
2 Right turn signal light
3 Headlamp flashing
4 Left turn signal light #
Toindicate: pushthe combination switch in
th ere qu ired direction 2or4 until it
engages. In the case of larger steering mo ve‐
ments, the combination switch will automati‐
cally switch bac k. #
Toindicate briefl y:tapth e combination
switch briefly in there qu ired direction 2or
4. The cor responding turn signal lamp will
fl ash thre e times. #
Toswitch on the high beam: switchon the
low beam (/ page84). #
Push the combination switch forw ards 1.
The 0057 indicator lamp on the instrument
clus ter will light up. The combination switch
will return toits starting position.
% The high beam swit ches tothe0058 position
only in darkness and when the engine is run‐
ning. #
Toswitch off the high beam: pushthe com‐
bination switch forw ards 1or briefly pull it
in the direction of ar row3(the action for
headlamp flashing swit ches the high beam
off).
The 0057 indicator lamp on the instrument
clus ter will go out. The combination switch
will return toits starting position. %
Ve
hicles with Highbeam Assis t:when
Highbeam Assist is active, it controls the
activation and deactivation of the high beam
(/ page 86). #
Toactivate headlamp flashing: switch on
th e po wer supp lyor ignition. #
Brief lypull the combination switch in the
direction of ar row3. Switching hazard
warning lights on or off #
Toswitch on and off: press button1.
If yo u operate a turn signal indicator while the
hazard warning lights are switched on, only the
turn signal la mps on there leva nt side of theve hi‐
cle will light up.
% The hazard
warning lights will workeven
when theve hicle has been switched off. Cornering light function
The cornering light impr
ovesth e illumination of
th ero adw ayove r a wide angle in the turning
direction, e.g. enabling better visibility in tight
bends. Light and vision
85
Page 88 of 416

The function is active under
thefo llowing condi‐
tions:
R The speed is less than 37 mph (60 km/h) and
th e indicator has been switched on or the
st eering wheel is turned.
R The speed is between 37mph (60 km/h) and
50 mph (8 0 km/h) and thesteering wheel is
turned.
The cornering light may still light up for a short
time but is switched off automatically af ter a
maximum of thre e minutes.
% When
reve rsege ar is engaged, the lighting
switches tothe opposite side. Highbeam Assist
Ad
aptive Highbeam Assist function &
WARNING Risk of accident despite
Ad aptive Highbeam Assist
Ad aptive Highbeam Assist does not recognize
th efo llowing road users:
R Road users without lights, e.g. pedes‐
trians
R Road users with poor lighting, e.g. cyclists
R Road users whose lighting is obstructed,
e.g. bya bar rier
On very rare occasions, Adaptive Highbeam
Assist may failto recognize other road users
with their own lighting, or may recognize
th em too late.
In these or similar situations, the automatic
high beam is not deactivated or is activated
despite the presence of other road users. #
Always obser vethe tra ffic carefully and
switch off the high beam in good time. The
Adaptive Highbeam Assist automatically
swit ches between thefo llowing settings:
R Low beam
R High beam
The sy stem de tects that vehicle lights are
approaching in the opposite direction or driving
ahead of theve hicle. At
speeds greater than 19 mp h (30 km/h), a
ch ange is made tothefo llowing setting:
R If no other road users are de tected, the high
beam switches on automaticall y.
At speeds less than 16 mp h (25 km/h) or if there
is suf ficient road lighting, a change is made to
th efo llowing setting:
R The high beam automatically switches off.
Sy stem limitations
Ad aptive Highbeam Assist cannot take thero ad,
we ather or traf fic conditions into consideration.
The de tection of obs tacles can be restricted if:
R Visibility is impaired, e.g. in fog, heavy rain or
snow
R The sensors are dirty or co vered
Ad aptive Highbeam Assist is only an aid. You are
re sponsible for ensuring cor rect vehicle lighting
in accordance with the pr evailing light, visibility
and traf fic conditions.
The sy stem's optical sensor is located behind the
windshield near theove rhead cont rol panel.
Switching Highbeam Assist on or off #
Toswitch on: turnthe light switch tothe
0058 position. #
Switch the highbeam on using the combina‐
tion switch.
If th e highbeam is automatically switched on
in darkness, the 00CE indicator lamp on the
multifunction display lights up. #
Toswitch off: switch offthe highbeam using
th e combination switch. Setting
theex terior lighting switch-off delay
time Re
quirements:
R The light switch is in the0058 position.
Multimedia sy stem:
4 © 5
Settings 5
Light
5 Exterior Lighting Delay #
Set a switch-off delay time.
When theve hicle engine is switched off, theex te‐
ri or lighting will be activated forth e set time. 86
Light and vision