Page 848 of 3229
Refer t o: Timi ng Belt (303-01B Engi ne - TD4 2.2L Dies el , Removaland Inst all at ion).
Connect t he batt ery ground cable and ins tall t he cover.
Refer t o: Specificati ons (414-00 Bat tery and Charging Sys tem -General Informat ion, Specificati ons).
4.
Page 849 of 3229
Publi s hed: 11-May-2011
Engine - TD4 2.2L Diesel - Timing Belt
Removal and Inst all ati on
Special T ool(s) 303-1270
Ti ming Pi n, Cranks haft 303-1272
Locki ng Tool , Flywheel 303-1277
Ti ming Pi n, Cams haft
Removal
• NOTE: The t imi ng and locking t ool s are ins tal led t o all ow t he ti mi ng cover to be r emoved. All t ool s mus t be left ins tal led
t o all ow t he ti ming cover ins tall ati on procedure t o be fol lowed.
Refer t o: Specificati ons (414-00 Bat tery and Charging Sys tem -
General Informat ion, Specificati ons).
1.
2. W ARNING: Make sure t o s upport the vehicle wit h axle
s tands .
Rais e and s upport t he vehi cl e. 2.
Refer t o: Timi ng Cover (303-01B Engi ne - TD4 2.2L Dies el , Removal
and Inst all at ion).
3.
Page 851 of 3229
2.
CAUTIONS: The cranks haft or camshaft s mus t not be rot ated
whil e t he t imi ng bel t is removed. Make s ure that t he ti mi ng bel t is not folded t o
produce a l oop wit h a di ameter les s t han 35 mm.
Inst all t he new t imi ng belt . St arti ng at t he cams haft pul ley, ins tall t he
t imi ng belt i n a clockwis e direct ion, in the
s equence s hown. 2.
Light ley t ighten t he t imi ng belt t ens i oner bolt . Us ing an Allen key, adjus t the t ensi on count er-
clockwis e unti l the point er is i n t he posi ti on
i llus t rated. Tight en the tens ioner bol t.
T orque: 25 Nm 3.
Page 854 of 3229
Loosen t he cranks haft damper bolt . 12.
13. CAUTION: If the point er pos i ti on is i ncorrect,
repeat t he ti ming bel t tens ioning operat ion.
Loosen t he t imi ng belt t ens i oner bolt . Us ing an Allen key, adjus t the t ensi oner
clockwis e unti l the point er is i n t he posi ti on
i llus t rated. Tight en the tens ioner bol t.
T orque: 25 Nm 13.
Tight en the cranks haft damper.
T orque: 70 Nm 14.
Page 855 of 3229
Remove t he cranks haft l ocking tool.
Speci al Tool (s ): 303-1272 15.
Remove the cranks haft t imi ng t ool .
Spec i al T ool(s ): 303-1270 16.
Remove t he camshaft sprocket ti ming tool.
Speci al Tool (s ): 303-1277 17.
Rotat e t he engi ne t wo complete turns cl ockwi se. 18.
Check the t iming belt t ensi oner i s in the correct pos it ion. If
not repeat the set ti ng procedure. 19.
Page 921 of 3229

Publi s hed: 11-May-2011
Engine Cooling - I6 3.2L Petrol - Coolant Pump
Removal and Inst all ati on
Removal
Remove t he cover and dis connect the bat tery ground cabl e.
Refer t o: Specificati ons (414-00 Bat tery and Charging Sys tem -General Informat ion, Specificati ons).
1.
Remove t he engi ne cover.
Refer t o: Engi ne Cover - I6 3.2L Pet rol (501-05 Int eri or Trim andOrnament ati on, Removal and Ins tal lat ion).
2.
Remove t he bat t ery t ray.
Refer t o: Bat t ery Tray (414-01 Bat tery, Mount ing and Cables ,Removal and Ins tall ati on).
3.
Remove t he air cleaner as s embly.
Refer t o: Air Cleaner (303-12A Intake Ai r Dis tribut ion and Fil tering -I6 3.2L Pet rol, Removal and Ins t al lat ion).
4.
Drai n t he cool ant .
Refer t o: Cool ing Sys tem Drai ni ng, Fi lli ng and Bleeding (303-03AEngine Cooli ng - I6 3.2L Petrol, General Procedures).
5.
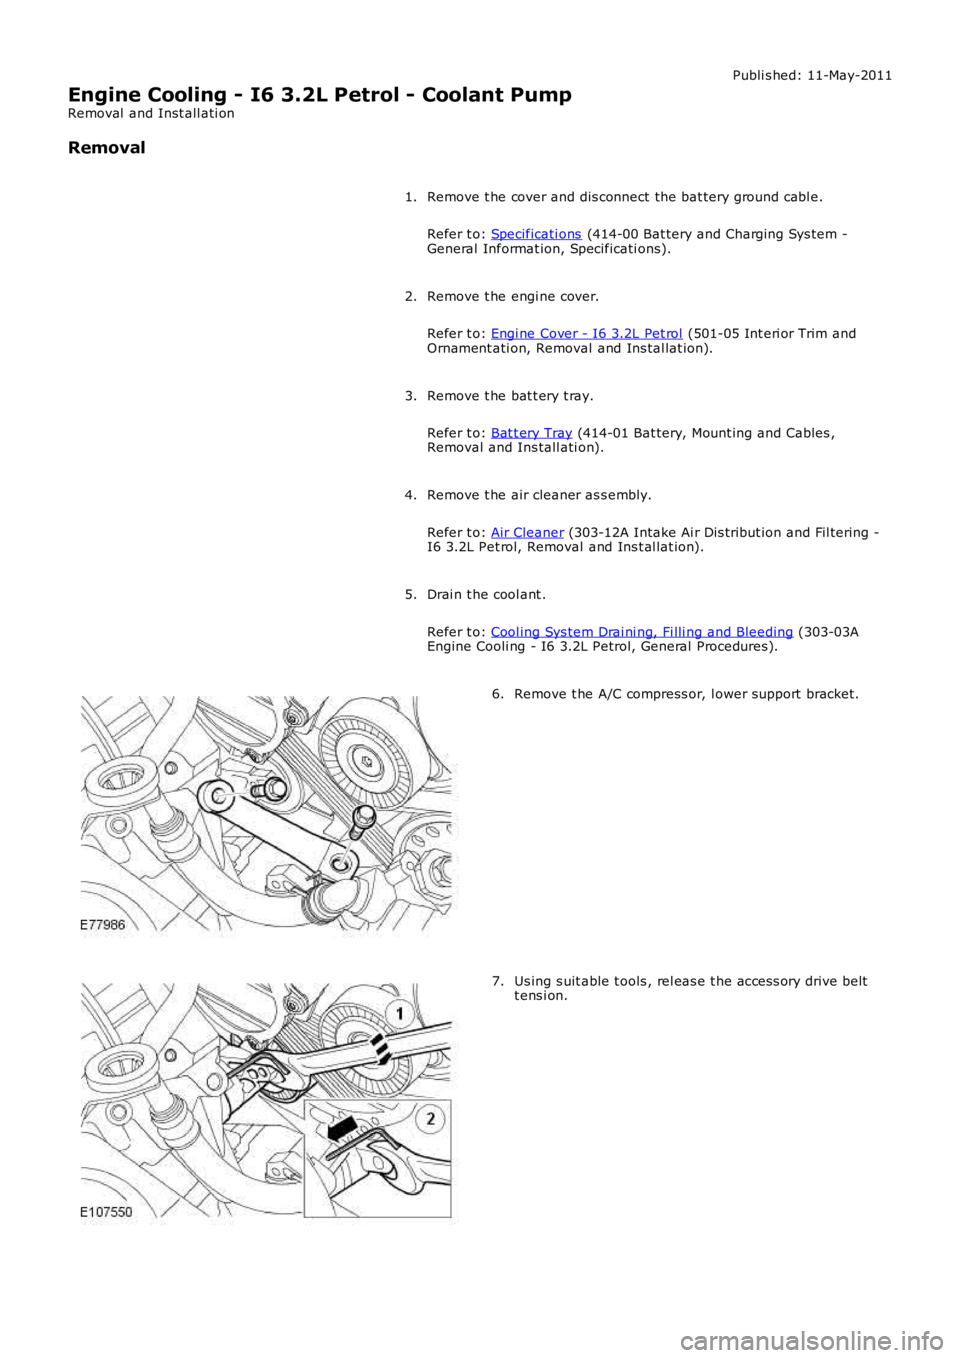
Remove t he A/C compress or, l ower support bracket.6.
Us ing s uit able t ools , rel eas e t he acces s ory drive beltt ens i on.7.
Page 922 of 3229
Remove t he power s t eering pump support bracket
8. Releas e t he power s t eering pump.
9. 10.
NOTE: Dis card t he gasket .
Remove t he cool ant pump.
10.
Installation 1. NOTE: Ins t al l a new gas ket .
Inst all t he cool ant pump.
T orque: 17 Nm 1.
2. CAUTION: The acces s ory drive belt mus t be i n posi ti on
before t he power s t eering pump is i nst all ed.
Inst all t he power s t eering pump.
T orque: 25 Nm 2.
Inst all t he power s t eering pump support bracket.
T orque: 25 Nm 3.
Inst all t he acces sory dri ve bel t.
4.
Page 930 of 3229
Remove t he A/C compress or, upper s upport bracket.
7. Us ing s uit able t ools , rel eas e t he acces s ory drive belt
t ens i on.
8. Releas e t he A/C compress or and posi ti on as ide.
9.