Page 385 of 408

I TROUBLESHOOTING II-3
Condition Section/hem Number
2-A, 1
2-A, 2
2-A, 3 Transmission shifts erratically
Transmission will not engage
Transmission will not downshift during heavy acceleration
Transmission grinds going into forward gears while driving
Transmission jumps out of gear
Transmission difficult to shift
Transmission leaks fluid 2-B, 1 2-C, 2
2-B, 2
2-B, 3 2-C, 2
2-B, 4
2-C,l
2-c,2
2-c,3
2-c,4
2-c,5
2-C,6 Clutch slips on hills or during sudden acceleration
Clutch will not disengage, difficult to shift
Clutch is noisy when the clutch pedal is pressed
Clutch pedal extremely difficult to press
Clutch pedal remains down when pressed
Clutch chatters when engaging
2-D, 1
2-D, 2 Differential makes a low pitched rumbling noise
Differential makes a howling noise
All Wheel and Four Wheel Drive Vehicles Leaks fluid from seals or vent after being driven
Makes excessive noise while driving
Jumps out of gear 2-E, 1
2-E, 2
2-E, 3
Rear Wheel, All Wheel and Four Wheel Drive Vehicles Clunking noise from center of vehicle shifting from forward to reverse
,Excessive vibration from center of vehicle when accelerating 2-F, l
2-F,2
All Wheel and Four Wheel Drive Vehicles , Front or rear wheel makes a clicking noise
Front or Rear wheel vibrates with increased speed 2-G,l
2-G,2
Front Wheel Drive Vehicles Front wheel makes a clicking noise
Rear wheel makes a clicking noise 2-G,3
2-G,4
Rear Wheel Drive Vehicles Front or rear wheel makes a clicking
Rear wheel shudders or vibrates noise 2-G,5
2-G,6
2-H, 1; 2-C, 1; 3-A, 9
2-H, 2; 2-C, 1; 3-A, 9 Burning odor from center of vehicle when accelerating
Engine accelerates, but vehicle does not gain speed
Brakes pedal pulsates or shimmies when pressed 3-A-l
Brakes make a squealing noise CI
3-A, 2
Brakes make a grinding noise
Vehicle pulls to one side during.braking
Brake pedal feels spongy or has excessive brake pedal travel
Brake pedal feel is firm, but brakes lack sufficient stopping power or fade 3-A, 3
3-A, 4
3-A, 5
3-A, 6
Page 386 of 408

11-4 TROUBLESHOOTING
Condition
2 Section/Item Number ^i Vehicle has excessive front end dive or locks rear brakes too easily
3-A, 7
Brake pedal goes to floor when pressed and will not pump up
3-A, 8
Brakes make a burning odor
3-A, 9
All Wheel and Four Wheel Drive Vehicles Front wheel or wheel bearing loose
Rear wheel or wheel bearingloose
Front Wheel Drive Vehicles Front wheel or wheel bearing loose
Rear wheel or wheel bearing loose 4-A. 1
4-A: 1
4-A, 1
4-A, 2
Rear Wheel Drive Vehicles Front wheel or wheel bearing loose
Rear wheel or wheel bearing loose 4-A, 2
4-A, 1
Tires worn on inside tread
Tires worn on outside tread
s Tires worn unevenly 4-B, 1
4-B, 2
4-B, 3
Excessive play in steering wheel
Steering wheel shakes at cruising speeds
Steering wheel shakes when braking
Steering wheel becomes stiff when turned 4-c, 1
4-c, 2
3-A, 1
4-c, 4
Vehicle pulls to one side
Vehicle is very bouncy over bumps
Vehicle seems to lean excessively in turns
Vehicle ride quality seems excessively harsh
Vehicle seems low or leans to one side 4-D 1
4-D, 2
4-D, 3
4-D, 4
4-D, 5
Noises Vehicle makes a clicking noise when driven
Vehicle makes a clunking or knocking noise over bumps
Vehicle makes a low pitched rumbling noise when driven
Vehicle makes a squeaking noise over bumps
Vibrations Vehicle vibrates when driven 4-E, 1
4-E, 2
4-E, 3
4-E, 4
4-E, 5
One headlight only works on high or low beam
Headlight does not work on high or low beam
Headlight(s) very dim
Tail light, running light or side marker light inoperative
Tail light, running light or side marker light works intermittently
Tail light, running light or side marker light very dim 5-A, 1
5-A, 2
5-A, 3
/ .
5-B, 1
5-B, 2
5-B, 3
Interior light inoperative
Interior light works intermittently
Interior light very dim 5-c, 1
5-c, 2
5-c, 3
Page 387 of 408

.
TROUBLESHOOTING II-5
Condition Section/Item Number
One brake light inoperative
Both brake lights inoperative
One or both brake lights very dim 5-D, 1
5-D, 2
5-D, 3
Ignition, Battery and Alternator Warning Lights, Check Engine
Light, Anti-Lock Braking System (ABS) Light, Brake Warning
Light, Oil Pressure Warning Light, and Parking Brake Warning
Light
Warning light(s) remains on after the engine is started
Warning light(s) flickers on and off when driving
Warning light(s) inoperative with ignition on, and engine not started 5-E, 1
5-E, 2
5-E, 3
Turn signals or hazard lights come on, but do not flash
Turn signals or hazard lights do not function on either side
Turn signals or hazard lights only work on one side
One signal light does not work
Turn signals flash too slowly
Turn signals flash too fast
Four-way hazard flasher indicator light inoperative
Turn signal indicator light(s) do not work in either direction
One turn signal indicator light does not work 5-F, 1
5-F, 2
5-F, 3
5-F, 4
5-F, 5
5-F, 6
5-F, 7
5-F, 8
5-F, 9
Horn does not operate
Horn has an unusual tone 5-G, 1
5-G, 2
Windshield wipers do not operate
Windshield wiper motor makes a humming noise, gets hot or blows fuses
Windshield wiper motor operates but one or both wipers fail to move
Windshield wipers will not park 5-H, 1
5-H, 2
5-H, 3
5-H, 4
Speedometer does not work
Speedometer needle fluctuates when driving at steady speeds
Speedometer works intermittently 6-A, 1
6-A, 2
6-A, 3
Speedometer does not work
Speedometer works intermittently 6-B, 1
6-B, 2
Gauge does not register 6-C 1
Gauge operates erratically 6-C 2
’
Gauge operates fully pegged 6-C 3
No air coming from air conditioner vents 7-A, 1
Air conditioner blows warm air ’ 7-A, 2
Water collects on the interior floor when the air conditioner is used
Air conditioner has a moldy odor when used 7-A, 3
7-A, 4
Blower motor does not operate
Heater blows cool air
Heater steams the windshield when used 7-B, 1
7-B, 2
7-B, 3
Page 388 of 408

II-6 TROUBLESHOOTING
DIAGhUSTIC PROCEDURES
Gasoline Engines
1. Engine turns over, but wilt not start
a. Check fuel level in fuel tank, add fuel if empty.
b. Check battery condition and state of charge. If voltage and load test below specifica-
tion, charge or replace battery.
c. Check battery terminal and cable condition and tightness. Clean terminals and replace
damaged, worn or corroded cables.
d. Check fuel delivery system. If fuel is not reaching the fuel injectors, check for a loose
electrical connector or defective fuse, relay or fuel pump and replace as necessary.
e. Engine may have excessive wear or mechanical damage such as low cylinder cranking
pressure, a broken camshaft drive system, insufficient valve clearance or bent valves.
f. Check for fuel contamination such as water in the fuel. During winter months, the wa-
ter may freeze and cause a fuel restriction. Adding a fuel additive may help, however
the fuel system may require draining and purging with fresh fuel.
g. Check for ignition system failure. Check for loose or shorted wires or damaged igni-
tion system components. Check the spark plugs for excessive wear or incorrect elec-
trode gap. If the problem is worse in wet weather, check for shorts between the spark
plugs and the ignition coils.
h. Check the engine management system for a failed sensor or control module.
2. Engine does not turn over when attempting to start
a. Check the battery state of charge and condition. If the dash lights are not visible or
very dim when turning the ignition key on, the battery has either failed internally or
discharged, the battery cables are loose, excessively corroded or damaged, or the al-
ternator has failed or internally shorted, discharging the battery. Charge or replacethe
battery, clean or replace the battery cables, and check the alternator output.
b. Check the operation of the neutral safety switch. On automatic transmission vehicles,
try starting the vehicle in both Park and Neutral. On manual transmission vehicles, de-
press the clutch pedal and attempt to start. On some vehicles, these switches can be
adjusted. Make sure the switches or wire connectors are not loose or damaged. Re-
place or adjust the switches as necessary.
c. Check the starter motor, starter solenoid or relay, and starter motor cables and wires.
Check the ground from the engine to the chassis. Make sure the wires are not loose,
damaged, or corroded. If battery voltage is present at the starter relay, try using a re-
mote starter to start the vehicle for test purposes only. Replace any damaged or cor-
roded cables, in addition to replacing any failed components.
d. Check the engine for seizure. If the engine has not been started for a long period of
time, internal parts such as the rings may have rusted to the cylinder walls. The engine
may have suffered internal damage, or could be hydro-locked from ingesting water.
Remove the spark plugs and carefully attempt to rotate the engine using a suitable
breaker bar and socket on the crankshaft pulley. If the engine is resistant to moving, or
moves slightly and then binds, do not force the engine any further before determining
the problem.
3. Enpine stalls immediately when started
a. Check the ignition switch condition and operation. The electrical contacts in the run
position may be worn or damaged. Try restarting the engine with all electrical acces-
sories in the off position. Sometimes turning the key on an off will help in emergency
situations, however once the switch has shown signs of failure, it should be replaced
as soon as possible.
b. Check for loose, corroded, damaged or shorted wires for the ignition system and re-
pair or replace.
c. Check for manifold vacuum leaks or vacuum hose leakage and repair or replace parts
as necessary.
d. Measure the fuel pump delivery volume and pressure. Low fuel pump pressure can
also be noticed as a lack of power when accelerating. Make sure the fuel pump lines
are not restricted. The fuel pump output is not adjustable and requires fuel pump re-
placement to repair.
e. Check the engine fuel and ignition management system. Inspect the sensor wiring and
electrical connectors. A dirty, loose or damaged sensor or control module wire can
simulate a failed component.
f. Check the exhaust system for internal restrictions.
4. Starter motor spins, but does not engage
a. Check the starter motor for a seized or binding pinion gear.
b. Remove the flywheel inspection plate and check for a damaged ring gear.
5. Engine is difficult to start when Gold
a. Check the battery condition, battery state of charge and starter motor current draw. Re-
place the battery if marginal and the starter motor if the current draw is beyond specifi-
cation. b. Check the battery cable condition. Clean the battery terminals and replace corroded or
damaged cables.
c. Check the fuel system for proper operation. A fuel pump with insufficient fuel pressure
or clogged injectors should be replaced.
d. Check the engine’s tune-up status. Note the tune-up specifications and check for items
such as severely worn spark plugs; adjust or replace as needed. On vehicles with
manually adjusted valve clearances, check for tight valves and adjust to specification.
e. Check for a failed coolant temperature sensor, and replace if out of specification.
f. Check the operation of the engine management systems for fuel and ignition; repair or
replace failed components as necessary.
6. En#ine is ditticutt to start when hot
a. Check the air filter and air intake system. Replace the air filter if it is dirty or contami-
nated. Check the fresh air intake system for restrictions or blockage.
b. Check for loose or deteriorated engine grounds and clean, tighten or replace as
needed.
c. Check for needed maintenance. Inspect tune-up and service related items such as
spark plugs and engine oil condition, and check the operation of the engine fuel and
ignition management system.
Diesel Engines
1. Engine turns over but won’t start
a. Check engine starting procedure and restart engine.
b. Check the glow plug operation and repair or replace as necessary.
c. Check for air in the fuel system or fuel filter and bleed the air as necessary.
d. Check the fuel delivery system and repair or replace as necessary.
e. Check fuel level and add fuel as needed.
f. Check fuel quality. If the fuel is contaminated, drain and flush the fuel tank.
g. Check engine compression. If compression is below specification, the engine may
need to be renewed or replaced.
h. Check the injection pump timing and set to specification.
i. Check the injection pump condition and replace as necessary.
j. Check the fuel nozzle operation and condition or replace as necessary.
2. Engine does
hot turn over when attempting to start
a. Check the battery state of charge and condition. If the dash lights are not visible or
very dim when turning the ignition key on, the battery has either failed internally or
discharged, the battery cables are loose, excessively corroded or damaged, or the al-
ternator has failed or internally shorted, discharging the battery. Charge or replace the
battery, clean or replace the battery cables, and check the alternator output.
b. Check the operation of the neutral safety switch. On automatic transmission vehicles,
try starting the vehicle in both Park and Neutral. On manual transmission vehicles, de-
press the clutch pedal and attempt to start. On some vehicles, these switches can be
adjusted. Make sure the switches or wire connectors are not loose or damaged. Re-
place or adjust the switches as necessary.
c. Check the starter motor, starter solenoid or relay, and starter motor cables and wires.
Check the ground from the engine to the chassis. Make sure the wires are not loose,
damaged, or corroded. If battery voltage is present at the starter relay, try using a re-
mote starter to start the vehicle for test purposes only. Replace any damaged or cor-
roded cables, in addition to replacing any failed components.
d. Check the engine for seizure. If the engine has not been started for a long period of
time, internal parts such as the rings may have rusted to the cylinder walls. The engine
may have suffered internal damage, or could be hydro-locked from ingesting water.
Remove the injectors and carefully attempt to rotate the engine using a suitable
breaker bar and socket on the crankshaft pulley. If the engine is resistant to moving, or
moves slightly and then binds, do not force the engine any further before determining
the cause of the problem.
3. Engine stalls afier starting
a. Check for a restriction in the fuel return line or the return line check valve and repair as
necessary.
b. Check the glow plug operation for turning the glow plugs off too soon and repair as
necessary.
c. Check for incorrect injection pump timing and reset to specification.
d. Test the engine fuel pump and replace if the output is below specification.
e. Check for contaminated or incorrect fuel. Completely flush the fuel system and replace
with fresh fuel.
f. Test the engine’s compression for low compression. If below specification, mechanical
repairs are necessary to repair.
g. Check for air in the fuel. Check fuel tank fuel and fill as needed.
h. Check for a failed injection pump. Replace the pump, making sure to properly set the
pump timing.
Page 389 of 408

TROUBLESHOOiNG 11-7
4. Starter motor spins, but does not engage
a. Check the starter motor for a seized or binding pinion gear.
b. Remove the flywheel inspection plate and check for a damaged ring gear.
Gasoline Engines
1. Engine runs poor/y, hesiiates
a. Check the engine ignition system operation and adjust if possible, or replace defective
parts.
b. Check for restricted fuel injectors and replace as necessary.
c. Check the fuel pump output and delivery. Inspect fuel lines for restrictions. If the fuel
pump pressure is below specification, replace the fuel pump.
d. Check the operation of the engine management system and repair as necessary.
2. Enfline lacks power
a. Check the engine’s tune-up status. Note the tune-up specifications and check for items
such as severely worn spark plugs; adjust or replace as needed. On vehicles with
manually adjusted valve clearances, check for tight valves and adjust to specification.
b. Check the air filter and air intake system. Replace the air filter if it is dirty or contami-
nated. Check the fresh air intake system for restrictions or blockage.
c. Check the operation of the engine fuel and ignition management systems. Check the
sensor operation and wiring. Check for low fuel pump pressure and repair or replace
components as necessary.
d. Check the throttle linkage adjustments. Check to make sure the linkage is fully open-
ing the throttle. Replace any worn or defective bushings or linkages.
e. Check for a restricted exhaust system. Check for bent or crimped exhaust pipes, or in-
ternally restricted mufflers or catalytic converters. Compare inlet and outlet tempera-
tures for the converter or muffler. If the inlet is hot, but outlet cold, the component is
restricted.
f. Check for a loose or defective knock sensor. A loose, improperly torqued or defective
knock sensor will decrease spark advance and reduce power. Replace defective knock
sensors and install using the recommended torque specification.
g. Check for engine mechanical conditions such as low compression, worn piston rings,
worn valves, worn camshafts and related parts. An engine which has severe mechani-
cal wear, or has suffered internal mechanical damage must be rebuilt or replaced to re-
store lost power.
h. Check the engine oil level for being overfilled. Adjust the engine’s oil level, or change
the engine oil and filter, and top off to the correct level.
i. Check for an intake manifold or vacuum hose leak. Replace leaking gaskets or worn
vacuum hoses.
j. Check for dragging brakes and replace or repair as necessary.
k. Check tire air pressure and tire wear. Adjust the pressure to the recommended set-
tings. Check the tire wear for possible alignment problems causing increased rolling
resistance, decreased acceleration and increased fuel usage.
I. Check the octane rating of the fuel used during refilling, and use a higher octane rated
fuel.
3. Poor fuel economy
a. Inspect the air filter and check for any air restrictions going into the air filter housing.
Replace the air filter if it is dirty or contaminated.
b. Check the engine for tune-up and related adjustments. Replace worn ignition parts,
check the engine ignition timing and fuel mixture, and set to specifications if possible.
c. Check the tire size, tire wear, alignment and tire pressure. Large tires create more
rolling resistance, smaller tires require more engine speed to maintain a vehicle’s road
speed. Excessive tire wear can be caused by incorrect tire pressure, incorrect wheel
alignment or a suspension problem. All of these conditions create increased rolling
resistance, causing the engine to work harder to accelerate and maintain a vehicle’s
speed.
d. Inspect the brakes for binding or excessive drag. A sticking brake caliper, overly ad-
justed brake shoe, broken brake shoe return spring, or binding parking brake cable or
linkage can create a significant drag, brake wear and loss of fuel economy. Check the
brake system operation and repair as necessary.
4. Engine runs on (diesels) when turned off
a. Check for idle speed set too high and readjust to specification.
b. Check the operation of the idle control valve, and replace if defective.
c. Check the ignition timing and adjust to recommended settings.
Check for defective
sensors or related components and replace if defective.
d. Check for a vacuum leak at the intake manifold or vacuum hose
and replace defective
gaskets or hoses.
e. Check the engine for excessive carbon build-up in the combustion chamber. Use a
recommended decarbonizing fuel additive or disassemble the cylinder head to remove
the carbon.
f. Check the operation of the engine fuel management system and replace defective sen-
sors or control units.
g. Check the engine operating temperature for overheating and repair as necessary. 5. Engine knocks and pinfls during heavy accele/ation, and on steep hills
a. Check the octane rating of the fuel used during refilling, and use a higher octane rated
fuel.
b. Check the ignition timing and adjust to recommended settings. Check for defective
sensors or related components and replace if defective.
c. Check the engine for excessive carbon build-up in the combustion chamber. Use a
recommended decarbonizing fuel additive or disassemble the cylinder head to remove
the carbon.
d. Check the spark plugs for the correct type, electrode gap and heat range. Replace worn
or damaged spark plugs. For severe or continuous high speed use, install a spark plug
that is one heat range colder.
e. Check the operation of the engine fuel management system and replace defective sen-
sors or control units.
f. Check for a restricted exhaust system. Check for bent or crimped exhaust pipes, or in-
ternally restricted mufflers or catalytic converters. Compare inlet and outlet tempera-
tures for the converter or muffler. If the inlet is hot, but outlet cold, the component is
restricted.
6. Engine atxelerates, but vehicle does not gain speed
a. On manual transmission vehicles, check for causes of a slipping clutch. Refer to the
clutch troubleshooting section for additional information.
b. On automatic transmission vehicles, check for a slipping transmission” Check the
transmission fluid level and condition. If the fluid level is too high, adjust to the cor-
rect level. If the fluid level is low, top off using the recommended fluid type. If the fluid
exhibits a burning odor, the transmission has been slipping internally. Changing the
fluid and filter may help temporarily, however in this situation a transmission may re-
quire overhauling to ensure long-term reliability.
Diesel Engines
1. Engine runs pOOr!y a. Check the injection pump timing and adjust to specification.
b. Check for air in the fuel lines or leaks, and bleed the air from the fuel system.
c. Check the fuel filter, fuel feed and return lines for a restriction and repair as necessary.
d. Check the fuel for contamination, drain and flush the fuel tank and replenish with fresh
fuel.
2. Enfline lacks power
a. Inspect the air intake system and air filter for restrictions and, if necessary, replace the
air filter.
b. Verify the injection pump timing and reset if out of specification.
c. Check the exhaust for an internal restriction and replace failed parts.
d. Check for a restricted fuel filter and, if restricted, replace the filter.
e. Inspect the fuel filler cap vent. When removing the filler cap, listen for excessive hiss-
ing noises indicating a blockage in the fuel filler cap vents, If the filler cap vents are
blocked, replace the cap.
f. Check the fuel system for restrictions and repair as necessary.
g. Check for low engine compression and inspect for external leakage at the glow plugs
or nozzles. If no external leakage is noted, repair or replace the engine.
ENGINE PERFORMANCE TROUBLESHOOTING HINTS When troubleshooting an engine running or performance condition, the mechanical
condition of the engine should be determined before lengthy troubleshooting procedures
are performed.
The engine fuel management systems in fuel injected vehicles rely on electronic sen-
sors to provide information to the engine control unit for precise fuel metering. Unlike
carburetors, which use the incoming air speed to draw fuel through the fuel metering jets
in order to provide a proper fuel-to-air ratio, a fuel injection system provides a specific
amount of fuel which is introduced by the fuel injectors into the intake manifold or intake
port, based on the information provided by electronic sensors.
The sensors monitor the engine’s operating temperature, ambient temperature and the
amount of air entering the engine, engine speed and throttle position to provide informa-
tion to the engine control unit, which, in turn, operates the fuel injectors by electrical
pulses. The sensors provide information to the engine control unit using low voltage
electrical signals. As a result, an unplugged sensor or a poor electrical contact could
cause a poor running condition similar to a failed sensor.
When troubleshooting a fuel related engine condition on fuel injected vehicles, care-
fully inspect the wiring and electrical connectors to the related components. Make sure
the electrical connectors are fully connected, clean and not physically damaged. If neces-
sary, clean the electrical contacts using electrical contact cleaner. The use of cleaning
agents not specifically designed for electrical contacts should not be used, as they could
leave a surface film or damage the insulation of the wiring.
The engine electrical system provides the necessary electrical power to operate the ve-
hicle’s electrical accessories, electronic control units and sensors. Because engine man-
agement systems are sensitive to voltage changes, an alternator which over or under-
charges could cause engine running problems or component failure. Most alternators
utilize internal voltage regulators which cannot be adjusted and must be replaced indi-
vidually or as a unit with the alternator.
Page 390 of 408

11-8 TROUBLESHOOTING
Ignition systems may be controlled by, or linked to, the engine fuel management sys-
tem. Similar to the fuel injection system, these ignition systems rely on electronic sen-
sors for information to determine the optimum ignition timing for a given engine speed
and load. Some ignition systems no longer allow the ignition timing to be adjusted.
Feedback from low voltage electrical sensors provide information to the control unit to
determine the amount of ignition advance. On these systems, if a failure occurs the failed
component must be replaced. Before replacing suspected failed electrical components,
carefully inspect the wiring and electrical connectors to the related components. Make
sure the electrical connectors are fully connected, clean and not physically damaged. If
necessary, clean the electrical contacts using electrical contact cleaner. The use of clean-
ing agents not specifically designed for electrical contacts should be avoided, as they
could leave a surface film or damage the insulation of the wiring.
1. Engine makes a knocking or pinging noise when accelerating
a. Check the octane rating of the fuel being used. Depending on the type of driving or
driving conditions, it may be necessary to use a higher octane fuel.
b. Verify the ignition system settings and operation. Improperly adjusted ignition timing
or a failed component, such as a knock sensor, may cause the ignition timing to ad-
vance excessively or prematurely. Check the ignition system operation and adjust, or
replace components as needed.
c. Check the spark plug gap, heat range and condition. If the vehicle is operated in se-
vere operating conditions or at continuous high speeds, use a colder heat range spark
plug. Adjust the spark plug gap to the manufacturer’s recommended specification and
replace worn or damaged spark plugs.
2. Sfarter motor grinds when used
a. Examine the starter pinion gear and the engine ring gear for damage, and replace dam-
aged parts.
b. Check the starter mounting bolts and housing. If the housing is cracked or damaged
replace the starter motor and check the mounting bolts for tightness.
3. Engine makes a screeching noise
a. Check the accessory drive belts for looseness and adjust as necessary.
b. Check the accessory drive belt tensioners for seizing or excessive bearing noises and
replace if loose, binding, or excessively noisy.
c. Check for a seizing water pump. The pump may not be leaking; however, the bearing
may be faulty or the impeller loose and jammed. Replace the water pump.
4. Engine makes a growling noise
a. Check for a loose or failing water pump. Replace the pump and engine coolant.
b. Check the accessory drive belt tensioners for excessive bearing noises and replace if
loose or excessively noisy.
5. Engine makes a ticking or tapping noise
a. On vehicles with hydraulic lash adjusters, check for low or dirty engine oil and top off
or replace the engine oil and filter.
b. On vehicles with hydraulic lash adjusters, check for collapsed lifters and replace failed
components.
c. On vehicles with hydraulic lash adjusters, check for low oil pressure caused by a re-
stricted oil filter, worn engine oil pump, or oil pressure relief valve.
d. On vehicles with manually adjusted valves, check for excessive valve clearance or
worn valve train parts. Adjust the valves to specification or replace worn and defective
parts.
e. Check for a loose or improperly tensioned timing belt or timing chain and adjust or re-
place parts as necessary.
f. Check for a bent or sticking exhaust or intake valve. Remove the engine cylinder head
to access and replace.
6. Engine makes a heavy knocking noise
a. Check for a loose crankshaft pulley or flywheel; replace and torque the mounting
bolt(s) to specification.
b. Check for a bent connecting rod caused by a hydro-lock condition. Engine disassem-
bly is necessary to inspect for damaged and needed replacement parts.
c. Check for excessive engine rod bearing wear or damage. This condition is also asso-
ciated with low engine oil pressure and will require engine disassembly to inspect for
damaged and needed replacement parts,
7. Vehicle has a fuel odor when driven ’ a. Check the fuel gauge level. If the fuel gauge registers full, it is possible that the odor is
caused by being filled beyond capacity, or some spillage occurred during refueling.
The odor should clear after driving an hour, or twenty miles, allowing the vapor canis-
ter to purge.
b. Check the fuel filler cap for looseness or seepage. Check the cap tightness and, if
loose, properly secure. If seepage is noted, replace the filler cap.
c. Check for loose hose clamps, cracked or damaged fuel delivery and return lines, or
leaking components or seals, and replace or repair as necessary. d. Check the vehicle’s fuel economy. If fuel consumption has increased due to a failed
component, or if the fuel is not properly ignited due to an ignition related failure, the
catalytic converter may become contaminated. This condition may also trigger the
check engine warning light. Check the spark plugs for a dark, rich condition or verify
the condition by testing the vehicle’s emissions. Replace fuel fouled spark plugs, and
test and replace failed components as necessary.
5. Vehicle has a rotten egg odor when driven
a. Check for a leaking intake gasket or vacuum leak causing a lean running condition. A
lean mixture may result in increased exhaust temperatures, causing the catalytic con-
verter to run hotter than normal. This condition may also trigger the check engine
warning light. Check and repair the vacuum leaks as necessary.
b. Check the vehicle’s alternator and battery condition. If the alternator is overcharging,
the battery electrolyte can be boiled from the battery, and the battery casing may begin
to crack, swell or bulge, damaging or shorting the battery internally. If this has oc-
curred, neutralize the battery mounting area with a suitable baking soda and water
mixture or equivalent, and replace the alternator or voltage regulator. Inspect, service,
and load test the battery, and replace if necessary.
9. Vehicle has a sweet odor when driven
a. Check for an engine coolant leak caused by a seeping radiator cap, loose hose clamp,
weeping cooling system seal, gasket or cooling system hose and replace or repair as
needed.
b. Check for a coolant leak from the radiator, coolant reservoir, heater control valve or
under the dashboard from the heater core, and replace the failed part as necessary.
c. Check the engine’s exhaust for white smoke in addition to a sweet odor. The presence
of white, steamy smoke with a sweet odor indicates coolant leaking into the combus-
tion chamber. Possible causes include a failed head gasket, cracked engine block or
cylinder head. Other symptoms of this condition include a white paste build-up on the
inside of the oil filler cap, and softened, deformed or bulging radiator hoses.
19. Engine vibraies when idling
a. Check for loose, collapsed, or damaged engine or transmission mounts and repair or
replace as necessary.
b. Check for loose or damaged engine covers or shields and secure or replace as neces-
sary.
11. Engine vibrates during acceleration
a. Check for missing, loose or damaged exhaust system hangers and mounts; replace or
repair as necessary.
b. Check the exhaust system routing and fit for adequate clearance or potential rubbing;
repair or adjust as necessary.
7. Battery goes dead while driving
a. Check the battery condition. Replace the battery if the battery will not hold a charge or
fails a battery load test. If the battery loses fluid while driving, check for an overcharg-
ing condition. If the alternator is overcharging, replace the alternator or voltage regula-
tor. (A voltage regulator is typically built into the alternator, necessitating alternator re-
placement or overhaul.)
b. Check the battery cable condition. Clean or replace corroded cables and clean the bat-
tery terminals.
c. Check the alternator and voltage regulator operation. If the charging system is over or
undercharging, replace the alternator or voltage regulator, or both.
d. Inspect the wiring and wire connectors at the alternator for looseness, a missing .
ground or defective terminal, and repair as necessary.
e. Inspect the alternator drive belt tension, tensioners and condition. Properly tension the
drive belt, replace weak or broken tensioners, and replace the drive belt if worn or
cracked.
2. Battery goes dead overnight
a. Check the battery condition. Replace the battery if the battery will not hold a charge or
fails a battery load test.
b. Check for a voltage draw, such as a trunk light, interior light or glove box light staying
on. Check light switch position and operation, and replace if defective.
c. Check the alternator for an internally failed diode, and replace the alternator if defec-
tive.
1. Engine overheats
a. Check the coolant level. Set the heater temperature to full hot and check for internal air
pockets, bleed the cooling system and inspect for leakage. Top off the cooling system
with the correct coolant mixture.
b. Pressure test the cooling system and radiator cap for leaks. Check for seepage caused
by loose hose clamps, failed coolant hoses, and cooling system components such as
the heater control valve, heater core, radiator, radiator cap, and water pump. Replace
defective parts and fill the cooling system with the recommended coolant mixture.
Page 391 of 408

TROUBLESHOOTING 11-9
c. On vehicles with electrically controlled cooling fans, check the cooling fan operation.
Check for blown fuses or defective fan motors, temperature sensors and relays, and
replace failed components.
d. Check for a coolant leak caused by a failed head gasket, or a porous water jacket cast-
ing in the cylinder head or engine block. Replace defective parts as necessary.
e. Check for an internally restricted radiator. Flush the radiator or replace if the blockage
is too severe for flushing.
f. Check for a damaged water pump. If coolant circulation is poor, check for a loose wa-
ter pump impeller. If the impeller is loose, replace the water pump.
2. Engine loses coolant
a. Pressure test the cooling system and radiator cap for leaks. Check for seepage caused
by loose hose clamps, failed coolant hoses, and cooling system components such as
the heater control valve, heater core, radiator, radiator cap, and water pump. Replace
defective parts and fill the cooling system with the recommended coolant mixture.
b. Check for a coolant leak caused by a failed head gasket, or a porous water jacket cast-
ing in the cylinder head or engine block. Replace defective parts as necessary.
3. Engine temperature remains co/d when driving
a. Check the thermostat operation. Replace the thermostat if it sticks in the open posi-
tion.
b. On vehicles with electrically controlled cooling fans, check the cooling fan operation.
Check for defective temperature sensors and stuck relays, and replace failed compo-
nents.
c. Check temperature gauge operation if equipped to verify proper operation of the
gauge. Check the sensors and wiring for defects, and repair or replace defective com-
ponents.
4. Engine runs hot
a. Check for an internally restricted radiator. Flush the radiator or replace if the blockage
is too severe for flushing.
b. Check for a loose or slipping water pump drive belt. Inspect the drive belt condition.
Replace the belt if brittle, cracked or damaged. Check the pulley condition and prop-
erly tension the belt.
c. Check the cooling fan operation. Replace defective fan motors, sensors or relays as
necessary.
d. Check temperature gauge operation if equipped to verify proper operation of the
gauge. Check the sensors and wiring for defects, and repair or replace defective com-
ponents.
e. Check the coolant level. Set the heater temperature to full hot, check for internal air
pockets, bleed the cooling system and inspect for leakage. Top off the cooling system
with the correct coolant mixture. Once the engine is cool, recheck the fluid level and
top off as needed.
NOTE: The engine cooling system can also be affected by an engine’s me-
chanical condition. A failed head gasket or a porous casting in the engine
block or cylinder head could cause a loss of coolant and result in engine
overheating.
Some cooling systems rely on electrically driven cooling fans to cool the radiator and
use electrical temperature sensors and relays to operate the cooling fan. When diagnos-
ing these systems, check for blown fuses, damaged wires and verify that the electrical
connections are fully connected, clean and not physically damaged. If necessary, clean
the electrical contacts using electrical contact cleaner. The use of cleaning igents not specifically designed for electrical contacts could leave a film or damage the insulation of
the wiring.
1. Exhaust rattles at idle speed
a. Check the engine and transmission mounts and replace mounts showing signs of
damage or wear.
b. Check the exhaust hangers, brackets and mounts. Replace broken, missing or dam-
aged mounts.
c. Check for internal damage to mufflers and catalytic converters. The broken pieces from
the defective component may travel in the direction of the exhaust flow and collect
and/or create a blockage in a component other than the one which failed, causing en-
gine running and stalling problems. Another symptom of a restricted exhaust is low
engine manifold vacuum. Remove the exhaust system and carefully remove any loose
or broken pieces, then replace any failed or damaged parts as necessary.
d. Check the exhaust system clearance, routing and alignment. If the exhaust is making
contact with the vehicle in any manner, loosen and reposition the exhaust system.
2. Exhaust system vibrates when driving
a. Check the exhaust hangers, brackets and mounts. Replace broken, missing or dam-
aged mounts.
b. Check the exhaust system clearance, routing and alignment. If the exhaust is making
contact with the vehicle in any manner, check for bent or damaged components and
replace, then loosen and reposition the exhaust system.
c. Check for internal damage to mufflers and catalytic converters. The broken pieces from
the defective component may travel in the direction of the exhaust flow and collect
and/or create a blockage in a component other than the one which failed, causing en-
gine running and stalling problems. Another symptom of a restricted exhaust is low
engine manifold vacuum. Remove the exhaust system and carefully remove any loose
or broken pieces, then replace any failed or damaged parts as necessary.
3. Exhaust system hangs too low
a. Check the exhaust hangers, brackets and mounts. Replace broken, missing or dam-
aged mounts.
b. Check the exhaust routing and alignment. Check and replace bent or damaged com-
ponents. If the exhaust is not routed properly, loosen and reposition the exhaust sys-
tern.
4. Exhaust sounds loud
a. Check the system for looseness and leaks. Check the exhaust pipes, clamps, flange
bolts and manifold fasteners for tightness. Check and replace any failed gaskets.
b. Check and replace exhaust silencers that have a loss of efficiency due to internally
broken baffles or worn packing material.
c. Check for missing mufflers and silencers that have been replaced with straight pipes
or with non-original equipment silencers.
NOTE: Exhaust system rattles, vibration and proper alignment should not
be overlooked. Excessive vibration caused by collapsed engine mounts,
damaged or missing exhaust hangers and misalignment may cause surface
cracks and broken welds, creating exhaust leaks or internal damage to ex-
haust components such as the catalytic converter, creating a restriction to
exhaust flow and loss of power.
1. Transmission shit& erratically
a. Check and if not within the recommended range, add or remove transmission fluid to
obtain the correct fluid level. Always use the recommended fluid type when adding
transmission fluid.
b. Check the fluid level condition. If the fluid has become contaminated, fatigued from
excessive heat or exhibits a burning odor, change the transmission fluid and filter us-
ing the recommended type and amount of fluid. A fluid which exhibits a burning odor
indicates that the transmission has been slipping internally and may require future re-
pairs.
c. Check for an improperly installed transmission filter, or missing filter gasket, and re-
pair as necessary.
d. Check for loose or leaking gaskets, pressure lines and fittings, and repair or replace as
necessary.
e. Check for loose or disconnected shift and throttle linkages or vacuum hoses, and re-
pair as necessary. ,
2. Transmission will not engage
a. Check the shift linkage for looseness, wear and proper adjustment, and repair as nec-
essary. b. Check for a loss of transmission fluid and top off as needed with the recommended
fluid.
c. If the transmission does not engage with the shift linkage correctly installed and the
proper fluid level, internal damage has likely occurred, requiring transmission removal
and disassembly.
3. Transmission will not downshift during heavy acceleration
a. On computer controlled transmissions, check for failed sensors or control units and
repair or replace defective components.
b. On vehicles with kickdown linkages or vacuum servos, check for proper linkage ad-
justment or leaking vacuum hoses or servo units.
NOTE: Mlany automatic transmissions use an electronic control module,
electrical sensors and solenoids to control transmission shifting. When
troubleshooting a vehicle with this type of system, be sure the electrical
connectors are fully connected, clean and not physically damaged. If nec-
essary, clean the electrical contacts using electrical contact cleaner. The
use of cleaning agents not specifically designed for electrical contacts
could leave a film or damage the insulation of the wiring.
Page 392 of 408

II-10 TROUBLESHOOTING
1. Transmission grinds going into forward gears while driving
a. Check the clutch release system. On clutches with a mechanical or cable linkage,
check the adjustment. Adjust the clutch pedal to have 1 inch (25mm) of free-play at
the pedal.
b. If the clutch release system is hydraulically operated, check the fluid level and, if low,
top off using the recommended type and amount of fluid. ,
c. Synchronizers worn. Remove transmission and replace synchronizers.
d. Synchronizer sliding sleeve worn. Remove transmission and replace sliding sleeve.
e. Gear engagement dogs worn or damaged. Remove transmission and replace gear.
2. Transmission jumps out of gear
a. Shift shaft detent springs worn. Replace shift detent springs.
b. Synchronizer sliding sleeve worn. Remove transmission and replace sliding sleeve.
c. Gear engagement dogs worn or damaged. Remove transmission and replace gear.
d. Crankshaft thrust bearings worn. Remove engine and crankshaft, and repair as neces-
sary.
3. Transmission difficult to shift
a. Verify the clutch adjustment and, if not properly adjusted, adjust to specification.
b. Synchronizers worn. Remove transmission and replace synchronizers.
c. Pilot bearing seized. Remove transmission and replace pilot bearing.
d. Shift linkage or bushing seized. Disassemble the shift linkage, replace worn or dam-
aged bushings, lubricate and reinstall.
4. Transmission leaks fluid
a. Check the fluid level for an overfilled condition. Adjust the fluid level to specification.
b. Check for a restricted transmission vent or breather tube. Clear the blockage as neces-
sary and check the fluid level. If necessary, top off with the recommended lubricant.
c. Check for a porous casting, leaking seal or gasket. Replace defective parts and top off
the fluid level with the recommended lubricant.
1. Clutch slips on hills or during sudden acceleration
a. Check for insufficient clutch pedal free-play. Adjust clutch linkage or cable to allow
about 1 inch (25mm) of pedal free-play.
b. Clutch disc worn or severely damaged. Remove engine or transmission and replace
clutch disc.
c. Clutch pressure plate is weak. Remove engine or transmission and replace the clutch
pressure plate and clutch disc.
d. Clutch pressure plate and/or flywheel incorrectly machined. If the clutch system has
been recently replaced and rebuilt, or refurbished parts have been used, it is possible
that the machined surfaces decreased the clutch clamping force. Replace defective
parts with new replacement parts.
2. Clutch will not disengage, difficult to shift
a. Check the clutch release mechanism. Check for stretched cables, worn linkages or
failed clutch hydraulics and replace defective parts. On hydraulically operated clutch
release mechanisms, check for air in the hydraulic system and bleed as necessary.
b. Check for a broken, cracked or fatigued clutch release arm or release arm pivot. Re-
place defective parts and properly lubricate upon assembly.
c. Check for a damaged clutch hub damper or damper spring. The broken parts tend to
become lodged between the clutch disc and the pressure plate. Disassemble clutch
system and replace failed parts.
d. Check for a seized clutch pilot bearing. Disassemble the clutch assembly and replace
the defective parts.
e. Check for a defective clutch disc. Check for warpage or liningthicknesses larger than
original equipment.
3. Clutch is noisy when the clutch pedal is pressed
a. Check the clutch pedal stop and pedal free-play adjustment for excessive movement
and adjust as necessary.
b. Check for a worn or damaged release bearing. If the noise ceases when the pedal is re-
leased, the release bearing should be replaced.
c. Check the engine crankshaft axial play. If the crankshaft thrust bearings are worn or
damaged, the crankshaft will move when pressing the clutch pedal. The engine must
be disassembled to replace the crankshaft thrust bearings.
4. Clutch pedal extremely difficult to press
a. Check the clutch pedal pivots and linkages for binding. Clean and lubricate linkages.
b. On cable actuated clutch systems, check the cable routing and condition. Replace
kinked, frayed, damaged or corroded cables and check cable routing to avoid sharp
bends. Check the engine ground strap for poor conductivity. If the ground strap is
marginal, the engine could try to ground itself via the clutch cable, causing premature
failure. c. On mechanical linkage clutches, check the linkage for binding or misalignment. Lubri-
cate pivots or linkages and repair as necessary.
d. Check the release bearing guide tube and release fork for a lack of lubrication. Install a
smooth coating of high temperature grease to allow smooth movement of the release
bearing over the guide tube.
5. Clutch pedal remains down when pressed
a, On mechanical linkage or cable actuated clutches, check for a loose or disconnected
link.
b. On hydraulically actuated clutches, check the fluid level and check for a hydraulic leak
at the clutch slave or master cylinder, or hydraulic line. Replace failed parts and bleed
clutch hydraulic system. If no leakage is noted, the clutch master cylinder may have
failed internally. Replace the clutch master cylinder and bleed the clutch hydraulic sys-
tem.
6. clutch chatters when engaging
a. Check the engine flywheel for warpage or surface variations and replace or repair as
necessary.
b. Check for a warped clutch disc or damaged clutch damper hub. Remove the clutch
disc and replace.
c. Check for a loose or damaged clutch pressure plate and replace defective components.
NOTE: The clutch is actuated either by a mechanical linkage, cable or a
clutch hydraulic system. The mechanical linkage and cable systems may
require the clutch pedal free-play to be adjusted as the clutch disc wears. A
hydraulic clutch system automatically adjusts as the clutch wears and, with
the exception of the clutch pedal height, no adjustment is possible.
1. Differential makes a low pitched rumbling noise
a. Check fluid level type and amount. Replace the fluid with the recommended type and
amount of lubricant.
b. Check the differential bearings for wear or damage. Remove the bearings, inspect the
drive and driven gears for wear or damage, and replace components as necessary.
2. Differential makes a howling noise
a. Check fluid level type and amount. Replace the fluid with the recommended type and
amount of lubricant.
b. Check the differential drive and driven gears for wear or damage, and replace compo-
nents as necessary.
All Wheel and Four Wheel Drive Vehicles
1. Leaks fluid from seals or vent after being driven
a. Fluid level overfilled. Check and adjust transfer case fluid level.
b. Check for a restricted breather or breather tube, clear and check the fluid level and top
off as needed.
c. Check seal condition and replace worn, damaged, or defective seals. Check the fluid
level and top off as necessary.
2. Makes excessive noise while driving
a. Check the fluid for the correct type of lubricant. Drain and refill using the recom-
mended type and amount of lubricant.
b. Check the fluid level. Top off the fluid using the recommended type and amount of lu-
bricant.
c. If the fluid level and type of lubricant meet specifications, check for internal wear or
damage. Remove assembly and disassemble to inspect for worn, damaged, or defec-
tive components.
3. Jumps out of gear
a. Stop vehicle and make sure the unit is fully engaged.
b. Check for worn, loose or an improperly adjusted linkage. Replace and/or adjust link-
age as necessary.
c. Check for internal wear or damage. Remove assembly and disassemble to inspect for
worn, damaged, or defective components.
Rear Wheel, All Wheel and Four Wheel Drive Vehicles
1. Clunking noise from center of Vehicle shifting from forward to reverse
a. Worn universal joint. Remove driveshaft and replace universal joint.
2. Excessive vibration from center of vehicle when accelerating
a. Worn universal joint. Remove driveshaft and replace universal joint.
 1
1 2
2 3
3 4
4 5
5 6
6 7
7 8
8 9
9 10
10 11
11 12
12 13
13 14
14 15
15 16
16 17
17 18
18 19
19 20
20 21
21 22
22 23
23 24
24 25
25 26
26 27
27 28
28 29
29 30
30 31
31 32
32 33
33 34
34 35
35 36
36 37
37 38
38 39
39 40
40 41
41 42
42 43
43 44
44 45
45 46
46 47
47 48
48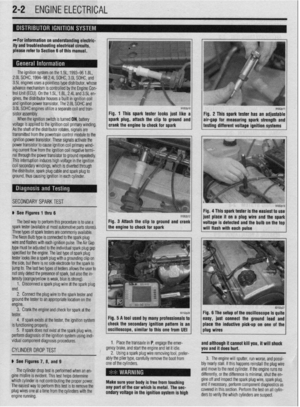 49
49 50
50 51
51 52
52 53
53 54
54 55
55 56
56 57
57 58
58 59
59 60
60 61
61 62
62 63
63 64
64 65
65 66
66 67
67 68
68 69
69 70
70 71
71 72
72 73
73 74
74 75
75 76
76 77
77 78
78 79
79 80
80 81
81 82
82 83
83 84
84 85
85 86
86 87
87 88
88 89
89 90
90 91
91 92
92 93
93 94
94 95
95 96
96 97
97 98
98 99
99 100
100 101
101 102
102 103
103 104
104 105
105 106
106 107
107 108
108 109
109 110
110 111
111 112
112 113
113 114
114 115
115 116
116 117
117 118
118 119
119 120
120 121
121 122
122 123
123 124
124 125
125 126
126 127
127 128
128 129
129 130
130 131
131 132
132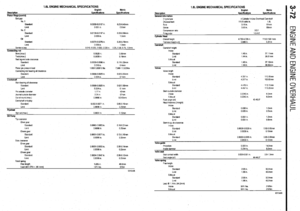 133
133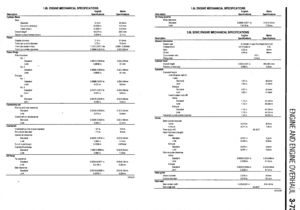 134
134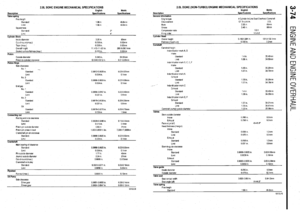 135
135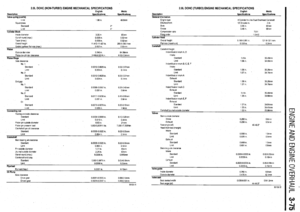 136
136 137
137 138
138 139
139 140
140 141
141 142
142 143
143 144
144 145
145 146
146 147
147 148
148 149
149 150
150 151
151 152
152 153
153 154
154 155
155 156
156 157
157 158
158 159
159 160
160 161
161 162
162 163
163 164
164 165
165 166
166 167
167 168
168 169
169 170
170 171
171 172
172 173
173 174
174 175
175 176
176 177
177 178
178 179
179 180
180 181
181 182
182 183
183 184
184 185
185 186
186 187
187 188
188 189
189 190
190 191
191 192
192 193
193 194
194 195
195 196
196 197
197 198
198 199
199 200
200 201
201 202
202 203
203 204
204 205
205 206
206 207
207 208
208 209
209 210
210 211
211 212
212 213
213 214
214 215
215 216
216 217
217 218
218 219
219 220
220 221
221 222
222 223
223 224
224 225
225 226
226 227
227 228
228 229
229 230
230 231
231 232
232 233
233 234
234 235
235 236
236 237
237 238
238 239
239 240
240 241
241 242
242 243
243 244
244 245
245 246
246 247
247 248
248 249
249 250
250 251
251 252
252 253
253 254
254 255
255 256
256 257
257 258
258 259
259 260
260 261
261 262
262 263
263 264
264 265
265 266
266 267
267 268
268 269
269 270
270 271
271 272
272 273
273 274
274 275
275 276
276 277
277 278
278 279
279 280
280 281
281 282
282 283
283 284
284 285
285 286
286 287
287 288
288 289
289 290
290 291
291 292
292 293
293 294
294 295
295 296
296 297
297 298
298 299
299 300
300 301
301 302
302 303
303 304
304 305
305 306
306 307
307 308
308 309
309 310
310 311
311 312
312 313
313 314
314 315
315 316
316 317
317 318
318 319
319 320
320 321
321 322
322 323
323 324
324 325
325 326
326 327
327 328
328 329
329 330
330 331
331 332
332 333
333 334
334 335
335 336
336 337
337 338
338 339
339 340
340 341
341 342
342 343
343 344
344 345
345 346
346 347
347 348
348 349
349 350
350 351
351 352
352 353
353 354
354 355
355 356
356 357
357 358
358 359
359 360
360 361
361 362
362 363
363 364
364 365
365 366
366 367
367 368
368 369
369 370
370 371
371 372
372 373
373 374
374 375
375 376
376 377
377 378
378 379
379 380
380 381
381 382
382 383
383 384
384 385
385 386
386 387
387 388
388 389
389 390
390 391
391 392
392 393
393 394
394 395
395 396
396 397
397 398
398 399
399 400
400 401
401 402
402 403
403 404
404 405
405 406
406 407
407