2006 LAND ROVER FRELANDER 2 clock
[x] Cancel search: clockPage 2829 of 3229
109
Convenience features
R
6. Use the rotary control to adjust the
minutes and press to confirm selection.
7. Once the time has been set, OK will be
highlighted. Press the rotary control to
accept the settings.
Set 12/24 hour display
1. With the audio unit switched on, press the
MENU button to access the function menu.
2. Rotate the control to select Clock and
press to confirm selection.
3. Rotate the control to select 12/24 and
press to confirm selection.
4. Use the rotary control to select 12hr or
24hr and press to confirm selection.
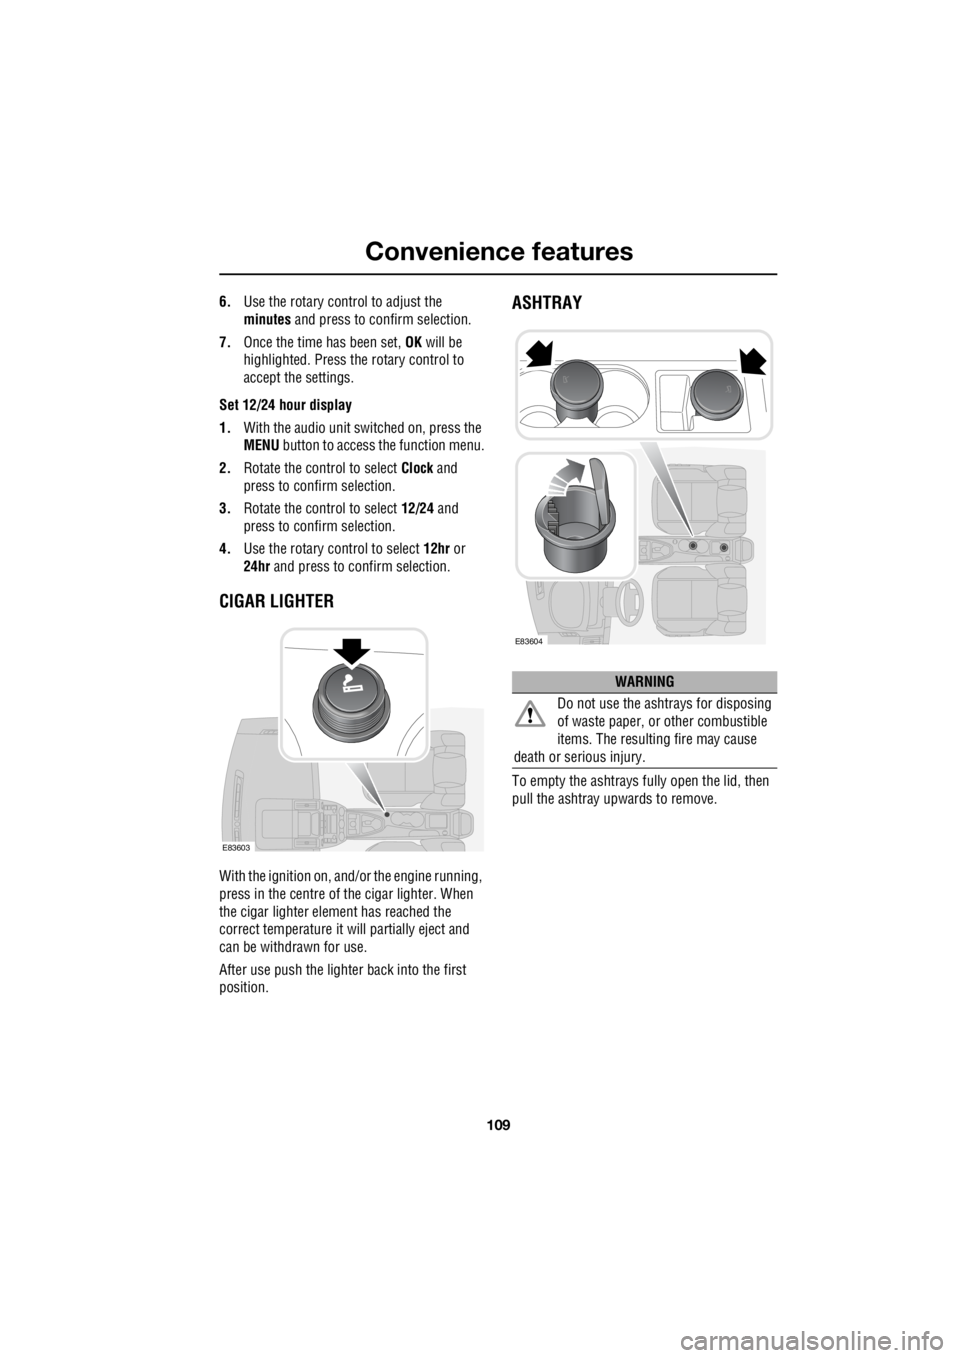
CIGAR LIGHTER
With the ignition on, and/ or the engine running,
press in the centre of the cigar lighter. When
the cigar lighter element has reached the
correct temperature it w ill partially eject and
can be withdrawn for use.
After use push the lighter back into the first
position.
ASHTRAY
To empty the ashtrays fu lly open the lid, then
pull the ashtray upwards to remove.
E83603
WARNING
Do not use the ashtrays for disposing
of waste paper, or other combustible
items. The resulting fire may cause
death or serious injury.
E83604
Page 2864 of 3229
Fuel and refuelling
144
L
RUNNING OUT OF FUEL
Note: If the vehicle does run out of fuel, a
minimum of 4 litres (0 .8 gallons) will be
required to restart the engine. The vehicle will
need to be driven 1.6-5 km (1-3 miles) in order
to reset the engine management and
monitoring systems.
Note: If the vehicle does run out of fuel,
seeking qualified assistance is advisable.
FUEL CUT-OFF
The fuel system cut-off forms part of the
Supplementary Restraint System (SRS) fitted
to your vehicle. Following an impact, and
depending on the severity, the fuel pump may
be switched off.
Resetting the fuel cut-off
1. Switch the ignition off and wait for one
minute.
2. Turn the ignition on for 30 seconds.
3. Check the vehicle thor oughly for fuel leaks.
If a leak is detected switch the ignition off
immediately.
• Do not start the vehicle if a leak is
present. Seek qualifi ed advice, and have
the vehicle recovered.
4. If no leaks are detected, start the vehicle.
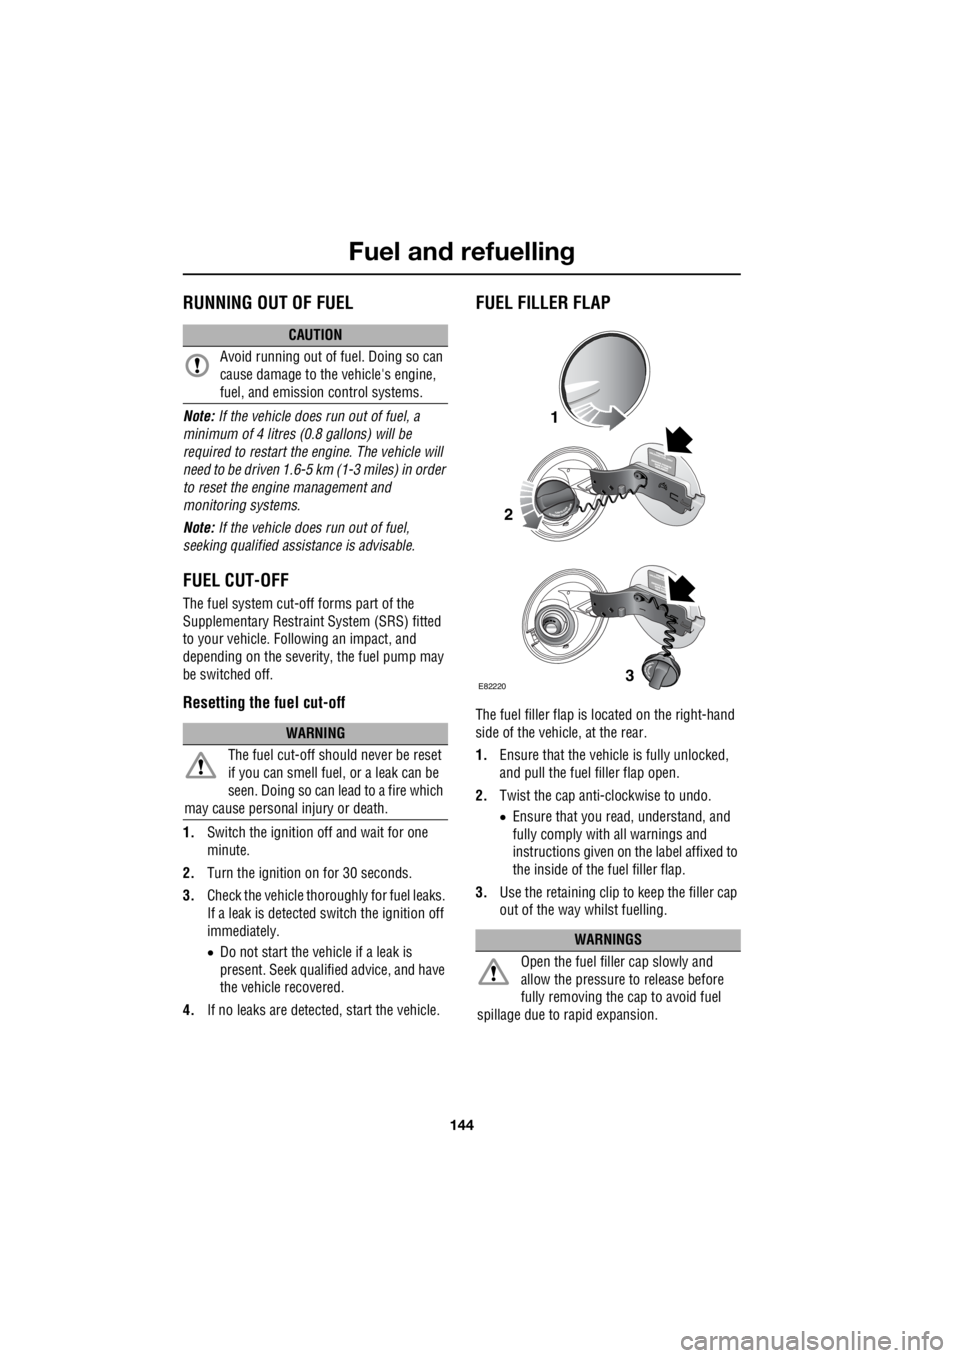
FUEL FILLER FLAP
The fuel filler flap is located on the right-hand
side of the vehicle, at the rear.
1. Ensure that the vehicle is fully unlocked,
and pull the fuel filler flap open.
2. Twist the cap anti-clockwise to undo.
• Ensure that you re ad, understand, and
fully comply with all warnings and
instructions given on the label affixed to
the inside of the fuel filler flap.
3. Use the retaining clip to keep the filler cap
out of the way whilst fuelling.
CAUTION
Avoid running out of fuel. Doing so can
cause damage to the vehicle's engine,
fuel, and emission control systems.
WARNING
The fuel cut-off s hould never be reset
if you can smell fuel , or a leak can be
seen. Doing so can lead to a fire which
may cause personal injury or death.
WARNINGS
Open the fuel filler cap slowly and
allow the pressure to release before
fully removing the cap to avoid fuel
spillage due to rapid expansion.
1
2
3E82220
Page 2876 of 3229
Vehicle care
156
L
Leather should be clea ned and protected at
least every six months.
Land Rover recommend the use of leather
cleaning kit BAC500490. Use only in
accordance with the instructions.
Note: Some materials/fabrics are prone to dye
transfer, which can cause unsightly
discolouration of lighter coloured leathers.
Affected areas should be cleaned and
re-protected as soon as possible.
Carpets and fabrics
Only clean with a dilute solution of an approved
upholstery cleaner. It is advisable to test all
cleaners on a concea led area before use.
Instrument pack, clock, and audio
equipment
Only use a soft dry cloth to clean the
instrument pack, clock, and audio equipment.
Do not use cleaning fluids or sprays.
Seat belts
Extend the seat belts fully, then use warm
water and a non-detergent soap to clean. Allow
the seat belts to dry naturally whilst fully
extended. Note:
Whilst cleaning the seat belt, take the
opportunity to examine the webbing for
damage/wear. Any wear or damage should be
reported to, and rectified by, a Land Rover
Dealer/Approved repairer.
Airbag module covers
REPAIRING MINOR PAINT DAMAGE
Regularly inspect the paintwork for damage.
Any stone chips, fractures, or deep scratches,
in the paint/bodywork should be repaired
promptly. Bare metal wi ll corrode quickly, and
if left untreated can resu lt in expensive repairs.
Minor chips and scratc hes can be touched up
using materials and advi ce available from a
Land Rover Dealer/Authoris ed Repairer. Larger
areas of damage will require professional
repair, and you should consult a Land Rover
Dealer/Authorised Repairer.
If you are in any doubt as to which
products to use, consult your Land
Rover Dealer/Approved repairer.
WARNING
Do not allow any water, cleaning
products, or fabric from cloths to enter
the seat belt mechanism. Any
substance which enters the mechanism may
affect the performance of the seat belt in an
impact.
CAUTIONS
WARNINGS
Airbag covers should only be cleaned
using a slightly dampened cloth, and a
small amount of upholstery cleaner.
Do not allow the airbag covers, or
surrounding areas, to become
contaminated with liquids. Any
substance which enters the mechanism can
prevent correct deployment of an airbag
during an impact.
Page 2905 of 3229
185
Wheels and tyres
R
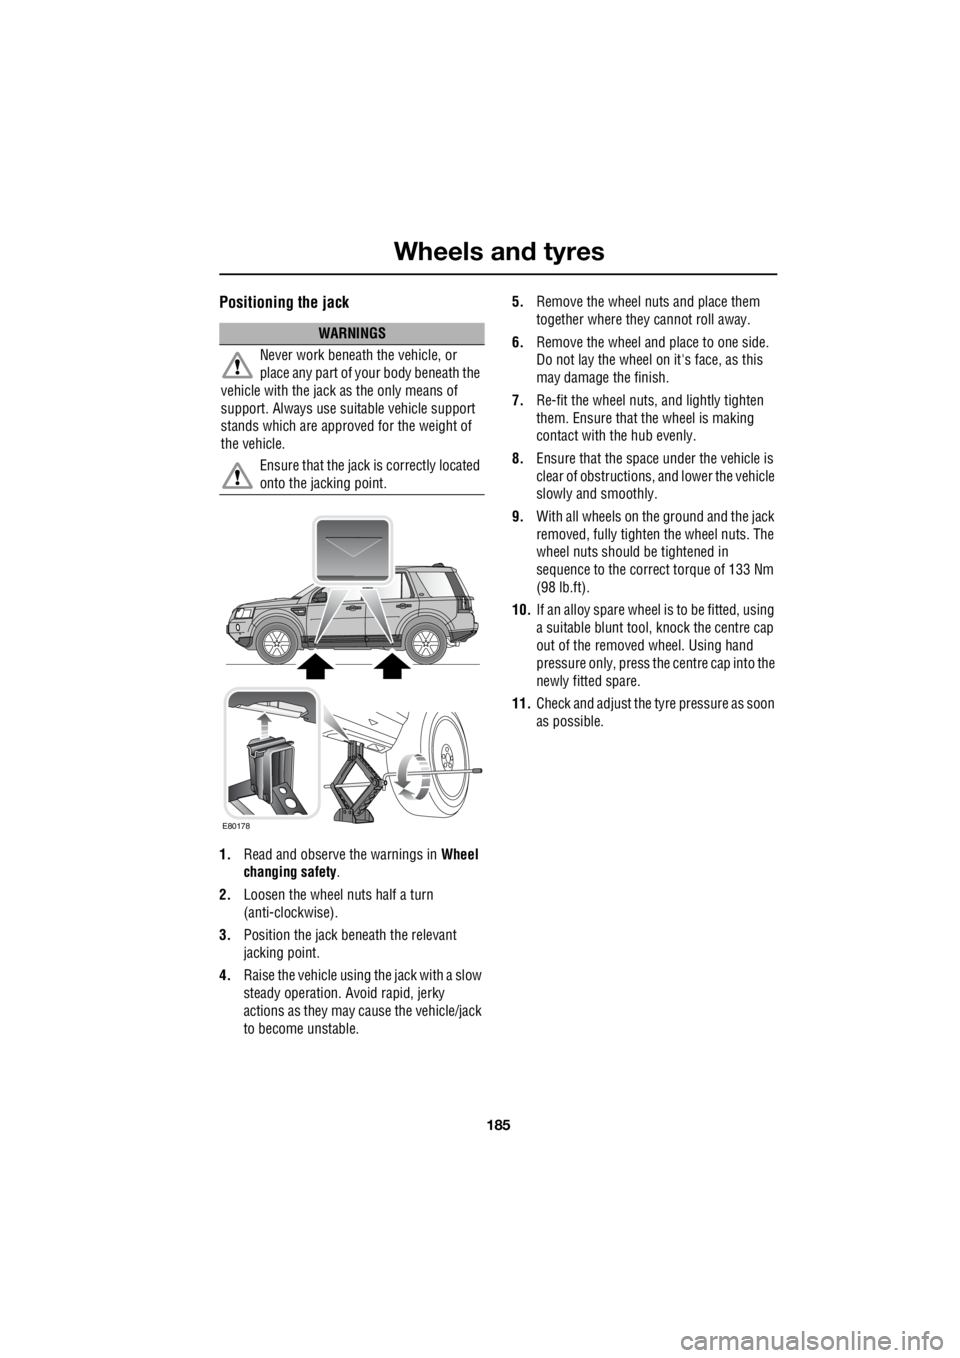
Positioning the jack
1. Read and observe the warnings in Wheel
changing safety .
2. Loosen the wheel nuts half a turn
(anti-clockwise).
3. Position the jack be neath the relevant
jacking point.
4. Raise the vehicle using the jack with a slow
steady operation. Avoid rapid, jerky
actions as they may cause the vehicle/jack
to become unstable. 5.
Remove the wheel nuts and place them
together where they cannot roll away.
6. Remove the wheel and place to one side.
Do not lay the wheel on it's face, as this
may damage the finish.
7. Re-fit the wheel nuts, and lightly tighten
them. Ensure that the wheel is making
contact with the hub evenly.
8. Ensure that the space under the vehicle is
clear of obstructions, and lower the vehicle
slowly and smoothly.
9. With all wheels on the ground and the jack
removed, fully tighte n the wheel nuts. The
wheel nuts should be tightened in
sequence to the correct torque of 133 Nm
(98 lb.ft).
10. If an alloy spare wheel is to be fitted, using
a suitable blunt tool, knock the centre cap
out of the removed wheel. Using hand
pressure only, press the centre cap into the
newly fitted spare.
11. Check and adjust the tyre pressure as soon
as possible.
WARNINGS
Never work beneath the vehicle, or
place any part of yo ur body beneath the
vehicle with the jack as the only means of
support. Always use su itable vehicle support
stands which are approved for the weight of
the vehicle.
Ensure that the jack is correctly located
onto the jacking point.
E80178
Page 2910 of 3229

Wheels and tyres
190
L
Using the Land Rover tyre repair kit
Note: All vehicle drivers and occupants should
be made aware that a temporary repair has
been made to a tyre fitted to the vehicle. They
should also be made aware of the special
driving conditions im posed when using a
repaired tyre. Repair procedure
1. Open the tyre repair kit and peel off the
maximum speed label. Attach the label to
the facia in the driver's field of view. Take
care not to obstruct any of the instruments
or warning lights.
2. Uncoil the compressor power cable and
the inflation hose.
3. Unscrew the orange cap from the sealant
bottle receiver, and the sealant bottle cap.
4. Screw the sealant bottle into the receiver
(clockwise) until tight.
• Screwing the bottle onto the receiver will
pierce the bottle's se al. Do not unscrew
a full, or partly us ed bottle from the
receiver. Doing so will result in the
sealant leaking from the bottle.
5. Remove the valve cap from the damaged
tyre.
6. Remove the protective cap from the
inflation hose, and c onnect the inflation
hose to the tyre valve. Ensure that the hose
is screwed on firmly.
7. Ensure that the compressor switch is in
the off ( O) position.
8. Insert the power cable connector into an
auxiliary power socket. See AUXILIARY
POWER SOCKETS (page 110).
9. Unless the vehicle is in an enclosed or
poorly ventilated area , start the engine.
10. Set the compressor switch to the on ( l)
position.
11. Inflate the tyre to a minimum of 1.8 bar (26
lb/in²) and a maximum of 3.5 bar (51
lb/in²).
†
WARNINGS
Avoid skin contact with the sealant
which contains natu ral rubber latex.
Do not unscrew the sealant bottle from the
receiver until it is empty, as sealant will leak
out.
If the tyre inflation pressure does not
reach 1.8 bar (26 lb/in²) within seven
minutes, the tyre may have suffered excessive
damage. A temporary repair will not be
possible, and the vehicle should not be driven
until the tyre has been replaced.
CAUTIONS
Before attempting a tyre repair, ensure
that the vehicle is parked safely, as far
away from passing traffic as possible.
Ensure that the parki ng brake is applied,
and P is selected if an automatic
transmission is fitted.
Do not attempt to remove foreign objects
such as nails, screws, etc from the tyre.
Always run the engine when using the
compressor, unless the vehicle is in an
enclosed, or poorly ventilated space.
To prevent overheating do not operate
the compressor continuously for longer
than ten minutes.
Page 2911 of 3229

191
Wheels and tyres
R
12. During the inflation, switch the
compressor off briefly to check the tyre
pressure using the gauge mounted on the
compressor.
• It should not take longer than seven
minutes to inflate the tyre. If after seven
minutes the tyre ha s not reached the
minimum pressure, the tyre should not
be used.
13. Once the tyre has been inflated switch off
the compressor. If desired the engine may
be turned off after the compressor has
been turned off.
14. Remove the power connector from the
auxiliary power socket.
15. Remove the inflation hose from the tyre
valve by unscrewing it as quickly as
possible (anti-clockwise).
16. Replace the inflation hose protective cap,
and the tyre valve cap.
17. Do not remove the sealant bottle from the
receiver.
18. Ensure that the tyre repair kit (including
the bottle, and receiver caps) are placed
securely in the vehicle. You will need to
use the kit to check the tyre pressure after
3km (2 miles) so ensure they are easily
accessible.
19. Immediately drive the vehicle for 3 km (2
miles) to allow the sealant to coat the inner
surface of the tyre and form a seal at the
puncture.
†When pumping the sealant through the tyre
valve, the pressure may rise up to 6 bar (87
lb/in²). The pressure will drop again after
approximately 30 seconds.
Checking the tyre pressure after a repair
1. Drive the vehicle for 3 km (2 miles) then
stop in a safe place. Carry out a visual
examination of the tyres condition.
2. Remove the protective cap from the
inflation hose.
3. Screw the inflation hos e connector firmly
onto the tyre valve.
4. Read the tyre pressure from the gauge.
5. If the pressure of the sealant filled tyre is
above 1.3 bar (19 lb/in²) adjust the
pressure to the correct value. See
TECHNICAL SPECIFICATIONS (page 194).
6. Ensure that the compressor switch is in
the off position ( O), and insert the power
cable connector into an auxiliary power
socket. See AUXILIARY POWER
SOCKETS (page 110).
7. If the vehicle is in a well ventilated area,
start the engine.
8. Switch on the compressor ( I), and inflate
the tyre to the correct pressure.
WARNINGS
When driving the vehicle, if you
experience vibr ations, abnormal
steering, or noises, re duce speed immediately.
Drive with extreme caution and reduced speed
to the first safe place to stop the vehicle.
Visually examine the tyre, and check it's
pressure. If there are any signs of damage or
deformity to the tyre, or the tyre pressure is
below 1.3 bar (19 lb/i n²) do not continue
driving.
Consult a tyre repair centre, or your
Land Rover Dealer/Authorised repairer
for advice concerning the replacement of a
tyre after using a tyre repair kit.
Page 2939 of 3229
219
Audio unit overview
R
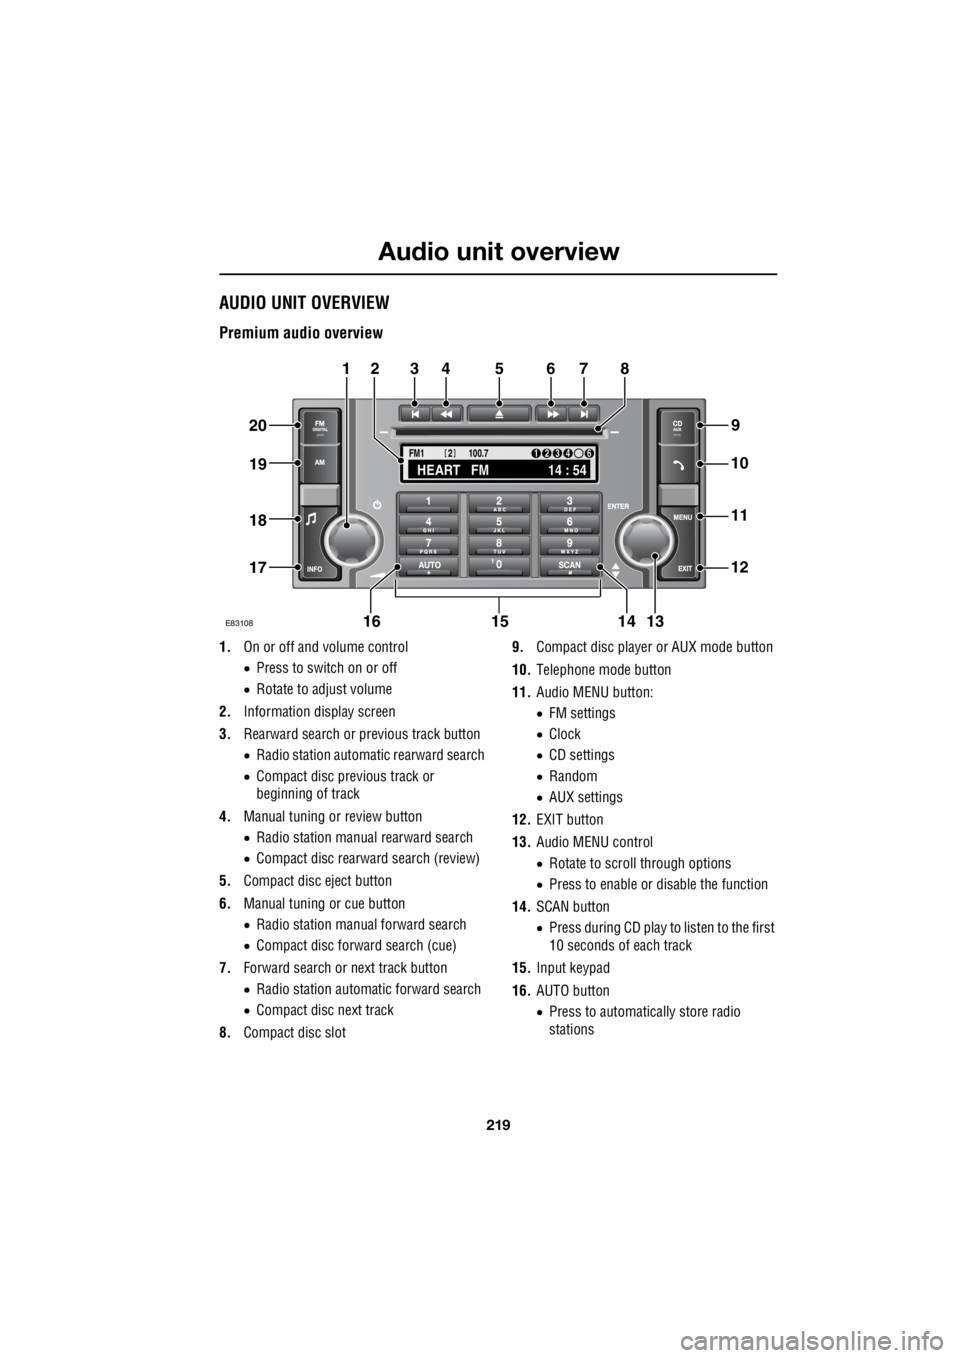
Audio unit overviewAUDIO UNIT OVERVIEW
Premium audio overview
1. On or off and volume control
• Press to switch on or off
• Rotate to adjust volume
2. Information display screen
3. Rearward search or previous track button
• Radio station automatic rearward search
• Compact disc previous track or
beginning of track
4. Manual tuning or review button
• Radio station manual rearward search
• Compact disc rearward search (review)
5. Compact disc eject button
6. Manual tuning or cue button
• Radio station manual forward search
• Compact disc forward search (cue)
7. Forward search or next track button
• Radio station automatic forward search
• Compact disc next track
8. Compact disc slot 9.
Compact disc player or AUX mode button
10. Telephone mode button
11. Audio MENU button:
• FM settings
• Clock
• CD settings
• Random
• AUX settings
12. EXIT button
13. Audio MENU control
• Rotate to scroll through options
• Press to enable or disable the function
14. SCAN button
• Press during CD play to listen to the first
10 seconds of each track
15. Input keypad
16. AUTO button
• Press to automatically store radio
stations
TA
NEWSPTY100.7
FM1
14 : 54
HEART FM
1234 6
2
E83108
34567
9
21
11
12
10
13141516
17
18
19
20
8
Page 2947 of 3229
227
Audio unit operation
R
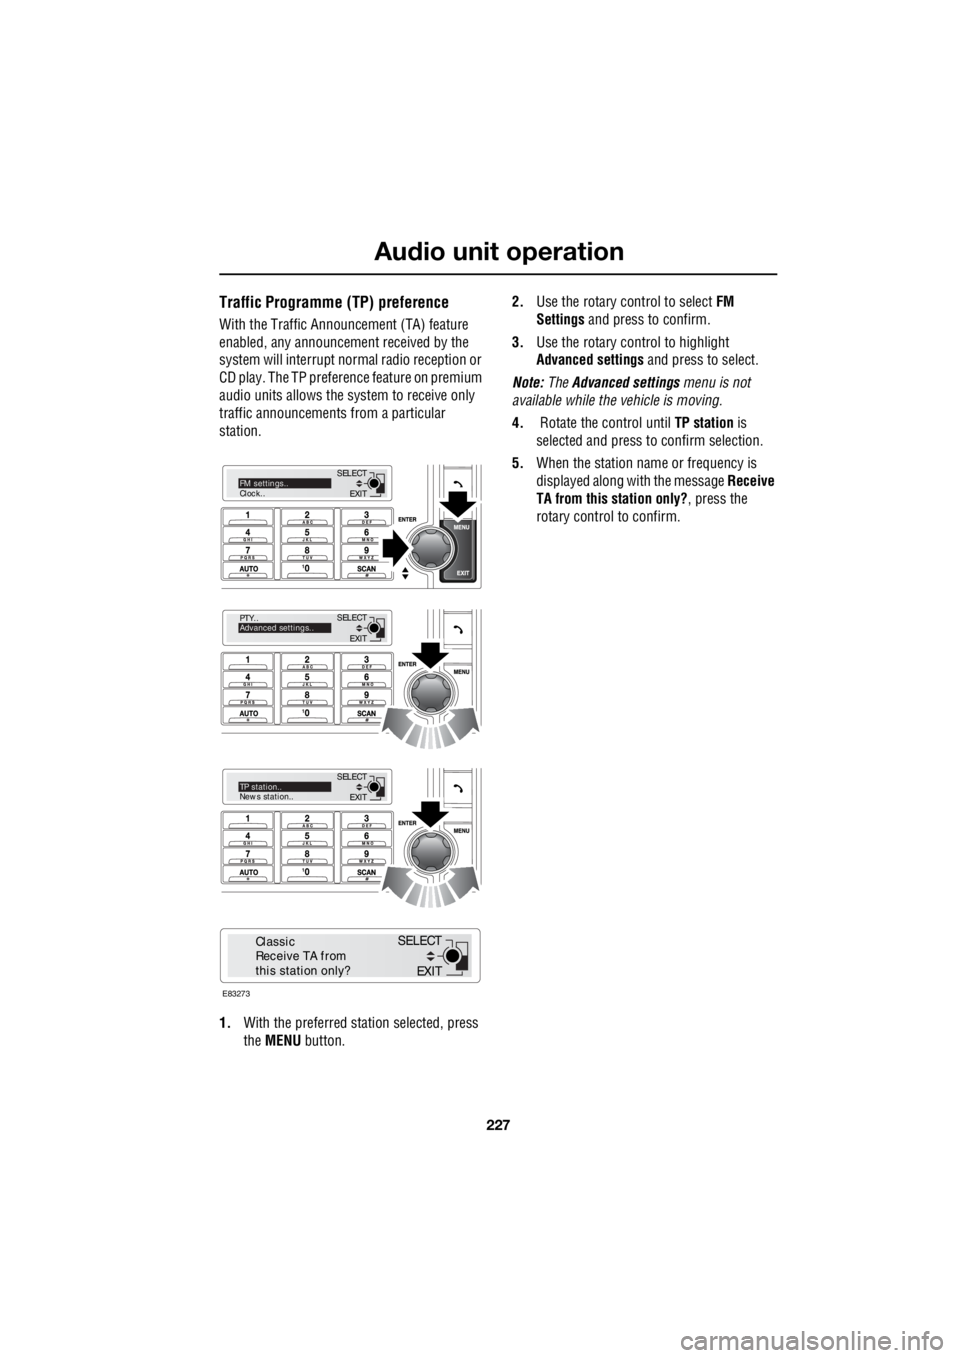
Traffic Programme (TP) preference
With the Traffic Announc ement (TA) feature
enabled, any announcem ent received by the
system will interrupt nor mal radio reception or
CD play. The TP preference feature on premium
audio units allows the system to receive only
traffic announcements from a particular
station.
1. With the preferred station selected, press
the MENU button. 2.
Use the rotary control to select FM
Settings and press to confirm.
3. Use the rotary control to highlight
Advanced settings and press to select.
Note: The Advanced settings menu is not
available while the vehicle is moving.
4. Rotate the control until TP station is
selected and press to confirm selection.
5. When the station name or frequency is
displayed along with the message Receive
TA from this station only? , press the
rotary control to confirm.
EXIT
SELECT
PTY..
Advanced settings..
EXIT
SELECTTP station..
News station..
EXIT
SELECTFM settings..
Clock..
E83273
EXIT
SELECT
Classic
Receive TA from
this station only?