2006 LAND ROVER FRELANDER 2 clock setting
[x] Cancel search: clock settingPage 2751 of 3229
31
Quick start
R
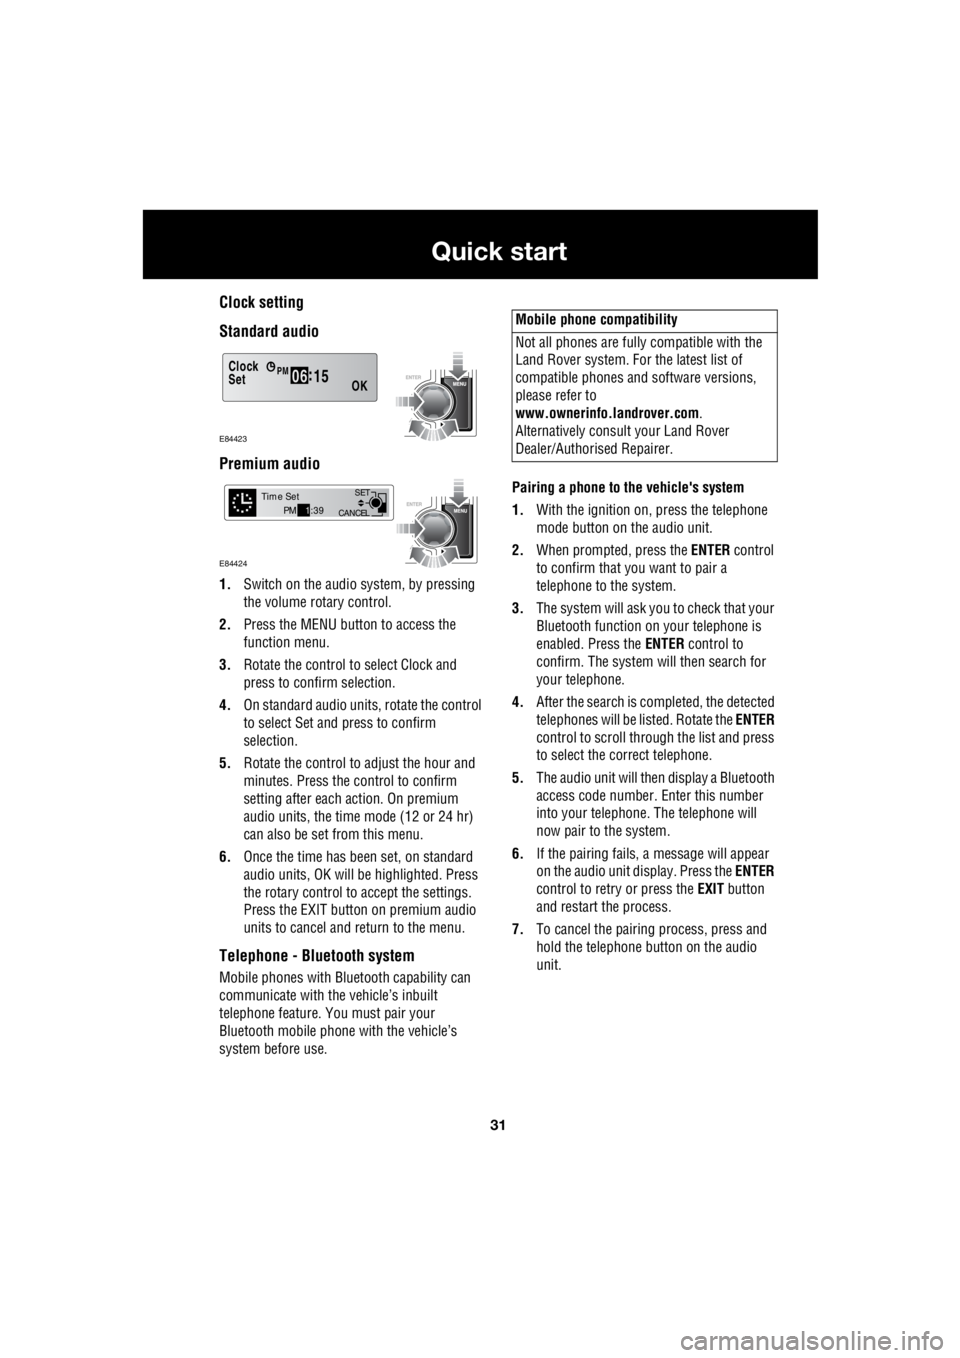
Clock setting
Standard audio
Premium audio
1. Switch on the audio system, by pressing
the volume rotary control.
2. Press the MENU button to access the
function menu.
3. Rotate the control to select Clock and
press to confirm selection.
4. On standard audio units, rotate the control
to select Set and press to confirm
selection.
5. Rotate the control to adjust the hour and
minutes. Press the c ontrol to confirm
setting after each action. On premium
audio units, the time mode (12 or 24 hr)
can also be set from this menu.
6. Once the time has been set, on standard
audio units, OK will be highlighted. Press
the rotary control to accept the settings.
Press the EXIT button on premium audio
units to cancel and return to the menu.
Telephone - Bluetooth system
Mobile phones with Blue tooth capability can
communicate with the vehicle’s inbuilt
telephone feature. You must pair your
Bluetooth mobile phone with the vehicle’s
system before use. Pairing a phone to the vehicle's system
1. With the ignition on, press the telephone
mode button on the audio unit.
2. When prompted, press the ENTER control
to confirm that you want to pair a
telephone to the system.
3. The system will ask you to check that your
Bluetooth function on your telephone is
enabled. Press the ENTER control to
confirm. The system will then search for
your telephone.
4. After the search is completed, the detected
telephones will be listed. Rotate the ENTER
control to scroll through the list and press
to select the correct telephone.
5. The audio unit will then display a Bluetooth
access code number. Enter this number
into your telephone. The telephone will
now pair to the system.
6. If the pairing fails, a message will appear
on the audio unit display. Press the ENTER
control to retry or press the EXIT button
and restart the process.
7. To cancel the pairing process, press and
hold the telephone button on the audio
unit.
Clock
OK06 :
15SetPM
E84423
CANCEL SET
Time SetPM
1:39
E84424
Mobile phone compatibility
Not all phones are fully compatible with the
Land Rover system. For the latest list of
compatible phones and software versions,
please refer to
www.ownerinfo.landrover.com .
Alternatively consult your Land Rover
Dealer/Authorised Repairer.
Page 2827 of 3229
107
Convenience features
R
Convenience featuresSUN VISORS
CLOCK
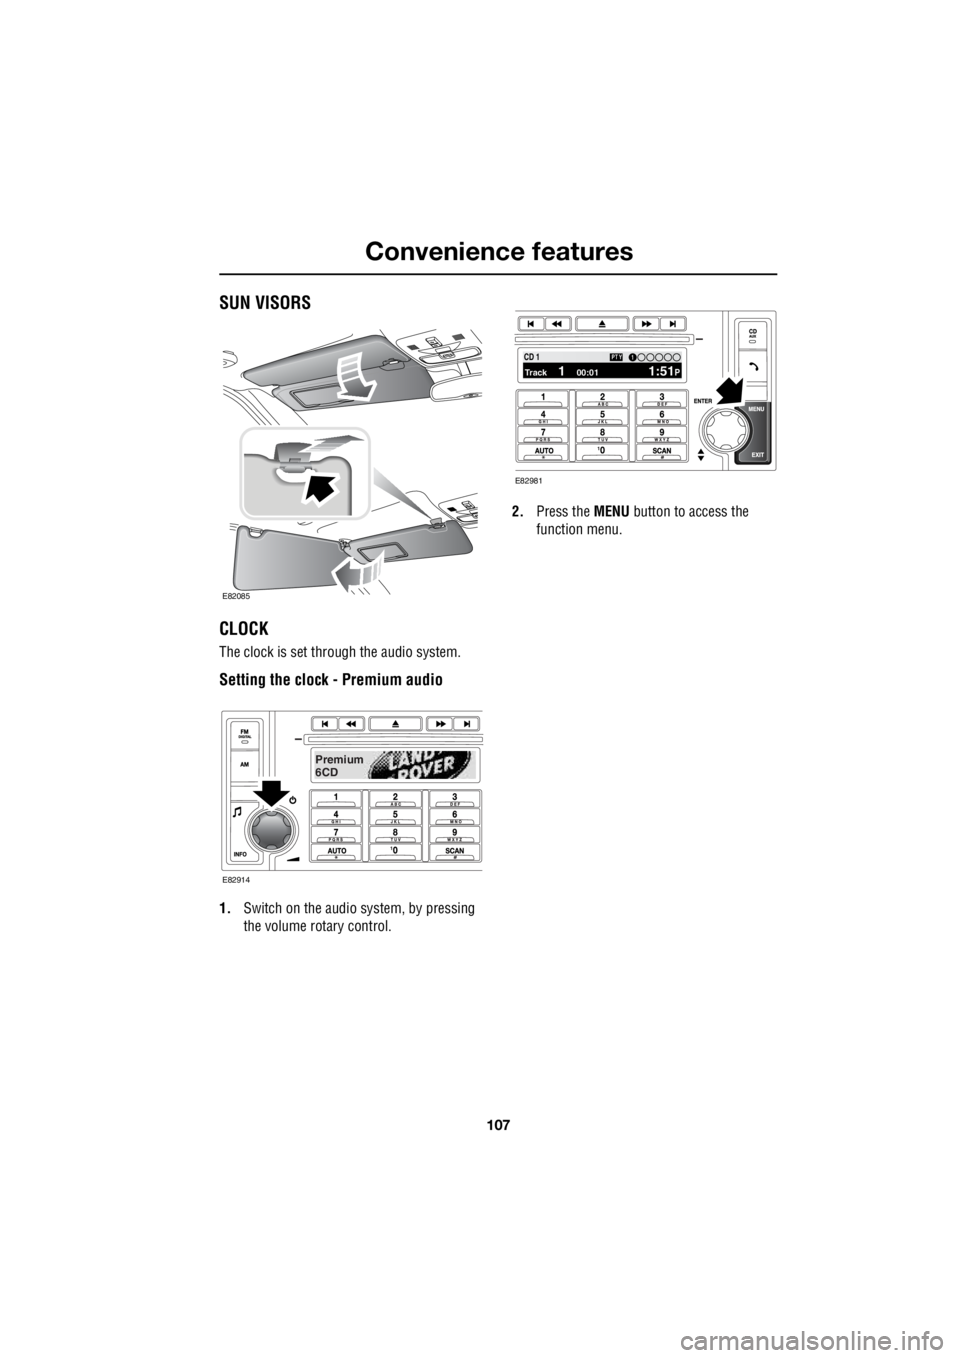
The clock is set through the audio system.
Setting the clock - Premium audio
1. Switch on the audio system, by pressing
the volume rotary control. 2.
Press the MENU button to access the
function menu.
E82085
Premium
6CD
E82914
100.71 12 3 4 6CD 1Track 1 00:01 1:51P
PTY1
E82981
Page 2828 of 3229
Convenience features
108
L
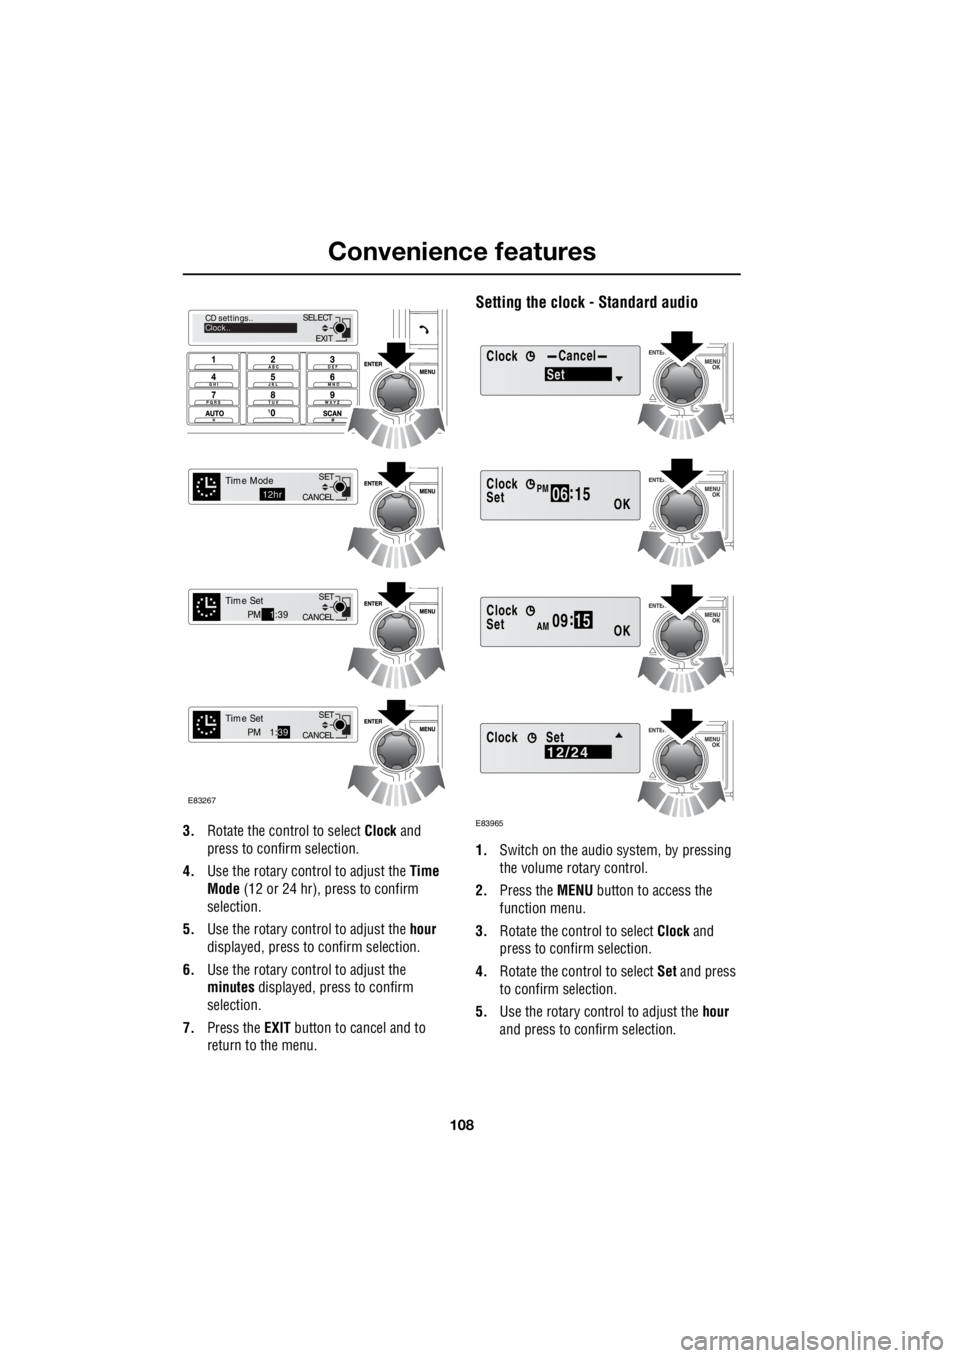
3. Rotate the control to select Clock and
press to confirm selection.
4. Use the rotary control to adjust the Time
Mode (12 or 24 hr), press to confirm
selection.
5. Use the rotary control to adjust the hour
displayed, press to confirm selection.
6. Use the rotary control to adjust the
minutes displayed, press to confirm
selection.
7. Press the EXIT button to cancel and to
return to the menu.
Setting the clock - Standard audio
1. Switch on the audio system, by pressing
the volume rotary control.
2. Press the MENU button to access the
function menu.
3. Rotate the control to select Clock and
press to confirm selection.
4. Rotate the control to select Set and press
to confirm selection.
5. Use the rotary control to adjust the hour
and press to c onfirm selection.
EXIT
SELECT
CD settings..
Clock..
CANCEL SET
Time Mode12hr
CANCELSET
Time SetPM
1:39
CANCEL SET
Time SetPM 1:
39
E83267
ClockCancel
Set
Clock
OK06 :
15SetPM
Clock
OK09 :
15SetAM
E83965
Clock12/24Set
Page 2829 of 3229
109
Convenience features
R
6. Use the rotary control to adjust the
minutes and press to confirm selection.
7. Once the time has been set, OK will be
highlighted. Press the rotary control to
accept the settings.
Set 12/24 hour display
1. With the audio unit switched on, press the
MENU button to access the function menu.
2. Rotate the control to select Clock and
press to confirm selection.
3. Rotate the control to select 12/24 and
press to confirm selection.
4. Use the rotary control to select 12hr or
24hr and press to confirm selection.
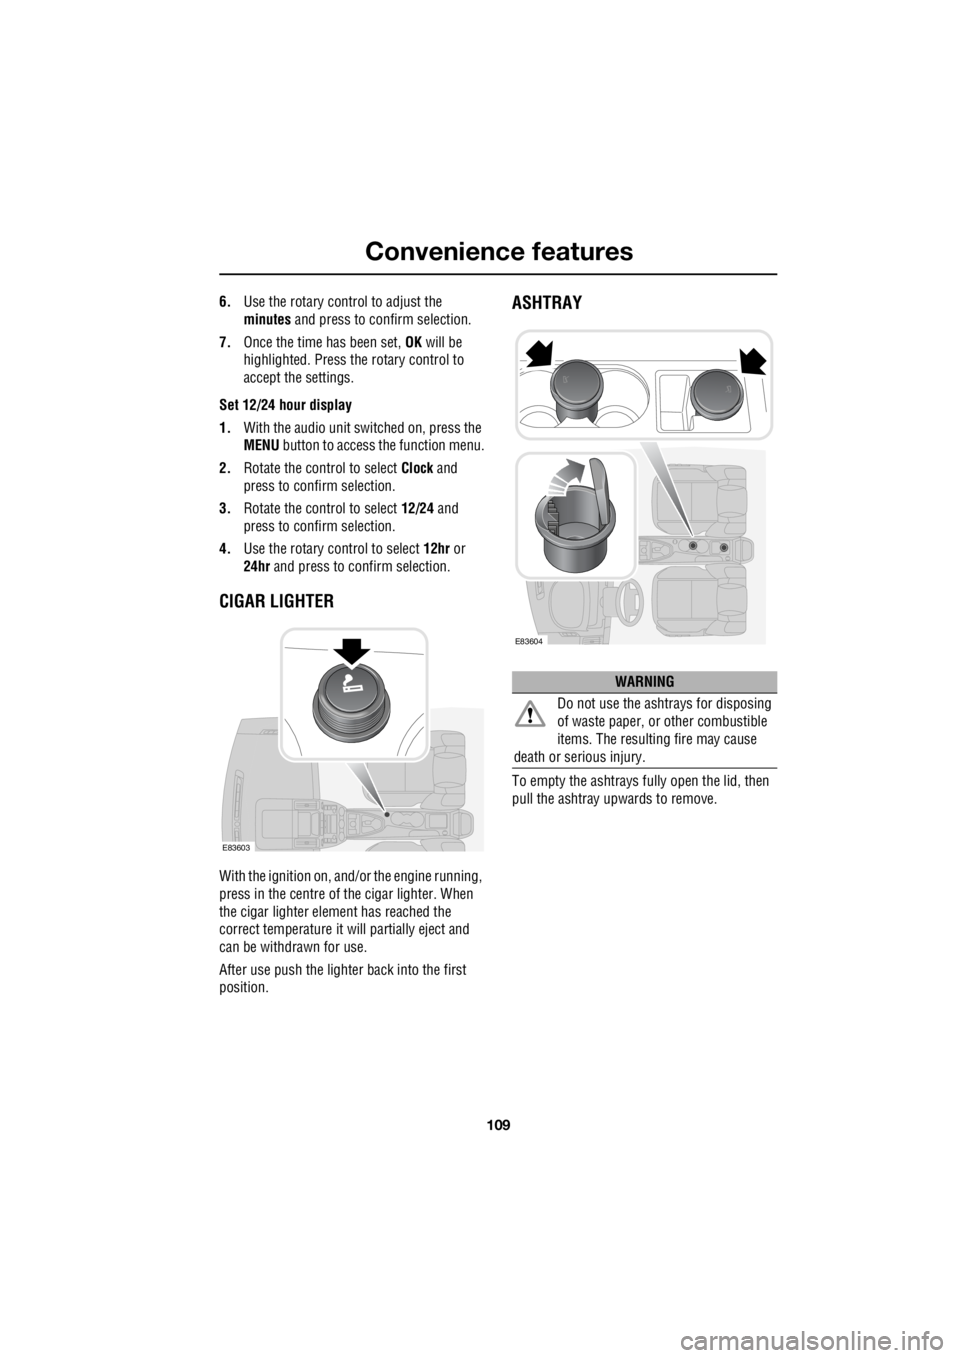
CIGAR LIGHTER
With the ignition on, and/ or the engine running,
press in the centre of the cigar lighter. When
the cigar lighter element has reached the
correct temperature it w ill partially eject and
can be withdrawn for use.
After use push the lighter back into the first
position.
ASHTRAY
To empty the ashtrays fu lly open the lid, then
pull the ashtray upwards to remove.
E83603
WARNING
Do not use the ashtrays for disposing
of waste paper, or other combustible
items. The resulting fire may cause
death or serious injury.
E83604
Page 2864 of 3229
Fuel and refuelling
144
L
RUNNING OUT OF FUEL
Note: If the vehicle does run out of fuel, a
minimum of 4 litres (0 .8 gallons) will be
required to restart the engine. The vehicle will
need to be driven 1.6-5 km (1-3 miles) in order
to reset the engine management and
monitoring systems.
Note: If the vehicle does run out of fuel,
seeking qualified assistance is advisable.
FUEL CUT-OFF
The fuel system cut-off forms part of the
Supplementary Restraint System (SRS) fitted
to your vehicle. Following an impact, and
depending on the severity, the fuel pump may
be switched off.
Resetting the fuel cut-off
1. Switch the ignition off and wait for one
minute.
2. Turn the ignition on for 30 seconds.
3. Check the vehicle thor oughly for fuel leaks.
If a leak is detected switch the ignition off
immediately.
• Do not start the vehicle if a leak is
present. Seek qualifi ed advice, and have
the vehicle recovered.
4. If no leaks are detected, start the vehicle.
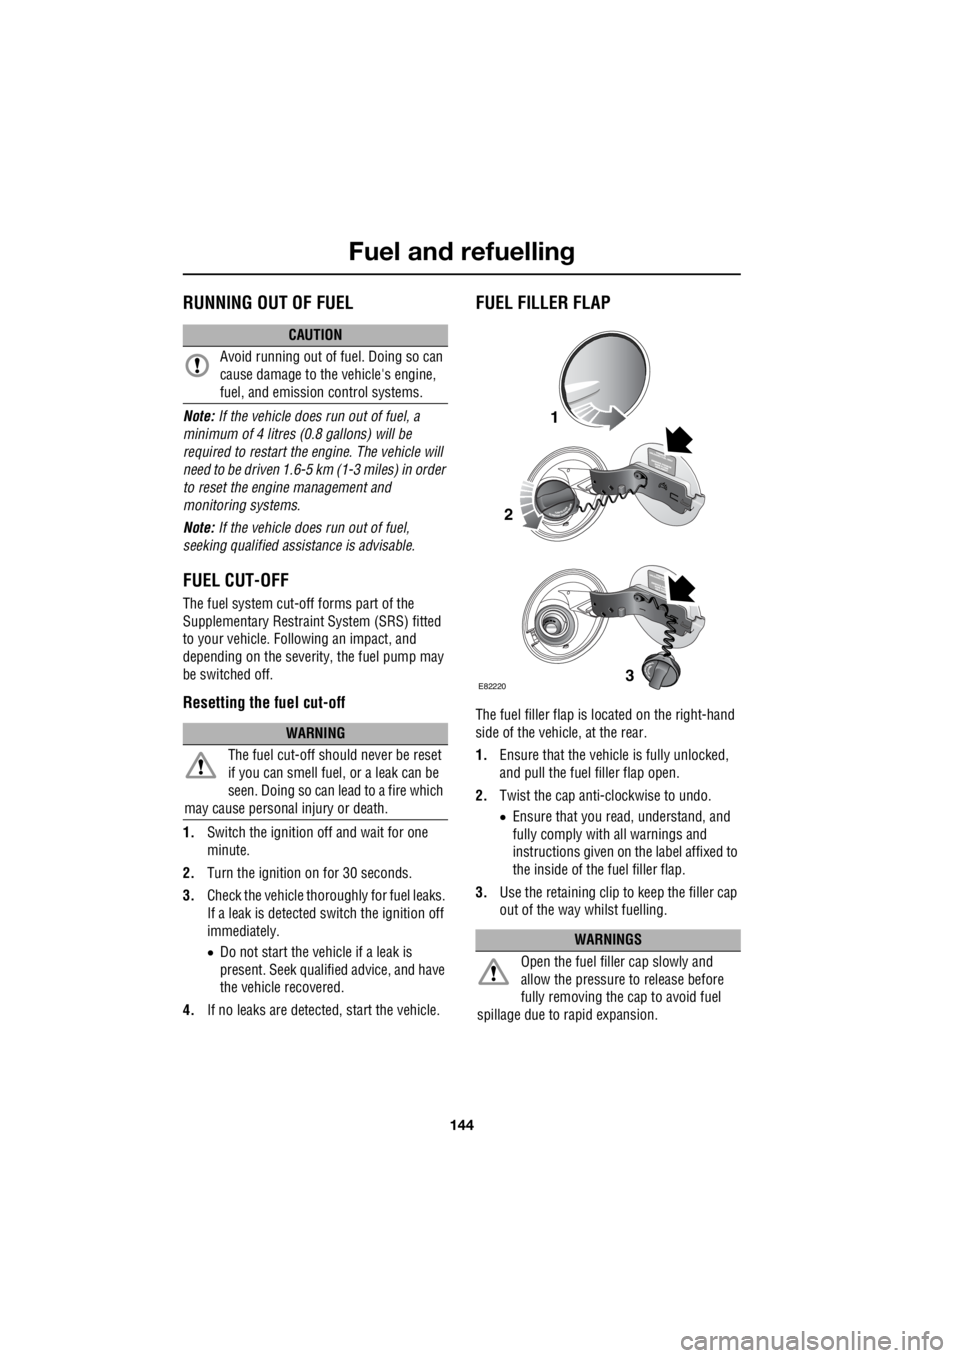
FUEL FILLER FLAP
The fuel filler flap is located on the right-hand
side of the vehicle, at the rear.
1. Ensure that the vehicle is fully unlocked,
and pull the fuel filler flap open.
2. Twist the cap anti-clockwise to undo.
• Ensure that you re ad, understand, and
fully comply with all warnings and
instructions given on the label affixed to
the inside of the fuel filler flap.
3. Use the retaining clip to keep the filler cap
out of the way whilst fuelling.
CAUTION
Avoid running out of fuel. Doing so can
cause damage to the vehicle's engine,
fuel, and emission control systems.
WARNING
The fuel cut-off s hould never be reset
if you can smell fuel , or a leak can be
seen. Doing so can lead to a fire which
may cause personal injury or death.
WARNINGS
Open the fuel filler cap slowly and
allow the pressure to release before
fully removing the cap to avoid fuel
spillage due to rapid expansion.
1
2
3E82220
Page 2939 of 3229
219
Audio unit overview
R
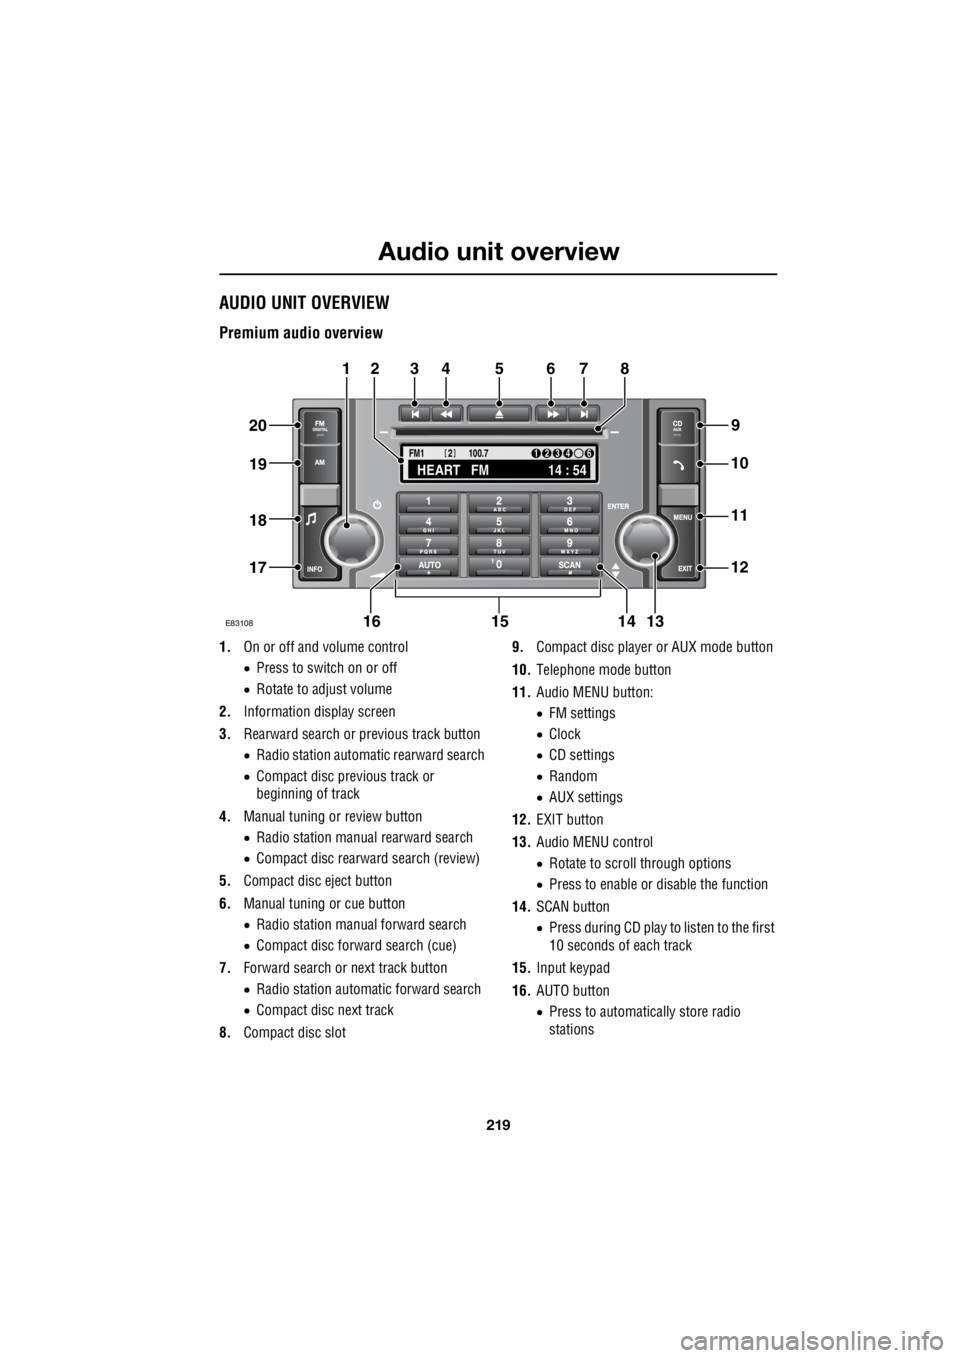
Audio unit overviewAUDIO UNIT OVERVIEW
Premium audio overview
1. On or off and volume control
• Press to switch on or off
• Rotate to adjust volume
2. Information display screen
3. Rearward search or previous track button
• Radio station automatic rearward search
• Compact disc previous track or
beginning of track
4. Manual tuning or review button
• Radio station manual rearward search
• Compact disc rearward search (review)
5. Compact disc eject button
6. Manual tuning or cue button
• Radio station manual forward search
• Compact disc forward search (cue)
7. Forward search or next track button
• Radio station automatic forward search
• Compact disc next track
8. Compact disc slot 9.
Compact disc player or AUX mode button
10. Telephone mode button
11. Audio MENU button:
• FM settings
• Clock
• CD settings
• Random
• AUX settings
12. EXIT button
13. Audio MENU control
• Rotate to scroll through options
• Press to enable or disable the function
14. SCAN button
• Press during CD play to listen to the first
10 seconds of each track
15. Input keypad
16. AUTO button
• Press to automatically store radio
stations
TA
NEWSPTY100.7
FM1
14 : 54
HEART FM
1234 6
2
E83108
34567
9
21
11
12
10
13141516
17
18
19
20
8
Page 2947 of 3229
227
Audio unit operation
R
Traffic Programme (TP) preference
With the Traffic Announc ement (TA) feature
enabled, any announcem ent received by the
system will interrupt nor mal radio reception or
CD play. The TP preference feature on premium
audio units allows the system to receive only
traffic announcements from a particular
station.
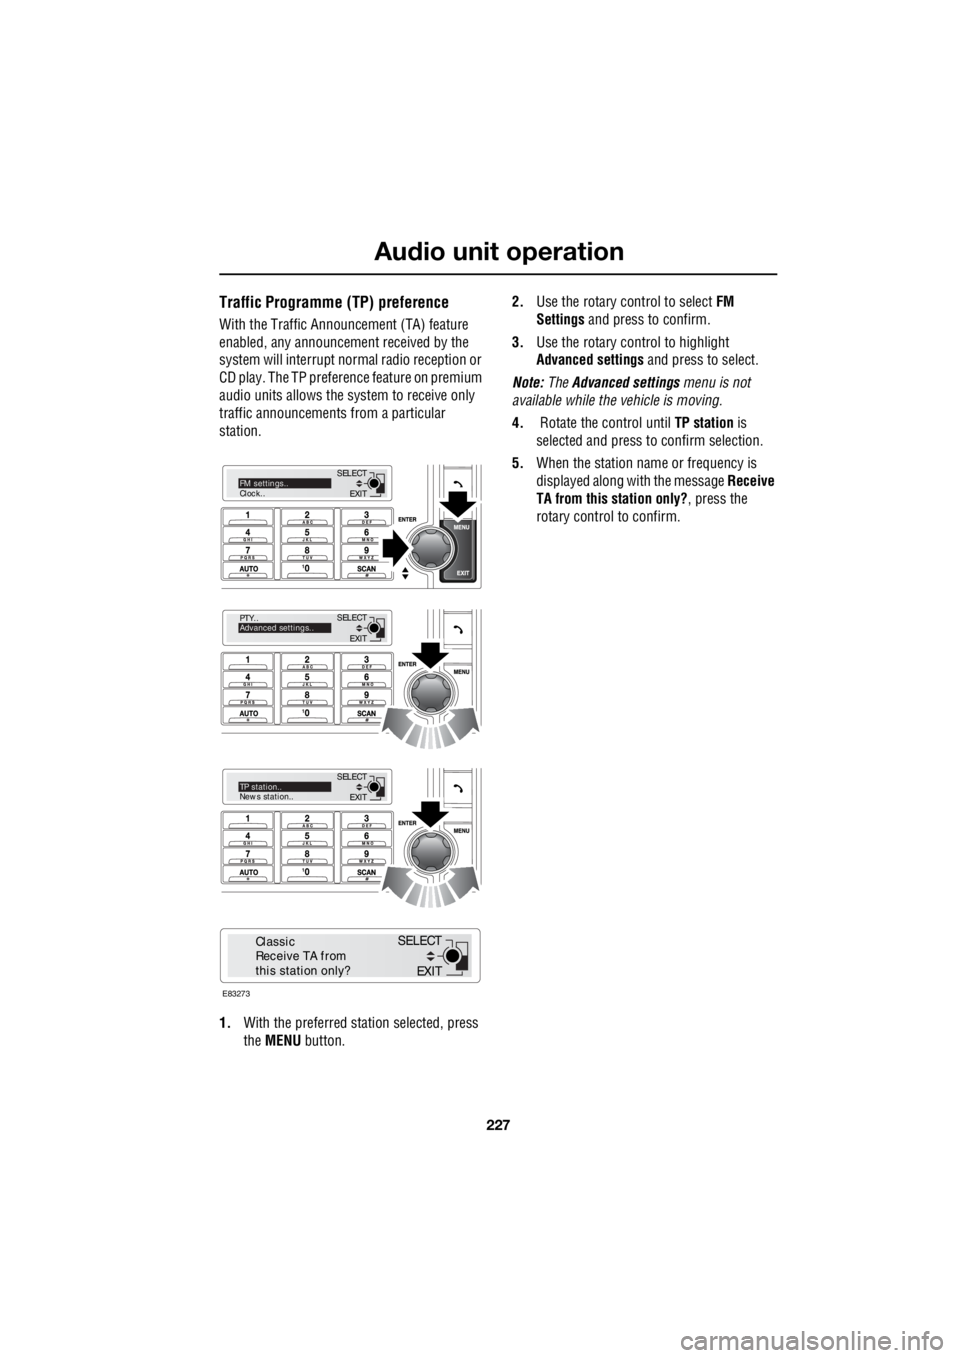
1. With the preferred station selected, press
the MENU button. 2.
Use the rotary control to select FM
Settings and press to confirm.
3. Use the rotary control to highlight
Advanced settings and press to select.
Note: The Advanced settings menu is not
available while the vehicle is moving.
4. Rotate the control until TP station is
selected and press to confirm selection.
5. When the station name or frequency is
displayed along with the message Receive
TA from this station only? , press the
rotary control to confirm.
EXIT
SELECT
PTY..
Advanced settings..
EXIT
SELECTTP station..
News station..
EXIT
SELECTFM settings..
Clock..
E83273
EXIT
SELECT
Classic
Receive TA from
this station only?
Page 2948 of 3229
Audio unit menus
228
L
Audio unit menusRADIO DATA SYSTEM (RDS)
Your audio system is equipped with RDS
(Radio Data System), which enables the audio
unit to receive extra information with the
normal radio signals.
On the FM waveband, RD S enables the audio to
receive traffic and news information
broadcasts. RDS also al lows the audio unit to
automatically retune to stations that are linked
to the same network.
Note: Not all FM radio stat ions broadcast RDS.
If a non-RDS station is selected, RDS features
will not be available.
Selecting RDS
On standard audio unit s, RDS can be enabled
or disabled, according to preference. The
following procedure explains how to switch
RDS on or off.
1. With FM1, FM2 or FMa selected, press the
MENU button to display the menu.
2. Using the rotary control, select RDS from
the menu. ON or OFF will be displayed,
dependent on status.
3. Press the rotary control to change status.
The RDS status will be displayed briefly on the
information screen.
REGIONAL MODE (REG)
As you drive into diffe rent radio reception
areas, the Radio Data System (RDS)
automatically retunes the radio to the strongest
signal. Regional mode is an RDS feature which
stops the system from tuning to another local
radio station with a stronger signal. With this
feature enabled, your selected local radio
station will re main tuned.
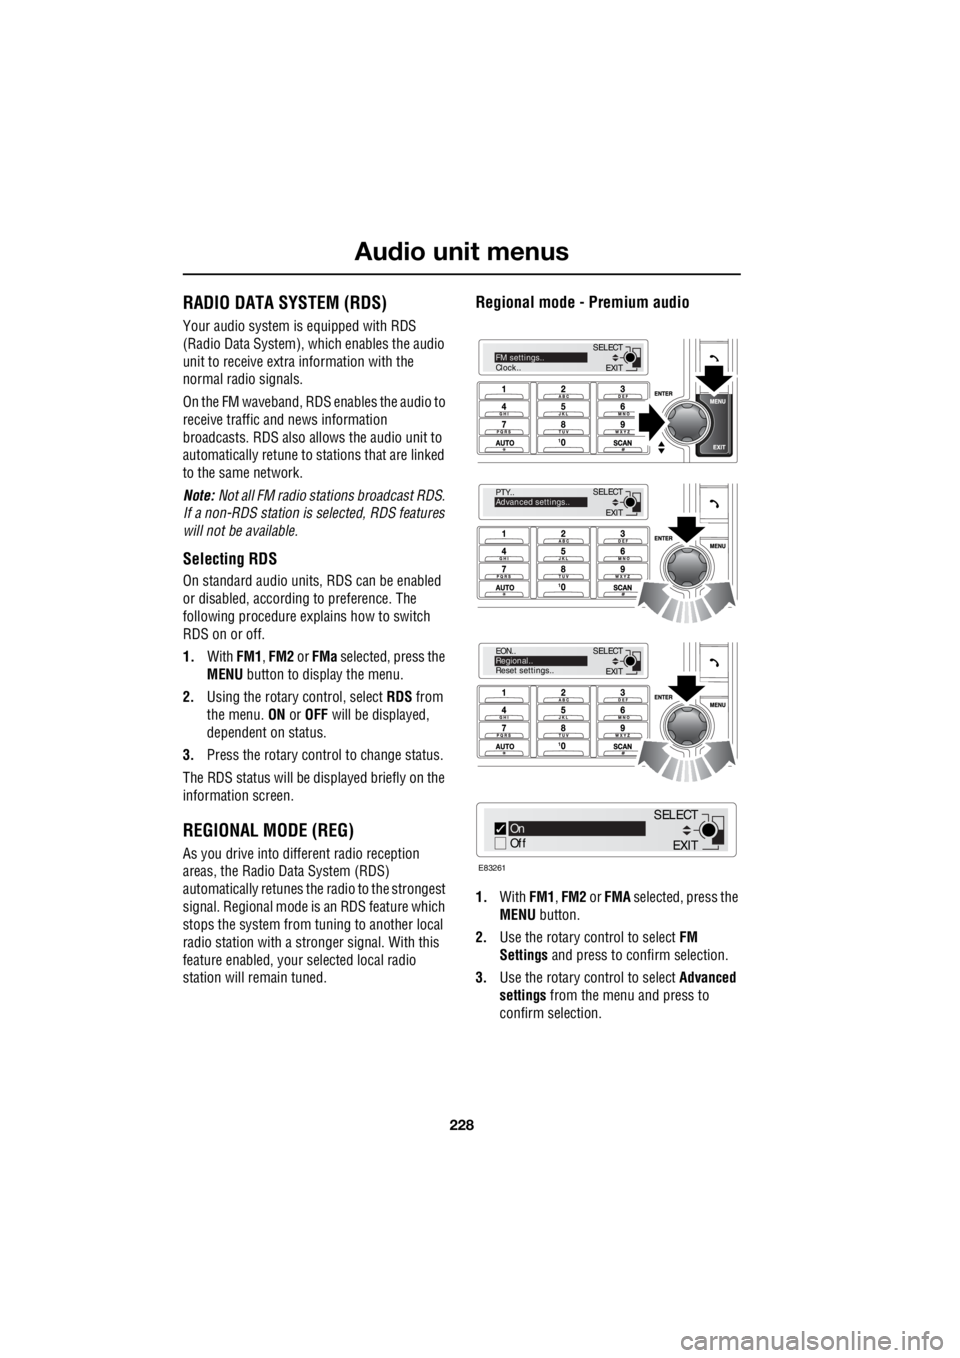
Regional mode - Premium audio
1.With FM1, FM2 or FMA selected, press the
MENU button.
2. Use the rotary control to select FM
Settings and press to c onfirm selection.
3. Use the rotary control to select Advanced
settings from the menu and press to
confirm selection.
EXIT
SELECT
PTY..
Advanced settings..
EXIT
SELECT
EON..
Regional..
Reset settings..
EXIT
SELECTFM settings..
Clock..
On
Off
E83261
EXIT
SELECT