2006 LAND ROVER FRELANDER 2 child lock
[x] Cancel search: child lockPage 2309 of 3229
The lock and double lock mot ors control the engagement of t he door lat ches with t he releas e cables to lock and unlock thevehicle. W hen t he vehicl e i s l ocked, the lock mot ors disengage the door latches from the exterior rel ease cabl es . W hen t hevehicle is doubl e l ocked, the double lock mot ors als o dis engage t he door l at ches from t he interior rel ease cables . W hen t hevehicle is s ubsequentl y unl ocked, the int erior and ext eri or releas e cables are re-engaged wi th the door latches.
Al l the door interior release handl es incorporate a locking button. W hen a front door central locking but ton is press ed/pulled,all the vehi cle doors will cent rally lock/unlock. W hen a rear door locki ng butt on is press ed/pull ed, t he locking button will onlylock/unlock the activat ed rear door.
W hen the door locki ng butt on is press ed, t he interior release cable is pus hed and causes the exterior releas e cabl e t o bedis engaged from t he door l at ch. On the rear doors, pres sing the locki ng butt on will also disengage the interior handl e fromthe i nt eri or releas e cable.
W hen the door locki ng butt on is pul led away from t he door, the door int erior releas e handle is re-engaged wit h the i nt eri orrelease cable. As the i nt eri or releas e cable is re-engaged it i s pulled, caus ing the door lat ch to re-engage with t he ext eri orrelease cable.
Rear Door Child Locks
The rear door latches i ncorporat e child locks that provide addit ional rear occupancy safety. The chi ld locks are manuallyoperat ed us ing the emergency key blade within the remote hands et . Setti ng the child lock t o t he l ocked pos it ion wil ldis engage the door lat ch interior rel ease cable from the door latch, and prevent opening of the rear door us ing t he interiorrelease handl e.
For further informati on on chi ld locks, refer to t he Owners Handbook.
Door Ajar Switch
An ajar s wi tch i s i ns talled in each door l atch and is hardwi red t o the CJB. If the igniti on is i n power modes 4 (Access ory) or 6(Igni tion) and a door i s opened or is not fully clos ed, the corresponding door ajar s wi tch i s opened to disconnect t he groundfrom the CJB. A mes sage is t ransmi tted by the CJB vi a t he medium speed CAN bus to t he inst rument clus ter, to inform t hedriver t hat a door is ajar.
On vehicl es with a low-li ne inst rument clus ter t he door ajar symbol is il luminated.For addit ional informat ion, refer t o: Inst rument Clus ter (413-01 Ins trument Clust er, Des cription and Operat ion).On vehicl es with a high-l ine i ns trument clust er, t he door ajar s ymbol is ill uminat ed and a mes sage is also dis played in themess age cent er.For addit ional informat ion, refer t o: Informat ion and Mes sage Center (413-08 Informati on and Mes sage Center, Descriptionand Operat ion).
The door ajar swit ch is also i ntegrat ed wit h t he vehicl e securit y s ys tem and is us ed as the detecti on devi ce for unauthorizedvehicle ent ry.For addit ional informat ion, refer t o: Anti -Theft - Act ive (419-01A Anti-Theft - Act ive, Description and Operat ion).
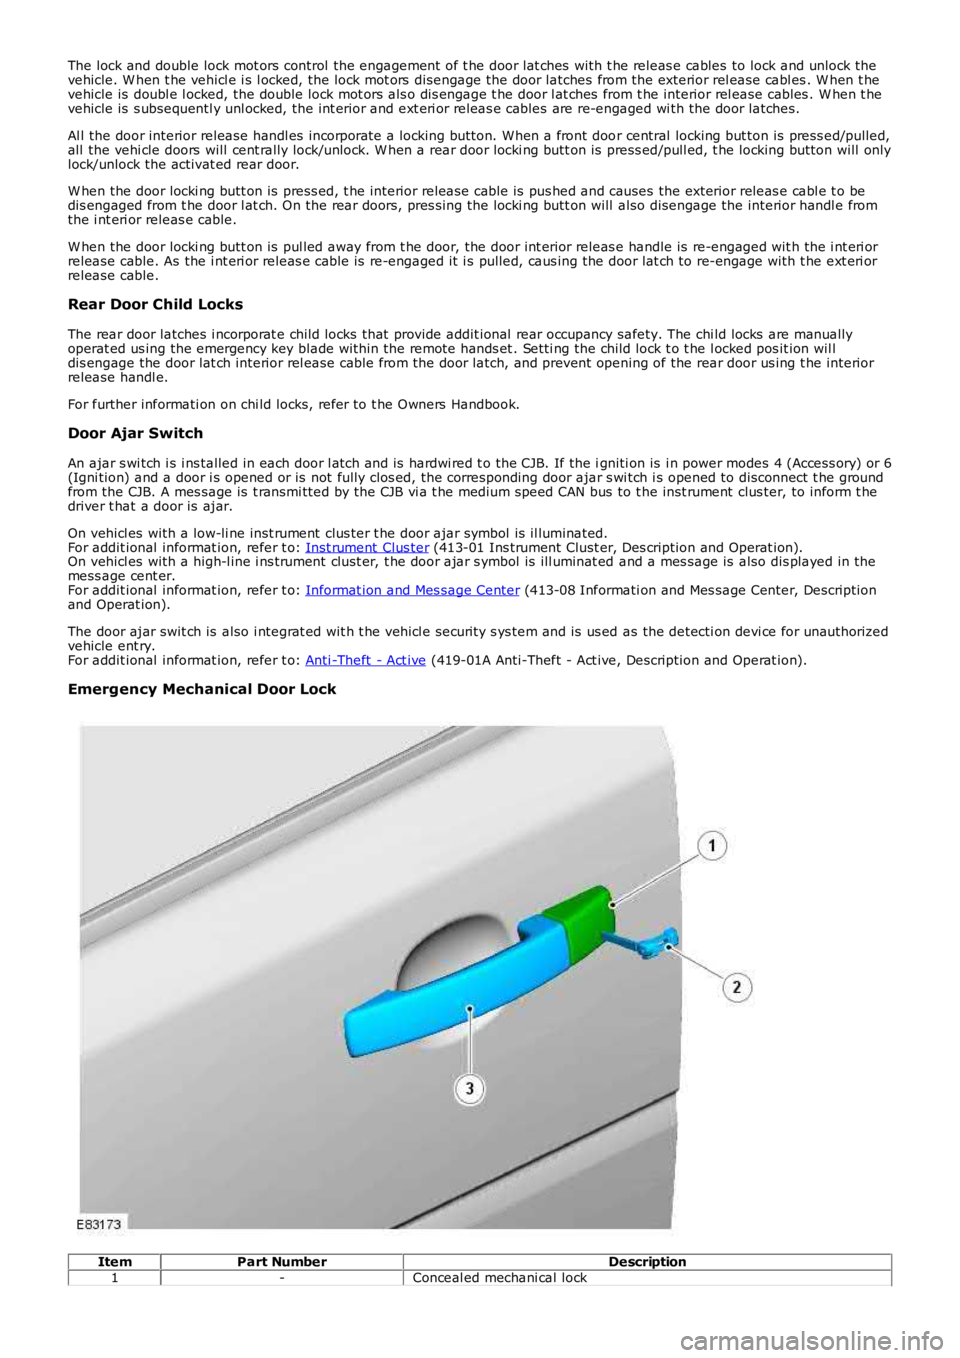
Emergency Mechanical Door Lock
ItemPart NumberDescription1-Conceal ed mechani cal lock
Page 2322 of 3229
1
2
3
1
Is t he exterior door handle releas e cabl e ins t al led correct ly?YesGO t o Pinpoint Tes t C.NoConnect the door rel eas e cable correctl y. If the cable isdamaged, install a new door release cable. Tes t t hesys t em for normal operat ion.
PINPOINT TEST B : SINGLE DOOR WILL NOT OPEN FROM THE INSIDE (BUT OPENS FROM THE
OU TSIDE)
T EST CO NDIT IONSDET AILS/RESULT S/ACT IONS
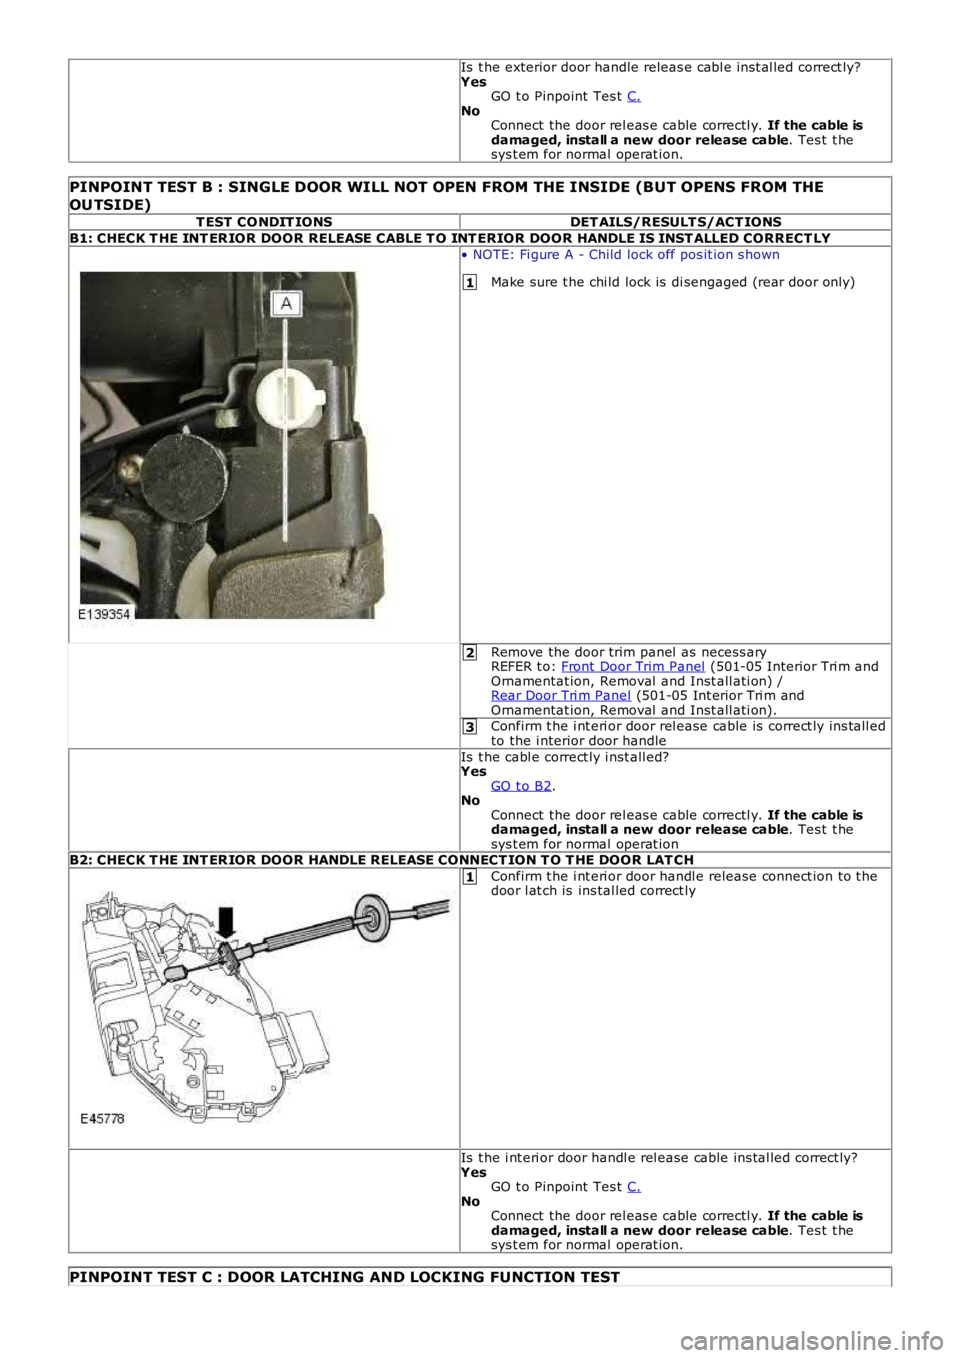
B1: CHECK T HE INT ER IOR DOOR RELEASE CABLE T O INT ERIOR DOOR HANDLE IS INST ALLED CORRECT LY
• NOTE: Fi gure A - Child lock off pos it ion s hown
Make sure t he chi ld lock is di sengaged (rear door only)
Remove the door trim panel as necess aryREFER t o: Front Door Trim Panel (501-05 Interior Tri m andOrnamentat ion, Removal and Inst all ati on) /Rear Door Tri m Panel (501-05 Int erior Tri m andOrnamentat ion, Removal and Inst all ati on).Confirm t he i nt eri or door rel ease cable is correct ly ins tall edto the i nterior door handle
Is t he cabl e correct ly i nst all ed?YesGO t o B2.NoConnect the door rel eas e cable correctl y. If the cable isdamaged, install a new door release cable. Tes t t hesys t em for normal operat ionB2: CHECK T HE INT ER IOR DOOR HANDLE RELEASE CONNECT ION T O T HE DOOR LAT CH
Confirm t he i nt eri or door handl e release connect ion to t hedoor l at ch is ins tal led correct ly
Is t he i nt eri or door handl e rel ease cable ins tal led correct ly?YesGO t o Pinpoint Tes t C.NoConnect the door rel eas e cable correctl y. If the cable isdamaged, install a new door release cable. Tes t t hesys t em for normal operat ion.
PINPOINT TEST C : DOOR LATCHING AND LOCKING FUNCTION TEST
Page 2326 of 3229
1
2
3
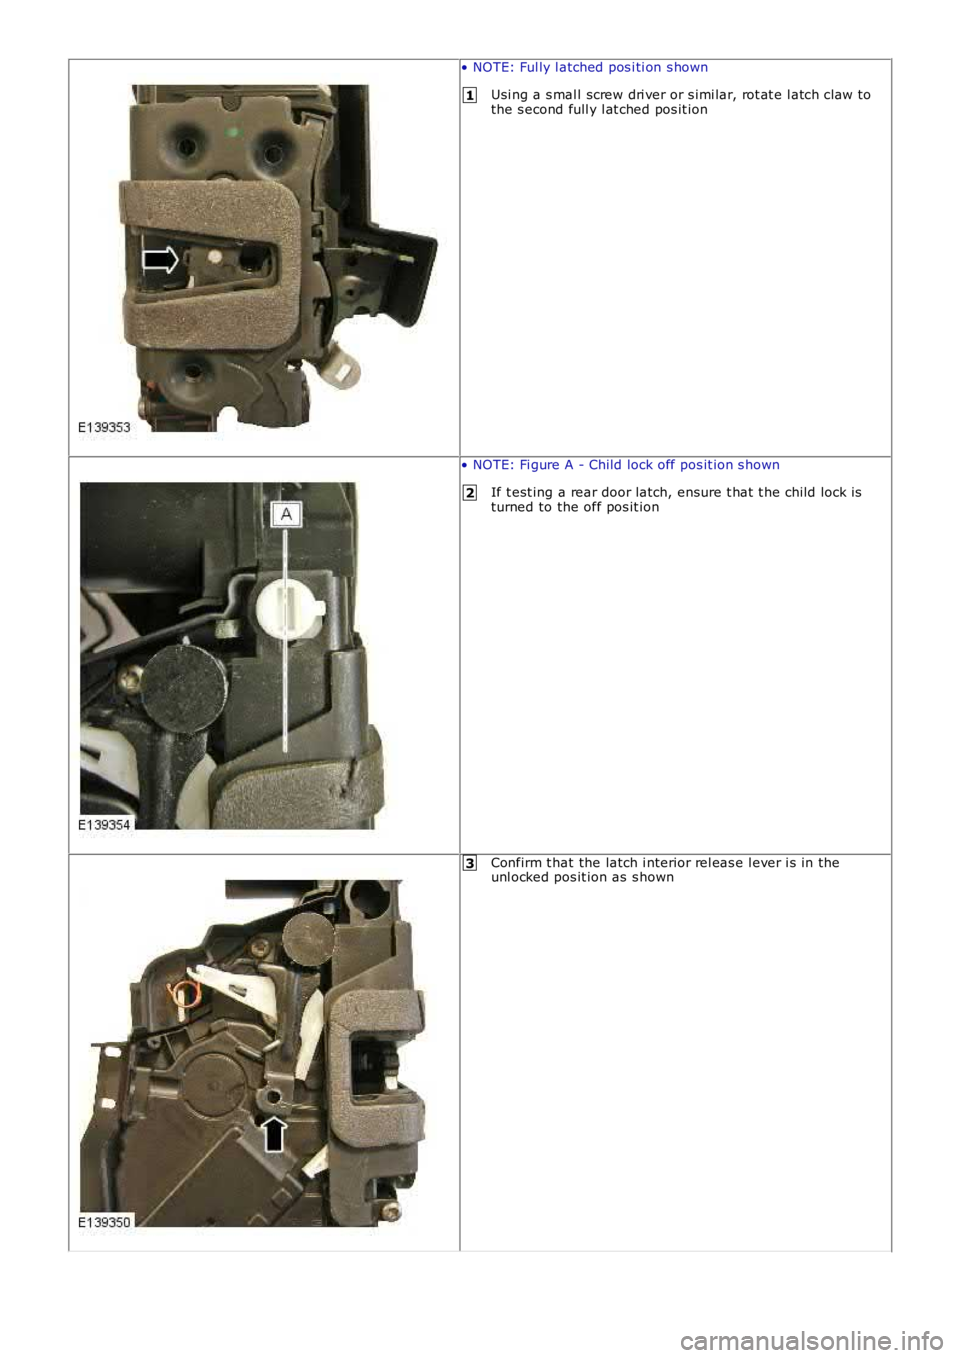
• NOTE: Ful ly l atched pos i ti on s hown
Usi ng a s mal l screw dri ver or s imi lar, rot at e l atch claw tothe s econd full y l at ched pos it ion
• NOTE: Fi gure A - Child lock off pos it ion s hown
If t est ing a rear door latch, ensure t hat t he child lock isturned to the off pos it ion
Confirm t hat the latch i nterior rel eas e l ever i s in theunl ocked pos it ion as s hown
Page 2454 of 3229
1
2
3
1
2
3
4
1
2
3
4
5
CarlineMarketSeat positionAutomatic Locking Retractor InstalledFrom Model Year
Range Rover Evoque (L358)AllDriverNo2011
Range Rover Evoque (L358)ROWPas sengerNo2011Range Rover Evoque (L358)USPas sengerY es2011
Range Rover Evoque (L358)ROWRow 2No2011
Range Rover Evoque (L358)USRow 2Y es2011Range Rover (L322)AllDriverNo2003
Range Rover (L322)ROWPas sengerNo2003
Range Rover (L322)USPas sengerY es2003Range Rover (L322)ROWRow 2No2003
Range Rover (L322)USRow 2Y es2003
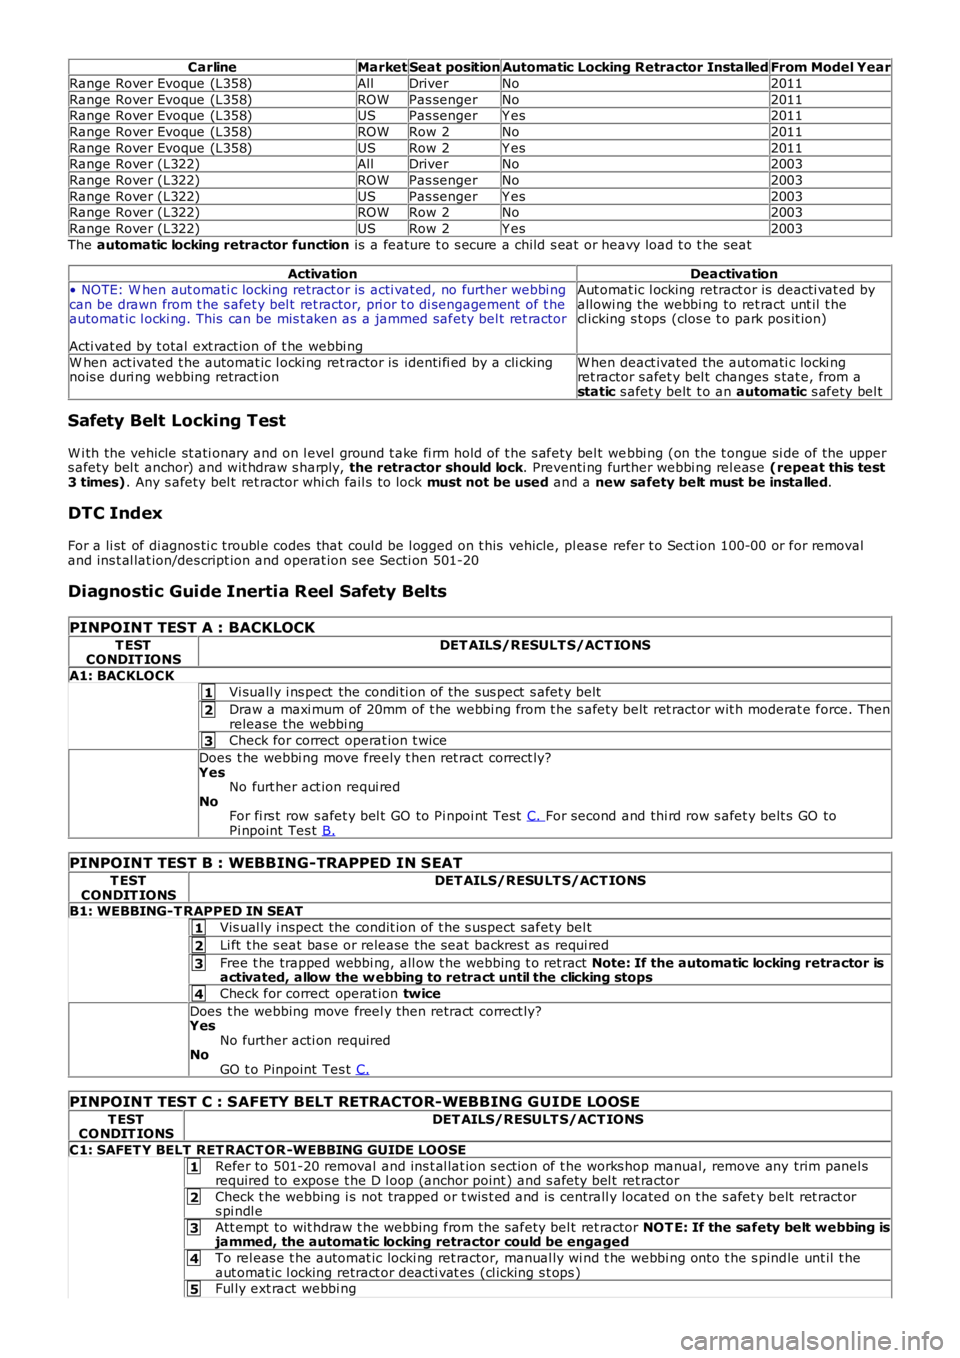
The automatic locking retractor function is a feature t o s ecure a child s eat or heavy load t o t he seat
ActivationDeactivation• NOTE: W hen aut omati c locking retract or is acti vat ed, no further webbi ngcan be drawn from t he s afet y bel t ret ractor, pri or t o di sengagement of t heautomat ic l ocki ng. This can be mis t aken as a jammed safety bel t ret ractor
Acti vat ed by t otal ext ract ion of t he webbi ng
Aut omat ic l ocking retract or is deacti vat ed byallowi ng the webbi ng to ret ract unt il t hecl icking s t ops (clos e t o park pos it ion)
W hen act ivated t he automat ic l ocki ng ret ractor is identi fi ed by a cli ckingnois e duri ng webbing retract ionW hen deact ivated the aut omati c locki ngret ractor s afet y bel t changes s tat e, from astatic s afet y belt t o an automatic s afety bel t
Safety Belt Locking Test
W i th the vehicle st ati onary and on l evel ground t ake fi rm hold of t he s afety bel t webbi ng (on the t ongue si de of the uppers afety bel t anchor) and wit hdraw s harply, the retractor should lock. Preventi ng further webbi ng rel eas e (repeat this test3 times). Any s afety bel t ret ractor whi ch fail s t o lock must not be used and a new safety belt must be installed.
DTC Index
For a li st of di agnos ti c troubl e codes that coul d be l ogged on t his vehicle, pl eas e refer t o Sect ion 100-00 or for removaland ins t al lat ion/des cript ion and operat ion s ee Secti on 501-20
Diagnostic Guide Inertia Reel Safety Belts
PINPOINT TEST A : BACKLOCK
T ESTCONDIT IONSDET AILS/RESULT S/ACT IONS
A1: BACKLOCK
Vi suall y i ns pect the condi ti on of the sus pect s afet y belt
Draw a maxi mum of 20mm of t he webbi ng from t he s afet y belt ret ract or wit h moderat e force. Thenrelease the webbi ng
Check for correct operat ion t wice
Does t he webbi ng move freely t hen ret ract correct ly?YesNo furt her act ion requi redNoFor fi rs t row s afet y bel t GO to Pi npoi nt Tes t C. For second and thi rd row s afet y belt s GO toPi npoint Tes t B.
PINPOINT TEST B : WEBBING-TRAPPED IN SEAT
T ESTCONDIT IONSDET AILS/RESULT S/ACT IONS
B1: WEBBING-T RAPPED IN SEAT
Vis ual ly i nspect the condit ion of t he s uspect safety bel t
Li ft t he s eat bas e or release the s eat backres t as requi red
Free t he trapped webbi ng, all ow t he webbing t o ret ract Note: If the automatic locking retractor isactivated, allow the w ebbing to retract until the clicking stops
Check for correct operat ion twice
Does t he webbing move freel y then retract correct ly?YesNo further acti on requiredNoGO t o Pinpoint Tes t C.
PINPOINT TEST C : SAFETY BELT RETRACTOR-WEBBING G UIDE LOOSE
T ESTCO NDIT IONSDET AILS/RESULT S/ACT IONS
C1: SAFET Y BELT RET RACT OR -WEBBING GUIDE LOOSE
Refer to 501-20 removal and ins t al lat ion s ect ion of t he works hop manual, remove any trim panel srequired to expos e t he D l oop (anchor point ) and s afety bel t ret ractor
Check t he webbing i s not trapped or t wis t ed and is centrall y located on t he s afet y belt ret ract ors pi ndl e
Att empt to wit hdraw t he webbing from t he safety bel t ret ractor NOT E: If the safety belt webbing isjammed, the automatic locking retractor could be engaged
To rel eas e t he automat ic locki ng ret ractor, manual ly wi nd t he webbi ng onto t he s pindle unt il t heaut omat ic l ocking retract or deacti vat es (cl icking s t ops )Ful ly ext ract webbi ng
Page 2723 of 3229

Contents
3
R
Quick start
QUICK START ................................................... 7
Filling station information
FILLING STATION INFORMATION................... 33
Introduction
SYMBOLS GLOSSARY .................................... 35
LABEL LOCATIONS ......................................... 35
HEALTH AND SAFETY ..................................... 36
DATA RECORDING.......................................... 37
DISABILITY MODIFICATIONS ......................... 37
PARTS AND ACCESSORIES ............................ 37
Keys and remote controls
USING THE KEY .............................................. 40
GENERAL INFORMATION ON RADIO
FREQUENCIES ................................................ 40
USING THE REMOTE CONTROL ..................... 41
Locks
LOCKING AND UNLOCKING ............................ 44
Alarm
ARMING THE ALARM ..................................... 45
DISARMING THE ALARM ............................... 46
Seats
SITTING IN THE CORRECT POSITION ............ 47
MANUAL SEATS ............................................. 48
ELECTRIC SEATS ............................................ 49
HEAD RESTRAINTS ........................................ 51
REAR SEATS................................................... 51
HEATED SEATS............................................... 53
Seat belts
PRINCIPLE OF OPERATION ............................ 54
SEAT BELT REMINDER ................................... 55
FASTENING THE SEAT BELTS ........................ 56
SEAT BELT HEIGHT ADJUSTMENT................. 56
USING SEAT BELTS DURI NG PREGNANCY .... 57
Supplementary restraints system
PRINCIPLE OF OPERATION ............................ 58
AIRBAG WARNING LAMP ............................... 61
DISABLING THE PASSENGER AIRBAG ........... 62
AIRBAG SERVICE INFORMATION ................... 63
Child safety
CHILD SEATS ................................................. 64
BOOSTER CUSHIONS ..................................... 66
ISOFIX ANCHOR POINTS................................ 67
CHILD SAFETY LOCKS ................................... 69
Steering wheel
ADJUSTING THE STEERING WHEEL .............. 70
AUDIO CONTROL ........................................... 70
Lighting
LIGHTING CONTROL ...................................... 72
FRONT FOG LAMPS........................................ 72
REAR FOG LAMPS.......................................... 73
ADJUSTING THE HEADLAMPS....................... 73
HEADLAMP LEVELLING ................................. 73
HAZARD WARNING FLASHERS...................... 74
ADAPTIVE FRONT LIGHTING SYSTEM (AFS) . 74
DIRECTION INDICATORS ............................... 75
INTERIOR LAMPS .......................................... 76
APPROACH LAMPS ........................................ 76
CHANGING A BULB ........................................ 77
BULB SPECIFICATION CHART ........................ 86
Wipers and washers
WINDSCREEN WIPERS .................................. 87
RAIN SENSOR ................................................ 87
WINDSCREEN WASHERS............................... 88
HEADLAMP WASHERS................................... 88
REAR WINDOW WIPER AND WASHERS ........ 89
ADJUSTING THE WINDSCREEN WASHER JETS .
89
CHECKING THE WIPER BLADES .................... 90
CHANGING THE WIPER BLADES.................... 90
Windows and mirrors
ELECTRIC WINDOWS ..................................... 93
EXTERIOR MIRRORS ..................................... 94
ELECTRIC EXTERIOR MIRRORS .................... 95
INTERIOR MIRROR ........................................ 96
Instruments
INSTRUMENT PANEL OVERVIEW .................. 97
Information displays
TRIP COMPUTER ........................................... 99
INFORMATION MESSAGES ............................ 99
Page 2761 of 3229
41
Keys and remote controls
R
USING THE REMOTE CONTROL
Remote control
Note: The operational range of the remote
control will vary considerably depending on
atmospheric conditions and interference from
other transmitting devices.
The vehicle is supplied with two remote
controls, but up to six can be programmed to
the vehicle at any one time.
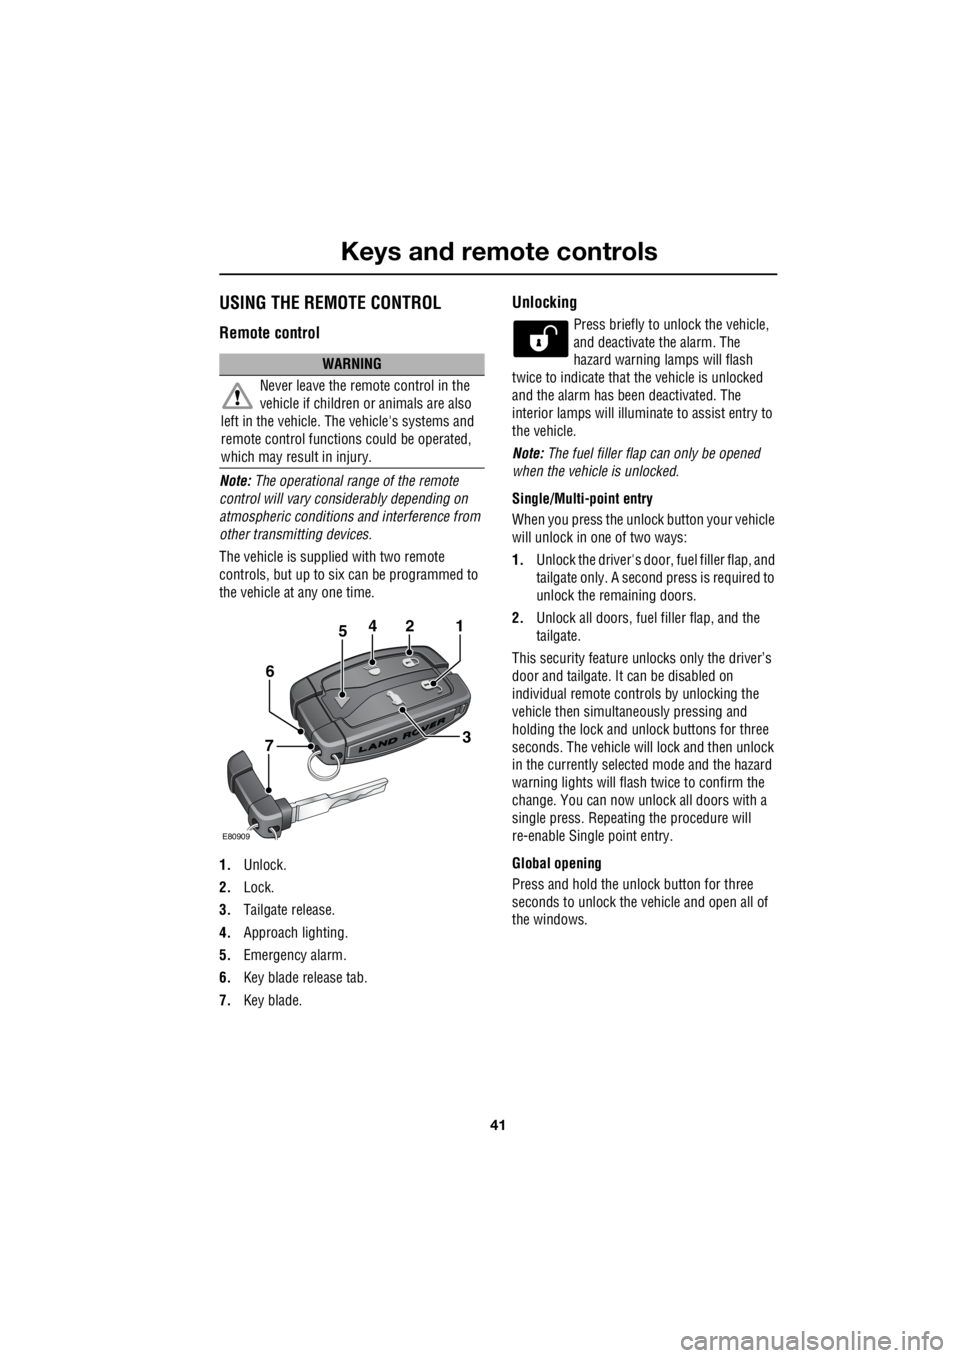
1. Unlock.
2. Lock.
3. Tailgate release.
4. Approach lighting.
5. Emergency alarm.
6. Key blade release tab.
7. Key blade.
Unlocking
Press briefly to unlock the vehicle,
and deactivate the alarm. The
hazard warning lamps will flash
twice to indicate that the vehicle is unlocked
and the alarm has been deactivated. The
interior lamps will illuminate to assist entry to
the vehicle.
Note: The fuel filler flap can only be opened
when the vehicle is unlocked.
Single/Multi- point entry
When you press the unlock button your vehicle
will unlock in one of two ways:
1. Unlock the driver's door, fuel filler flap, and
tailgate only. A second press is required to
unlock the remaining doors.
2. Unlock all doors, fuel filler flap, and the
tailgate.
This security feature unlocks only the driver’s
door and tailgate. It can be disabled on
individual remote controls by unlocking the
vehicle then simultaneously pressing and
holding the lock and unlock buttons for three
seconds. The vehicle will lock and then unlock
in the currently selected mode and the hazard
warning lights will flas h twice to confirm the
change. You can now unlock all doors with a
single press. Repeating the procedure will
re-enable Single point entry.
Global opening
Press and hold the unlock button for three
seconds to unlock the ve hicle and open all of
the windows.
WARNING
Never leave the remote control in the
vehicle if children or animals are also
left in the vehicle. The vehicle's systems and
remote control functions could be operated,
which may result in injury.
2
E80909
451
3
6
7
Page 2762 of 3229
Keys and remote controls
42
L
Single and double locking
The vehicle can be locked in two ways.
Single locking
Single locking secures the vehicle and prevents
the doors being opened from outside of the
vehicle. The doors can be unlocked and opened
from inside the vehicle.
Double locking
Double locking secures the vehicle and
prevents the doors being opened from inside
or outside of the vehicle. The doors can not be
unlocked or opened from inside the vehicle.
This provides additional security if the vehicle
is left unattended. The vehicle cannot be
opened by breaking a window and operating
the door locks from inside the vehicle.
Locking
Press briefly to single lock the
vehicle, and partially activate the
alarm. The hazard warning lamps
will flash to indicate that the vehicle is locked.
A second press within three seconds will
double lock the vehicle and fully arm the alarm.
The hazard warning lamps will flash again to
indicate the enhanced lock/alarm state.
Note: The fuel filler flap can only be opened
when the vehicle is unlocked. Global closing
Press and hold the lock button for three
seconds to single lock the vehicle, fully arm the
alarm, and close all of the windows.
Note: For safety reasons, th e sunroof does not
close automatically. It sh ould be closed in the
normal way before exiting the vehicle.
Automatic relocking
If a door, or the tailgate, are not opened within
one minute of unlocking the vehicle, doors will
lock again automatically.
Approach lighting
When approaching the vehicle
during darkness press to switch on
the approach illumination. Press
again to turn the approach lamps off.
The approach ill umination period
set at the factory is thirty seconds.
This can be configured by a Land
Rover Dealer/Authorised Repairer to provide
illumination lasting between Zero and 120
seconds.
WARNING
Never double lock the vehicle with
people, children, or pets inside. In the
event of an emergency th ey would be unable to
escape, and the emergency services would be
unable to release them quickly.
WARNING
Ensure that no children, pets, or
obstructions are in any open aperture
before operating globa l closing. Safety
mechanisms are in place to prevent serious
injury, however, inju ries can still occur.
Page 2764 of 3229
Locks
44
L
LocksLOCKING AND UNLOCKING
Drive-away locking
The vehicle can be configured by a
Land Rover Dealer/Authorised
Repairer to lock automatically
when in motion. Contact your
Dealer/Authorised Re pairer for further
information.
Locking and unlocking from inside the
vehicle
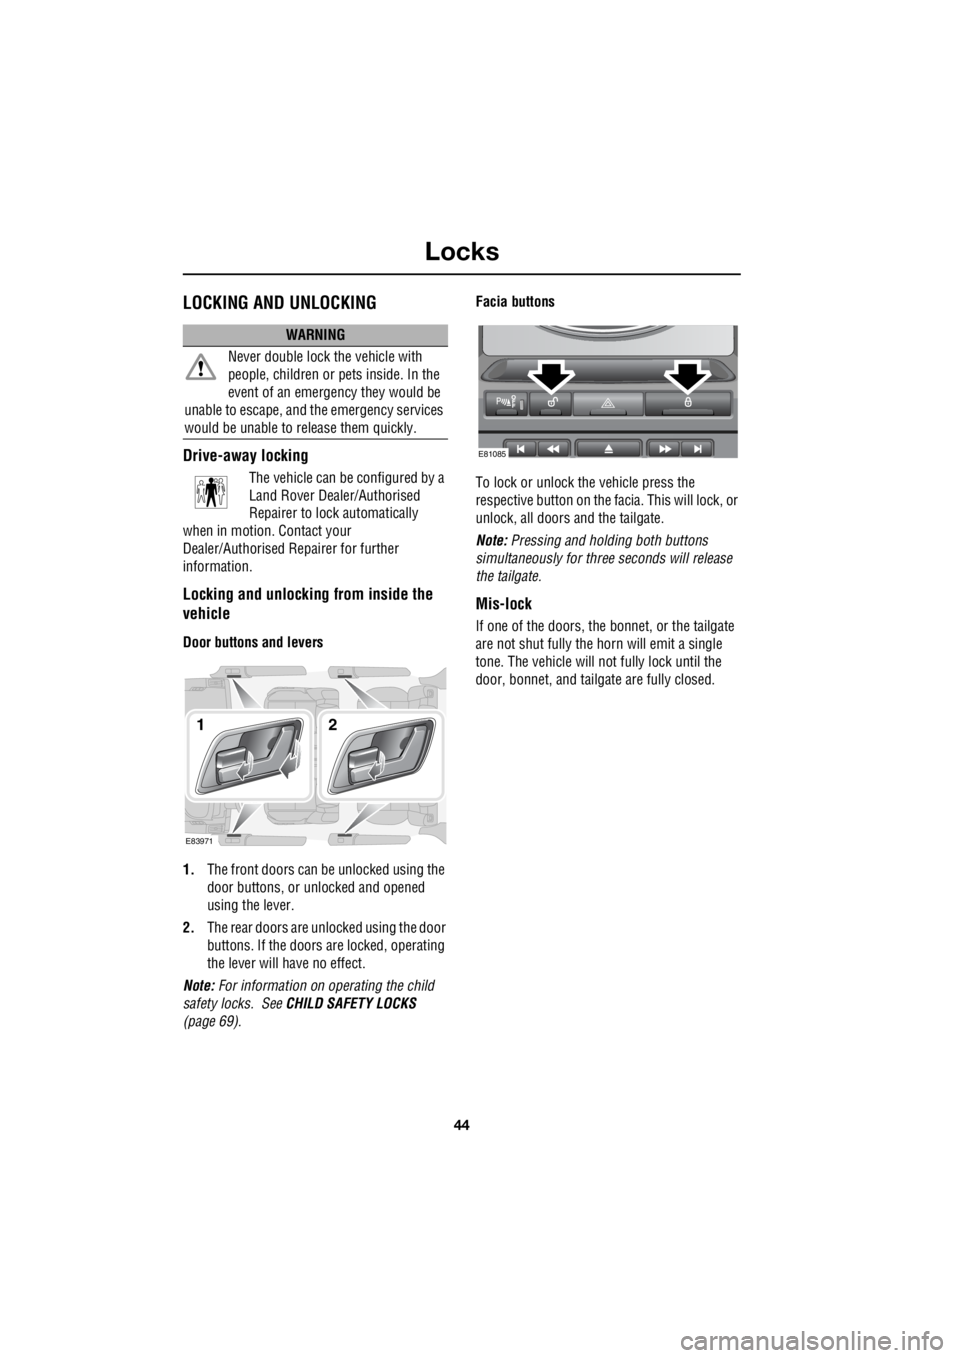
Door buttons and levers
1. The front doors can be unlocked using the
door buttons, or unlocked and opened
using the lever.
2. The rear doors are unlocked using the door
buttons. If the doors are locked, operating
the lever will have no effect.
Note: For information on operating the child
safety locks. See CHILD SAFETY LOCKS
(page 69). Facia buttons
To lock or unlock the vehicle press the
respective button on the fa cia. This will lock, or
unlock, all doors and the tailgate.
Note: Pressing and holding both buttons
simultaneously for thre e seconds will release
the tailgate.
Mis-lock
If one of the doors, the bon net, or the tailgate
are not shut fully the horn will emit a single
tone. The vehicle will not fully lock until the
door, bonnet, and tailga te are fully closed.
WARNING
Never double lock the vehicle with
people, children or pe ts inside. In the
event of an emergency they would be
unable to escape, and th e emergency services
would be unable to release them quickly.
E83971
12
E81085