2006 LAND ROVER FRELANDER 2 wiper blades
[x] Cancel search: wiper bladesPage 175 of 3229
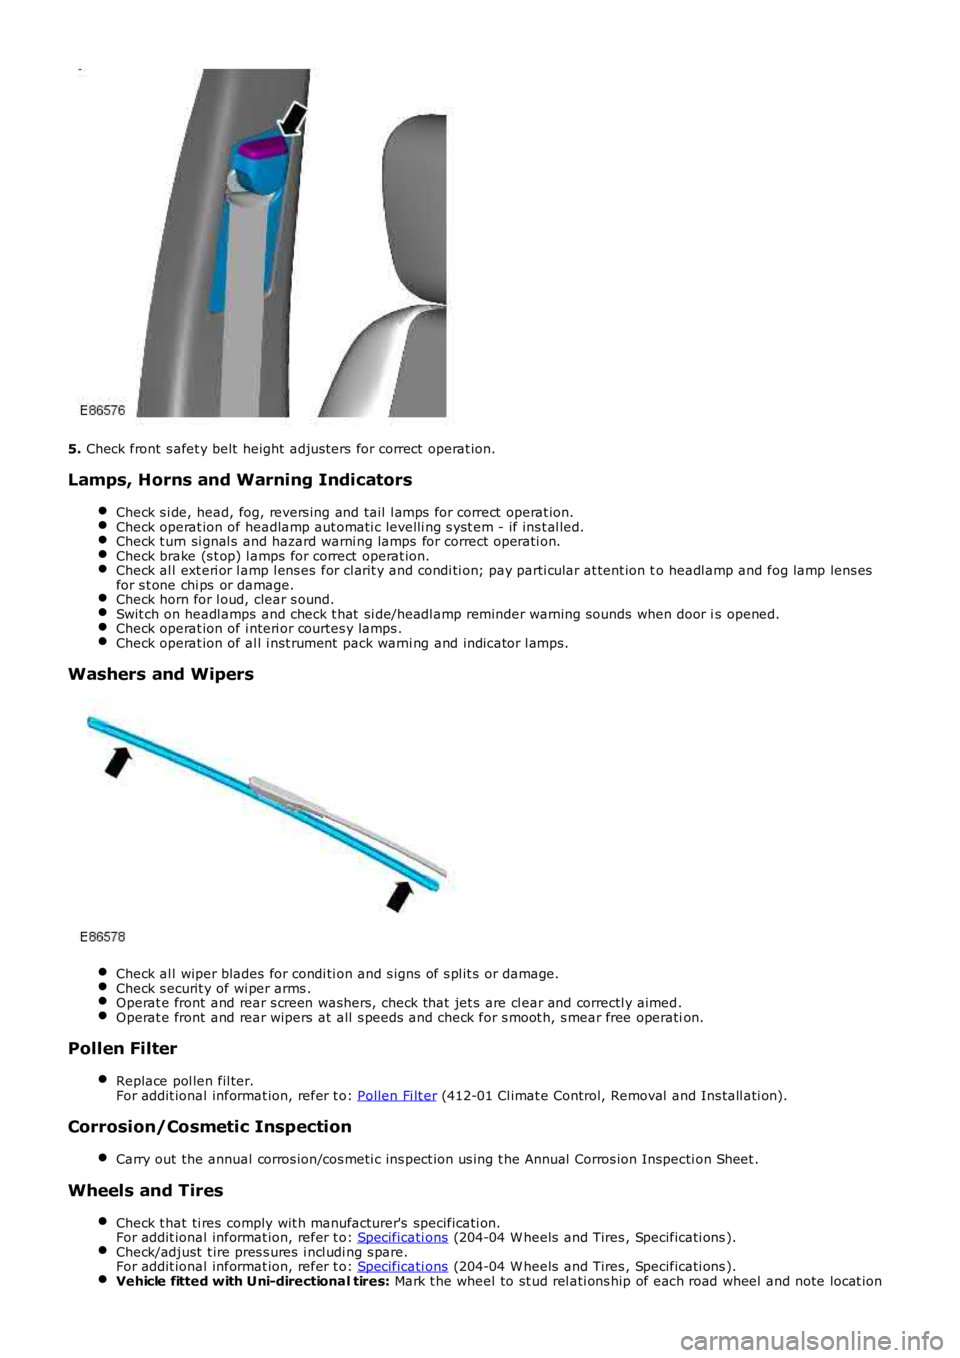
5. Check front s afet y belt height adjus ters for correct operat ion.
Lamps, Horns and Warning Indicators
Check s i de, head, fog, revers ing and tail l amps for correct operat ion.Check operat ion of headlamp aut omati c levelli ng s yst em - if ins t al led.Check t urn si gnal s and hazard warni ng lamps for correct operati on.Check brake (s t op) l amps for correct operat ion.Check al l ext eri or l amp l ens es for cl arit y and condi ti on; pay parti cular at tent ion to headl amp and fog lamp lens esfor s t one chi ps or damage.Check horn for l oud, clear s ound.Swit ch on headl amps and check t hat si de/headl amp reminder warning s ounds when door is opened.Check operat ion of i nteri or courtes y lamps .Check operat ion of al l i nst rument pack warni ng and indicator l amps.
Washers and Wipers
Check al l wiper blades for condi ti on and s igns of s pl it s or damage.Check s ecurit y of wi per arms .Operat e front and rear s creen washers, check that jet s are cl ear and correctl y aimed.Operat e front and rear wipers at all s peeds and check for s moot h, s mear free operation.
Pollen Filter
Replace pol len fil ter.For addit ional informat ion, refer t o: Pollen Fi lt er (412-01 Cl imat e Control, Removal and Ins tall ati on).
Corrosion/Cosmetic Inspection
Carry out the annual corros ion/cos meti c ins pect ion us ing t he Annual Corros ion Inspecti on Sheet .
Wheels and Tires
Check t hat ti res comply wit h manufacturer's specificati on.For addit ional informat ion, refer t o: Specificati ons (204-04 W heels and Tires , Specificati ons ).Check/adjust t ire pres s ures i ncl udi ng s pare.For addit ional informat ion, refer t o: Specificati ons (204-04 W heels and Tires , Specificati ons ).Vehicle fitted with Uni-directional tires: Mark t he wheel to st ud rel ati ons hip of each road wheel and note locat ion
Page 186 of 3229
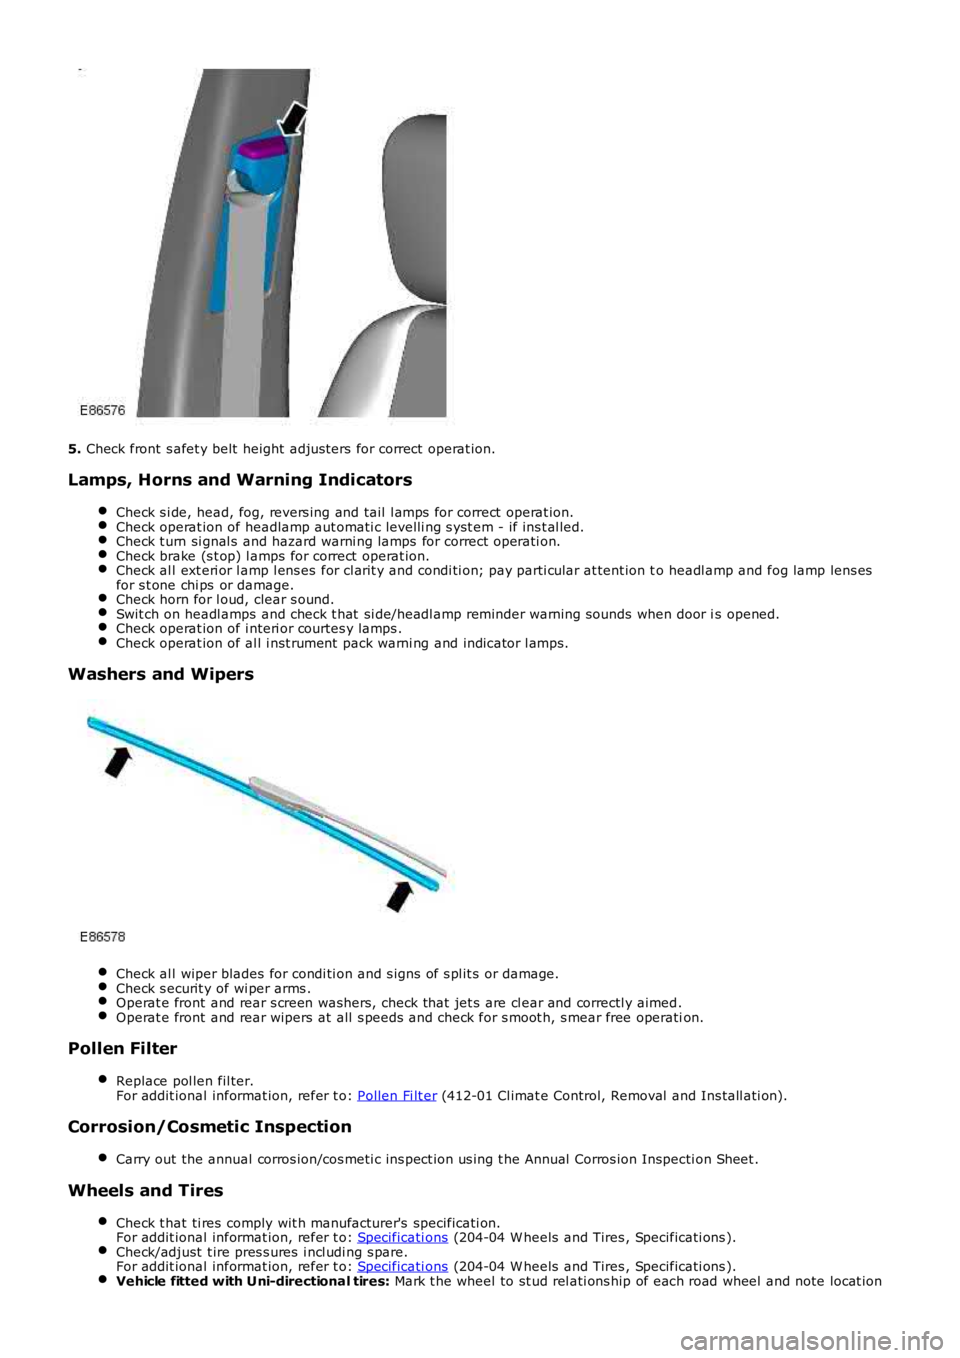
5.
Check front s afet y belt height adjus ters for correct operat ion.
Lamps, Horns and Warning Indicators Check s i de, head, fog, revers ing and tail l amps for correct operat ion. Check operat ion of headlamp aut omati c levelli ng s yst em - if ins t al led.
Check t urn si gnal s and hazard warni ng lamps for correct operati on.
Check brake (s t op) l amps for correct operat ion.
Check al l ext eri or l amp l ens es for cl arit y and condi ti on; pay parti cular at tent ion t
o headl amp and fog lamp lens es
for s t one chi ps or damage. Check horn for l oud, clear s ound.
Swit ch on headl amps and check t hat si de/headl amp reminder warning s ounds when door i
s opened.Check operat ion of i nteri or courtes y lamps .
Check operat ion of al l i nst rument pack warni ng and indicator l amps.
Washers and Wipers
Check al l wiper blades for condi ti on and s igns of s pl it s or damage.
Check s ecurit y of wi per arms .
Operat e front and rear s creen washers, check that jet s are cl ear and correctl y aimed
.Operat e front and rear wipers at all s peeds and check for s moot h, s mear free operati
on.Pollen Filter
Replace pol len fil ter.
For addit ional informat ion, refer t o: Pollen Fi lt er (412-01 Cl imat e Control, Removal and Ins tall ati on).
Corrosion/Cosmetic Inspection
Carry out the annual corros ion/cos meti c ins pect ion us ing t he Annual Corros ion Inspec ti on Sheet .Wheels and Tires
Check t hat ti res comply wit h manufacturer's specificati on.
For addit ional informat ion, refer t o: Specificati ons (204-04 W heels and Tires , Specificati ons ).
Check/adjust t ire pres s ures i ncl udi ng s pare.
For addit ional informat ion, refer t o: Specificati ons (204-04 W heels and Tires , Specificati ons ).
Vehicle fitted with Uni-directional tires:
Mark t he wheel to st ud rel ati ons hip of each road wheel and note locat ion
Page 2347 of 3229
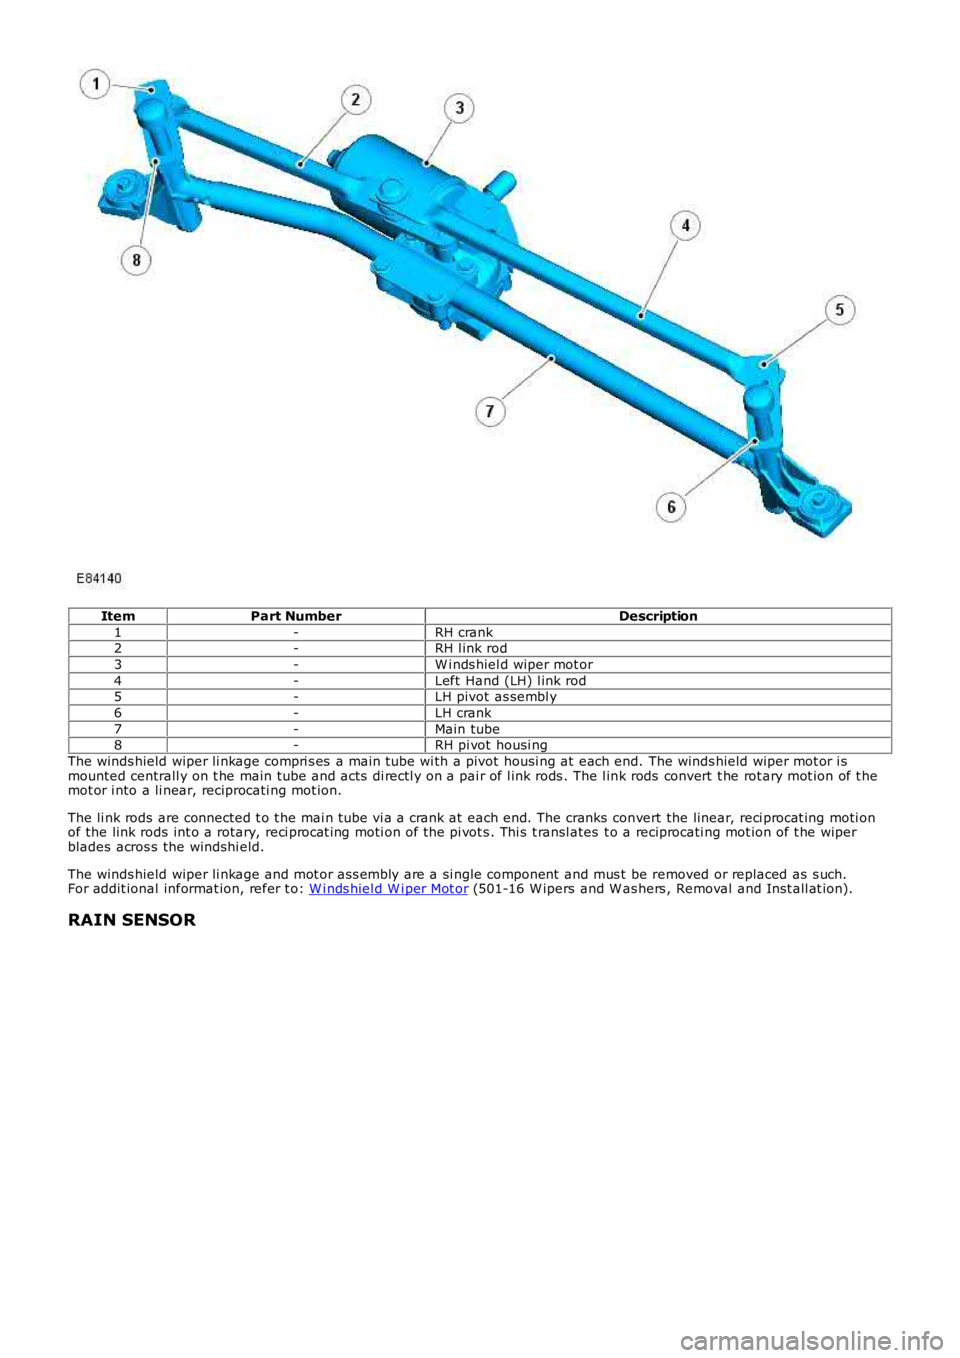
ItemPart NumberDescription
1-RH crank2-RH l ink rod
3-W i nds hiel d wiper mot or
4-Left Hand (LH) l ink rod5-LH pivot as sembl y
6-LH crank
7-Main tube8-RH pi vot housi ng
The winds hield wiper li nkage compri s es a main tube wi th a pivot housi ng at each end. The winds hield wiper mot or i smounted centrall y on t he main tube and acts di rectl y on a pai r of l ink rods . The l ink rods convert t he rot ary mot ion of t hemot or i nto a li near, reciprocati ng mot ion.
The li nk rods are connected t o t he mai n tube vi a a crank at each end. The cranks convert the linear, reci procat ing moti onof the link rods int o a rotary, reci procat ing moti on of the pi vot s . Thi s t ransl ates t o a reciprocati ng mot ion of t he wiperblades acros s the windshi eld.
The winds hield wiper li nkage and mot or ass embly are a si ngle component and mus t be removed or replaced as s uch.For addit ional informat ion, refer t o: W i nds hiel d W i per Mot or (501-16 W ipers and W as hers , Removal and Inst all at ion).
RAIN SENSOR
Page 2723 of 3229

Contents
3
R
Quick start
QUICK START ................................................... 7
Filling station information
FILLING STATION INFORMATION................... 33
Introduction
SYMBOLS GLOSSARY .................................... 35
LABEL LOCATIONS ......................................... 35
HEALTH AND SAFETY ..................................... 36
DATA RECORDING.......................................... 37
DISABILITY MODIFICATIONS ......................... 37
PARTS AND ACCESSORIES ............................ 37
Keys and remote controls
USING THE KEY .............................................. 40
GENERAL INFORMATION ON RADIO
FREQUENCIES ................................................ 40
USING THE REMOTE CONTROL ..................... 41
Locks
LOCKING AND UNLOCKING ............................ 44
Alarm
ARMING THE ALARM ..................................... 45
DISARMING THE ALARM ............................... 46
Seats
SITTING IN THE CORRECT POSITION ............ 47
MANUAL SEATS ............................................. 48
ELECTRIC SEATS ............................................ 49
HEAD RESTRAINTS ........................................ 51
REAR SEATS................................................... 51
HEATED SEATS............................................... 53
Seat belts
PRINCIPLE OF OPERATION ............................ 54
SEAT BELT REMINDER ................................... 55
FASTENING THE SEAT BELTS ........................ 56
SEAT BELT HEIGHT ADJUSTMENT................. 56
USING SEAT BELTS DURI NG PREGNANCY .... 57
Supplementary restraints system
PRINCIPLE OF OPERATION ............................ 58
AIRBAG WARNING LAMP ............................... 61
DISABLING THE PASSENGER AIRBAG ........... 62
AIRBAG SERVICE INFORMATION ................... 63
Child safety
CHILD SEATS ................................................. 64
BOOSTER CUSHIONS ..................................... 66
ISOFIX ANCHOR POINTS................................ 67
CHILD SAFETY LOCKS ................................... 69
Steering wheel
ADJUSTING THE STEERING WHEEL .............. 70
AUDIO CONTROL ........................................... 70
Lighting
LIGHTING CONTROL ...................................... 72
FRONT FOG LAMPS........................................ 72
REAR FOG LAMPS.......................................... 73
ADJUSTING THE HEADLAMPS....................... 73
HEADLAMP LEVELLING ................................. 73
HAZARD WARNING FLASHERS...................... 74
ADAPTIVE FRONT LIGHTING SYSTEM (AFS) . 74
DIRECTION INDICATORS ............................... 75
INTERIOR LAMPS .......................................... 76
APPROACH LAMPS ........................................ 76
CHANGING A BULB ........................................ 77
BULB SPECIFICATION CHART ........................ 86
Wipers and washers
WINDSCREEN WIPERS .................................. 87
RAIN SENSOR ................................................ 87
WINDSCREEN WASHERS............................... 88
HEADLAMP WASHERS................................... 88
REAR WINDOW WIPER AND WASHERS ........ 89
ADJUSTING THE WINDSCREEN WASHER JETS .
89
CHECKING THE WIPER BLADES .................... 90
CHANGING THE WIPER BLADES.................... 90
Windows and mirrors
ELECTRIC WINDOWS ..................................... 93
EXTERIOR MIRRORS ..................................... 94
ELECTRIC EXTERIOR MIRRORS .................... 95
INTERIOR MIRROR ........................................ 96
Instruments
INSTRUMENT PANEL OVERVIEW .................. 97
Information displays
TRIP COMPUTER ........................................... 99
INFORMATION MESSAGES ............................ 99
Page 2807 of 3229
87
Wipers and washers
R
Wipers and washersWINDSCREEN WIPERS
Note: If the wiper blades do become stuck, or
jammed, an electronic cut-out may temporarily
halt the operation of the wipers. If this
happens, switch off the wipers and the ignition.
Clear any obstructions, and free the wiper
blades before attempting to switch on the
ignition.
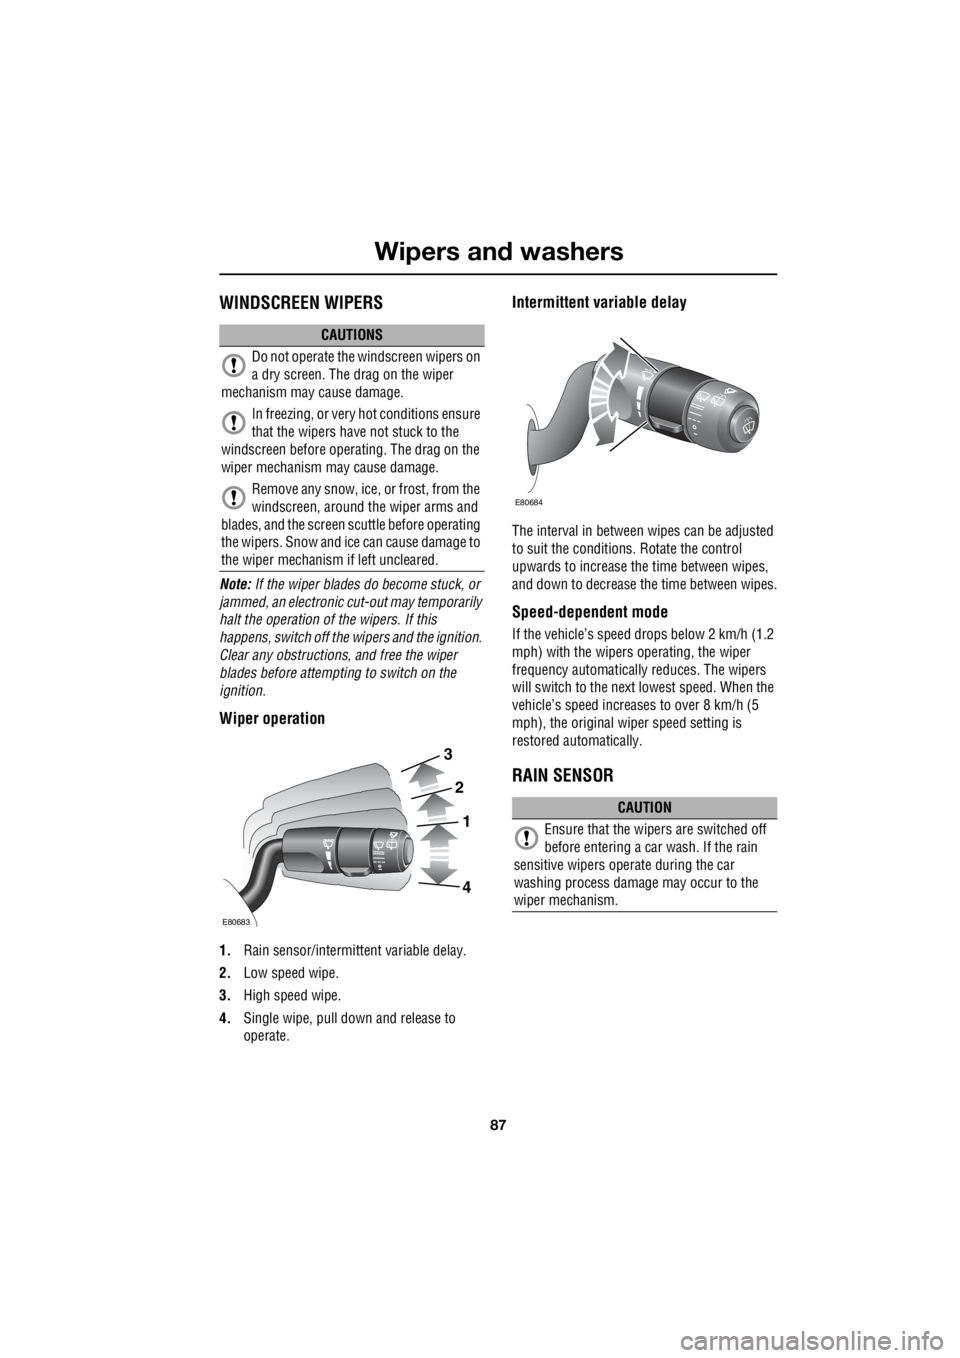
Wiper operation
1. Rain sensor/intermitt ent variable delay.
2. Low speed wipe.
3. High speed wipe.
4. Single wipe, pull down and release to
operate.
Intermittent variable delay
The interval in between wipes can be adjusted
to suit the conditions. Rotate the control
upwards to increase th e time between wipes,
and down to decrease the time between wipes.
Speed-dependent mode
If the vehicle’s speed drops below 2 km/h (1.2
mph) with the wipers operating, the wiper
frequency automatically reduces. The wipers
will switch to the next lowest speed. When the
vehicle’s speed increases to over 8 km/h (5
mph), the original wiper speed setting is
restored automatically.
RAIN SENSOR
CAUTIONS
Do not operate the windscreen wipers on
a dry screen. The drag on the wiper
mechanism may cause damage.
In freezing, or very hot conditions ensure
that the wipers have not stuck to the
windscreen before operating. The drag on the
wiper mechanism ma y cause damage.
Remove any snow, ice, or frost, from the
windscreen, around the wiper arms and
blades, and the screen scuttle before operating
the wipers. Snow and ic e can cause damage to
the wiper mechanism if left uncleared.
3
2
1
4
E80683
CAUTION
Ensure that the wipers are switched off
before entering a car wash. If the rain
sensitive wipers ope rate during the car
washing process damage may occur to the
wiper mechanism.
E80684
Page 2810 of 3229
Wipers and washers
90
L
Blocked jets
If a washer jet becomes blocked, use a thin
strand of wire to unblock the jet by inserting
the wire into the jet. Ensure that the wire is
completely remove d after unblocking.
CHECKING THE WIPER BLADES
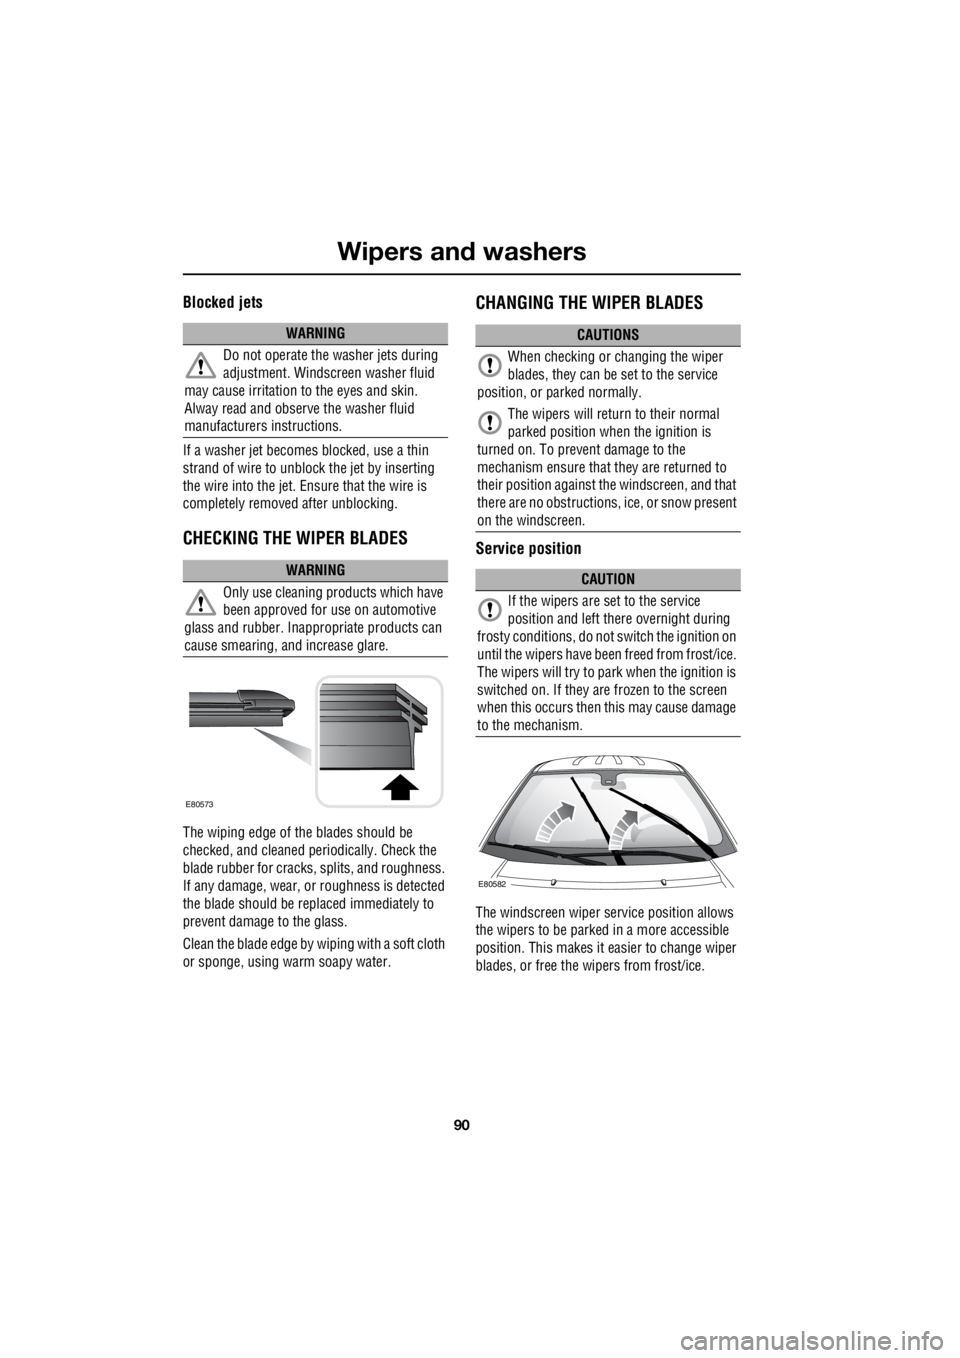
The wiping edge of the blades should be
checked, and cleaned pe riodically. Check the
blade rubber for cracks , splits, and roughness.
If any damage, wear, or roughness is detected
the blade should be repl aced immediately to
prevent damage to the glass.
Clean the blade edge by wiping with a soft cloth
or sponge, using warm soapy water.
CHANGING THE WIPER BLADES
Service position
The windscreen wiper se rvice position allows
the wipers to be parked in a more accessible
position. This makes it ea sier to change wiper
blades, or free the wipers from frost/ice.
WARNING
Do not operate the washer jets during
adjustment. Windscreen washer fluid
may cause irritation to the eyes and skin.
Alway read and observe the washer fluid
manufacturers instructions.
WARNING
Only use cleaning pr oducts which have
been approved for use on automotive
glass and rubber. Inappr opriate products can
cause smearing, and increase glare.
E80573
CAUTIONS
When checking or changing the wiper
blades, they can be set to the service
position, or parked normally.
The wipers will return to their normal
parked position when the ignition is
turned on. To prevent damage to the
mechanism ensure that they are returned to
their position against th e windscreen, and that
there are no obstructions, ice, or snow present
on the windscreen.
CAUTION
If the wipers are set to the service
position and left there overnight during
frosty conditions, do not switch the ignition on
until the wipers have been freed from frost/ice.
The wipers will try to park when the ignition is
switched on. If they are frozen to the screen
when this occurs then this may cause damage
to the mechanism.
E80582
Page 2811 of 3229
91
Wipers and washers
R
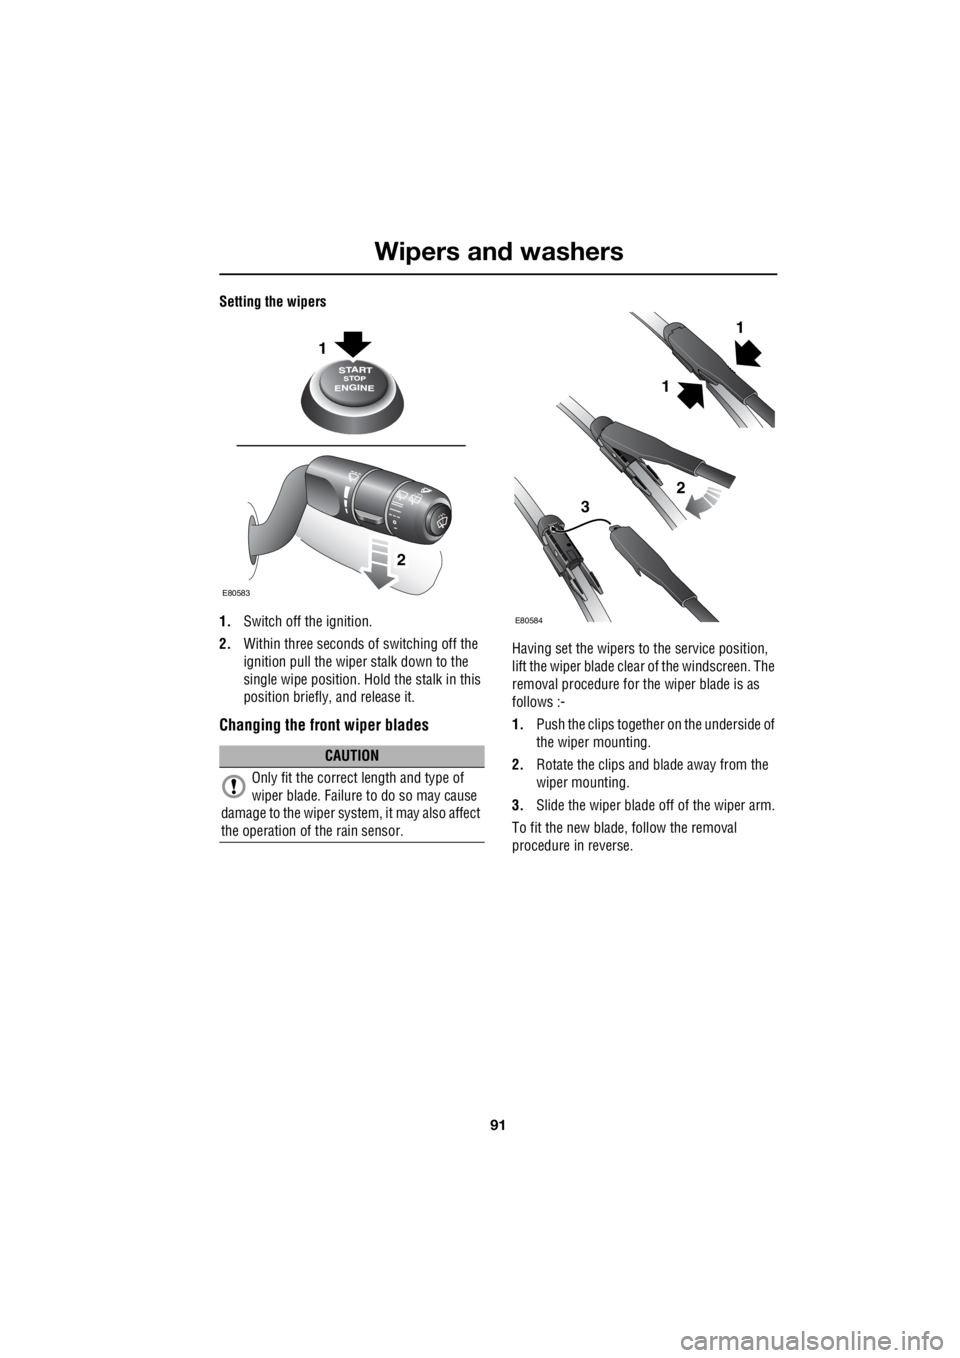
Setting the wipers
1. Switch off the ignition.
2. Within three seconds of switching off the
ignition pull the wiper stalk down to the
single wipe position. Ho ld the stalk in this
position briefly, and release it.
Changing the front wiper blades
Having set the wipers to the service position,
lift the wiper blade clea r of the windscreen. The
removal procedure for the wiper blade is as
follows :-
1. Push the clips together on the underside of
the wiper mounting.
2. Rotate the clips and blade away from the
wiper mounting.
3. Slide the wiper blade off of the wiper arm.
To fit the new blade, follow the removal
procedure in reverse.
CAUTION
Only fit the correct length and type of
wiper blade. Failure to do so may cause
damage to the wiper system, it may also affect
the operation of the rain sensor.
1
2
E80583
1
2
3
E80584
1
Page 2812 of 3229
Wipers and washers
92
L
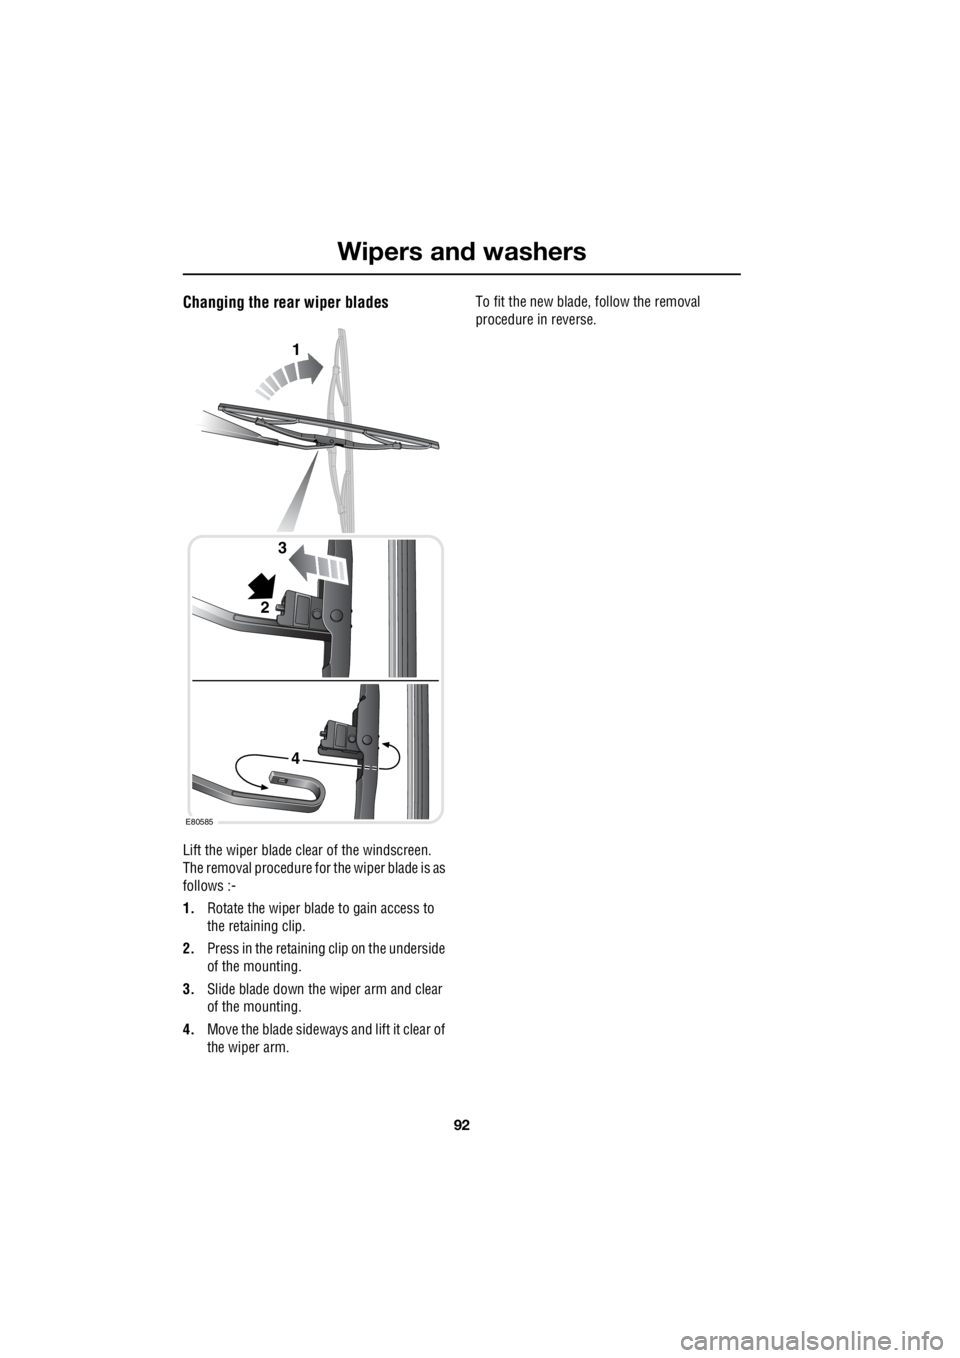
Changing the rear wiper blades
Lift the wiper blade clear of the windscreen.
The removal procedure for the wiper blade is as
follows :-
1. Rotate the wiper blade to gain access to
the retaining clip.
2. Press in the retaining clip on the underside
of the mounting.
3. Slide blade down the wiper arm and clear
of the mounting.
4. Move the blade sideways and lift it clear of
the wiper arm. To fit the new blade, follow the removal
procedure in reverse.
E80585
1
2
3
4