2006 LAND ROVER FRELANDER 2 lock
[x] Cancel search: lockPage 2760 of 3229
Keys and remote controls
40
L
Keys and remote controlsUSING THE KEY
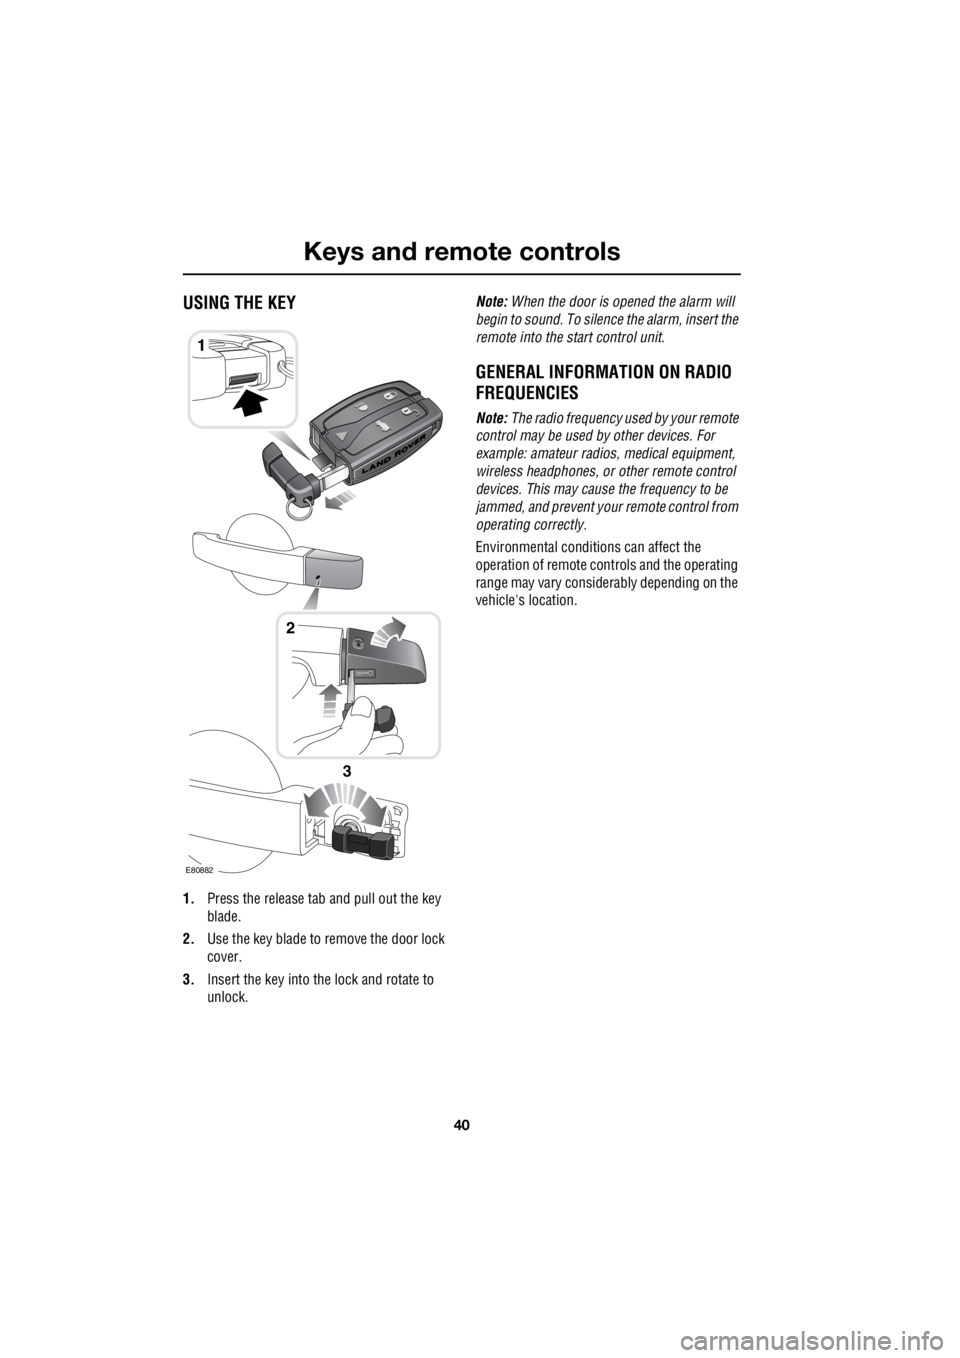
1. Press the release tab and pull out the key
blade.
2. Use the key blade to remove the door lock
cover.
3. Insert the key into the lock and rotate to
unlock. Note:
When the door is opened the alarm will
begin to sound. To silenc e the alarm, insert the
remote into the start control unit.
GENERAL INFORMATION ON RADIO
FREQUENCIES
Note: The radio frequency used by your remote
control may be used by other devices. For
example: amateur radios , medical equipment,
wireless headphones, or other remote control
devices. This may cause the frequency to be
jammed, and prevent your remote control from
operating correctly.
Environmental conditions can affect the
operation of remote cont rols and the operating
range may vary considerably depending on the
vehicle's location.
1
E80882
2
3
Page 2761 of 3229
41
Keys and remote controls
R
USING THE REMOTE CONTROL
Remote control
Note: The operational range of the remote
control will vary considerably depending on
atmospheric conditions and interference from
other transmitting devices.
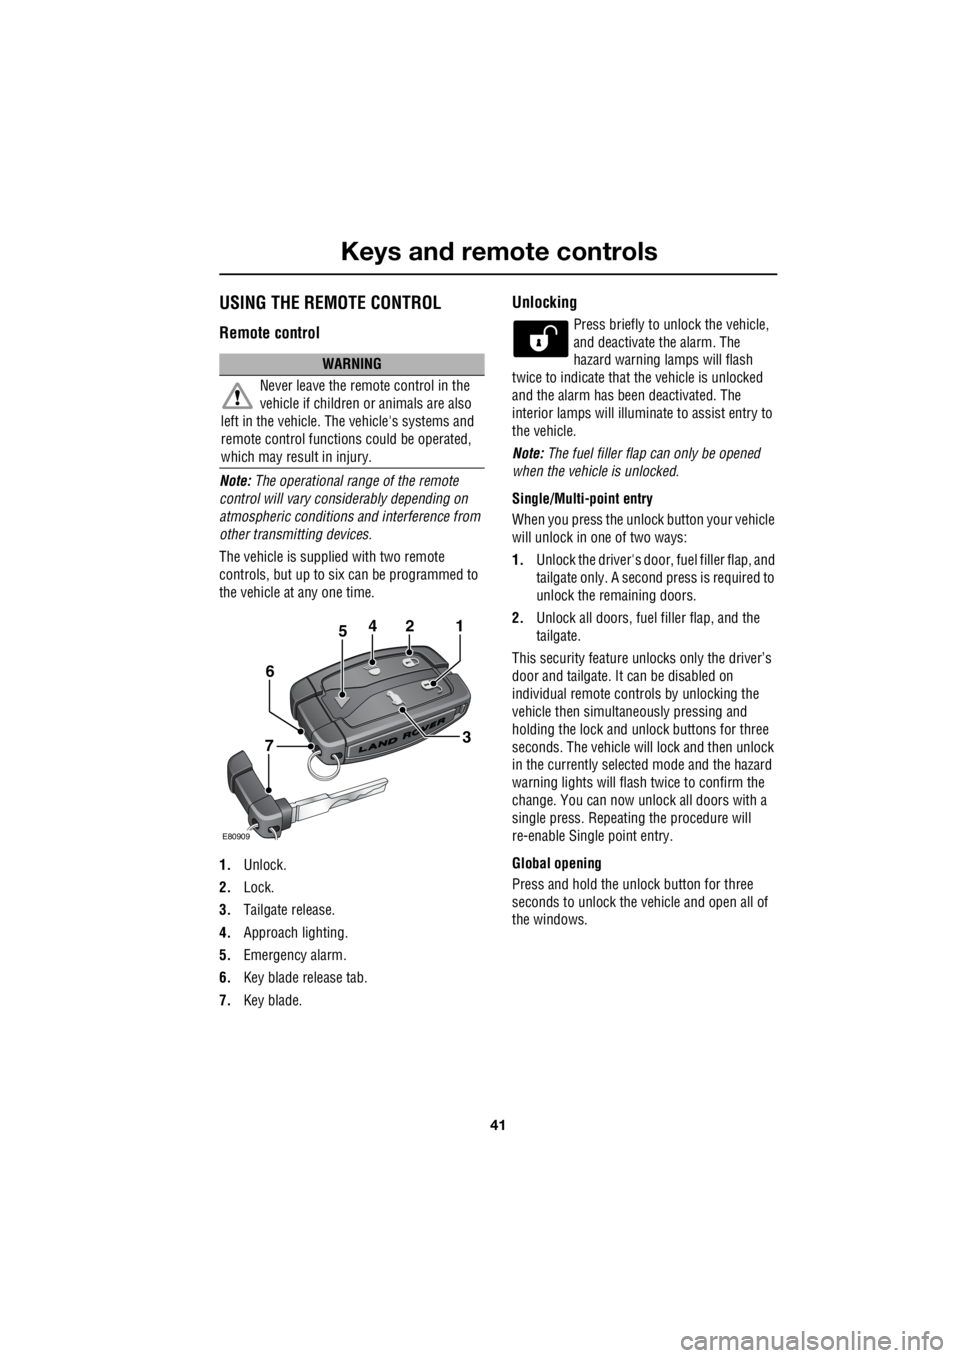
The vehicle is supplied with two remote
controls, but up to six can be programmed to
the vehicle at any one time.
1. Unlock.
2. Lock.
3. Tailgate release.
4. Approach lighting.
5. Emergency alarm.
6. Key blade release tab.
7. Key blade.
Unlocking
Press briefly to unlock the vehicle,
and deactivate the alarm. The
hazard warning lamps will flash
twice to indicate that the vehicle is unlocked
and the alarm has been deactivated. The
interior lamps will illuminate to assist entry to
the vehicle.
Note: The fuel filler flap can only be opened
when the vehicle is unlocked.
Single/Multi- point entry
When you press the unlock button your vehicle
will unlock in one of two ways:
1. Unlock the driver's door, fuel filler flap, and
tailgate only. A second press is required to
unlock the remaining doors.
2. Unlock all doors, fuel filler flap, and the
tailgate.
This security feature unlocks only the driver’s
door and tailgate. It can be disabled on
individual remote controls by unlocking the
vehicle then simultaneously pressing and
holding the lock and unlock buttons for three
seconds. The vehicle will lock and then unlock
in the currently selected mode and the hazard
warning lights will flas h twice to confirm the
change. You can now unlock all doors with a
single press. Repeating the procedure will
re-enable Single point entry.
Global opening
Press and hold the unlock button for three
seconds to unlock the ve hicle and open all of
the windows.
WARNING
Never leave the remote control in the
vehicle if children or animals are also
left in the vehicle. The vehicle's systems and
remote control functions could be operated,
which may result in injury.
2
E80909
451
3
6
7
Page 2762 of 3229
Keys and remote controls
42
L
Single and double locking
The vehicle can be locked in two ways.
Single locking
Single locking secures the vehicle and prevents
the doors being opened from outside of the
vehicle. The doors can be unlocked and opened
from inside the vehicle.
Double locking
Double locking secures the vehicle and
prevents the doors being opened from inside
or outside of the vehicle. The doors can not be
unlocked or opened from inside the vehicle.
This provides additional security if the vehicle
is left unattended. The vehicle cannot be
opened by breaking a window and operating
the door locks from inside the vehicle.
Locking
Press briefly to single lock the
vehicle, and partially activate the
alarm. The hazard warning lamps
will flash to indicate that the vehicle is locked.
A second press within three seconds will
double lock the vehicle and fully arm the alarm.
The hazard warning lamps will flash again to
indicate the enhanced lock/alarm state.
Note: The fuel filler flap can only be opened
when the vehicle is unlocked. Global closing
Press and hold the lock button for three
seconds to single lock the vehicle, fully arm the
alarm, and close all of the windows.
Note: For safety reasons, th e sunroof does not
close automatically. It sh ould be closed in the
normal way before exiting the vehicle.
Automatic relocking
If a door, or the tailgate, are not opened within
one minute of unlocking the vehicle, doors will
lock again automatically.
Approach lighting
When approaching the vehicle
during darkness press to switch on
the approach illumination. Press
again to turn the approach lamps off.
The approach ill umination period
set at the factory is thirty seconds.
This can be configured by a Land
Rover Dealer/Authorised Repairer to provide
illumination lasting between Zero and 120
seconds.
WARNING
Never double lock the vehicle with
people, children, or pets inside. In the
event of an emergency th ey would be unable to
escape, and the emergency services would be
unable to release them quickly.
WARNING
Ensure that no children, pets, or
obstructions are in any open aperture
before operating globa l closing. Safety
mechanisms are in place to prevent serious
injury, however, inju ries can still occur.
Page 2764 of 3229
Locks
44
L
LocksLOCKING AND UNLOCKING
Drive-away locking
The vehicle can be configured by a
Land Rover Dealer/Authorised
Repairer to lock automatically
when in motion. Contact your
Dealer/Authorised Re pairer for further
information.
Locking and unlocking from inside the
vehicle
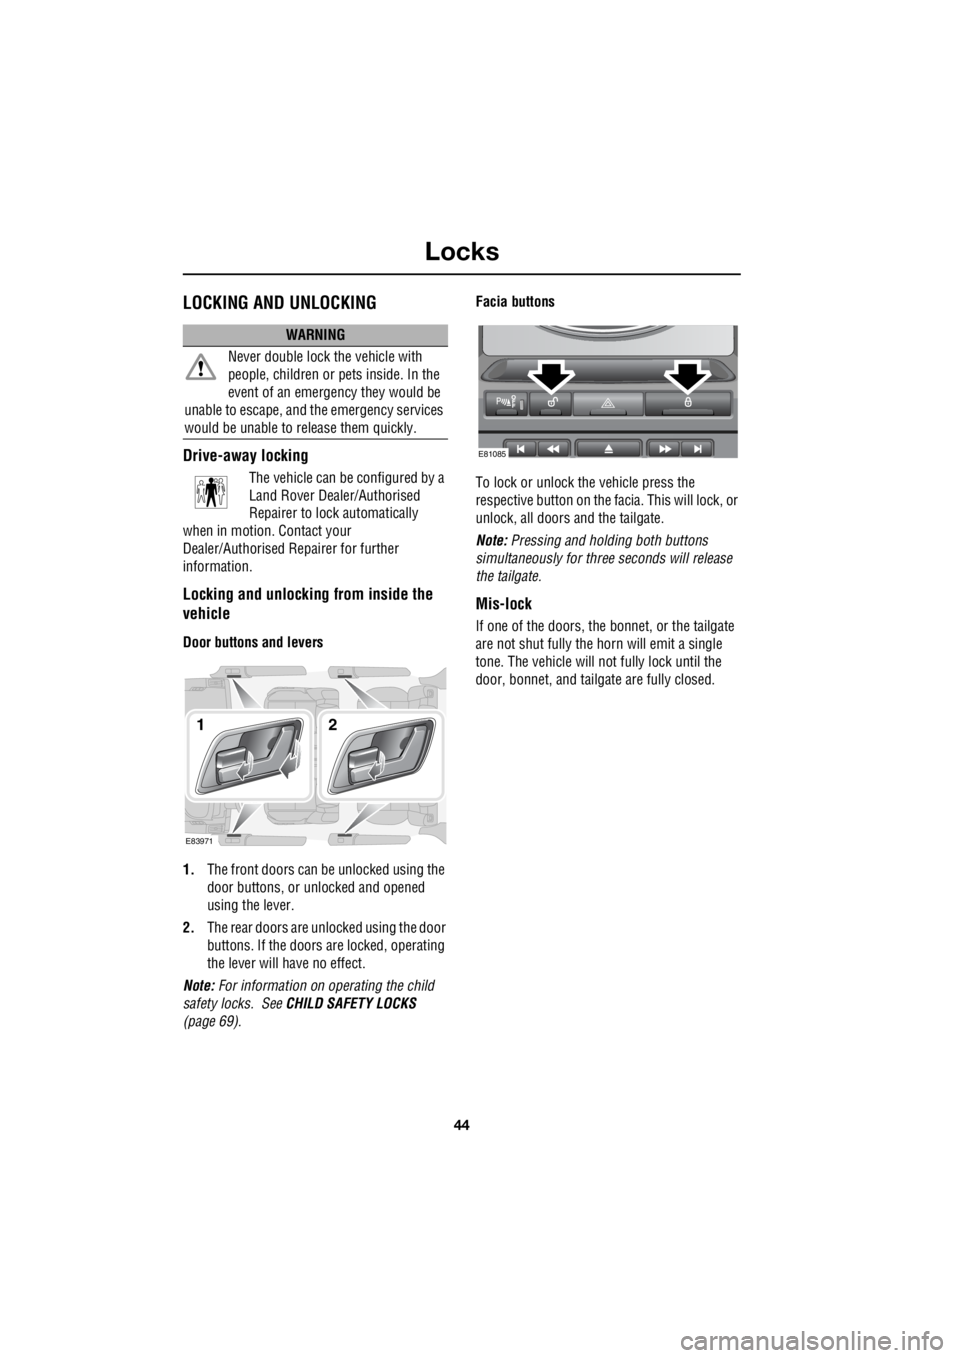
Door buttons and levers
1. The front doors can be unlocked using the
door buttons, or unlocked and opened
using the lever.
2. The rear doors are unlocked using the door
buttons. If the doors are locked, operating
the lever will have no effect.
Note: For information on operating the child
safety locks. See CHILD SAFETY LOCKS
(page 69). Facia buttons
To lock or unlock the vehicle press the
respective button on the fa cia. This will lock, or
unlock, all doors and the tailgate.
Note: Pressing and holding both buttons
simultaneously for thre e seconds will release
the tailgate.
Mis-lock
If one of the doors, the bon net, or the tailgate
are not shut fully the horn will emit a single
tone. The vehicle will not fully lock until the
door, bonnet, and tailga te are fully closed.
WARNING
Never double lock the vehicle with
people, children or pe ts inside. In the
event of an emergency they would be
unable to escape, and th e emergency services
would be unable to release them quickly.
E83971
12
E81085
Page 2765 of 3229
45
Alarm
R
AlarmARMING THE ALARM
The engine is automatically
immobilised when the remote
control is removed from the starter
control unit. The alarm system is automatically
armed when the remote lock button is pressed.
The hazard lamps will flash to indicate that the
alarm is armed.
Full alarm
To set full alarm protection ensure that all the
windows and the sunroof are closed. Then
press the lock button twice within three
seconds. The hazard warn ing lights will flash
twice to confirm the alarm state.
Once fully armed the alarm will sound if :-
• the bonnet, tailgate, or a door are opened.
• movement is detected within the vehicle
interior.
• a window, front or rear windscreen, or
sunroof glass are broken.
• the vehicle is raised or tilted.
• the vehicle battery is disconnected.
• an attempt is made to disconnect the alarm
siren.
Note: If the alarm is armed and a window or the
sunroof are left open the alarm will sound due
to movement of air currents.
Partial alarm
To set partial alarm protection, briefly press the
lock button once. The hazard warning lights
will flash once to confirm the alarm state.
Once partially armed the alarm will sound if :-
• the bonnet, tailgate, or a door are opened.
• the vehicle battery is disconnected.
• an attempt is made to disconnect the alarm
siren. Note:
This setting should be used in
circumstances such as travelling on a ferry,
when pets are to be left in the vehicle, when a
window must be left open etc
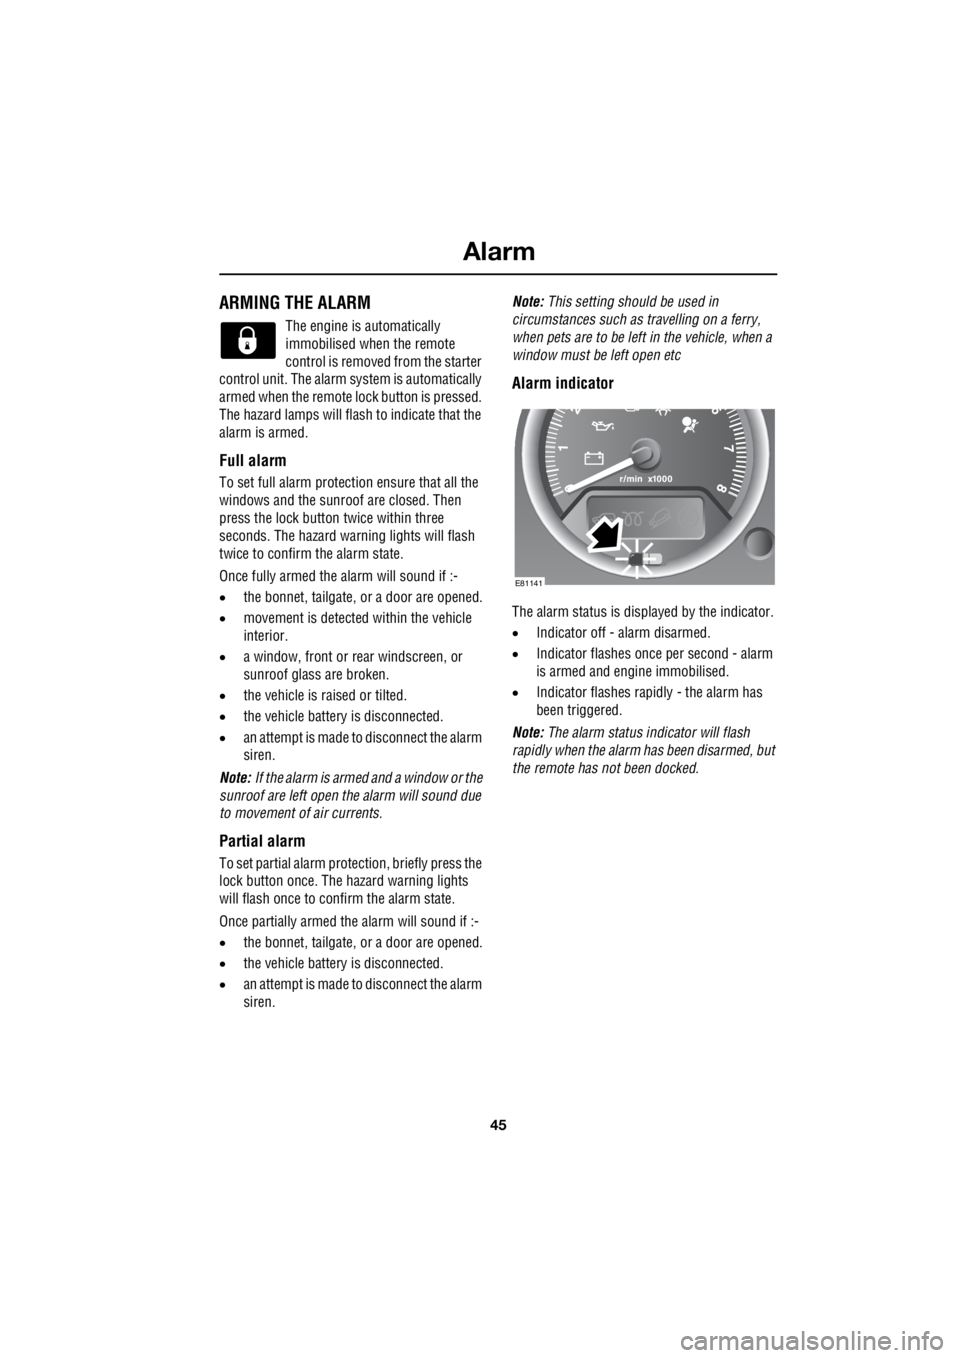
Alarm indicator
The alarm status is disp layed by the indicator.
• Indicator off - alarm disarmed.
• Indicator flashes once per second - alarm
is armed and engine immobilised.
• Indicator flashes rapidly - the alarm has
been triggered.
Note: The alarm status in dicator will flash
rapidly when the alarm has been disarmed, but
the remote has not been docked.
E81141
Page 2766 of 3229

Alarm
46
L
DISARMING THE ALARM
When the vehicle is unlocked using
the remote control, the alarm is
automatically disabled. The hazard
lamps will flash twice to indicate that the alarm
is disabled.
Disarming when the unlock button fails
to work
If, when pressed, the unlock button fails to
operate the vehicle can still be unlocked and
the alarm disabled. To unlock the vehicle :-
1. Unlock the drivers door using the key
blade.
2. Dock the remote control.
Note: When the drivers door is unlocked using
the key, the alarm will sound until the remote is
docked.
Deactivating the alarm when triggered
If the alarm has been triggered it can be
deactivated by pressi ng the remote unlock
button, or by docking the remote control.
Page 2771 of 3229
51
Seats
R
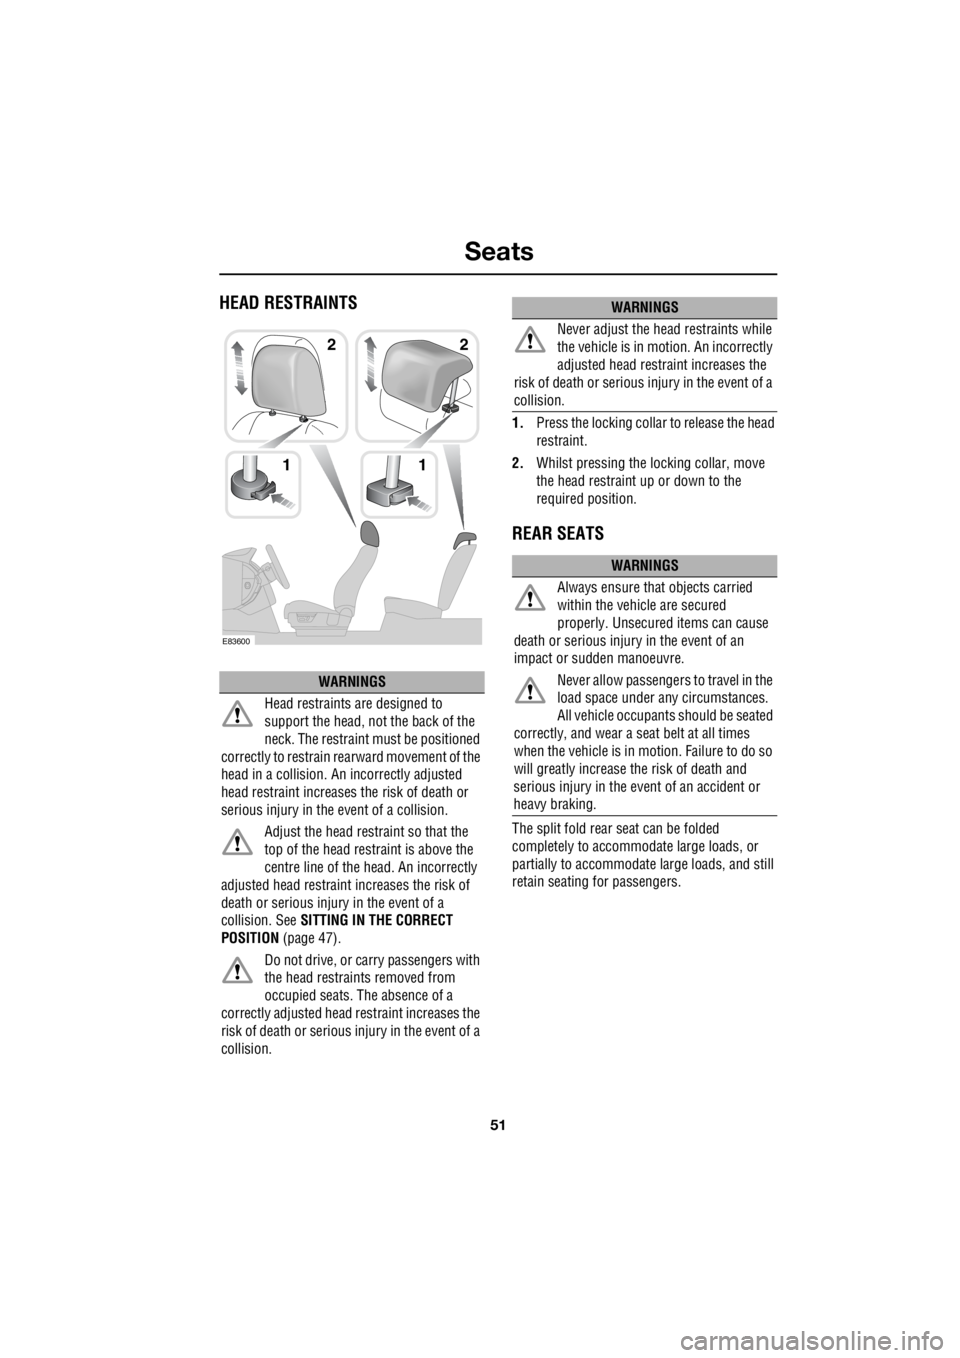
HEAD RESTRAINTS
1. Press the locking collar to release the head
restraint.
2. Whilst pressing the locking collar, move
the head restraint up or down to the
required position.
REAR SEATS
The split fold rear seat can be folded
completely to accommodate large loads, or
partially to accommodate large loads, and still
retain seating for passengers.
WARNINGS
Head restraints are designed to
support the head, not the back of the
neck. The restraint must be positioned
correctly to restrain re arward movement of the
head in a collision. An incorrectly adjusted
head restraint increases the risk of death or
serious injury in the event of a collision.
Adjust the head restraint so that the
top of the head restraint is above the
centre line of the he ad. An incorrectly
adjusted head restraint increases the risk of
death or serious injury in the event of a
collision. See SITTING IN THE CORRECT
POSITION (page 47).
Do not drive, or ca rry passengers with
the head restraints removed from
occupied seats. The absence of a
correctly adjusted head restraint increases the
risk of death or serious injury in the event of a
collision.
1
E83600
1
2 2Never adjust the head restraints while
the vehicle is in motion. An incorrectly
adjusted head restraint increases the
risk of death or serious injury in the event of a
collision.
WARNINGS
Always ensure that objects carried
within the vehicle are secured
properly. Unsecured items can cause
death or serious injury in the event of an
impact or sudden manoeuvre.
Never allow passengers to travel in the
load space under any circumstances.
All vehicle occupant s should be seated
correctly, and wear a seat belt at all times
when the vehicle is in motion. Failure to do so
will greatly increase the risk of death and
serious injury in the event of an accident or
heavy braking.
WARNINGS
Page 2773 of 3229
53
Seats
R
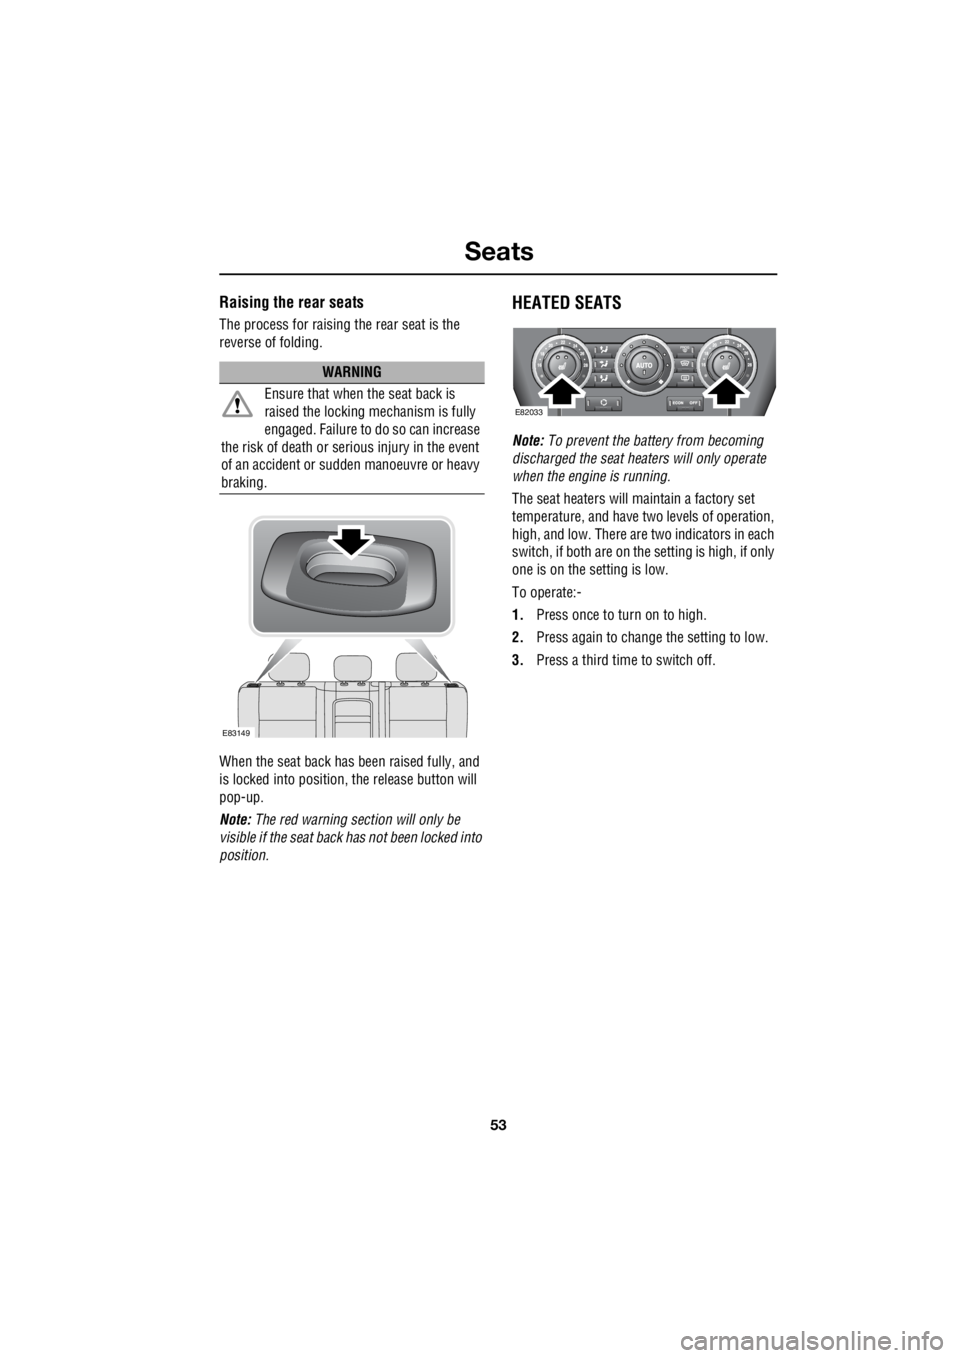
Raising the rear seats
The process for raising the rear seat is the
reverse of folding.
When the seat back has been raised fully, and
is locked into position, the release button will
pop-up.
Note: The red warning section will only be
visible if the seat back has not been locked into
position.
HEATED SEATS
Note: To prevent the battery from becoming
discharged the seat heaters will only operate
when the engine is running.
The seat heaters will maintain a factory set
temperature, and have two levels of operation,
high, and low. There are two indicators in each
switch, if both are on the setting is high, if only
one is on the setting is low.
To operate:-
1. Press once to turn on to high.
2. Press again to change the setting to low.
3. Press a third time to switch off.
WARNING
Ensure that when the seat back is
raised the locking mechanism is fully
engaged. Failure to do so can increase
the risk of death or serious injury in the event
of an accident or s udden manoeuvre or heavy
braking.
E83149
E82033