2006 LAND ROVER FRELANDER 2 lock
[x] Cancel search: lockPage 2829 of 3229
109
Convenience features
R
6. Use the rotary control to adjust the
minutes and press to confirm selection.
7. Once the time has been set, OK will be
highlighted. Press the rotary control to
accept the settings.
Set 12/24 hour display
1. With the audio unit switched on, press the
MENU button to access the function menu.
2. Rotate the control to select Clock and
press to confirm selection.
3. Rotate the control to select 12/24 and
press to confirm selection.
4. Use the rotary control to select 12hr or
24hr and press to confirm selection.
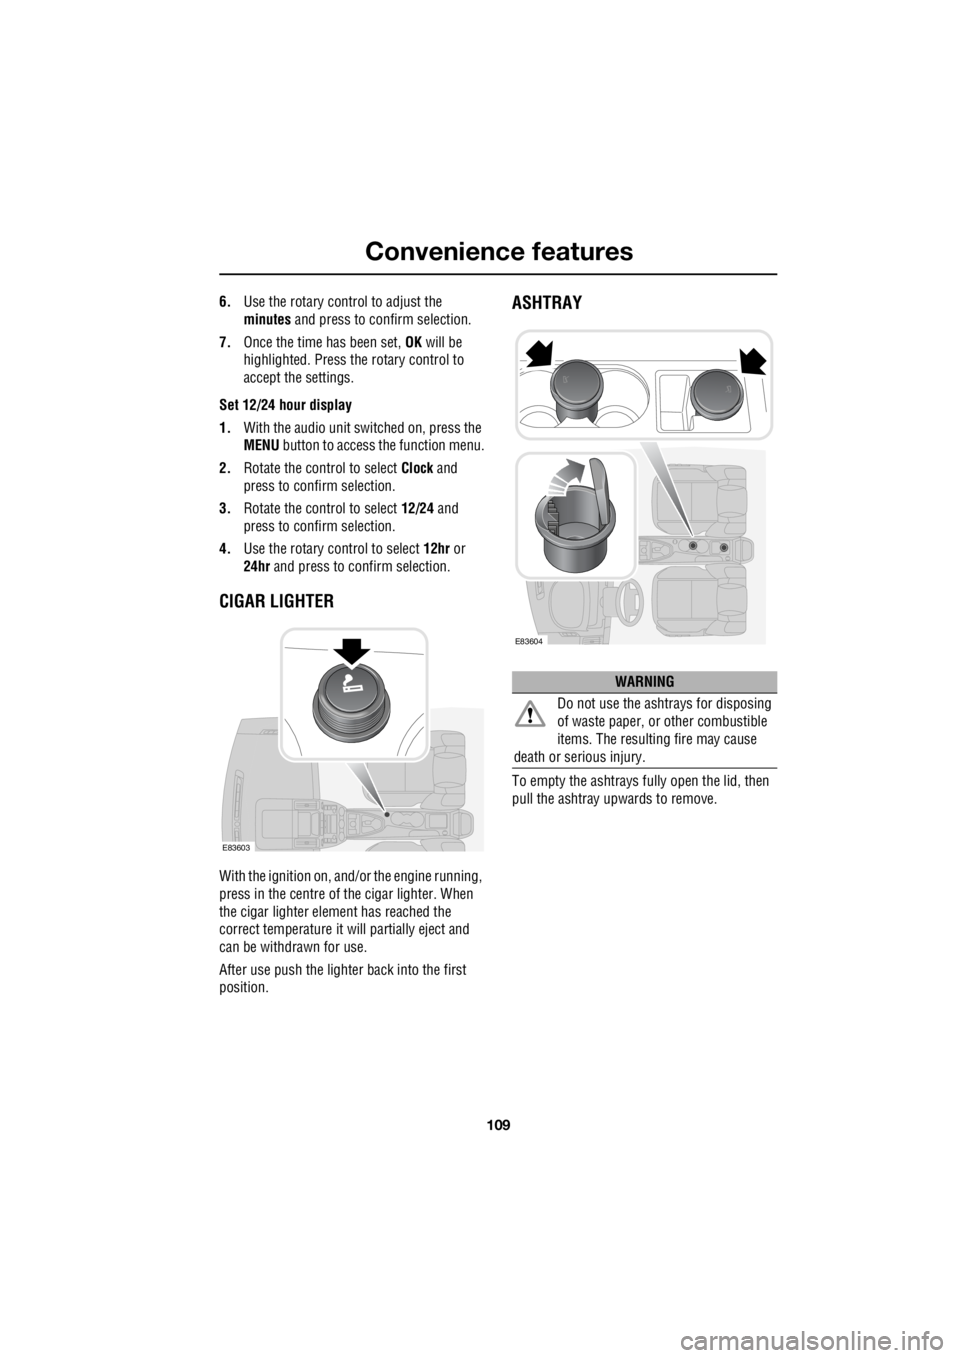
CIGAR LIGHTER
With the ignition on, and/ or the engine running,
press in the centre of the cigar lighter. When
the cigar lighter element has reached the
correct temperature it w ill partially eject and
can be withdrawn for use.
After use push the lighter back into the first
position.
ASHTRAY
To empty the ashtrays fu lly open the lid, then
pull the ashtray upwards to remove.
E83603
WARNING
Do not use the ashtrays for disposing
of waste paper, or other combustible
items. The resulting fire may cause
death or serious injury.
E83604
Page 2843 of 3229
123
Brakes
R
BrakesPRINCIPLE OF OPERATION
Brake pads
Brake pads require a period of bedding in when
new. Drive with extra caution for the first 800
km (500 miles) to avoi d then need for heavy
braking.
Wet conditions
Driving through heavy rain or water can have
an adverse effect on braking efficiency. Under
those circumstances it is recommended that
you lightly apply the brak es intermittently to
dry the brakes.
HINTS ON DRIVING WITH ABS
ABS (Anti-Lock Braki ng System) allows
maximum brake pressure, and thus maximum
braking efficiency, to be applied, and prevents
the road wheels locking. This allows the driver
to retain steering control during heavy braking
under most road conditions.
During emergency brak ing conditions ABS
constantly monitors the speed of each wheel.
ABS varies the brake pressure to individual
wheels, according to the grip available. The
constant alteration of brake pressure can be
felt as a pulsing sensat ion through the brake
pedal. This is not a cause for concern, as it is
designed to demonstrate to the driver that ABS
is operating.
ABS warning indicator
If this amber warning indicator
illuminates, driv e with extra
caution, avoid heavy braking where
possible, and seek qualified assistance as soon
as possible.
WARNINGS
Do not rest your foot on the brake
pedal whilst the vehicle is in motion.
This may cause a light application of
the brakes, which can re sult in overheating,
reduced brake performance, and excessive
brake wear.
Never allow the vehicle to coast
(freewheel) with the engine turned off.
The engine must be running to provide
full braking assistance. The brakes will still
function with the engine off, but far more
pressure will be required to operate them.
If the red brake warning indicator
illuminates, safely bring the vehicle to
a stop, as quickly as possible. Seek
qualified assistance before proceeding.
Never place non-approved floor
matting or any ot her obstructions
under the brake pedal. This restricts
pedal travel and braking efficiency.WARNINGS
ABS cannot overcome the physical
limitations of brak ing distance. Nor
can it overcome the lack of grip on a
road surface, aquaplaning on water for
example.
Braking distance is increased on a
slippery surface. This applies to all
vehicles, even those fitted with ABS.
The driver should not be tempted to
take risks when driving, in the hope
that ABS will correct errors of
judgement. In all cases it remains the driver's
responsibility to driv e with due care and
attention, paying partic ular attention to the
effects of speed, weather, road conditions etc.
Page 2844 of 3229

Brakes
124
L
ABS and off-road driving
ABS will operate when driving off-road,
however it may be unw ise to rely on it's
assistance under some conditions.
Stopping distances will be increased when
travelling over rough, or bumpy terrain.
Soft surfaces
On soft or deep surfaces such as powdery
snow, sand, or gravel, the braking distance
required will be increased. This is because the
natural action of a lock ed wheel (which cannot
happen when ABS is operating) is to form a
wedge of surface material in front of the wheel,
which reduces the stopping distance.
Steep slopes
If the vehicle is stationary on a steep, slippery
slope, it may begin to slide even with the
brakes applied. This is because without wheel
rotation the ABS cannot determine vehicle
movement.
To counteract this, briefl y release the brakes to
allow some wheel rota tion. Then re-apply the
brakes to allow ABS to gain control.
Emergency Brake Assist (EBA)
If the driver rapidly applies the brakes, EBA
automatically boosts the braking force to it's
maximum in order to bring the vehicle to a halt
as quickly as possible. If the driver applies the
brakes slowly, but condi tions mean that ABS
operates on the front wheels, EBA will increase
the braking force in order to apply ABS control
to the rear wheels.
EBA stops operating as soon as the brake pedal
is released.
A fault with the EBA system is
indicated by the red brake warning
indicator illuminating.
Electronic Brake Distribution (EBD)
EBD controls the balanc e of braking forces
supplied to the front and rear wheels, in order
to maintain maximum braking efficiency.
If the vehicle has a light load (only the driver in
the vehicle for example) the EBD will reduce the
braking force applied to the rear wheels. If the
vehicle is heavily laden then EBD will increase
the braking force to the rear wheels.
A fault with the EBD system is
indicated by the red brake warning
indicator illuminating.
PARKING BRAKE
Parking on a slope
Facing uphill
If the vehicle is parked facing uphill, select first
gear (manual gearbox), or Park (automatic
gearbox), and turn the steering wheel so that
the front wheels face away from the kerb.
Facing downhill
If the vehicle is parked facing downhill, select
reverse gear (manual gearbox), or Park
(automatic gearbox), and turn the steering
wheel so that the front wheels face towards the
kerb.
Page 2864 of 3229
Fuel and refuelling
144
L
RUNNING OUT OF FUEL
Note: If the vehicle does run out of fuel, a
minimum of 4 litres (0 .8 gallons) will be
required to restart the engine. The vehicle will
need to be driven 1.6-5 km (1-3 miles) in order
to reset the engine management and
monitoring systems.
Note: If the vehicle does run out of fuel,
seeking qualified assistance is advisable.
FUEL CUT-OFF
The fuel system cut-off forms part of the
Supplementary Restraint System (SRS) fitted
to your vehicle. Following an impact, and
depending on the severity, the fuel pump may
be switched off.
Resetting the fuel cut-off
1. Switch the ignition off and wait for one
minute.
2. Turn the ignition on for 30 seconds.
3. Check the vehicle thor oughly for fuel leaks.
If a leak is detected switch the ignition off
immediately.
• Do not start the vehicle if a leak is
present. Seek qualifi ed advice, and have
the vehicle recovered.
4. If no leaks are detected, start the vehicle.
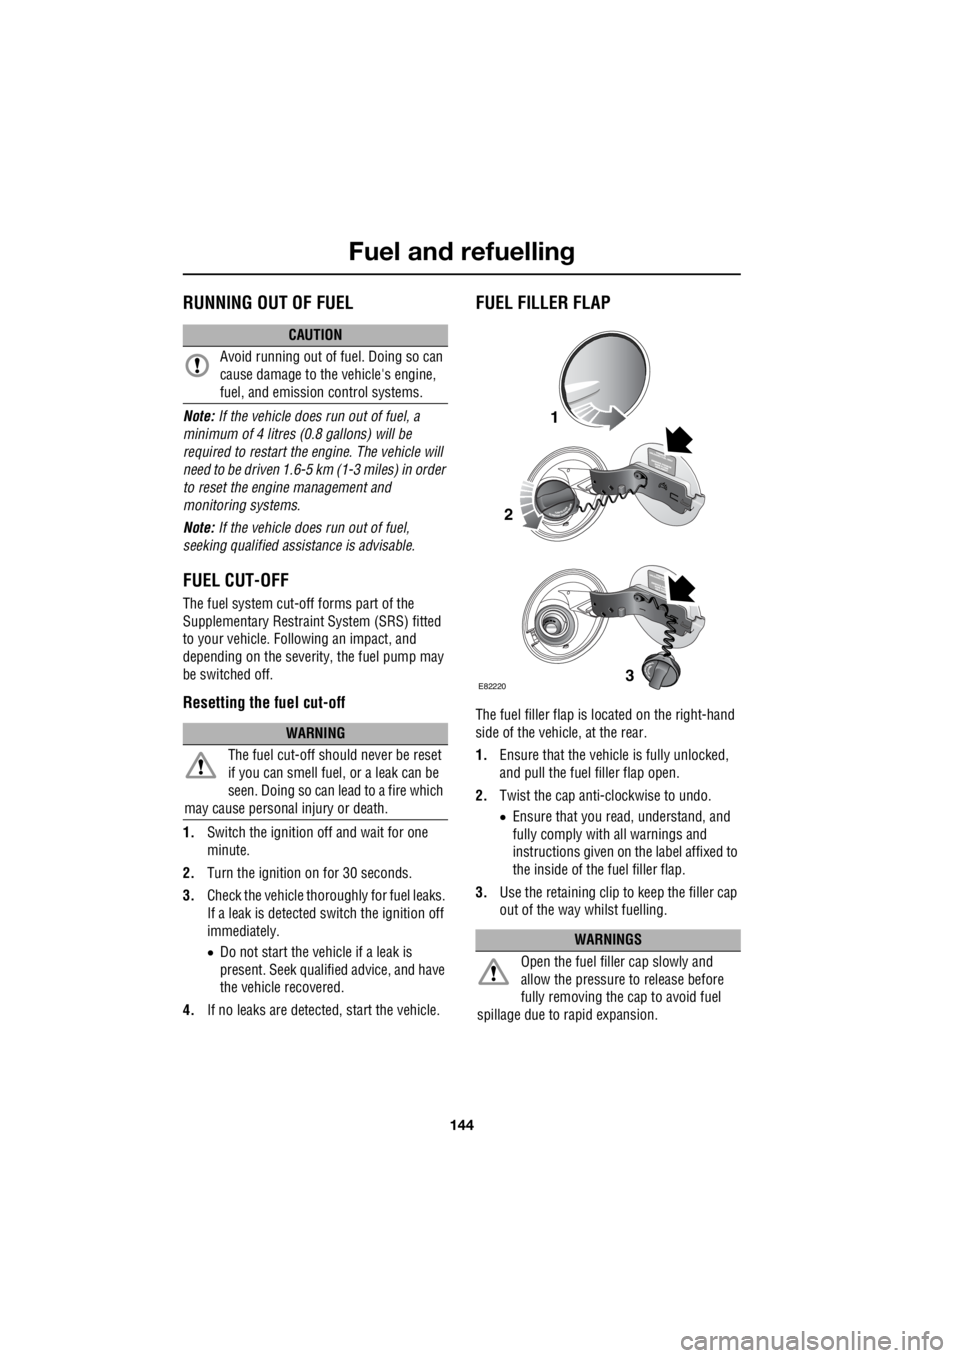
FUEL FILLER FLAP
The fuel filler flap is located on the right-hand
side of the vehicle, at the rear.
1. Ensure that the vehicle is fully unlocked,
and pull the fuel filler flap open.
2. Twist the cap anti-clockwise to undo.
• Ensure that you re ad, understand, and
fully comply with all warnings and
instructions given on the label affixed to
the inside of the fuel filler flap.
3. Use the retaining clip to keep the filler cap
out of the way whilst fuelling.
CAUTION
Avoid running out of fuel. Doing so can
cause damage to the vehicle's engine,
fuel, and emission control systems.
WARNING
The fuel cut-off s hould never be reset
if you can smell fuel , or a leak can be
seen. Doing so can lead to a fire which
may cause personal injury or death.
WARNINGS
Open the fuel filler cap slowly and
allow the pressure to release before
fully removing the cap to avoid fuel
spillage due to rapid expansion.
1
2
3E82220
Page 2874 of 3229
Vehicle care
154
L
Vehicle careCLEANING THE ALLOY WHEELS
Wash the wheels with soap and water, this
should be done more frequently when the
wheels are exposed to he avy dirt deposits, salt,
clay etc. If you are unsure how often to clean
the wheels in particular conditions, seek advice
from your Land Rover Dealer/Authorised
Repairer.
Land Rover approved wheel cleaner should be
used to remove heavy soiling.
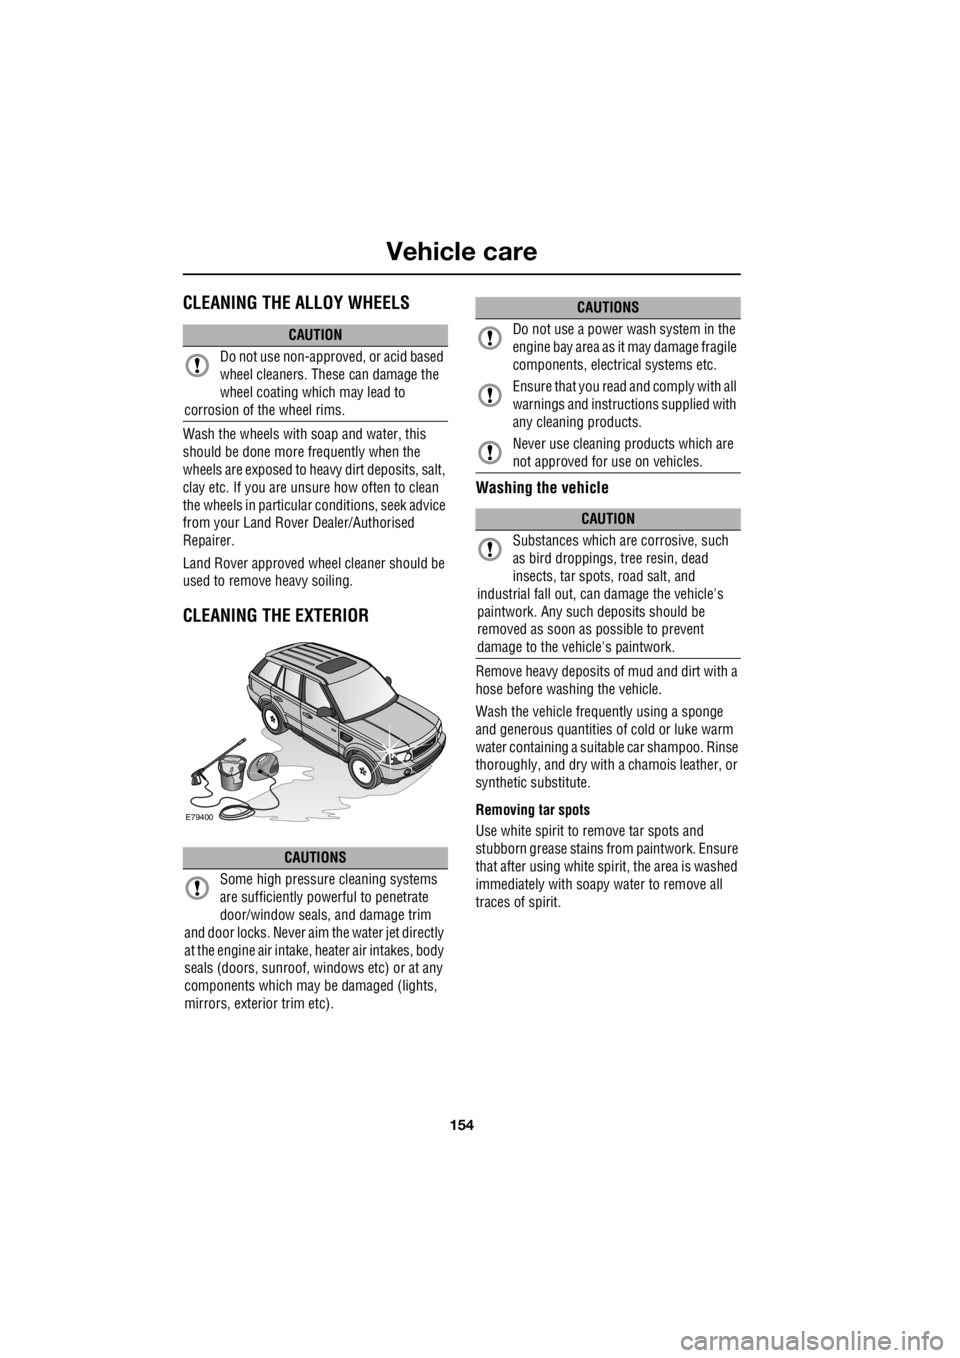
CLEANING THE EXTERIOR
Washing the vehicle
Remove heavy deposits of mud and dirt with a
hose before washing the vehicle.
Wash the vehicle frequently using a sponge
and generous quantities of cold or luke warm
water containing a suit able car shampoo. Rinse
thoroughly, and dry with a chamois leather, or
synthetic substitute.
Removing tar spots
Use white spirit to remove tar spots and
stubborn grease stains from paintwork. Ensure
that after using white spirit, the area is washed
immediately with soapy water to remove all
traces of spirit.
CAUTION
Do not use non-approved, or acid based
wheel cleaners. These can damage the
wheel coating which may lead to
corrosion of the wheel rims.
CAUTIONS
Some high pressure cleaning systems
are sufficiently pow erful to penetrate
door/window seals, and damage trim
and door locks. Never aim the water jet directly
at the engine air intake, heater air intakes, body
seals (doors, sunroof, windows etc) or at any
components which may be damaged (lights,
mirrors, exterior trim etc).
E79400
Do not use a power wash system in the
engine bay area as it may damage fragile
components, electrical systems etc.
Ensure that you read and comply with all
warnings and instruct ions supplied with
any cleaning products.
Never use cleaning products which are
not approved for use on vehicles.
CAUTION
Substances which are corrosive, such
as bird droppings, tr ee resin, dead
insects, tar spots, road salt, and
industrial fall out, can damage the vehicle's
paintwork. Any such deposits should be
removed as soon as possible to prevent
damage to the vehicle's paintwork.
CAUTIONS
Page 2876 of 3229

Vehicle care
156
L
Leather should be clea ned and protected at
least every six months.
Land Rover recommend the use of leather
cleaning kit BAC500490. Use only in
accordance with the instructions.
Note: Some materials/fabrics are prone to dye
transfer, which can cause unsightly
discolouration of lighter coloured leathers.
Affected areas should be cleaned and
re-protected as soon as possible.
Carpets and fabrics
Only clean with a dilute solution of an approved
upholstery cleaner. It is advisable to test all
cleaners on a concea led area before use.
Instrument pack, clock, and audio
equipment
Only use a soft dry cloth to clean the
instrument pack, clock, and audio equipment.
Do not use cleaning fluids or sprays.
Seat belts
Extend the seat belts fully, then use warm
water and a non-detergent soap to clean. Allow
the seat belts to dry naturally whilst fully
extended. Note:
Whilst cleaning the seat belt, take the
opportunity to examine the webbing for
damage/wear. Any wear or damage should be
reported to, and rectified by, a Land Rover
Dealer/Approved repairer.
Airbag module covers
REPAIRING MINOR PAINT DAMAGE
Regularly inspect the paintwork for damage.
Any stone chips, fractures, or deep scratches,
in the paint/bodywork should be repaired
promptly. Bare metal wi ll corrode quickly, and
if left untreated can resu lt in expensive repairs.
Minor chips and scratc hes can be touched up
using materials and advi ce available from a
Land Rover Dealer/Authoris ed Repairer. Larger
areas of damage will require professional
repair, and you should consult a Land Rover
Dealer/Authorised Repairer.
If you are in any doubt as to which
products to use, consult your Land
Rover Dealer/Approved repairer.
WARNING
Do not allow any water, cleaning
products, or fabric from cloths to enter
the seat belt mechanism. Any
substance which enters the mechanism may
affect the performance of the seat belt in an
impact.
CAUTIONS
WARNINGS
Airbag covers should only be cleaned
using a slightly dampened cloth, and a
small amount of upholstery cleaner.
Do not allow the airbag covers, or
surrounding areas, to become
contaminated with liquids. Any
substance which enters the mechanism can
prevent correct deployment of an airbag
during an impact.
Page 2879 of 3229
159
Maintenance
R
In addition, engine se ttings must not be
tampered with. These have been established to
ensure that your vehicle complies with
stringent exhaust em ission regulations.
Incorrect engine settings may adversely affect
exhaust emissions, engi ne performance and
fuel consumption. The y may also cause high
temperatures, which will result in damage to
the catalytic converter and the vehicle.
Road testing dynamometers (rolling
roads)
Because your vehicle is equipped with anti-lock
brakes and four wheel drive, it is essential that
any dynamometer testing is carried out only by
a qualified person, familiar with the
dynamometer testing an d safety procedures
practised by Land Rove r Dealers/Authorised
Repairers.
Safety in the garage
Fuel system
Poisonous fluids
Fluids used in motor vehicles are poisonous
and should not be consumed or brought into
contact with open wounds. These include;
battery acid, antifreeze, brake, clutch and
power steering fluid, petr ol, diesel, engine oil
and windscreen washer additives.
For your own safety, al ways read and obey all
instructions printed on labels and containers.
Used engine oil
Prolonged contact with engine oil may cause
serious skin disorders, including dermatitis
and cancer of the skin. Always wash
thoroughly after contact.
It is illegal to pollute drains, water
courses or soil. Use authorised
waste disposal sites to dispose of
used oil and toxic chemicals.
WARNINGS
If the vehicle has been driven recently,
do not touch exhaust and cooling
system components un til the engine has
cooled.
Never leave the engine running in an
unventilated area - exhaust gases are
poisonous and extremely dangerous.
Do not work beneath the vehicle with
the wheel changing jack as the only
means of support.
Keep your hands and clothing away
from drive belt s and pulleys.
Remove metal wr ist bands and
jewellery, before working in the engine
compartment.
Do not touch electrical leads or
components while the engine is
running, or with the starter switch turned on.
Do not allow tools or metal parts of the
vehicle to make contact with the battery
leads or terminals.
WARNINGS
Under no circumstances should any
part of the fuel system be dismantled or
replaced by anyone other than a suitably
qualified vehicle technician. Failure to comply
with this instruction, may result in fuel spillage
with a consequent serious risk of fire.
Ensure sparks and naked lights are kept
away from the engine compartment.
Wear protective cl othing, including,
where practicable, gloves made from
an impervious material.
WARNINGS
Page 2903 of 3229
183
Wheels and tyres
R
USING WINTER TYRES
If winter tyres are fitted to the vehicle, the tyre
manufacturers instructions should be
followed. Pay particular attention to
instructions regarding the maximum speed
that the vehicle can be driven, and the correct
pressures for the tyres.
CHANGING A ROAD WHEEL
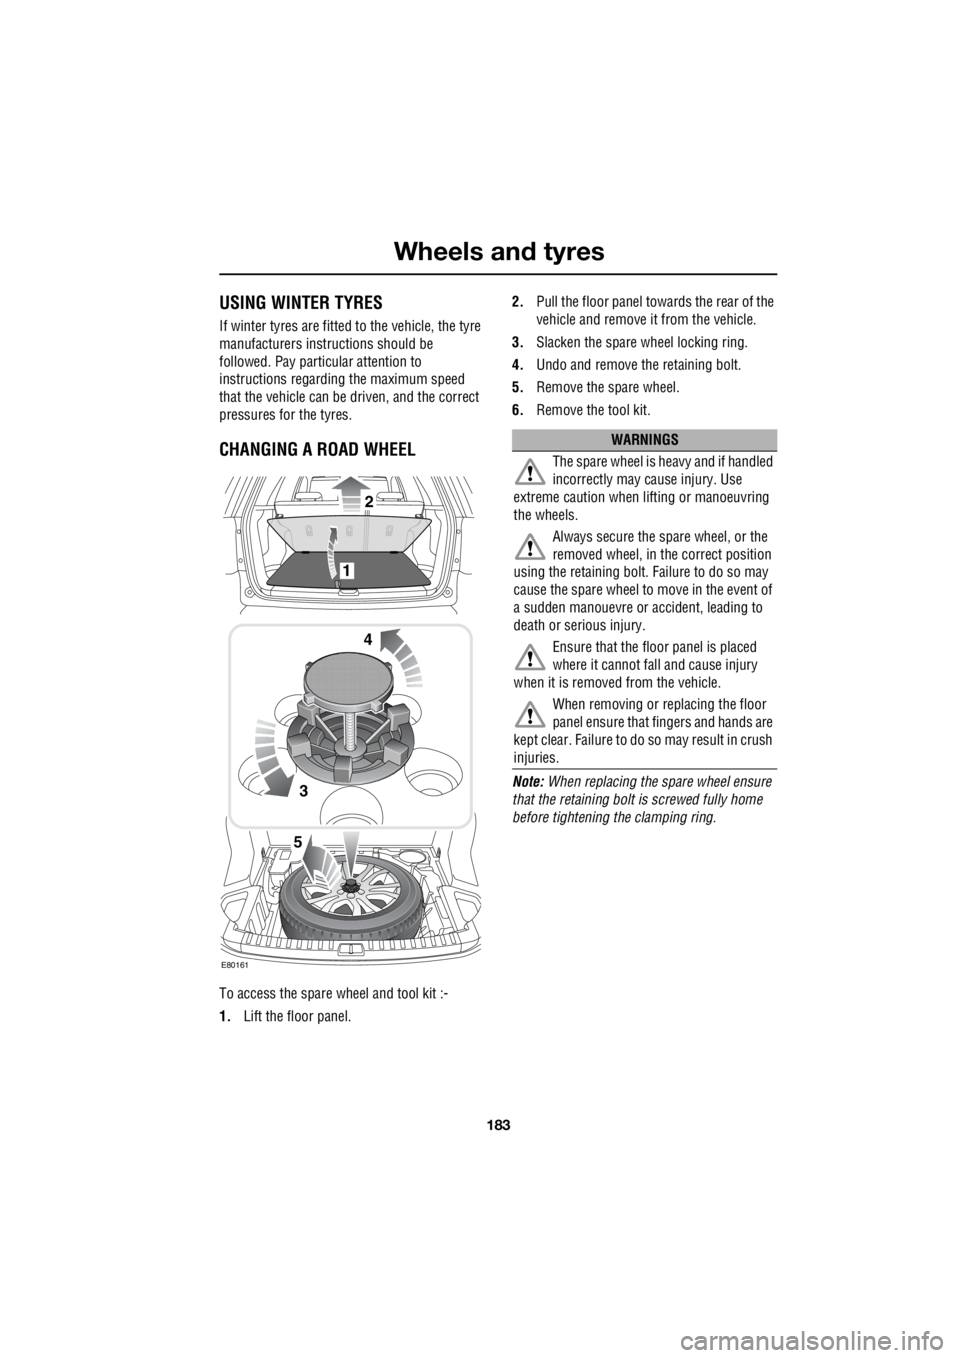
To access the spare wheel and tool kit :-
1. Lift the floor panel. 2.
Pull the floor panel towards the rear of the
vehicle and remove it from the vehicle.
3. Slacken the spare wheel locking ring.
4. Undo and remove the retaining bolt.
5. Remove the spare wheel.
6. Remove the tool kit.
Note: When replacing the spare wheel ensure
that the retaining bolt is screwed fully home
before tightening the clamping ring.
3
4
1
2
5
E80161
WARNINGS
The spare wheel is heavy and if handled
incorrectly may cause injury. Use
extreme caution when lifting or manoeuvring
the wheels.
Always secure the spare wheel, or the
removed wheel, in the correct position
using the retaining bolt. Failure to do so may
cause the spare wheel to move in the event of
a sudden manouevre or accident, leading to
death or serious injury.
Ensure that the floo r panel is placed
where it cannot fall and cause injury
when it is removed from the vehicle.
When removing or replacing the floor
panel ensure that fingers and hands are
kept clear. Failure to do so may result in crush
injuries.