2006 LAND ROVER FRELANDER 2 bluetooth
[x] Cancel search: bluetoothPage 80 of 3229
Publ is hed: 27-Apr-2011
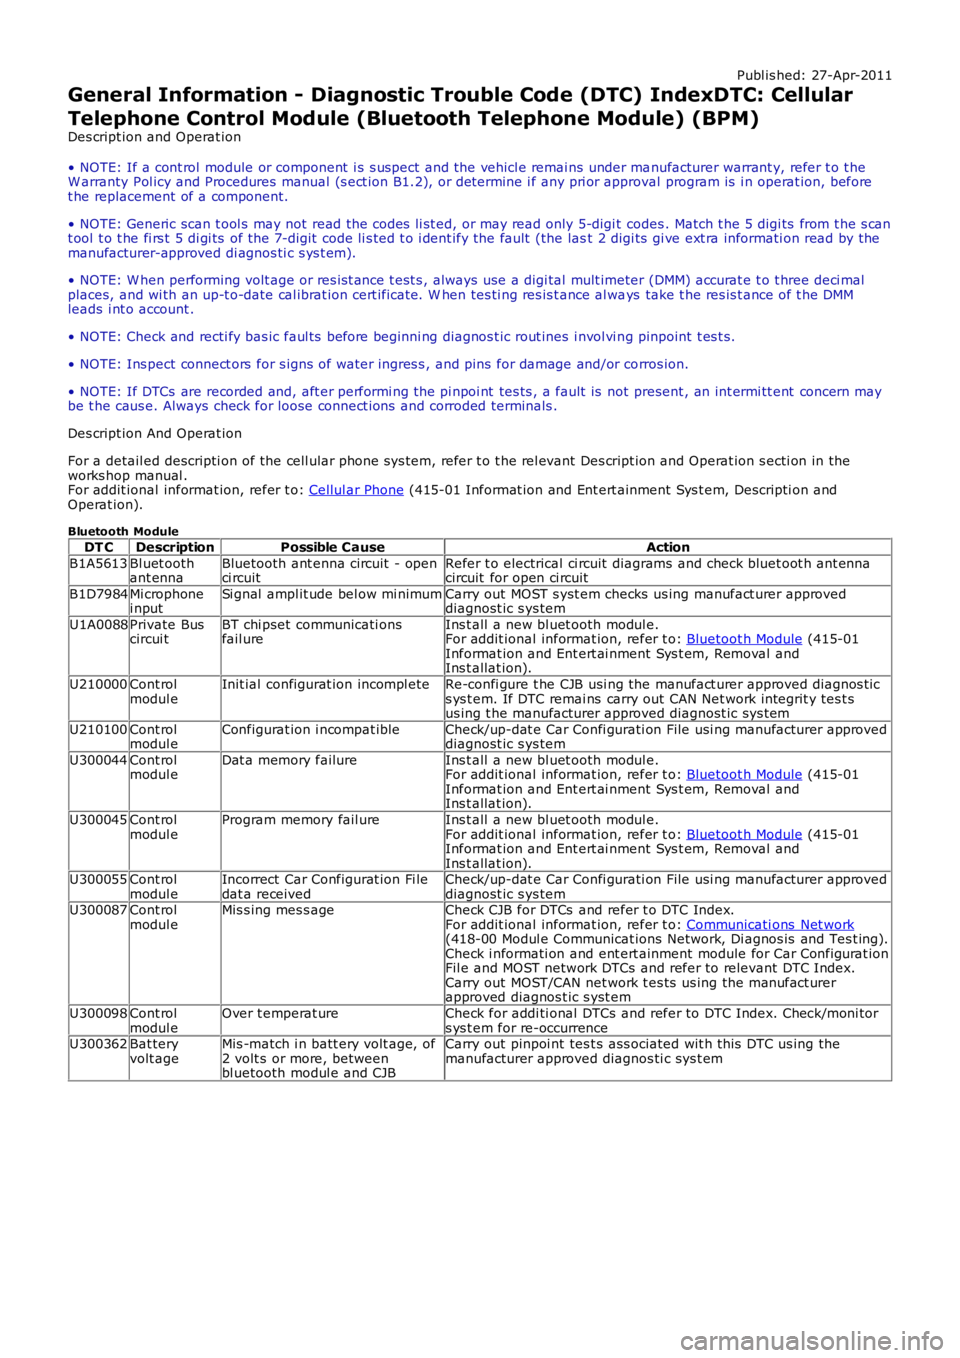
General Information - Diagnostic Trouble Code (DTC) IndexDTC: Cellular
Telephone Control Module (Bluetooth Telephone Module) (BPM)
Des cript ion and Operat ion
• NOTE: If a cont rol module or component i s s uspect and the vehicl e remai ns under manufacturer warrant y, refer t o t heW arranty Pol icy and Procedures manual (s ect ion B1.2), or determine i f any pri or approval program is i n operat ion, beforet he replacement of a component.
• NOTE: Generic scan t ool s may not read the codes li st ed, or may read only 5-digi t codes . Match t he 5 digi ts from t he s cant ool t o t he fi rs t 5 di gi ts of the 7-digit code li s ted t o i dent ify the fault (the last 2 digi ts gi ve ext ra informati on read by themanufacturer-approved di agnos ti c s ys t em).
• NOTE: W hen performing volt age or res is t ance t est s , always use a digi tal mult imeter (DMM) accurat e t o t hree deci malplaces, and wi th an up-t o-date cal ibrat ion cert ificate. W hen tes ti ng res is t ance al ways take t he res is t ance of t he DMMleads i nt o account .
• NOTE: Check and recti fy bas ic faul ts before beginni ng diagnos t ic rout ines i nvol vi ng pinpoint t es t s.
• NOTE: Ins pect connect ors for s igns of water ingres s , and pins for damage and/or corros ion.
• NOTE: If DTCs are recorded and, aft er performi ng the pi npoi nt tes ts , a fault is not present , an int ermi tt ent concern maybe t he caus e. Always check for loose connect ions and corroded terminals .
Des cript ion And Operat ion
For a detail ed descripti on of the cell ular phone sys tem, refer t o t he rel evant Des cript ion and Operat ion s ecti on in theworks hop manual .For addit ional informat ion, refer t o: Cellul ar Phone (415-01 Informat ion and Ent ert ainment Sys t em, Descripti on andOperat ion).
Bluetooth Module
DT CDescriptionPossible CauseAction
B1A5613Bl uet oothant ennaBluetooth ant enna circuit - openci rcuitRefer t o electrical ci rcuit diagrams and check bluet oot h ant ennacircuit for open ci rcuit
B1D7984Mi crophonei nputSi gnal ampl it ude bel ow mi nimumCarry out MOST s yst em checks us ing manufact urer approveddiagnost ic s ys tem
U1A0088Private Buscircui tBT chi pset communicati onsfail ureIns t all a new bl uet ooth modul e.For addit ional informat ion, refer t o: Bluetoot h Module (415-01Informat ion and Ent ert ai nment Sys t em, Removal andIns t allat ion).
U210000Cont rolmodul eInit ial configurat ion incompl eteRe-confi gure t he CJB usi ng the manufact urer approved diagnos t ics ys t em. If DTC remai ns carry out CAN Net work integrit y tes t sus ing t he manufacturer approved diagnost ic sys tem
U210100Cont rolmodul eConfigurat ion i ncompat ibleCheck/up-dat e Car Confi gurati on File usi ng manufacturer approveddiagnost ic s ys tem
U300044Cont rolmodul eDat a memory failureIns t all a new bl uet ooth modul e.For addit ional informat ion, refer t o: Bluetoot h Module (415-01Informat ion and Ent ert ai nment Sys t em, Removal andIns t allat ion).
U300045Cont rolmodul eProgram memory fail ureIns t all a new bl uet ooth modul e.For addit ional informat ion, refer t o: Bluetoot h Module (415-01Informat ion and Ent ert ai nment Sys t em, Removal andIns t allat ion).U300055Cont rolmodul eIncorrect Car Configurat ion Fi ledat a receivedCheck/up-dat e Car Confi gurati on File usi ng manufacturer approveddiagnost ic s ys temU300087Cont rolmodul eMis s ing mes s ageCheck CJB for DTCs and refer t o DTC Index.For addit ional informat ion, refer t o: Communicati ons Net work(418-00 Modul e Communicat ions Network, Di agnos is and Tes t ing).Check i nformati on and ent ert ainment module for Car Configurat ionFil e and MOST network DTCs and refer to relevant DTC Index.Carry out MOST/CAN net work t es ts us ing the manufact urerapproved diagnos t ic s yst em
U300098Cont rolmodul eOver t emperat ureCheck for addi ti onal DTCs and refer to DTC Index. Check/moni tors ys t em for re-occurrenceU300362Bat teryvolt ageMis -match i n batt ery volt age, of2 volt s or more, betweenbl uetooth modul e and CJB
Carry out pinpoi nt tes t s ass ociated wit h t hi s DTC us ing themanufacturer approved diagnos ti c sys t em
Page 1854 of 3229
Publi s hed: 11-May-2011
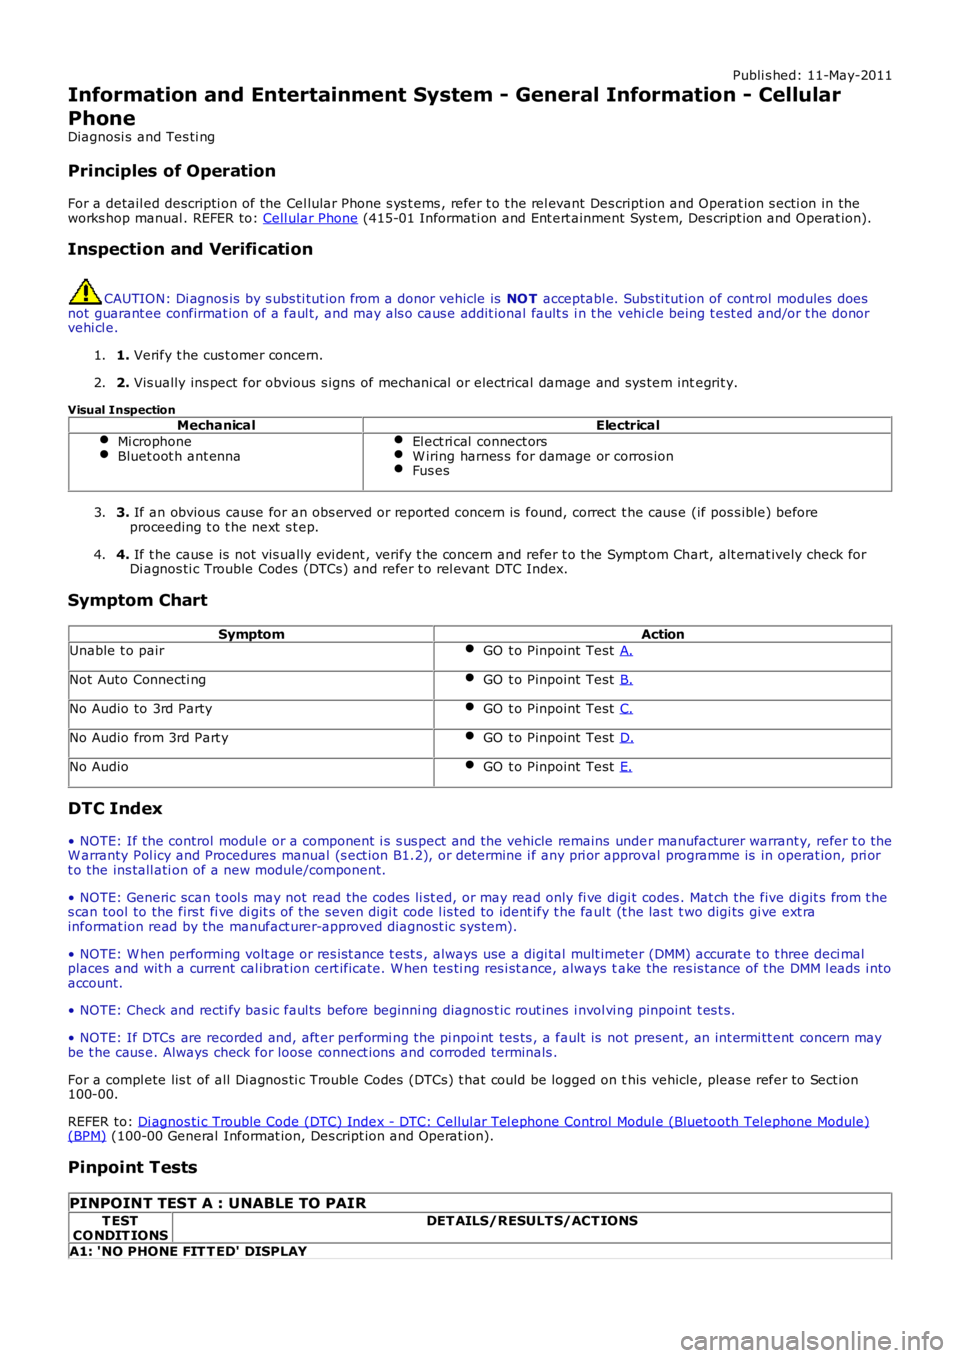
Information and Entertainment System - General Information - Cellular
Phone
Diagnosi s and Tes ti ng
Principles of Operation
For a detail ed descripti on of the Cel lular Phone s ys t ems , refer t o t he rel evant Des cript ion and Operat ion s ecti on in theworks hop manual . REFER to: Cell ular Phone (415-01 Informati on and Ent ert ainment Syst em, Des cript ion and Operat ion).
Inspection and Verification
CAUTION: Di agnos is by s ubs ti tut ion from a donor vehicle is NO T acceptabl e. Subs ti tut ion of cont rol modules doesnot guarant ee confirmat ion of a faul t, and may als o caus e addit ional fault s i n t he vehi cl e being t est ed and/or t he donorvehi cl e.
1. Verify t he cus t omer concern.1.
2. Vis ually ins pect for obvious s igns of mechani cal or electrical damage and sys tem integrit y.2.
Visual InspectionMechanicalElectrical
Mi crophoneBluet oot h ant ennaEl ect ri cal connect orsW iring harnes s for damage or corros ionFus es
3. If an obvious cause for an obs erved or report ed concern is found, correct t he caus e (if pos s ible) beforeproceeding t o t he next s t ep.3.
4. If t he caus e is not vis ually evi dent , verify t he concern and refer t o t he Sympt om Chart, alt ernat ively check forDi agnos ti c Trouble Codes (DTCs) and refer t o rel evant DTC Index.4.
Symptom Chart
SymptomAction
Unable t o pairGO t o Pinpoint Test A.
Not Auto Connecti ngGO t o Pinpoint Test B.
No Audio to 3rd PartyGO t o Pinpoint Test C.
No Audio from 3rd Part yGO t o Pinpoint Test D.
No AudioGO t o Pinpoint Test E.
DTC Index
• NOTE: If the control modul e or a component i s s us pect and the vehicle remains under manufacturer warrant y, refer t o theW arranty Pol icy and Procedures manual (s ect ion B1.2), or determine i f any pri or approval programme is in operat ion, pri ort o the ins tall ati on of a new module/component.
• NOTE: Generic scan t ool s may not read the codes li st ed, or may read only fi ve digit codes . Mat ch the five di git s from t hes can tool to the firs t fi ve di git s of the seven digi t code l is ted to ident ify t he faul t (t he las t t wo digi ts gi ve ext rainformat ion read by the manufact urer-approved diagnost ic s ys tem).
• NOTE: W hen performing volt age or res is t ance t est s , always use a digi tal mult imeter (DMM) accurat e t o t hree deci malplaces and wit h a current cal ibrat ion cert ificate. W hen tes ti ng res i st ance, always take the res is tance of the DMM l eads i ntoaccount.
• NOTE: Check and recti fy bas ic faul ts before beginni ng diagnos t ic rout ines i nvol vi ng pinpoint t es t s.
• NOTE: If DTCs are recorded and, aft er performi ng the pi npoi nt tes ts , a fault is not present , an int ermi tt ent concern maybe t he caus e. Always check for loose connect ions and corroded terminals .
For a compl ete lis t of all Di agnos ti c Trouble Codes (DTCs) t hat could be logged on this vehicle, pleas e refer to Sect ion100-00.
REFER to: Di agnos ti c Trouble Code (DTC) Index - DTC: Cell ul ar Tel ephone Control Modul e (Bluetooth Tel ephone Module)(BPM) (100-00 General Informat ion, Des cript ion and Operat ion).
Pinpoint Tests
PINPOINT TEST A : UNABLE TO PAIR
T ESTCO NDIT IONSDET AILS/RESULT S/ACT IONS
A1: 'NO PHONE FIT T ED' DISPLAY
Page 1856 of 3229
1
1
1
1
1
1
1
1
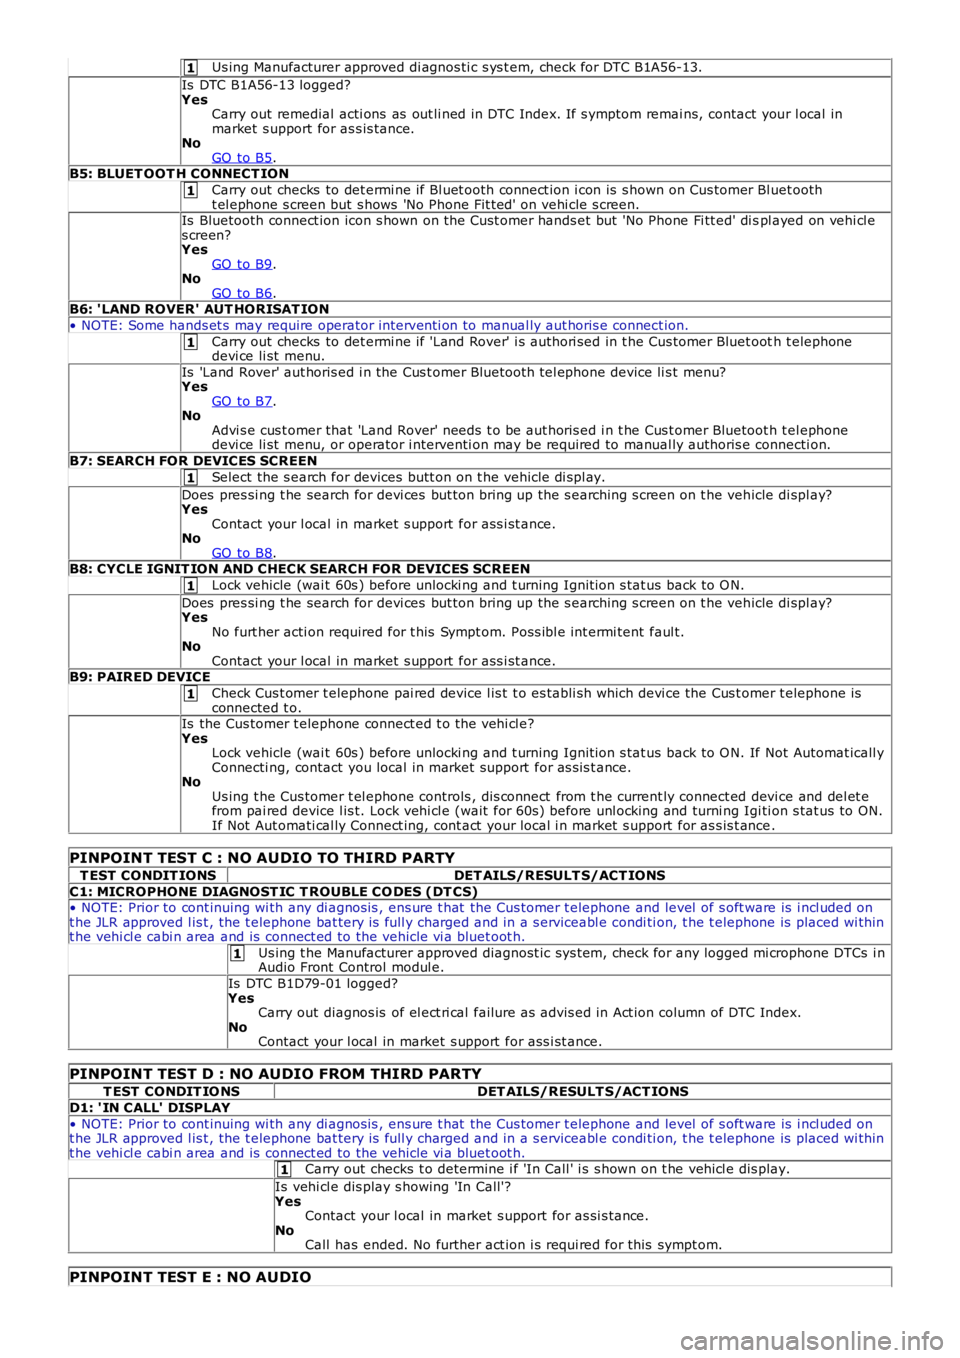
Us ing Manufacturer approved di agnos ti c s ys t em, check for DTC B1A56-13.
Is DTC B1A56-13 logged?YesCarry out remedial acti ons as out li ned in DTC Index. If s ymptom remai ns, contact your l ocal inmarket s upport for as s is tance.NoGO to B5.B5: BLUET OOT H CONNECT ION
Carry out checks to det ermi ne if Bl uet ooth connect ion i con is s hown on Cus tomer Bl uet ootht el ephone s creen but s hows 'No Phone Fit ted' on vehi cle s creen.Is Bluetooth connect ion icon s hown on the Cus t omer hands et but 'No Phone Fi tt ed' di spl ayed on vehi cl es creen?YesGO to B9.NoGO to B6.B6: 'LAND ROVER' AUT HORISAT ION
• NOTE: Some hands et s may require operator int erventi on to manual ly aut horis e connect ion.
Carry out checks to det ermi ne if 'Land Rover' i s authori sed in t he Cus tomer Bluet ooth t elephonedevi ce li st menu.
Is 'Land Rover' aut horis ed i n the Cus t omer Bluetooth tel ephone device li s t menu?YesGO to B7.NoAdvi s e cus t omer that 'Land Rover' needs t o be aut horis ed i n t he Cus t omer Bluetoot h tel ephonedevi ce li st menu, or operator i nterventi on may be required to manual ly authoris e connecti on.
B7: SEARCH FOR DEVICES SCREEN
Select the s earch for devices butt on on t he vehicle di spl ay.
Does pres si ng t he search for devi ces but ton bring up the s earching s creen on t he vehicle di spl ay?YesContact your l ocal in market s upport for ass i st ance.NoGO to B8.B8: CYCLE IGNIT ION AND CHECK SEARCH FOR DEVICES SCREEN
Lock vehicle (wai t 60s ) before unlocki ng and t urning Ignit ion s tat us back to O N.
Does pres si ng t he search for devi ces but ton bring up the s earching s creen on t he vehicle di spl ay?YesNo furt her acti on required for t his Sympt om. Poss ibl e int ermi tent faul t.NoContact your l ocal in market s upport for ass i st ance.B9: PAIRED DEVICE
Check Cus t omer t elephone pai red device l is t t o es tabli sh which devi ce the Cus t omer telephone isconnected t o.Is the Cus tomer t elephone connect ed t o t he vehi cl e?YesLock vehicle (wai t 60s ) before unlocki ng and t urning Ignit ion s tat us back to O N. If Not Automat icall yConnecti ng, contact you local in market support for as s is t ance.NoUs ing t he Cus tomer t el ephone controls , dis connect from t he current ly connect ed devi ce and del et efrom pai red device l is t. Lock vehi cl e (wait for 60s ) before unl ocking and turni ng Igi ti on s tat us to ON.If Not Aut omati cal ly Connect ing, cont act your local i n market s upport for as s is t ance.
PINPOINT TEST C : NO AUDIO TO THIRD PARTY
T EST CONDIT IONSDET AILS/RESULT S/ACT IONS
C1: MICROPHONE DIAGNOST IC T ROUBLE CO DES (DT CS)• NOTE: Prior to cont inuing wi th any di agnos is , ens ure t hat the Cus tomer t elephone and level of s oft ware is i ncl uded ont he JLR approved l is t , the t elephone bat tery is full y charged and in a s erviceabl e condi ti on, t he t elephone is placed wi thint he vehi cl e cabi n area and is connect ed to the vehicle vi a bluet oot h.
Us ing t he Manufacturer approved diagnost ic sys tem, check for any logged mi crophone DTCs i nAudio Front Control modul e.
Is DTC B1D79-01 logged?YesCarry out diagnos is of el ect ri cal failure as advis ed in Act ion column of DTC Index.NoContact your l ocal in market s upport for ass i st ance.
PINPOINT TEST D : NO AUDIO FROM THIRD PARTY
T EST CONDIT IO NSDET AILS/RESULT S/ACT IONS
D1: ' IN CALL' DISPLAY
• NOTE: Prior to cont inuing wi th any di agnos is , ens ure t hat the Cus tomer t elephone and level of s oft ware is i ncl uded ont he JLR approved l is t , the t elephone bat tery is full y charged and in a s erviceabl e condi ti on, t he t elephone is placed wi thint he vehi cl e cabi n area and is connect ed to the vehicle vi a bluet oot h.Carry out checks t o determine i f 'In Call ' i s s hown on t he vehi cl e dis play.
Is vehi cl e dis play s howing 'In Call'?YesContact your l ocal in market s upport for as si s tance.NoCall has ended. No further act ion i s requi red for this sympt om.
PINPOINT TEST E : NO AUDIO
Page 1862 of 3229
1
1
2
3
1
1
1
2
3
1
2
3
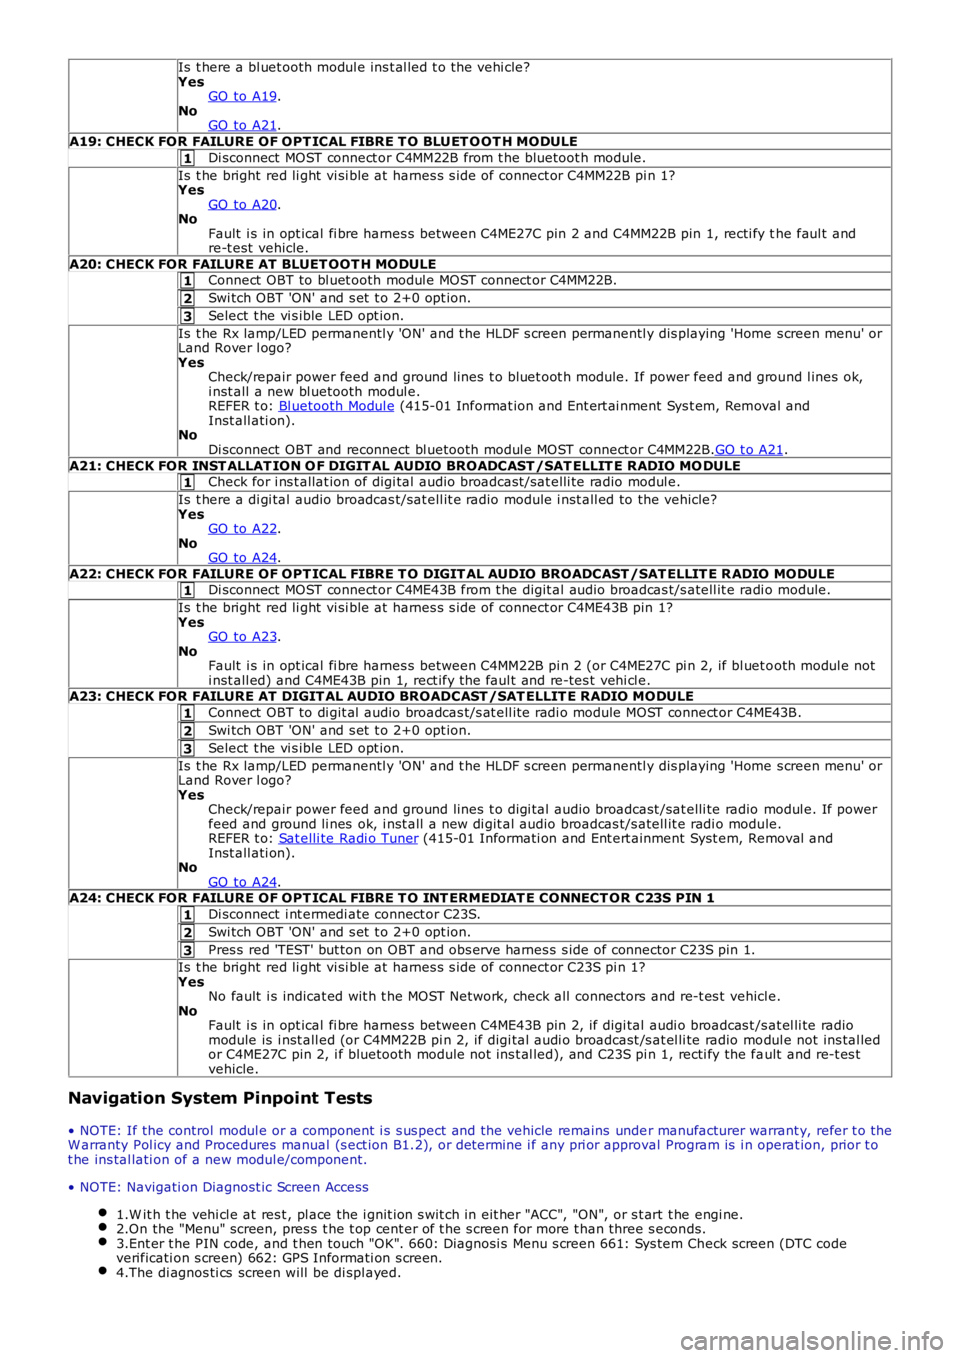
Is t here a bl uet ooth modul e ins t al led t o t he vehi cle?YesGO to A19.NoGO to A21.
A19: CHECK FOR FAILURE OF OPT ICAL FIBRE T O BLUET O OT H MODULE
Di sconnect MOST connect or C4MM22B from t he bluetoot h module.
Is t he bright red li ght vi si ble at harnes s s ide of connect or C4MM22B pi n 1?YesGO to A20.NoFault i s in opt ical fi bre harnes s between C4ME27C pin 2 and C4MM22B pin 1, recti fy the faul t andre-t est vehicle.
A20: CHECK FOR FAILURE AT BLUET OOT H MODULEConnect OBT to bl uet ooth modul e MOST connect or C4MM22B.
Swi tch OBT 'ON' and s et t o 2+0 opt ion.
Select t he vi s ible LED opt ion.
Is t he Rx lamp/LED permanentl y 'ON' and t he HLDF s creen permanentl y dis playing 'Home s creen menu' orLand Rover l ogo?YesCheck/repair power feed and ground lines t o bluet oot h module. If power feed and ground l ines ok,i nst all a new bl uetooth modul e.REFER t o: Bl uetooth Modul e (415-01 Informat ion and Ent ert ai nment Sys t em, Removal andInst all ati on).NoDi sconnect OBT and reconnect bl uetooth modul e MOST connect or C4MM22B.GO t o A21.
A21: CHECK FOR INST ALLAT ION O F DIGIT AL AUDIO BROADCAST /SAT ELLIT E RADIO MO DULECheck for i ns t allat ion of digi tal audio broadcast /sat elli te radio modul e.
Is t here a di gi tal audio broadcas t/sat ell it e radio module i nst all ed to the vehicle?YesGO to A22.NoGO to A24.
A22: CHECK FOR FAILURE OF OPT ICAL FIBRE T O DIGIT AL AUDIO BROADCAST /SAT ELLIT E R ADIO MODULEDi sconnect MOST connect or C4ME43B from t he digit al audio broadcas t/s atell it e radi o module.
Is t he bright red li ght vi si ble at harnes s s ide of connect or C4ME43B pin 1?YesGO to A23.NoFault i s in opt ical fi bre harnes s between C4MM22B pi n 2 (or C4ME27C pi n 2, if bl uet ooth modul e noti nst all ed) and C4ME43B pin 1, rect ify t he faul t and re-tes t vehi cl e.A23: CHECK FOR FAILURE AT DIGIT AL AUDIO BROADCAST /SAT ELLIT E RADIO MODULE
Connect OBT to di git al audio broadcas t/s at ell it e radi o module MOST connect or C4ME43B.
Swi tch OBT 'ON' and s et t o 2+0 opt ion.
Select t he vi s ible LED opt ion.
Is t he Rx lamp/LED permanentl y 'ON' and t he HLDF s creen permanentl y dis playing 'Home s creen menu' orLand Rover l ogo?YesCheck/repair power feed and ground lines t o digi tal audio broadcast /sat elli te radio modul e. If powerfeed and ground li nes ok, i nst all a new di git al audio broadcas t/s atell it e radi o module.REFER t o: Sat elli te Radi o Tuner (415-01 Informati on and Ent ert ainment Syst em, Removal andInst all ati on).NoGO to A24.A24: CHECK FOR FAILURE OF OPT ICAL FIBRE T O INT ERMEDIAT E CONNECT OR C23S PIN 1
Di sconnect i nt ermedi ate connect or C23S.
Swi tch OBT 'ON' and s et t o 2+0 opt ion.
Pres s red 'TEST' but ton on OBT and obs erve harnes s s ide of connector C23S pin 1.
Is t he bright red li ght vi si ble at harnes s s ide of connect or C23S pi n 1?YesNo fault i s indicat ed wit h t he MOST Net work, check all connectors and re-t es t vehicle.NoFault i s in opt ical fi bre harnes s between C4ME43B pin 2, if digi tal audi o broadcas t /s at el li te radiomodule is i nst all ed (or C4MM22B pi n 2, if digi tal audi o broadcast /s at el li te radio modul e not ins tal ledor C4ME27C pin 2, i f bluetooth module not ins t al led), and C23S pi n 1, recti fy the fault and re-t es tvehicle.
Navigation System Pinpoint Tests
• NOTE: If the control modul e or a component i s s us pect and the vehicle remains under manufacturer warrant y, refer t o theW arranty Pol icy and Procedures manual (s ect ion B1.2), or determine i f any pri or approval Program is i n operat ion, prior t ot he ins tal lati on of a new modul e/component.
• NOTE: Navigati on Diagnost ic Screen Access
1.W it h t he vehi cl e at res t , pl ace the i gnit ion s wit ch in eit her "ACC", "ON", or s t art t he engi ne.2.On the "Menu" screen, pres s t he t op cent er of t he s creen for more t han three s econds.3.Ent er t he PIN code, and t hen touch "OK". 660: Diagnosi s Menu s creen 661: Sys tem Check screen (DTC codeverificati on s creen) 662: GPS Informati on s creen.4.The di agnos ti cs screen will be di spl ayed.
Page 1908 of 3229
Publi s hed: 11-May-2011
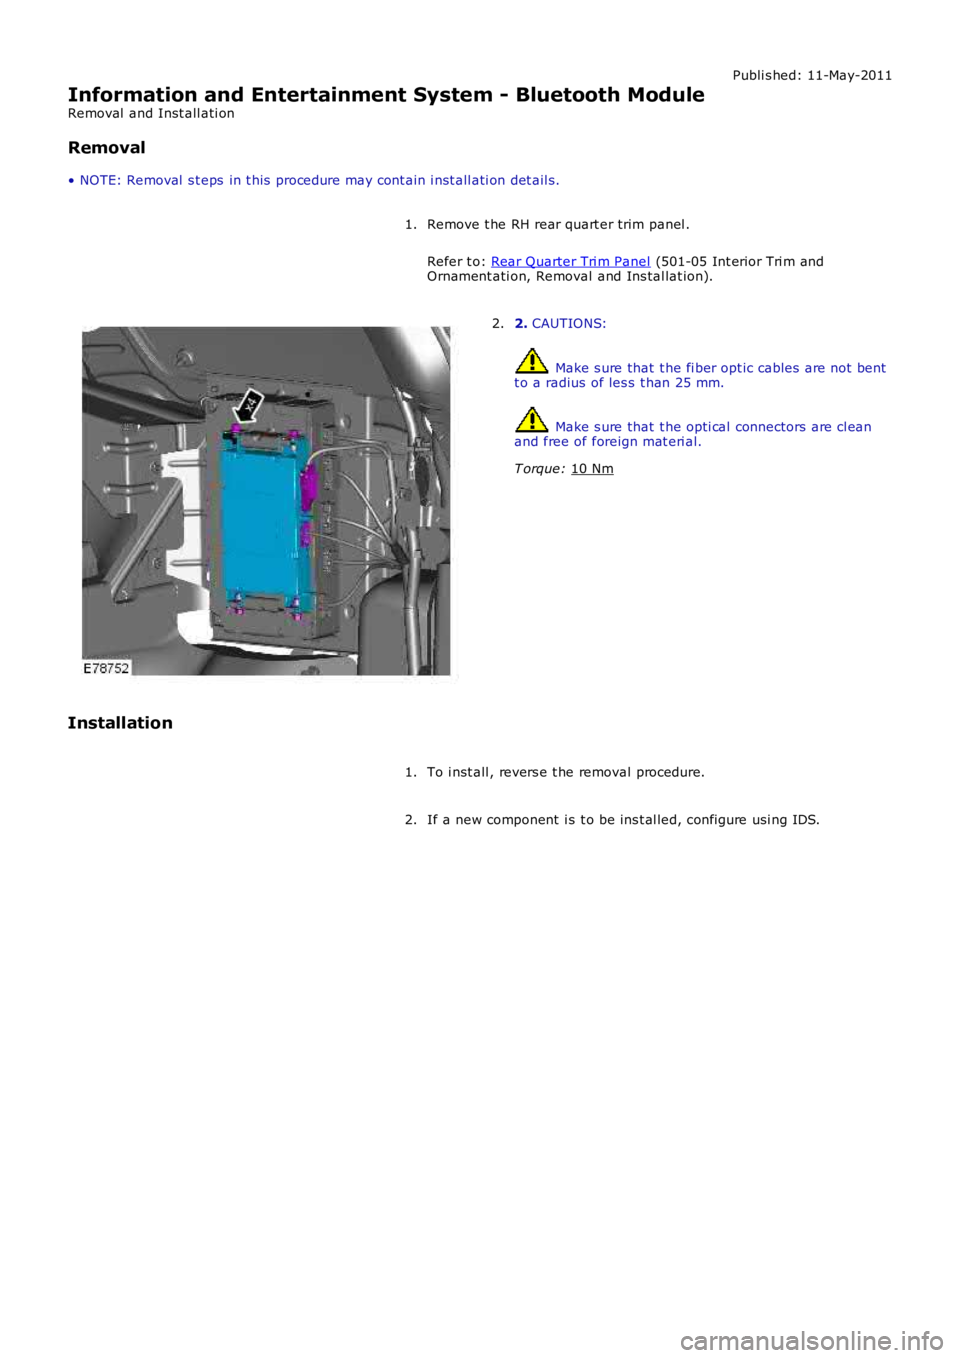
Information and Entertainment System - Bluetooth Module
Removal and Inst all ati on
Removal
• NOTE: Removal s t eps in t his procedure may cont ain i nst all ati on det ail s.
Remove t he RH rear quart er trim panel .
Refer t o: Rear Quarter Tri m Panel (501-05 Int erior Tri m and
Ornament ati on, Removal and Ins tal lat ion).
1. 2.
CAUTIONS: Make s ure that t he fi ber opt ic cables are not bent
t o a radius of les s t han 25 mm. Make s ure that t he opti cal connectors are cl ean
and free of foreign mat eri al.
T orque: 10 Nm 2.
Installation To i nst all , revers e t he removal procedure.
1.
If a new component i s t o be ins t al led, configure usi ng IDS.
2.
Page 1968 of 3229
6-El ect ronic rear different ial cont rol module
7-TCM
8-Headlamp leveling cont rol module9-Terrain Res ponse cont rol module
10-Ant i-lock Brake Sys tem (ABS) module
11-ECM - TD412-ECM - i6
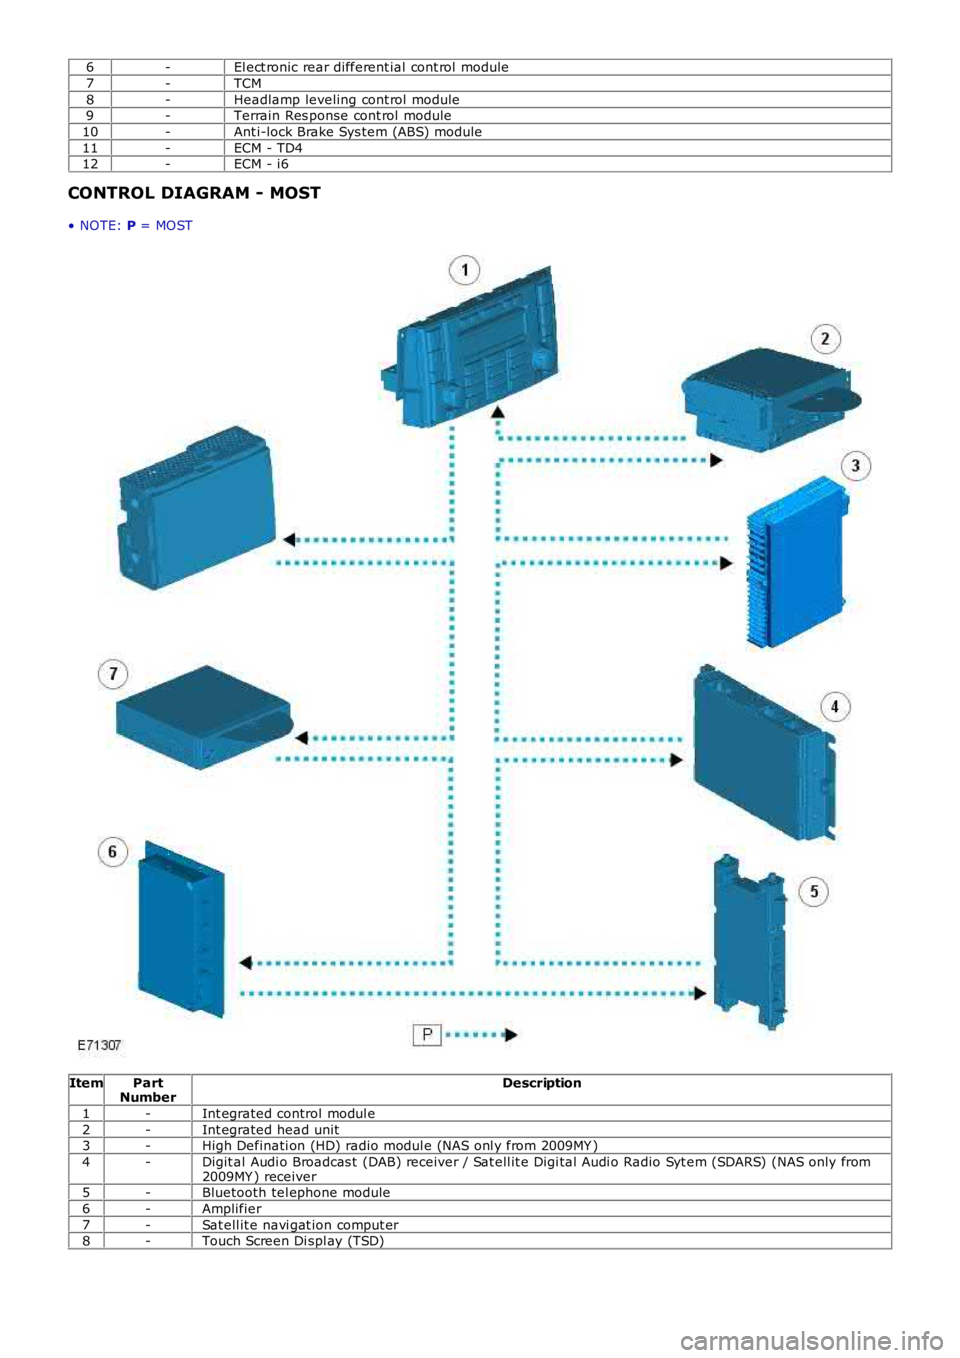
CONTROL DIAGRAM - MOST
• NOTE: P = MOST
ItemPartNumberDescription
1-Int egrated control modul e
2-Int egrated head unit3-High Definati on (HD) radio modul e (NAS onl y from 2009MY )
4-Digit al Audi o Broadcas t (DAB) receiver / Sat ell it e Digi tal Audi o Radio Syt em (SDARS) (NAS only from2009MY ) receiver5-Bluetooth tel ephone module
6-Amplifier
7-Sat ell it e navi gat ion comput er8-Touch Screen Di spl ay (TSD)
Page 2726 of 3229

Contents
6
L
TRACK SELECTION....................................... 246
COMPACT DISC PAUSE................................ 246
FAST FORWARD/REVERSE .......................... 247
COMPACT DISC FUNCTION MENU ............... 247
COMPACT DISC DISPLAY OPTIONS ............ 247
SHUFFLE/RANDOM ...................................... 247
REPEAT COMPACT DISC TRACKS ............... 248
COMPACT DISC TRACK SCANNING ............. 248
MP3 FILE PLAYBACK ................................... 249
Auxiliary input (AUX IN) socket
AUXILIARY INPUT (AUX IN) SOCKET........... 250
Rear passenger controls
REAR SEAT CONTROLS ............................... 252
HEADPHONES .............................................. 253
Telephone
GENERAL INFORMATION ............................. 254
TELEPHONE CONTROLS .............................. 255
BLUETOOTH SETUP ..................................... 256
TELEPHONE SETUP...................................... 258
USING THE TELEPHONE .............................. 261
PHONEBOOK ................................................ 266
TELEPHONE VOICE CONTROL...................... 270
Page 2751 of 3229
31
Quick start
R
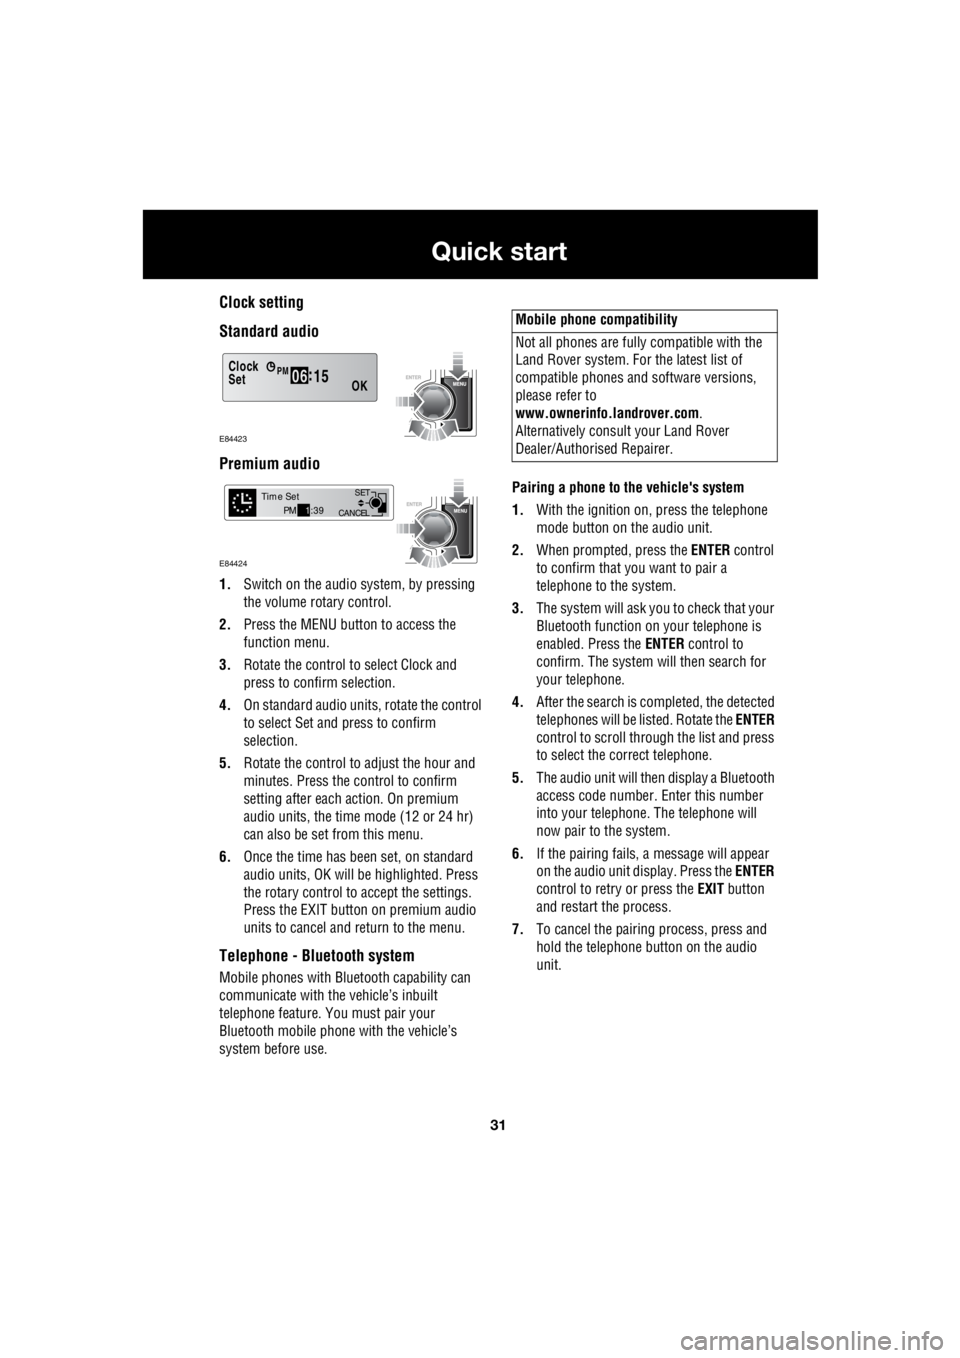
Clock setting
Standard audio
Premium audio
1. Switch on the audio system, by pressing
the volume rotary control.
2. Press the MENU button to access the
function menu.
3. Rotate the control to select Clock and
press to confirm selection.
4. On standard audio units, rotate the control
to select Set and press to confirm
selection.
5. Rotate the control to adjust the hour and
minutes. Press the c ontrol to confirm
setting after each action. On premium
audio units, the time mode (12 or 24 hr)
can also be set from this menu.
6. Once the time has been set, on standard
audio units, OK will be highlighted. Press
the rotary control to accept the settings.
Press the EXIT button on premium audio
units to cancel and return to the menu.
Telephone - Bluetooth system
Mobile phones with Blue tooth capability can
communicate with the vehicle’s inbuilt
telephone feature. You must pair your
Bluetooth mobile phone with the vehicle’s
system before use. Pairing a phone to the vehicle's system
1. With the ignition on, press the telephone
mode button on the audio unit.
2. When prompted, press the ENTER control
to confirm that you want to pair a
telephone to the system.
3. The system will ask you to check that your
Bluetooth function on your telephone is
enabled. Press the ENTER control to
confirm. The system will then search for
your telephone.
4. After the search is completed, the detected
telephones will be listed. Rotate the ENTER
control to scroll through the list and press
to select the correct telephone.
5. The audio unit will then display a Bluetooth
access code number. Enter this number
into your telephone. The telephone will
now pair to the system.
6. If the pairing fails, a message will appear
on the audio unit display. Press the ENTER
control to retry or press the EXIT button
and restart the process.
7. To cancel the pairing process, press and
hold the telephone button on the audio
unit.
Clock
OK06 :
15SetPM
E84423
CANCEL SET
Time SetPM
1:39
E84424
Mobile phone compatibility
Not all phones are fully compatible with the
Land Rover system. For the latest list of
compatible phones and software versions,
please refer to
www.ownerinfo.landrover.com .
Alternatively consult your Land Rover
Dealer/Authorised Repairer.