2006 LAND ROVER FRELANDER 2 lock
[x] Cancel search: lockPage 2930 of 3229
Vehicle identification
210
L
Vehicle identificationVEHICLE IDENTIFICATION PLATE
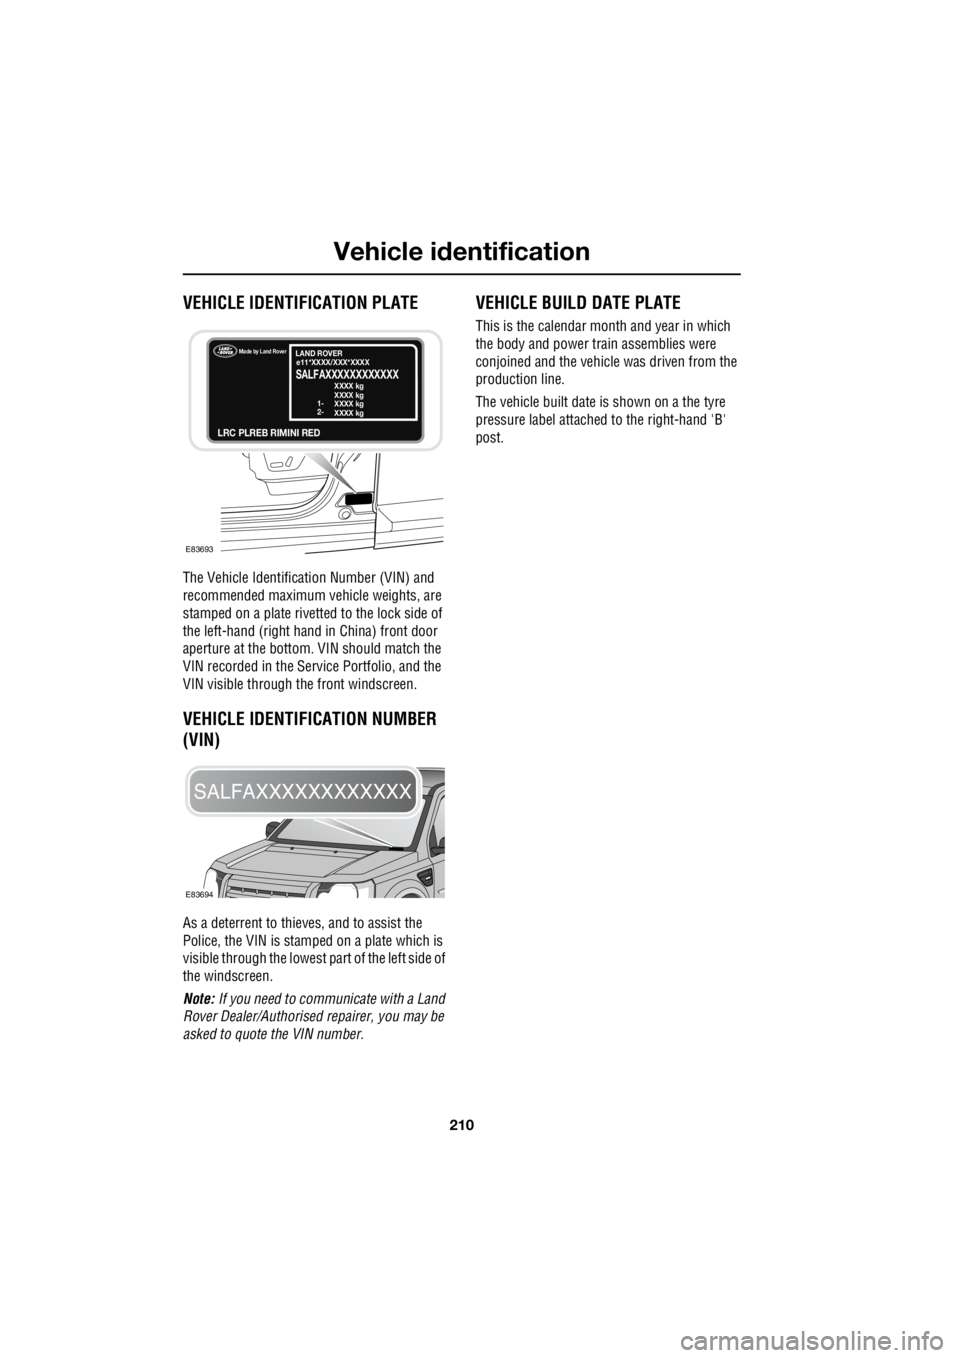
The Vehicle Identification Number (VIN) and
recommended maximum vehicle weights, are
stamped on a plate rivetted to the lock side of
the left-hand (right hand in China) front door
aperture at the bottom. VIN should match the
VIN recorded in the Serv ice Portfolio, and the
VIN visible through the front windscreen.
VEHICLE IDENTIFICATION NUMBER
(VIN)
As a deterrent to thieves, and to assist the
Police, the VIN is stam ped on a plate which is
visible through the lowest pa rt of the left side of
the windscreen.
Note: If you need to communicate with a Land
Rover Dealer/Authorised repairer, you may be
asked to quote the VIN number.
VEHICLE BUILD DATE PLATE
This is the calendar mont h and year in which
the body and power train assemblies were
conjoined and the vehicle was driven from the
production line.
The vehicle built date is shown on a the tyre
pressure label attached to the right-hand 'B'
post.
E83693
Made by Land Rover
LRC PLREB RIMINI RED
LAND ROVER
SALFAXXXXXXXXXXXXe11*XXXX/XXX*XXXX
XXXX kg
XXXX kg
1-
2- XXXX kg
XXXX kg
E83694
SALFAXXXXXXXXXXXX
Page 2939 of 3229
219
Audio unit overview
R
Audio unit overviewAUDIO UNIT OVERVIEW
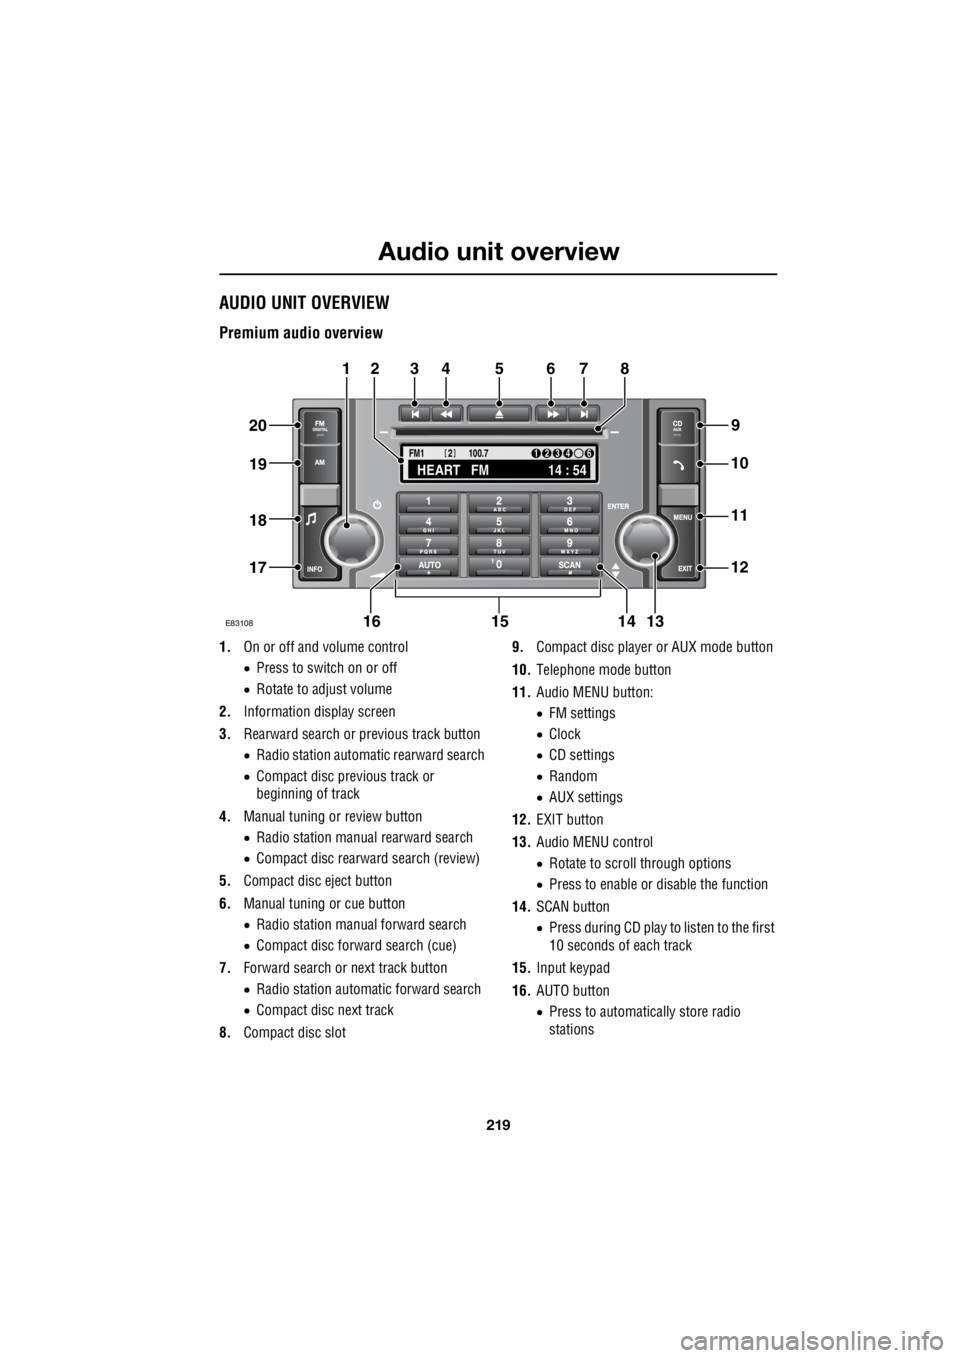
Premium audio overview
1. On or off and volume control
• Press to switch on or off
• Rotate to adjust volume
2. Information display screen
3. Rearward search or previous track button
• Radio station automatic rearward search
• Compact disc previous track or
beginning of track
4. Manual tuning or review button
• Radio station manual rearward search
• Compact disc rearward search (review)
5. Compact disc eject button
6. Manual tuning or cue button
• Radio station manual forward search
• Compact disc forward search (cue)
7. Forward search or next track button
• Radio station automatic forward search
• Compact disc next track
8. Compact disc slot 9.
Compact disc player or AUX mode button
10. Telephone mode button
11. Audio MENU button:
• FM settings
• Clock
• CD settings
• Random
• AUX settings
12. EXIT button
13. Audio MENU control
• Rotate to scroll through options
• Press to enable or disable the function
14. SCAN button
• Press during CD play to listen to the first
10 seconds of each track
15. Input keypad
16. AUTO button
• Press to automatically store radio
stations
TA
NEWSPTY100.7
FM1
14 : 54
HEART FM
1234 6
2
E83108
34567
9
21
11
12
10
13141516
17
18
19
20
8
Page 2947 of 3229
227
Audio unit operation
R
Traffic Programme (TP) preference
With the Traffic Announc ement (TA) feature
enabled, any announcem ent received by the
system will interrupt nor mal radio reception or
CD play. The TP preference feature on premium
audio units allows the system to receive only
traffic announcements from a particular
station.
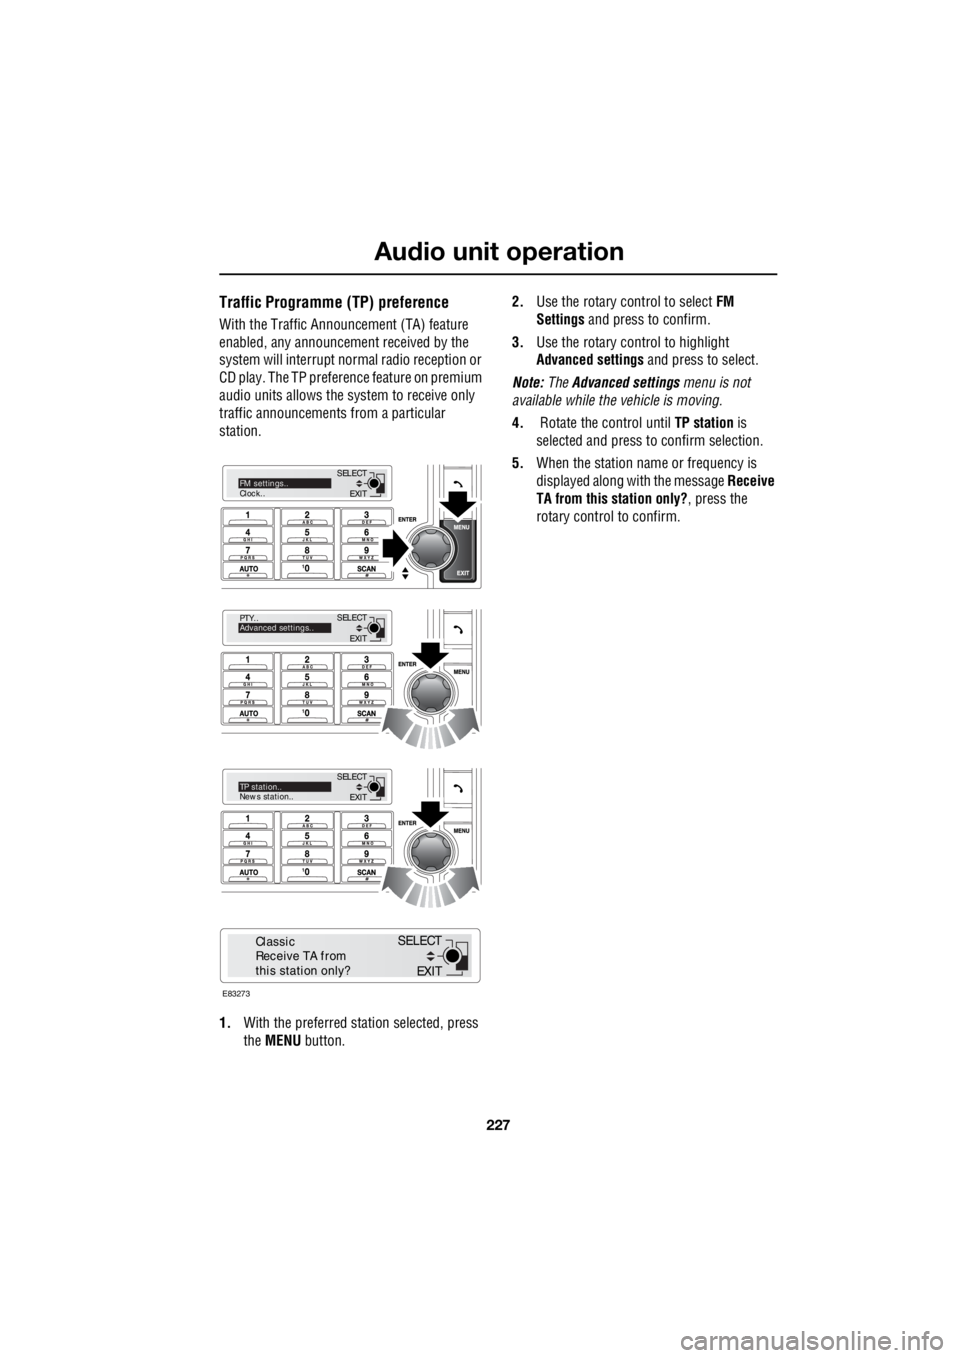
1. With the preferred station selected, press
the MENU button. 2.
Use the rotary control to select FM
Settings and press to confirm.
3. Use the rotary control to highlight
Advanced settings and press to select.
Note: The Advanced settings menu is not
available while the vehicle is moving.
4. Rotate the control until TP station is
selected and press to confirm selection.
5. When the station name or frequency is
displayed along with the message Receive
TA from this station only? , press the
rotary control to confirm.
EXIT
SELECT
PTY..
Advanced settings..
EXIT
SELECTTP station..
News station..
EXIT
SELECTFM settings..
Clock..
E83273
EXIT
SELECT
Classic
Receive TA from
this station only?
Page 2948 of 3229
Audio unit menus
228
L
Audio unit menusRADIO DATA SYSTEM (RDS)
Your audio system is equipped with RDS
(Radio Data System), which enables the audio
unit to receive extra information with the
normal radio signals.
On the FM waveband, RD S enables the audio to
receive traffic and news information
broadcasts. RDS also al lows the audio unit to
automatically retune to stations that are linked
to the same network.
Note: Not all FM radio stat ions broadcast RDS.
If a non-RDS station is selected, RDS features
will not be available.
Selecting RDS
On standard audio unit s, RDS can be enabled
or disabled, according to preference. The
following procedure explains how to switch
RDS on or off.
1. With FM1, FM2 or FMa selected, press the
MENU button to display the menu.
2. Using the rotary control, select RDS from
the menu. ON or OFF will be displayed,
dependent on status.
3. Press the rotary control to change status.
The RDS status will be displayed briefly on the
information screen.
REGIONAL MODE (REG)
As you drive into diffe rent radio reception
areas, the Radio Data System (RDS)
automatically retunes the radio to the strongest
signal. Regional mode is an RDS feature which
stops the system from tuning to another local
radio station with a stronger signal. With this
feature enabled, your selected local radio
station will re main tuned.
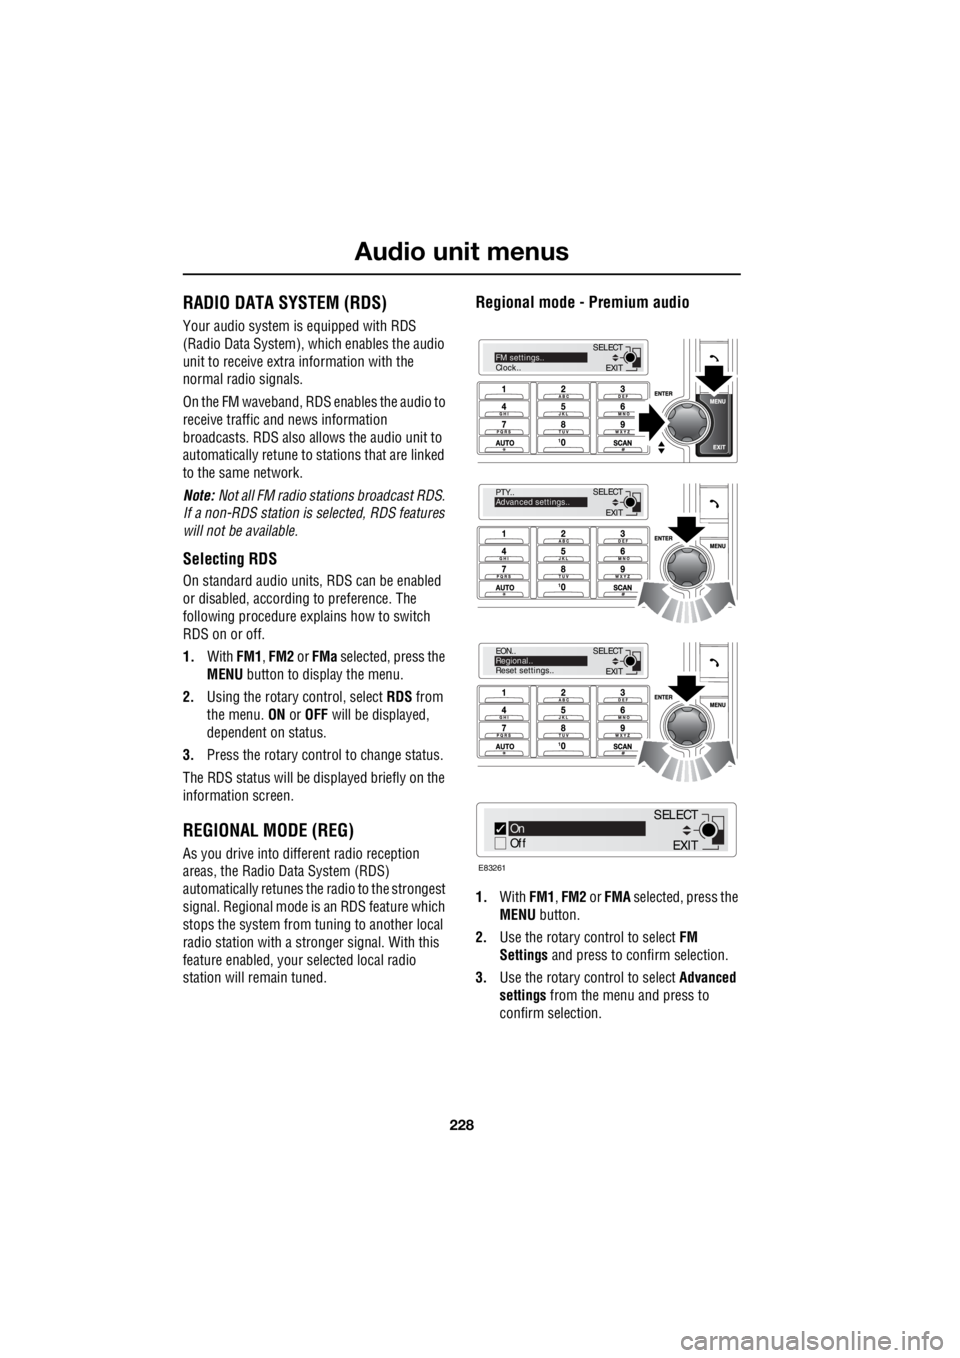
Regional mode - Premium audio
1.With FM1, FM2 or FMA selected, press the
MENU button.
2. Use the rotary control to select FM
Settings and press to c onfirm selection.
3. Use the rotary control to select Advanced
settings from the menu and press to
confirm selection.
EXIT
SELECT
PTY..
Advanced settings..
EXIT
SELECT
EON..
Regional..
Reset settings..
EXIT
SELECTFM settings..
Clock..
On
Off
E83261
EXIT
SELECT
Page 2951 of 3229
231
Audio unit menus
R
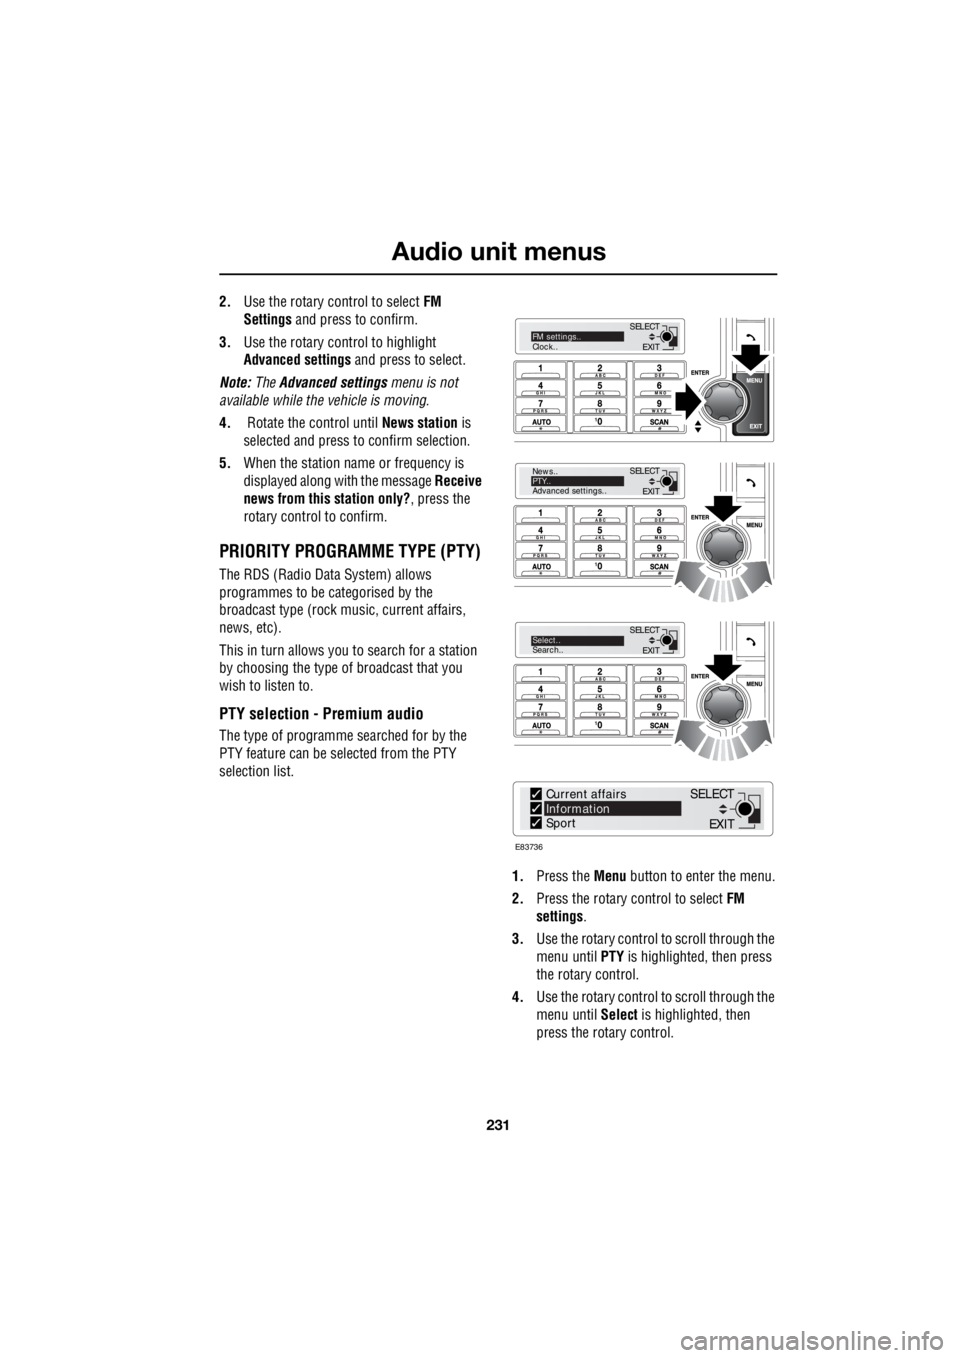
2. Use the rotary control to select FM
Settings and press to confirm.
3. Use the rotary control to highlight
Advanced settings and press to select.
Note: The Advanced settings menu is not
available while the vehicle is moving.
4. Rotate the control until News station is
selected and press to confirm selection.
5. When the station name or frequency is
displayed along with the message Receive
news from this station only? , press the
rotary control to confirm.
PRIORITY PROGRAMME TYPE (PTY)
The RDS (Radio Data System) allows
programmes to be categorised by the
broadcast type (rock mu sic, current affairs,
news, etc).
This in turn allows you to search for a station
by choosing the type of broadcast that you
wish to listen to.
PTY selection - Premium audio
The type of programme searched for by the
PTY feature can be selected from the PTY
selection list.
1. Press the Menu button to enter the menu.
2. Press the rotary control to select FM
settings .
3. Use the rotary control to scroll through the
menu until PTY is highlighted, then press
the rotary control.
4. Use the rotary control to scroll through the
menu until Select is highlighted, then
press the rotary control.
EXIT
SELECT
News..
PTY..
Advanced settings..
EXIT
SELECTSelect..
Search..
EXIT
SELECTFM settings..
Clock..
E83736
Current affairs
Information
Sport
EXIT
SELECT
Page 2958 of 3229
Digital audio broadcasting
238
L
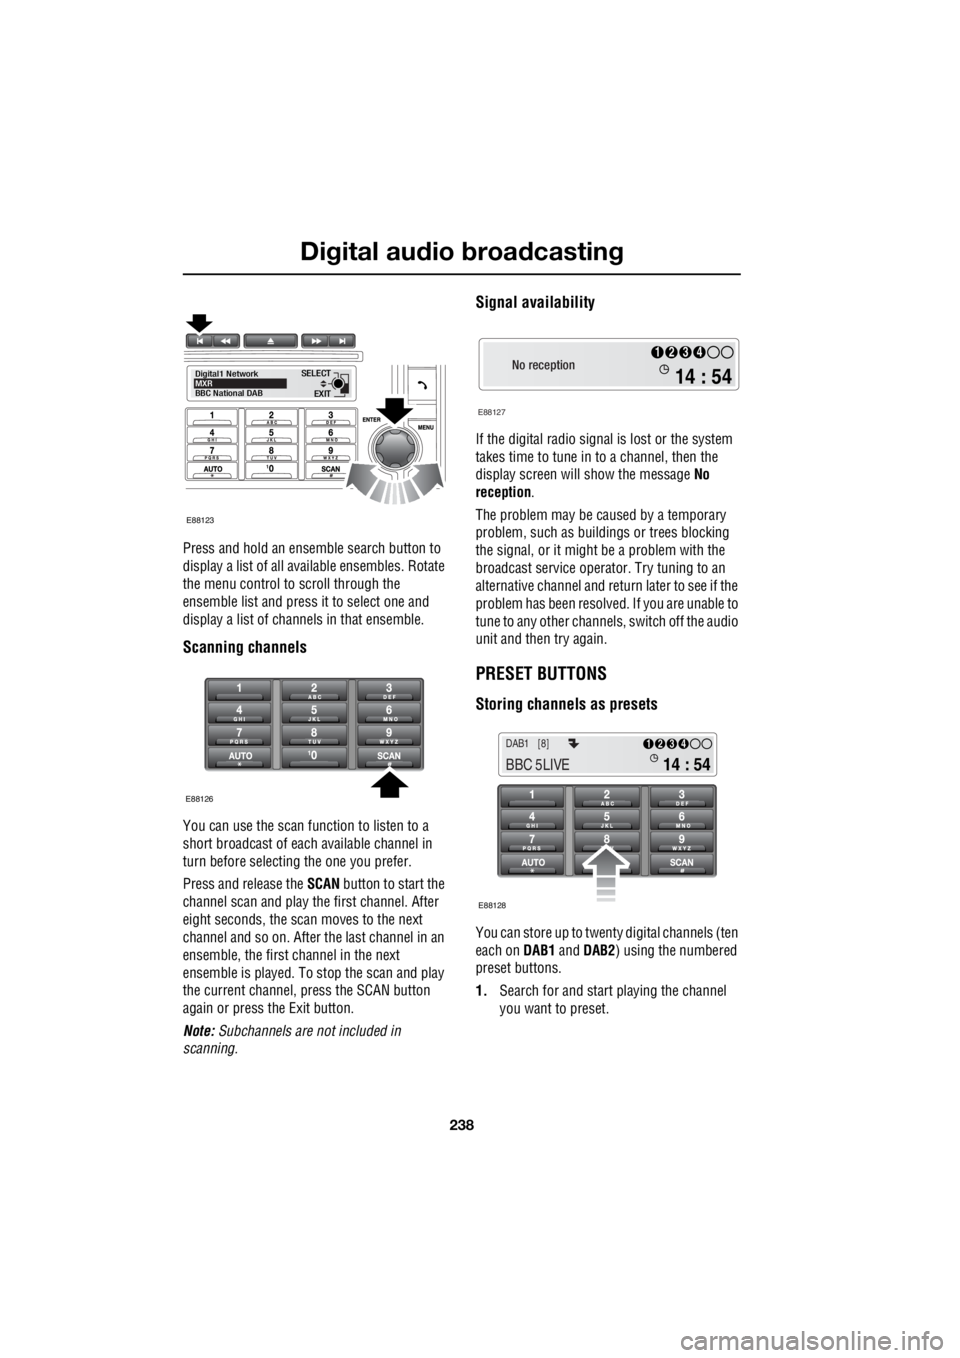
Press and hold an ensemble search button to
display a list of all available ensembles. Rotate
the menu control to scroll through the
ensemble list and press it to select one and
display a list of channels in that ensemble.
Scanning channels
You can use the scan function to listen to a
short broadcast of each available channel in
turn before selecting the one you prefer.
Press and release the SCAN button to start the
channel scan and play the first channel. After
eight seconds, the scan moves to the next
channel and so on. After the last channel in an
ensemble, the first channel in the next
ensemble is played. To stop the scan and play
the current channel, press the SCAN button
again or press the Exit button.
Note: Subchannels are not included in
scanning.
Signal availability
If the digital radio signal is lost or the system
takes time to tune in to a channel, then the
display screen will show the message No
reception .
The problem may be caused by a temporary
problem, such as buildings or trees blocking
the signal, or it might be a problem with the
broadcast service operator. Try tuning to an
alternative channel and return later to see if the
problem has been resolved. If you are unable to
tune to any other channe ls, switch off the audio
unit and then try again.
PRESET BUTTONS
Storing channels as presets
You can store up to twenty digital channels (ten
each on DAB1 and DAB2 ) using the numbered
preset buttons.
1. Search for and start playing the channel
you want to preset.
EXIT
SELECT
Digital1 Network
MXR
BBC National DAB
E88123
E88126
No reception
E88127
14 : 54
1234
14 : 54
1234DAB1 [8]
BBC 5LIVE
E88128
Page 2960 of 3229
Digital audio broadcasting
240
L
SETTINGS
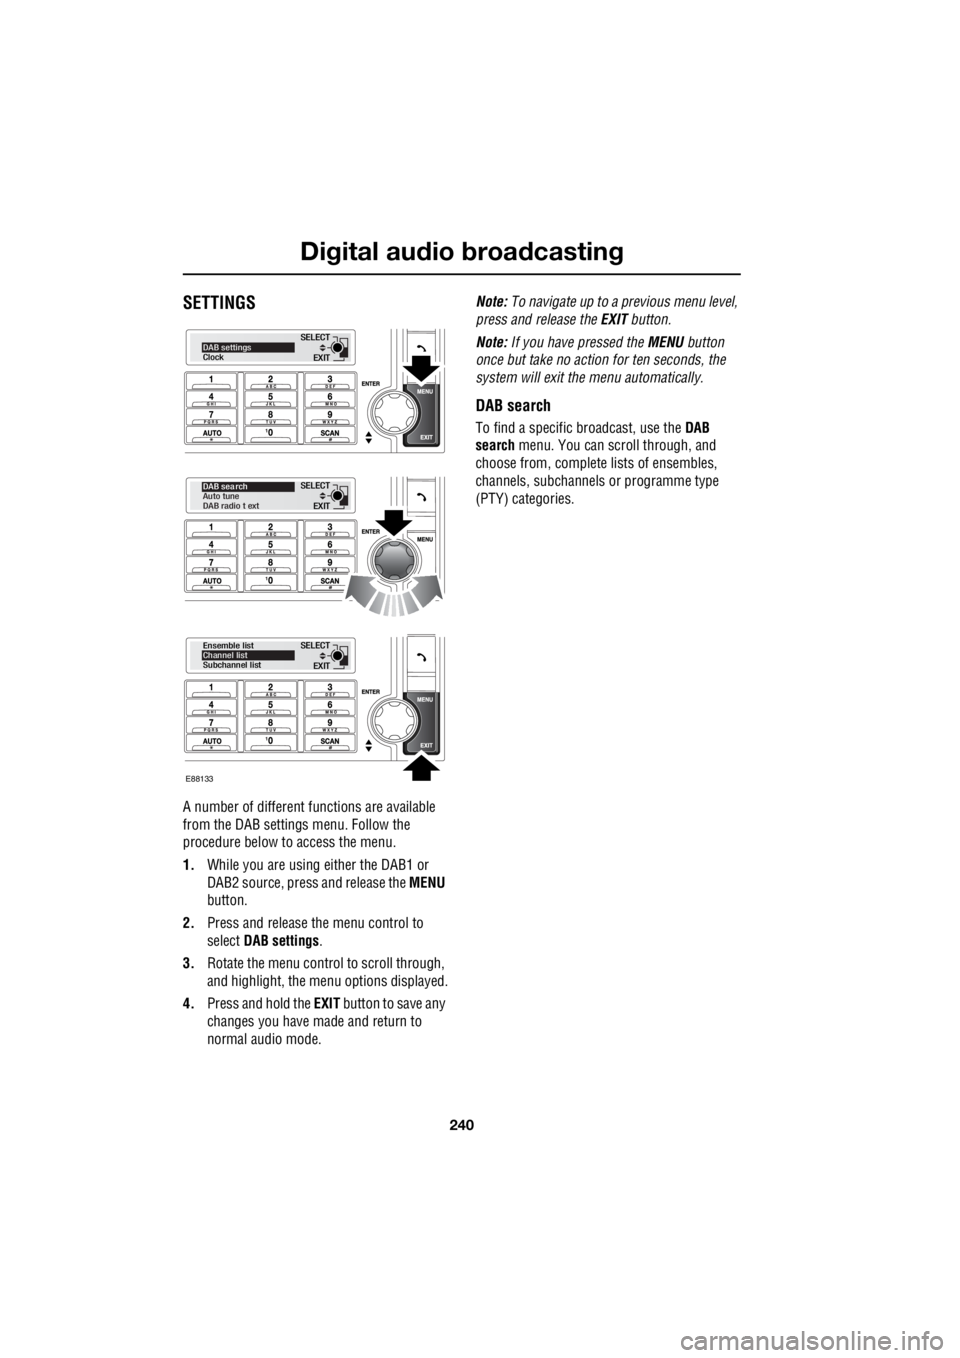
A number of different f unctions are available
from the DAB settings menu. Follow the
procedure below to access the menu.
1. While you are using either the DAB1 or
DAB2 source, press and release the MENU
button.
2. Press and release the menu control to
select DAB settings .
3. Rotate the menu control to scroll through,
and highlight, the menu options displayed.
4. Press and hold the EXIT button to save any
changes you have made and return to
normal audio mode. Note:
To navigate up to a pr evious menu level,
press and release the EXIT button.
Note: If you have pressed the MENU button
once but take no action for ten seconds, the
system will exit the menu automatically.
DAB search
To find a specific br oadcast, use the DAB
search menu. You can scroll through, and
choose from, complete lists of ensembles,
channels, subchannels or programme type
(PTY) categories.
EXIT
SELECTDAB settings
Clock
EXIT
SELECT
DAB sea rch
Auto tune
DAB radio t ext
EXIT
SELECT
Ensemble list
Channel list
Subchannel list
E88133
Page 2965 of 3229
245
Compact disc player
R
Compact disc playerLOADING COMPACT DISCS
Note: Some music CD manufacturers are
using data encryption to copy-protect their
recordings and prevent the production of
counterfeit copies. These CDs differ from the
internationally agreed CD audio standard,
RedBook, a standard that serves as the
operating basis for all CD players and
changers. Copy-pro tected CDs may fail to play
in your CD changer or ma y be played subject to
various limitations, e. g. sound quality may be
impaired. If you do ex perience a problem, try
the CD in other player s before contacting the
CD vendor.
Loading a CD - Single disc player
To insert a disc into the player, make sure that
the label side of the di sc is facing upwards and
present the disc to the slot. Ease the disc into
the slot until the mech anism takes over and
draws the disc in fully.
Loading a CD - Six disc player
Press the CD mode button, then press the
numbered button of the position in which the
compact disc is to be stored ( 1 to 6). Make sure that the label side of the disc is
facing upwards then, when prompted, partially
insert the disc. The play er mechanism will draw
the disc in automatica lly and the disc number
will appear on the display.
Note: If there is a problem with a disc that has
been loaded (inserted upside down, wrong
format etc.), Disc unreadable or Disc error will
appear in the information display, and the disc
will be ejected. If the problem can be corrected
(disc upside down for example), then re-insert
the disc in the correct manner. If the problem
cannot be rectified, do not re-insert the disc.
There will be a pause while the player reads
information from the disc, then play will start at
the first track.
To load another CD, pr ess another numbered
button ( 1 to 6) and repeat the loading
procedure.
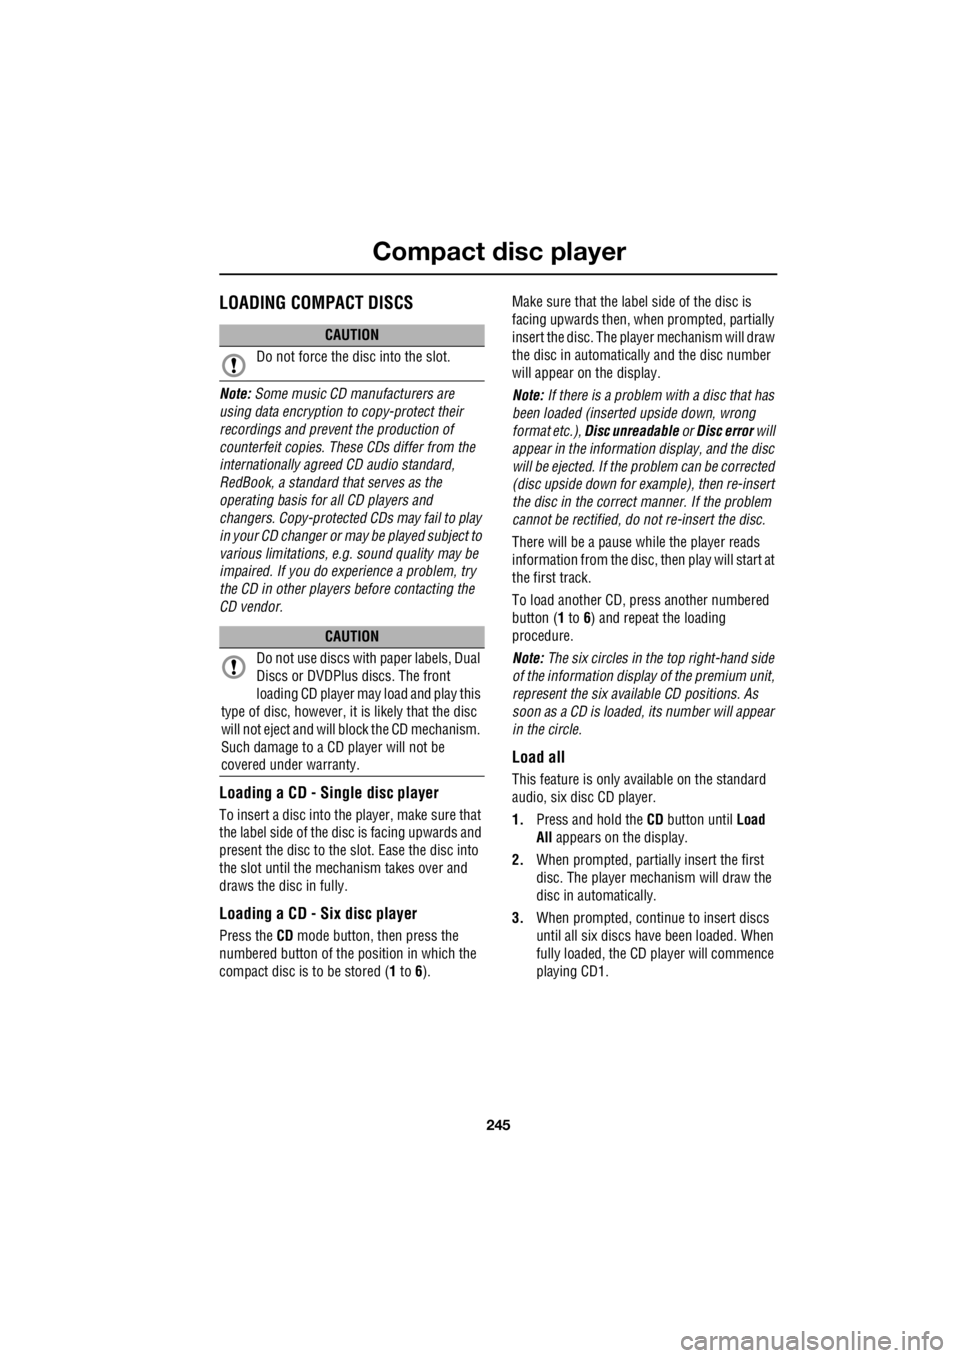
Note: The six circles in the top right-hand side
of the information display of the premium unit,
represent the six available CD positions. As
soon as a CD is loaded, its number will appear
in the circle.
Load all
This feature is only available on the standard
audio, six disc CD player.
1. Press and hold the CD button until Load
All appears on the display.
2. When prompted, partia lly insert the first
disc. The player mechanism will draw the
disc in automatically.
3. When prompted, conti nue to insert discs
until all six discs have been loaded. When
fully loaded, the CD player will commence
playing CD1.
CAUTION
Do not force the disc into the slot.
CAUTION
Do not use discs with paper labels, Dual
Discs or DVDPlus discs. The front
loading CD player may load and play this
type of disc, however, it is likely that the disc
will not eject and will block the CD mechanism.
Such damage to a CD player will not be
covered under warranty.