2006 LAND ROVER FRELANDER 2 battery
[x] Cancel search: batteryPage 14 of 3229
Publi s hed: 11-May-2011
General Information - Standard Workshop Practices
Des cript ion and Operat ion
Vehicle in Workshop
W hen working on a vehicl e in the workshop al ways make sure t hat :
W here practi cable, t he parking brake is appli ed and t he wheel s are securely chocked to prevent t he vehi cl e movingforwards or backwards .W henever pos si ble, t he ignit ion key i s removed before any work is carried out on t he vehi cle.If the engine i s t o be run, t here i s adequat e vent il ati on, or an extract ion hos e i s us ed to remove exhaus t fumes.There i s adequat e room to rais e the vehicle and remove t he wheel s , if neces s ary.Fender covers are al ways ins tal led i f any work i s to be carri ed out in t he engine compart ment.W here practi cable, t he batt ery i s dis connected if worki ng on the engi ne, underneath t he vehicle, or if t he vehi cl e i srai sed.
• CAUTIO NS:
Prior to dis connect ing the bat tery, refer to the El ect ri cal Secti on of this manual - Bat tery dis connect ion/connect ion.For addit ional informat ion, refer t o: Specificati ons (414-01 Bat t ery, Mount ing and Cables , Speci ficat ions).
W hen el ect ri c arc wel ding on a vehi cl e, al ways dis connect t he generator wi ri ng to prevent t he pos si bili ty of a s urgeof current caus i ng damage to the i nternal component s of the generat or.
If us i ng welding equipment on t he vehicle, a s uit abl e fire exti nguis her is readily avail able.
Battery - General
• CAUTIO NS:
Prior to carrying out any procedures which i nvol ve dis connect ing/ or connecti ng the bat tery, refer t o t he ElectricalSect ion of t his manual - Batt ery di sconnect ion/connect ion.For addit ional informat ion, refer t o: Specificati ons (414-01 Bat t ery, Mount ing and Cables , Speci ficat ions).
A di s charged bat tery condit ion may have been caus ed by an electrical short ci rcuit . If t his condit ion exis t s there wil lbe an apparentl y li ve circuit on the vehicle even when al l normal circuit s are s wit ched off. This can cause arcing when t hejumper cables are connect ed.
W hi le it i s not recommended that the vehicl e is jump s t art ed, i t is recognized t hat thi s may occas ionall y be t he onl ypracti cal way t o mobi lize a vehi cl e. Prior t o at tempt ing a jump s t art , reference must be made to the El ect ri cal Secti on oft hi s manual - Jump St art ing.
Followi ng jump s tart ing of a dis abl ed vehi cle, the di s charged bat tery mus t be checked for s erviceabili ty and recharged offt he vehi cl e as s oon as poss ibl e t o avoi d permanent damage.
Do not rel y on t he generator t o res t ore a di s charged bat tery. For a generat or t o recharge a batt ery, it woul d take i n exces sof eight hours cont inuous dri vi ng wi th no addi ti onal loads placed on t he batt ery.
Always make s ure that t he jumper cabl es are adequate for the tas k.Always make s ure that t he s lave batt ery i s of the same vol tage as t he vehicle bat tery. The bat teries mus t beconnected i n paral lel.Always make s ure that s wit chabl e electric circui ts are s wi tched off before connecti ng jumper cabl es. This reducest he ri sk of arci ng occurring when the final connecti on is made.
Towing the Vehicle
W ARNING: W hen t owing i s neces sary, reference mus t be made to the Jacki ng, Lift ing and Towing Secti on of thi sManual .
W hen t he vehicle i s being t owed dock the remote cont rol and s wit ch on the ignit ion. (s t eering l ock releas ed and warni ngli ght s i ll uminated). Onl y t hen wil l the s t eering, turn s ignal lamps , horn and s t op lamps be operat ional. Fail ure t o followt hes e i nst ructi ons may res ult in pers onal injury. It mus t be noted that wit h t he engine not running, t he power s t eering andbrake boost er wil l be inoperat ive t herefore, great er effort wil l be needed t o s t eer t he vehicle and apply the brakes .
General Installation Instructions
Component removal
W henever pos si ble, clean component s and the surroundi ng area before removal .
Blank off openings expos ed by component removal .Followi ng dis connecti on, s eal fuel, oil or hydrauli c li nes i mmediat ely us ing sui table bl anki ng plugs or caps .Seal open ends of expos ed oil ways us i ng sui table tapered hardwood pl ugs or cons pi cuous pl as t ic pl ugs .Immediat el y a component i s removed, place it i n a sui table contai ner; us e a s eparate cont ai ner for each componentand it s as s ociat ed part s .
Page 22 of 3229
Do not t ouch t he glas s port ion of t he bulb.On no account s hould headlamps be s wi tched on wi th t he bulb removed from the headlamp.Bulb t es ti ng may only be carri ed out wit h the bul b ins t al led i n t he headl amp.Bulbs mus t be di spos ed of in accordance wit h the local aut horit y bye-laws .
Connectors and harnesses
The engi ne compart ment of a vehi cl e is a part icularl y host il e environment for el ect ri cal component s and connectors. Al waysobserve the foll owing:
Make s ure el ect ri cal ly related it ems are dry and oil free before di sconnect ing/connecti ng t es t equipment .Make s ure t hat dis connect ed mul ti pl ugs and s ens ors are prot ect ed from any pos s ibl e oil , coolant or other li qui dcont aminat ion. Any such contami nat ion could impair performance or l ead to component fail ure.Never force connectors apart or pull on t he wiring harnes s .Always make s ure locki ng t abs are dis engaged before di sconnect ing mul ti plugs etc. and make s ure that correctori ent ati on is achieved before connecti on.Make s ure t hat any protecti on covers, i nsul at ion et c. are replaced if dis t urbed.
Having confirmed t hat a component is fault y, carry out t he fol lowing:
Swit ch off t he ignit ion and di s connect t he batt ery.Remove the component and support t he dis connected harnes s .W hen replaci ng electrical components , keep oily hands away from electrical connect ions and make s ure that lockingt abs on connect ors are ful ly engaged.
Battery Disconnection/Connection
Always refer to the El ect ri cal Secti on of this manual - Bat tery Connecti on/Dis connecti on pri or t o at tempt ing t o connect ordis connect the bat tery.For addit ional informat ion, refer t o: Specificati ons (414-01 Bat t ery, Mount ing and Cables , Speci ficat ions).
Fuel Handling Precautions
The fol lowing informati on li s ts bas ic precauti ons which mus t be obs erved if fuel i s t o be handl ed s afely. It als o outl inesother areas of ris k which mus t not be i gnored. As t his informati on is is sued for basi c gui dance only, consul t your local Fi reDepart ment where any doubt as to personal and envi ronmental s afet y exi s ts - See al so Heal th and Safety Precaut ions .
General precaut ions
Always have t he correct type of fire ext inguis her cont aining Foam, CO2, Gas or powder acces s ible when handl ing ordrai ni ng fuel or dis mantl ing fuel s ys tems . Fire exti ngui shers mus t als o be l ocat ed in areas where fuel i s s tored.
Make s ure t hat sui table warning si gns are exhibit ed.
Keep all s ources of ignit ion wel l away from areas where fuel is bei ng handl ed.
Make s ure t hat any leadlamps are fl ameproof and kept clear of spi ll age.
• W ARNINGS:
Do not di sas s emble or reas s emble fuel sys tem components whils t vehicle is over a pit .
No one should be permi tt ed to repair component s as sociat ed wit h fuel wi thout fi rs t having s peci alis t t rai ni ng.
Always dis connect t he vehi cl e batt ery before carryi ng out dis ass embly, reas s embly or drai ning work on a fuel sys tem.
Fuel t ank and s ys t em drai ning
Drai ning mus t be carried out in accordance wit h t he procedures given in the relevant Fuel Syst em s ecti on of thi s manual .
• W ARNINGS:
Never drain fuel or work on a fuel sys t em whil e t he vehi cl e i s over a pi t. Ext raction or draining of fuel must becarri ed out in a well venti lated area.
Al ways at tach fuel vapor warning l abel s t o fuel t anks i mmediat ely after drai ni ng.
Contai ners us ed for s toring fuel must be cl early marked wit h t he cont ents and pl aced i n a safe s torage area whichmeets the requi rement s of the local authorit y.
CAUTION: Some fuel l ines are now i ns t alled wit h 'quick release' connectors. If a connect or i s damaged, no at t emptmus t be made t o repai r the connect or, a new fuel line and connect or(s ) as s embly must be ins tall ed.
Always release pipe cli ps full y before att empti ng t o dis connect fuel pipes.
Fuel tank repairs
CAUTION: No at tempt s hould be made to repair a pl ast ic fuel tank. If t he s truct ure of t he t ank is damaged, a new
Page 24 of 3229
shows signs of fraying.Alw ays disconnect the vehicle battery before carrying out any electric welding on a vehicle installed with anSRS system.
CAUTION: Do not expos e ai rbag modules or s eat belt pre-tens ioners t o t emperat ures exceeding 85° C (185° F).
It should be not ed t hat thes e precaut ions are not res trict ed to operat ions performed when s ervicing t he SRS s yst em. Thes ame care s hould be exerci sed when working on ancil lary sys t ems and components located i n the vi ci nit y of SRScomponents ; t hese include but are not l imi ted t o:
Steering wheel ai rbag, rot ary coupler.Pass enger front airbag.Side curt ain ai rbag modules - front and rear.Seat bel t pre-t ensi oners .SRS harnes ses , li nk leads and connectors.Side (t horax) ai r bags .
Making t he s ys t em s afe
Before working on or in t he vicini ty of SRS component s , make s ure t he s ys t em i s rendered safe by performi ng the foll owingoperati ons :
Remove the remot e cont rol .Dis connect batt ery, eart h lead first .W ai t 2 mi nut es for t he SRS power ci rcuit t o di scharge before commenci ng work.
• NOTE: The SRS us es energy res erve capaci tors to keep t he s yst em act ive i n t he event of electrical supply fail ure undercras h condi ti ons . It is necess ary to al low the capaci tors s uffi ci ent ti me t o dis charge (2 mi nut es ) in order t o avoid t he ris kof accidental deployment.
Ins t allat ion
In order to make s ure s ys tem int egrit y, it is ess enti al t hat the SRS sys tem is regularl y checked and mai nt ained s o t hat itis ready for effecti ve operat ion in t he event of a col lis i on. Carefully ins pect SRS component s before ins tal lati on. Do notins t al l a part t hat shows s i gns of being dropped or i mproperl y handl ed, s uch as dents , cracks or deformat ion.
W ARNING: The integrit y of the SRS sys tems is crit ical for safety reasons . Make s ure t he fol lowing precaut ions arealways adhered t o:
Do not install accessories or other objects to trim panels w hich cover airbags.Never install used SRS components from another vehicle or attempt to repair an SRS component.When repairing an SRS system, only use genuine new parts.Never apply electrical power to an SRS component unless instructed to do so as part of an approved testprocedure.Special fixings are necessary for installing an airbag module – do not use other fixings.Alw ays use new fixings w hen replacing an SRS component and make sure that all fixings are tightened to thecorrect torque.
• CAUTIO NS:
Take care not t o t rap airbag modules when i nst all ing i nt eri or trim components .
Make s ure SRS components are not cont aminat ed by oil or greas e.
• NOTE: Followi ng s eat bel t pre-t ensi oner deployment, t he s eat bel ts can s t ill be used as convent ional seat belt s but wil lneed to be replaced as s oon as poss i bl e t o make s ure full SRS protecti on. Do not us e t he s eat bel ts if t he ret racti onmechani sm i s not working correct ly.
• NOTE: If the SRS component s are to be repl aced, the part number/bar code of the new uni t mus t be recorded.
SRS component t es t ing precauti ons
The SRS component s are t riggered us ing relati vel y l ow operati ng current s, al ways adhere to the foll owing :
W ARNING: Never us e a mul ti meter or ot her general purpose equi pment on SRS components. Us e only Land Roverapproved diagnos t ic equipment t o diagnos e sys tem faul ts .
Page 35 of 3229
Any s praying s houl d preferably be carri ed out in venti lat ed boot hs which i ncorporat e faci li ti es for removi ng vapors ands pray dropl et s from the breathing zone.
W ear appropri at e gl oves , eye and res pirat ory protecti on.
Antifreeze
May be flammabl e when undilut ed.
Vapors may be gi ven off from coolant anti freeze when heat ed. Avoid breathi ng thes e vapors .
Anti freeze may be absorbed through t he s kin i n t oxi c or harmful quanti ti es. Ant ifreeze, i f s wal lowed, can be fat al; SEEKIMMEDIAT E MEDICAL AT T ENT ION.
Battery Acids
See als o Al kal is and Acids .
Gas es releas ed duri ng bat t ery charging are expl osi ve. Al ways remove t he batt ery from t he vehi cl e pri or to chargi ng. Neverus e naked flames or al low s parks near charging or recentl y charged bat t eries . NEVER add aci d t o a bat tery, t he chemicalreacti on produced wil l be vi olent and expl os i ve. In cases of eye contact, was h affected area wit h copious amount s of wat erand SEEK IMMEDIAT E MEDICAL AT T ENT ION.
Make s ure t here i s adequat e vent il ati on during bat tery charging, obs erve NO SMOKING POLICY .
Brake Pads and Linings
Always fit t he correct grade and s peci fi cat ion of brake pads and l inings . W hen renewi ng pads and lini ngs , always repl aceas complete axl e s ets .
Brake and Clutch Fluid
Splas hes to t he s kin and eyes are irri tat ing and i n t he long t erm can be damagi ng, avoid prolonged s ki n cont act. In casesof eye cont act , wash affect ed area wi th copious amount s of water and SEEK IMMEDIATE MEDICAL ATTENTION.
Chemical Materials
All chemical materials should al ways be used wit h caut ion and st ored and handled wi th care. They may be toxic, harmful,corros ive, irri tant or highly fl ammable and gi ve ri se to hazardous fumes and dus t s.
The effect s of exces s ive expos ure to chemi cal s may be i mmediat e or delayed; briefl y experienced or permanent ;cumulati ve; s uperficial; life t hreatening; or may reduce l ife expect ancy.
Chemical Materials - Do's
Do careful ly read and observe hazard and precaut ion warnings given on material cont ai ners (labels ) and in anyaccompanyi ng leaflets , pos ters or ot her ins truct ions . Material heal th and safet y data s heet s can be obtained frommanufacturers .Do remove chemi cal mat eri al s from the s kin and cl othing as soon as pract icable after s oil ing. Change heavily soi ledclothi ng and have it cleaned.Do organi se work pract ices and prot ect ive clot hing t o avoi d s oil ing of t he s ki n and eyes .Do avoid breat hing vapors , aeros ols , dus t s or fumes ; inadequat e container labell ing; fi re and expl os i on hazards .Do was h before job breaks, before eati ng, s moking, dri nki ng or usi ng t oi let faci lit ies when handli ng chemicalmat erial s.Do keep work areas clean, unclut tered and free of s pi ll s.Do s t ore chemical materials according to nat ional and local regul at ions .Do keep chemical materi als out of t he reach of chi ldren.
Chemical Materials - Do Not
Do Not mi x chemical materials except under the manufact urers ins truct ions ; s ome chemicals can form ot her toxic orharmful chemi cal s, gi ve off t oxi c or harmful fumes or become explos ive when mixed t oget her.Do Not s pray chemical materials , part icularly t hose bas ed on s olvents , i n confined spaces , for example when peopleare ins ide a vehicle.Do Not apply heat or fl ame t o chemical materi als except under the manufact urers ins truct ions . Some are hi ghlyfl ammable and some may rel ease toxic or harmful fumes .Do Not l eave contai ners open. Fumes given off can bui ld up to t oxic, harmful or explos ive concentrati ons . Somefumes are heavier than ai r and wil l accumulate in confi ned areas s uch as pi ts .Do Not t rans fer chemical materi als t o unlabell ed cont ainers .Do Not clean hands or cl othing wit h chemicals . Chemical s , parti cul arly sol vent s and fuel s, wi ll dry ski n and maycaus e i rrit ati on leading t o dermat it is or be abs orbed t hrough t he s ki n i n t oxi c or harmful quanti ti es .Do Not us e empt ied containers for ot her mat eri al s except when t hey have been cleaned under s upervis edcondi ti ons .Do Not s niff or smel l chemi cal mat eri al s , even brief expos ure to hi gh concentrat ions of fumes can be toxic orharmful.
Corrosion Protection Materials
Some corrosi on prot ect ion mat eri als are highly flammabl e – obs erve NO SMOKING POLICY.
Thes e materials are vari ed and the manufact urers ins truct ions mus t always be foll owed. The mat eri als may contai ns olvent s , res ins or petroleum product s. Skin and eye cont act s houl d be avoided. They s hould only be s prayed in condit ionsof adequate vent il at ion and not i n confined s paces .
Page 171 of 3229

Publi s hed: 11-May-2011
Maintenance Schedules - Maintenance Schedules - Gasoline Engines
Des cript ion and Operat ion
Under Bonnet View
ItemPart NumberDescription1-Coolant expans ion t ank
2-Brake flui d res ervoir (LH drive i llus t rated - RH dri ve on oppos i te si de)
3-Engine oi l fil ler cap4-Power s teeri ng res ervoir
5-Engine oi l l evel i ndi cat or
6-W indscreen washer fl uid res ervoi r
Maintenance Operations
CAUTION: Not e that t he 'A' and 'B' Service Interval s li s ted on the 'Maintenance Check Sheet' for vehicles operat ingunder arduous condi ti ons , vary from t hos e s pecifi ed for vehicles operat ing under normal condit ions . Reference mus tt herefore, always be made to the 'Arduous Condi ti ons secti on for vehicles operat ing under thes e condi ti ons .
Unles s s tat ed otherwis e, the foll owi ng operati ons mus t be carri ed out at every s ervice int erval.
Battery
Page 182 of 3229

Publi s hed: 11-May-2011
Maintenance Schedules - Maintenance Schedules - Diesel Engines
Des cript ion and Operat ion
Under Bonnet View Item
Part Number Description
1 -Coolant expans ion t ank
2 -Brake flui d res ervoir (RH drive i ll us t rat ed - LH dri ve on oppos i te si de)
3 -W indshi eld was her res ervoir
4 -Power s teeri ng fl uid reservoi r
5 -Engine oi l fil ler cap
6 -Engine oi l l evel i ndi cat or
Maintenance Operations CAUTION: Not e that t he A and B Services li st ed on t he Maint enance Check Sheet , appl i
cabl e t o vehi cl es operati ng
under arduous condi ti ons , vary bot h i n period and mil eage (kil ometres) t o t he int erv als s pecifi ed for t hose vehi cl es
operati ng under normal condit ions. Reference mus t therefore, always be made t o t he ' Arduous Condit ions s ect ion' for
vehi cl es operati ng under t hese condit ions .
Unles s s tat ed otherwis e, the foll owi ng operati ons mus t be carri ed out at every s ervi ce int erval.
Battery
Page 666 of 3229
Publ ished: 11-May-2011
Engine - I6 3.2L Petrol - Valve Cover
Removal and Installation
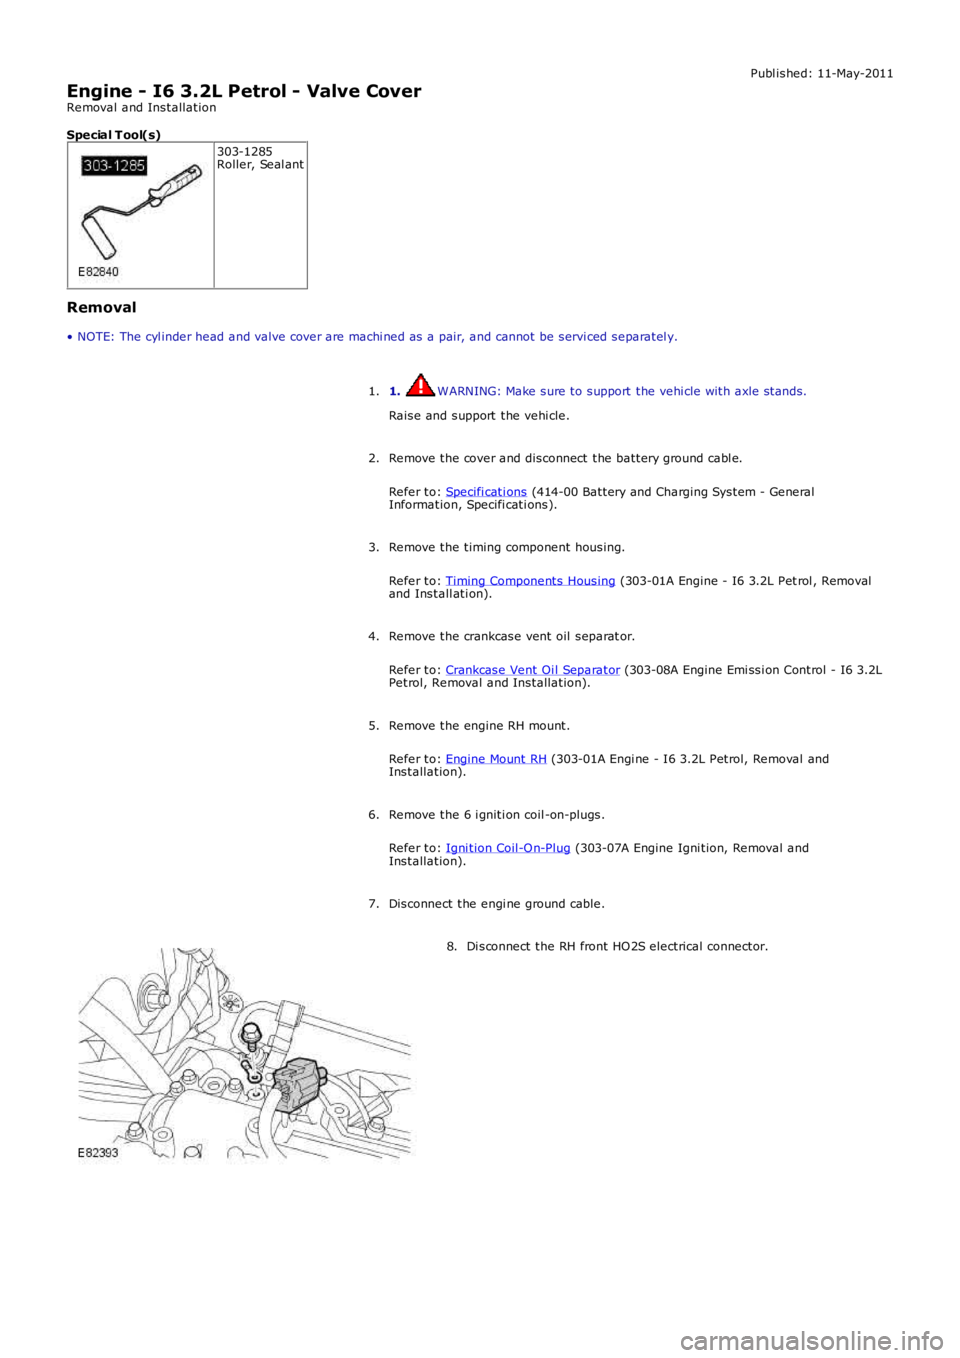
Special T ool(s) 303-1285
Roller, Seal ant
Removal
• NOTE: The cyl inder head and valve cover are machi ned as a pair, and cannot be serv i ced separatel y.
1. WARNING: Make sure to support the vehi cle with axle stands.
Raise and support the vehi cle.
1.
Remove the cover and disconnect the battery ground cabl e.
Refer to: Specifi cati ons (414-00 Battery and Charging System - General
Information, Specifi cati ons).
2.
Remove the timing component housing.
Refer to: Timing Components Housing (303-01A Engine - I6 3.2L Pet rol , Removal
and Install ati on).
3.
Remove the crankcase vent oil separat or.
Refer to: Crankcase Vent Oi l Separator (303-08A Engine Emi ssi on Control - I6 3.2L
Petrol, Removal and Installation).
4.
Remove the engine RH mount.
Refer to: Engine Mount RH (303-01A Engi ne - I6 3.2L Petrol, Removal and
Installation).
5.
Remove the 6 i gniti on coil -on-plugs.
Refer to: Igni tion Coil-On-Plug (303-07A Engine Igni tion, Removal and
Installation).
6.
Disconnect the engi ne ground cable.
7. Di sconnect the RH front HO2S electrical connector.
8.
Page 671 of 3229
Torque:
6 Nm 13.
CAUTIONS: Extreme cleanli ness must be exerci sed when handli ng this component.
A new O-ring seal is t o be instal led.
Install the CPS solenoids.
Torque: 10 Nm 13.
Connect the CPS solenoi ds.
14.
15. CAUTIONS: Apply clean engi ne oil to t he VVT sol enoid shaft.
Extreme cleanli ness must be exerci sed when handli ng this component.
A new O-ring seal is t o be instal led.
Install the VVT solenoid.
Torque: 10 Nm 15.
Connect the VVT solenoid.
16.
Install the CMP sensors.
Torque: 10 Nm 17.
Connect and secure the CMP sensor electrical connectors.
18.
Connect the fuel i nj ector electrical connectors.
19.
Connect the ground cabl e.
Torque: 6 Nm 20.
Install the engine mount.
Refer to: Engine Mount RH (303-01A Engi ne - I6 3.2L Petrol, Removal and
Installation).
21.
Install the i gniti on coil-on-pl ugs.
Refer to: Igni tion Coil-On-Plug (303-07A Engine Igni tion, Removal and
Installation).
22.
Install the crankcase vent oil separator.
Refer to: Crankcase Vent Oi l Separator (303-08A Engine Emi ssi on Control - I6 3.2L
Petrol, Removal and Installation).
23.
Install the ti ming component housi ng.
Refer to: Timing Components Housing (303-01A Engine - I6 3.2L Pet rol , Removal
and Install ati on).
24.
Connect the battery ground cable and instal l the cover.
Refer to: Specifi cati ons (414-00 Battery and Charging System - General
Information, Specifi cati ons).
25.