2006 LAND ROVER FRELANDER 2 lock
[x] Cancel search: lockPage 2732 of 3229
12
Quick start
L
Steering column adjustment
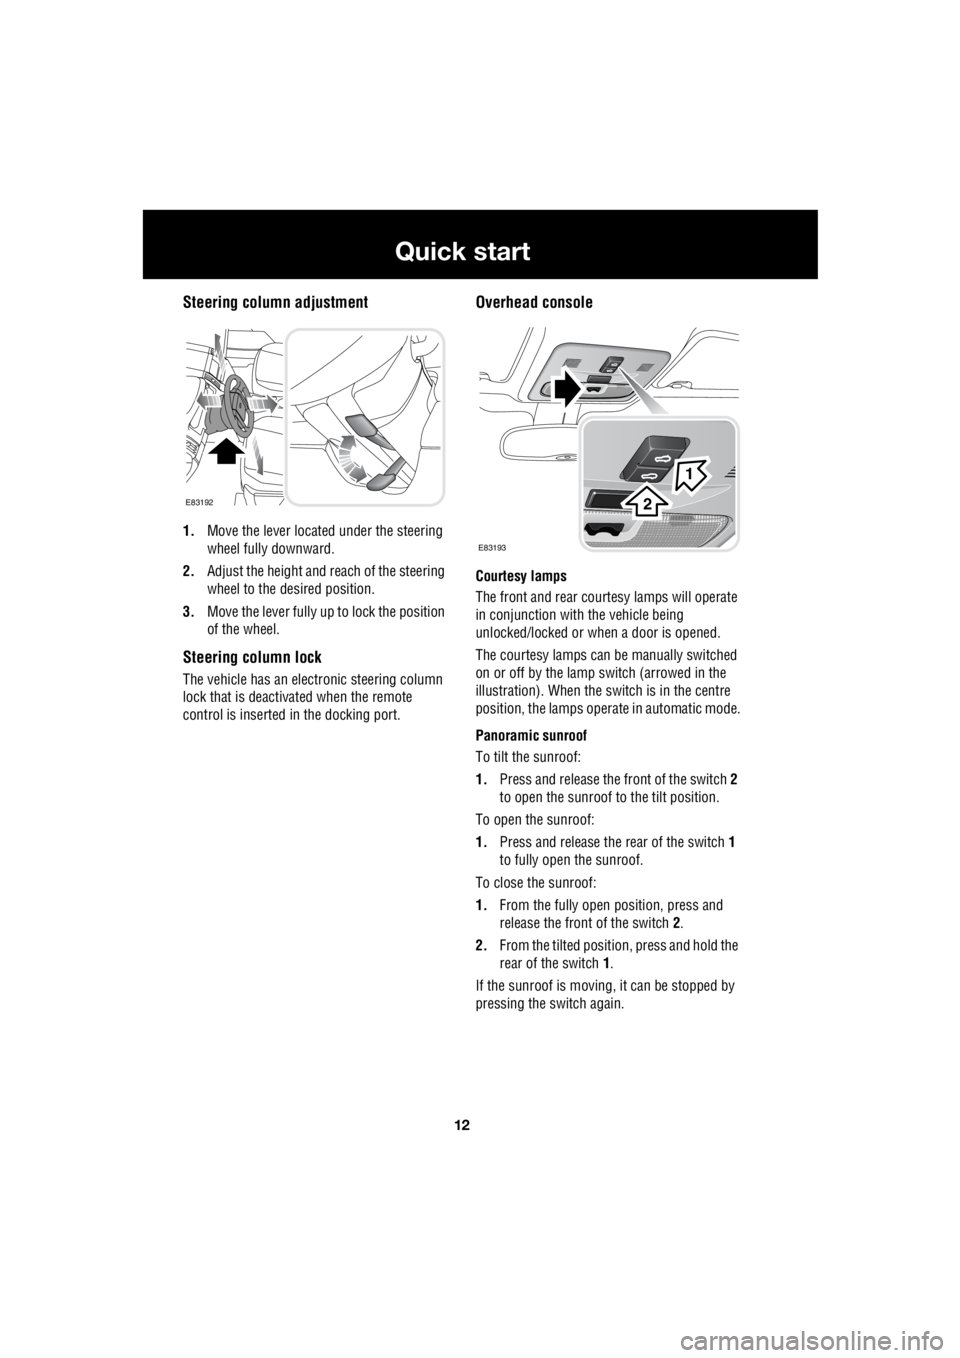
1. Move the lever located under the steering
wheel fully downward.
2. Adjust the height and reach of the steering
wheel to the desired position.
3. Move the lever fully up to lock the position
of the wheel.
Steering column lock
The vehicle has an electronic steering column
lock that is deactivated when the remote
control is inserted in the docking port.
Overhead console
Courtesy lamps
The front and rear cour tesy lamps will operate
in conjunction with the vehicle being
unlocked/locked or when a door is opened.
The courtesy la mps can be manually switched
on or off by the lamp switch (arrowed in the
illustration). When the switch is in the centre
position, the lamps opera te in automatic mode.
Panoramic sunroof
To tilt the sunroof:
1. Press and release the front of the switch 2
to open the sunroof to the tilt position.
To open the sunroof:
1. Press and release the rear of the switch 1
to fully open the sunroof.
To close the sunroof:
1. From the fully open position, press and
release the front of the switch 2.
2. From the tilted positi on, press and hold the
rear of the switch 1.
If the sunroof is moving, it can be stopped by
pressing the switch again.
E83192
E83193
1
2
Page 2738 of 3229

18
Quick start
L
1. Exterior lamps master switch
2. Direction indicators/headlam ps/trip computer switch
3. Cruise control switches
4. Instrument pack
5. Audio/telephone switches
6. Washer/wiper switch
7. Start stop engine button
8. Master unlock switch
9. Hazard warning switch
10. Master lock switch
11. Audio unit
12. Heater/air conditioning controls
13. Dynamic Stability Control (DSC) switch
14. Gear selector
15. Touch screen
16. Parking brake
17. Terrain Response control switch
18. Hill Descent Control (HDC) switch
19. Starter control unit
20. Steering column adjustment lever
21. Horn switches
22. Facia illumination dimmer control
Page 2741 of 3229
21
Quick start
R
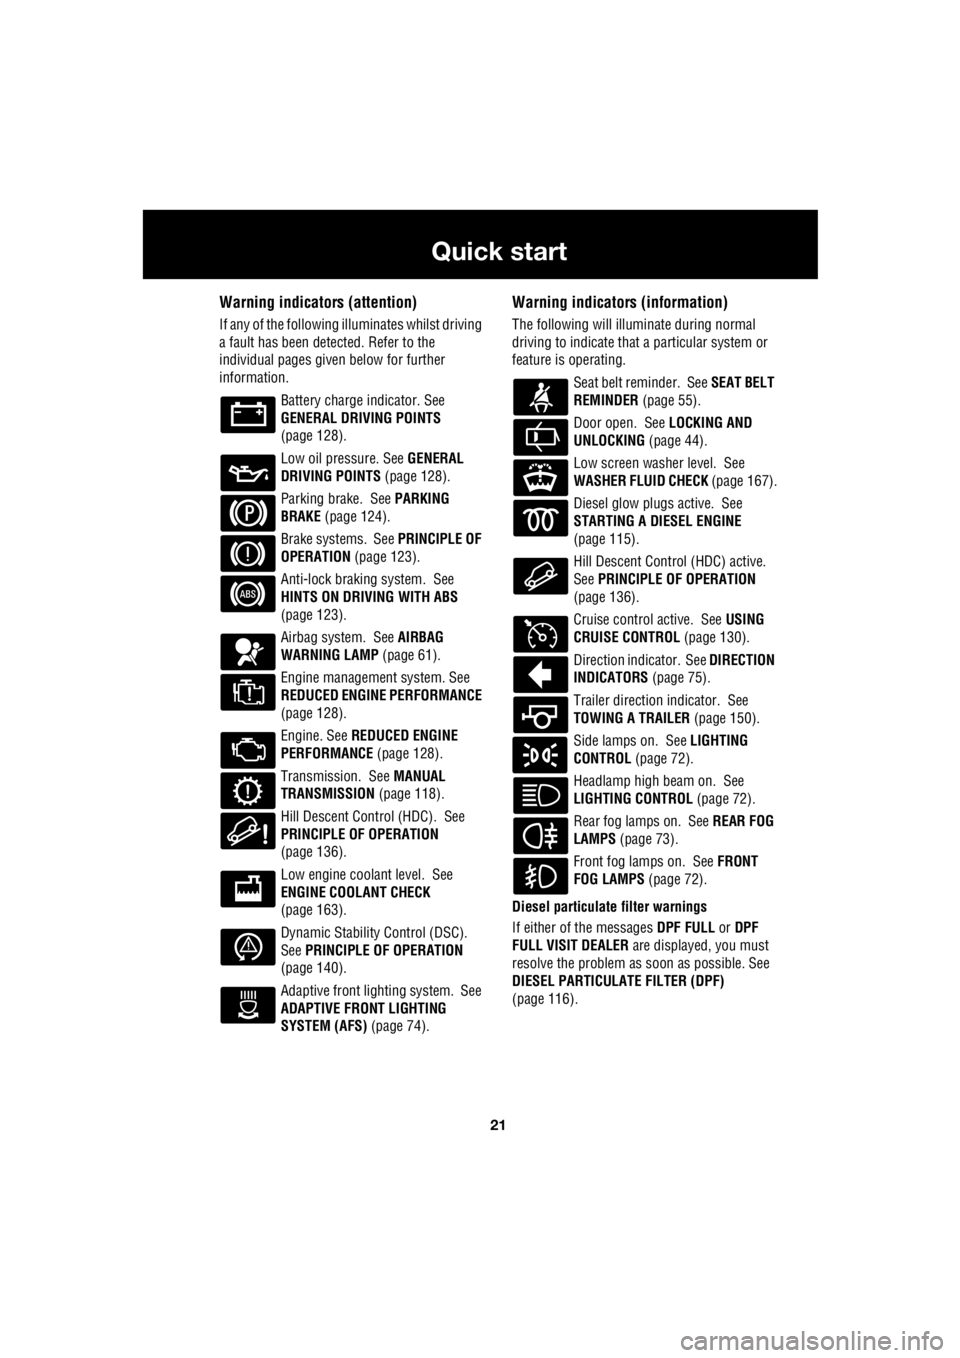
Warning indicators (attention)
If any of the following illuminates whilst driving
a fault has been detected. Refer to the
individual pages give n below for further
information.
Battery charge indicator. See
GENERAL DRIVING POINTS
(page 128).
Low oil pressure. See GENERAL
DRIVING POINTS (page 128).
Parking brake. See PARKING
BRAKE (page 124).
Brake systems. See PRINCIPLE OF
OPERATION (page 123).
Anti-lock braking system. See
HINTS ON DRIVING WITH ABS
(page 123).
Airbag system. See AIRBAG
WARNING LAMP (page 61).
Engine management system. See
REDUCED ENGINE PERFORMANCE
(page 128).
Engine. See REDUCED ENGINE
PERFORMANCE (page 128).
Transmission. See MANUAL
TRANSMISSION (page 118).
Hill Descent Control (HDC). See
PRINCIPLE OF OPERATION
(page 136).
Low engine coolant level. See
ENGINE COOLANT CHECK
(page 163).
Dynamic Stability Control (DSC).
See PRINCIPLE OF OPERATION
(page 140).
Adaptive front lighting system. See
ADAPTIVE FRONT LIGHTING
SYSTEM (AFS) (page 74).
Warning indicators (information)
The following will illuminate during normal
driving to indicate that a particular system or
feature is operating.
Seat belt reminder. See SEAT BELT
REMINDER (page 55).
Door open. See LOCKING AND
UNLOCKING (page 44).
Low screen washer level. See
WASHER FLUID CHECK (page 167).
Diesel glow plugs active. See
STARTING A DIESEL ENGINE
(page 115).
Hill Descent Control (HDC) active.
See PRINCIPLE OF OPERATION
(page 136).
Cruise control active. See USING
CRUISE CONTROL (page 130).
Direction indicator. See DIRECTION
INDICATORS (page 75).
Trailer direction indicator. See
TOWING A TRAILER (page 150).
Side lamps on. See LIGHTING
CONTROL (page 72).
Headlamp high beam on. See
LIGHTING CONTROL (page 72).
Rear fog lamps on. See REAR FOG
LAMPS (page 73).
Front fog lamps on. See FRONT
FOG LAMPS (page 72).
Diesel particulate filter warnings
If either of the messages DPF FULL or DPF
FULL VISIT DEALER are displayed, you must
resolve the problem as soon as possible. See
DIESEL PARTICULATE FILTER (DPF)
(page 116).
Page 2743 of 3229
23
Quick start
R
Direction indicators and headlamp high
beam
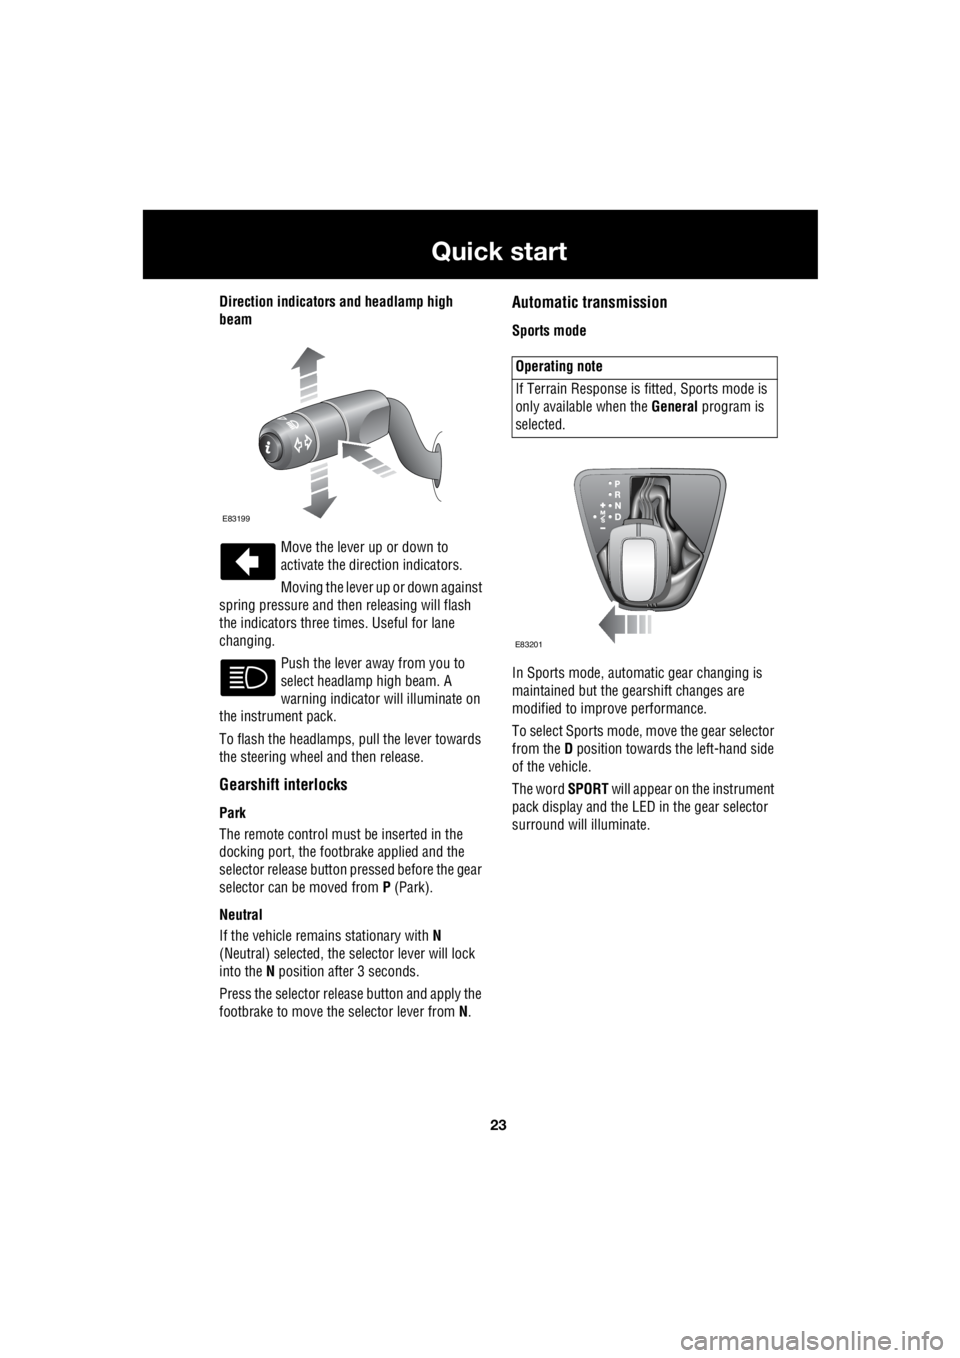
Move the lever up or down to
activate the direction indicators.
Moving the lever up or down against
spring pressure and then releasing will flash
the indicators three times. Useful for lane
changing.
Push the lever away from you to
select headlamp high beam. A
warning indicator will illuminate on
the instrument pack.
To flash the headlamps, pull the lever towards
the steering wheel and then release.
Gearshift interlocks
Park
The remote control must be inserted in the
docking port, the footbrake applied and the
selector release button pr essed before the gear
selector can be moved from P (Park).
Neutral
If the vehicle remains stationary with N
(Neutral) selected, the selector lever will lock
into the N position after 3 seconds.
Press the selector rele ase button and apply the
footbrake to move the selector lever from N.
Automatic transmission
Sports mode
In Sports mode, automatic gear changing is
maintained but the gearshift changes are
modified to improve performance.
To select Sports mode, move the gear selector
from the D position towards the left-hand side
of the vehicle.
The word SPORT will appear on the instrument
pack display and the LED in the gear selector
surround will illuminate.
E83199
Operating note
If Terrain Response is fi tted, Sports mode is
only available when the General program is
selected.
E83201
Page 2745 of 3229
25
Quick start
R
Hill Descent Control (HDC)
HDC operates in conjunction with the anti-lock
braking system to provide greater control in
off-road situations particularly when
descending severe gradients.
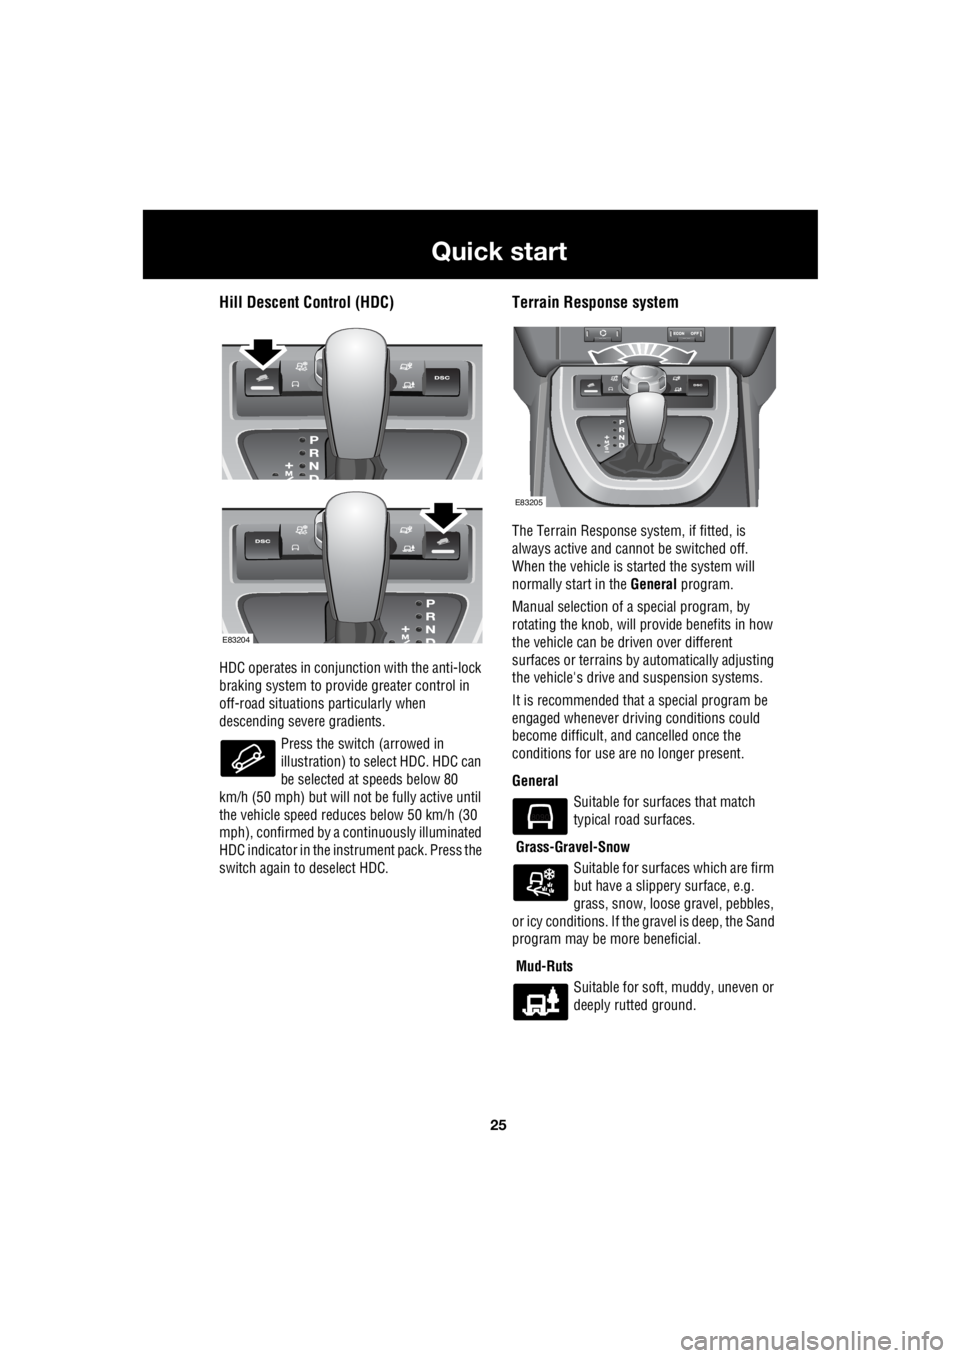
Press the switch (arrowed in
illustration) to se lect HDC. HDC can
be selected at speeds below 80
km/h (50 mph) but will not be fully active until
the vehicle speed reduc es below 50 km/h (30
mph), confirmed by a c ontinuously illuminated
HDC indicator in the instrument pack. Press the
switch again to deselect HDC.
Terrain Response system
The Terrain Response sy stem, if fitted, is
always active and cannot be switched off.
When the vehicle is st arted the system will
normally start in the General program.
Manual selection of a special program, by
rotating the knob, will pr ovide benefits in how
the vehicle can be driven over different
surfaces or terrains by automatically adjusting
the vehicle's drive and suspension systems.
It is recommended that a special program be
engaged whenever driving conditions could
become difficult, a nd cancelled once the
conditions for use are no longer present.
General Suitable for surfaces that match
typical road surfaces.
Grass-Gravel-Snow Suitable for surfaces which are firm
but have a slippery surface, e.g.
grass, snow, loose gravel, pebbles,
or icy conditions. If the gravel is deep, the Sand
program may be more beneficial.
Mud-Ruts Suitable for soft, muddy, uneven or
deeply rutted ground.
E83204
E83205
E80903
Page 2751 of 3229
31
Quick start
R
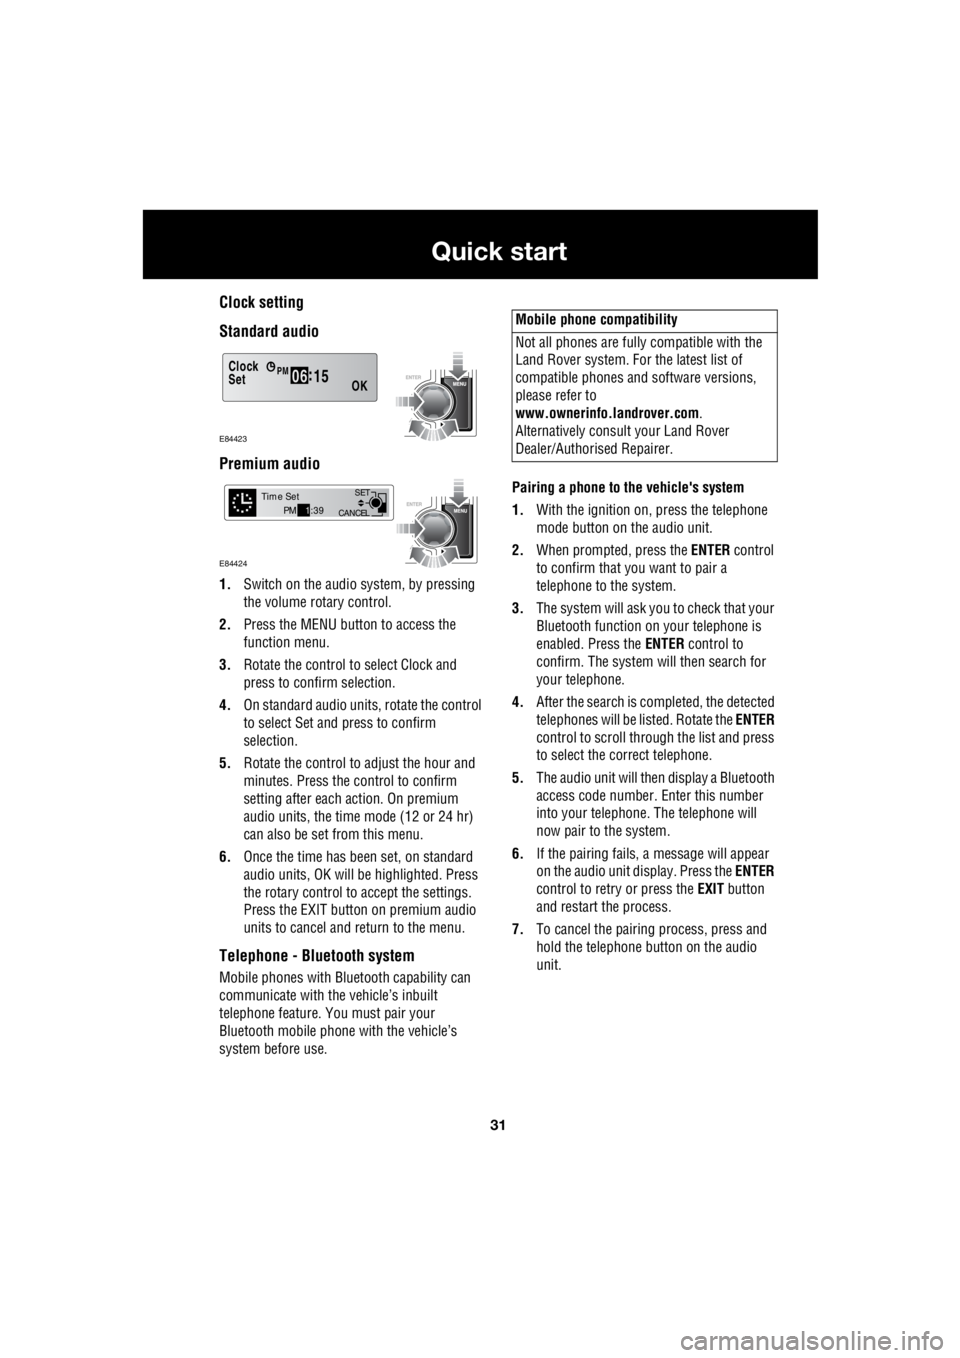
Clock setting
Standard audio
Premium audio
1. Switch on the audio system, by pressing
the volume rotary control.
2. Press the MENU button to access the
function menu.
3. Rotate the control to select Clock and
press to confirm selection.
4. On standard audio units, rotate the control
to select Set and press to confirm
selection.
5. Rotate the control to adjust the hour and
minutes. Press the c ontrol to confirm
setting after each action. On premium
audio units, the time mode (12 or 24 hr)
can also be set from this menu.
6. Once the time has been set, on standard
audio units, OK will be highlighted. Press
the rotary control to accept the settings.
Press the EXIT button on premium audio
units to cancel and return to the menu.
Telephone - Bluetooth system
Mobile phones with Blue tooth capability can
communicate with the vehicle’s inbuilt
telephone feature. You must pair your
Bluetooth mobile phone with the vehicle’s
system before use. Pairing a phone to the vehicle's system
1. With the ignition on, press the telephone
mode button on the audio unit.
2. When prompted, press the ENTER control
to confirm that you want to pair a
telephone to the system.
3. The system will ask you to check that your
Bluetooth function on your telephone is
enabled. Press the ENTER control to
confirm. The system will then search for
your telephone.
4. After the search is completed, the detected
telephones will be listed. Rotate the ENTER
control to scroll through the list and press
to select the correct telephone.
5. The audio unit will then display a Bluetooth
access code number. Enter this number
into your telephone. The telephone will
now pair to the system.
6. If the pairing fails, a message will appear
on the audio unit display. Press the ENTER
control to retry or press the EXIT button
and restart the process.
7. To cancel the pairing process, press and
hold the telephone button on the audio
unit.
Clock
OK06 :
15SetPM
E84423
CANCEL SET
Time SetPM
1:39
E84424
Mobile phone compatibility
Not all phones are fully compatible with the
Land Rover system. For the latest list of
compatible phones and software versions,
please refer to
www.ownerinfo.landrover.com .
Alternatively consult your Land Rover
Dealer/Authorised Repairer.
Page 2753 of 3229
33
Filling station information
R
Filling station informationFILLING STATION INFORMATION
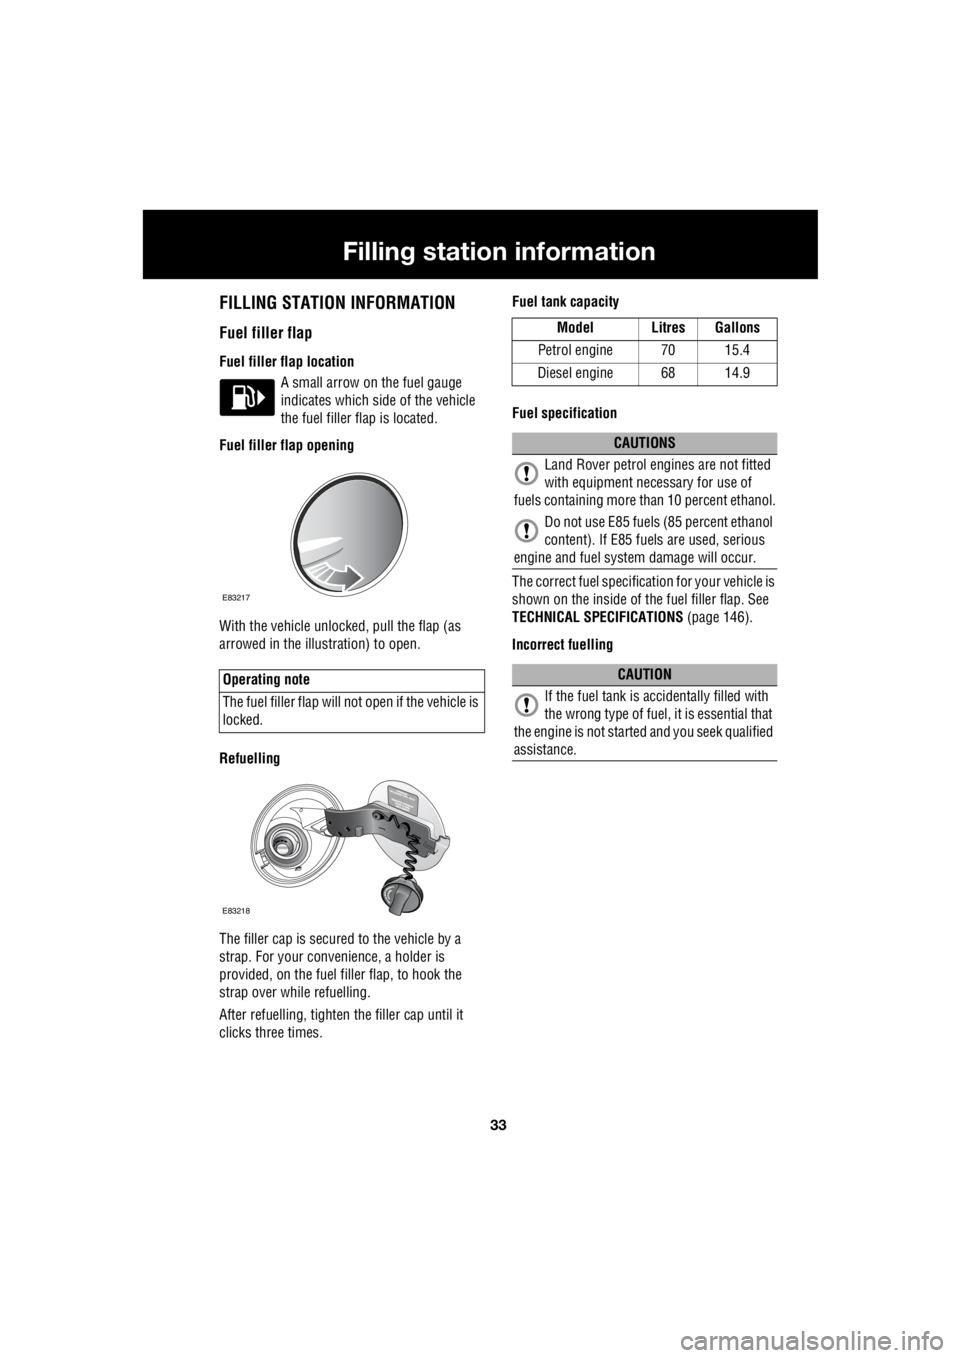
Fuel filler flap
Fuel filler flap location A small arrow on the fuel gauge
indicates which side of the vehicle
the fuel filler flap is located.
Fuel filler flap opening
With the vehicle unlocked, pull the flap (as
arrowed in the illustration) to open.
Refuelling
The filler cap is secured to the vehicle by a
strap. For your conv enience, a holder is
provided, on the fuel filler flap, to hook the
strap over while refuelling.
After refuelling, tighten the filler cap until it
clicks three times. Fuel tank capacity
Fuel specification
The correct fuel specification for your vehicle is
shown on the inside of the fuel filler flap. See
TECHNICAL SPECIFICATIONS (page 146).
Incorrect fuelling
Operating note
The fuel filler flap will not open if the vehicle is
locked.
E83705
E83217
E83218
Model Litres Gallons
Petrol engine 70 15.4
Diesel engine 68 14.9
CAUTIONS
Land Rover petrol engines are not fitted
with equipment necessary for use of
fuels containing more than 10 percent ethanol.
Do not use E85 fuels (85 percent ethanol
content). If E85 fuels are used, serious
engine and fuel system damage will occur.
CAUTION
If the fuel tank is accidentally filled with
the wrong type of fuel, it is essential that
the engine is not starte d and you seek qualified
assistance.
Page 2756 of 3229
Introduction
36
L
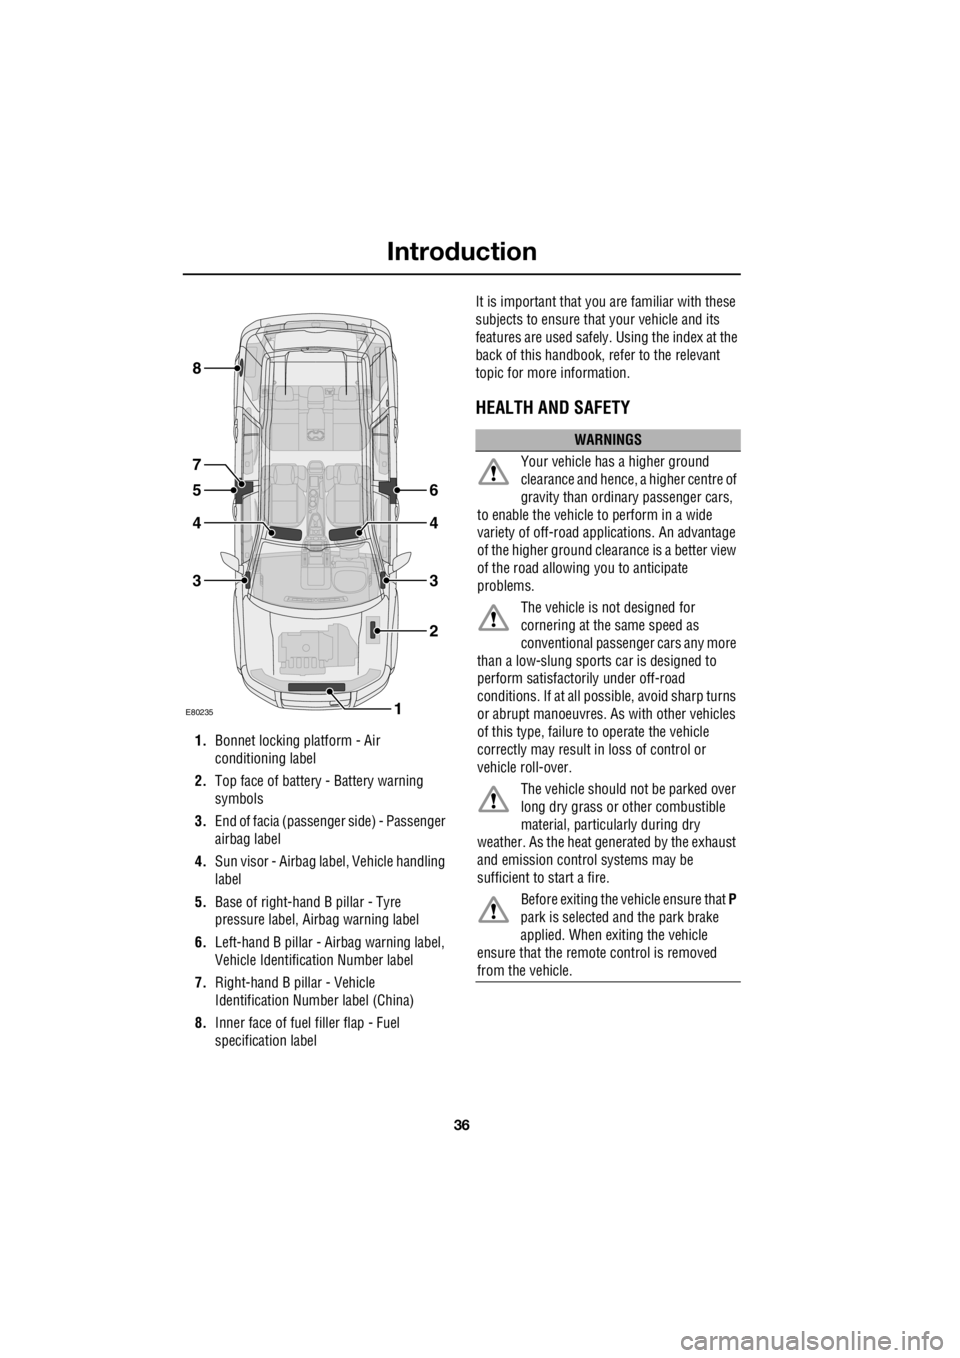
1. Bonnet locking platform - Air
conditioning label
2. Top face of battery - Battery warning
symbols
3. End of facia (passenger side) - Passenger
airbag label
4. Sun visor - Airbag label, Vehicle handling
label
5. Base of right-hand B pillar - Tyre
pressure label, Ai rbag warning label
6. Left-hand B pillar - Airbag warning label,
Vehicle Identification Number label
7. Right-hand B pillar - Vehicle
Identification Number label (China)
8. Inner face of fuel filler flap - Fuel
specification label It is important that you are familiar with these
subjects to ensure that your vehicle and its
features are used safely. Using the index at the
back of this handbook, re fer to the relevant
topic for more information.
HEALTH AND SAFETY
E80235
6
4
3
2
1
5
4
3
8
7
WARNINGS
Your vehicle has a higher ground
clearance and hence, a higher centre of
gravity than ordina ry passenger cars,
to enable the vehicle to perform in a wide
variety of off-road app lications. An advantage
of the higher ground clea rance is a better view
of the road allowing you to anticipate
problems.
The vehicle is not designed for
cornering at the same speed as
conventional passenge r cars any more
than a low-slung sports car is designed to
perform satisfactori ly under off-road
conditions. If at all possible, avoid sharp turns
or abrupt manoeuvres. As with other vehicles
of this type, failure to operate the vehicle
correctly may result in loss of control or
vehicle roll-over.
The vehicle should no t be parked over
long dry grass or other combustible
material, particul arly during dry
weather. As the heat ge nerated by the exhaust
and emission control systems may be
sufficient to start a fire.
Before exiting the vehicle ensure that P
park is selected and the park brake
applied. When exiting the vehicle
ensure that the remote control is removed
from the vehicle.