Page 2397 of 3229
further act ionrequired.NoReplace theglass panel(The drip lip isnot aservi ceablepart ).
Roof opening panel blind rewind procedure - Vehicles built up to VIN 154971
1. Close t he roof opening panel blind (but do not lat ch t he handle t o the frame ) .1.
• NOTE: Rot at e the roof opening panel in t he direct ions illus trat ed.
2. Releas e the roof opening panel blind from the runners.
Rota te t he left -hand e dge count er clockwise and releas e the right -hand edge from t he fra me.
2.
3. Open the roof opening panel blind.3.
Page 2398 of 3229
4. Releas e the roof opening panel blind from the mount ing bracke t and remove the roof opening panel blind from the vehicl e.
1. Push the roof ope ning panel blind in t o the frame t o releas e t he left -hand spring axle .2. Rot at e the roof opening panel blind count er clockwis e.3. Remove t he roof ope ning panel blind.
4.
• NOTE: The roof ope ning panel must be rewound 7 rotat ions .
5. Rewind the roof opening panel.
1. Using a s uit able tool, hol d a nd rotat e t he spring axle.2. Push the spring axle in t o the roof ope ning panel blind and al ign the s pring axle locking holes .3. Using s uit able pin or paperclip (as illustrat ed), lock t he spring axle.
5.
• NOTE: Make sure t hat the s pring axle is correct ly located into t he roof opening panel frame.
• NOTE: Make sure t hat the s uit able pin or paperclip rema ins in place while ins talling t he roof opening pa nel blind.
6. Inst all the roof ope ning panel blind t o t he frame.
6.
Page 2399 of 3229
Remove t he suit able pin or pape rclip from the roof opening panel blind once the roof opening panel has bee n correct lyinst alled.
7. Inst all the roof ope ning panel blind s liders to t he runners.
1. Push the roof ope ning panel blind right -hand slider in t o the runner.2. Inst all t he left -hand s lider clockwise t o t he runner.
7.
8. Open the roof opening panel blind and check for corre ct operati on.8.
Roof opening panel blind rewind procedure - Vehicles built from VIN 154972
1. Close t he roof opening panel blind.1.
• NOTE: Rot at e the roof opening panel in t he direct ions illus trat ed.
2. Releas e the roof opening panel blind from the runners.
Rota te t he left -hand e dge count er clockwise and releas e the right -hand edge from t he fra me.
2.
Page 2401 of 3229
• NOTE: Make sure t hat the s pring axle is correct ly located into t he roof opening panel frame.
6. Inst all the roof ope ning panel blind t o t he frame.
6.
7. Inst all the roof ope ning panel blind s liders to t he runners.
1. Push the roof ope ning panel blind right -hand slider in t o the runner.2. Inst all t he left -hand s lider clockwise t o t he runner.
7.
8. Open the roof opening panel blind and check for corre ct operati on.8.
Page 2405 of 3229

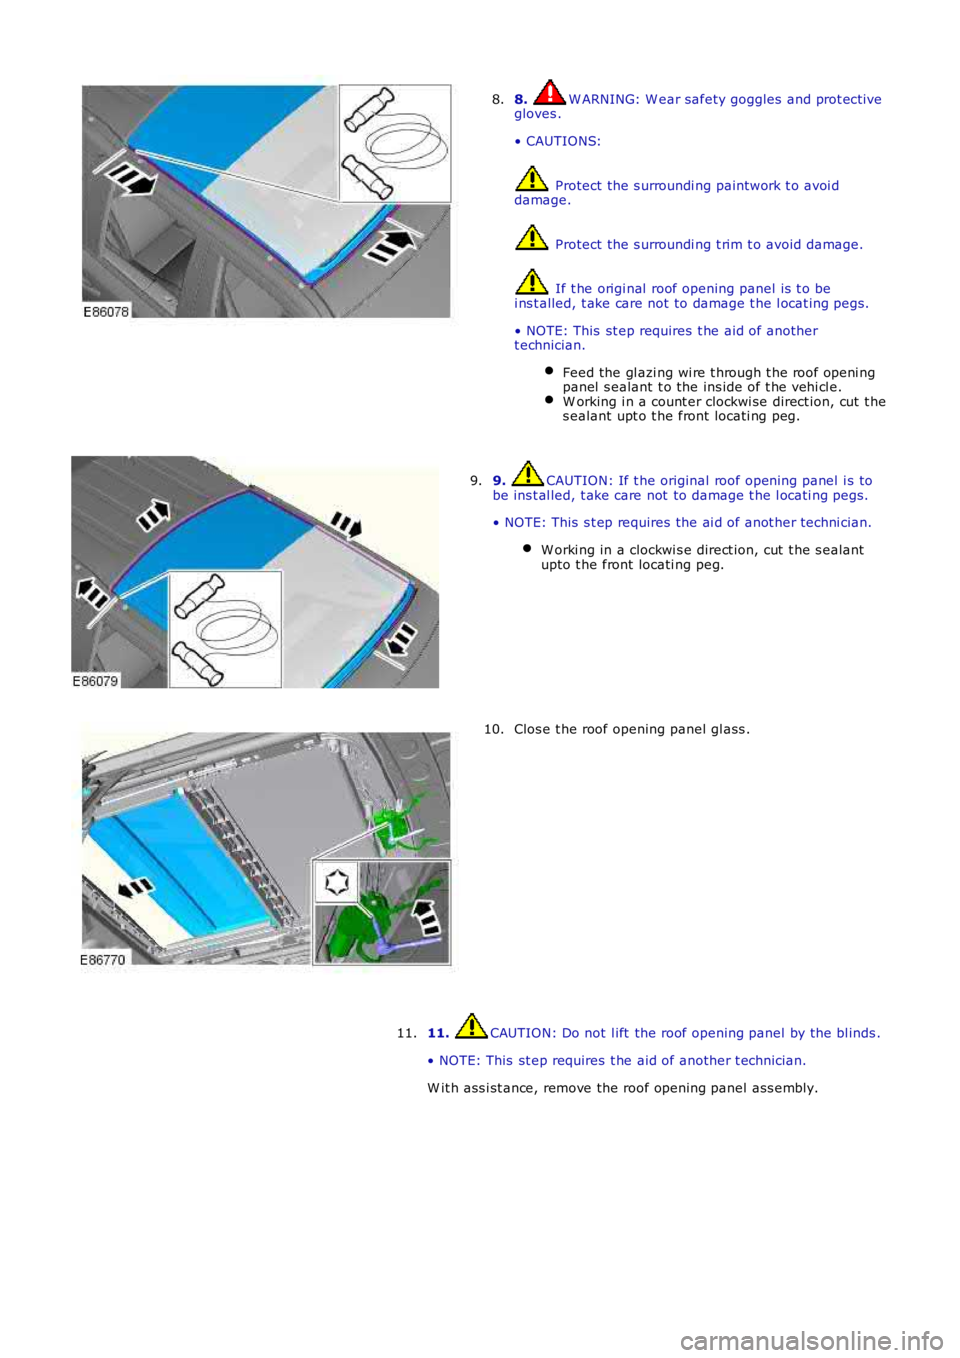
8. W ARNING: W ear safety goggles and prot ecti vegloves .
• CAUTIONS:
Protect the s urroundi ng paintwork t o avoi ddamage.
Protect the s urroundi ng t rim t o avoid damage.
If t he origi nal roof opening panel is t o bei ns t alled, t ake care not to damage t he l ocat ing pegs.
• NOTE: This st ep requires t he aid of anothert echnician.
Feed the gl azi ng wi re t hrough t he roof openi ngpanel s ealant t o the ins ide of t he vehi cl e.W orking i n a count er clockwi se direct ion, cut t hes ealant upt o t he front locati ng peg.
8.
9. CAUTION: If t he original roof openi ng panel i s tobe ins t al led, t ake care not to damage t he l ocati ng pegs.
• NOTE: This s t ep requires the ai d of anot her techni cian.
W orki ng in a clockwi s e direct ion, cut t he s ealantupto t he front locati ng peg.
9.
Clos e t he roof opening panel gl ass .10.
11. CAUTION: Do not l ift the roof opening panel by the bl inds .
• NOTE: This st ep requires t he aid of another t echnician.
W it h ass i st ance, remove the roof opening panel ass embly.
11.
Page 2427 of 3229
Clos e t he glas s roof panel bl ind.11.
12. CAUTIONS:
Do not al low the gl as s roof panel blind tube t orot ate.
Do not releas e t he metal pin from i ts locat or unt ilt he locking pin is i n place.
Carefully sl ide t he glas s roof panel bl ind t ube t ot he left.Releas e t he plas ti c pin from it s l ocat or.
12.
Us ing a s ui table pin (1mm diamet er), l ock theglas s roof panel bl ind.Releas e t he metal pin from i ts locat or.
13.
Remove t he glas s roof panel bl ind.14.
Installation
Inst all t he glas s roof panel bl ind s li der feet to the guides .1.
Page 2428 of 3229

2. CAUTION: Do not all ow t he glas s roof panel bl ind t ube t orot ate unt il t he plas t ic pin is s ecure i n it s l ocat or.
Secure t he met al pi n to it s locator.Remove t he locki ng pin from t he glas s roof panel bl ind.
2.
Carefully sl ide t he glas s roof panel bl ind t ube t o t he left .Ali gn and s ecure t he plas ti c pin t o i ts l ocat or.
3.
Open t he glas s roof panel bl ind.4.
Secure t he headl iner.5.
At tach t he front door s eal s .6.
At tach t he rear of the headli ner.7.
Inst all t he pas s enger as s is t handl es .8.
Inst all t he s un vi s ors .9.
Inst all t he int erior rear vi ew mi rror.
Refer t o: Int erior Rear View Mirror (501-09 Rear Vi ew Mi rrors ,Removal and Ins tall ati on).
10.
Inst all t he D-pi llar t ri m panels .
Refer t o: D-Pi llar Trim Panel (501-05 Int eri or Trim andOrnament ati on, Removal and Ins tal lat ion).
11.
Inst all t he C-pi llar t ri m panels .
Refer t o: C-Pil lar Tri m Panel (501-05 Int erior Trim andOrnament ati on, Removal and Ins tal lat ion).
12.
Inst all t he B-pi llar t ri m panels .
Refer t o: B-Pil lar Upper Trim Panel (501-05 Interior Tri m andOrnament ati on, Removal and Ins tal lat ion).
13.
Inst all t he A-pi llar t ri m panels .
Refer t o: A-Pil lar Tri m Panel (501-05 Int erior Trim andOrnament ati on, Removal and Ins tal lat ion).
14.
Page 2431 of 3229
Clos e t he roof opening panel bl ind.
11. 12.
CAUTIONS: Do not al low the roof opening panel bl ind t ube t o
rot ate. Do not releas e t he metal pin from i ts locat or unt il
t he locking pin is i n place.
Carefully sl ide t he roof opening panel bl ind t ube
t o t he ri ght . Releas e t he plas ti c pin from it s l ocat or.12.
Us ing a s ui table pin (1 mm di amet er), lock t he
roof opening panel bl ind. Releas e t he metal pin from i ts locat or.13.
Remove t he roof openi ng panel bli nd.
14.
Installation Inst all t he roof openi ng panel bli nd s li der feet t o t he guides .
1.