2006 LAND ROVER FRELANDER 2 oil level
[x] Cancel search: oil levelPage 30 of 3229
Air condi ti oning unit s mus t not be li ft ed by t hei r hos es , pipes or capil lary li nes .Hos es and lines mus t not be s ubjected t o any t wis t or s tress ; t he efficiency of the s ys tem wil l be impai red by ki nksor res trict ions. Make s ure that hos es are correct ly pos it ioned before t ightening coupli ngs , and make s ure that allclips and support s are ut il is ed.Flexible hos es s houl d not be pos it ioned cl oser t han 100 mm (4.0 i n) t o t he exhaus t manifold unl es s protected byheat shi el ding.Complet ed ass embli es mus t be checked for refrigerat ion l ines t ouching met al panels . Any direct contact ofcomponents and panels may t rans mit nois e and s o must be el iminated.The appropri at e t orque wrench must be us ed when t ight eni ng refri gerant connect ions to t he s ti pul at ed value. Anaddi ti onal s panner mus t be us ed t o hold t he union t o prevent t wis ti ng of the pi pe when t ightening connect ions .Before connecti ng any hos e or pipe, make s ure that refri gerant oil is appli ed t o t he seat of t he new O-ri ngs , BUTNOT to the t hreads of the connect ion.All prot ect ive pl ugs or caps mus t remai n i n place in the component unt il i mmediat el y pri or to connect ion.Make s ure component s are at room temperat ure before uncappi ng/unpl uggi ng, t o prevent condens at ion of moi s turefrom the ai r that enters it .W hen di sconnect ing, immedi ately pl ug or cap all air condi ti oni ng pipes t o prevent ingres s of dirt and mois t ure i ntot he sys t em.Component s mus t not remain uncapped/unpl ugged, if a sys t em has been left uncapped/unpl ugged for 20 mi nut esor longer, a new recei ver/drier mus t be i ns t alled.The receiver/dri er contai ns des i ccant which absorbs mois t ure. It must be pos it ively sealed at al l ti mes . Areceiver/dri er t hat has been left uncapped for longer t han 20 mi nutes mus t not be used; i nst all a new uni t.The receiver/dri er s hould be the l ast component connect ed to the sys tem t o make s ure opt imum dehydrat ion andmaximum moi st ure protecti on of the sys tem.W henever a component of t he refrigerat ion s yst em is repl aced, it will al so be neces sary t o ins t al l a newreceiver/dri er uni t.Us e alcohol and a cl ean li nt -free cl oth to cl ean di rt y connecti ons.Make s ure t hat all new part s i ns t alled are marked for us e wit h R134a.W hen a major repai r has been complet ed, a leak t es t s hould be conduct ed; refer t o t he Repai rs Secti on of thi smanual for the correct procedure.
Refrigerant oil
CAUTION: Refrigerant oil eas il y absorbs water and mus t not be s tored for long periods. Do not pour unusedrefri gerant oi l back i nto the container. Always use an approved refrigerant oi l.
W hen replaci ng component s in the ai r condit ioning s ys tem, drai n t he refri gerant oi l from t he component being replacedint o a graduat ed cont ainer. On as s embly, add t he quant it y of refri gerant oi l drained t o t he new component - See Ai rCondi ti oni ng Compres s or Repl acement in this Sect ion.
Compres s or
A new compress or is sealed and press uris ed wit h Ni trogen gas . W hen i nst all ing a new compres sor, sl owly releas e thes eal ing cap; gas pres sure s houl d be heard to vent as t he s eal i s broken.
CAUTION: A new compress or s houl d always be s ealed and could be pres suris ed wit h ni trogen gas . To avoid pos si bleoil l os s , rel eas e t he s ealing cap(s ) s lowl y. Do not remove t he cap(s ) unt il i mmediatel y pri or to connect ing t he aircondi ti oni ng pipes t o the compress or.
Rapid refrigerant dis charge
If the ai r condit ioning s ys tem is i nvol ved in accident damage and t he s yst em is punct ured, t he refri gerant will di schargerapi dl y. The rapid di scharge of refrigerant wil l als o res ult in t he los s of mos t of the oi l from t he s yst em. The compres sormus t be removed and al l the remaining oi l in t he compres s or drained and refil led as i nst ruct ed in t he air condit ionings ect ion of t his manual.
Precaut ions for refrigerant recovery, recycl ing and rechargi ng
W hen t he air condit ioning s yst em is recharged, any exi s ti ng refri gerant i s first recovered from t he s ys t em and recycled.The s ys t em i s t hen charged wit h the required weight of refrigerant and volume of refrigerant oil .
W ARNING: Refri gerant mus t al ways be recycl ed before reus e t o make s ure that the purit y of the refrigerant i s highenough for s afe us e i n the ai r condit ioni ng sys t em. Recycl ing s hould al ways be carried out wit h equipment which i s des i gncert ifi ed by Underwrit er Laborat ory Inc. for compl iance wit h SAE J1991. Ot her equipment may not recycle refrigerant t o t herequired level of purit y.
• CAUTIO NS:
A R134a Refri gerant Recovery Recycli ng Rechargi ng Stat ion mus t not be us ed wit h any ot her t ype of refrigerant .Refrigerant R134a from domes ti c and commercial s ources mus t not be used i n mot or vehi cl e air condi ti oni ng s yst ems .
The s yst em must be evacuat ed i mmediat el y before recharging commences. Del ay bet ween evacuati on and rechargingis not permit ted.
Air Condit ioning Compress or Repl acement
A new compress or is suppli ed fi ll ed wit h a full charge (X cm³) of refrigerant oi l.
A calculat ed quant it y of oil mus t be drai ned from t he new compres s or before i nst all ing. To cal cul at e t he quant it y of oil t obe drai ned:
Remove the drain pl ug from the ol d compres sor.
Page 39 of 3229
Health Protection Precautions
Avoi d prol onged and repeat ed cont act wit h oil s, parti cularly us ed engine oi ls .W ear prot ect ive clot hing, including i mpervious gl oves where practi cable.Do not put oily rags i nt o pocket s .Avoi d contami nat ing cl ot hes, parti cularly underpants , wi th oi l.Heavi ly s oil ed clot hi ng and oil -i mpregnated foot wear s hould not be worn. Overall s mus t be cleaned regularly.First Ai d t reatment s hould be obt ained i mmediat el y for open cuts and wounds .Us e barrier creams , appl yi ng t hem before each work peri od, t o help the removal of oil from t he s ki n.W as h wi th soap and wat er to make s ure al l oi l is removed (s kin cl eans ers and nail brushes wi ll help). Preparati onscont aining lanol ine replace the nat ural s ki n oil s which have been removed.Do not us e gasol ine (pet rol ), keros ene (paraffin), di esel fuel (gas oi l), thi nners or s ol vent s for cleaning skin.If skin dis orders develop, obtain medical advice wi thout delay.W here practi cable, degreas e component s pri or t o handling.W here there is a ri s k of eye cont act , eye protecti on s houl d be worn, for exampl e chemical goggles or face s hiel ds ;in addi ti on an eye was h facil it y s houl d be provided.
Environmental Precautions
This s ecti on provides general informati on which can help t o reduce t he environment al i mpact s from the act ivit ies carriedout in workshops .
Emis s ions t o air
Many of the act ivit ies t hat are carried out i n works hops emit gas es and fumes whi ch can contribut e to global warmi ng,depl eti on of the ozone layer and/or the format ion of phot ochemical s mog at ground level. By cons ideri ng how t he works hopact ivi ti es are carried out , thes e gases and fumes can be mi nimi s ed, t hus reduci ng t he impact on t he envi ronment.
Exhaus t fumes
Runni ng car engines i s an es sent ial part of works hop act ivi ti es and exhaust fumes need t o be venti lated to at mos phere.However, the amount of t ime engi nes are runni ng and the pos it ion of t he vehi cle s hould be carefully cons idered at al lt imes , to reduce the releas e of poi s onous gas es and mini mis e t he i nconveni ence t o peopl e l iving nearby.
Solvent s
Some of t he cl eani ng agent s us ed are sol vent based and wil l evaporate rapidl y to atmos phere i f used carel ess l y, or i fcont ainers are l eft unseal ed. Al l contai ners mus t be firmly cl os ed when not requi red and s olvent should be used sparingly.W herever poss i bl e, sol vent s havi ng a l ow t oxi ci ty and flammabi li ty should be sel ect ed. Al ways foll ow t he ins t ructi onss uppl ied by t he s olvent manufact urer. Si mil arl y, many pai nt s are s olvent bas ed and the s pray s houl d be us ed in such away as t o reduce emi ss i ons t o a mini mum.
Refrigerant
It is i ll egal t o rel eas e any refrigerant int o t he atmos phere. Dis charge and repl acement of thes e mat eri al s from aircondi ti oni ng uni ts should onl y be carried out us ing t he appropri at e equipment .
Dis charges to water
Mos t works hops wi ll have t wo s ys t ems for di schargi ng wast e wat er - st orm drai ns and foul drains . Storm drains s houl d onlyreceive clean wat er i.e. rainwat er. Foul drai ns wil l accept many of the normal was t e wat er i .e. was hing wat er, detergent sand domest ic type was te BUT NOT oi l, petrol, s olvent , acids , hydraul ic fluid, anti freeze and si mil ar fl ui ds. If in doubt ,always cons ult the l ocal authori ty or wat er company.
Spill ages
Every precauti on mus t be taken t o prevent s pi ll age of oi l, fuel , sol vent s etc., reachi ng the drains . All handl ing of s uchmat erial s mus t take pl ace wel l away from drai ns and preferably i n an area wit h a s uit able contai ni ng wall t o preventdis charge int o drai ns or watercours es . If a spi llage occurs , it mus t be s oaked up immedi ately us i ng a s pil l ki t whereprovided.
Checkli s t
Spillage prevention:
Store li quids in a s ecure area.
Make s ure t hat taps on l iquid cont ai ners are s ecure and cannot be acci dent ally turned on.
Prot ect bulk st orage t anks from vandal is m by locki ng the val ves .
Trans fer li quids from one cont ai ner t o another i n an area away from open drai ns .
Ensure li ds are replaced s ecurel y on cont ainers .
Have s pi ll kit s availabl e near t o point s of s torage and liquid handl ing areas .
Spill Ki ts
Speci al mat eri als are avai lable to abs orb a number of di fferent subs tances. They can be in granular form, ready t o us e andare suppli ed in sui table cont ai ners . Dis posal of used spi ll absorbing mat eri al i s deal t wit h i n W as t e management .
Land contamination
Oil s , fuels and s olvents etc. can cont aminate any soi l wit h which t hey come int o cont act . Such materials MUST never bedis posed of by pouri ng on t o s oil and every precauti on mus t be t aken t o avoid s pil lage reaching s oil . W as te materials
Page 44 of 3229
Publi s hed: 11-May-2011
General Information - Road/Roller Testing
Des cript ion and Operat ion
Road or roll ing road t es t ing may be carri ed out for various reasons and a procedure det ail ing pre-t es t checks , throughengi ne s tarti ng and s topping, pre-driving checks , on-t es t checks to final checks on complet ion of t he tes t are given.
Unles s complete vehi cl e performance is bei ng checked, t he ful l road t est procedure need not be carried out . Ins tead, t hos eit ems part icularly relevant t o t he s yst em(s) bei ng checked can be ext racted.
Pre-Test Checks
W ARNING: If t he brake s yst em hydraul ic fluid level i s l ow, pedal travel i s exces si ve or a hydraulic leak is found, donot att empt to road t est t he vehicle unt il t he reas on for t he low fl ui d l evel, excess ive pedal travel or hydraulic leak isfound and rect ified.
It is s ugges t ed that pre-t es t and funct ional t es ts of t hose sys tems/circuit s whi ch affect t he safe and l egal operati ons oft he vehi cl e, s uch as brakes , light s and s teeri ng, should al ways be carri ed out before the road or roll ing road tes t .
Engi ne oil l evelEngi ne cool ant levelTires, for correct pres sure, compat ible types and tread patt erns , and wear wi thi n limi ts .There i s s ufficient fuel in the t ank to compl ete the t est .Check al l around the engine, t rans mis s ion and under the vehicle for oil , coolant , hydraul ic and fuel l eaks . Make anote of any apparent leaks and wipe off t he surrounding areas t o make it easi er to identi fy t he extent of the leakon complet ion of t he tes t.
Starting the Engine
• NOTE: On i nit ial dri ve away from cold and wit hi n t he fi rs t 1.5 km (1 mile), do not depress accelerat or pedal beyond halft ravel unt il t he vehi cl e has att ained a minimum s peed of 25 km/h (15 mil es /h). Never operat e at high engi ne speed or wi tht he accelerat or pedal at ful l travel whil st the engine i s cold.
With the ignition off, check:
The parking brake is appli ed.Automatic transmission: The s el ect or lever is i n 'P' - PARK.Manual transmission: The gear l ever i s in NEUTRAL.All i ns t rument gauges read zero.
With the ignition on, check:
Igni ti on cont roll ed warni ng li ght s come on.Engi ne t emperature gauge regis t ers a readi ng compat ibl e wi th t he engine t emperat ure.Fuel gauge regi st ers a reading appropriate to the fuel l evel i n t he tank.The operati on of the parki ng brake warning l ight and fl ui d l evel warni ng indicator light.
On Road Test Check:
CAUTION: At commencement of road tes ti ng, check the brake operati on while s ti ll travel li ng at low speed beforecont inuing wit h t he tes t. If t he brakes pul l to one si de, or appear to be ot herwi se fault y, do not cont inue wit h t he roadt es t unti l the fault has been found and rect ified.
The parking brake releas es completel y.Gear changing i s s mooth, and t here are no abnormal noi s es or vi brati ons from t he t rans mis s ion.The engi ne power out put is s ati s factory, accel erati on is smoot h and accel erator pedal operat ion is not s ti ff orheavy, and engi ne s peed ret urns t o idl e correctl y.There i s no exces s ive or abnormall y colored s moke from t he engi ne under normal driving, heavy l oad or overruncondi ti ons .Steering operat ion i s s moot h, accurat e, not exces s ively heavy or wit h exces s ive free pl ay or vibrat ion. Does not pul lt o one s ide and s elf centres smoot hly after corneri ng.All i ns t rument s regis t er the correct readi ngs and operate correctl y.Swit ches and controls operat e s moothl y and posi ti vel y, warning or i ndi cat or light s operate correctl y and thedirect ion i ndi cat or cont rol s elf cancels when the s t eering i s ret urned t o t he s traight ahead pos it ion.Heati ng and vent il at ion sys tems work correct ly and effect ively.Brakes operate efficientl y.
Brake Testing
Avoi d brake t es ti ng on busy roads where i t can caus e i nconveni ence or danger t o ot her road users.
CAUTION: Brake t es ti ng which i ncludes heavy brake appl icati ons should not be carri ed out wit h new brake pads /dis csunti l the component s have bedded-i n. New brake fri ct ion component s wi ll not reach ful l efficiency unt il t he beddi ng-inprocess is complet e. Not e t hat when new parking brake shoes or rear brake di scs have been ins t al led, it i s es sent ial thatt he 'beddi ng-in' procedure i s carri ed out.For addit ional informat ion, refer t o: Parking Brake Shoes Bedding-In (206-05 Parking Brake and Actuati on, GeneralProcedures).
Test t he brakes at s everal speeds wit hin the normal operat ing range usi ng both light and heavy pedal pres s ure. Note anyt endency to snat ch, pull or drag, and any undue del ay in appli cat ion or release.
Page 163 of 3229
Publ is hed: 24-Jun-2011
Jacking and Lifting - Jacking
Des cript ion and Operat ion
General
W ARNING: The foll owing i nst ructi ons mus t be adhered to before rais i ng the vehicle off t he ground:
Posi ti on vehi cl e on a sol id, level surface.Apply t he parking brake.Select 'P' - PARK on automat ic t rans mis s ion sel ect or.Select 'N' - Neutral on manual t rans mis s ion.
W ARNING: If t he dri ve s haft(s ) are t o be di sconnect ed, i t wil l be neces s ary t o rai s e all four wheels off the ground inorder t hat t he s haft (s ) can be rot ated. DO NOT us e the cus tomer jack and ens ure that t he vehi cl e is adequatel y s upport edon axle s t ands . W i th the vehicle rai sed, it will be necess ary to releas e t he park brake and sel ect Neutral - 'N' in the mai nt ransmis s ion t o enabl e t he dri ve s haft(s ) to be rot ated.
• CAUTIO NS:
To avoid damage t o t he underbody components of t he vehi cle, the foll owing i ns t ructions mus t be adhered to:
Do not pos it ion jacks or axle s t ands under the foll owing component s :
Body s truct ure ot her t han any approved jacki ng or li ft ing point sRear subframeBumpersFuel l inesFuel t ankBrake l inesFront or rear s uspens ion armsSteering l inkageRear di fferenti al uni tTrans mis s ionEngi ne oil pan - See not e below
• NOTE: For certain repair operat ions, i t may be necess ary to support t he engine under t he oil pan. In thi s cas e, a bl ock ofhardwood or a rubber pad mus t be pos it ioned on t he jack li ft ing pad t o protect the oi l pan.
Hydraulic jack
• W ARNINGS:
Before commenci ng work on undersi de of vehi cl e, ens ure that axle s t ands are correctly pos it ioned and vehi cle i ss ecurel y s upported.
Al ways chock the rear wheel s when jacking t he front of the vehicle.
A hydrauli c jack wi th a mi ni mum li ft ing capacit y of 1500 kg, (3,300 l bs) must be us ed.
Raising and Supporting the Vehicle
To as si s t in rais ing the vehicle, us e t he cus t omer jacki ng poi nts on the s i ll or on t he trolley jack pos i ti on at the rear of t hefront subframe as indicated i n t he fol lowing ill ust rat ions .
Raising the front of the vehicle
W ARNING: Always chock t he rear wheels when jacki ng the front of t he vehi cl e.
Apply t he parking brake.
Select 'P' - Park on aut omat ic trans mi s si on s el ect or.
Select 'N' - Neutral on manual t rans mis s ion.
Page 179 of 3229
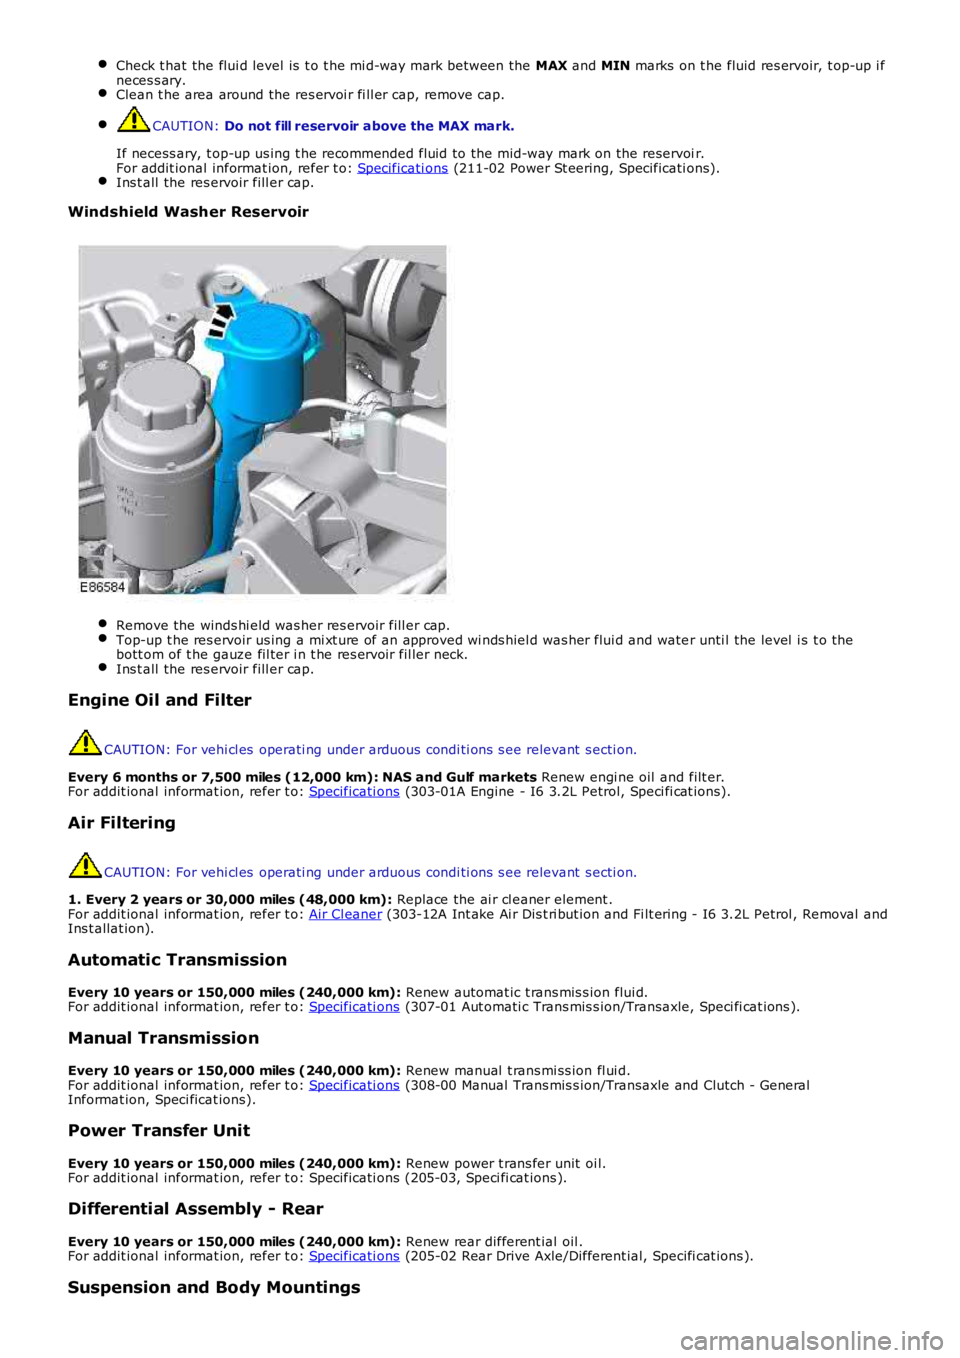
Check t hat the flui d level is t o t he mi d-way mark between the MAX and MIN marks on t he fluid res ervoir, t op-up i fneces s ary.Clean t he area around the res ervoi r fi ll er cap, remove cap.
CAUTION: Do not fill reservoir above the MAX mark.
If necess ary, t op-up us ing t he recommended fluid to the mid-way mark on the reservoir.For addit ional informat ion, refer t o: Specificati ons (211-02 Power St eering, Specificati ons).Ins t all the res ervoir fill er cap.
Windshield Washer Reservoir
Remove the winds hi eld was her res ervoir fill er cap.Top-up t he res ervoir us ing a mi xt ure of an approved wi nds hiel d was her flui d and water unti l the level i s t o thebott om of t he gauze fil ter i n t he res ervoir fil ler neck.Ins t all the res ervoir fill er cap.
Engine Oil and Filter
CAUTION: For vehi cl es operati ng under arduous condi ti ons s ee relevant s ecti on.
Every 6 months or 7,500 miles (12,000 km): NAS and Gulf markets Renew engi ne oil and filt er.For addit ional informat ion, refer t o: Specificati ons (303-01A Engine - I6 3.2L Petrol, Speci fi cat ions).
Air Filtering
CAUTION: For vehi cl es operati ng under arduous condi ti ons s ee relevant s ecti on.
1. Every 2 years or 30,000 miles (48,000 km): Replace the ai r cl eaner element .For addit ional informat ion, refer t o: Air Cl eaner (303-12A Int ake Ai r Dis t ri but ion and Fi lt ering - I6 3.2L Petrol , Removal andIns t allat ion).
Automatic Transmission
Every 10 years or 150,000 miles (240,000 km): Renew automat ic t rans mis s ion flui d.For addit ional informat ion, refer t o: Specificati ons (307-01 Aut omati c Trans mis s ion/Transaxle, Speci fi cat ions ).
Manual Transmission
Every 10 years or 150,000 miles (240,000 km): Renew manual t rans mi ss ion fl ui d.For addit ional informat ion, refer t o: Specificati ons (308-00 Manual Trans mis s ion/Transaxle and Clutch - GeneralInformat ion, Speci ficat ions).
Power Transfer Unit
Every 10 years or 150,000 miles (240,000 km): Renew power t rans fer unit oi l.For addit ional informat ion, refer t o: Specificati ons (205-03, Speci fi cat ions ).
Differential Assembly - Rear
Every 10 years or 150,000 miles (240,000 km): Renew rear different ial oil .For addit ional informat ion, refer t o: Specificati ons (205-02 Rear Drive Axle/Different ial, Specifi cat ions ).
Suspension and Body Mountings
Page 190 of 3229
Ensure that the steering wheel is in the straight ahead position, do not turn the st eering w heel prior to checking the
fluid level.
Check t hat the flui d level is t o t he mi d-way mark between the MAX and MIN marks on t he fluid res ervoir, t op-up i f
neces s ary. Clean t he area around the res ervoi r fi ll er cap, remove cap.
CAUTION:
Do not fill reservoir above the MAX mark.
If necess ary, t op-up us ing t he recommended fluid to the mid-way mark on the reservoi r.
For addit ional informat ion, refer t o: Specificati ons (211-02 Power St eering, Specificati ons).
Ins t all the res ervoir fill er cap.
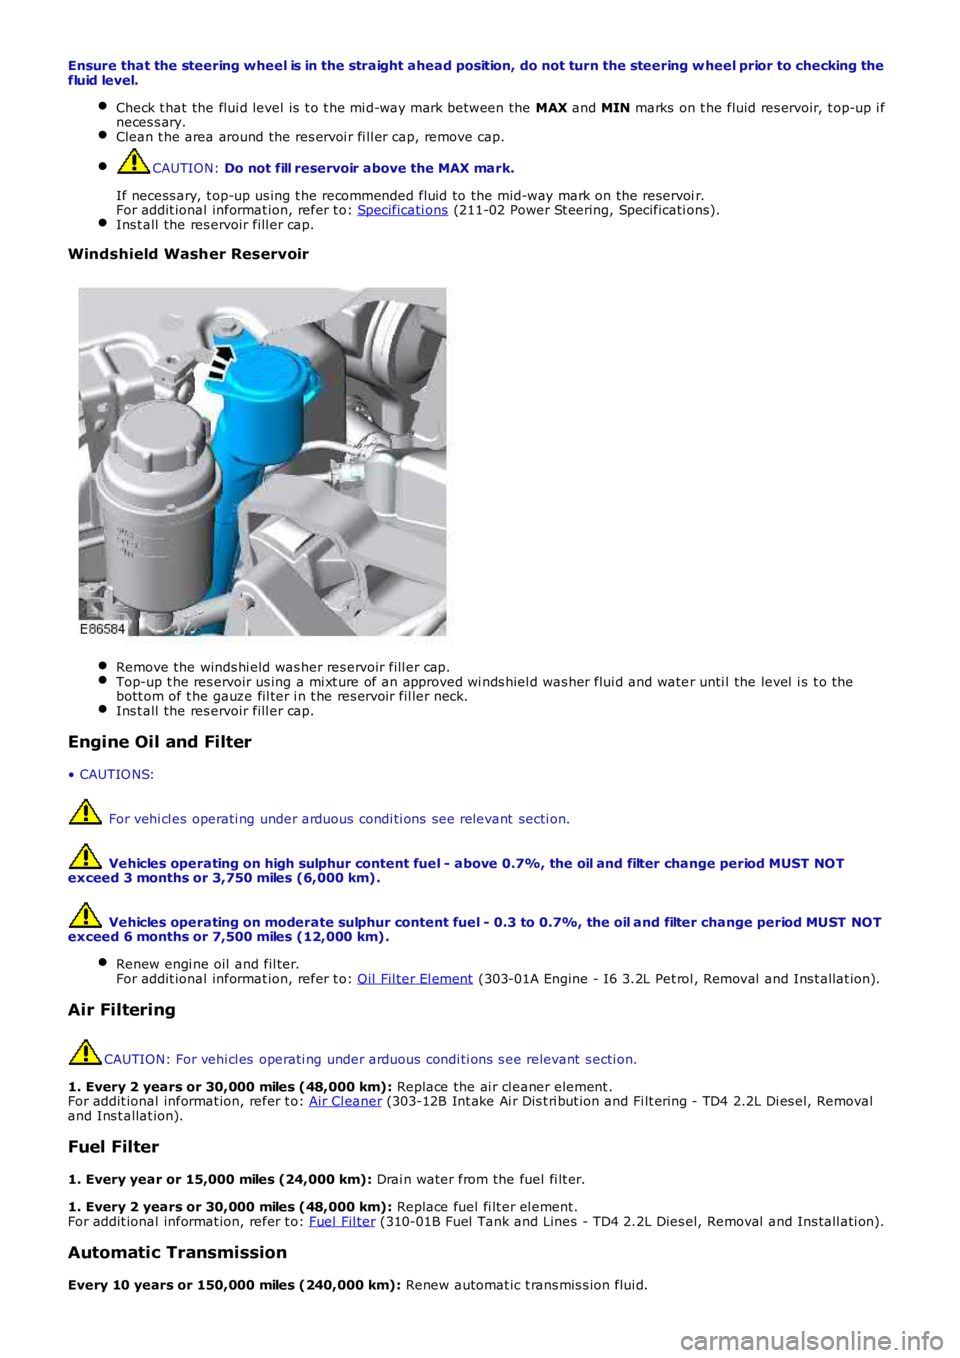
Windshield Washer Reservoir
Remove the winds hi eld was her res ervoir fill er cap.
Top-up t he res ervoir us ing a mi xt ure of an approved wi nds hiel d was her flui d and wate
r unti l the level i s t o the
bott om of t he gauze fil ter i n t he res ervoir fil ler neck. Ins t all the res ervoir fill er cap.
Engine Oil and Filter
• CAUTIO NS: For vehi cl es operati ng under arduous condi ti ons see relevant secti on.
Vehicles operating on high sulphur content fuel - above 0.7%, the oil and filter cha nge period MUST NOT
exceed 3 months or 3,750 miles (6,000 km).
Vehicles operating on moderate sulphur content fuel - 0.3 to 0.7%, the oil and filte r change period MUST NOT
exceed 6 months or 7,500 miles (12,000 km).
Renew engi ne oil and fil ter.
For addit ional informat ion, refer t o: Oil Fil ter El ement (303-01A Engine - I6 3.2L Pet rol , Removal and Ins t allat ion).
Air Filtering
CAUTION: For vehi cl es operati ng under arduous condi ti ons s ee relevant s ecti on.
1. Every 2 years or 30,000 miles (48,000 km): Replace the ai r cl eaner element .
For addit ional informat ion, refer t o: Air Cl eaner (303-12B Int ake Ai r Dis t ri but ion and Fi lt ering - TD4 2.2L Di es el, Removal
and Ins t allat ion).
Fuel Filter
1. Every year or 15,000 miles (24,000 km): Drai n water from the fuel fi lt er.
1. Every 2 years or 30,000 miles (48,000 km): Replace fuel fi lt er el ement.
For addit ional informat ion, refer t o: Fuel Fil ter (310-01B Fuel Tank and Lines - TD4 2.2L Dies el, Removal and Ins tall ati on).
Automatic Transmission
Every 10 years or 150,000 miles (240,000 km): Renew automat ic t rans mis s ion flui d.
Page 302 of 3229
Bearing Rumbl e
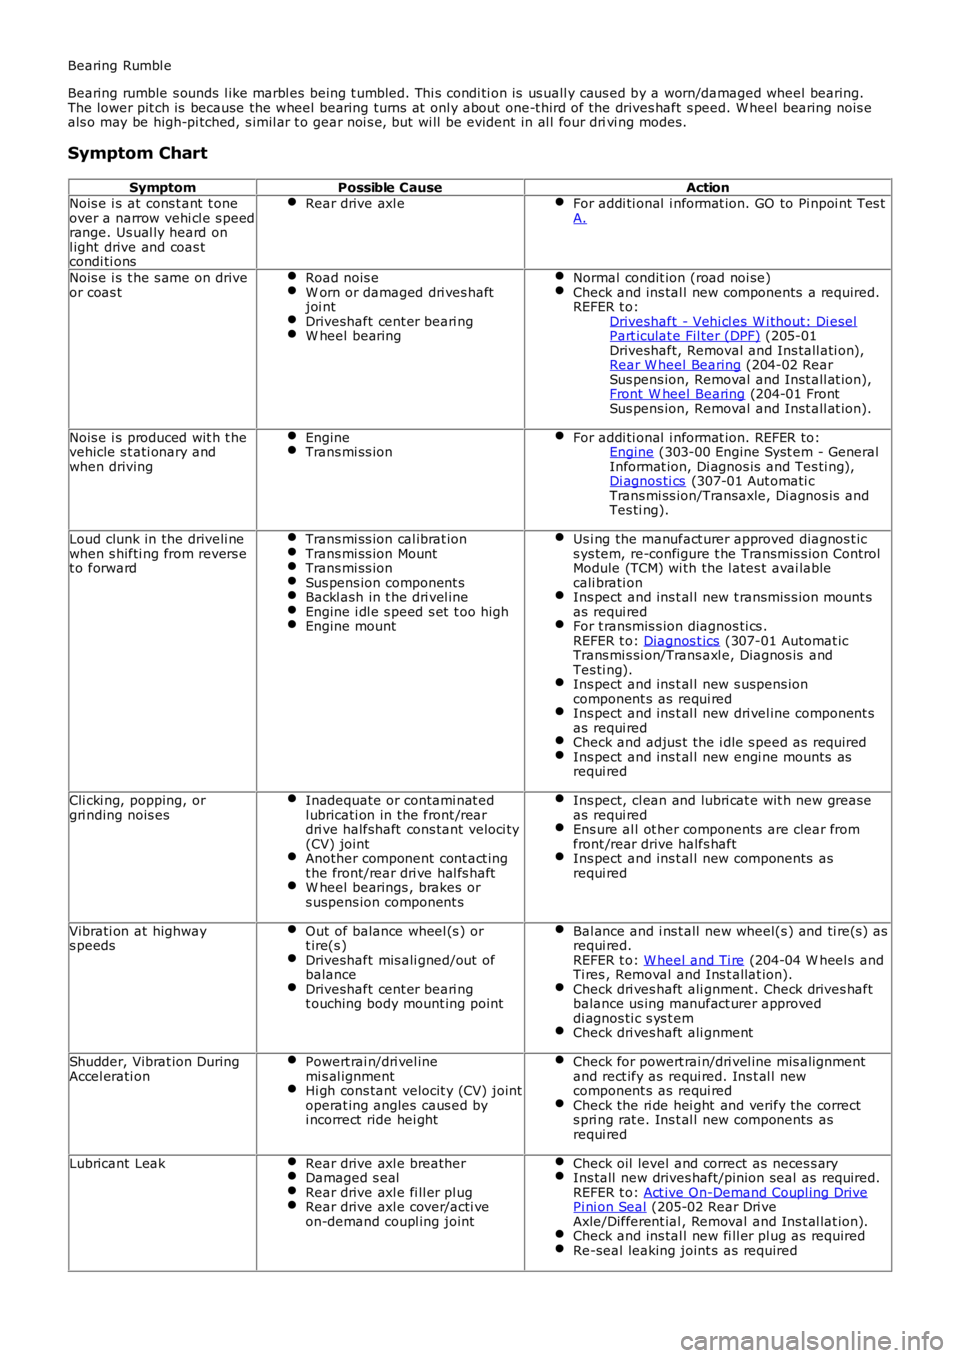
Bearing rumble s ounds l ike marbl es being t umbled. Thi s condi ti on is us uall y caus ed by a worn/damaged wheel bearing.The lower pit ch is because the wheel bearing turns at onl y about one-t hird of the drives haft s peed. W heel bearing nois eals o may be high-pi tched, s imil ar t o gear noi s e, but wi ll be evident in al l four drivi ng modes.
Symptom Chart
SymptomPossible CauseActionNois e i s at cons t ant t oneover a narrow vehi cl e s peedrange. Us ual ly heard onl ight drive and coas tcondi ti ons
Rear drive axl eFor addi ti onal i nformat ion. GO to Pi npoi nt Tes tA.
Nois e i s t he s ame on driveor coas tRoad nois eW orn or damaged dri ves haftjoi ntDriveshaft cent er beari ngW heel bearing
Normal condit ion (road noi se)Check and ins tal l new components a required.REFER t o:Driveshaft - Vehi cl es W i thout: Di eselPart iculat e Fil ter (DPF) (205-01Driveshaft, Removal and Ins tall ati on),Rear W heel Bearing (204-02 RearSus pens ion, Removal and Inst all at ion),Front W heel Bearing (204-01 FrontSus pens ion, Removal and Inst all at ion).
Nois e i s produced wit h t hevehicle s t ati onary andwhen driving
EngineTrans mi ss ionFor addi ti onal i nformat ion. REFER to:Engine (303-00 Engine Syst em - GeneralInformat ion, Di agnos is and Tes ti ng),Di agnos ti cs (307-01 Aut omati cTrans mi ss ion/Transaxle, Di agnos is andTes ti ng).
Loud clunk in the driveli newhen s hifti ng from revers et o forward
Trans mi ss ion cal ibrat ionTrans mi ss ion MountTrans mi ss ionSus pens ion component sBackl ash in t he dri vel ineEngine i dl e s peed s et t oo highEngine mount
Us i ng the manufact urer approved diagnos t ics ys tem, re-configure t he Transmis s ion ControlModule (TCM) wi th the l ates t avai lablecali brati onIns pect and ins t al l new t ransmis s ion mount sas requi redFor t ransmis s ion diagnos ti cs .REFER t o: Diagnos t ics (307-01 Automat icTrans mi s si on/Trans axl e, Diagnos is andTes ti ng).Ins pect and ins t al l new s uspens ioncomponent s as requi redIns pect and ins t al l new dri vel ine component sas requi redCheck and adjus t the i dle s peed as requi redIns pect and ins t al l new engi ne mounts asrequi red
Cli cki ng, popping, orgri nding nois esInadequate or contami nat edl ubricati on in the front /reardri ve halfshaft cons tant veloci ty(CV) jointAnother component cont act ingt he front/rear dri ve hal fs haftW heel bearings , brakes ors uspens ion component s
Ins pect, cl ean and lubri cat e wit h new greaseas requi redEns ure al l ot her components are clear fromfront /rear drive halfs haftIns pect and ins t al l new components asrequi red
Vibrati on at highways peedsOut of balance wheel (s ) ort ire(s )Driveshaft mis ali gned/out ofbalanceDriveshaft cent er beari ngt ouching body mount ing point
Bal ance and i ns t all new wheel(s ) and ti re(s) asrequi red.REFER t o: W heel and Ti re (204-04 W heel s andTi res , Removal and Ins t allat ion).Check dri ves haft ali gnment . Check drives haftbalance us ing manufact urer approveddi agnos ti c s ys t emCheck dri ves haft ali gnment
Shudder, Vibrat ion DuringAccel erati onPowert rai n/dri vel inemi s al ignmentHi gh cons tant velocit y (CV) jointoperat ing angles caus ed byi ncorrect ride hei ght
Check for powert rai n/dri vel ine mis alignmentand rect ify as requi red. Ins t al l newcomponent s as requi redCheck the ri de hei ght and verify the corrects pri ng rat e. Ins t al l new components asrequi red
Lubricant LeakRear drive axl e breatherDamaged s ealRear drive axl e fi ll er pl ugRear drive axl e cover/acti veon-demand coupl ing joint
Check oil level and correct as neces s aryIns tall new drives haft/pinion seal as required.REFER t o: Act ive On-Demand Coupl ing DrivePi ni on Seal (205-02 Rear Dri veAxle/Different ial , Removal and Ins t al lat ion).Check and ins tal l new fi ll er pl ug as requiredRe-seal leaking joint s as required
Page 328 of 3229
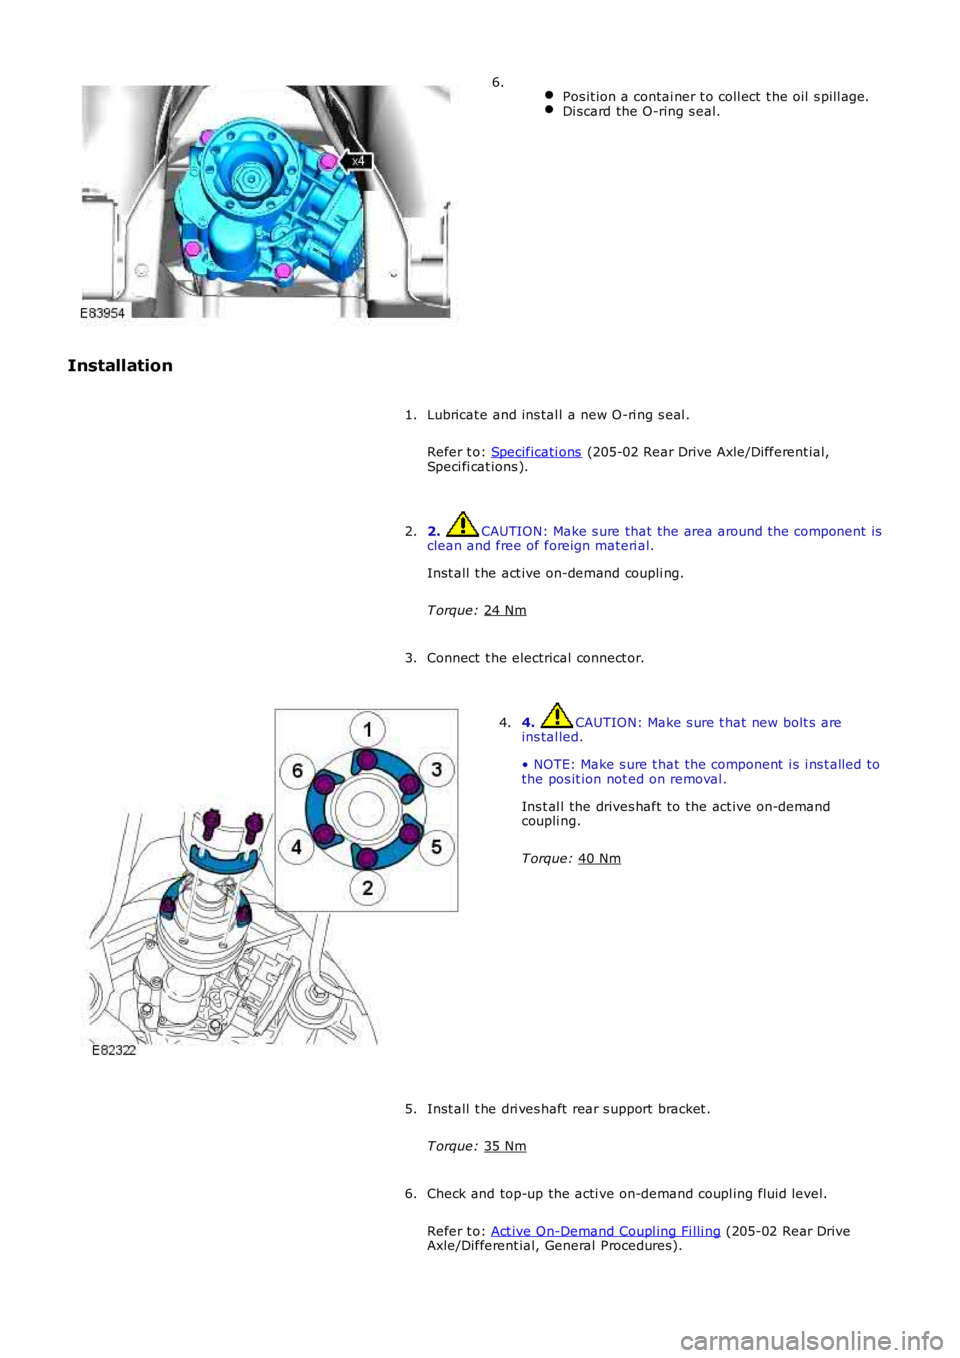
Pos it ion a contai ner t o coll ect t he oil s pill age. Di scard the O-ring s eal.6.
Installation Lubricat e and ins tal l a new O-ri ng s eal .
Refer t o: Specificati ons (205-02 Rear Drive Axle/Different ial,
Speci fi cat ions ).
1.
2. CAUTION: Make s ure that the area around t he component is
clean and free of foreign materi al.
Inst all t he act ive on-demand coupli ng.
T orque: 24 Nm 2.
Connect t he electrical connect or.
3. 4. CAUTION: Make s ure t hat new bolt s are
ins tal led.
• NOTE: Make s ure t hat the component i s i ns t alled to
the pos it ion not ed on removal .
Ins t al l the drives haft to the act ive on-demand
coupli ng.
T orque: 40 Nm 4.
Inst all t he dri ves haft rear s upport bracket .
T orque: 35 Nm 5.
Check and top-up the acti ve on-demand coupl ing fluid level.
Refer t o: Act ive On-Demand Coupl ing Fi lli ng (205-02 Rear Drive
Axle/Different ial, General Procedures).
6.