2006 LAND ROVER FRELANDER 2 sunroof
[x] Cancel search: sunroofPage 72 of 3229
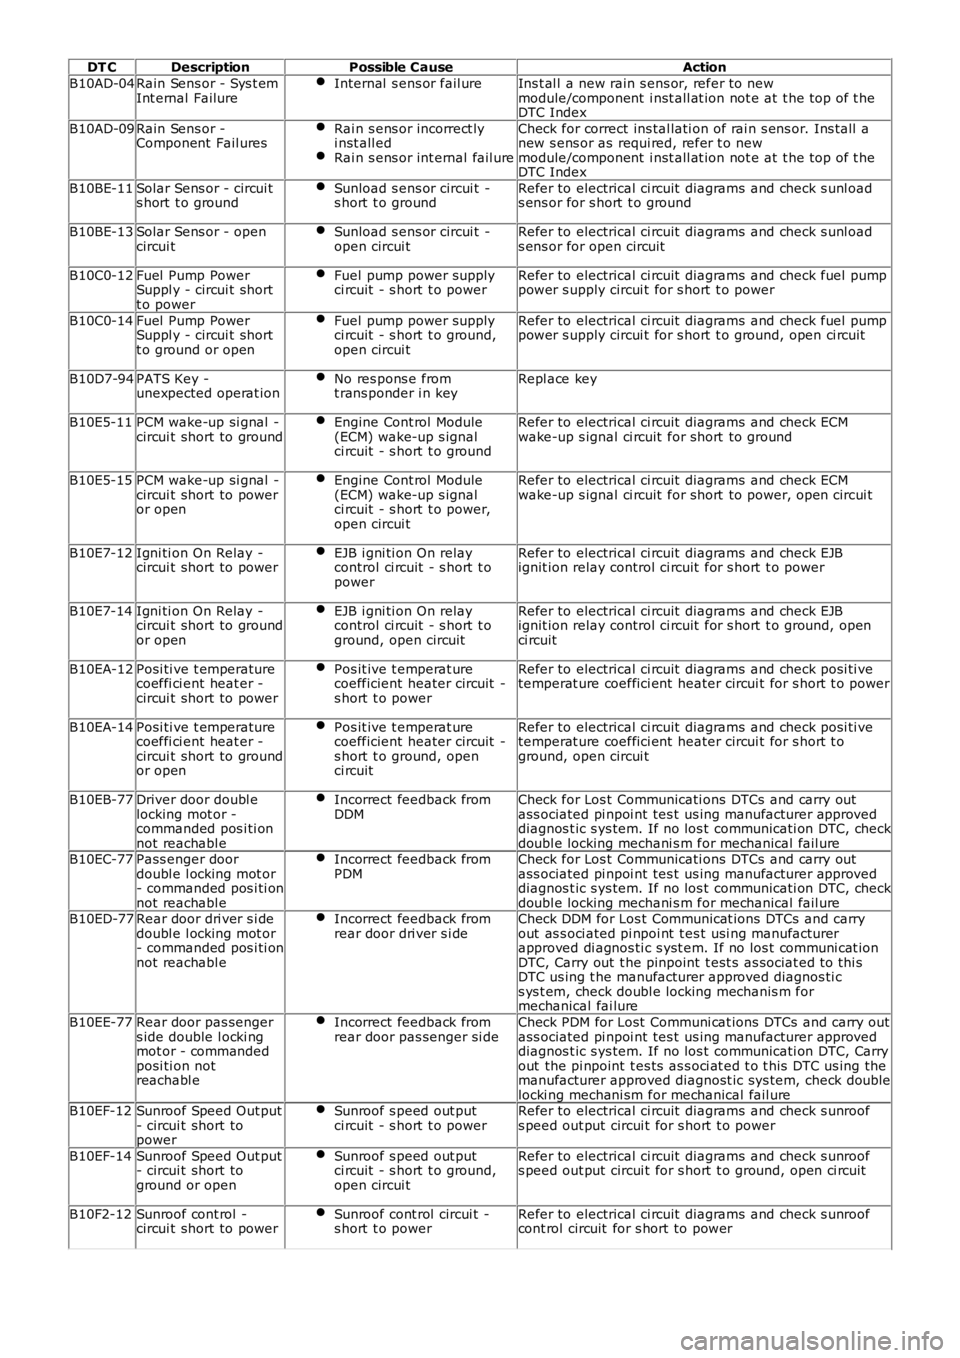
DT CDescriptionPossible CauseAction
B10AD-04Rain Sens or - Sys t emInt ernal FailureInternal s ens or fail ureIns t al l a new rain s ens or, refer to newmodule/component i nst all at ion not e at t he top of t heDTC Index
B10AD-09Rain Sens or -Component Fail uresRai n s ens or incorrect lyi nst all edRai n s ens or int ernal fail ure
Check for correct ins tal lati on of rai n s ens or. Ins tall anew s ens or as requi red, refer t o newmodule/component i nst all at ion not e at t he top of t heDTC Index
B10BE-11Solar Sens or - circui ts hort t o groundSunload s ens or circui t -s hort t o groundRefer to electrical ci rcuit diagrams and check s unl oads ens or for s hort t o ground
B10BE-13Solar Sens or - opencircui tSunload s ens or circui t -open circui tRefer to electrical ci rcuit diagrams and check s unl oads ens or for open circuit
B10C0-12Fuel Pump PowerSuppl y - circui t shortt o power
Fuel pump power supplyci rcuit - s hort t o powerRefer to electrical ci rcuit diagrams and check fuel pumppower s upply circui t for s hort t o power
B10C0-14Fuel Pump PowerSuppl y - circui t shortt o ground or open
Fuel pump power supplyci rcuit - s hort t o ground,open circui t
Refer to electrical ci rcuit diagrams and check fuel pumppower s upply circui t for s hort t o ground, open ci rcuit
B10D7-94PATS Key -unexpected operat ionNo res pons e fromt rans ponder i n keyRepl ace key
B10E5-11PCM wake-up si gnal -circui t short to groundEngine Cont rol Module(ECM) wake-up s ignalci rcuit - s hort t o ground
Refer to electrical ci rcuit diagrams and check ECMwake-up s ignal ci rcuit for short to ground
B10E5-15PCM wake-up si gnal -circui t short to poweror open
Engine Cont rol Module(ECM) wake-up s ignalci rcuit - s hort t o power,open circui t
Refer to electrical ci rcuit diagrams and check ECMwake-up s ignal ci rcuit for short to power, open circui t
B10E7-12Igni ti on On Relay -circui t short to powerEJB i gni ti on On relaycontrol ci rcuit - s hort t opower
Refer to electrical ci rcuit diagrams and check EJBignit ion relay control ci rcuit for s hort t o power
B10E7-14Igni ti on On Relay -circui t short to groundor open
EJB i gni ti on On relaycontrol ci rcuit - s hort t oground, open circuit
Refer to electrical ci rcuit diagrams and check EJBignit ion relay control ci rcuit for s hort t o ground, openci rcuit
B10EA-12Posi ti ve t emperaturecoeffi ci ent heat er -circui t short to power
Pos it ive t emperat urecoefficient heater circuit -s hort t o power
Refer to electrical ci rcuit diagrams and check posi ti vetemperat ure coeffici ent heater circui t for s hort t o power
B10EA-14Posi ti ve t emperaturecoeffi ci ent heat er -circui t short to groundor open
Pos it ive t emperat urecoefficient heater circuit -s hort t o ground, openci rcuit
Refer to electrical ci rcuit diagrams and check posi ti vetemperat ure coeffici ent heater circui t for s hort t oground, open circui t
B10EB-77Driver door doubl elocking mot or -commanded pos i ti onnot reachabl e
Incorrect feedback fromDDMCheck for Los t Communicati ons DTCs and carry outass ociated pi npoi nt tes t us ing manufacturer approveddiagnos t ic s ys tem. If no los t communicati on DTC, checkdoubl e locking mechani s m for mechanical fail ureB10EC-77Pass enger doordoubl e l ocking mot or- commanded pos i ti onnot reachabl e
Incorrect feedback fromPDMCheck for Los t Communicati ons DTCs and carry outass ociated pi npoi nt tes t us ing manufacturer approveddiagnos t ic s ys tem. If no los t communicati on DTC, checkdoubl e locking mechani s m for mechanical fail ureB10ED-77Rear door dri ver s i dedoubl e l ocking mot or- commanded pos i ti onnot reachabl e
Incorrect feedback fromrear door dri ver s i deCheck DDM for Los t Communicat ions DTCs and carryout as s oci ated pi npoi nt t es t usi ng manufacturerapproved di agnos ti c s yst em. If no los t communi cat ionDTC, Carry out t he pinpoint t est s as sociat ed t o thi sDTC us ing t he manufacturer approved diagnos ti cs ys t em, check doubl e locking mechanis m formechanical fai lure
B10EE-77Rear door pas sengers ide double l ocki ngmot or - commandedposi ti on notreachabl e
Incorrect feedback fromrear door pas senger si deCheck PDM for Lost Communi cat ions DTCs and carry outass ociated pi npoi nt tes t us ing manufacturer approveddiagnos t ic s ys tem. If no los t communicati on DTC, Carryout the pi npoint t es ts as s oci at ed t o t his DTC us ing themanufacturer approved diagnost ic sys tem, check doublelocki ng mechani sm for mechanical fail ureB10EF-12Sunroof Speed Out put- circui t short topower
Sunroof s peed out putci rcuit - s hort t o powerRefer to electrical ci rcuit diagrams and check s unroofs peed out put circui t for s hort t o power
B10EF-14Sunroof Speed Out put- circui t short toground or open
Sunroof s peed out putci rcuit - s hort t o ground,open circui t
Refer to electrical ci rcuit diagrams and check s unroofs peed out put circui t for s hort t o ground, open ci rcuit
B10F2-12Sunroof cont rol -circui t short to powerSunroof cont rol circui t -s hort t o powerRefer to electrical ci rcuit diagrams and check s unroofcont rol circuit for s hort to power
Page 73 of 3229
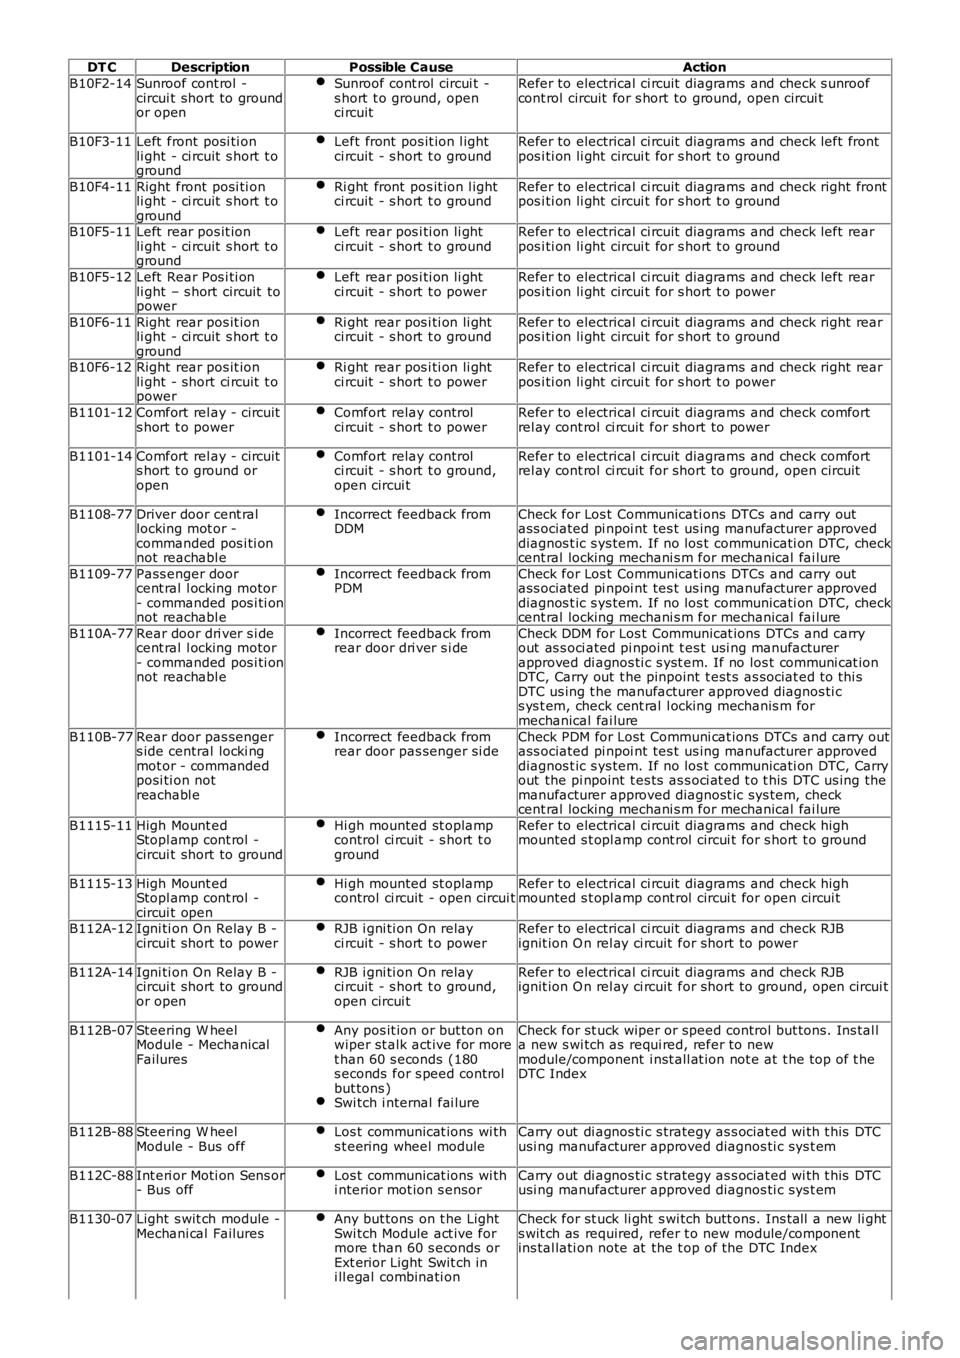
DT CDescriptionPossible CauseAction
B10F2-14Sunroof cont rol -circui t short to groundor open
Sunroof cont rol circui t -s hort t o ground, openci rcuit
Refer to electrical ci rcuit diagrams and check s unroofcont rol circuit for s hort to ground, open circui t
B10F3-11Left front posi ti onli ght - ci rcuit s hort t oground
Left front pos it ion l ightci rcuit - s hort t o groundRefer to electrical ci rcuit diagrams and check left frontpos i ti on li ght circui t for s hort t o ground
B10F4-11Right front posi ti onli ght - ci rcuit s hort t oground
Ri ght front pos it ion l ightci rcuit - s hort t o groundRefer to electrical ci rcuit diagrams and check right frontpos i ti on li ght circui t for s hort t o ground
B10F5-11Left rear pos it ionli ght - ci rcuit s hort t oground
Left rear pos i ti on li ghtci rcuit - s hort t o groundRefer to electrical ci rcuit diagrams and check left rearpos i ti on li ght circui t for s hort t o ground
B10F5-12Left Rear Pos i ti onli ght – s hort circuit topower
Left rear pos i ti on li ghtci rcuit - s hort t o powerRefer to electrical ci rcuit diagrams and check left rearpos i ti on li ght circui t for s hort t o power
B10F6-11Right rear pos it ionli ght - ci rcuit s hort t oground
Ri ght rear pos i ti on li ghtci rcuit - s hort t o groundRefer to electrical ci rcuit diagrams and check right rearpos i ti on li ght circui t for s hort t o ground
B10F6-12Right rear pos it ionli ght - short ci rcuit t opower
Ri ght rear pos i ti on li ghtci rcuit - s hort t o powerRefer to electrical ci rcuit diagrams and check right rearpos i ti on li ght circui t for s hort t o power
B1101-12Comfort rel ay - circuits hort t o powerComfort relay controlci rcuit - s hort t o powerRefer to electrical ci rcuit diagrams and check comfortrel ay cont rol ci rcuit for short to power
B1101-14Comfort rel ay - circuits hort t o ground oropen
Comfort relay controlci rcuit - s hort t o ground,open circui t
Refer to electrical ci rcuit diagrams and check comfortrel ay cont rol ci rcuit for short to ground, open circui t
B1108-77Driver door cent rallocking mot or -commanded pos i ti onnot reachabl e
Incorrect feedback fromDDMCheck for Los t Communicati ons DTCs and carry outass ociated pi npoi nt tes t us ing manufacturer approveddiagnos t ic s ys tem. If no los t communicati on DTC, checkcent ral locking mechani s m for mechanical fai lure
B1109-77Pass enger doorcent ral l ocking motor- commanded pos i ti onnot reachabl e
Incorrect feedback fromPDMCheck for Los t Communicati ons DTCs and carry outass ociated pi npoi nt tes t us ing manufacturer approveddiagnos t ic s ys tem. If no los t communicati on DTC, checkcent ral locking mechani s m for mechanical fai lure
B110A-77Rear door dri ver s i decent ral l ocking motor- commanded pos i ti onnot reachabl e
Incorrect feedback fromrear door dri ver s i deCheck DDM for Los t Communicat ions DTCs and carryout as s oci ated pi npoi nt t es t usi ng manufacturerapproved di agnos ti c s yst em. If no los t communi cat ionDTC, Carry out t he pinpoint t est s as sociat ed t o thi sDTC us ing t he manufacturer approved diagnos ti cs ys t em, check cent ral l ocking mechanis m formechanical fai lure
B110B-77Rear door pas sengers ide central locki ngmot or - commandedposi ti on notreachabl e
Incorrect feedback fromrear door pas senger si deCheck PDM for Lost Communi cat ions DTCs and carry outass ociated pi npoi nt tes t us ing manufacturer approveddiagnos t ic s ys tem. If no los t communicati on DTC, Carryout the pi npoint t es ts as s oci at ed t o t his DTC us ing themanufacturer approved diagnost ic sys tem, checkcent ral locking mechani s m for mechanical fai lure
B1115-11High Mount edStopl amp cont rol -circui t short to ground
Hi gh mounted st oplampcontrol ci rcuit - s hort t oground
Refer to electrical ci rcuit diagrams and check highmounted s t opl amp cont rol circui t for s hort t o ground
B1115-13High Mount edStopl amp cont rol -circui t open
Hi gh mounted st oplampcontrol ci rcuit - open circui tRefer to electrical ci rcuit diagrams and check highmounted s t opl amp cont rol circui t for open circui t
B112A-12Igni ti on On Relay B -circui t short to powerRJB i gni ti on On relayci rcuit - s hort t o powerRefer to electrical ci rcuit diagrams and check RJBignit ion O n rel ay ci rcuit for short to power
B112A-14Igni ti on On Relay B -circui t short to groundor open
RJB i gni ti on On relayci rcuit - s hort t o ground,open circui t
Refer to electrical ci rcuit diagrams and check RJBignit ion O n rel ay ci rcuit for short to ground, open circui t
B112B-07Steering W heelModule - MechanicalFailures
Any pos it ion or but ton onwiper st alk act ive for moret han 60 s econds (180s econds for s peed controlbut tons )Swi tch i nternal fai lure
Check for st uck wiper or speed control but tons . Ins tal la new s wi tch as requi red, refer to newmodule/component i nst all at ion not e at t he top of t heDTC Index
B112B-88Steering W heelModule - Bus offLos t communicat ions wi ths t eering wheel moduleCarry out di agnos ti c s trategy as s ociat ed wi th t his DTCusi ng manufacturer approved diagnos ti c sys t em
B112C-88Int eri or Moti on Sens or- Bus offLos t communicat ions wi thi nterior mot ion s ensorCarry out di agnos ti c s trategy as s ociat ed wi th t his DTCusi ng manufacturer approved diagnos ti c sys t em
B1130-07Light s wit ch module -Mechani cal FailuresAny but tons on t he LightSwi tch Module act ive formore t han 60 s econds orExt erior Light Swit ch ini ll egal combinati on
Check for st uck li ght s wi tch butt ons. Ins tall a new li ghts wit ch as required, refer t o new module/componentins tal lati on note at the t op of the DTC Index
Page 74 of 3229
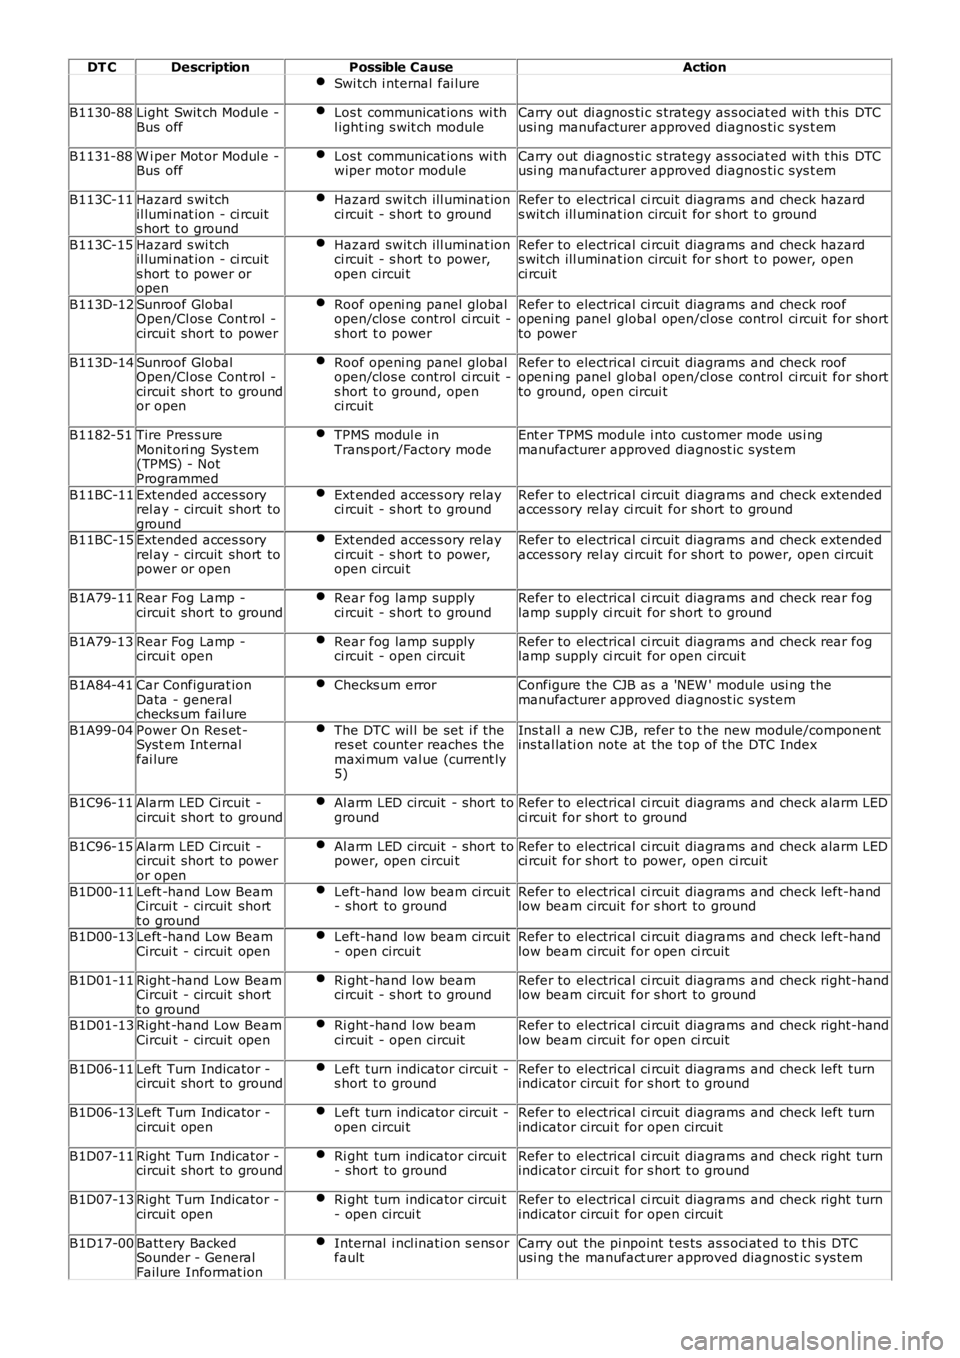
DT CDescriptionPossible CauseAction
Swi tch i nternal fai lure
B1130-88Light Swit ch Modul e -Bus offLos t communicat ions wi thl ight ing s wit ch moduleCarry out di agnos ti c s trategy as s ociat ed wi th t his DTCusi ng manufacturer approved diagnos ti c sys t em
B1131-88W i per Mot or Modul e -Bus offLos t communicat ions wi thwiper motor moduleCarry out di agnos ti c s trategy as s ociat ed wi th t his DTCusi ng manufacturer approved diagnos ti c sys t em
B113C-11Hazard s wi tchil lumi nat ion - ci rcuits hort t o ground
Hazard swit ch ill uminat ionci rcuit - s hort t o groundRefer to electrical ci rcuit diagrams and check hazards wit ch ill uminat ion circui t for s hort t o ground
B113C-15Hazard s wi tchil lumi nat ion - ci rcuits hort t o power oropen
Hazard swit ch ill uminat ionci rcuit - s hort t o power,open circui t
Refer to electrical ci rcuit diagrams and check hazards wit ch ill uminat ion circui t for s hort t o power, openci rcuit
B113D-12Sunroof GlobalOpen/Cl os e Cont rol -circui t short to power
Roof openi ng panel globalopen/clos e control ci rcuit -s hort t o power
Refer to electrical ci rcuit diagrams and check roofopeni ng panel global open/cl os e control ci rcuit for shortto power
B113D-14Sunroof GlobalOpen/Cl os e Cont rol -circui t short to groundor open
Roof openi ng panel globalopen/clos e control ci rcuit -s hort t o ground, openci rcuit
Refer to electrical ci rcuit diagrams and check roofopeni ng panel global open/cl os e control ci rcuit for shortto ground, open circui t
B1182-51Tire Pres s ureMonit ori ng Sys t em(TPMS) - NotProgrammed
TPMS modul e inTrans port /Factory modeEnt er TPMS module i nto cus tomer mode us i ngmanufacturer approved diagnost ic sys tem
B11BC-11Extended acces soryrel ay - circuit short toground
Ext ended acces s ory relayci rcuit - s hort t o groundRefer to electrical ci rcuit diagrams and check extendedacces sory rel ay ci rcuit for short to ground
B11BC-15Extended acces soryrel ay - circuit short topower or open
Ext ended acces s ory relayci rcuit - s hort t o power,open circui t
Refer to electrical ci rcuit diagrams and check extendedacces sory rel ay ci rcuit for short to power, open ci rcuit
B1A79-11Rear Fog Lamp -circui t short to groundRear fog lamp supplyci rcuit - s hort t o groundRefer to electrical ci rcuit diagrams and check rear foglamp supply ci rcuit for s hort t o ground
B1A79-13Rear Fog Lamp -circui t openRear fog lamp supplyci rcuit - open circuitRefer to electrical ci rcuit diagrams and check rear foglamp supply ci rcuit for open circui t
B1A84-41Car Configurat ionData - generalchecks um fai lure
Checks um errorConfigure the CJB as a 'NEW ' module usi ng t hemanufacturer approved diagnost ic sys tem
B1A99-04Power On Res et -Syst em Int ernalfai lure
The DTC wil l be set i f theres et counter reaches themaxi mum val ue (current ly5)
Ins t al l a new CJB, refer t o t he new module/componentins tal lati on note at the t op of the DTC Index
B1C96-11Alarm LED Ci rcuit -circui t short to groundAl arm LED circuit - short togroundRefer to electrical ci rcuit diagrams and check alarm LEDci rcuit for short to ground
B1C96-15Alarm LED Ci rcuit -circui t short to poweror open
Al arm LED circuit - short topower, open circui tRefer to electrical ci rcuit diagrams and check alarm LEDci rcuit for short to power, open ci rcuit
B1D00-11Left -hand Low BeamCircui t - circuit shortt o ground
Left-hand low beam ci rcuit- short to groundRefer to electrical ci rcuit diagrams and check left-handlow beam circuit for s hort to ground
B1D00-13Left -hand Low BeamCircui t - circuit openLeft-hand low beam ci rcuit- open circui tRefer to electrical ci rcuit diagrams and check left-handlow beam circuit for open ci rcuit
B1D01-11Right -hand Low BeamCircui t - circuit shortt o ground
Ri ght -hand l ow beamci rcuit - s hort t o groundRefer to electrical ci rcuit diagrams and check right-handlow beam circuit for s hort to ground
B1D01-13Right -hand Low BeamCircui t - circuit openRi ght -hand l ow beamci rcuit - open circuitRefer to electrical ci rcuit diagrams and check right-handlow beam circuit for open ci rcuit
B1D06-11Left Turn Indicator -circui t short to groundLeft turn indicator circui t -s hort t o groundRefer to electrical ci rcuit diagrams and check left turnindicator circui t for s hort t o ground
B1D06-13Left Turn Indicator -circui t openLeft turn indicator circui t -open circui tRefer to electrical ci rcuit diagrams and check left turnindicator circui t for open circuit
B1D07-11Right Turn Indicator -circui t short to groundRi ght turn indicator circui t- short to groundRefer to electrical ci rcuit diagrams and check right turnindicator circui t for s hort t o ground
B1D07-13Right Turn Indicator -circui t openRi ght turn indicator circui t- open circui tRefer to electrical ci rcuit diagrams and check right turnindicator circui t for open circuit
B1D17-00Batt ery BackedSounder - GeneralFailure Informat ion
Internal i ncl inati on s ens orfaultCarry out the pi npoint t es ts as s oci at ed t o t his DTCusi ng t he manufact urer approved diagnost ic s ys tem
Page 2370 of 3229
Switch Inputs
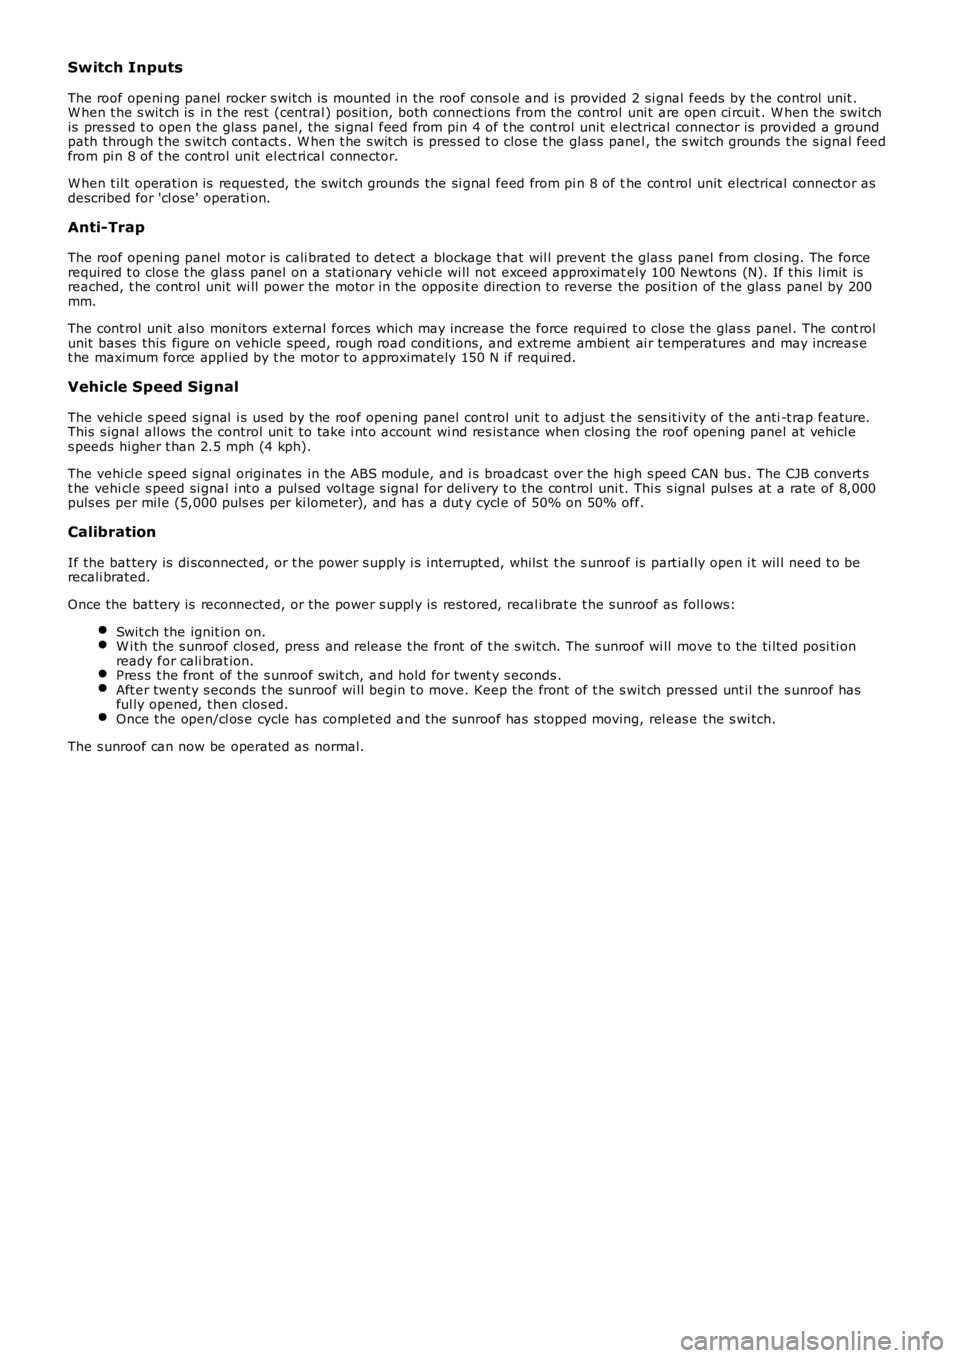
The roof openi ng panel rocker s wit ch is mount ed in the roof cons ol e and i s provided 2 si gnal feeds by t he control unit .W hen t he s wit ch is in t he res t (cent ral ) pos it ion, both connect ions from the cont rol uni t are open ci rcuit . W hen t he swit chis pres sed t o open t he glas s panel , the si gnal feed from pin 4 of t he cont rol unit electrical connect or is provi ded a groundpath through t he s wit ch cont act s . W hen t he s wit ch is pres s ed t o clos e t he glas s panel , the s wi tch grounds t he s ignal feedfrom pi n 8 of t he cont rol unit el ect ri cal connector.
W hen t il t operati on is reques t ed, t he s wit ch grounds the si gnal feed from pi n 8 of the cont rol unit electrical connect or asdescribed for 'cl ose' operati on.
Anti-Trap
The roof openi ng panel mot or is cali brat ed to det ect a blockage t hat wil l prevent t he glas s panel from cl osi ng. The forcerequired t o clos e t he glas s panel on a st ati onary vehi cl e wi ll not exceed approximately 100 Newt ons (N). If t his l imit isreached, t he cont rol unit wi ll power the motor in the oppos it e direct ion t o reverse the pos it ion of t he glas s panel by 200mm.
The cont rol unit al so monit ors external forces which may i ncrease the force requi red t o clos e t he glas s panel . The cont rolunit bas es this fi gure on vehicle speed, rough road condit ions, and ext reme ambi ent ai r temperatures and may increas et he maximum force appl ied by t he mot or t o approximat ely 150 N if requi red.
Vehicle Speed Signal
The vehi cl e s peed s ignal i s us ed by the roof openi ng panel cont rol unit t o adjus t t he s ens it ivi ty of t he anti -t rap feature.This s ignal all ows the control uni t to take i nt o account wi nd res is t ance when clos ing the roof opening panel at vehicl es peeds hi gher t han 2.5 mph (4 kph).
The vehi cl e s peed s ignal originat es in t he ABS modul e, and i s broadcas t over the hi gh s peed CAN bus . The CJB convert st he vehi cl e s peed si gnal i nt o a pul sed vol tage s ignal for deli very t o the cont rol uni t. Thi s s ignal puls es at a rate of 8,000puls es per mil e (5,000 puls es per ki lomet er), and has a dut y cycl e of 50% on 50% off.
Calibration
If the bat tery is di sconnect ed, or t he power s upply i s int errupt ed, whils t t he s unroof is part ial ly open i t wil l need t o berecali brated.
Once the bat tery is reconnected, or the power s uppl y is res tored, recal ibrat e t he s unroof as foll ows:
Swit ch the ignit ion on.W i th the s unroof clos ed, press and releas e t he front of t he s wit ch. The s unroof wi ll move t o t he ti lt ed posi ti onready for cali brat ion.Pres s t he front of t he s unroof s wit ch, and hold for twent y s econds .Aft er twent y s econds t he sunroof wi ll begin t o move. Keep the front of t he s wit ch pres sed unt il t he s unroof hasful ly opened, t hen clos ed.Once the open/cl os e cycle has complet ed and the sunroof has s topped moving, rel eas e the s wi tch.
The s unroof can now be operated as normal.
Page 2372 of 3229
1
12
• NOTE: If DTCs are recorded a nd, aft er performing t he pinpoint tes ts , a fault is not present , an int ermitt ent concern may be t he cause.Always check for loose connect ions a nd corroded t erminals.
DTCDescriptionPossible CauseActionB10EF-12Sunroof Speed Output -circuit short t o powerRoof ope ning panel mot or speedoutput circuit short t o powerRefer t o electrical circuit dia gra ms and check t he (speedoutput) circuit be tween t he cent ral junct ion box and t he roofopening pane l motor for short to power. Repair as requiredB10EF-14Sunroof Speed Output -circuit short t o ground oropen
Roof ope ning panel mot or speedoutput circuit short t o ground oropen circuit
Refer t o electrical circuit dia gra ms and check t he (speedoutput) circuit be tween t he cent ral junct ion box and t he roofopening pane l motor for short to ground or ope n circuit . Repairas requiredB10F2-12Sunroof cont rol - circuitshort to powerRoof ope ning panel mot or (ACC)circuit short to powerRefer t o t he elect rica l circuit diagrams and check t he (ACC)circuit bet ween the cent ral junct ion box and t he roof openingpanel mot or for circuit short to power. Repair as requiredB10F2-14Sunroof cont rol - circuitshort to ground or openRoof ope ning panel mot or (ACC)circuit short to ground or opencircuit
Refer t o t he elect rica l circuit diagrams and check t he (ACC)circuit bet ween the cent ral junct ion box and t he roof openingpanel mot or for circuit short to ground or open circuit. Repair asrequiredB113D-12Sunroof Global Open/CloseControl - circuit s hort t opower
Roof ope ning panel mot or globalopen/close cont rol circui t shortt o power
Refer t o electrical circuit dia gra ms and check t he (global close)circuit bet ween the cent ral junct ion box and t he roof openingpanel mot or for circuit for short t o power. Repa ir as required
B113D-14Sunroof Global Open/CloseControl - circuit s hort t oground or open
Roof ope ning panel mot or globalopen/close cont rol circui t shortt o ground or open circuit
Refer t o electrical circuit dia gra ms and check t he (global close)circuit bet ween the cent ral junct ion box and t he roof openingpanel mot or for circuit for short t o ground or open circuit .Repair as required
Roof Opening Panel Diagnostic Pinpoint
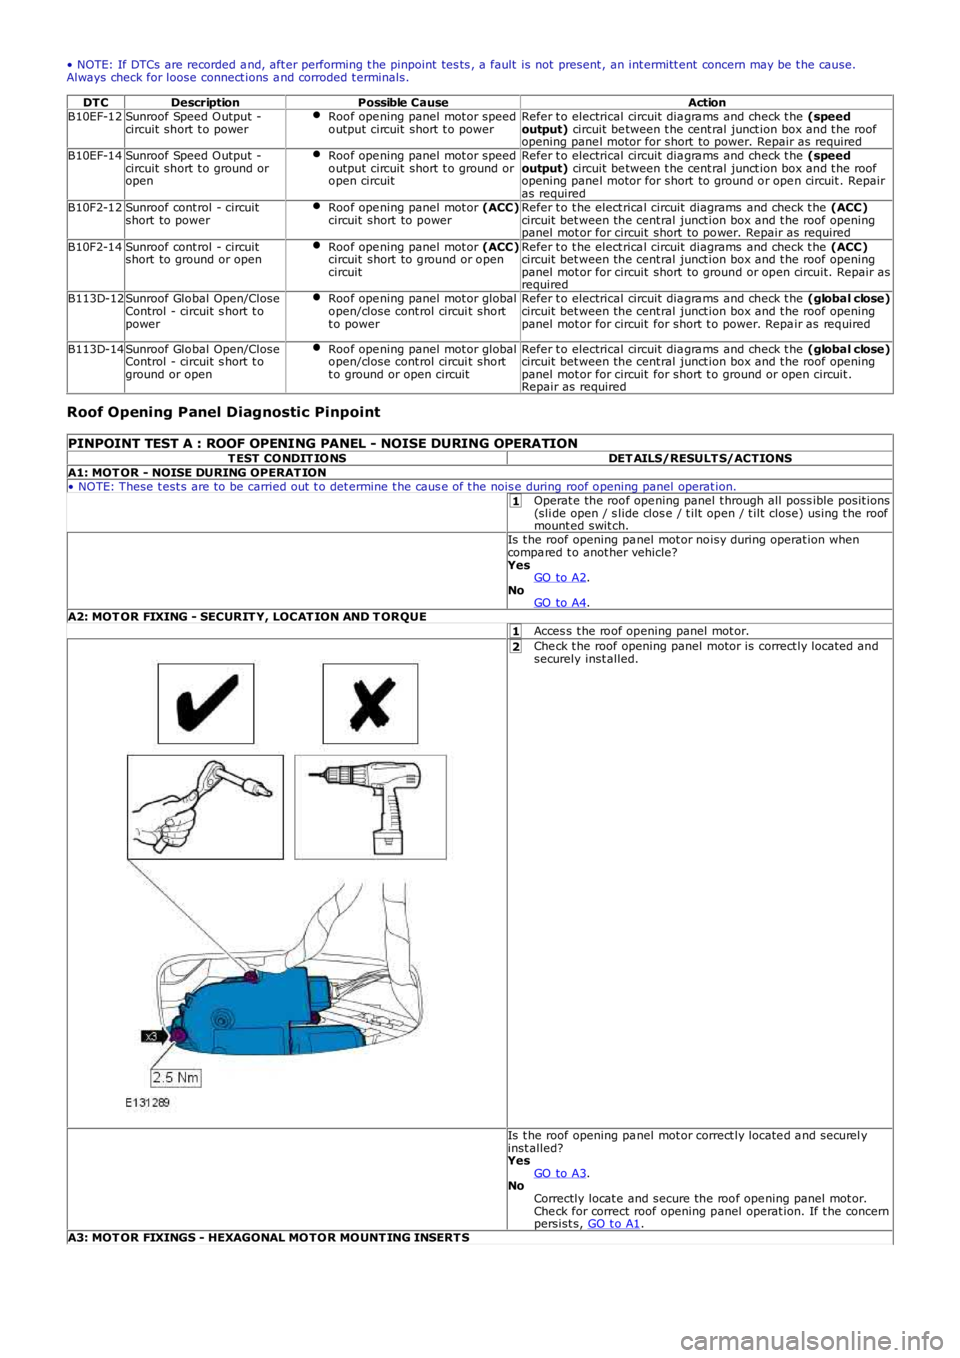
PINPOINT TEST A : ROOF OPENING PANEL - NOISE DURING OPERATIONT EST CONDIT IONSDET AILS/RESULT S/ACTIONSA1: MOT OR - NOISE DURING OPERAT ION• NOTE: These t est s are to be carried out t o det ermine t he caus e of t he nois e during roof opening panel operat ion.Operat e the roof ope ning panel t hrough all poss ible posit ions(sli de open / s lide clos e / t ilt open / t ilt close) using t he roofmount ed swit ch.Is t he roof opening pa nel mot or noisy during operat ion whencompa red t o anot her vehicle?YesGO to A2.NoGO to A4.A2: MOT OR FIXING - SECURIT Y, LOCAT ION AND T ORQUEAcces s t he roof opening panel mot or.Che ck t he roof opening panel motor is correct ly located andsecurely inst alled.
Is t he roof opening pa nel mot or correct ly locate d a nd securel yinst alled?YesGO to A3.NoCorrectly locat e and secure the roof ope ning panel mot or.Che ck for correct roof opening panel operat ion. If t he concernpersist s, GO t o A1.A3: MOT OR FIXINGS - HEXAGONAL MOTOR MOUNT ING INSERT S
Page 2374 of 3229
1
2
1
1
2
1
1
1
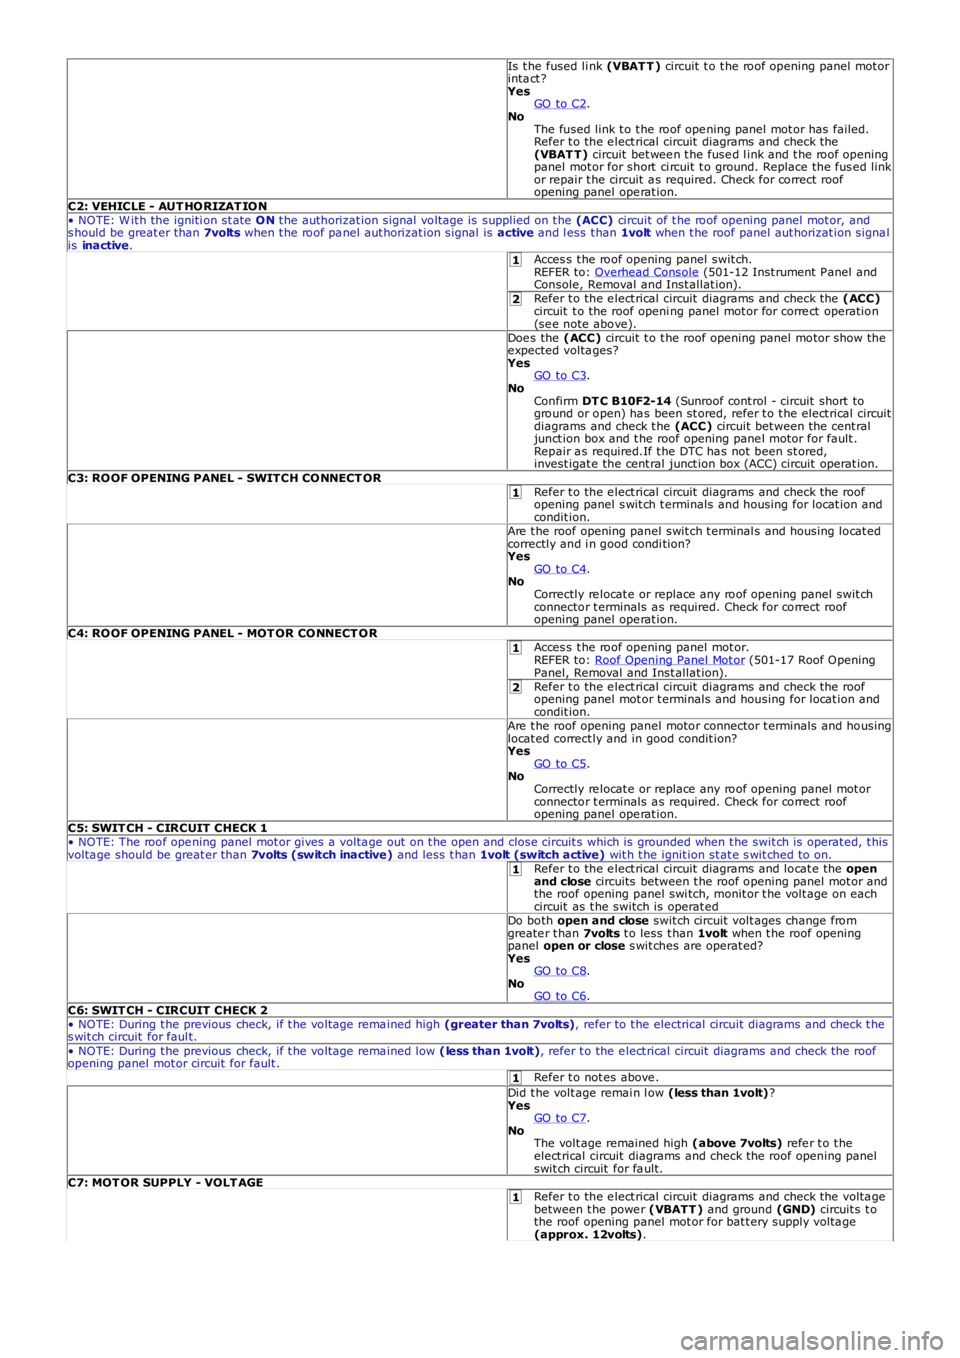
Is t he fused li nk (VBAT T ) circuit t o t he roof opening panel mot orinta ct ?YesGO to C2.NoThe fused link t o t he roof ope ning panel mot or has failed.Refer t o the e lect rical circuit diagrams and check the(VBAT T) circuit bet wee n t he fuse d l ink and t he roof openingpanel mot or for short ci rcuit t o ground. Replace the fus ed linkor repair t he circuit a s required. Check for correct roofopening panel ope rat ion.C2: VEHICLE - AUT HORIZAT ION• NOTE: W it h the igniti on st ate ON t he authorizat ion signal voltage is supplied on t he (ACC) circuit of t he roof opening panel mot or, ands hould be great er than 7volts when t he roof pa nel aut horizat ion signal is active and l ess t han 1volt when t he roof panel aut horizat ion signa lis inactive.Acces s t he roof opening panel swit ch.REFER to: Overhead Console (501-12 Inst rument P anel andConsole, Removal and Inst allat ion).Refer t o the e lect rical circuit diagrams and check the (ACC)circuit t o the roof openi ng panel mot or for corre ct operation(se e note above).Doe s the (ACC) circuit t o t he roof opening panel motor show theexpected volta ges?YesGO to C3.NoConfirm DT C B10F2-14 (Sunroof cont rol - circuit short toground or open) ha s been st ored, refer t o t he elect rical circuitdiagrams and check t he (ACC) circuit bet ween the cent raljunct ion box and t he roof opening pane l motor for fault .Repair a s required.If t he DTC ha s not been st ored,invest igat e the cent ral junct ion box (ACC) circuit operat ion.C3: ROOF OPENING PANEL - SWITCH CONNECT ORRefer t o the e lect rical circuit diagrams and check the roofopening panel s wit ch t erminals and housing for locat ion andcondit ion.Are t he roof opening panel swit ch t erminal s and housing locat edcorrectly and i n good condi tion?YesGO to C4.NoCorrectly re locat e or replace any roof opening panel swit chconnector t erminals a s required. Check for correct roofopening panel ope rat ion.C4: ROOF OPENING PANEL - MOT OR CONNECT ORAcces s t he roof opening panel mot or.REFER to: Roof Opening Panel Mot or (501-17 Roof OpeningPanel, Removal and Inst allat ion).Refer t o the e lect rical circuit diagrams and check the roofopening panel mot or t erminals and housing for locat ion andcondit ion.Are t he roof opening panel motor connector t erminals and housinglocat ed correct ly and in good condit ion?YesGO to C5.NoCorrectly re locat e or replace any roof opening panel mot orconnector t erminals a s required. Check for correct roofopening panel ope rat ion.C5: SWIT CH - CIRCUIT CHECK 1• NOTE: The roof ope ning panel mot or gives a volta ge out on t he open and close circuit s which is grounded when t he swit ch is operat ed, t hisvolta ge should be great er than 7volts (switch inactive) and less t han 1volt (switch active) wit h t he ignit ion st at e s wit ched to on.Refer t o the e lect rical circuit diagrams and locat e the openand close circuits between t he roof opening panel mot or andthe roof opening panel swi tch, monit or t he volt age on eachcircuit as t he switch is operat edDo both open and close swit ch circuit volt ages change fromgreate r t han 7volts t o less t han 1volt when t he roof openingpanel open or close s wit ches are operat ed?YesGO to C8.NoGO to C6.C6: SWIT CH - CIRCUIT CHECK 2• NOTE: During t he previous check, if t he voltage rema ined high (greater than 7volts), refer to t he electrical circuit diagrams and check t hes wit ch circuit for faul t.• NOTE: During t he previous check, if t he voltage rema ined low (less than 1volt), refer t o the e lect rical circuit diagrams and check the roofopening panel mot or circuit for fault .Refer t o not es above .Did t he volt age remai n l ow (less than 1volt)?YesGO to C7.NoThe volt age remained high (above 7volts) refe r t o t heelect rical circuit diagrams and check the roof opening panelswit ch circuit for fa ult.C7: MOT OR SUPPLY - VOLT AGERefer t o the e lect rical circuit diagrams and check the volta gebetween t he powe r (VBATT ) and ground (GND) circuit s t othe roof opening panel mot or for bat t ery supply volta ge(approx. 12volts).
Page 2724 of 3229

Contents
4
L
Climate control
AIR VENTS ................................................... 101
MANUAL CLIMATE CONTROL ...................... 102
AUTOMATIC CLIMATE CONTROL ................. 103
HEATED WINDOWS AND MIRRORS ............ 104
AUXILIARY HEATER ..................................... 104
ELECTRIC SUNROOF .................................... 105
Convenience features
SUN VISORS ................................................ 107
CLOCK .......................................................... 107
CIGAR LIGHTER ........................................... 109
ASHTRAY ..................................................... 109
AUXILIARY POWER SOCKETS ..................... 110
CUP HOLDERS ............................................. 111
STORAGE COMPARTMENTS ........................ 112
Starting the engine
GENERAL INFORMATION ............................. 113
STARTING A PETROL ENGINE ..................... 114
STARTING A DIESEL ENGINE ....................... 115
DIESEL PARTICULATE FILTER (DPF) ........... 116
Transmission
MANUAL TRANSMISSION ............................ 118
AUTOMATIC TRANSMISSION ...................... 118
TECHNICAL SPECIFICATIONS ...................... 122
Brakes
PRINCIPLE OF OPERATION .......................... 123
HINTS ON DRIVING WITH ABS .................... 123
PARKING BRAKE .......................................... 124
Parking aid
PRINCIPLE OF OPERATION .......................... 126
USING THE PARKING AID ............................ 127
Driving hints
GENERAL DRIVING POINTS ......................... 128
REDUCED ENGINE PERFORMANCE ............. 128
RUNNING-IN ................................................ 128
ECONOMICAL DRIVING ................................ 129
Cruise control
PRINCIPLE OF OPERATION .......................... 130
USING CRUISE CONTROL ............................ 130
Terrain response
PRINCIPLE OF OPERATION .......................... 132
USING TERRAIN RESPONSE ........................ 132
Hill descent control (HDC)
PRINCIPLE OF OPERATION .......................... 136
USING HDC ................................................... 137
Traction control
USING TRACTION CONTROL ........................ 139
Stability control
PRINCIPLE OF OPERATION .......................... 140
USING STABILITY CONTROL ........................ 141
Fuel and refuelling
SAFETY PRECAUTIONS................................. 142
FUEL QUALITY .............................................. 142
RUNNING OUT OF FUEL................................ 144
FUEL CUT-OFF............................................... 144
FUEL FILLER FLAP ........................................ 144
REFUELLING ................................................. 145
TECHNICAL SPECIFICATIONS ....................... 146
Load carrying
GENERAL INFORMATION.............................. 147
LUGGAGE ANCHOR POINTS ......................... 148
LUGGAGE COVERS ....................................... 149
Towing
TOWING A TRAILER...................................... 150
LEVELLING.................................................... 151
ESSENTIAL TOWING CHECKS ...................... 151
RECOMMENDED TOWING WEIGHTS ............ 152
TOW BAR ...................................................... 153
Vehicle care
CLEANING THE ALLOY WHEELS................... 154
CLEANING THE EXTERIOR ............................ 154
CLEANING THE INTERIOR ............................ 155
REPAIRING MINOR PAINT DAMAGE ............ 156
Maintenance
GENERAL INFORMATION.............................. 157
OPENING AND CLOSING THE BONNET......... 160
ENGINE COMPARTMENT OVERVIEW ........... 161
ENGINE OIL CHECK....................................... 162
Page 2732 of 3229
12
Quick start
L
Steering column adjustment
1. Move the lever located under the steering
wheel fully downward.
2. Adjust the height and reach of the steering
wheel to the desired position.
3. Move the lever fully up to lock the position
of the wheel.
Steering column lock
The vehicle has an electronic steering column
lock that is deactivated when the remote
control is inserted in the docking port.
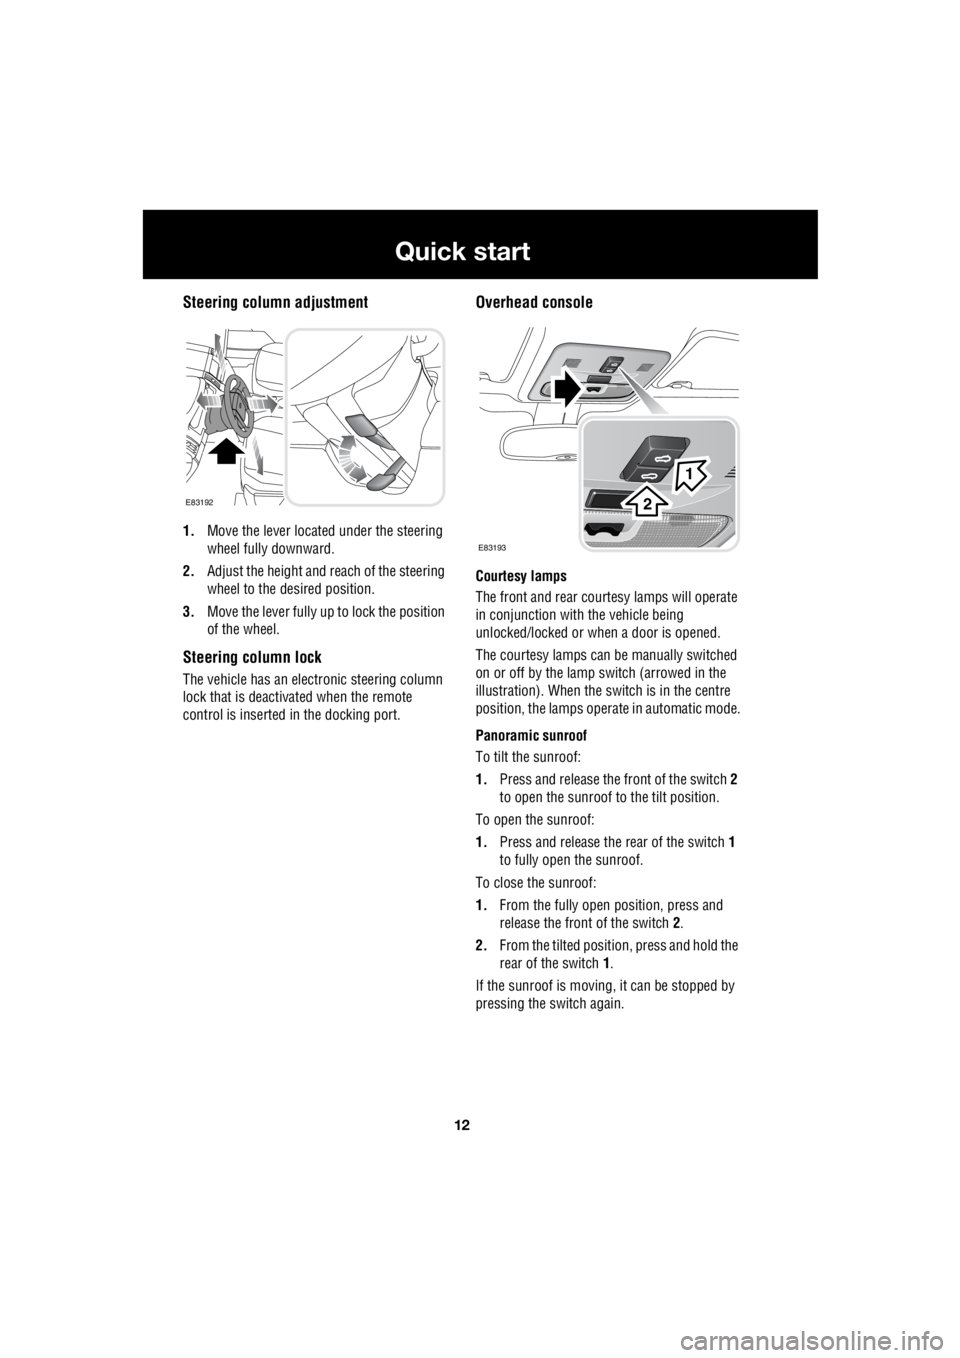
Overhead console
Courtesy lamps
The front and rear cour tesy lamps will operate
in conjunction with the vehicle being
unlocked/locked or when a door is opened.
The courtesy la mps can be manually switched
on or off by the lamp switch (arrowed in the
illustration). When the switch is in the centre
position, the lamps opera te in automatic mode.
Panoramic sunroof
To tilt the sunroof:
1. Press and release the front of the switch 2
to open the sunroof to the tilt position.
To open the sunroof:
1. Press and release the rear of the switch 1
to fully open the sunroof.
To close the sunroof:
1. From the fully open position, press and
release the front of the switch 2.
2. From the tilted positi on, press and hold the
rear of the switch 1.
If the sunroof is moving, it can be stopped by
pressing the switch again.
E83192
E83193
1
2