Page 1963 of 2103

INTERIOR Instrument
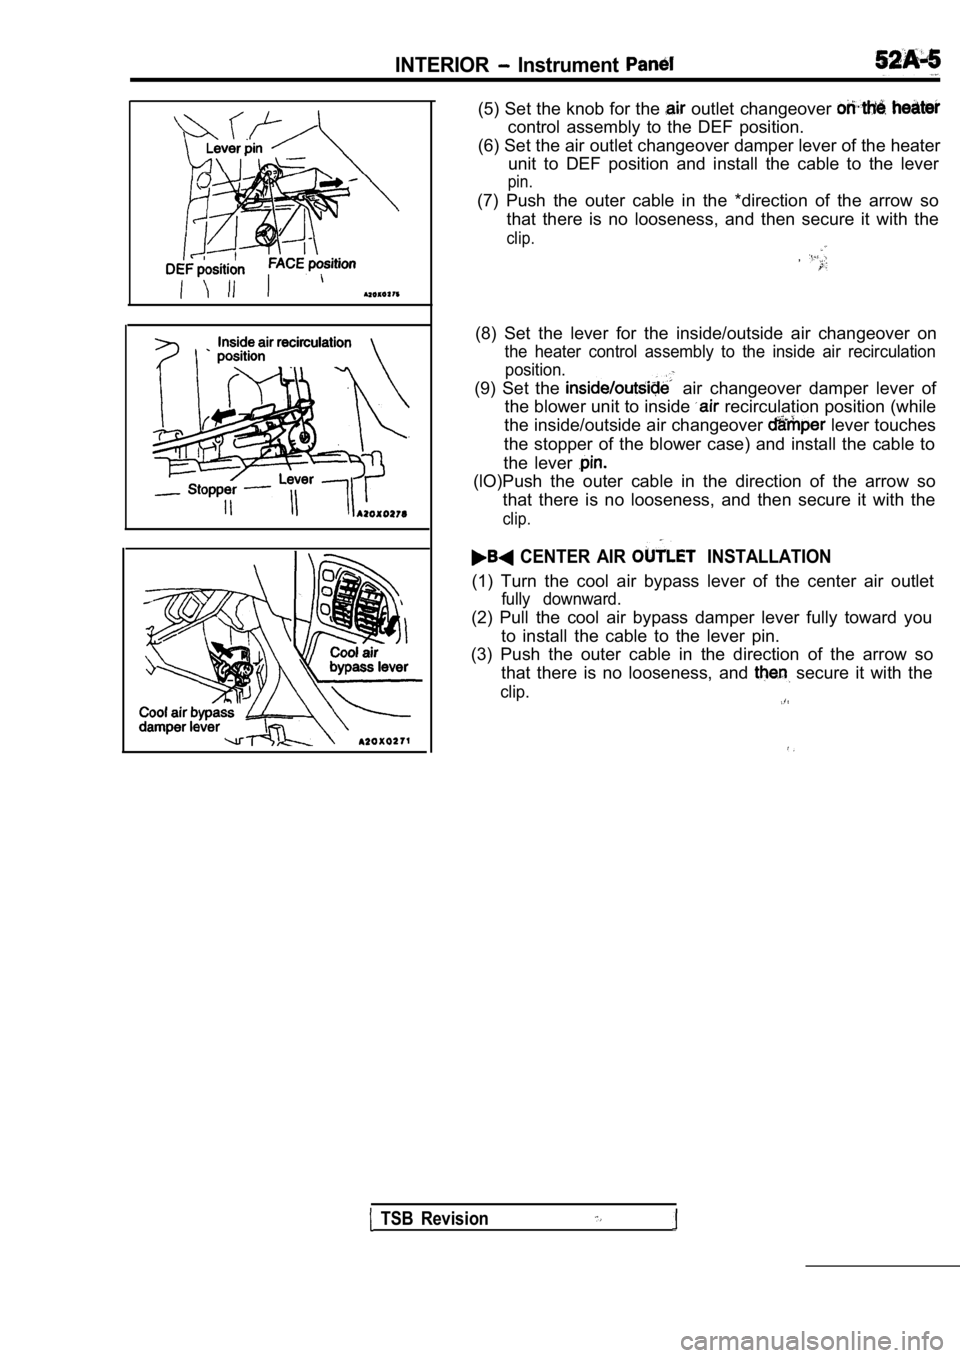
(5) Set the knob for the outlet changeover
control assembly to the DEF position.
(6) Set the air outlet changeover damper lever of t he heater
unit to DEF position and install the cable to the l ever
pin.
(7) Push the outer cable in the *direction of the a rrow so
that there is no looseness, and then secure it with the
clip.
,
(8) Set the lever for the inside/outside air changeover on
the heater control assembly to the inside air recirculation
position.
(9) Set the air changeover damper lever of
the blower unit to inside
recirculation position (while
the inside/outside air changeover
lever touches
the stopper of the blower case) and install the cab le to
the lever
(lO)Push the outer cable in the direction of the ar row so
that there is no looseness, and then secure it with the
clip.
CENTER AIR INSTALLATION
(1) Turn the cool air bypass lever of the center ai r outlet
fully downward.
(2) Pull the cool air bypass damper lever fully toward you
to install the cable to the lever pin.
(3) Push the outer cable in the direction of the ar row so
that there is no looseness, and
secure it with the
clip.
TSB Revision
Page 1976 of 2103

INTERIOR Front Seat
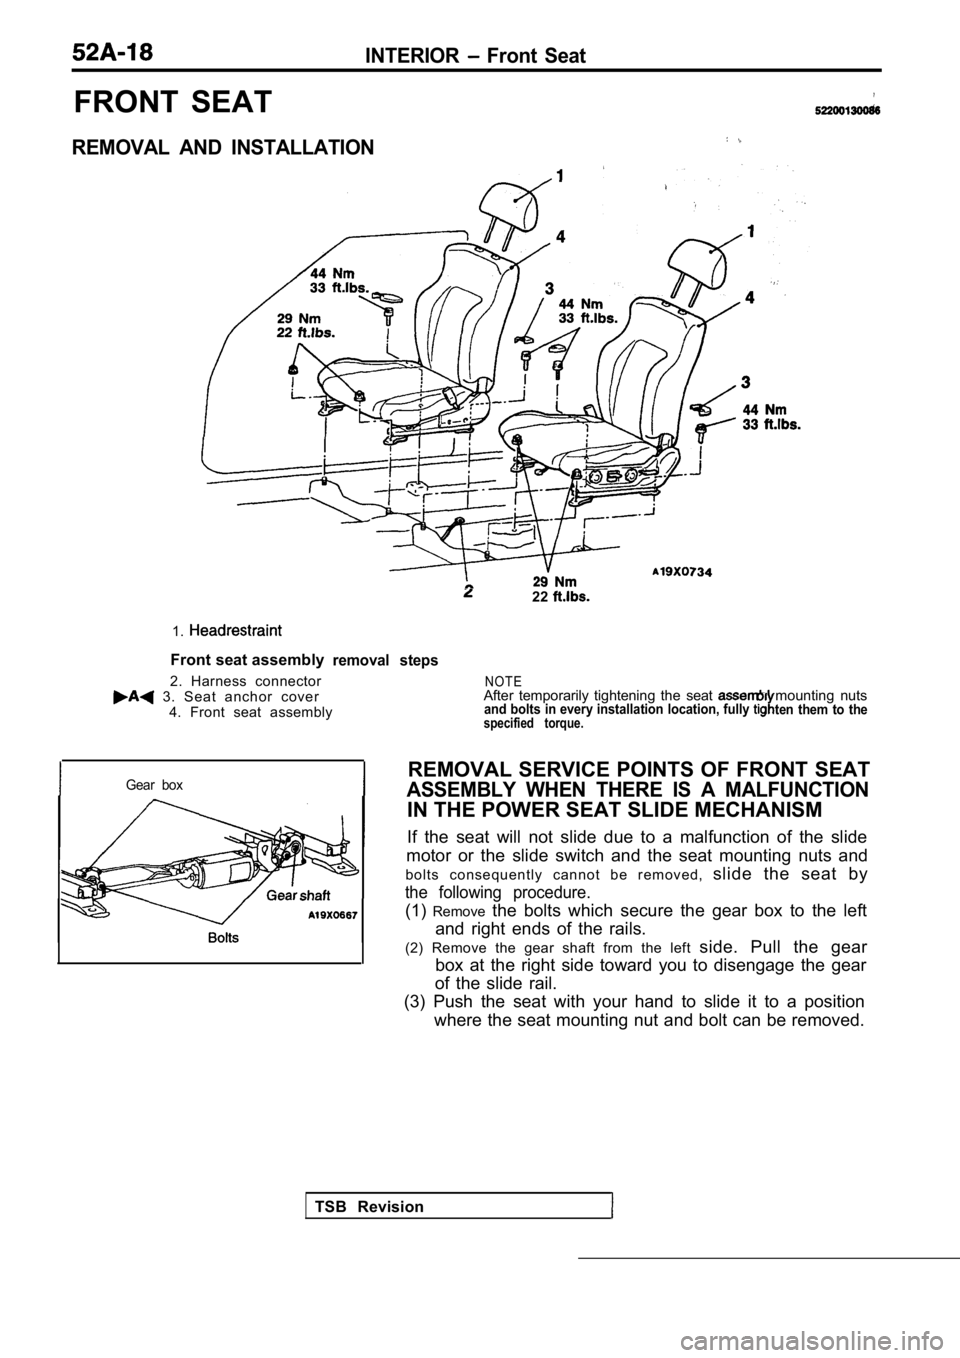
FRONT SEAT
REMOVAL AND INSTALLATION
1.
Front seat assembly
2. Harness connector
3. Seat anchor cover 4. Front seat assembly
22
removal steps
Gear box
TSB Revision
N O T EAfter temporarily tightening the seat mounting nutsand bolts in every installation location, fully ten them to thespecified torque.
REMOVAL SERVICE POINTS OF FRONT SEAT
ASSEMBLY WHEN THERE IS A MALFUNCTION
IN THE POWER SEAT SLIDE MECHANISM
If the seat will not slide due to a malfunction of the slide
motor or the slide switch and the seat mounting nut s and
b o l t s c o n s e q u e n t l y c a n n o t b e r e m o v e d , slide the seat by
the following procedure.
(1)Remove the bolts which secure the gear box to the left
and right ends of the rails.
(2) Remove the gear shaft from the left side. Pull the gear
box at the right side toward you to disengage the g ear
of the slide rail.
(3) Push the seat with your hand to slide it to a p osition
where the seat mounting nut and bolt can be removed .
Page 1981 of 2103
INTERIOR Rear Seat
Rear seat hook
Rear seat cushion 0 0 0 0 0 0 4 0
Rear
Hook
hook hole
REMOVAL SERVICE POINT
SEAT CUSHION REMOVAL.
While keeping the rear seat hook pulled, lift up the rear seat
cushion to remove it.
INSTALLATION SERVICE POINTS
SEAT BACK INSTALLATION
Push the rear seat back in the direction indicated in the
illustration; then securely attach the attachment w ire to the
body
hook and install the rear’ seat back.
REAR SEAT CUSHION INSTALLATION
(1) the rear seat cushion attachment wire below the
rear seat back.
(2) Pass the rear inner seat belt through the rear s eat cushion.
(3) Insert the rear seat’ cushion lock plate into the rear seat
hook holes.
TSB Revision
Page 1985 of 2103
INTERIORFrontSeat Belt
T R O U B L E S H O O T I N G
DIAGNOSTIC FUNCTION
INPUT SIGNAL INSPECTION POINTS
When Using the Scan
1. Connect the scan tool to the data link connector.
Caution
Turn the ignition switch OFF to connect or disconne ct
the scan tool.
2. If buzzer of the scan sounds once when the front
seat belt buckle switch (L.H.) is operated (ON/OFF), ‘the
ETACS-ECU input signal for that switch circuit system
is normal.
When Using a Voltmeter
1.Use the special tool a voltmeter between the
ground terminal and the
terminal of the data link’
connector.
2. If the voltmeter indicator deflects once when th e front
seat belt buckle switch (LH)
operated (ON/OFF), the
ETACS-ECU input signal for that
circuit system
is normal.
TSB Revision
Page 1986 of 2103

INTERIOR Front Seat Belt
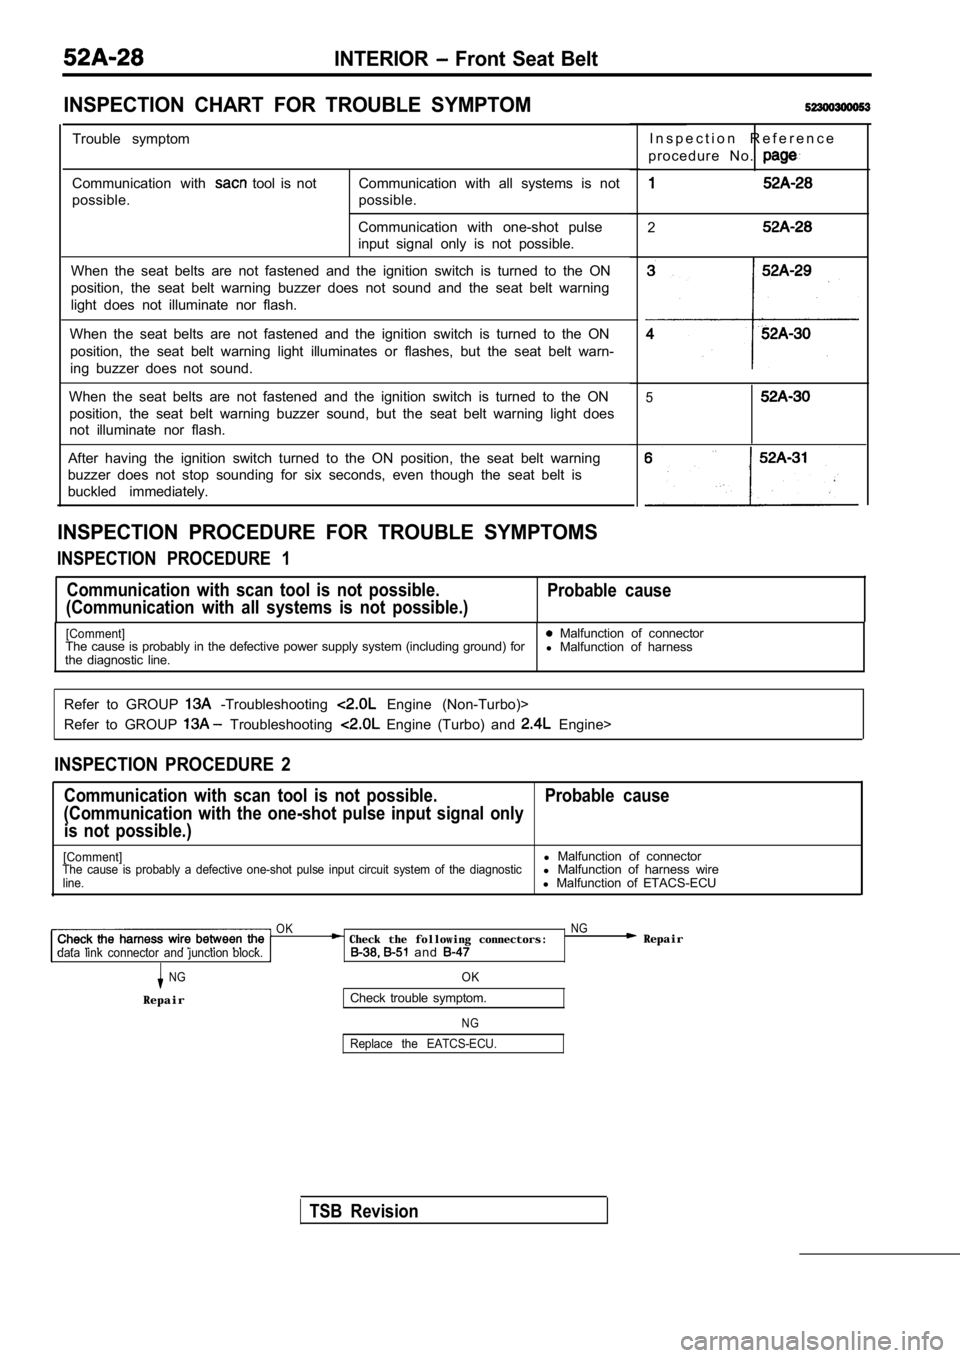
INSPECTION CHART FOR TROUBLE SYMPTOM
Trouble symptom
Communication with
tool is not
possible. Communication with all systems is not
possible.
Communication with one-shot pulse
input signal only is not possible.
When the seat belts are not fastened and the igniti on switch is turned to the ON
position, the seat belt warning buzzer does not sou nd and the seat belt warning
light does not illuminate nor flash.
When the seat belts are not fastened and the igniti on switch is turned to the ON
position, the seat belt warning light illuminates o r flashes, but the seat belt warn-
ing buzzer does not sound.
When the seat belts are not fastened and the igniti on switch is turned to the ON
position, the seat belt warning buzzer sound, but t he seat belt warning light does
not illuminate nor flash.
After having the ignition switch turned to the ON p osition, the seat belt warning
buzzer does not stop sounding for six seconds, even though the seat belt is
buckled immediately.
INSPECTION PROCEDURE FOR TROUBLE SYMPTOMS
INSPECTION PROCEDURE 1
I n s p e c t i o n R e f e r e n c e
p r o c e d u r e N o .
2
3
4
5
Communication with scan tool is not possible.
(Communication with all systems is not possible.) Probable cause
[Comment] Malfunction of connector
The cause is probably in the defective power supply system (including ground) for
l Malfunction of harness
the diagnostic line.
Refer to GROUP
-Troubleshooting Engine (Non-Turbo)>
Refer to GROUP
Troubleshooting Engine (Turbo) and Engine>
INSPECTION PROCEDURE 2
Communication with scan tool is not possible. Probab le cause
(Communication with the one-shot pulse input signal only
is not possible.)
[Comment]l Malfunction of connectorThe cause is probably a defective one-shot pulse in put circuit system of the diagnosticl Malfunction of harness wireline.l Malfunction of ETACS-ECU
OK NG Check the following connectors: Repairdata link connector and junction block. and
NGOK
RepairCheck trouble symptom.
N G
Replace the EATCS-ECU.
TSB Revision
Page 1987 of 2103
INTERIORFront Seat
INSPECTION PROCEDURE 3 ,
When the seat belts are not fastened and the ignitionProbable cause
switch is turned to the ON position, the seat belt warning
buzzer does not sound, and the seat belt warning li ght
does not illuminate nor flash.
[Comment] Malfunction of connector
It is possible that there is a malfunction of the p ower supply circuit (including of
l Malfunction of harness
grounding) of ETACS-ECU.l Malfunction of ETACS-ECU
Disconnect the junction and measure at the harness side.
NG Repair
Check at the harness side
Check continuity between the Check the following connector:
Check trouble symptom.
and measure at the harness side*.Check continuity between the l
(36) and the ground’.
OK
Replace the ETACS-ECU.
NOTE Without theft-alarm system
TSB RevisionI
Page 1988 of 2103

INTERIOR Front Seat Belt
INSPECTION PROCEDURE 4,
When the seat belts are not fastened and the ignitionProbable cause
switch is turned to the ON position, the seat belt warning
light illuminates or flashes, but the seat belt war ning
.
er does not sound.
[Comment]lMalfunction of front seat belt buckle It is possible that there is a malfunction of the front seat belt switch circuit.
l Malfunction of l Malfunction of ETACS-ECU
Replace the ETACS-ECU.
NG.
INSPECTION PROCEDURE 5
Front seat belt buckle switch input circuitsysyem check.
(Refer to
When the seat belts are not fastened and the igniti onProbable cause
switch is turned to the ON position, the seat belt warning.,
buzzer sounds, but the seat belt warning light does not il-
luminate nor flash.
[Comment]l Malfunction of bulbIt is possible that there is a malfunction of the s eat belt warning light circuit or l Malfunction of ECU.l Malfunction of harness wire
l Malfunction of ETACS-ECU
OKNG the followina connectors:NG
TSB Revision
junction block and combination meter.
OKOKNGNGDisconnectthejunction blockconnector Check the following connectors:
Disconnectthejunction blockconnector Check the following connectors: and measure at the harness side. and measure at the harness side. and and llContinuity between terminal (5) and
Continuity between terminal (5) and
NGNG Repair Repair
OK: ContinuityNGCheck trouble symptom. Check the harness wire between block and combination
trouble symptom.Replace the ETACS-ECU.
Repair, if necessary.
Page 1989 of 2103

Front Seat Belt
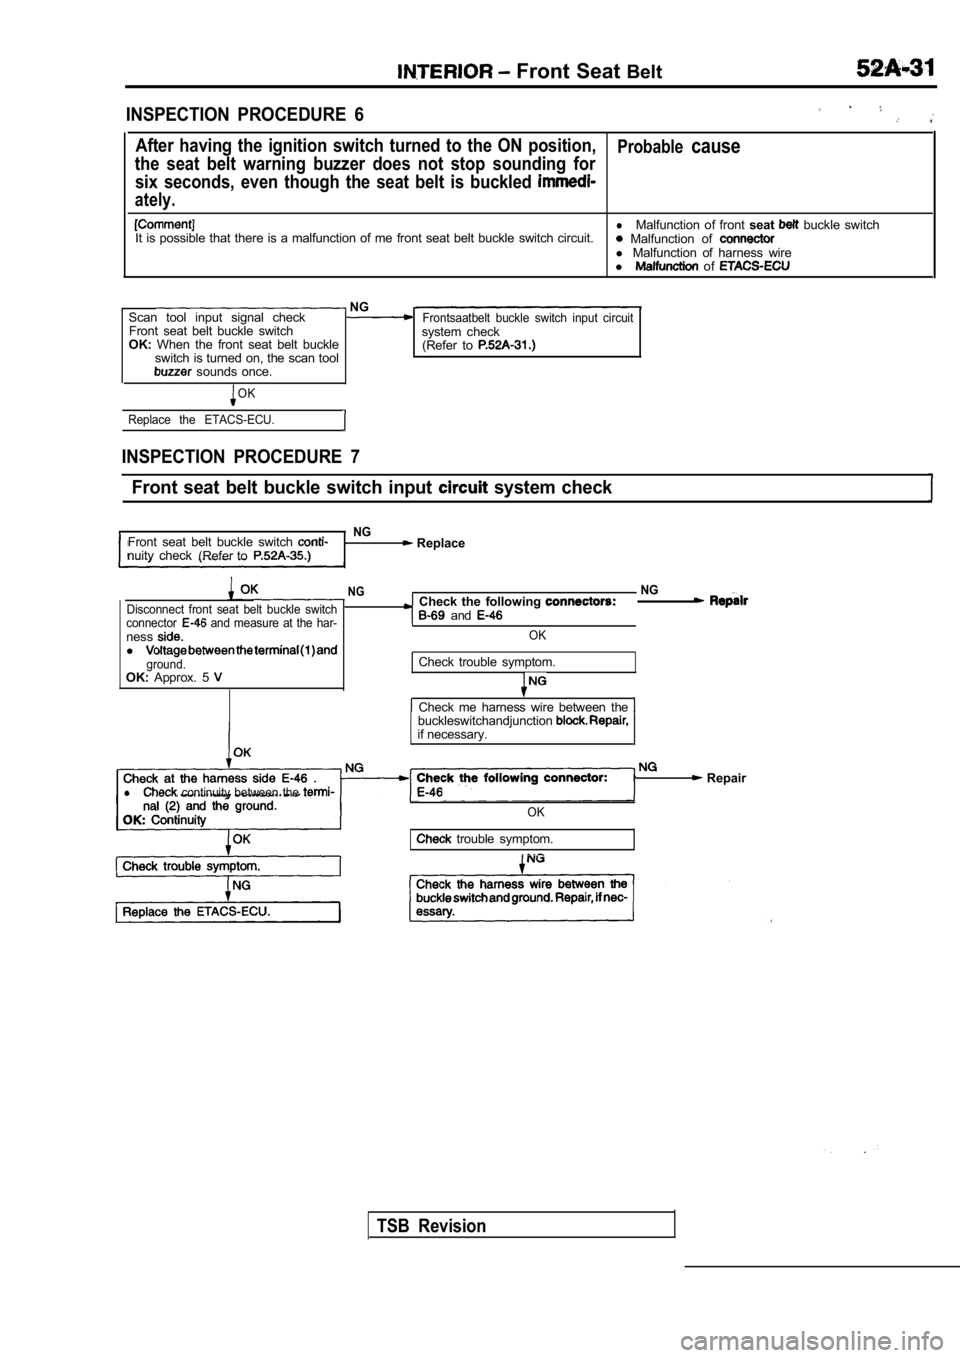
INSPECTION PROCEDURE 6
After having the ignition switch turned to the ON p osition,Probablecause
the seat belt warning buzzer does not stop sounding for
six seconds, even though the seat belt is buckled
ately.
lMalfunction of front seat buckle switch
It is possible that there is a malfunction of me fr ont seat belt buckle switch circuit. Malfunction of l Malfunction of harness wire
l of
NG
Scan tool input signal checkFrontsaatbelt buckle switch input circuitFront seat belt buckle switch system check
OK: When the front seat belt buckle
(Refer to
switch is turned on, the scan tool sounds once.
OK
Replace the ETACS-ECU.
INSPECTION PROCEDURE 7
Front seat belt buckle switch input system check
NGFront seat belt buckle switch Replace
nuity check (Refer to
NGNG
Disconnect front seat belt buckle switchCheck the following
connector and measure at the har- and
nessOKl ground.Check trouble symptom.
OK: Approx. 5
l continuity between the
Check me harness wire between the buckleswitchandjunctionif necessary.
Repair
OK
trouble symptom.
TSB Revision