1990 MITSUBISHI SPYDER check transmission fluid
[x] Cancel search: check transmission fluidPage 49 of 2103
GENERALMaintenance Service
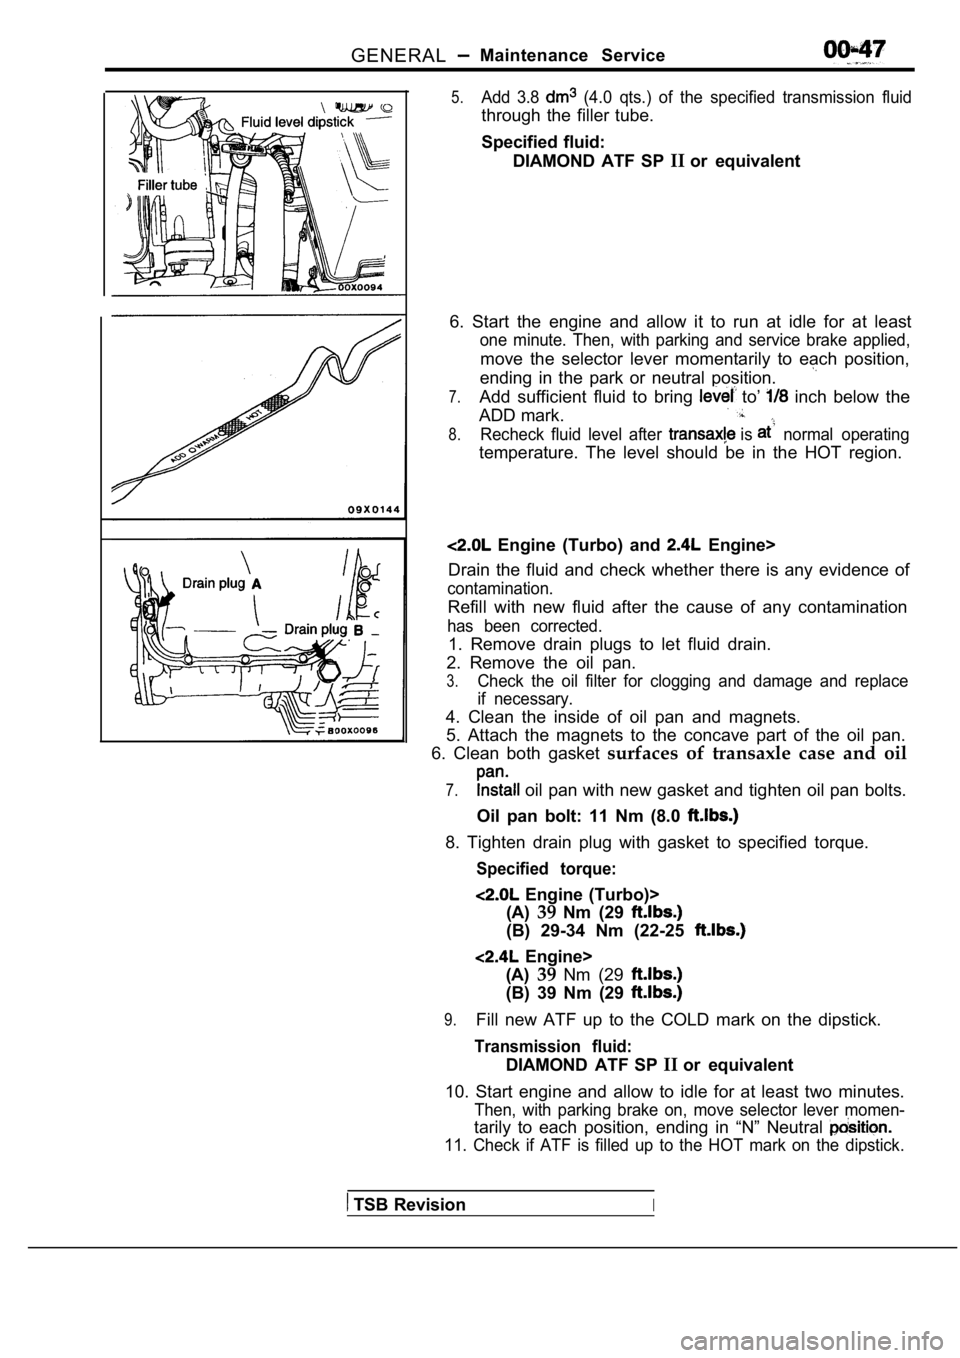
5.Add 3.8 (4.0 qts.) of the specified transmission fluid
through the filler tube.
Specified fluid:DIAMOND ATF SP IIor equivalent
6. Start the engine and allow it to run at idle for at least
one minute. Then, with parking and service brake ap plied,
move the selector lever momentarily to each positio n,
ending in the park or neutral position.
7.Add sufficient fluid to bring to’ inch below the
ADD mark.
8.Recheck fluid level after is normal operating
temperature. The level should be in the HOT region.
Engine (Turbo) and Engine>
Drain the fluid and check whether there is any evid ence of
contamination.
Refill with new fluid after the cause of any contam ination
has been corrected.
1. Remove drain plugs to let fluid drain.
2. Remove the oil pan.
3.Check the oil filter for clogging and damage and re place
if necessary.
4. Clean the inside of oil pan and magnets.
5. Attach the magnets to the concave part of the oi l pan.
6. Clean both gasket surfaces of transaxle case and oil
7. oil pan with new gasket and tighten oil pan bolts.
Oil pan bolt: 11 Nm (8.0
8. Tighten drain plug with gasket to specified torq ue.
Specified torque:
Engine (Turbo)>
(A) 39Nm (29
(B) 29-34 Nm (22-25
Engine>
(A) 39Nm (29
(B) 39 Nm (29
9.Fill new ATF up to the COLD mark on the dipstick.
Transmission fluid:
DIAMOND ATF SP IIor equivalent
10. Start engine and allow to idle for at least two minutes.
Then, with parking brake on, move selector lever mo men-
tarily to each position, ending in “N” Neutral
11. Check if ATF is filled up to the HOT mark on the dipstick.
TSB RevisionI
Page 528 of 2103
ENGINE (TURBO)
AND
ENGINE> Troubleshooting
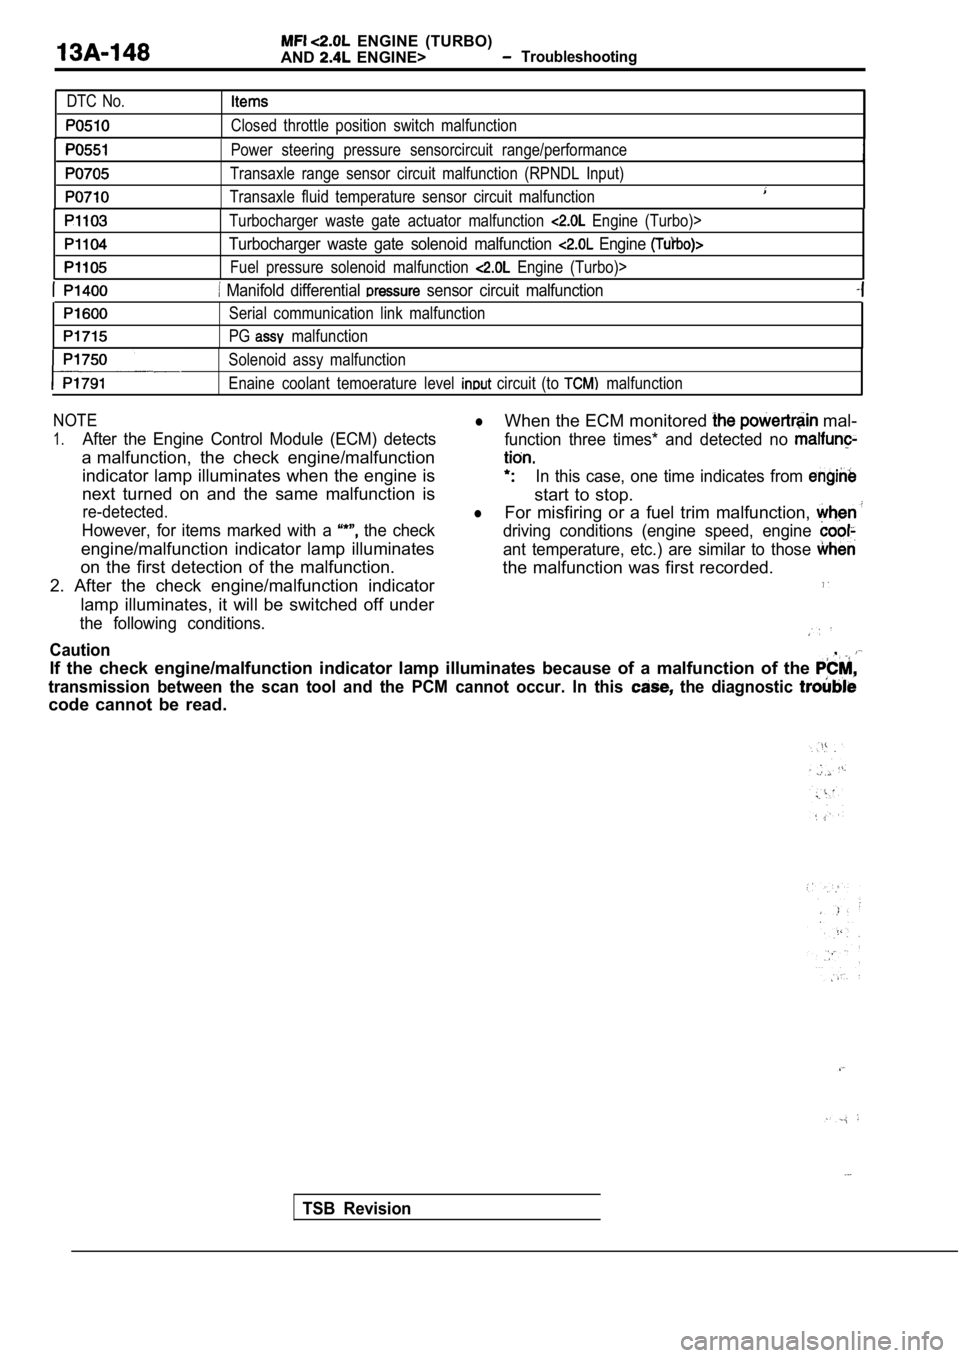
DTC No.
Closed throttle position switch malfunction
Power steering pressure sensorcircuit range/perfor mance
Transaxle range sensor circuit malfunction (RPNDL Input)
Transaxle fluid temperature sensor circuit malfunct ion
Turbocharger waste gate actuator malfunction Engine (Turbo)>
Turbocharger waste gate solenoid malfunction Engine
Fuel pressure solenoid malfunction Engine (Turbo)>
Manifold differential sensor circuit malfunction
Serial communication link malfunction
PG
malfunction
Solenoid assy malfunction
Enaine coolant temoerature level
circuit (to malfunction
NOTElWhen the ECM monitored mal-
1.After the Engine Control Module (ECM) detects function three times* and detected no
a malfunction, the check engine/malfunction
indicator lamp illuminates when the engine isIn this case, one time indicates from
next turned on and the same malfunction is
start to stop.
re-detected.lFor misfiring or a fuel trim malfunction,
However, for items marked with a the checkdriving conditions (engine speed, engine
engine/malfunction indicator lamp illuminatesant temperature, etc.) are similar to those
on the first detection of the malfunction. the malfunction was first recorded.
2. After the check engine/malfunction indicator
lamp illuminates, it will be switched off under
the following conditions.
Caution,
If the check engine/malfunction indicator lamp illu minates because of a malfunction of the
transmission between the scan tool and the PCM cann ot occur. In this the diagnostic
code cannot be read.
TSB Revision
Page 1039 of 2103
![MITSUBISHI SPYDER 1990 Service Repair Manual AUTOMATIC TRANSAXLE ENGINE’
(TURBO) AND
ENGINE> T r o u b l e s h o o t i n g
Code No. 59 Anomalous vibration occurrence
[Comment]l Noise generatedIf pulse generator A output ind](/manual-img/19/57345/w960_57345-1038.png "MITSUBISHI SPYDER 1990 Service Repair Manual AUTOMATIC TRANSAXLE ENGINE’
(TURBO) AND
ENGINE> T r o u b l e s h o o t i n g
Code No. 59 Anomalous vibration occurrence
[Comment]l Noise generatedIf pulse generator A output ind")
AUTOMATIC TRANSAXLE ENGINE’
(TURBO) AND
ENGINE> T r o u b l e s h o o t i n g
Code No. 59 Anomalous vibration occurrence
[Comment]l Noise generatedIf pulse generator A output indicates the revolutio n alteration by more than 50
l Automatic transmission fluid deteriorated in a specified cycle, diagnosis code 59 is output.
l occurred
Yes there noise in the pulse generator Eliminate the source Of A output waveform?
No
Replace automatic’transmission fluid.
Check trouble symptom.
NG
Inspection procedure 15; vibration.
(Refer to
Code Torque reduction request and execution sig-
nal lines
causeCode Torque reduction request signal lines
Code
Torque reduction execution signal lines
[Comment]l Malfunction of ECMIf a “torque reduction executing” signal is detecte d for 0.2 second or more while al Malfunction of TCM
“no torque reduction request” signal is being outpu t, there is a short-circuit in the
l Malfunction of connector
torque reduction request signal line or an open cir cuit in the torque reduction executionsignal line, and code No. 61 is output.
If a “torque reduction executing” signal is not det ected four times even though 0.2
second has passed since a “torque reduction request ” signal was output, there is
an open circuit in the torque reduction request sig nal line and code No. 62 is output.
If a “torque reduction signal is not detected under the following conditi ons,there is a short-circuit in the torque reduction execution signal line and code NO.
63 is output.
The transaxle output shaft speed has been 1,000
or higher after the ignition
switch in turned on.
Engine speed has been 1,000 or higher for 20 minutes or more after the ignitio nswitch is turned on.
TSB Revision .
Measure at ECM
lDisconnect the connector and
l
Voltage between (7) and ground
l switch.
NG
Check the l
OK
Check trouble
Repair
TCM and
u n
Replace the TCM.
Page 1072 of 2103
AUTOMATIC TRANSAXLE
ENGINE (TURBO) AND On-vehicle Service
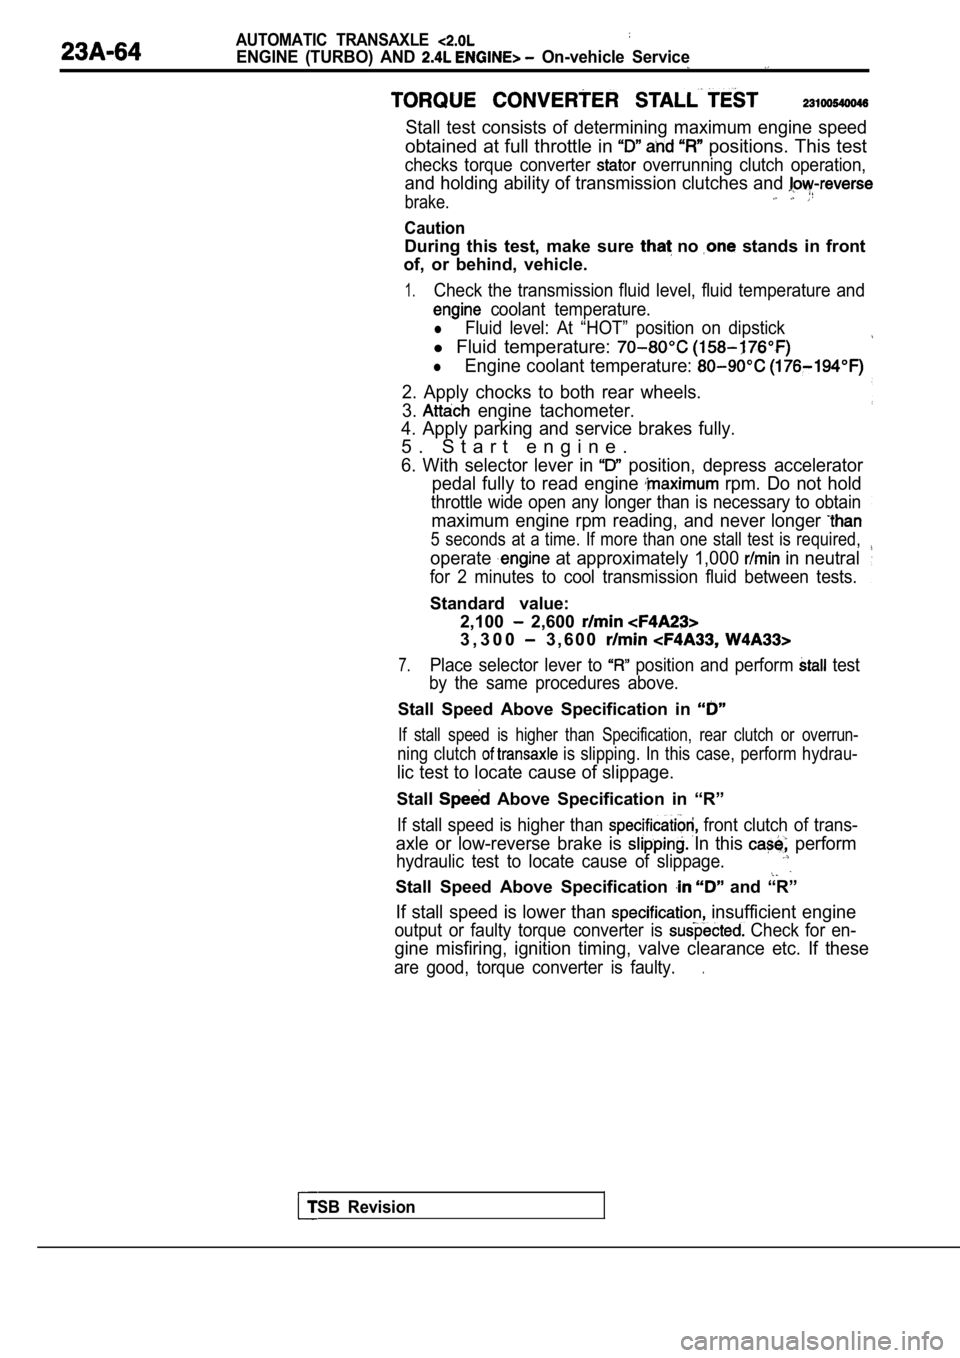
Stall test consists of determining maximum engine speed
obtained at full throttle in positions. This test
checks torque converter overrunning clutch operation,
and holding ability of transmission clutches and
brake.
Caution
During this test, make sure no stands in front
of, or behind, vehicle.
1.Check the transmission fluid level, fluid temperatu re and
coolant temperature.
lFluid level: At “HOT” position on dipstick
l Fluid temperature:
lEngine coolant temperature:
2. Apply chocks to both rear wheels.
3.
engine tachometer.
4. Apply parking and service brakes fully.
5 . S t a r t e n g i n e .
6. With selector lever in position, depress accelerator
pedal fully to read engine
rpm. Do not hold
throttle wide open any longer than is necessary to obtain
maximum engine rpm reading, and never longer
5 seconds at a time. If more than one stall test is required,
operate at approximately 1,000 in neutral
for 2 minutes to cool transmission fluid between te sts.
Standard value:
TSB Revision
2,100 2,600
3 , 3 0 0 3 , 6 0 0
7.Place selector lever to position and perform test
by the same procedures above.
Stall Speed Above Specification in
If stall speed is higher than Specification, rear c lutch or overrun-
ning clutch is slipping. In this case, perform hydrau-
lic test to locate cause of slippage.
Stall Above Specification in “R”
If stall speed is higher than front clutch of trans-
axle or low-reverse brake is In this perform
hydraulic test to locate cause of slippage.
Stall Speed Above Specification and “R”
If stall speed is lower than insufficient engine
output or faulty torque converter is Check for en-
gine misfiring, ignition timing, valve clearance etc. If these
are good, torque converter is faulty..
Page 1128 of 2103
AUTOMATIC TRANSAXLE ENGINE (NON-TURBO)> Troubleshooting
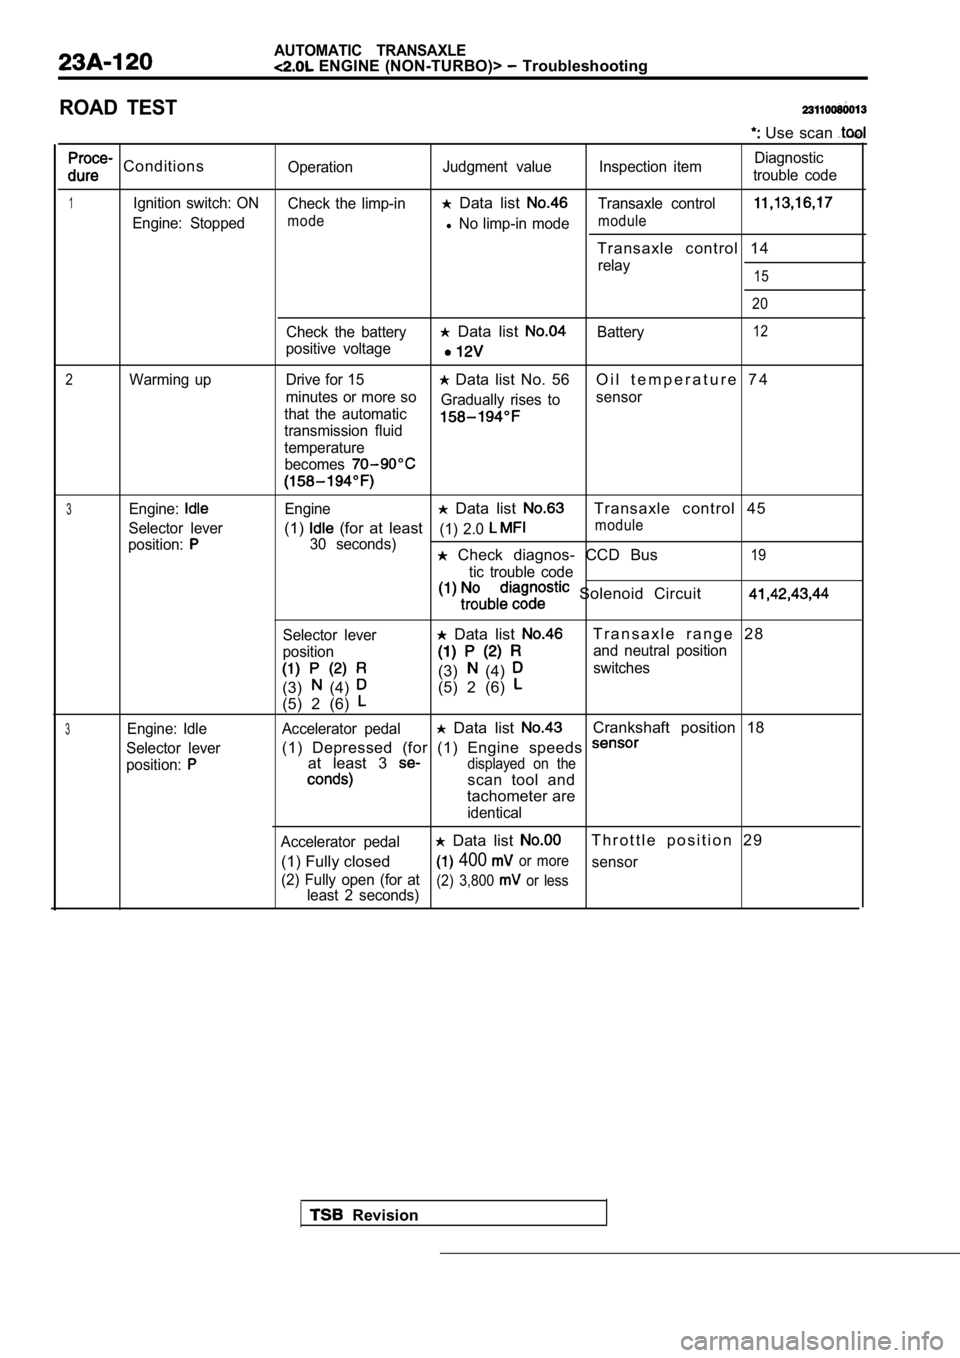
ROAD TEST
Use scan
ConditionsOperationJudgment value Inspection item Diagnostic
trouble code
1Ignition switch: ON Check the limp-in Data list Transaxle control
Engine: Stoppedmodel No limp-in modemodule
Transaxle control 14
relay15
20
Check the battery Data list Battery12
positive voltage
2Warming up Drive for 15 Data list No. 56 O i l t e m p e r a t u r e 7 4
minutes or more so
that the automatic Gradually rises to
sensor
transmission fluid
temperature
becomes
3Engine:Engine Data list Transaxle control 45
Selector lever(1) (for at least(1) 2.0 module
position:30 seconds) Check diagnos- CCD Bus19
tic trouble code
Solenoid Circuit
Selector lever
position
(3) (4)
(5) 2 (6)
Data list T r a n s a x l e r a n g e 2 8
and neutral position
(3) (4) switches
(5) 2 (6)
3Engine: Idle Accelerator pedal Data list Crankshaft position 18
Selector lever(1) Depressed (for (1) Engine speeds
position:at least 3 displayed on the
scan tool and
tachometer are
identical
Accelerator pedal
Data list T h r o t t l e p o s i t i o n 2 9
(1) Fully closed
400 or moresensor
(2) Fully open (for at least 2 seconds)
(2) 3,800 or less
Revision
Page 1142 of 2103
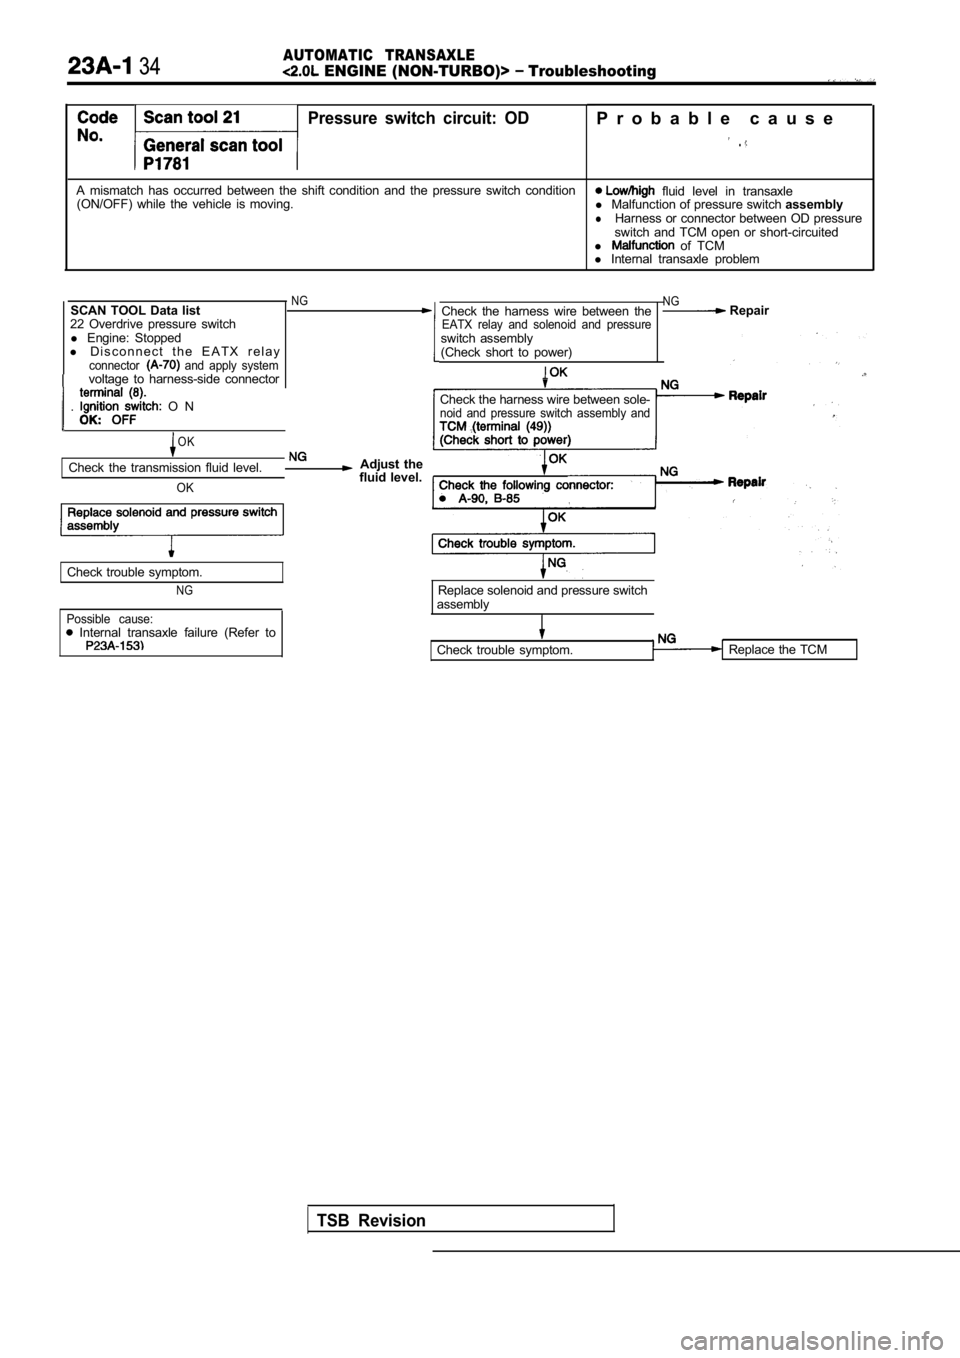
34AUTOMATIC TRANSAXLE ENGINE (NON-TURBO)> Troubleshooting
Pressure switch circuit: OD
A mismatch has occurred between the shift condition and the pressure switch condition
(ON/OFF) while the vehicle is moving.
SCAN TOOL Data list
NG
22 Overdrive pressure switch l Engine: Stopped
l D i s c o n n e c t t h e E A T X r e l a y
connector and apply systemvoltage to harness-side connector
. O N
OK
Check the transmission fluid level.
OK
Replace solenoid and pressure switch
Check trouble symptom.
NG
Possible cause: Internal transaxle failure (Refer to
Adjust the
fluid level.
P r o b a b l e c a u s e
.
fluid level in transaxle
l Malfunction of pressure switch assembly
lHarness or connector between OD pressure
switch and TCM open or short-circuited
l
of TCM
l Internal transaxle problem
Check the harness wire between the
EATX relay and solenoid and pressureswitch assembly
(Check short to power)
NG Repair
Check the harness wire between sole-noid and pressure switch assembly and
Replace solenoid and pressure switch
assembly
Check trouble symptom.
TSB Revision
Replace the TCM
Page 1144 of 2103

36AUTOMATIC TRANSAXLE
ENGINE (NON-TURBO)> Troubleshooting
Code Scan tool 24Pressure switch cricuit: LRProbable cause
No.General scan tool
A mismatch has occurred between the shift condition
and the pressure switch conditionl
Low/high fluid level transaxle
(ON/OFF) while the vehicle is moving. l
Malfunction of switch l Harness or connector between pressure
switch and TCM open or short-circuited
l Malfunction of TCM
l Internal transaxle problem
SCAN TOOL
list
20 pressure switch
l Engine: Stopped
l D i s c o n n e c t t h e E A T X r e l a y
connector and apply systemvoltage to harness-side connector
terminal (8).
l Ignition switch: ON
OK: OFF
NG Check the harness wire between theEATX relay and solenoid and pressureswitch assembly
(Check short to power)
Hydraulic Possible causes:
l Raise vehicle on hoist lIncorrect transmission fluid levelallowsfrontwheelstoturn.l
Internal transaxle failure (Refer
l Attach oauae to to
l the Replace and pressure
l
Increase speed to1 5 0 01. Take a reading of theclutch pressure.O K : psi)
2. SCAN TOOL list
20 L-R pressure switch
OK: ON Replace the TCM
OK
INTERMITTENT MALFUNCTIONl
Study the DTC information (back-
ground, range of check, setting
condition).l Refer to INTRODUCTION How
to Cope with Intermittent Malfunc-
tion. OK
Check the harness N G Repait and pressure switch assembly andTCM (terminal (10))
(Check short to power)
OK
Check the following connector: .N G Repair
OK
Check trouble
TSB Revision
Replace solenoid and pressure switch
Check trouble symptom.
NG
Replace the TCM
Code Scan tool 25
Pressure switch circuit: Probable cause
No.General scan tool
A mismatch has occurred between the shift condition and the pressure switch conditionl
Low/high fluid level in transaxle
(ON/OFF) while the vehicle is moving. l
Malfunction of pressure switch assembly
l Harness or connector between OD pressure
switch and TCM open or
l Harness or connector between pressure
switch and TCM open or short-circuited
l Malfunction of TCM
Internal transaxle problem
l Carrv out the procedure for code No. 21. (Refer
to
l Carry out the inspection procedure for code No. 24. (Refer
to
Page 1148 of 2103
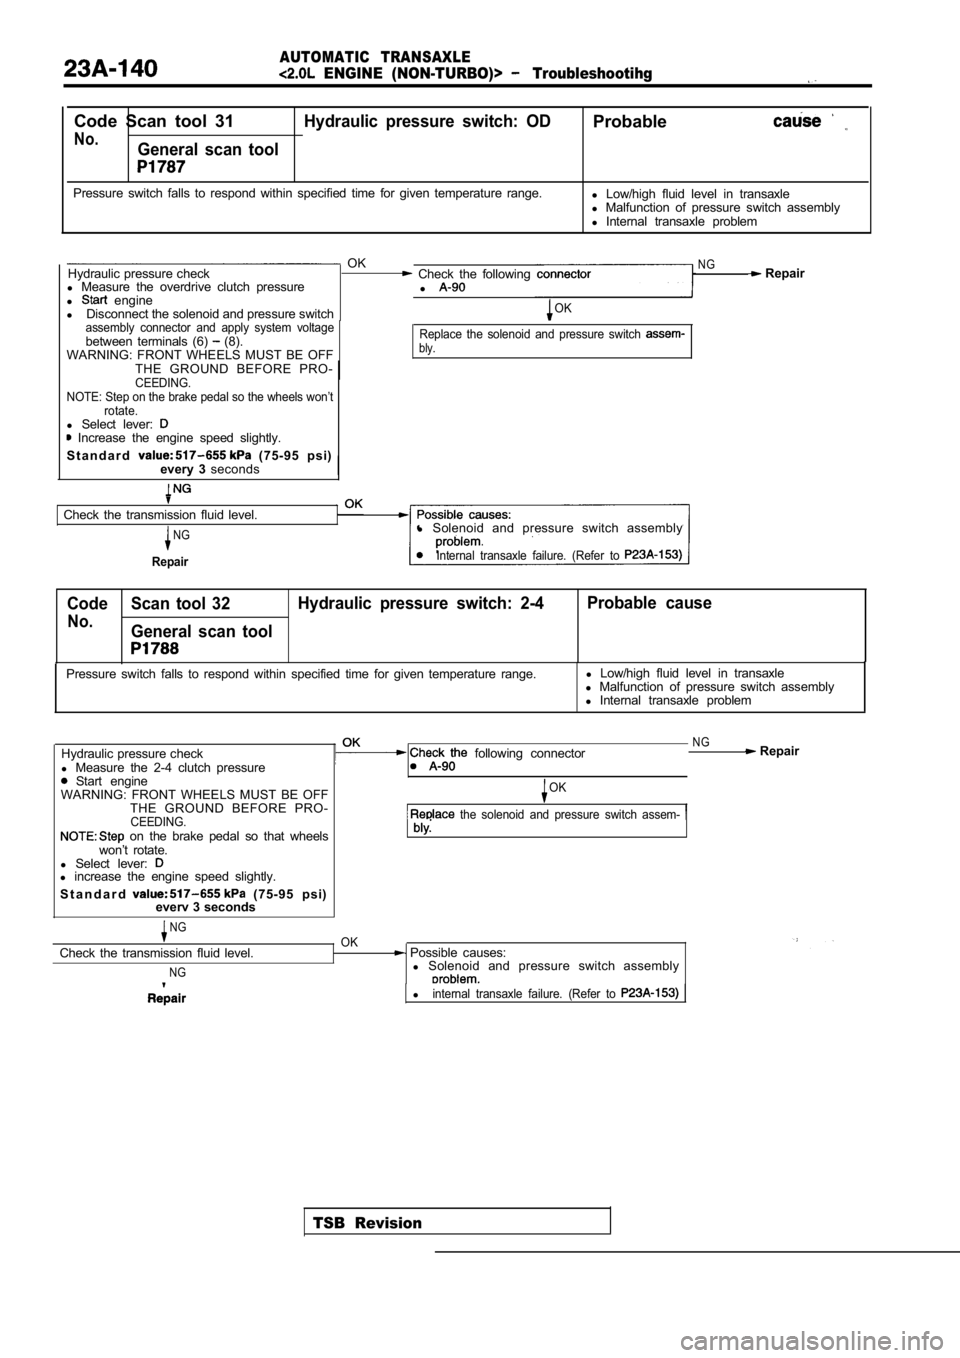
AUTOMATIC TRANSAXLE
ENGINE (NON-TURBO)> Troubleshootihg
Code Scan tool 31Hydraulic pressure switch: ODProbable
No.General scan tool
Pressure switch falls to respond within specified time for given temperature range.
l Low/high fluid level in transaxle
l Malfunction of pressure switch assembly
l Internal transaxle problem
OKNGHydraulic pressure check Check the following Repair
l Measure the overdrive clutch pressure
l
l engine
l Disconnect the solenoid and pressure switchOK
assembly connector and apply system voltage
between terminals (6) (8).
WARNING: FRONT WHEELS MUST BE OFFReplace the solenoid and pressure switch bly.
THE GROUND BEFORE PRO-CEEDING.
NOTE: Step on the brake pedal so the wheels won’t rotate.
l Select lever: Increase the engine speed slightly.
S t a n d a r d
(75-95 psi)
every 3 seconds
Check the transmission fluid level.
NG
Repair
l Solenoid and pressure switch assembly
Internal transaxle failure. (Refer to
Code Scan tool 32 Hydraulic pressure switch: 2-4 Probable cause
No.General scan tool
TSB Revision
Pressure switch falls to respond within specified t
ime for given temperature range.l
Low/high fluid level in transaxle
l Malfunction of pressure switch assembly
l Internal transaxle problem
Hydraulic pressure check
l Measure the 2-4 clutch pressure
Start engine
following connector
WARNING: FRONT WHEELS MUST BE OFF THE GROUND BEFORE PRO-
CEEDING. on the brake pedal so that wheels
won’t rotate.
l Select lever:
l increase the engine speed slightly.
S t a n d a r d
(75-95 psi)
everv 3 seconds
NGOK
NG Repair
OK
the solenoid and pressure switch assem-
Check the transmission fluid level.
NG
Possible causes:
l Solenoid and pressure switch assembly
linternal transaxle failure. (Refer to