Page 1746 of 2103
![MITSUBISHI SPYDER 1990 Service Repair Manual ,
INSPECTION PROCEDURE 5
When ignition key is turned to “START”, ABS warning light Probable
does not illuminate.
[Comment]The ABS-ECU uses the power to the which is cut MITSUBISHI SPYDER 1990 Service Repair Manual ,
INSPECTION PROCEDURE 5
When ignition key is turned to “START”, ABS warning light Probable
does not illuminate.
[Comment]The ABS-ECU uses the power to the which is cut](/manual-img/19/57345/w960_57345-1745.png)
,
INSPECTION PROCEDURE 5
When ignition key is turned to “START”, ABS warning light Probable
does not illuminate.
[Comment]The ABS-ECU uses the power to the which is cut when the ignition switch is M a l f u n c t i o n
turned to “START”. The ABS light uses power which is not cut evenl
M a l f u n c t i o n o f when the ignition switch is turned to “START”.Accordingly, because the power to the ABS-ECU is st opped in “START” position, .if the light does not illuminate at this time, the cause
is a problem in the light illumination circuit in the valve relay.,
Measure at NG
Disconnect the connector and
OK
the unit.
INSPECTION PROCEDURE 6
and Repair
Check trouble svmotom.
meter and the hydraulic
The ABS warning light flashes once after the igniti on key
is turned to “ON”. The light illuminates when the i gnitionProbable cause ,
key is turned to “START”, and when the key is retur
ned to
“ON”, it flashes once.
[Comment] Malfunction of harness or connectorWhen power flows, the ABS-ECU turns on the light for approximately 1 second Malfunction of while it performs a valve relay test. If there is a break in the harness between theECU and the light illuminates only when the valve relay is off in the valve
relay test, etc.
Measure at ABS-ECU connector l Disconnect the connector and mea-
sure at the harness side.
Ignition switch ON
Voltage between terminal 25 and body
ground
OK Battery positive voltage
TSB Revision
OK
Check the harness between thecombination meter and the ABS-ECU. if
Repair
l
OK
Check trouble symptom.
NG Repair
NG Replace the
Page 1747 of 2103
, , .
PROCEDURE 7
Break operation is
[Comment] o f w h e e l This depending on the driving conditions and the road surface conditions, so ‘ M a l f u n c t i o n _ _
problem diagnosis is difficult. However, if a normal diagnostic trouble code is displayed,l
carry out the following Malfunction of bearing. . .l of: .
W h e e l s p e e d -NG: Repair(Refer to
N G N G speed sensor check(Refer to GROUP -Wheel SpeedReplace the wheel speed sensor.
OKSensor Check.)
OK
Hydraulic unit check (Refer to N GABS rotor check (Refer to Replace the rotor.
OK
Wheel bearing end play check
Refer to GROUP 26 On-vehicle Repair
Refer to GROUP 27
On-vehide
Service.
Check trouble symptom.
N G
ABS-ECU connector Disconnect the connector and measure at the harness side.
Resistance value between termi-nals and
NG Repair
O K
The sensor harness and connector s h o u l d b e m o v e d w h i l e t h e s e
inspections are carried out.
the .
TSB Revision
Page 1748 of 2103
t h e . I-,..,
.. .
Short-circuiting the positive probe between a
connector terminal and ground could damage the
wiring, the sensor, ABS-ECU, or all three. Use
care to this!
3 .
If voltmeter any division from standard value, check
the
sensor, actuator and related electrical
wiring, then repair or replace.
4. , After
replacement, recheck with the voltmeter
the repair has corrected the problem.
Connector terminal arrangement for
troubleshooting
Terminal arrangement shown on the tool connector
0 0 0 0 0 0 7 6 ABS-ECU Connector Terminal Arrangement
Use the special tool to check the ABS-ECU
voltage and resistance.
2. The
connector terminal arrangement for
“troubleshooting is different from the terminal
shown on the special tool connector.
So take the readings from the terminal numbers of
the special tool when checking.
Example
ABS-ECU connector terminalTerminal number shown on
number for troubleshootingthespecial tool connector
181
TSB Revision
Page 1750 of 2103

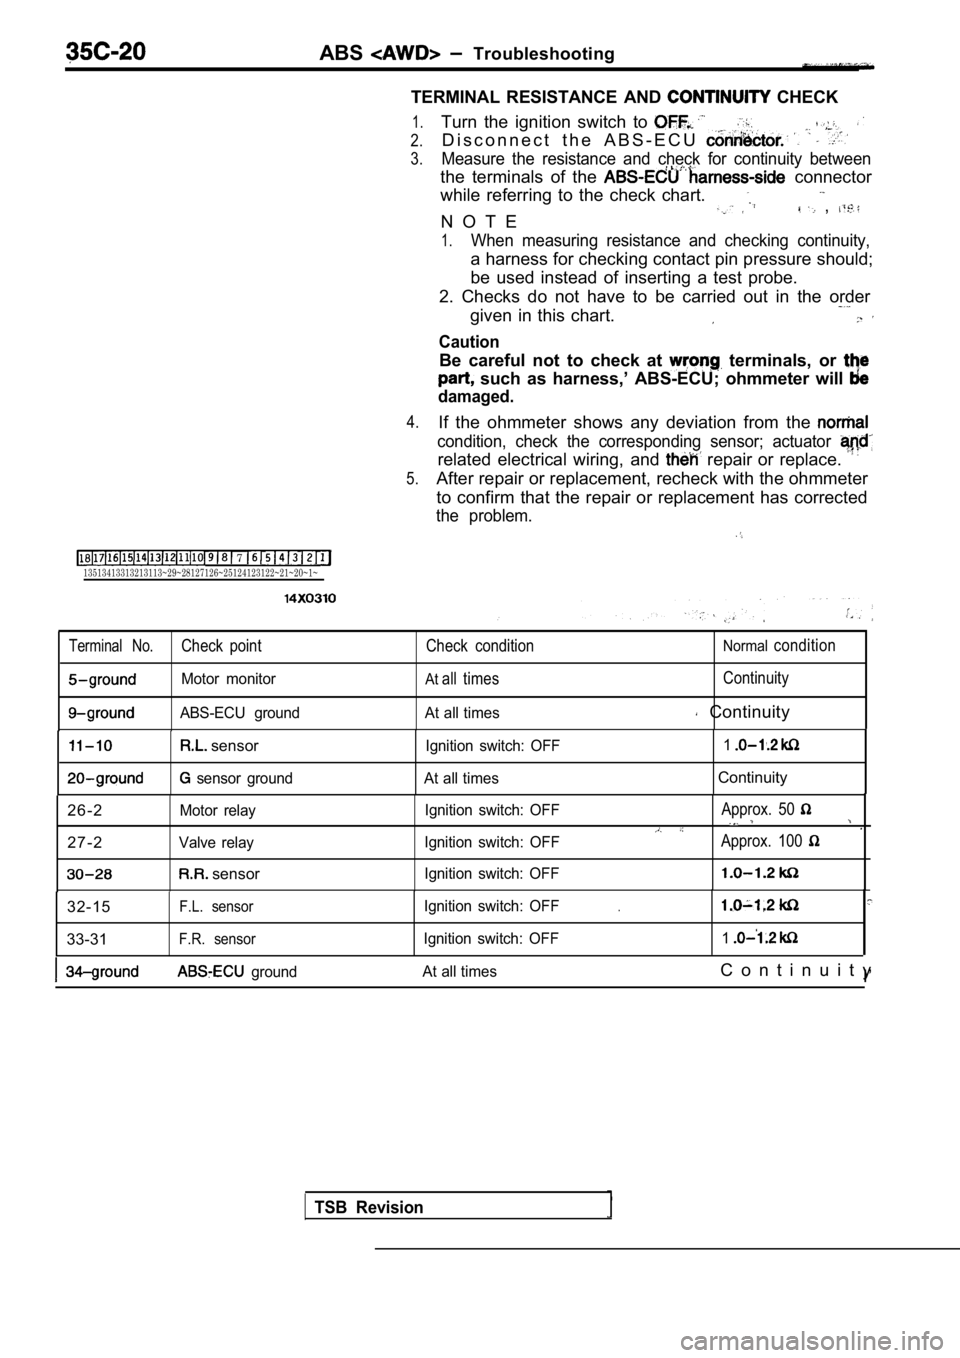
ABS Troubleshooting
TERMINAL RESISTANCE AND
CHECK
7 13513413313213113~29~28127126~25124123122~21~20~1~
1.
2.
3.
4.
5.
Turn the ignition switch to
D i s c o n n e c t t h e A B S - E C U
Measure the resistance and check for continuity bet ween
the terminals of the connector
while referring to the check chart.
N O T E
,
1.When measuring resistance and checking continuity,
a harness for checking contact pin pressure should;
be used instead of inserting a test probe.
2. Checks do not have to be carried out in the orde r
given in this chart.
Caution
Be careful not to check at terminals, or
such as harness,’ ABS-ECU; ohmmeter will
damaged.
If the ohmmeter shows any deviation from the
condition, check the corresponding sensor; actuator
related electrical wiring, and repair or replace.
After repair or replacement, recheck with the ohmmeter
to confirm that the repair or replacement has corre cted
the problem.
Terminal No.Check point Check conditionNormalcondition
Motor monitorAtall timesContinuity
ABS-ECU ground At all times Continuity
sensor
sensor groundIgnition switch: OFF
1At all timesContinuity
2 6 - 2
Motor relay
2 7 - 2Valve relay
sensor
Ignition switch: OFF
Ignition switch: OFF
Ignition switch: OFFApprox. 50
Approx. 100
32-15F.L. sensor
33-31F.R. sensor
Ignition switch: OFF
Ignition switch: OFF.
1
ground At all timesC o n t i n u i t y
I’
TSB Revision
Page 1751 of 2103

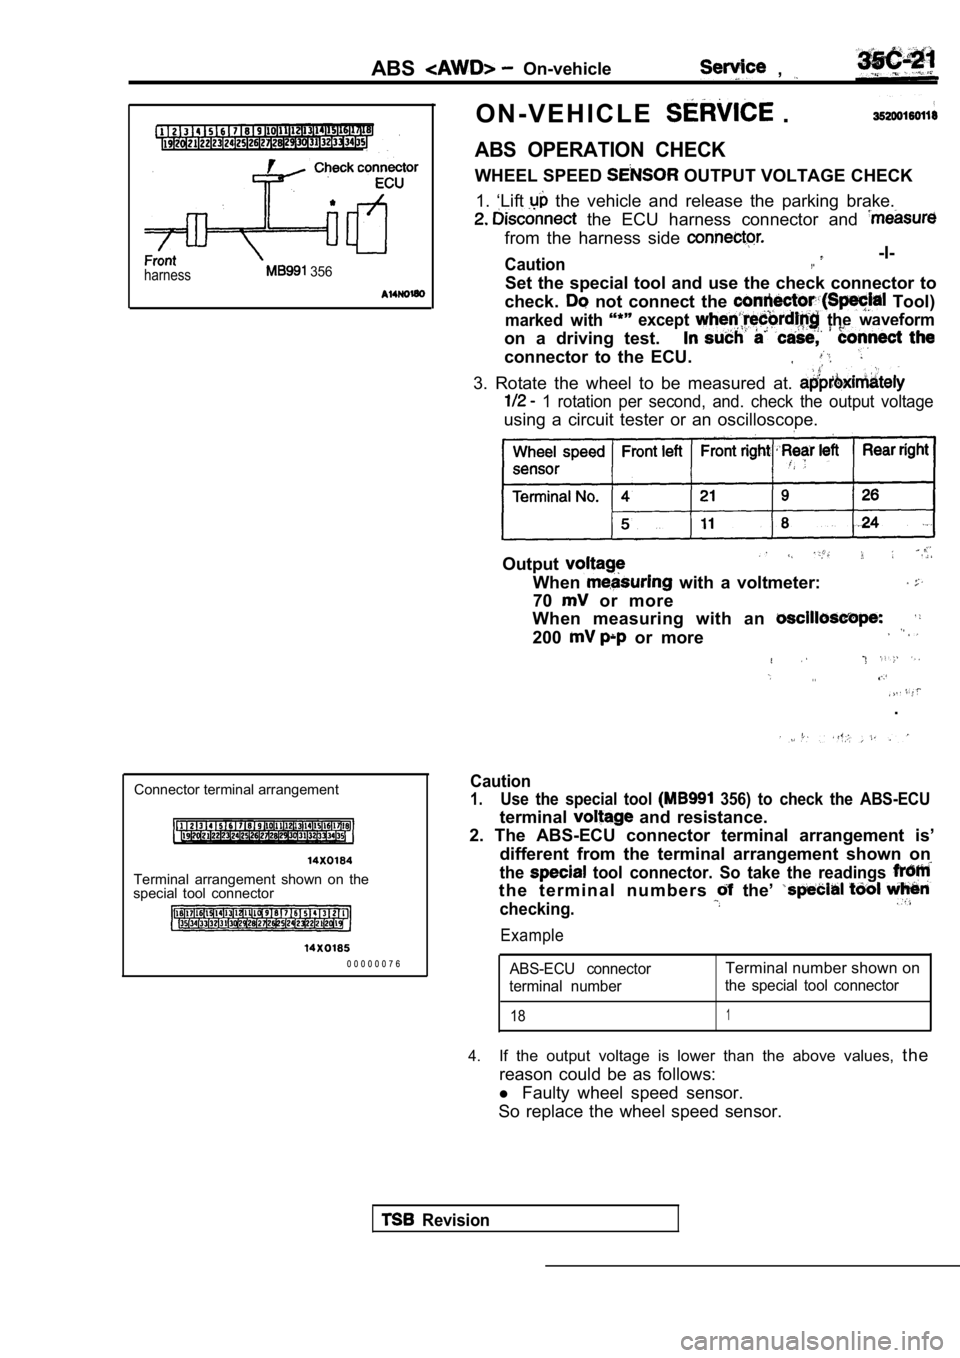
harness 356
ABSOn-vehicle ,
O N - V E H I C L E .
ABS OPERATION CHECK
WHEEL SPEED OUTPUT VOLTAGE CHECK
1. ‘Lift
the vehicle and release the parking brake.
the ECU harness connector and
from the harness side
Caution -I-,.
Set the special tool and use the check connector to
check.
not connect the Tool)
marked with except the waveform
on a driving test.
connector to the ECU.
3. Rotate the wheel to be measured at.
1 rotation per second, and. check the output volta ge
using a circuit tester or an oscilloscope.
Wheel speed Front left
Front right left
Output
When with a voltmeter:
70
or more
When measuring with an
200 or more
. .
.
Connector terminal arrangement
Terminal arrangement shown on the
special tool connector
0 0 0 0 0 0 7 6
Caution
1.Use the special tool 356) to check the ABS-ECU
terminal and resistance.
2. The ABS-ECU connector terminal arrangement is’
different from the terminal arrangement shown on
the tool connector. So take the readings
t h e t e r m i n a l n u m b e r s the’
checking.
Example
ABS-ECU connectorTerminal number shown on
terminal number the special tool connector
181
4.If the output voltage is lower than the above value
s, the
reason could be as follows:
l Faulty wheel speed sensor.
So replace the wheel speed sensor.
Revision
Page 1756 of 2103

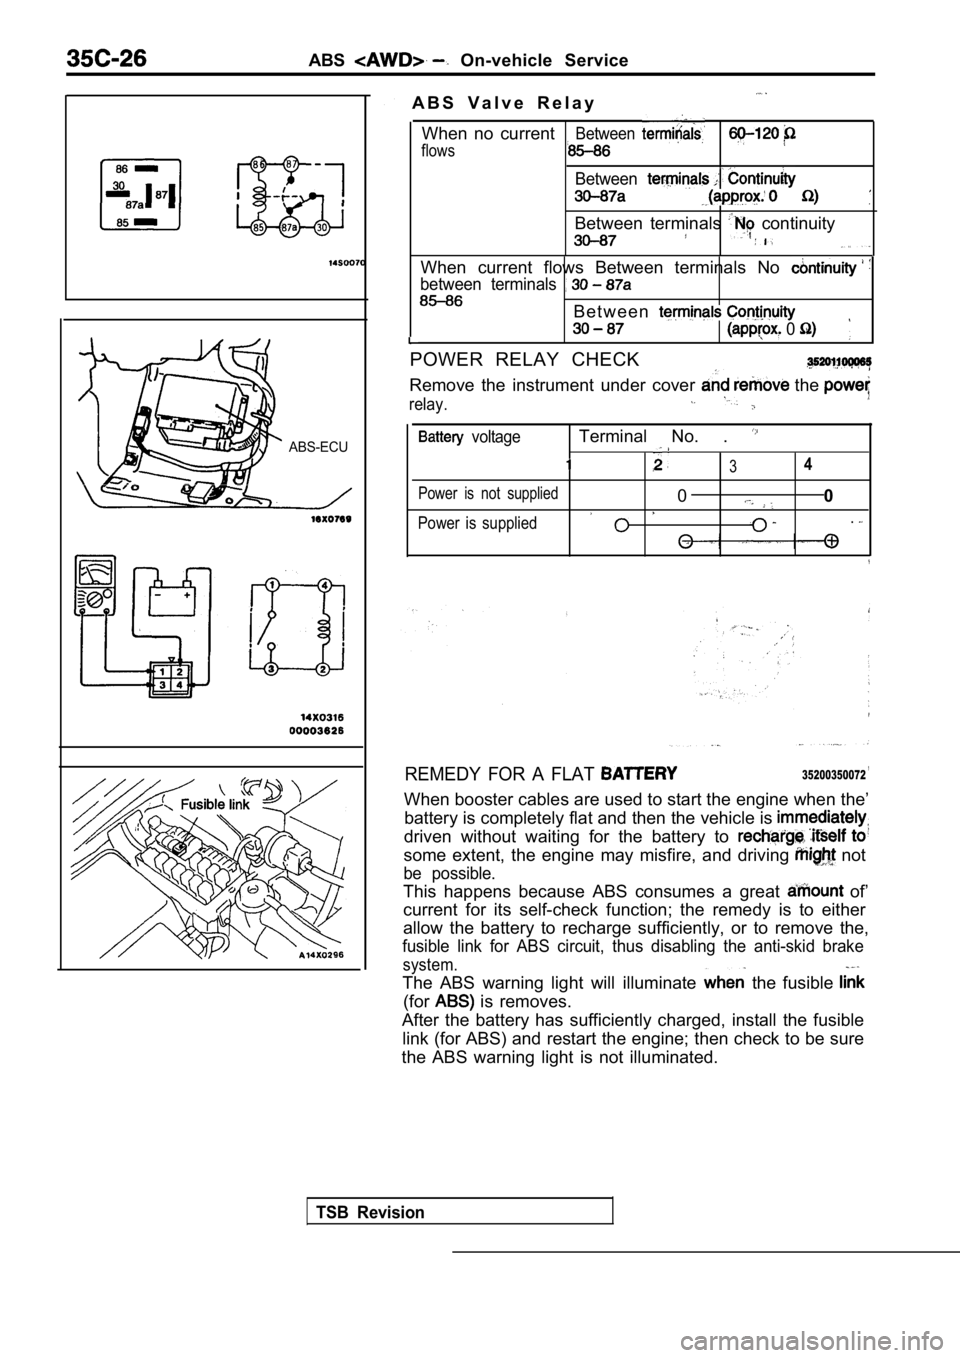
ABS On-vehicle Service
ABS-ECU
14
32
A B S V a l v e R e l a y
When no current
flows
Between
Between
Between terminals continuity
When current flows Between terminals No
between terminals
B e t w e e n
0
POWER RELAY CHECK
Remove the instrument under cover the
relay.
voltageTerminal No. .
34
Power is not supplied00
Power is supplied.
REMEDY FOR A FLAT ,35200350072
When booster cables are used to start the engine wh en the’
battery is completely flat and then the vehicle is
driven without waiting for the battery to
some extent, the engine may misfire, and driving not
be possible.
This happens because ABS consumes a great of’
current for its self-check function; the remedy is to either
allow the battery to recharge sufficiently, or to r emove the,
fusible link for ABS circuit, thus disabling the an ti-skid brake
system.
The ABS warning light will illuminate the fusible
(for is removes.
After the battery has sufficiently charged, install the fusible
link (for ABS) and restart the engine; then check t o be sure
the ABS warning light is not illuminated.
TSB Revision
Page 1760 of 2103
ABS G-Sensor
INSPECTION
G - S E N S O R C H E C K
(1) Disconnect the connector the
special tool (test,; harness set:,, the
terminals the connector.
(2) Turn the ignition
the following output voltage.
of
B e t w e e n
a n d ( 3 ) .
Standard value: 2.4-2.6
(3) With the special tool still connected, secure t he G-sensor
so that the FRONT mark on the sensor mounting surfa ce
is facing straight down, take a reading of the
following output
Between terminals (2) and (3)
Standard value:
(4)If the voltage outside the standard value; after checking
to be sure that there is no abnormality in the powe r supply
-and earth, wires, replace the G-sensor.
Revision
Page 1761 of 2103
REMOVAL AND INSTALLATION
Pre-removal and Post-installation OperationlCowl Side Trim (R.H.), Front Scuff Plate Removaland Installation (Refer to GROUP Trims.)
Removalsteps
Control unit cover
2. ABS-ECU
INSPECTION
ABS-ECU CHECK
Refer to
TSBRevision