Page 1708 of 2103
![MITSUBISHI SPYDER 1990 Service Repair Manual ABS Troubfeshooting , .
INSPECTION PROCEDURE 7
Break operation is abnormal
[Comment]This varies depending on the driving conditions and the road surface conditions, soproblem diagnosis is d MITSUBISHI SPYDER 1990 Service Repair Manual ABS Troubfeshooting , .
INSPECTION PROCEDURE 7
Break operation is abnormal
[Comment]This varies depending on the driving conditions and the road surface conditions, soproblem diagnosis is d](/manual-img/19/57345/w960_57345-1707.png)
ABS Troubfeshooting , .
INSPECTION PROCEDURE 7
Break operation is abnormal
[Comment]This varies depending on the driving conditions and the road surface conditions, soproblem diagnosis is difficult. However, if a normal diagnostic trouble code is displayed,carry out the following
l Malfunction of wheel speed l Malfunction of ABS rotor
l Malfunction of wheel bearing
of hydraulic Malfunction of ABS-ECU
NG Repair
(Refer to
Wheel speed sensor output voltage check [ R e p l a c e t h e w h e e l
Hydraulic unit check (Refer to 1NGABS rotor check (Refer to Replace the rotor.
O K NGWheel bearing end play check Refer to GROUP 26 On-vehicle Repair
Service.Refer to GROUP 27 On-vehicleIService.I
Check trouble symptom.
ABS-ECU connector l Disconnect the connector and
measure at the harness side.
l Resistance vaiue between termi-
nals
14-15, and
O KThe sensor harness and connector
should be moved while these checks
are carded out.
OK
Repair
TSB Revision
Repair
.
NG Repair
OK
Check trouble symptom.N G Replace ABS-ECU.
Page 1709 of 2103

ABS
Needle-nosed wire probe .I
I
Connector terminal. arrangement for
troubleshooting
Terminal arrangement shown on the
special tool connector
0 0 0 0 0 0 7 8
ABS-ECU CHECK
TERMINAL VOLTAGE CHECK CHART
1. Connect a needle-nosed to
a voltmeter probe. . .
2. the needle-nosed into each of the
ABS-ECU connector terminals from. the wire side, an d
measure the voltage while referring to the
NOTE
1. Measure voltage with the ABS-ECU
connected.,
2.You may find it convenient to pull out the ABS-ECU to make it easier to reach the connector terminals. :
3.Checks don’t have to be the order
in the chart.
Caution
Short-circuiting the positive probe between a
connector terminal and
could damage the
vehicle wiring, the sensor, ABS-ECU, or three.
care to prevent this!
3.If voltmeter shows any division from standard value , check
the corresponding electrical
wiring, then repair or replace.
4. After
or replacement, recheck with the voltmeter’
to confirm that the repair has corrected the proble m.
ABS-ECU Connector Terminal Arrangement
Caution
Use the special tool to the ABS-ECU
voltage and
2. The ABS-ECU connector terminal
troubleshooting is different from the terminal
arrangement shown on the special tool
So take the readings from the numbers of
the special tool when
Example
TSB Revision
Page 1711 of 2103
RESISTANCE AND CONTINUITY CHECK
1. Turn. the ignition switch to OFF.
2. Disconnect the ABS-ECU connector.
3.Measure the resistance and check for continuity bet ween
the terminals of the ABS-ECU connector
while referring to the check chart.
measuring resistance and checking continuity,
a ‘harness for checking contact pin pressure should
be used instead of inserting a test probe.
2.
Checks do not have to be carried out in the order
given
this chart.
Caution
or continuity checks are performed on
the
damage to the
and/or ohmmeter may occur.
care to prevent this!
If the ohmmeter shows any deviation from the norma l
condition, check the corresponding sensor, actuator and
related electrical wiring, and then repair or replace.
5. After repair or replacement, recheck with the oh mmeter
to confirm that the repair or replacement has corre cted
t h e p r o b l e m .
7
sensor switch: OFF
ABS-ECU groundAt all timesContinuity
TSB Revision
Page 1712 of 2103

On-vehicle. Service
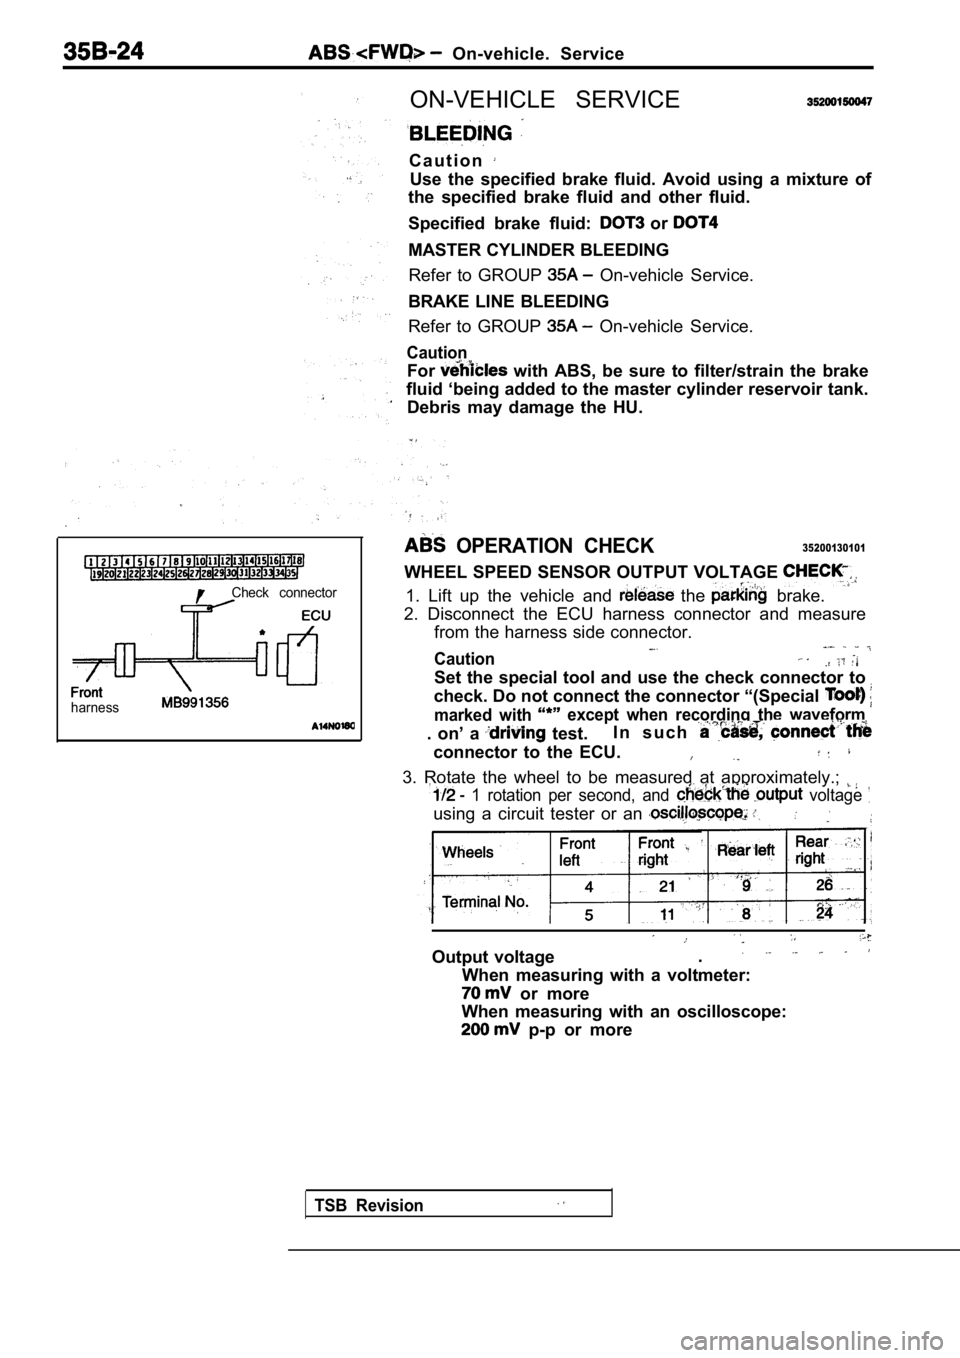
Check connector
l
harness
ON-VEHICLE SERVICE
C a u t i o n
Use the specified brake fluid. Avoid using a mixture of
the specified brake fluid and other fluid.
Specified brake fluid:
or
MASTER CYLINDER BLEEDING
Refer to GROUP
On-vehicle Service.
BRAKE LINE BLEEDING
Refer to GROUP
On-vehicle Service.
Caution
For with ABS, be sure to filter/strain the brake
fluid ‘being added to the master cylinder reservoir tank.
Debris may damage the HU.
OPERATION CHECK35200130101
WHEEL SPEED SENSOR OUTPUT VOLTAGE
1. Lift up the vehicle and the brake.
2. Disconnect the ECU harness connector and measure from the harness side connector.
Caution
Set the special tool and use the check connector to
check. Do not connect the connector “(Special
marked with except when recording the waveform
. on’ a test. I n s u c h
connector to the ECU.
3. Rotate the wheel to be measured at approximately
.;
1 rotation per second, and voltage
using a circuit tester or an
Output voltage.
When measuring with a voltmeter:
or more
When measuring with an oscilloscope:
p-p or more
TSB Revision
Page 1729 of 2103
ABS-ECU
and Post-installation Operation
Cowl Side Trim (R.H.) and Front Scuff Plate
Removal steps
1. Control unit cover
2. ABS-ECU
INSPECTION
ABS-ECU CHECK
Refer to
Page 1731 of 2103

CONTENTS
ABS-ECU. . . . . . . . . . . . . . . . . . . . . . . . . . . . . . . . .31 SERVICE SPECIFICATIONS . . . . . . . . . . . . . . . . . 3
GENERAL INFORMATION2SPECIAL TOOLS. . . . . . . . . . . . . . . . . . . . . . . . . . .3. . . . . . . . . . . . . . . . . .
G-SENSOR2 9. . . . . . . . . . . . . . . . . . . . . . . . . . . . . . .4
ON-VEHICLE SERVICE . . . . . . . . . . . .
. . . . 21WHEEL SPEED . . . . . . . . . . . . . . . . . .
ABS Operation Check . . . . . . . . . . . . . . . . . . . . . . . 21
Refer to for the following items.
BRAKE PEDAL
FRONT DISC BRAKE
LUBRICANTS
REAR DISC BRAKE
REAR DRUM BRAKE SHOE
REAR DRUM BRAKE WHEEL CYLINDER
ON-VEHICLE SERVICE
Brake Booster Operating Test
Brake Drum Inside Diameter Check
with Rear Drum Brakes>
Brake Fluid Level Sensor Check
Brake Lining and Brake Drum
Contact Check
Brake Lining Thickness Check Brake Pedal Check and Adjustment
Check Valve Operation Check
Front Brake Disc Run-out Check
Brake
Front Check and
Front Check
Proportioning Valve Test
Rear Brake Check
Rear Brake Disc Run-out Correction
Rear Brake Disc Thickness Check
Rear Disc Brake Pad Check and Replacement
Stop Light Switch Check
Refer to GROUP for the following items.
H Y D R A U L I C U N I T
MASTER CYLINDER AND BRAKE BOOSTER
PROPORTIONING VALVE
ON-VEHICLE
,
Bleeding,
Page 1732 of 2103
ABS General Information
G E N E R A L I N F O R M A T I O N
The ABS consists of wheel speed sensors, stop light switch, hydraulic unit and the ABS-ECU. If be erased even if the ignition switch is turned to
OFF.
a problem occurs in the system, the malfunctioning
system can be identified by
meansof the diagnostic
In addition, reading of diagnostic trouble codes
function, and the trouble symptom memory will’ not and service data
actuator testing are possible
using
the scan tool.
S p e c i f i c a t i o n s
Wheel speed sensorMagnet coil type
Front ABS rotor
Rear ABS rotor teeth
D I A G R A M
1. ABS-ECU2. Hydraulic unit ABS valve relay
4. ABS motor relay
5. Wheel speed sensor
6. ABS rotor D a t a 9. switch
10. ABS light11. G-sensor
TSB Revision
Page 1736 of 2103
INSPECTION CHART FOR DIAGNOSTIC TROUBLE
.. .
C h e c k a c c o r d i n g t o t h e f o r t h e d i a g n o s t i c t r o u b l e
Diagnostic Inspection item
troubleDiagnostic content. p a g e
code No. .
,
11Right front sensorOpen circuit
.,
15Wheel speed sensor system
21 s e n s o r
output signal
Broken
sensor or OFF
22
41
42
Stop light switch system Open circuit or ON malfunction
Left front solenoid valve systemNo response to
Right front solenoid valve systemdrive signal
43
51
52
Rear solenoid valve system
Valve relay system
Motor relay or motor system
The currents flowing
right and left valves different
under the same condition:,
Valve relay OFF failure
Motor relay OFF failure and
motor drive failure
55ABS-ECU ABS-ECU internal failure
(program maze, etc.)
Detection conditions
A: During system check immediately after starting B: While driving
Revision