1990 MITSUBISHI SPYDER oil viscosity
[x] Cancel search: oil viscosityPage 38 of 2103
GENERAL Recommended Lubricants and Capacities
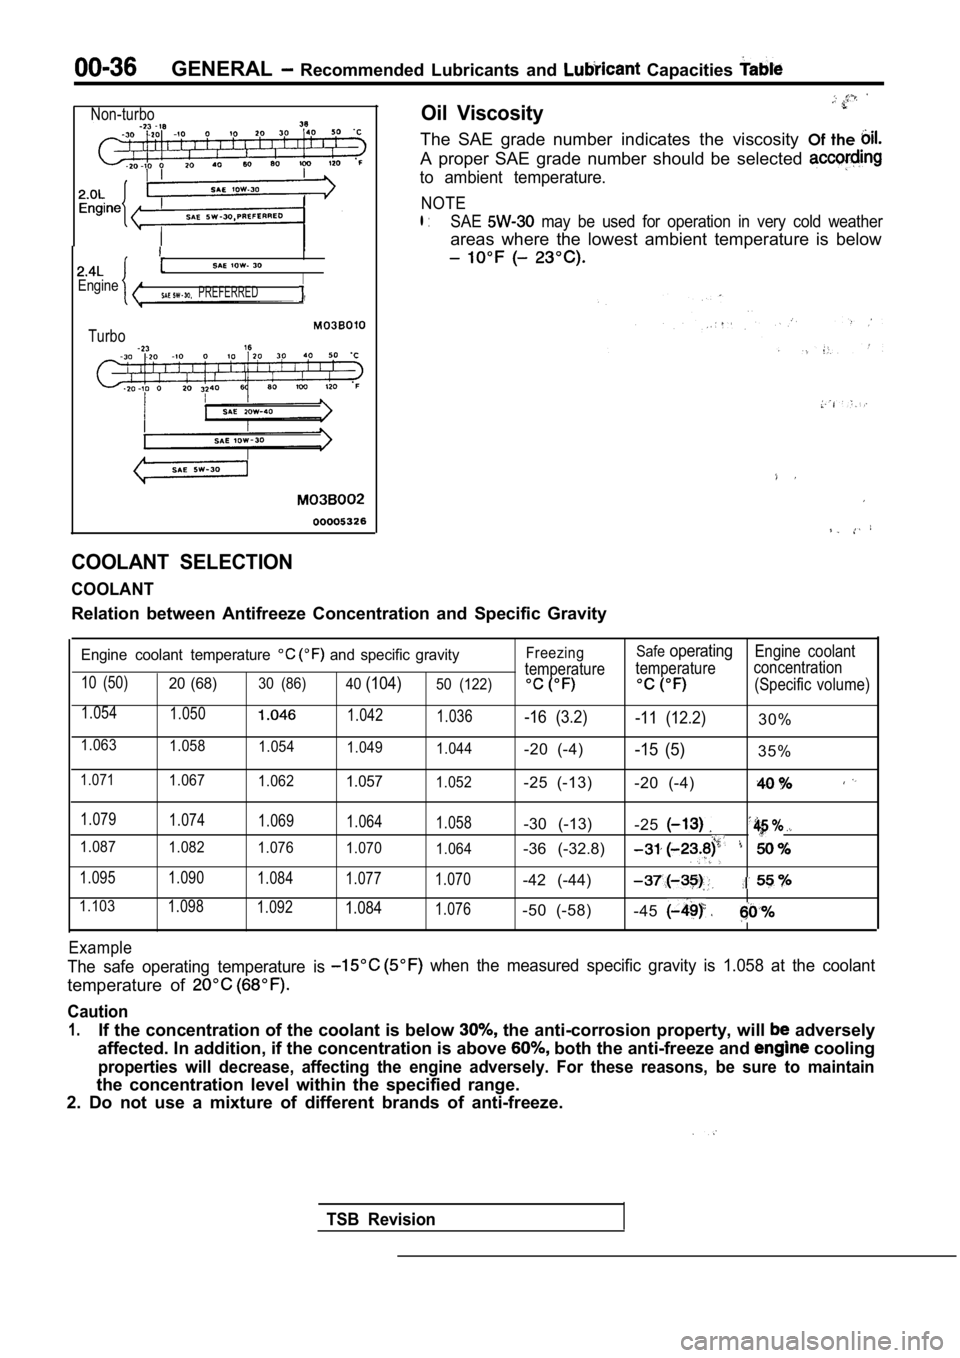
Non-turbo
I
EngineI PREFERRED
Turbo
Oil Viscosity
The SAE grade number indicates the viscosity Of the
A proper SAE grade number should be selected
to ambient temperature.
NOTE
l :SAE may be used for operation in very cold weather
areas where the lowest ambient temperature is below
COOLANT SELECTION
COOLANT
Relation between Antifreeze Concentration and Speci fic Gravity
Engine coolant temperature and specific gravity
10 (50)20 (68)30 (86)
40(104)50 (122)
1.054
1.0501.042
1.036
1.0631.058 1.0541.049
1.044
1.0711.0671.0621.0571.052 Freezing
Safe
operatingEngine coolant
temperature temperature concentration
(Specific volume)
-16 (3.2)
-11 (12.2)30%
-20 (-4)
-15 (5)35%
-25 (-13) -20 (-4)
1.079
1.074 1.0691.064
1.058-30 (-13)-25
1.0871.082 1.0761.070
1.064-36 (-32.8)
1.095 1.090 1.0841.077
1.070-42 (-44)
1.1031.0981.0921.0841.076-50 (-58)-45
Example
The safe operating temperature is when the measured specific gravity is 1.058 at the coolant
temperature of
Caution
1.If the concentration of the coolant is below the anti-corrosion property, will adversely
affected. In addition, if the concentration is abov e
both the anti-freeze and cooling
properties will decrease, affecting the engine adve rsely. For these reasons, be sure to maintain
the concentration level within the specified range.
2. Do not use a mixture of different brands of anti -freeze.
TSB Revision
Page 46 of 2103
GENERAL
Oil level
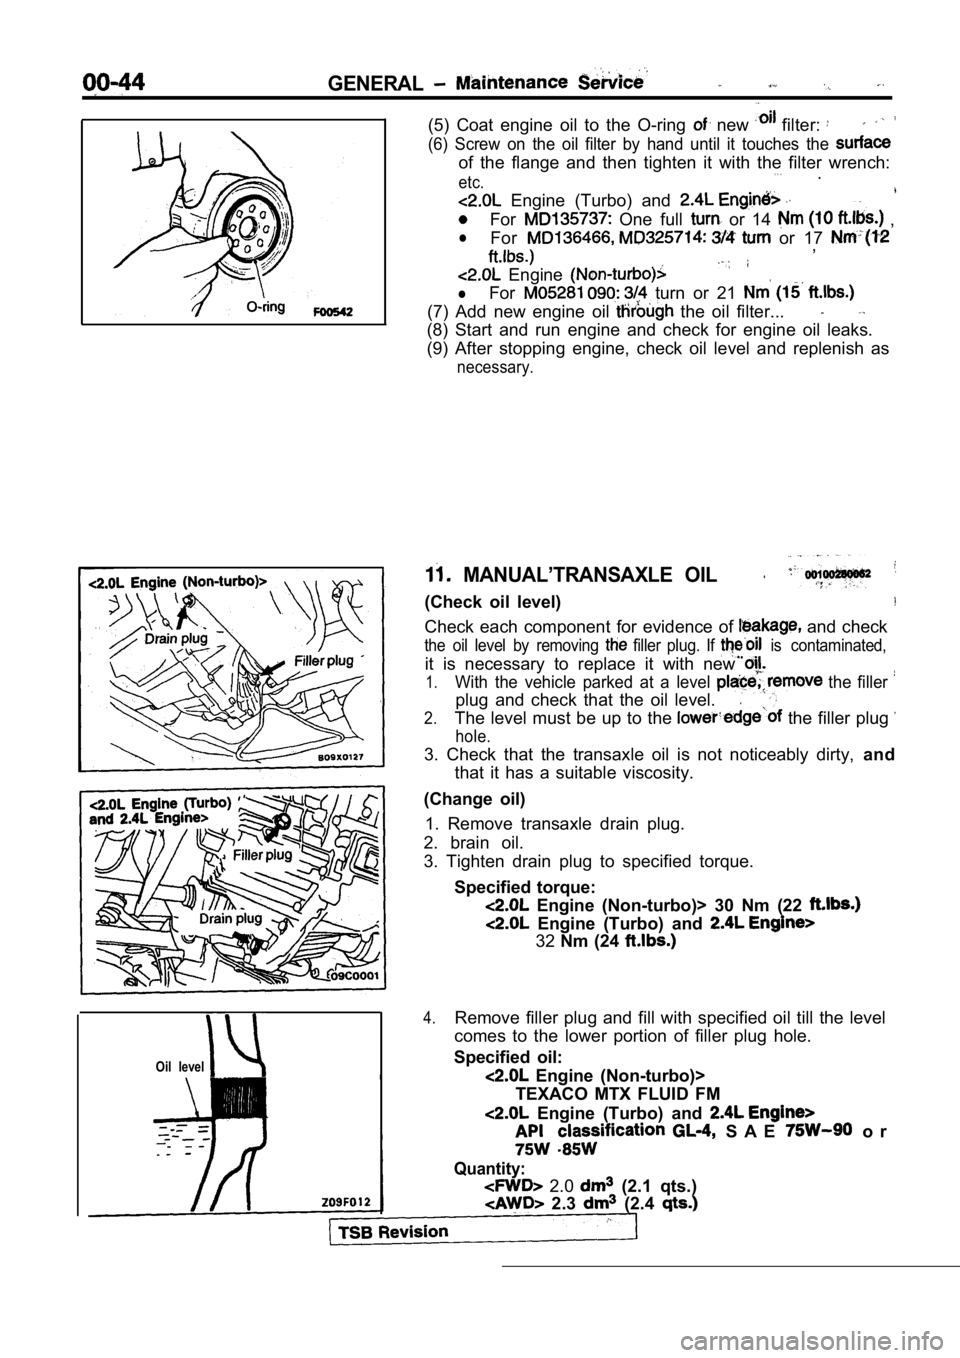
(5) Coat engine oil to the O-ring new filter:
(6) Screw on the oil filter by hand until it touches the
of the flange and then tighten it with the filter w rench:. . .etc..
Engine (Turbo) and
For One full or 14 ,
lFor or 17 ,
Engine
lFor turn or 21
(7) Add new engine oil the oil filter...
(8) Start and run engine and check for engine oil l eaks.
(9) After stopping engine, check oil level and repl enish as
necessary.
MANUAL’TRANSAXLE OIL
(Check oil level)
Check each component for evidence of and check
the oil level by removing filler plug. If is contaminated,
it is necessary to replace it with new
1.With the vehicle parked at a level the filler
plug and check that the oil level..
2.The level must be up to the the filler plug
hole.
3. Check that the transaxle oil is not noticeably d irty, and
that it has a suitable viscosity.
(Change oil) 1. Remove transaxle drain plug.
2. brain oil.
3. Tighten drain plug to specified torque.
Specified torque:
Engine (Non-turbo)> 30 Nm (22
Engine (Turbo) and
32Nm (24
4.Remove filler plug and fill with specified oil till the level
comes to the lower portion of filler plug hole.
Specified oil:
Engine (Non-turbo)>
TEXACO MTX FLUID FM
Engine (Turbo) and
S A E o r
Quantity:
2.0 (2.1 qts.)
2.3 (2.4
Page 50 of 2103
GENERAL Maintenance Service
,
Revision
Drain Plug
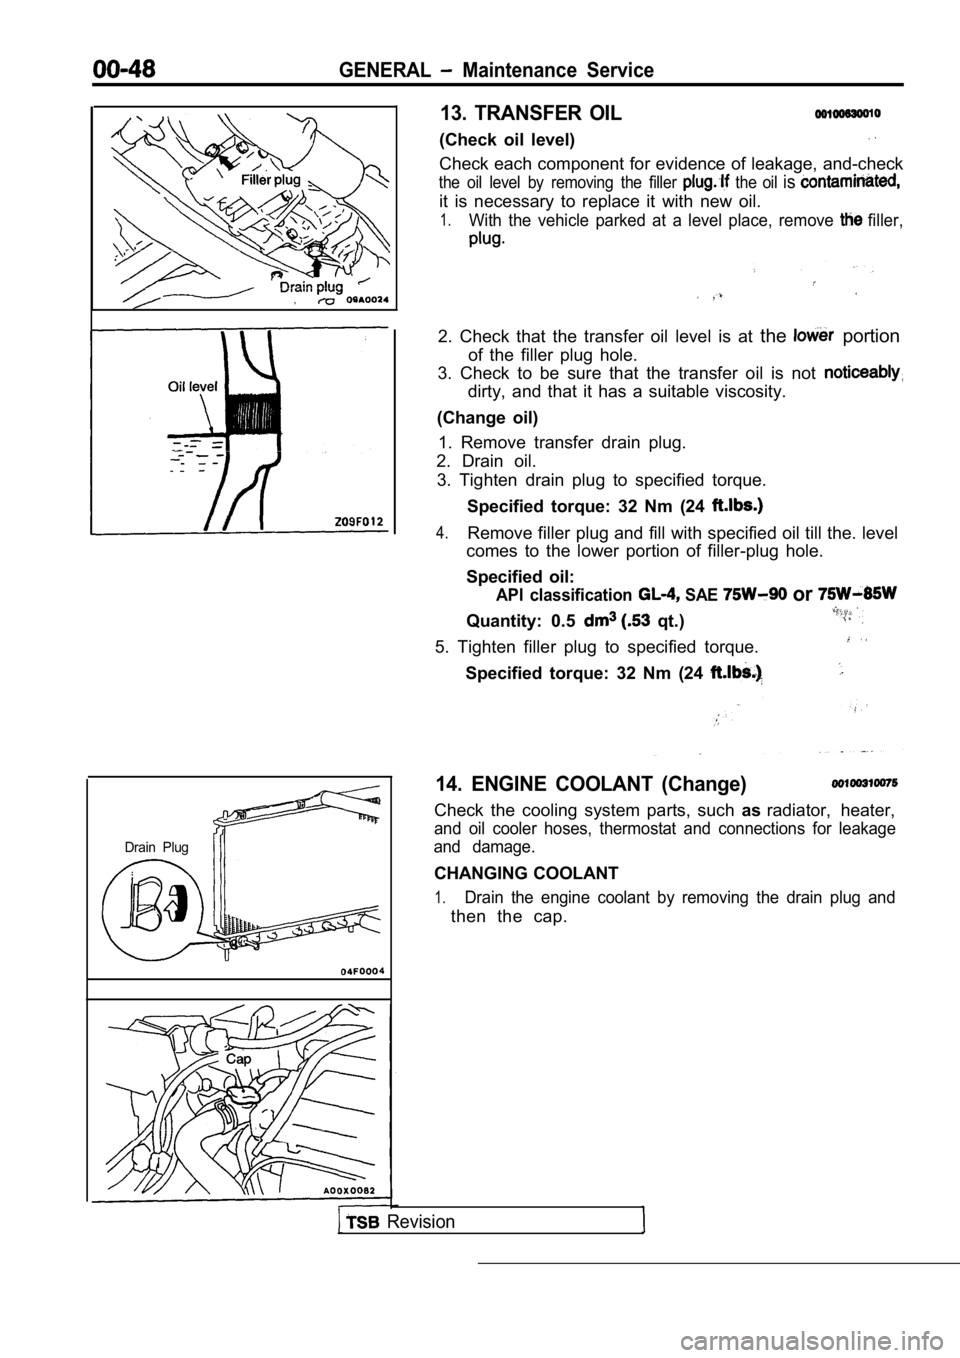
13. TRANSFER OIL
(Check oil level)
Check each component for evidence of leakage, and-check
the oil level by removing the filler the oil is
it is necessary to replace it with new oil.
1.With the vehicle parked at a level place, remove filler,
2. Check that the transfer oil level is at the portion
of the filler plug hole.
3. Check to be sure that the transfer oil is not
dirty, and that it has a suitable viscosity.
(Change oil) 1. Remove transfer drain plug.
2. Drain oil.
3. Tighten drain plug to specified torque.
Specified torque: 32 Nm (24
4.Remove filler plug and fill with specified oil till the. level
comes to the lower portion of filler-plug hole.
Specified oil:
API classification SAE or
Quantity: 0.5 qt.)
5. Tighten filler plug to specified torque.
Specified torque: 32 Nm (24
14. ENGINE COOLANT (Change)
Check the cooling system parts, such asradiator, heater,
and oil cooler hoses, thermostat and connections fo r leakage
and damage.
CHANGING COOLANT
1.Drain the engine coolant by removing the drain plug and
then the cap.
Page 66 of 2103
ENGINE,
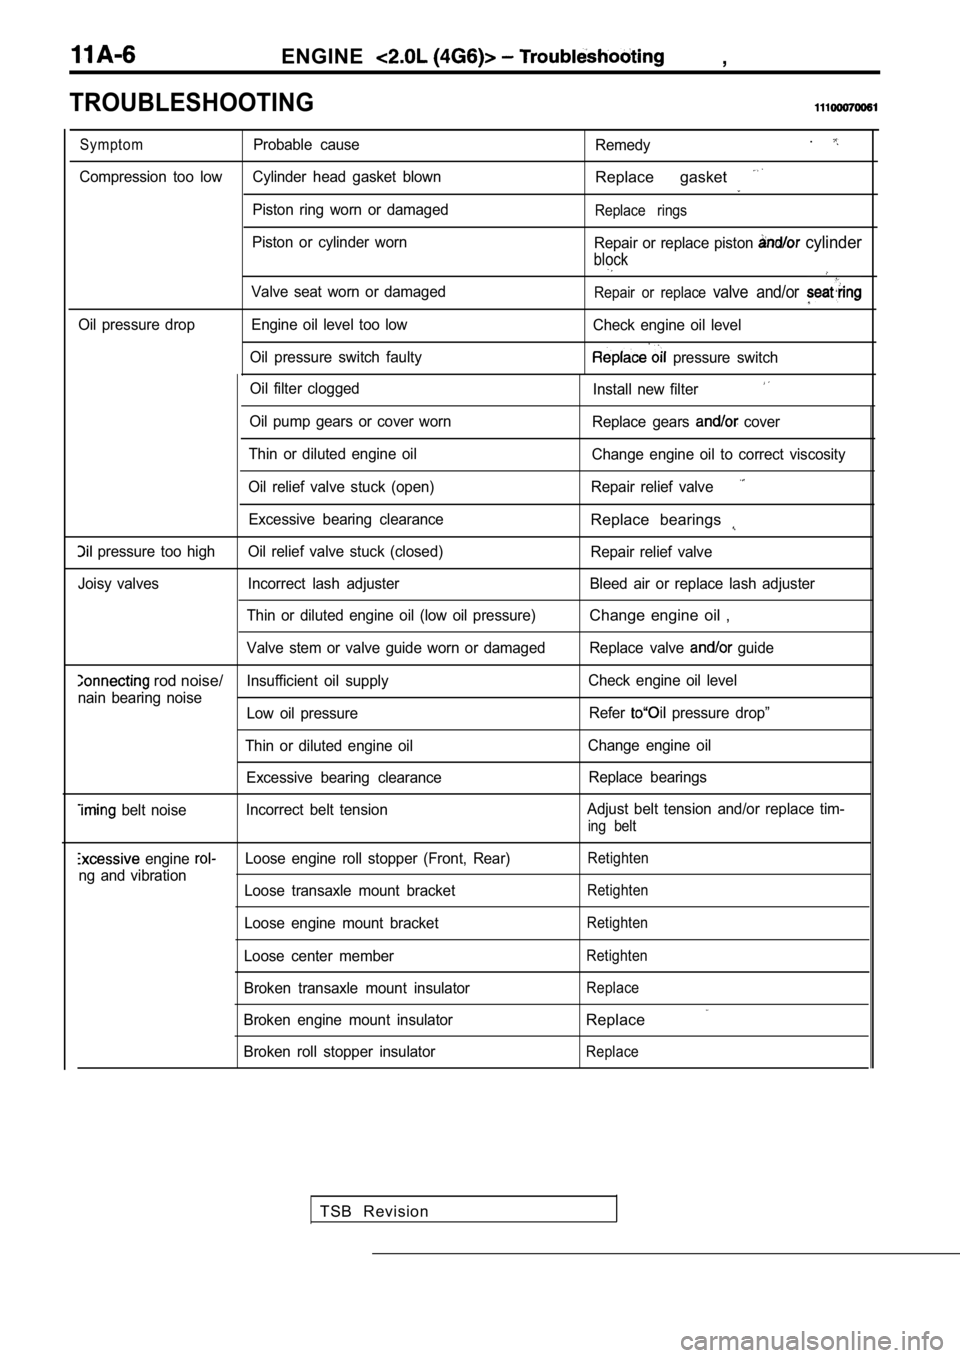
TROUBLESHOOTING
Oil filter cloggedInstall new filter
Oil pump gears or cover wornReplace gears cover
Thin or diluted engine oil Change engine oil to correct viscosity
Oil relief valve stuck (open) Repair relief valve
Excessive bearing clearanceReplace bearings
pressure too high Oil relief valve stuck (closed) Repair relief valve
Joisy valves Incorrect lash adjuster Bleed air or rep lace lash adjuster
Thin or diluted engine oil (low oil pressure)
Change engine oil ,
Valve stem or valve guide worn or damaged Replace va lve guide
rod noise/Insufficient oil supplyCheck engine oil level
nain bearing noise Low oil pressure Refer
pressure drop”
Thin or diluted engine oil Change engine oil
Excessive bearing clearance Replace bearings
belt noiseIncorrect belt tension Adjust belt tension and/or replace tim-ing belt
engine Loose engine roll stopper (Front, Rear)Retighten
ng and vibration
Loose transaxle mount bracketRetighten
Loose engine mount bracketRetighten
Loose center memberRetighten
Broken transaxle mount insulatorReplace
Broken engine mount insulatorReplace
Broken roll stopper insulatorReplace
Symptom
Probable cause
Remedy.
Compression too low Cylinder head gasket blownReplace gasket
Piston ring worn or damagedReplace rings
Piston or cylinder worn
Repair or replace piston cylinder
block
Valve seat worn or damagedRepair or replace valve and/or
Oil pressure drop Engine oil level too low Check engine oil level
Oil pressure switch faulty
pressure switch
TSB Revision
Page 274 of 2103
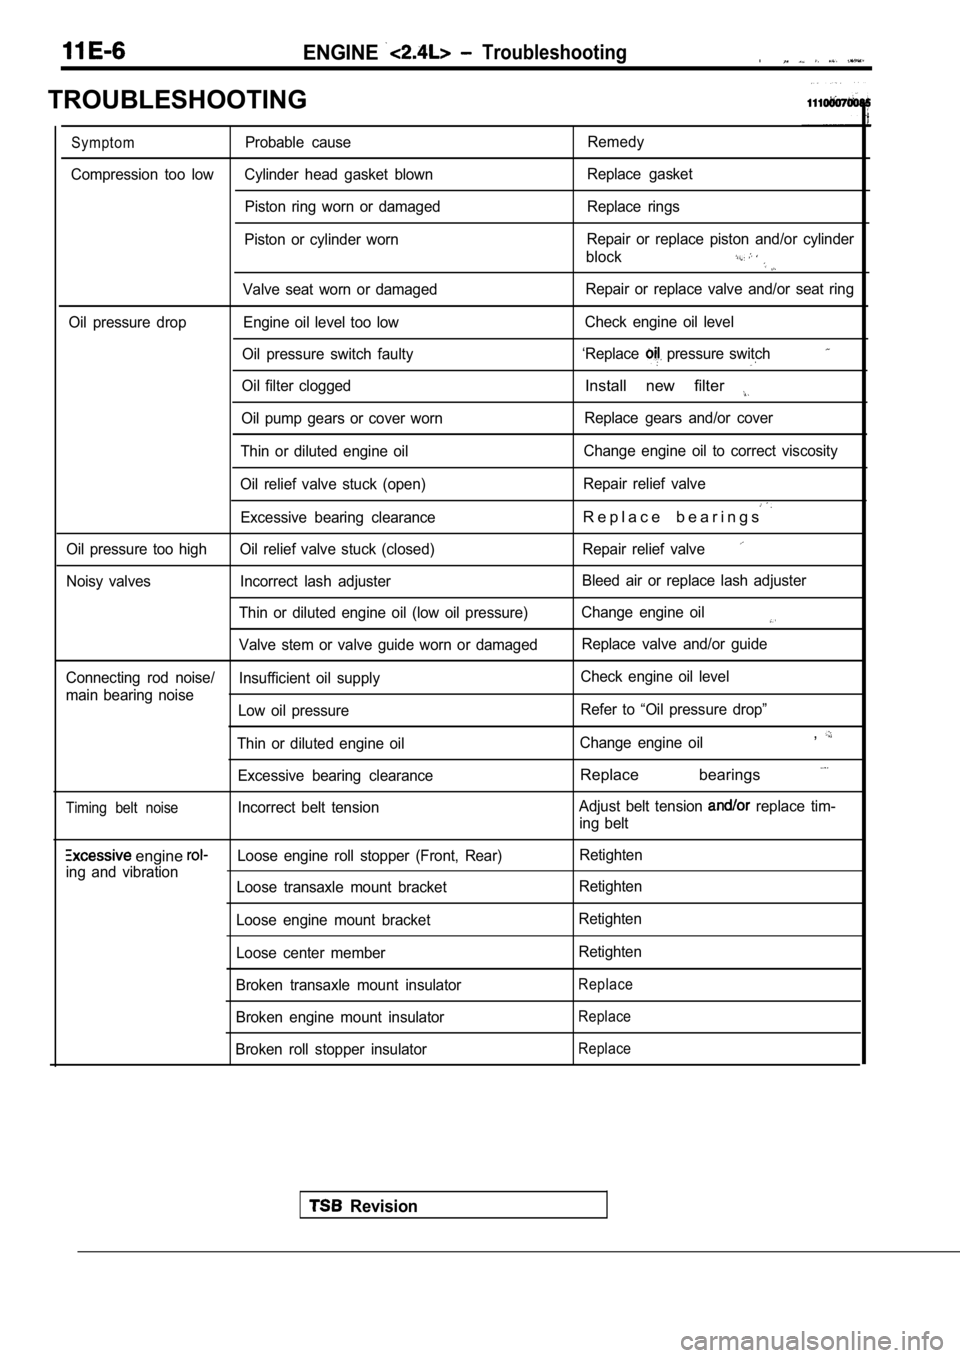
ENGINE Troubleshooting.
TROUBLESHOOTING
SymptomProbable causeRemedy
Compression too low Cylinder head gasket blown Replace gasket
Piston ring worn or damaged Replace rings
Piston or cylinder worn Repair or replace piston and/or cylinder
block
Valve seat worn or damaged Repair or replace valve and/or seat ring
Oil pressure drop Engine oil level too low Check engine oil level
Oil pressure switch faulty ‘Replace
pressure switch
Oil filter cloggedInstall new filter
Oil pump gears or cover worn Replace gears and/or cover
Thin or diluted engine oil Change engine oil to correct viscosity
Oil relief valve stuck (open) Repair relief valve
Excessive bearing clearanceR e p l a c e b e a r i n g s
Oil pressure too high Oil relief valve stuck (closed
) Repair relief valve
Noisy valves Incorrect lash adjuster Bleed air or replace lash adjuster
Thin or diluted engine oil (low oil pressure) Change engine oil
Valve stem or valve guide worn or damaged Replace valve and/or guide
Connecting rod noise/ Insufficient oil supply Check engine oil level
main bearing noise Low oil pressure Refer to “Oil pressure drop”
Thin or diluted engine oil Change engine oil
,
Excessive bearing clearanceReplace bearings
Timing belt noiseIncorrect belt tensionAdjust belt tension replace tim-
ing belt
engine Loose engine roll stopper (Front, Rear) Retighten
ing and vibration Loose transaxle mount bracket Retighten
Loose engine mount bracket Retighten
Loose center member Retighten
Broken transaxle mount insulator
Replace
Broken engine mount insulatorReplace
Broken roll stopper insulatorReplace
Revision
Page 375 of 2103
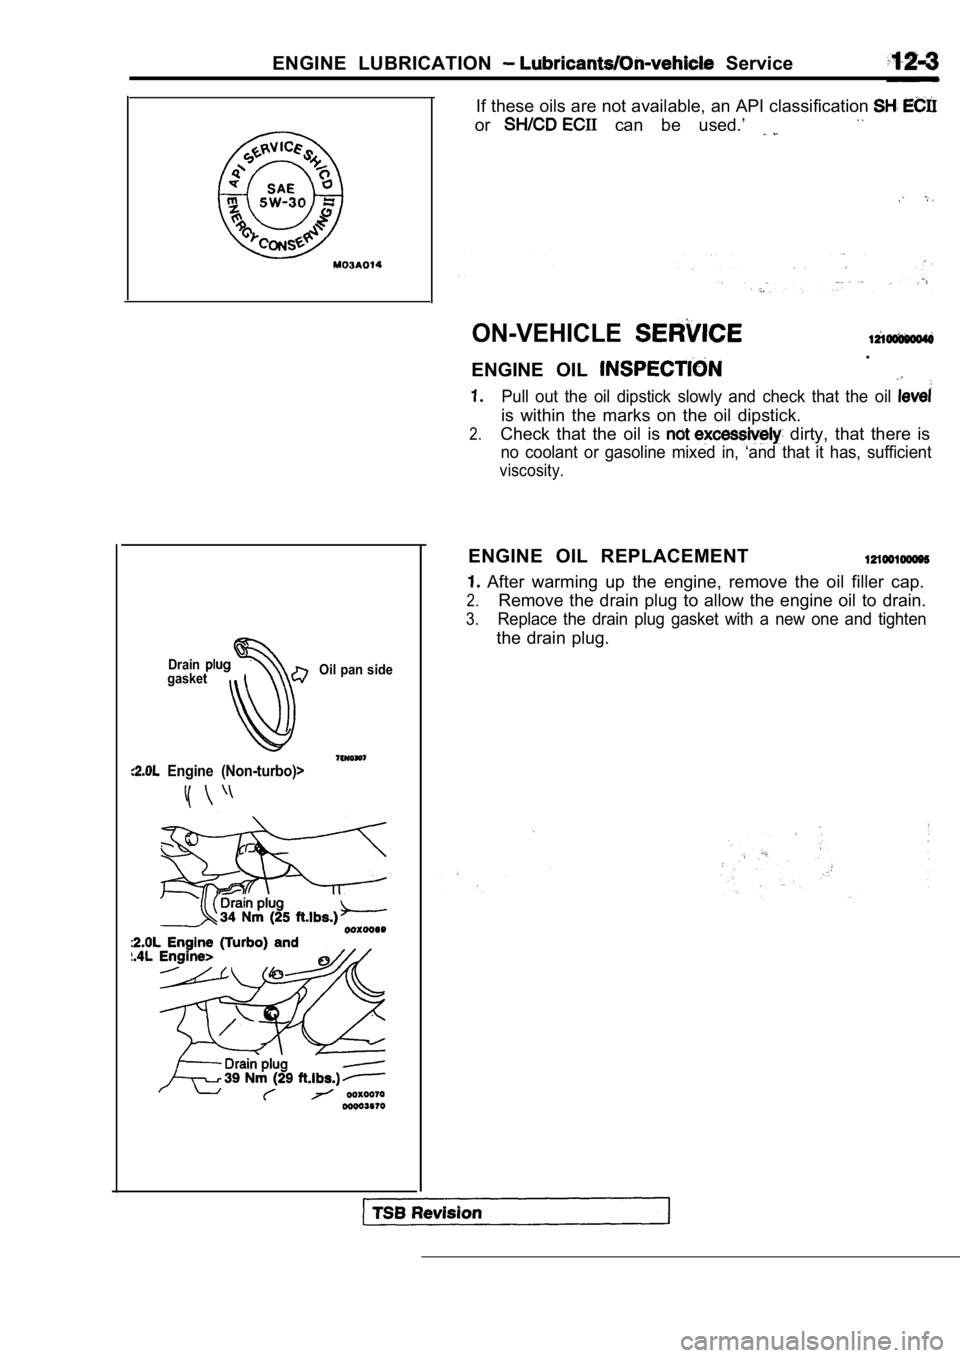
ENGINE LUBRICATION Service
DraingasketOil pan side
Engine (Non-turbo)>
If these oils are not available, an API classificat
ion
or can be used.’ . .
ON-VEHICLE
ENGINE OIL
.
Pull out the oil dipstick slowly and check that the oil
is within the marks on the oil dipstick.
2.Check that the oil is dirty, that there is
no coolant or gasoline mixed in, ‘and that it has, sufficient
viscosity.
ENGINE OIL REPLACEMENT
After warming up the engine, remove the oil filler cap.
2.Remove the drain plug to allow the engine oil to drain.
3.Replace the drain plug gasket with a new one and ti ghten
the drain plug.
Page 471 of 2103
![MITSUBISHI SPYDER 1990 Service Repair Manual ENGINE,
INSPECTION PROCEDURE 11When the engine is cold, it stalls at idle. (Die ou t)
[Comment]lMalfunction of the idle air control
In such cases as the above, the cause is pro MITSUBISHI SPYDER 1990 Service Repair Manual ENGINE,
INSPECTION PROCEDURE 11When the engine is cold, it stalls at idle. (Die ou t)
[Comment]lMalfunction of the idle air control
In such cases as the above, the cause is pro](/manual-img/19/57345/w960_57345-470.png)
ENGINE,
INSPECTION PROCEDURE 11When the engine is cold, it stalls at idle. (Die ou t)
[Comment]lMalfunction of the idle air control
In such cases as the above, the cause is probably t hat the air/fuel mixture is inappropriate when l Malfunction of the fhroffle body the engine is cold, or that the intake air volume i s insufficient..l Malfunction of the injector System l Malfunction: system
W ere the battery terminals disconnected recently?
NO
SCAN TOOL DTC
.After warming-up, let the engine run at idling for 10 minutes.I
,
Are diagnostic trouble codes output?TROUBLE CODES
N OI -.: .
Does the engine stall right after the accelerator p
edal is
Check the throffle body minimum air (Refer to released
NO . . . N O Check for unstable idle (Rough hunting)Is engine-idling stable after the warming-up?
YES(Refer to INSPECTION 8.)
SCAN TOOL Actuator test
07 motor (Refer to
OK NG
Check the idle air control motor circuit. (Refer t
o INSPECTION PROCEDURE FOR TROUBLE CODE
SCAN TOOL Special function
“Reset
Check trouble symptoms.
NG
OK
.
Check the injector control circuit. Carry procedures 19, in “INSPECTION PROCEDUREFOR DIAGNOSTIC TROUBLE
Check the fuel pressure. (Refer to
Check the following items.
l Check the ignition coil, spark plugs, spark plug ca bles.
l Check the compression pressure.
l Check the engine oil viscosity.
TSB Revision
Page 589 of 2103
![MITSUBISHI SPYDER 1990 Service Repair Manual ENGINE (TURBO)
AND ENGINE> Troubleshooting
INSPECTION PROCEDURE 11
When the engine is cold, it stalls at idle. (Die out)P r o b a b l e c a u s e .
[Comment]l Malfunction of the MITSUBISHI SPYDER 1990 Service Repair Manual ENGINE (TURBO)
AND ENGINE> Troubleshooting
INSPECTION PROCEDURE 11
When the engine is cold, it stalls at idle. (Die out)P r o b a b l e c a u s e .
[Comment]l Malfunction of the](/manual-img/19/57345/w960_57345-588.png)
ENGINE (TURBO)
AND ENGINE> Troubleshooting
INSPECTION PROCEDURE 11
When the engine is cold, it stalls at idle. (Die out)P r o b a b l e c a u s e .
[Comment]l Malfunction of the system
In such cases as the above, the cause is probably t hat the mixture is inappropriate whenl the bodythe engine is cold, or that the intake air volume is insufficient.l Malfunction of the injector system Malfunction of the s y s t e m
W ere the battery terminals disconnected recently
NO
After warming-up, let the engine run at idling for 10 minutes.
SCAN TOOL DTC
Are diagnostic trouble codesoutput?Refer to INSPECTION CHART FOR TROUBLE CODES.
(Refer to Check and adjust the (Refer to ,
NO
Is engine-idling stable after the warming-up
YES(Refer to INSPECTION PROCEDURE
Check the idle air control motor for operation soun d NG
Engine (Turbo)>. (Refer to Check the idle air control motor for operation sound (Refer to
Checktheinjectorforope
OK
Check the idle control system malfunction to .INSPECTION PROCEDURE FOR DIAGNOSTIC TROUBLE CODE
PROCEDURE FOR DIAGNOSTIC TROUBLE CODES
SCAN TOOL Data list Check the closed position switch system.
26 Closed throttle position switch (Refer to INSPECTION PROCEDURE FOR
OKTROUBLE CODES
SCAN TOOL Data listN G Check the engine coolant temperature circuit malfu nction. (Refer to21 Enginecoolanttemperaturesensor P. I N S P E C T I O N P R O C E D U R E F O R TROUBLE CODES
Check the fuel pressure. (Refer to I
Check the ignition timing. Engine Check that the position sensor and belt cover are
(Refer to GROUP
(Refer to GROUP Check the ignition timing. Engine>
Check the following items.
l Check the ignition coil, spark plugs, spark plug ca bles.
l Check the compression pressure.
l Check the engine oil viscosity.
TSB Revision