2006 DODGE RAM SRT-10 battery
[x] Cancel search: batteryPage 2252 of 5267
6. Perform fuel pressure release procedure. Refer to
Fuel Pressure Release Procedure.
7. Disconnect negative battery cable from battery.
8. Clean fitting of any foreign material before disas-
sembly.
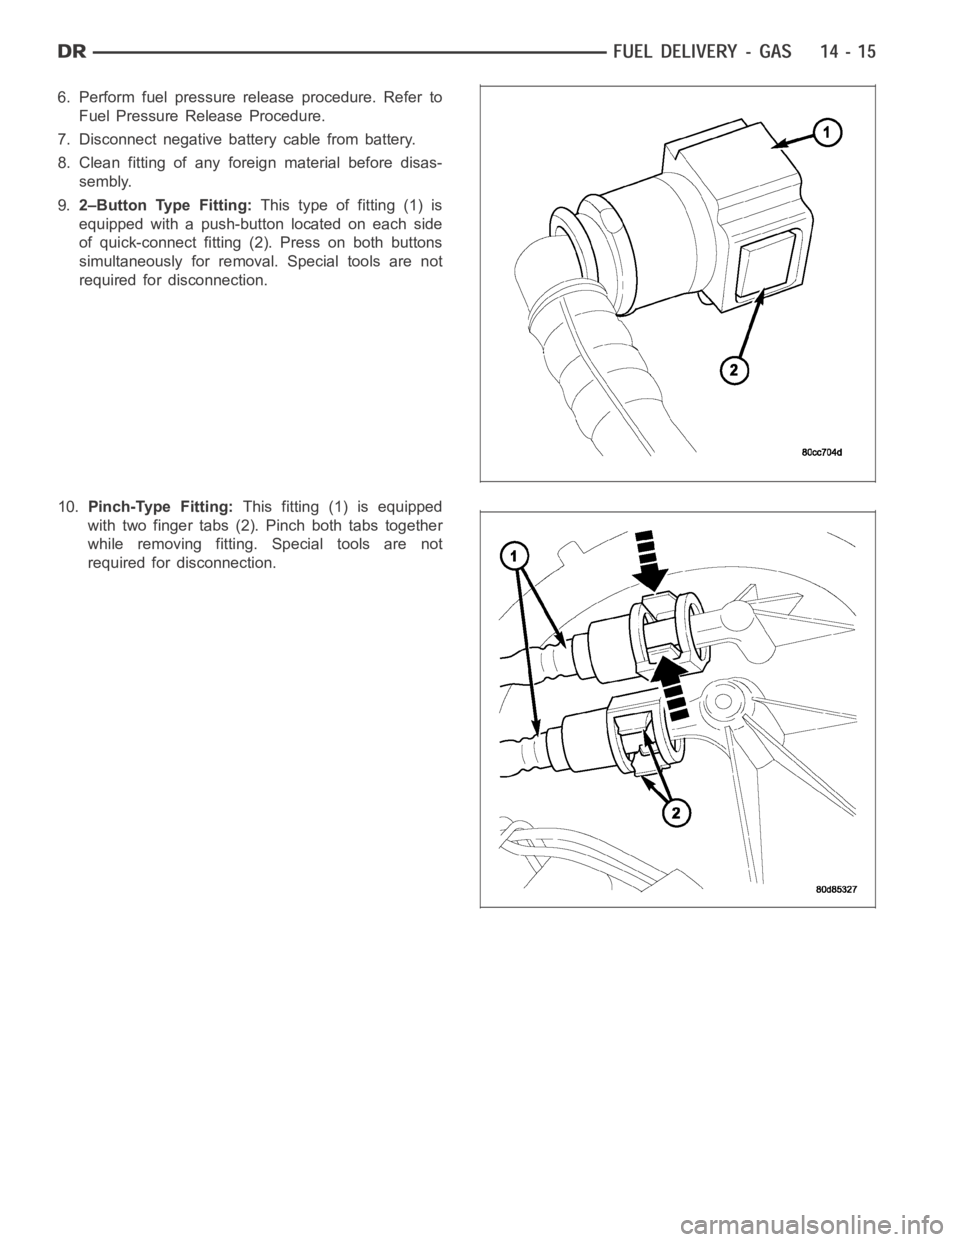
9.2–Button Type Fitting:This type of fitting (1) is
equipped with a push-button located on each side
of quick-connect fitting (2). Press on both buttons
simultaneously for removal. Special tools are not
required for disconnection.
10.Pinch-Type Fitting:This fitting (1) is equipped
with two finger tabs (2). Pinch both tabs together
while removing fitting. Special tools are not
required for disconnection.
Page 2255 of 5267
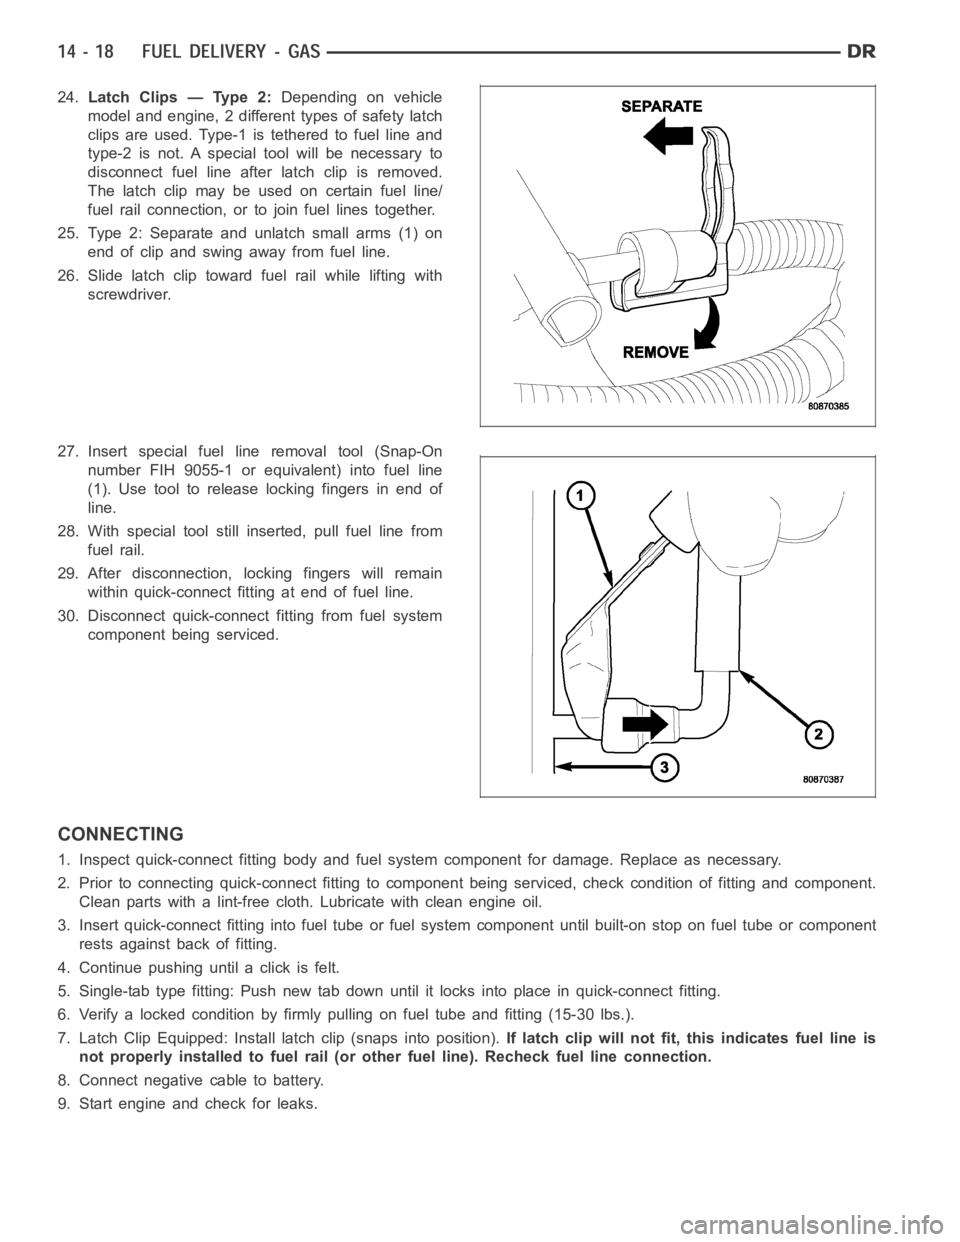
24.Latch Clips — Type 2:Depending on vehicle
model and engine, 2 different types of safety latch
clips are used. Type-1 is tethered to fuel line and
type-2 is not. A special tool will be necessary to
disconnect fuel line after latch clip is removed.
The latch clip may be used on certain fuel line/
fuel rail connection, or to join fuel lines together.
25. Type 2: Separate and unlatch small arms (1) on
end of clip and swing away from fuel line.
26. Slide latch clip toward fuel rail while lifting with
screwdriver.
27. Insert special fuel line removal tool (Snap-On
number FIH 9055-1 or equivalent) into fuel line
(1). Use tool to release locking fingers in end of
line.
28. With special tool still inserted, pull fuel line from
fuel rail.
29. After disconnection, locking fingers will remain
within quick-connect fitting at end of fuel line.
30. Disconnect quick-connect fitting from fuel system
component being serviced.
CONNECTING
1. Inspect quick-connect fitting body and fuel system component for damage. Replace as necessary.
2. Prior to connecting quick-connect fitting to component being serviced, check condition of fitting and component.
Clean parts with a lint-free cloth. Lubricate with clean engine oil.
3. Insert quick-connect fitting intofuel tube or fuel system component until built-on stop on fuel tube or component
rests against back of fitting.
4. Continue pushing until a click is felt.
5. Single-tab type fitting: Push new tab down until it locks into place in quick-connect fitting.
6. Verify a locked condition by firmly pulling on fuel tube and fitting (15-30 lbs.).
7. Latch Clip Equipped: Install latch clip (snaps into position).If latch clip will not fit, this indicates fuel line is
not properly installed to fuel rail (or other fuel line). Recheck fuel lineconnection.
8. Connect negative cable to battery.
9. Start engine and check for leaks.
Page 2259 of 5267
RAIL - FUEL
DESCRIPTION
The fuel injector rail is used to mount the fuel injectors to the engine.
OPERATION
High pressure from the fuel pump is routed to the fuel rail. The fuel rail then supplies the necessary fuel to each
individual fuel injector.
A quick-connect fitting with a safety latch clip is used to attach the fuel linetothefuelrail.
The fuel rail is not repairable.
CAUTION: The left and right sections of the fuel rail are connected with either a flexible connecting hose, or
joints. Do not attempt to separate the rail halves at these connecting hoseor joints. Due to the design of
the connecting hose or joint, it does not use any clamps. Never attempt to install a clamping device of any
kind to the hose or joint. When removing the fuel rail assembly for any reason, be careful not to bend or
kink the connecting hose or joint.
REMOVAL
3.7L V-6
WARNING: The fuel system is under constant pressure even with engine off. Before servicing fuel rail, fuel
system pressure must be released.
CAUTION: The left and right fuel rails are replaced as an assembly. Do not attempt to separate rail halves
at connector tubes. Due to design of tubes, it does not use any clamps. Neverattempt to install a clamping
device of any kind to tubes. When removing fuel rail assembly for any reason, be careful not to bend or
kink tubes.
1. Remove fuel tank filler tube cap.
2. Perform Fuel System Pressure Release Procedure.
(Refer to 14 - FUEL SYSTEM/FUEL DELIVERY -
STANDARD PROCEDURE)
3. Remove negative battery cable at battery.
4. Remove air duct at throttle body air box.
5. Remove air box at throttle body.
6. Remove air resonator mounting bracket at front of
throttle body (2 bolts).
7. Disconnect fuel line latch clip and fuel line at fuel
rail. A special tool will be necessary for fuel line
disconnection. (Refer to 14 - FUEL SYSTEM/FUEL
DELIVERY/QUICK CONNECT FITTING - STAN-
DARD PROCEDURE)
8. Remove necessary vacuumlines at throttle body.
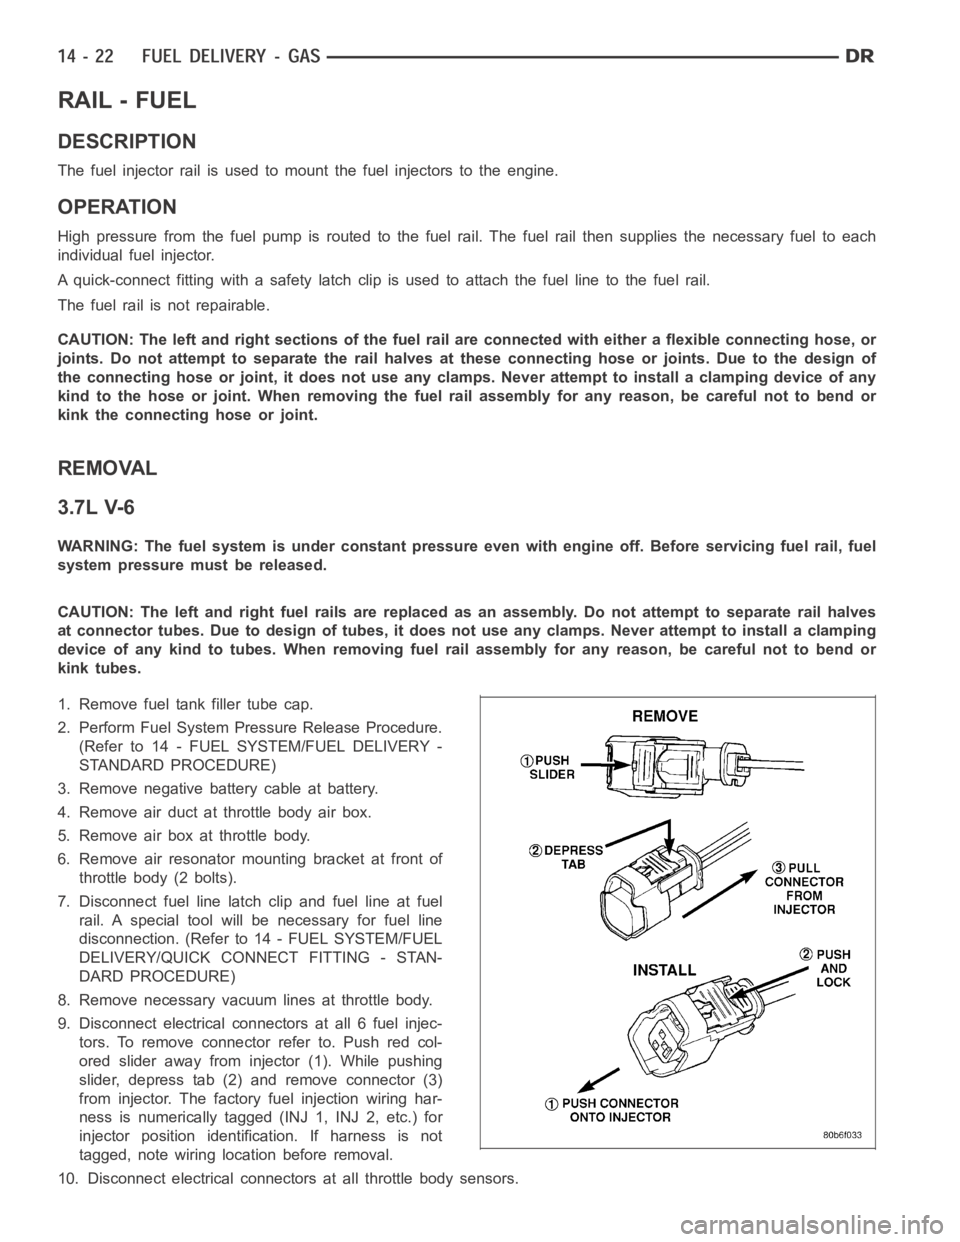
9. Disconnect electrical connectors at all 6 fuel injec-
tors. To remove connector refer to. Push red col-
ored slider away from injector (1). While pushing
slider, depress tab (2) and remove connector (3)
from injector. The factory fuel injection wiring har-
ness is numerically tagged (INJ 1, INJ 2, etc.) for
injector position identification. If harness is not
tagged, note wiring location before removal.
10. Disconnect electrical connectors at all throttle body sensors.
Page 2260 of 5267
11. Remove 6 ignition coils. (Refer to 8 - ELECTRICAL/IGNITION CONTROL/IGNITION COIL - REMOVAL)
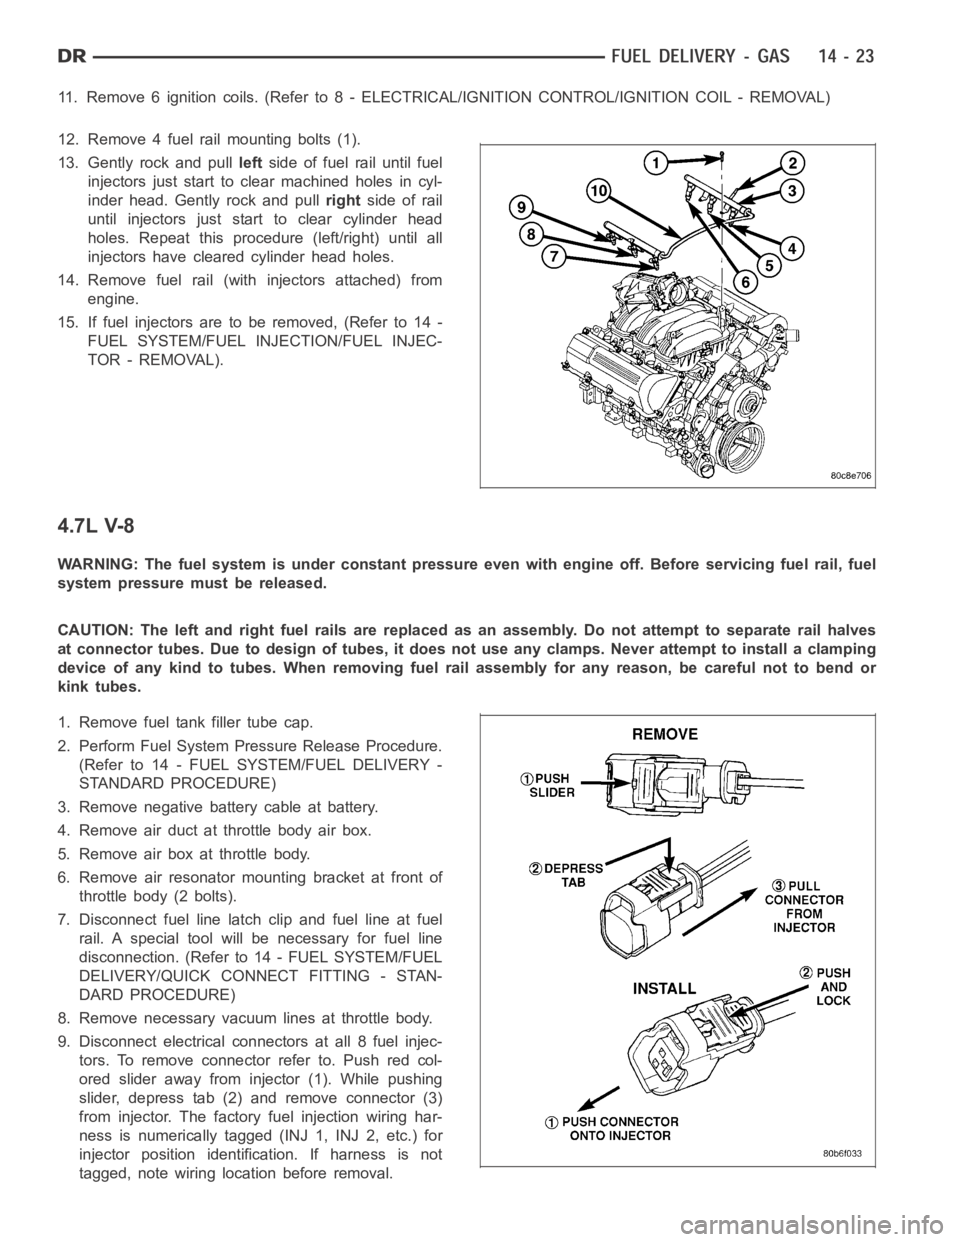
12. Remove 4 fuel rail mounting bolts (1).
13. Gently rock and pullleftside of fuel rail until fuel
injectors just start to clear machined holes in cyl-
inder head. Gently rock and pullrightside of rail
until injectors just start to clear cylinder head
holes. Repeat this procedure (left/right) until all
injectors have cleared cylinder head holes.
14. Remove fuel rail (with injectors attached) from
engine.
15. If fuel injectors are to be removed, (Refer to 14 -
FUEL SYSTEM/FUEL INJECTION/FUEL INJEC-
TOR - REMOVAL).
4.7L V-8
WARNING: The fuel system is under constant pressure even with engine off. Before servicing fuel rail, fuel
system pressure must be released.
CAUTION: The left and right fuel rails are replaced as an assembly. Do not attempt to separate rail halves
at connector tubes. Due to design of tubes, it does not use any clamps. Neverattempt to install a clamping
device of any kind to tubes. When removing fuel rail assembly for any reason, be careful not to bend or
kink tubes.
1. Remove fuel tank filler tube cap.
2. Perform Fuel System Pressure Release Procedure.
(Refer to 14 - FUEL SYSTEM/FUEL DELIVERY -
STANDARD PROCEDURE)
3. Remove negative battery cable at battery.
4. Remove air duct at throttle body air box.
5. Remove air box at throttle body.
6. Remove air resonator mounting bracket at front of
throttle body (2 bolts).
7. Disconnect fuel line latch clip and fuel line at fuel
rail. A special tool will be necessary for fuel line
disconnection. (Refer to 14 - FUEL SYSTEM/FUEL
DELIVERY/QUICK CONNECT FITTING - STAN-
DARD PROCEDURE)
8. Remove necessary vacuumlines at throttle body.
9. Disconnect electrical connectors at all 8 fuel injec-
tors. To remove connector refer to. Push red col-
ored slider away from injector (1). While pushing
slider, depress tab (2) and remove connector (3)
from injector. The factory fuel injection wiring har-
ness is numerically tagged (INJ 1, INJ 2, etc.) for
injector position identification. If harness is not
tagged, note wiring location before removal.
Page 2262 of 5267
1. Remove fuel tank filler tube cap.
2. Perform fuel system pressure release procedure.
(Refer to 14 - FUEL SYSTEM/FUEL DELIVERY -
STANDARD PROCEDURE)
3. Remove negative battery cable at battery.
4. Remove flex tube (air cleaner housing to engine).
5. Remove air resonator box at throttle body.
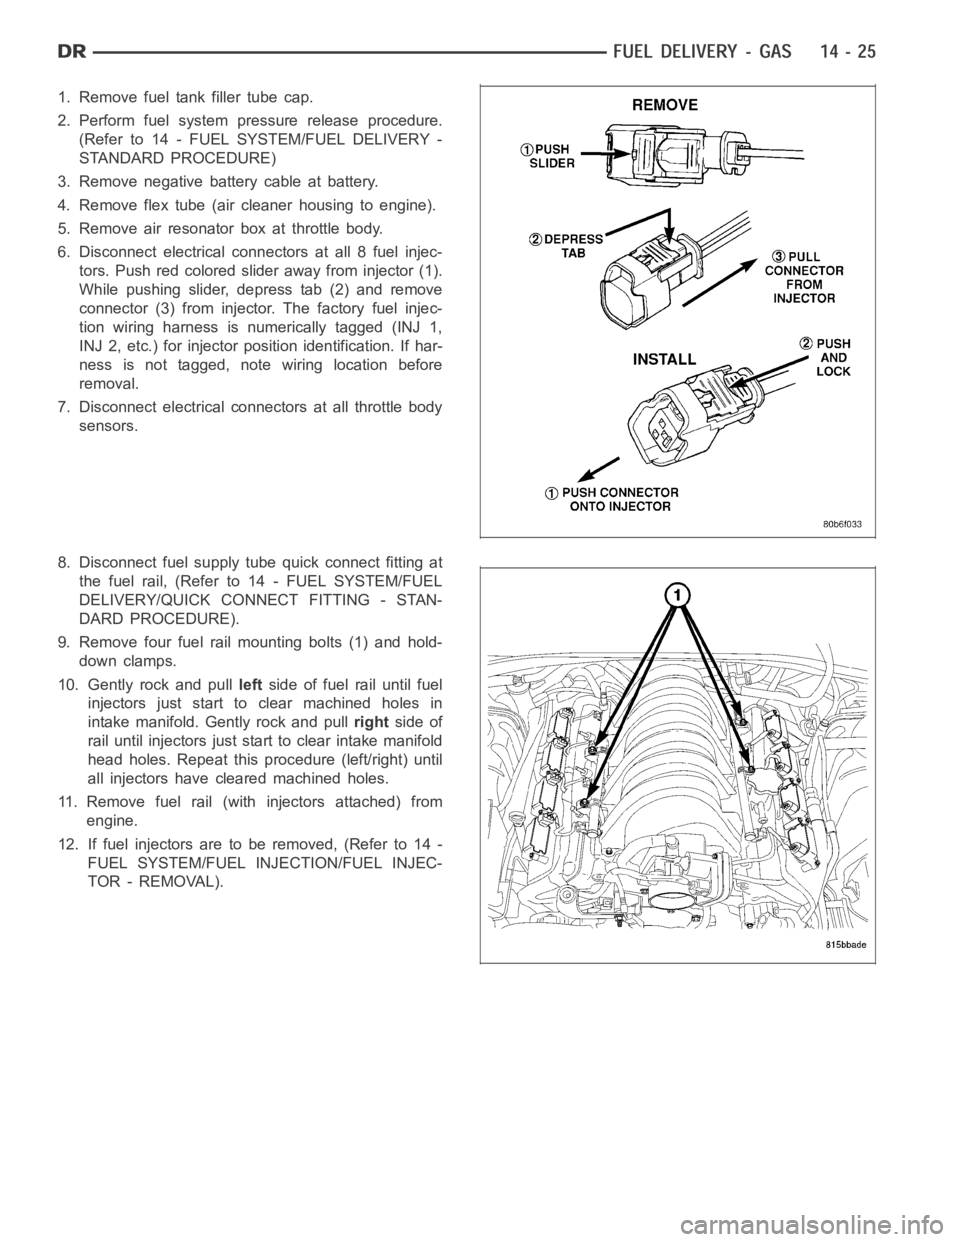
6. Disconnect electrical connectors at all 8 fuel injec-
tors. Push red colored slider away from injector (1).
While pushing slider, depress tab (2) and remove
connector (3) from injector. The factory fuel injec-
tion wiring harness is numerically tagged (INJ 1,
INJ 2, etc.) for injector position identification. If har-
ness is not tagged, note wiring location before
removal.
7. Disconnect electrical connectors at all throttle body
sensors.
8. Disconnect fuel supply tube quick connect fitting at
the fuel rail, (Refer to14 - FUEL SYSTEM/FUEL
DELIVERY/QUICK CONNECT FITTING - STAN-
DARD PROCEDURE).
9. Remove four fuel rail mounting bolts (1) and hold-
down clamps.
10. Gently rock and pullleftside of fuel rail until fuel
injectors just start to clear machined holes in
intake manifold. Gently rock and pullrightside of
rail until injectors just start to clear intake manifold
head holes. Repeat this procedure (left/right) until
all injectors have cleared machined holes.
11. Remove fuel rail (with injectors attached) from
engine.
12. If fuel injectors are to be removed, (Refer to 14 -
FUEL SYSTEM/FUEL INJECTION/FUEL INJEC-
TOR - REMOVAL).
Page 2263 of 5267
8.3L - SRT-10
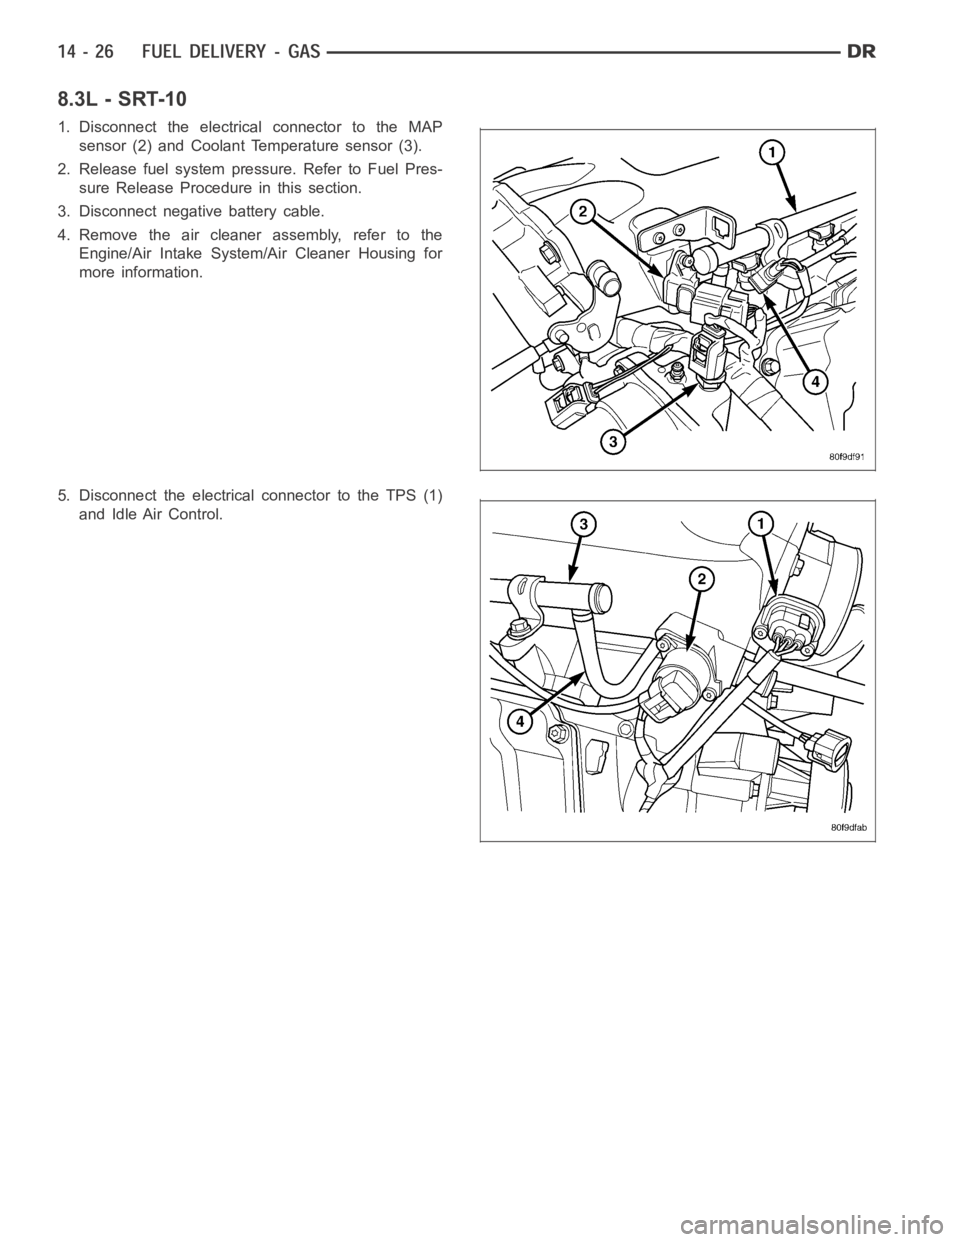
1. Disconnect the electrical connector to the MAP
sensor (2) and Coolant Temperature sensor (3).
2. Release fuel system pressure. Refer to Fuel Pres-
sure Release Procedure in this section.
3. Disconnect negative battery cable.
4. Remove the air cleaner assembly, refer to the
Engine/Air Intake System/Air Cleaner Housing for
more information.
5. Disconnect the electrical connector to the TPS (1)
and Idle Air Control.
Page 2267 of 5267
INSTALLATION
3.7L
1. If fuel injectors are to be installed, (Refer to 14 -
FUEL SYSTEM/FUEL INJECTION/FUEL INJEC-
TOR - INSTALLATION).
2. Clean out fuel injector machined bores in intake
manifold.
3. Apply a small amount of engine oil to each fuel
injector O-ring. This will helpin fuel rail installation.
4. Position fuel rail/fuel injector assembly to machined
injector openings in cylinder head.
5. Guide each injector into cylinder head. Be careful
not to tear injector O-rings.
6. Pushrightside of fuel rail down until fuel injectors
have bottomed on cylinder head shoulder. Push
leftfuel rail down until injectors have bottomed on
cylinder head shoulder.
7. Install 4 fuel rail mounting bolts and tighten. (Refer
to 14 - FUEL SYSTEM/FUEL DELIVERY - SPECI-
FICATIONS)
8. Install 6 ignition coils. (Refer to 8 - ELECTRICAL/
IGNITION CONTROL/IGNITION COIL - INSTALLA-
TION)
9. Connect electrical connectors to throttle body.
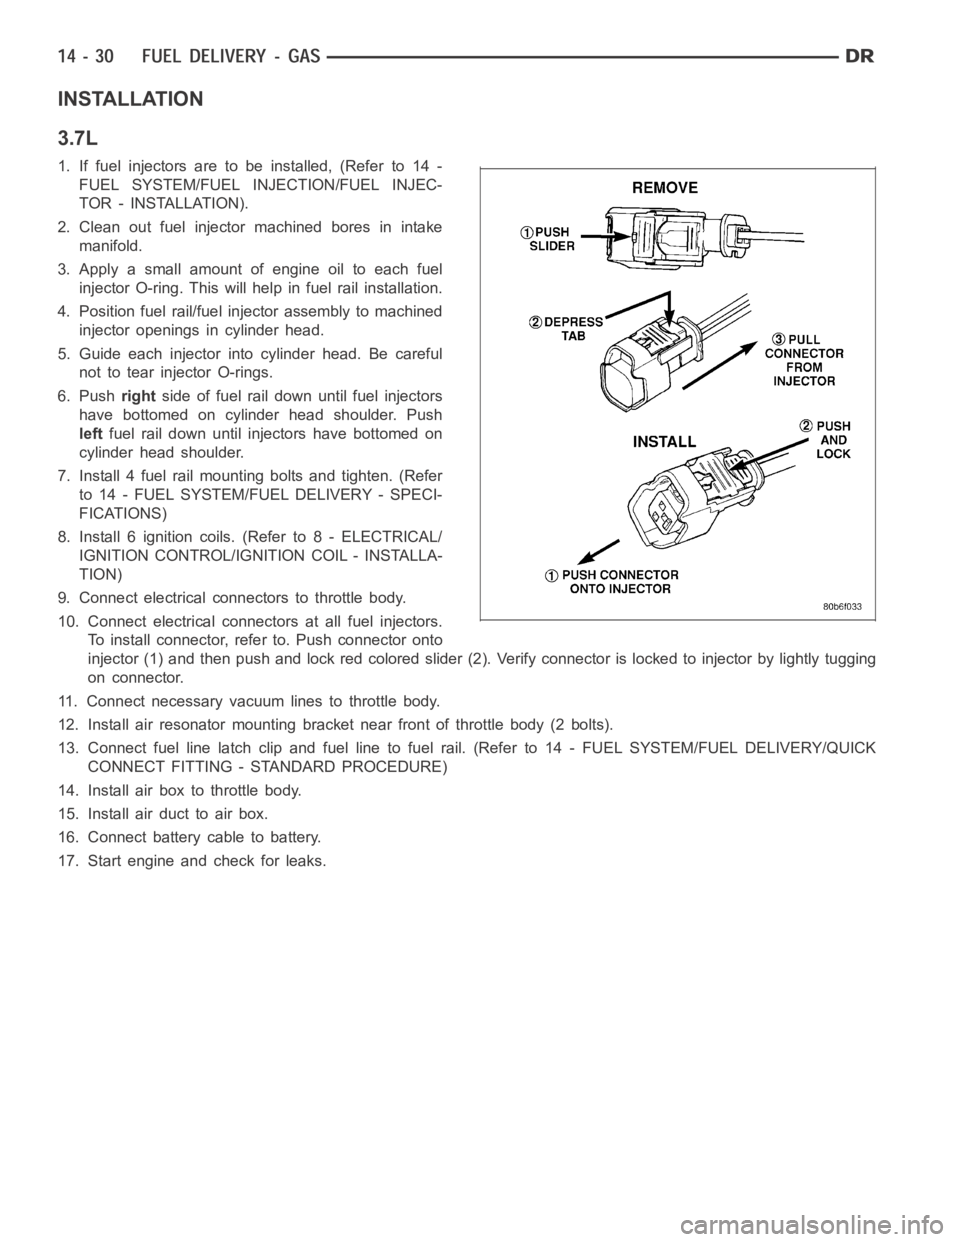
10. Connect electrical connectors at all fuel injectors.
To install connector, refer to. Push connector onto
injector (1) and then push and lock red colored slider (2). Verify connector is locked to injector by lightly tugging
on connector.
11. Connect necessary vacuum lines to throttle body.
12. Install air resonator mounting bracket near front of throttle body (2 bolts).
13. Connect fuel line latch clip and fuel line to fuel rail. (Refer to 14 - FUEL SYSTEM/FUEL DELIVERY/QUICK
CONNECT FITTING - STANDARD PROCEDURE)
14. Install air box to throttle body.
15. Install air duct to air box.
16. Connect battery cable to battery.
17. Start engine and check for leaks.
Page 2268 of 5267
4.7L
1. If fuel injectors are to be installed, (Refer to 14 -
FUEL SYSTEM/FUEL INJECTION/FUEL INJEC-
TOR - INSTALLATION).
2. Clean out fuel injector machined bores in intake
manifold.
3. Apply a small amount of engine oil to each fuel
injector O-ring. This will helpin fuel rail installation.
4. Position fuel rail/fuel injector assembly to machined
injector openings in cylinder head.
5. Guide each injector into cylinder head. Be careful
not to tear injector O-rings.
6. Pushrightside of fuel rail down until fuel injectors
have bottomed on cylinder head shoulder. Push
leftfuel rail down until injectors have bottomed on
cylinder head shoulder.
7. Install 4 fuel rail mounting bolts and tighten. (Refer
to 14 - FUEL SYSTEM/FUEL DELIVERY - SPECI-
FICATIONS)
8. Install 8 ignition coils. (Refer to 8 - ELECTRICAL/
IGNITION CONTROL/IGNITION COIL - INSTALLA-
TION)
9. Connect electrical connectors to throttle body.
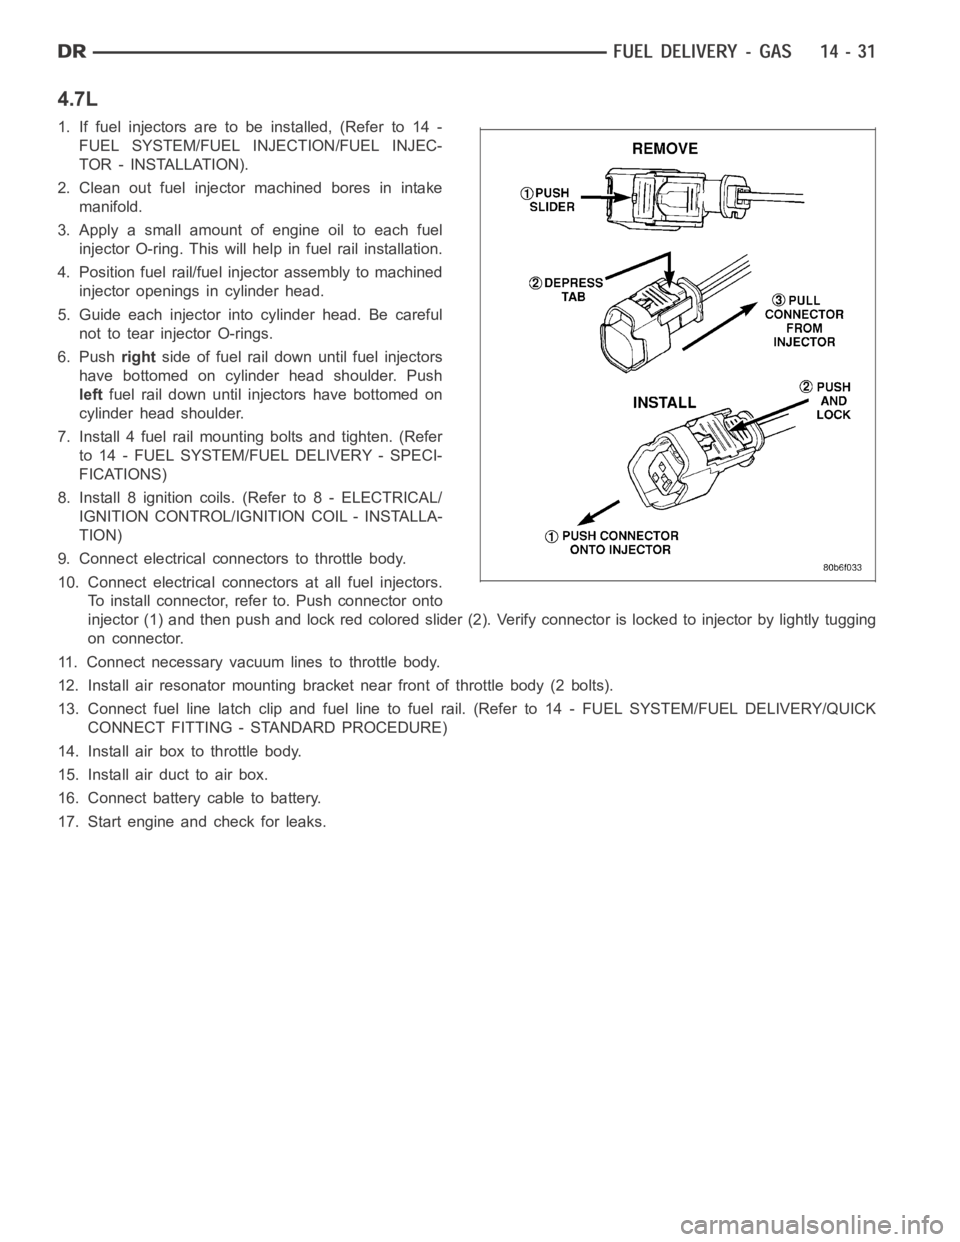
10. Connect electrical connectors at all fuel injectors.
To install connector, refer to. Push connector onto
injector (1) and then push and lock red colored slider (2). Verify connector is locked to injector by lightly tugging
on connector.
11. Connect necessary vacuum lines to throttle body.
12. Install air resonator mounting bracket near front of throttle body (2 bolts).
13. Connect fuel line latch clip and fuel line to fuel rail. (Refer to 14 - FUEL SYSTEM/FUEL DELIVERY/QUICK
CONNECT FITTING - STANDARD PROCEDURE)
14. Install air box to throttle body.
15. Install air duct to air box.
16. Connect battery cable to battery.
17. Start engine and check for leaks.