Page 2076 of 5267

INSPECTION
Va l v e
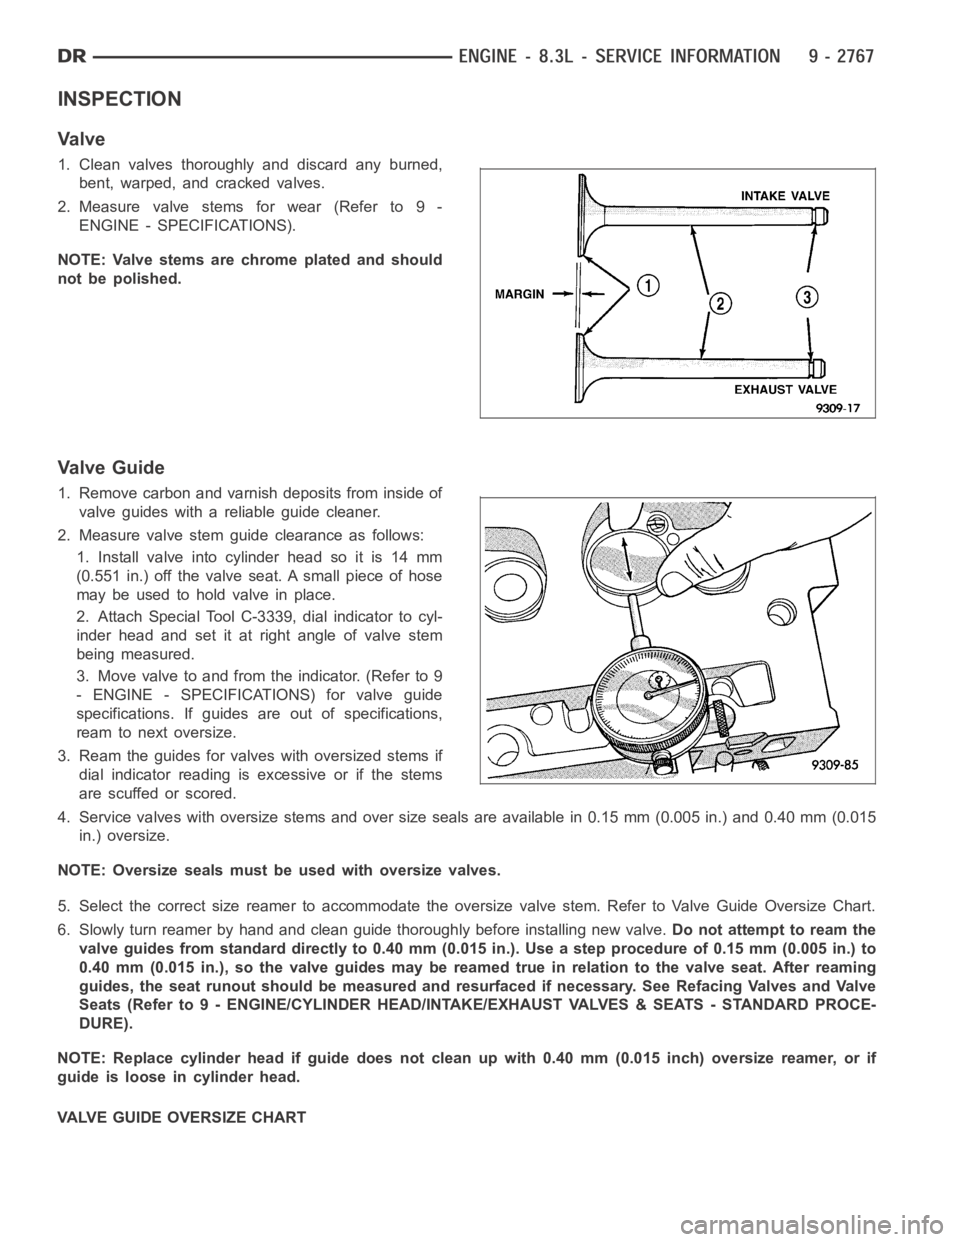
1. Clean valves thoroughly and discard any burned,
bent, warped, and cracked valves.
2. Measure valve stems for wear (Refer to 9 -
ENGINE - SPECIFICATIONS).
NOTE: Valve stems are chrome plated and should
not be polished.
Valve Guide
1. Remove carbon and varnish deposits from inside of
valve guides with a reliable guide cleaner.
2. Measure valve stem guide clearance as follows:
1. Install valve into cylinder head so it is 14 mm
(0.551 in.) off the valve seat. A small piece of hose
maybeusedtoholdvalveinplace.
2. Attach Special Tool C-3339, dial indicator to cyl-
inder head and set it at right angle of valve stem
being measured.
3. Move valve to and from the indicator. (Refer to 9
- ENGINE - SPECIFICATIONS) for valve guide
specifications. If guides are out of specifications,
ream to next oversize.
3. Ream the guides for valves with oversized stems if
dial indicator reading is excessive or if the stems
are scuffed or scored.
4. Service valves with oversize stems and over size seals are available in 0.15 mm (0.005 in.) and 0.40 mm (0.015
in.) oversize.
NOTE: Oversize seals must be used with oversize valves.
5. Select the correct size reamer to accommodate the oversize valve stem. Refer to Valve Guide Oversize Chart.
6. Slowly turn reamer by hand and clean guide thoroughly before installingnew valve.Do not attempt to ream the
valve guides from standard directly to 0.40 mm (0.015 in.). Use a step procedure of 0.15 mm (0.005 in.) to
0.40 mm (0.015 in.), so the valve guides may be reamed true in relation to thevalve seat. After reaming
guides, the seat runout should be measured and resurfaced if necessary. See Refacing Valves and Valve
Seats (Refer to 9 - ENGINE/CYLINDER HEAD/INTAKE/EXHAUST VALVES & SEATS - STANDARD PROCE-
DURE).
NOTE: Replace cylinder head if guide does not clean up with 0.40 mm (0.015 inch) oversize reamer, or if
guide is loose in cylinder head.
VALVE GUIDE OVERSIZE CHART
Page 2078 of 5267

COVER-TIMING CHAIN
REMOVAL
1. Disconnect negative battery cable.
2. Disconnect throttle body air inlet duct at the throttle
body, CCV hose, disconnect the IAT sensor and
remove air cleaner housing cover (Refer to 9 -
ENGINE/AIR INTAKE SYSTEM - REMOVAL).
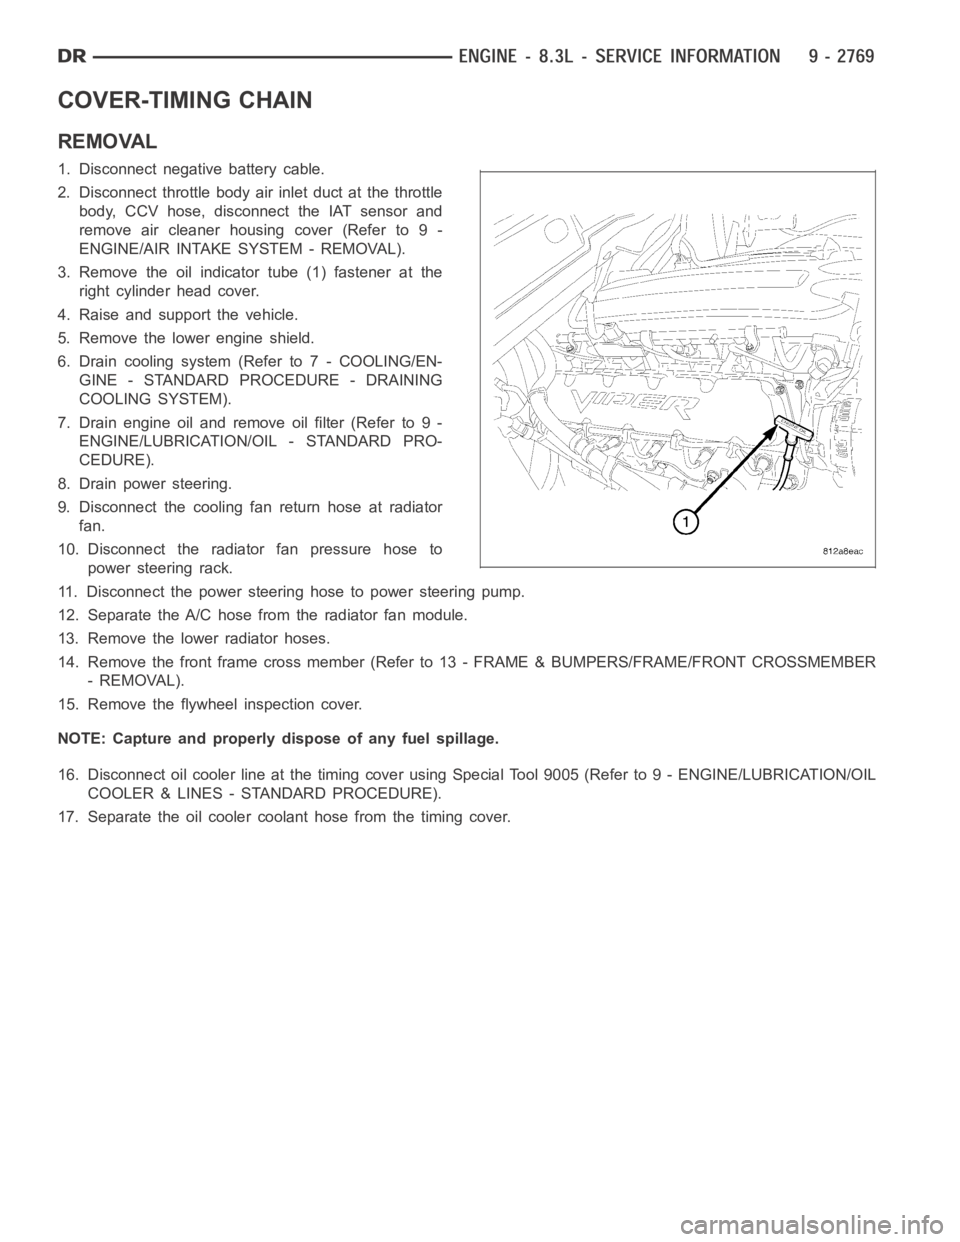
3. Remove the oil indicator tube (1) fastener at the
right cylinder head cover.
4. Raise and support the vehicle.
5. Remove the lower engine shield.
6. Drain cooling system (Refer to 7 - COOLING/EN-
GINE - STANDARD PROCEDURE - DRAINING
COOLING SYSTEM).
7. Drain engine oil and remove oil filter (Refer to 9 -
ENGINE/LUBRICATION/OIL - STANDARD PRO-
CEDURE).
8. Drain power steering.
9. Disconnect the cooling fan return hose at radiator
fan.
10. Disconnect the radiator fan pressure hose to
power steering rack.
11. Disconnect the power steering hose to power steering pump.
12. Separate the A/C hose from the radiator fan module.
13. Remove the lower radiator hoses.
14. Remove the front frame cross member (Refer to 13 - FRAME & BUMPERS/FRAME/FRONT CROSSMEMBER
- REMOVAL).
15. Remove the flywheel inspection cover.
NOTE: Capture and properly dispose of any fuel spillage.
16. Disconnect oil cooler line at the timing cover using Special Tool 9005 (Refer to 9 - ENGINE/LUBRICATION/OIL
COOLER & LINES - STANDARD PROCEDURE).
17. Separate the oil cooler coolant hose from the timing cover.
Page 2079 of 5267
18. Wiggle oil indicator tube free of oil pan.
19. Loosen engine mounts (3 and 5).
NOTE: Care must be taken not to damage the A/C
compressor when placing the jack stand and rais-
ing the engine
20. Raise and support the engine with a jack stand at
the A/C bracket.
21. Remove the engine oil pan.
22. Lower the engine and remove the jack stand.
23. Remove the oil pump pick up tube (2).
24. Remove accessory drive belt (Refer to 7 - COOL-
ING/ACCESSORY DRIVE/DRIVE BELTS -
REMOVAL).
Page 2080 of 5267

25. Remove A/C compressor mounting bolts. Reposi-
tion A/C compressor.Do notdisconnect A/C lines.
26. Disconnect the power steering line support
bracket at the radiator.
27. Lower the vehicle.
28. Remove the upper radiator hose and coolant
recovery container.
29. Remove the cooling fan module (Refer to 7 -
COOLING/ENGINE/RADIATOR FAN -
REMOVAL).
30. Remove the upper idler pulley.
31. Remove power steering pump mounting bolts.
Reposition power steering pump aside.Do not
disconnect power steering lines.
32. Remove the generator (Refer to 8 - ELECTRI-
CAL/CHARGING/GENERATOR - REMOVAL).
33. Disconnect the heater hose at the timing cover.
34. Disconnect the ground wire at the thermostat
housing.
NOTE: Do Not remove the camshaft position sensor from the timing cover.
35. Disconnect the camshaft sensor wiring harness connector.
36. Disconnect engine coolant temperature (ECT) sensor connector.
37. Remove crankshaft pulley and damper (Refer to 9 - ENGINE/ENGINE BLOCK/VIBRATION DAMPER -
REMOVAL).
38. Remove the timing cover.
INSTALLATION
CAUTION: Do not use a metal scraper to clean alu-
minum sealing surfaces, as damage to surfaces
may occur. Use only a plastic scraper and Mopar
Brake Parts Cleaner or the equivalent.
1. Be sure mating surfaces of chain case cover and
cylinder block are clean and free from burrs.
Crankshaft oil seal must be removed to insure cor-
rect oil pump engagement.
2. Install the timing chain cover gasket.
3. Position the oil pump inner rotor mating flats in the
same position as the crankshaft drive flats.
4. Install the timing chain cover onto crankshaft.
Ensure the oil pump is engaged on the crankshaft
correctly or severe damage may result (Refer to 9 -
ENGINE/LUBRICATION/OIL PUMP -
INSTALLATION).
Page 2081 of 5267

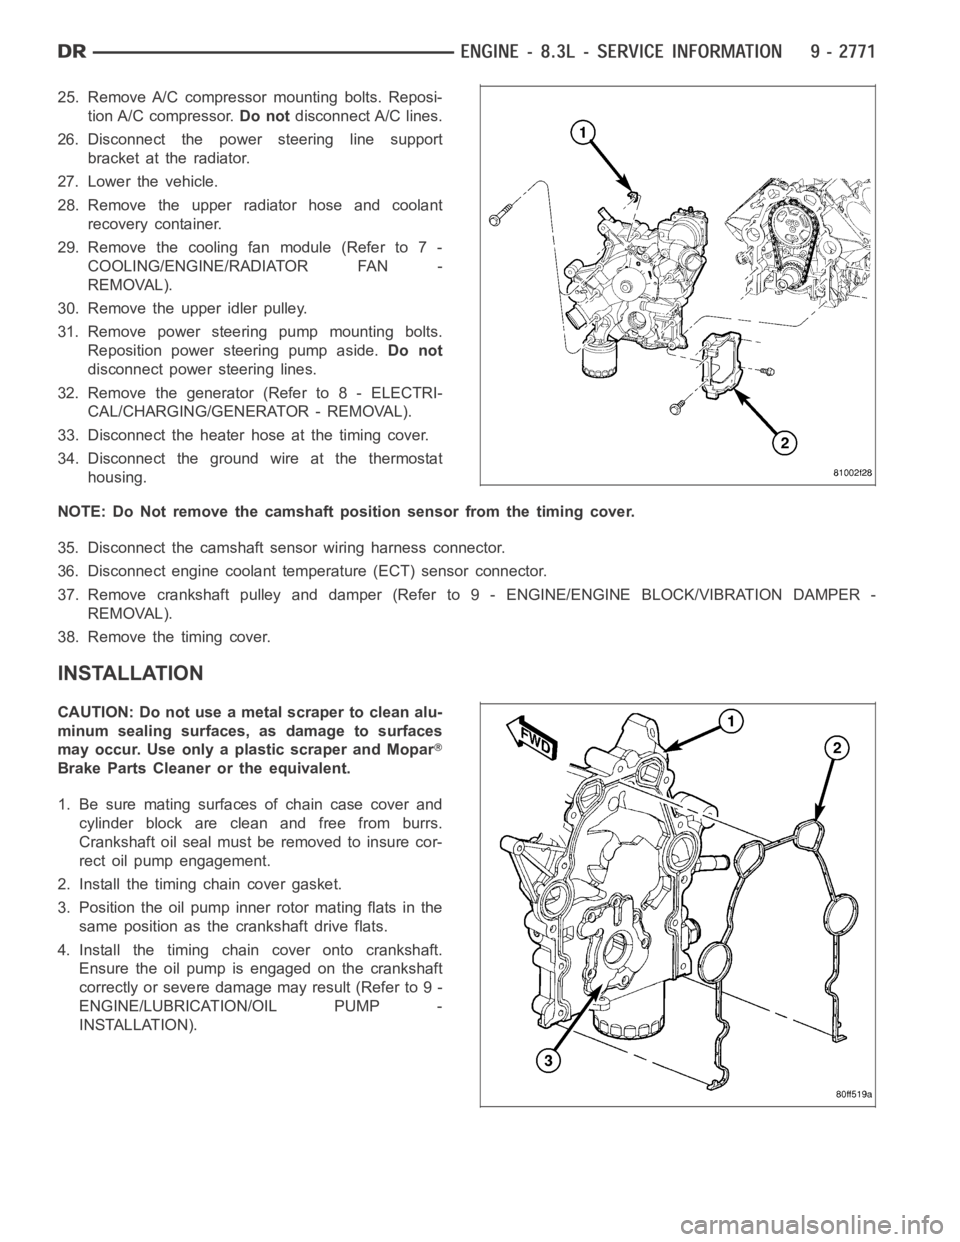
5. Hand start bolts No.1 and No.2.
6. Loosely install A/C compressor mounting bracket.
7. Hand start remaining timing chain cover bolts.
8. Torque timing chain cover bolts in the sequence
showninto23Nꞏm(200in.lbs.).
9. Torque A/C compressor mounting bracket bolts to
23 Nꞏm (200 in. lbs.).
10. Install crankshaft oil seal (Refer to 9 - ENGINE/
ENGINE BLOCK/CRANKSHAFT OIL SEAL -
FRONT - INSTALLATION).
11. Raise vehicle on hoist.
12. Install oil pump pick up tube using anewo-ring.
Torque 1/4–20 bolt to 11 Nꞏm (95 in. lbs.). Torque
5/16–18 nuts to 23 Nꞏm (200 in. lbs.).
13. Support the engine with a jack stand.
14. Install oil pan and drain plug (Refer to 9 -
ENGINE/LUBRICATION/OIL PAN - INSTALLA-
TION).
15. Remove the jackstand.
16. Tighten the engine mount to frame nuts to 102
Nꞏm (75 ft.lbs.).
17. Connect the oil cooler coolant hose to the timing
cover.
18. Connect the oil cooler line (Refer to 9 - ENGINE/
LUBRICATION/OIL COOLER & LINES - STAN-
DARD PROCEDURE).
19. Install the lower radiator hose.
20. Install the flywheel inspection cover.
21. Install the front frame cross member (Refer to 13
- FRAME & BUMPERS/FRAME/FRONT CROSS-
MEMBER - INSTALLATION).
22. Lower vehicle.
23. Position the compressor and install A/C compressor mounting bolts. Torque bolts to 23 Nꞏm (200 in. lbs.).
24. Connect heater hose at timing cover.
25. Install crankshaft damper and pulley (Refer to 9 - ENGINE/ENGINE BLOCK/VIBRATION DAMPER - INSTAL-
LATION).
26. Install generator. Connect electrical connectors.
27. Install the idler pulley.
28. Connect the camshaft position sensor wiring harness connector.
29. Connect engine coolant temperature (ECT) sensor wiring harness connector.
30. Install power steering pump mounting bolts.
31. Install accessory drive belt (Refer to 7 - COOLING/ACCESSORY DRIVE/DRIVE BELTS - INSTALLATION).
32. Install the radiator fan assembly (Refer to 7 - COOLING/ENGINE/RADIATOR FAN - INSTALLATION).
Page 2082 of 5267
33. Raise and support the vehicle.
34. Connect the hydraulic lines to the fan assembly and steering rack then connect the A/C hose to the fan shroud.
35. Install aNewoil filter.
36. Lower the vehicle.
37. Install upper radiator hose and connect the ground wire at the thermostat housing.
38. Install air cleaner housing cover assembly, connect throttle body airinlet duct, IAT sensor and CCV hose. (Refer
to 9 - ENGINE/AIR INTAKE SYSTEM - INSTALLATION).
39. Fill and purge air from the power steering system.
40. Fill engine crankcase with proper oil to correct level.
41. Fill and purge air from the cooling system (Refer to 7 - COOLING/ENGINE -STANDARD PROCEDURE - FILL-
ING COOLING SYSTEM).
42. Connect negative battery cable.
43. Start the vehicle and inspect for leaks.
44. Install the lower engine shield.
Page 2083 of 5267
TIMING CHAIN AND SPROCKETS
REMOVAL
TIMING CHAIN AND CAMSHAFT SPROCKET REMOVAL
1. Remove timing chain cover (Refer to 9 - ENGINE/
VALVE TIMING/TIMING CHAIN COVER -
REMOVAL).
2. Rotate crankshaft until timing marks are aligned.
3. Remove the camshaft sprocket attaching bolts (2).
4. Remove the timing chain (1) with camshaft
sprocket (2).
CRANKSHAFT SPROCKET REMOVAL
1. Install Special Tool 8194 into end of crankshaft.
Lubricate the end of Special Tool 8194 with wheel
bearing grease or equivalent.
NOTE: Lubricate the threads of Special Tool 5048
using Mopar
Nickel Anti-seize Compound or
equivalent, before beginning crankshaft sprocket
removal.
Page 2085 of 5267
TIMING CHAIN ANDCAMSHAFT SPROCKET INSTALLATION
1. Rotate the crankshaft sprocket so the timing mark
is at the 12 O’clock position.
2. Place the timing chain around the camshaft
sprocket and place the timing mark to the 6 O’clock
position.
3. Place the timing chain around crankshaft sprocket
and install the camshaft sprocket into position.
4. Using straight edge, check alignment of timing
marks.
5. Install the camshaft sprocket bolts. Tighten the
bolts to 23 Nꞏm (200 in. lbs.).
6. Rotate crankshaft 2 revolutions. Timing marks
should line up. If timing marks do not line up,
remove cam sprocket and realign.
7. Measure camshaft end play. (Refer to 9 - ENGINE
- SPECIFICATIONS). If not within specifications,
install new thrust plate.
8. Install timing chain cover (Refer to 9 - ENGINE/
VALVE TIMING/TIMING CHAIN COVER -
INSTALLATION).