Page 2086 of 5267
LUBRICATION
DESCRIPTION
The engine lubrication system is a full-flow filtration pressure feed type.
OPERATION
Engine oil stored in the oil pan is taken in and discharged by an internal geartypeoilpump,whichisdrivenbythe
crankshaft. A pressure relief valve is located in the timing chain case cover; it regulates oil pressure. The oil is
pumped through an oil filter and feeds a main oil gallery. Also, oil is routedtoanexternaloilcooler.Themainoil
gallery feeds oil under pressure to the main bearings, connecting rod bearings, and camshaft bearings. Passages in
the cylinder block feed oil to the hydraulic lifters. The oil then flows through hollow pushrods, which feed the rocker
arm pivots.
DIAGNOSIS AND TESTING
CHECKING ENGINE OIL PRESSURE
1. Remove oil pressure sensor (Refer to 9 - ENGINE/LUBRICATION/OIL PRESSURE SENSOR - REMOVAL).
2. Install oil pressure gauge.
3. Warm engine at high idle until thermostat opens.
CAUTION: If oil pressure is 0 at idle, Do Not Run engine at 3000 RPM.
4. Oil pressure should be 68.9 kPa (10 psi) at idle or 310 - 517 kPa (45 - 75 psi)at 3000 RPM.
5. If oil pressure is 0 at idle, shut off engine. Check for a clogged oil pick-up screen or a pressure relief valve stuck
open.
ENGINE OIL LEAK
Begin with a thorough visual inspection of the engine, particularly at thearea of the suspected leak. If an oil leak
source is not readily identifiable, thefollowingstepsshouldbefollowed:
1. Do not clean or degrease the engine at this time because some solvents maycause rubber to swell, temporarily
stopping the leak.
2. Add an oil soluble dye (use as recommended by manufacturer). Start the engine and let idle for approximately 15
minutes. Check the oil dipstick to make sure the dye is thoroughly mixed as indicated with a bright yellow color
under a black light.
3. Using a black light, inspect the entire engine for fluorescent dye, particularly at the suspected area of oil leak. If
the oil leak is found and identified, repair per service manual instructions.
4. If dye is not observed, drive the vehicle at various speeds for approximately 24 km (15 miles), and repeat inspec-
tion.If the oil leak source is not positively identified at this time, proceed with the air leak detection test
method.
Air Leak Detection Test Method
1. Remove the PCV valve from the IAFM. Cap or plug the PCV valve grommet.
2. Attach an air hose with pressure gauge and regulator to the dipstick tube.
CAUTION: Do not subject the engine assembly to more than 20.6 kPa (3 PSI) of test pressure.
3. Gradually apply air pressure from 6.89 - 17.23 kPa (1 - 2.5 psi) maximum while applying soapy water at the
suspected source. Adjust the regulator to the suitable test pressure thatprovide the best bubbles which will pin-
point the leak source. If the oil leak is detected and identified, repair per service manual procedures.
4. If the leakage occurs at the rear oil seal area, refer to the section, Inspection for Rear Seal Area Leak.
5. If no leaks are detected, turn off the air supply and remove the air hose and all plugs and caps. Install the PCV
valve.
6. Clean the oil off the suspect oil leak area using a suitable solvent. Drive the vehicle at various speeds approx-
imately 24 km (15 miles). Inspect the engine for signs of an oil leak by usinga black light.
Page 2087 of 5267
INSPECTION FOR REAR SEAL AREA LEAKS
Since it is sometimes difficult to determine the source of an oil leak in therear seal area of the engine, a more
involved inspection is necessary. The following steps should be followedto help pinpoint the source of the leak.
If the leakage occurs at the crankshaft rear oil seal area:
1. Disconnect the battery.
2. Raise the vehicle.
3. Remove torque converter or clutch housing cover and inspect rear of block for evidence of oil. Use a black light
to check for the oil leak:
a. Circular spray pattern generally indicates seal leakage or crankshaftdamage.
b. Where leakage tends to run straight down, possible causes are a porous block, distributor seal, camshaft
bore cup plugs oil galley pipe plugs, oil filter runoff, and main bearing cap to cylinder block mating surfaces.
4. If no leaks are detected, pressurize the crankcase as outlined in the, Inspection (Engine oil Leaks in general)
CAUTION: Do not exceed 20.6 kPa (3 psi).
5. If the leak is not detected, very slowly turn the crankshaft and watch forleakage. If a leak is detected between
the crankshaft and seal while slowly turning the crankshaft, it is possible the crankshaft seal surface is damaged.
The seal area on the crankshaft could have minor nicks or scratches that canbe polished out with emery cloth.
CAUTION: Use extreme caution when crankshaft polishing is necessary to remove minor nicks and
scratches. The crankshaft seal flange is especially machined to complement the function of the rear oil seal.
6. For bubbles that remain steady with shaft rotation, no further inspection can be done until disassembled.
Page 2088 of 5267
OIL
STANDARD PROCEDURE
CHECKING ENGINE OIL LEVEL
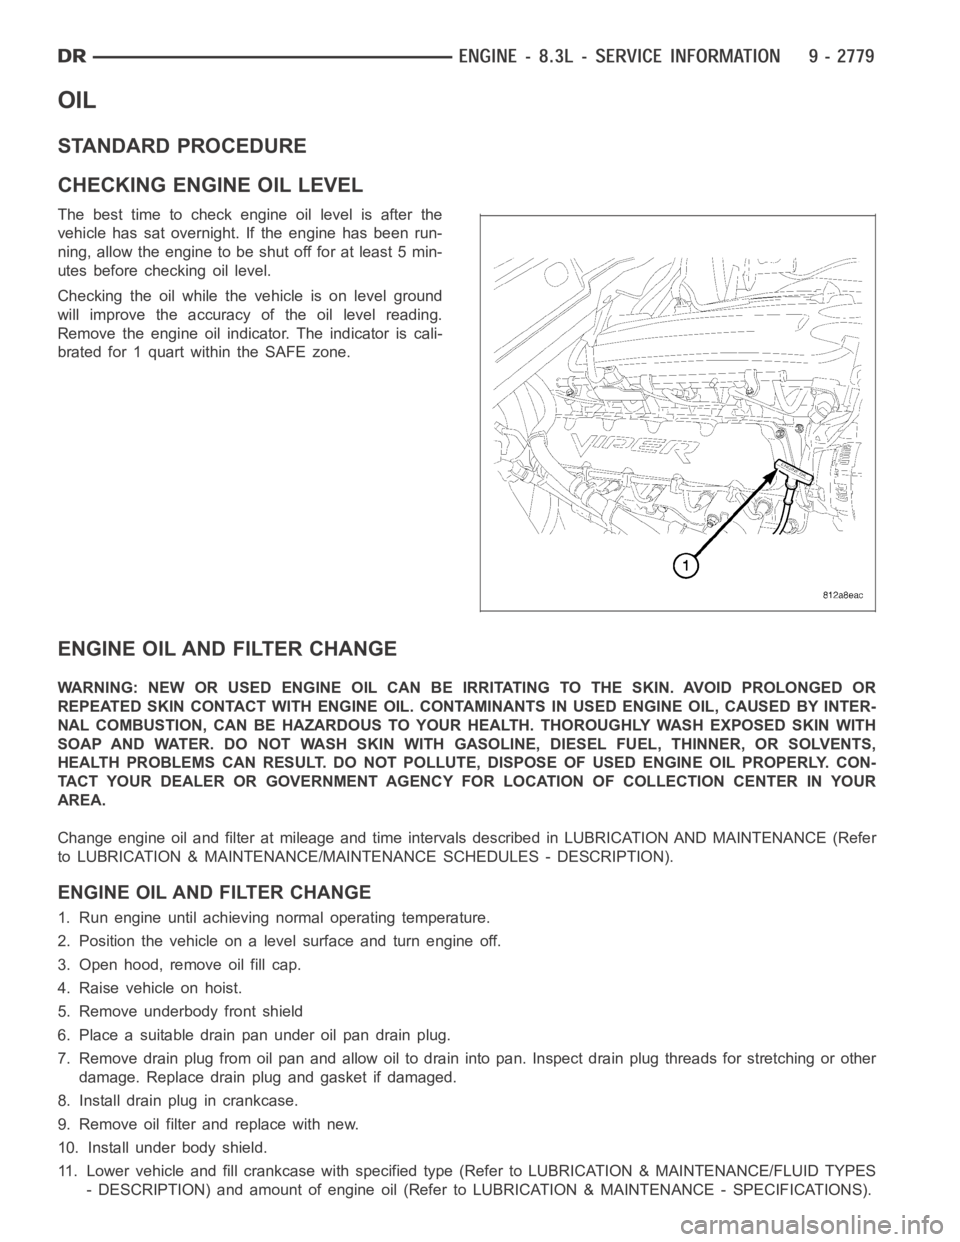
The best time to check engine oil level is after the
vehicle has sat overnight. If the engine has been run-
ning, allow the engine to be shut off for at least 5 min-
utes before checking oil level.
Checking the oil while the vehicle is on level ground
will improve the accuracy of the oil level reading.
Remove the engine oil indicator. The indicator is cali-
brated for 1 quart within the SAFE zone.
ENGINE OIL AND FILTER CHANGE
WARNING: NEW OR USED ENGINE OIL CAN BE IRRITATING TO THE SKIN. AVOID PROLONGED OR
REPEATED SKIN CONTACT WITH ENGINE OIL. CONTAMINANTS IN USED ENGINE OIL, CAUSED BY INTER-
NAL COMBUSTION, CAN BE HAZARDOUS TO YOUR HEALTH. THOROUGHLY WASH EXPOSED SKIN WITH
SOAP AND WATER. DO NOT WASH SKIN WITH GASOLINE, DIESEL FUEL, THINNER, OR SOLVENTS,
HEALTH PROBLEMS CAN RESULT. DO NOT POLLUTE, DISPOSE OF USED ENGINE OIL PROPERLY. CON-
TACT YOUR DEALER OR GOVERNMENT AGENCY FOR LOCATION OF COLLECTION CENTER INYOUR
AREA.
Change engine oil and filter at mileage and time intervals described in LUBRICATION AND MAINTENANCE (Refer
to LUBRICATION & MAINTENANCE/MAINTENANCE SCHEDULES - DESCRIPTION).
ENGINE OIL AND FILTER CHANGE
1. Run engine until achieving normal operating temperature.
2. Position the vehicle on a level surface and turn engine off.
3. Open hood, remove oil fill cap.
4. Raise vehicle on hoist.
5. Remove underbody front shield
6. Place a suitable drain pan under oil pan drain plug.
7. Remove drain plug from oil pan and allow oil to drain into pan. Inspect drain plug threads for stretching or other
damage. Replace drain plug and gasket if damaged.
8. Install drain plug in crankcase.
9. Remove oil filter and replace with new.
10. Install under body shield.
11. Lower vehicle and fill crankcase with specified type (Refer to LUBRICATION & MAINTENANCE/FLUID TYPES
- DESCRIPTION) and amount of engine oil (Refer to LUBRICATION & MAINTENANCE - SPECIFICATIONS).
Page 2089 of 5267
12. Install oil fill cap.
13. Start engine and inspect for leaks.
14. Stop engine and inspect oil level. Adjust oil level as necessary.
OIL SPECIFICATION
DaimlerChrysler Corporation recommends a fully synthetic API certifiedengine oil of the proper viscosity grade for
refill. Viper engine factory fill is Mobil 1
10W-30 Synthetic.
OIL FILTER SPECIFICATION
All DaimlerChrysler Corporation engines are equipped with a high qualityfull-flow, disposable type oil filter.
DaimlerChrysler Corporation recommends a Mopar
or equivalent oil filter be used.
USED ENGINE OIL DISPOSAL
Care should be exercised when disposing used engine oil after it has been drained from a vehicle engine.
Page 2090 of 5267
COOLER & LINES-OIL
DESCRIPTION
An engine oil cooler is used on all models. The cooler is a coolant-to-oil type and mounted on the right front inner
fender.
OPERATION
Engine oil travels from the oil pump and filter to the oil cooler via an oil supply line. The oil is cooled and returned
to the engine via an oil return line. Engine oil is then pumped into the main oil gallery. Engine coolant flows into the
cooler from the heater return hose and exits into the water pump inlet nipple.
STANDARD PROCEDURE - OIL COOLER LINE QUICK CONNECT FITTING
DISASSEMBLY/ASSEMBLY
DISASSEMBLY
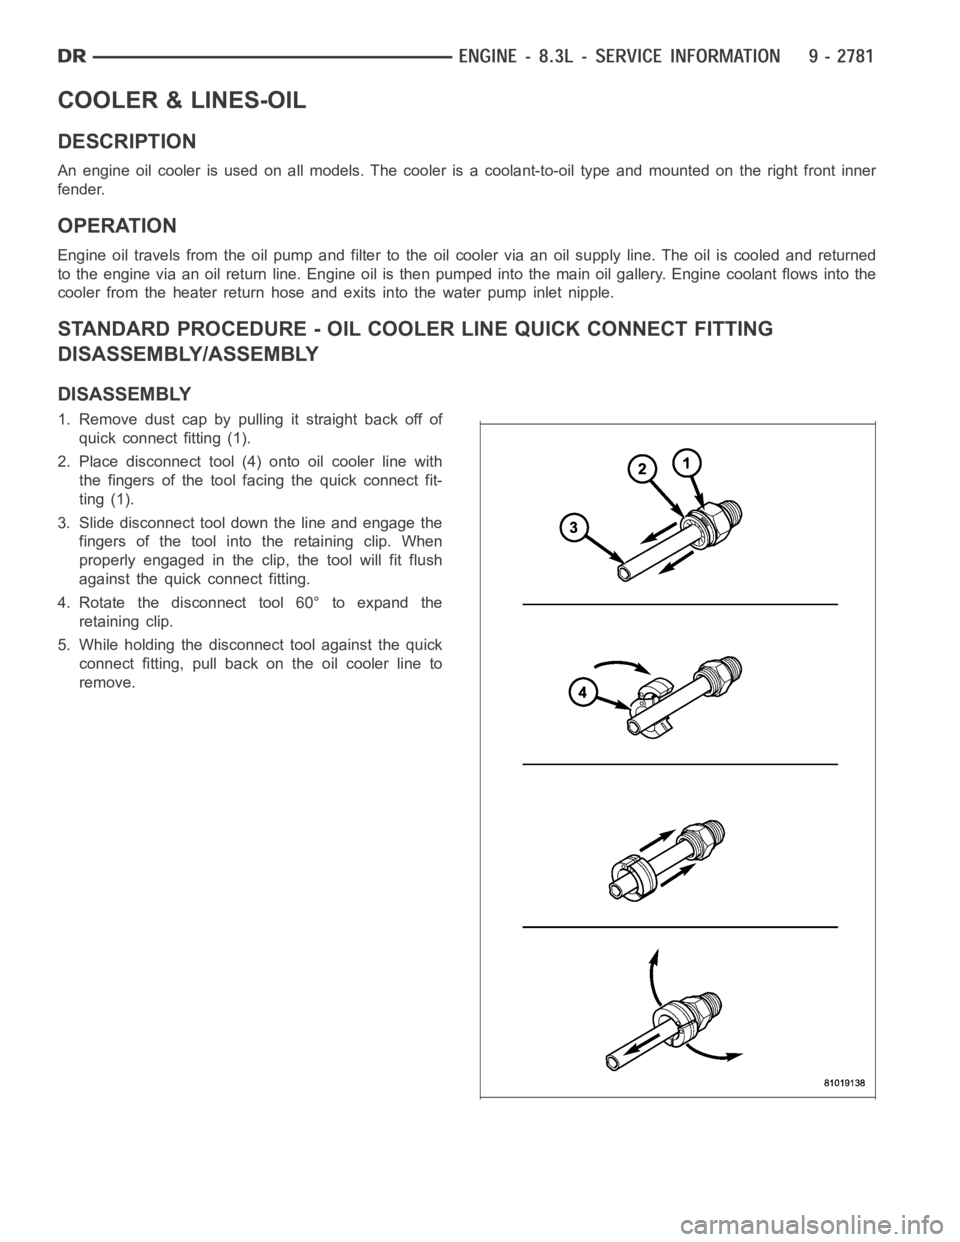
1. Remove dust cap by pulling it straight back off of
quick connect fitting (1).
2. Place disconnect tool (4) onto oil cooler line with
the fingers of the tool facing the quick connect fit-
ting (1).
3. Slide disconnect tool down the line and engage the
fingers of the tool into the retaining clip. When
properly engaged in the clip, the tool will fit flush
against the quick connect fitting.
4. Rotate the disconnect tool 60° to expand the
retaining clip.
5. While holding the disconnect tool against the quick
connect fitting, pull back on the oil cooler line to
remove.
Page 2091 of 5267
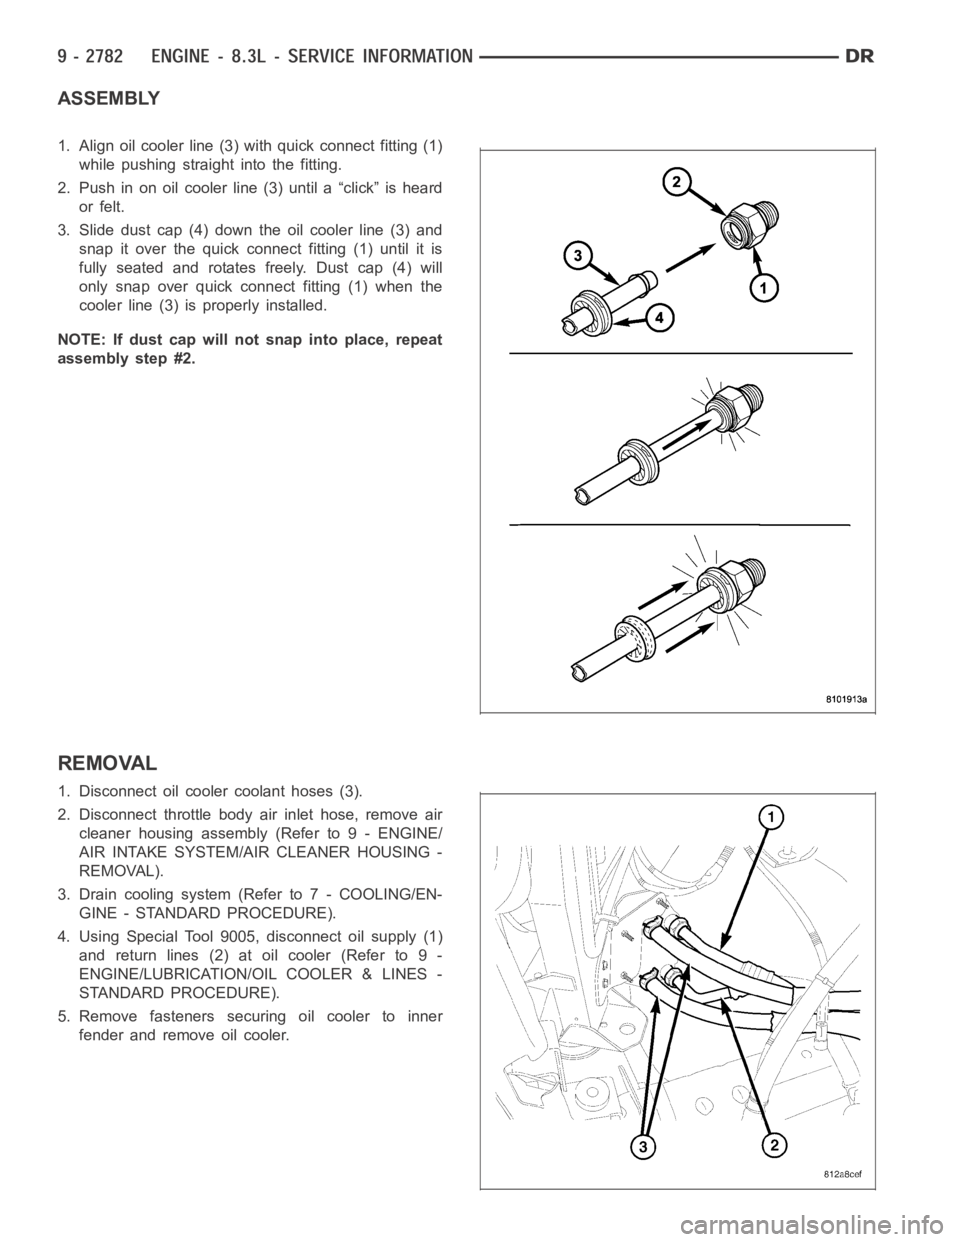
ASSEMBLY
1. Align oil cooler line (3) with quick connect fitting (1)
while pushing straight into the fitting.
2. Push in on oil cooler line (3) until a “click” is heard
or felt.
3. Slide dust cap (4) down the oil cooler line (3) and
snap it over the quick connect fitting (1) until it is
fully seated and rotates freely. Dust cap (4) will
only snap over quick connect fitting (1) when the
cooler line (3) is properly installed.
NOTE: If dust cap will not snap into place, repeat
assembly step #2.
REMOVAL
1. Disconnect oil cooler coolant hoses (3).
2. Disconnect throttle body air inlet hose, remove air
cleaner housing assembly (Refer to 9 - ENGINE/
AIR INTAKE SYSTEM/AIR CLEANER HOUSING -
REMOVAL).
3. Drain cooling system (Refer to 7 - COOLING/EN-
GINE - STANDARD PROCEDURE).
4. Using Special Tool 9005, disconnect oil supply (1)
and return lines (2) at oil cooler (Refer to 9 -
ENGINE/LUBRICATION/OIL COOLER & LINES -
STANDARD PROCEDURE).
5. Remove fasteners securing oil cooler to inner
fender and remove oil cooler.
Page 2092 of 5267
INSTALLATION
1. Position oil cooler to mounting position.
2. Install oil cooler fasteners. Tighten to 12 Nꞏm (105
in. lbs.).
3. Connect oil supply (1) and return lines (2) to oil
cooler and.
4. Connect oil cooler coolant hoses (3).
5. Install air cleaner housing assembly, connect throt-
tle body air inlet hose (Refer to 9 - ENGINE/AIR
INTAKE SYSTEM/AIR CLEANER HOUSING -
INSTALLATION).
6. Fill cooling system (Refer to 7 - COOLING/ENGINE
- STANDARD PROCEDURE).
7. Start the engine to circulate and fill the oil cooler.
Shut off the engine and check the oil level. Add oil
as needed.
8. Inspect the oil cooler connections for leaks.
Page 2093 of 5267
PA N - O I L
REMOVAL
1. Disconnect the negative battery cable.
2. Disconnect engine oil indicator tube fastener from
the right cylinder head cover.
3. Install engine lifting fixture TOOL 9363 and support
TOOL.
4. Raise vehicle on hoist.
5. Remove the lower engine shield.
6. Drain engine oil.
7. Remove the front cross member (Refer to 13 -
FRAME & BUMPERS/FRAME/FRONT CROSS-
MEMBER - REMOVAL)
8. Remove flywheel inspection cover.
9. Loosen engine mount through bolts.
10. Wiggle and separate the oil level indicator tube
from the oil pan.
NOTE: Careful positioning of the jack stand is nec-
essary to prevent damage to other components