Page 2114 of 5267

PISTON
1. Inspect all piston surfaces for nicks and scuffs.
2. Inspect piston and ring grooves for wear.
INSTALLATION
NOTE: Pistons and connecting rods are serviced
as an assembly. Left bank pistons are labeled
“ODD”. Right bank pistons are labeled “EVEN”.
1. Install piston rings (Refer to 9 - ENGINE/ENGINE
BLOCK/PISTON RINGS - INSTALLATION).
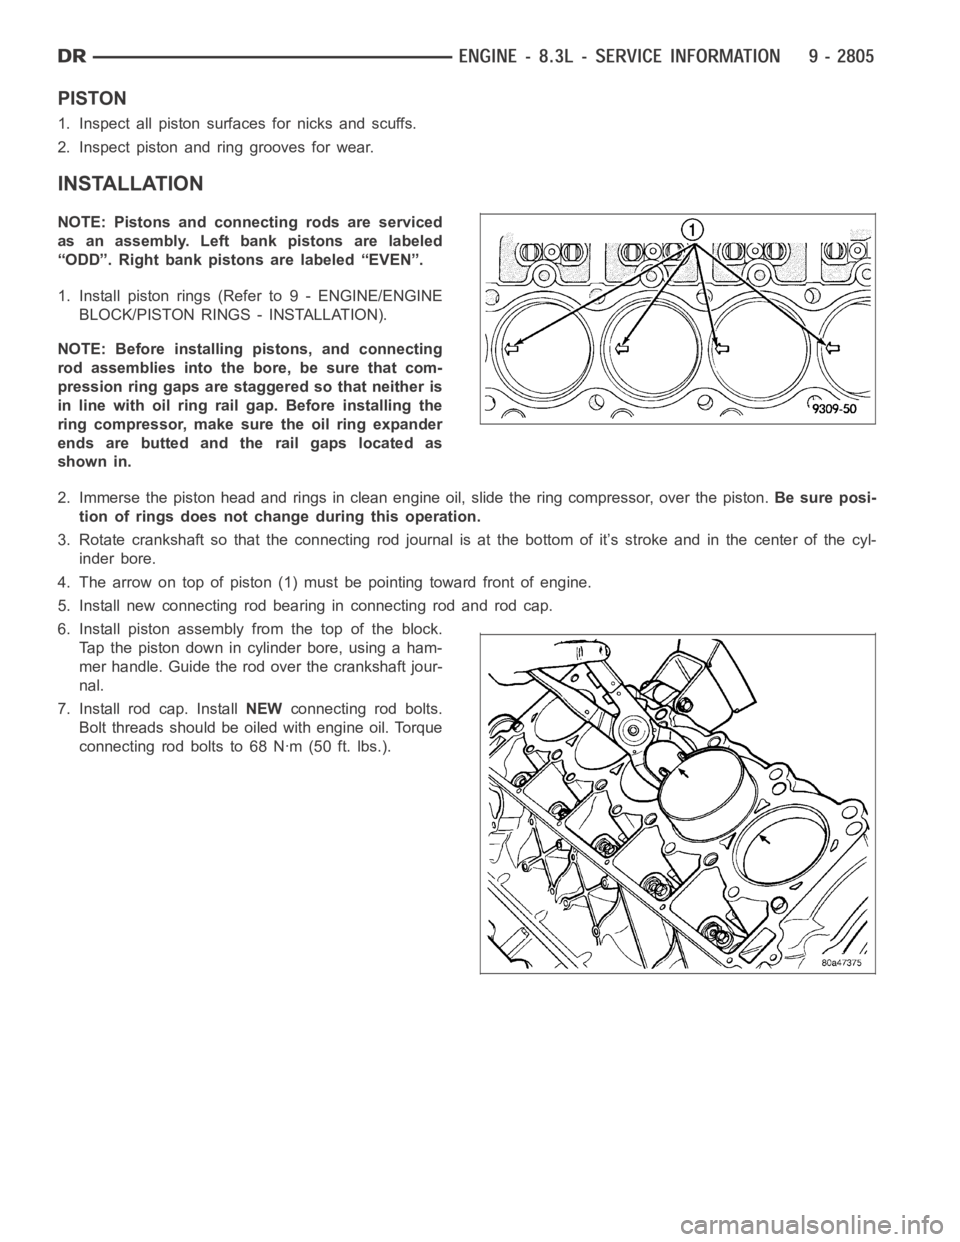
NOTE: Before installing pistons, and connecting
rod assemblies into the bore, be sure that com-
pression ring gaps are staggered so that neither is
in line with oil ring rail gap. Before installing the
ring compressor, make sure the oil ring expander
ends are butted and the rail gaps located as
shown in.
2. Immerse the piston head and rings in clean engine oil, slide the ring compressor, over the piston.Be sure posi-
tion of rings does not change during this operation.
3. Rotate crankshaft so that the connecting rod journal is at the bottom of it’s stroke and in the center of the cyl-
inder bore.
4. The arrow on top of piston (1) must be pointing toward front of engine.
5. Install new connecting rod bearing in connecting rod and rod cap.
6. Install piston assembly from the top of the block.
Tap the piston down in cylinder bore, using a ham-
mer handle. Guide the rod over the crankshaft jour-
nal.
7. Install rod cap. InstallNEWconnecting rod bolts.
Bolt threads should be oiled with engine oil. Torque
connecting rod bolts to 68 Nꞏm (50 ft. lbs.).
Page 2115 of 5267
8. Install the crankshaft oil scraper (2) and nuts (1).
Torque nuts (1) to 23 Nꞏm (200 in. lbs.).
9. Install oil pump pick up tube (2) using anewo-ring
(4). Torque 1/4-20 bolt to 11 Nꞏm (95 in. lbs.).
Torque 5/16-18 nuts to 23 Nꞏm (200 in. lbs.).
10. Install oil pan (Refer to 9 - ENGINE/LUBRICA-
TION/OIL PAN - INSTALLATION).
11. Install cylinder heads (Refer to 9 - ENGINE/CYL-
INDER HEAD - INSTALLATION).
12. Install engine, (Refer to 9 - ENGINE -
INSTALLATION).
Page 2116 of 5267
RINGS-PISTON
STANDARD PROCEDURE - MEASURING PISTON RING CLEARANCES
1. Wipe cylinder bore clean. Insert ring and push
down with piston to ensure it is square in bore. The
ring gap measurement must be made with the ring
positioning at least 12 mm (0.50 in.) from bottom of
cylinder bore. Check gap with feeler gauge (1).
(Refer to 9 - ENGINE - SPECIFICATIONS) for pis-
ton ring specifications.
2. Check piston ring side clearance. (Refer to 9 -
ENGINE - SPECIFICATIONS) for piston ring
specifications.
REMOVAL
1. Using a suitable ring expander, remove upper and
intermediate piston rings.
2. Remove the upper oil ring side rail, lower oil ring
side rail and then oil ring expander from piston.
3. Clean ring grooves of any carbon deposits.
Page 2119 of 5267

BEARINGS-CONNECTING ROD
DESCRIPTION
The bearing caps are not interchangeable and should be paint marked or scribed at removal to insure correct
assembly.
The bearing shells must be installed so that the tangs are in the machined grooves in the rods and caps.
Limits of taper or out-of-round on any crankshaft journals should be held to 0.013 mm (0.0005 in.). Bearings are
available in 0.025 mm (0.001 in.), 0.051 mm (0.002 in.), 0.076 mm (0.003 in.), 0.254 mm (0.010 in.) and 0.305 mm
(0.012 in.) undersize.Install the bearings in pairs. Do not use a new bearing half with an old bearing half. Do
not file the rods or bearing caps.
STANDARD PROCEDURE
CONNECTING ROD BEARING - FITTING
Fit all rods on one bank until complete. Do not alternate from one bank to another, because when the rods are
assembled to pistons correctly, they are not interchangeable from one bank to another.
The bearing caps are not interchangeable and should be marked at removal toinsure correct assembly.
The bearing shells must be installed so that the tangs are in the machined grooves in the rods and caps.
Limits of taper or out-of-round on any crankshaft journals should be held to 0.013 mm (0.0005 in.). Bearings are
available in 0.025 mm (0.001 in.), 0.051 mm (0.002 in.), 0.076 mm (0.003 in.), 0.254 mm (0.010 in.) and 0.305 mm
(0.012 in.) undersize.Install the bearings in pairs. Do not use a new bearing half with an old bearing half. Do
not file the rods or bearing caps.
1. (Refer to 9 - ENGINE/ENGINE BLOCK/CONNECTING ROD BEARINGS - STANDARD PROCEDURE) - Mea-
suring Connecting Rod Bearing Clearance to determine bearing clearance.
2. Before installing the connecting rod cap bolts, the bolt threads shouldbe oiled with engine oil.
3. Install bolts finger tight, then alternately torque each bolt to assemble the cap properly.
4. Tighten the connecting rod bolts to 68 Nꞏm (50 ft. lbs.).
MEASURING CONNECTING ROD BEARING CLEARANCE
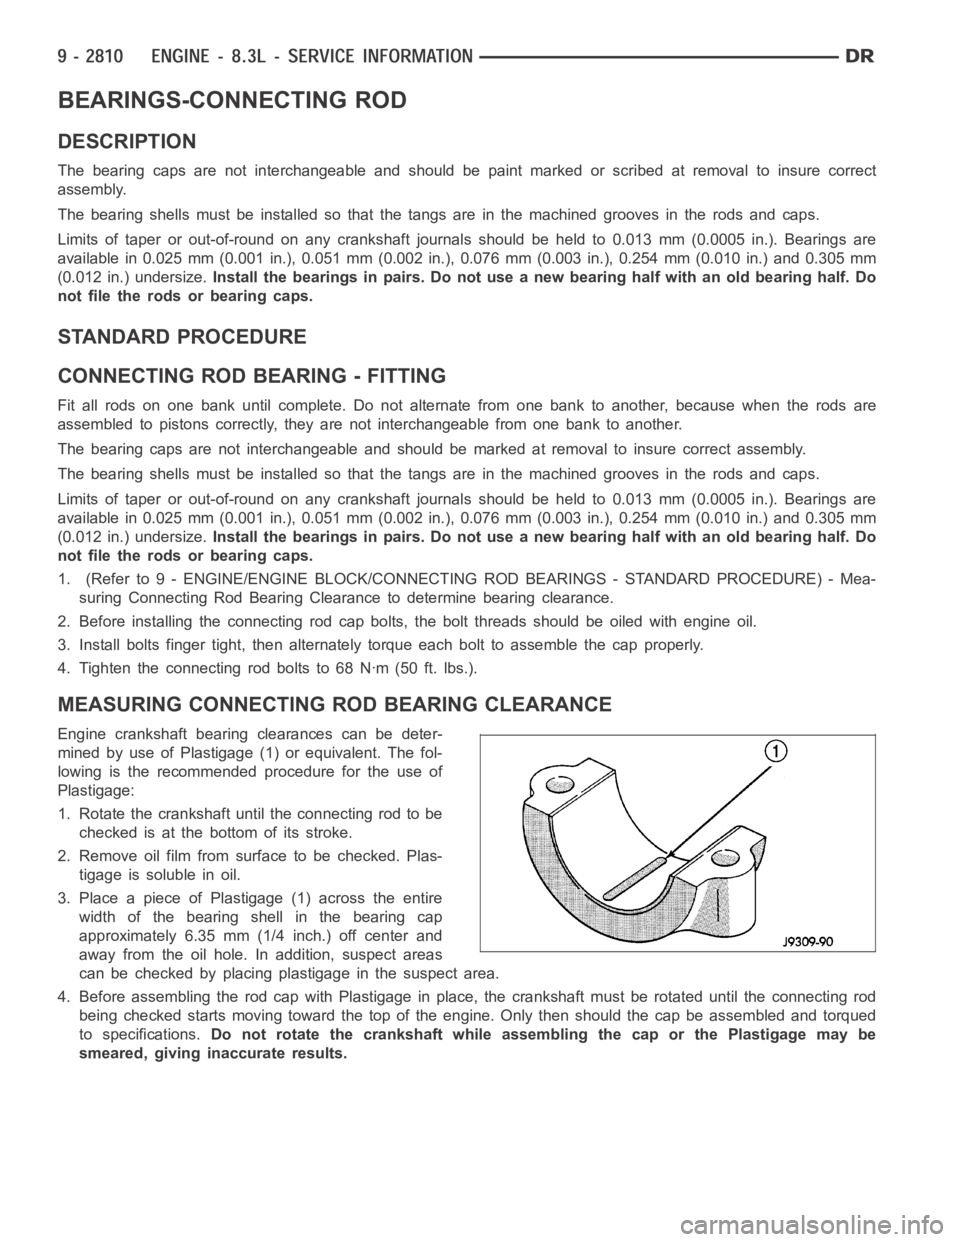
Engine crankshaft bearing clearances can be deter-
mined by use of Plastigage (1) or equivalent. The fol-
lowing is the recommended procedure for the use of
Plastigage:
1. Rotate the crankshaft until the connecting rod to be
checked is at the bottom of its stroke.
2. Remove oil film from surface to be checked. Plas-
tigage is soluble in oil.
3. Place a piece of Plastigage (1) across the entire
width of the bearing shell in the bearing cap
approximately 6.35 mm (1/4 inch.) off center and
away from the oil hole. In addition, suspect areas
can be checked by placing plastigage in the suspect area.
4. Before assembling the rod cap with Plastigage in place, the crankshaft must be rotated until the connecting rod
being checked starts moving toward the top of the engine. Only then should the cap be assembled and torqued
to specifications.Do not rotate the crankshaft while assembling the cap or the Plastigage maybe
smeared, giving inaccurate results.
Page 2120 of 5267
5. Remove the bearing cap and compare the width of
the flattened Plastigage with the metric scale pro-
vided on the package. Locate the band closest to
the same width. This band shows the amount of
clearance in thousandths of a millimeter. Differ-
ences in readings between the ends indicate the
amount of taper present. Record all readings taken.
(Refer to 9 - ENGINE - SPECIFICATIONS).Plasti-
gage generally is accompanied by two scales.
One scale is in inches, the other is a metric
scale.
6. Plastigage is available in a variety of clearance ranges. The 0.025-0.076 mm (.001-.003 inch) is usually the most
appropriate for checking engine bearing proper specifications.
Page 2121 of 5267
DAMPER-CRANKSHAFT
REMOVAL
1. Raise and support the vehicle.
2. Remove the engine front shield.
3. Disconnect the radiator fan hydraulic lines (Refer to
7 - COOLING/ENGINE/RADIATOR FAN -
REMOVAL).
4. Lower vehicle.
5. Disconnect the air inlet duct, IAT sensor, CCV hose
at the throttle body, and remove the air cleaner
housing cover.
6. Remove accessory drive belt (Refer to 7 - COOL-
ING/ACCESSORY DRIVE/DRIVE BELTS -
REMOVAL).
7. Remove the radiator fan (Refer to 7 - COOLING/
ENGINE/RADIATOR FAN - REMOVAL).
8. Raise and support the vehicle.
9. Remove crankshaft pulley.
10. Remove crankshaft damper bolt.
11. Install crankshaft insert, Special Tool 8194 (1).
Lubricate the end of Special Tool 8194 (1) with
wheel bearing grease or equivalent.
NOTE: Lubricate the threads of the puller using
Mopar
Nickel Anti-seize Compound or equivalent,
before beginning crankshaft damper removal.
12. Using a bolt-grip type universal puller (1), remove
the crankshaft damper.
Page 2122 of 5267
INSTALLATION
NOTE: Lubricate the threads of Special Tool 9055
(1) using Mopar
Nickel Anti-seize Compound or
equivalent, before beginning crankshaft damper
installation.
1. Raise and support the vehicle.
2. Install crankshaft damper using Special Tool 9055
(1).
3. Install and tighten damper bolt to 176 Nꞏm (130 ft.
lbs.).
4. Install the crankshaft pulley. Tighten crankshaft pul-
ley bolts to 23 Nꞏm (200 in. lbs.).
5. Install the front engine shield.
6. Lower the vehicle.
7. Install accessory drive belt (Refer to 7 - COOLING/
ACCESSORY DRIVE/DRIVE BELTS - INSTALLA-
TION).
8. Install the radiator fan (Refer to 7 - COOLING/EN-
GINE/RADIATOR FAN - INSTALLATION).
9. Install air cleaner cover connecting the CVV hose,
IAT, and air duct to the throttle body housing.
10. Lower vehicle.
Page 2123 of 5267
SEAL-CRANKSHAFT OIL- FRONT
REMOVAL
1. Disconnect the air inlet duct, IAT sensor, CCV hose
at the throttle body, and remove the air cleaner
housing cover.
2. Remove accessory drive belt (Refer to 7 - COOL-
ING/ACCESSORY DRIVE/DRIVE BELTS -
REMOVAL).
3. Remove crankshaft damper (Refer to 9 - ENGINE/
ENGINE BLOCK/CRANKSHAFT DAMPER -
REMOVAL).
4. Use Special Tool C-4679A (1) to remove crankshaft
oil seal. Be careful not to damage the crankshaft
seal surface of cover.
INSTALLATION
1. Install the new seal by using Special Tool MD
998306 (2).
2. Place seal into opening with seal spring towards
the inside of engine. Install seal until it bottoms out
in timing chain cover.
3. Install crankshaft damper (Refer to 9 - ENGINE/
ENGINE BLOCK/VIBRATION DAMPER - INSTAL-
LATION).
4. Install accessory drive belt (Refer to 7 - COOLING/
ACCESSORY DRIVE/DRIVE BELTS - INSTALLA-
TION).
5. Install air cleaner cover connecting the CVV hose,
IAT sensor, and air duct to the throttle body
housing.