Page 2156 of 5267
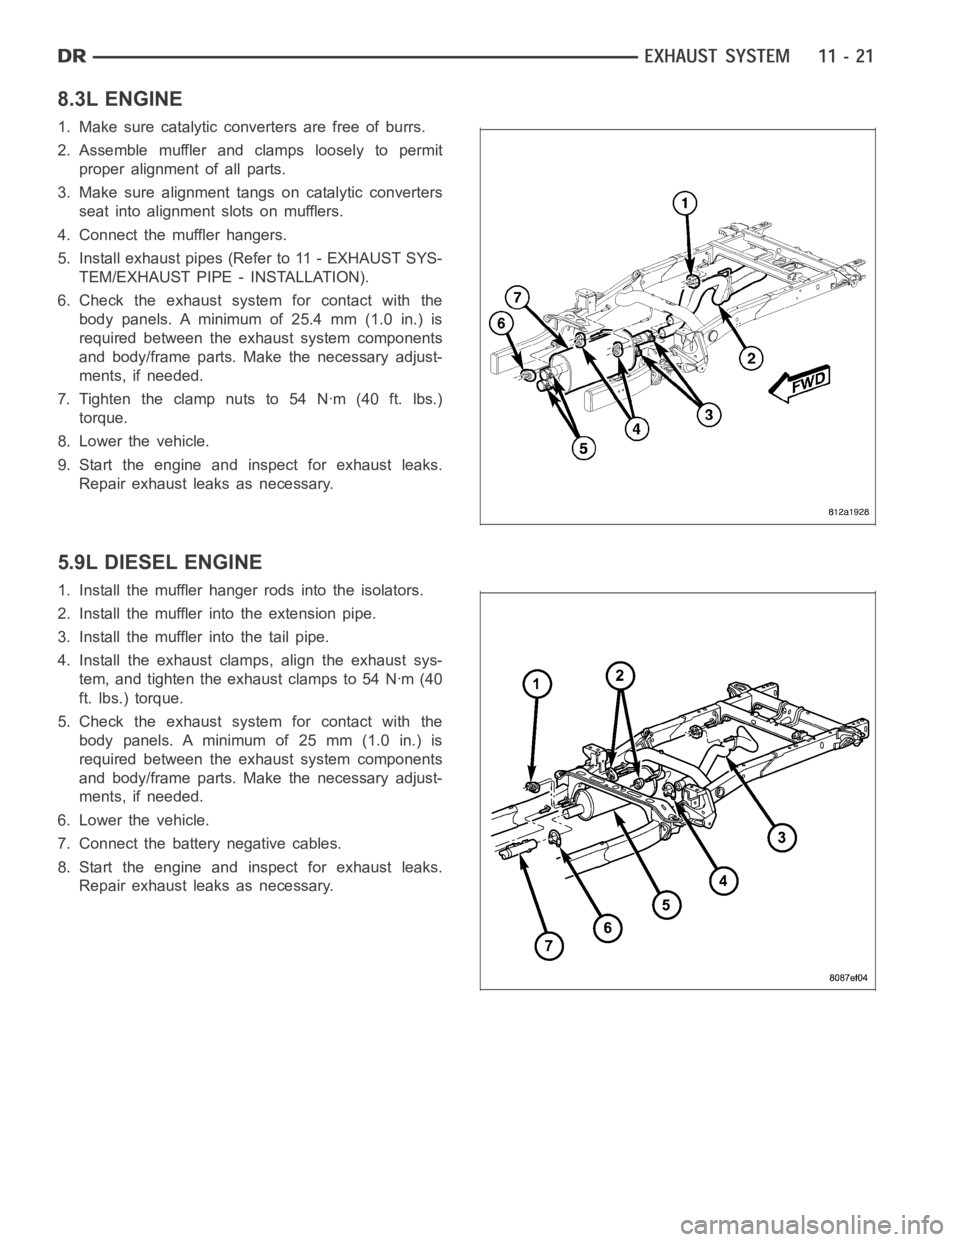
8.3L ENGINE
1. Make sure catalytic converters are free of burrs.
2. Assemble muffler and clamps loosely to permit
proper alignment of all parts.
3. Make sure alignment tangs on catalytic converters
seat into alignment slots on mufflers.
4. Connect the muffler hangers.
5. Install exhaust pipes (Refer to 11 - EXHAUST SYS-
TEM/EXHAUST PIPE - INSTALLATION).
6. Check the exhaust system for contact with the
body panels. A minimum of 25.4 mm (1.0 in.) is
required between the exhaust system components
and body/frame parts. Make the necessary adjust-
ments, if needed.
7.Tightentheclampnutsto54Nꞏm(40ft.lbs.)
torque.
8. Lower the vehicle.
9. Start the engine and inspect for exhaust leaks.
Repair exhaust leaks as necessary.
5.9L DIESEL ENGINE
1. Install the muffler hanger rods into the isolators.
2. Install the muffler into the extension pipe.
3. Install the muffler into the tail pipe.
4. Install the exhaust clamps, align the exhaust sys-
tem, and tighten the exhaust clamps to 54 Nꞏm (40
ft. lbs.) torque.
5. Check the exhaust system for contact with the
body panels. A minimum of 25 mm (1.0 in.) is
required between the exhaust system components
and body/frame parts. Make the necessary adjust-
ments, if needed.
6. Lower the vehicle.
7. Connect the battery negative cables.
8. Start the engine and inspect for exhaust leaks.
Repair exhaust leaks as necessary.
Page 2157 of 5267
TA I L P I P E
REMOVAL
3.7L/4.7L/5.7L ENGINE
1. Raise and support the vehicle.
2. Saturate the clamp nuts with heat valve lubricant.
Allow 5 minutes for penetration.
3. Disconnect the exhaust tailpipe support hanger.
4. Remove clamps and nuts.
5. Remove the exhaust tailpipe.
5.9L DIESEL
1. Disconnect the battery negative cables.
2. Raise and support the vehicle.
3. Saturate the clamp nuts with heat valve lubricant.
Allow 5 minutes for penetration.
4. Disconnect the exhaust tailpipe support hanger iso-
lators.
5. Remove the muffler-to-tailpipe clamps.
6. Remove the tailpipe from the vehicle.
Page 2158 of 5267
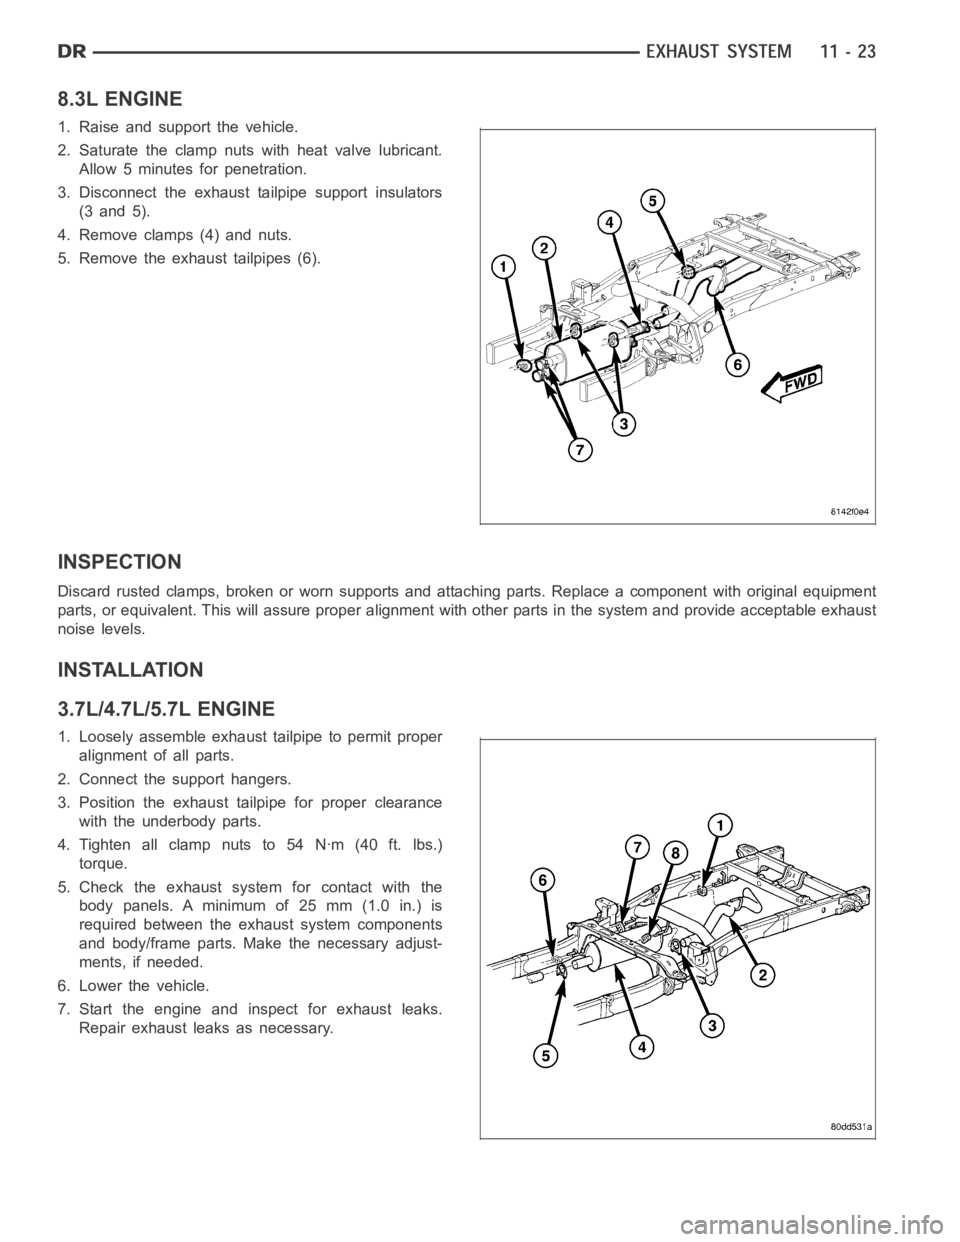
8.3L ENGINE
1. Raise and support the vehicle.
2. Saturate the clamp nuts with heat valve lubricant.
Allow 5 minutes for penetration.
3. Disconnect the exhaust tailpipe support insulators
(3 and 5).
4. Remove clamps (4) and nuts.
5. Remove the exhaust tailpipes (6).
INSPECTION
Discard rusted clamps, broken or worn supports and attaching parts. Replace a component with original equipment
parts, or equivalent. This will assure proper alignment with other parts in the system and provide acceptable exhaust
noise levels.
INSTALLATION
3.7L/4.7L/5.7L ENGINE
1. Loosely assemble exhaust tailpipe to permit proper
alignment of all parts.
2. Connect the support hangers.
3. Position the exhaust tailpipe for proper clearance
with the underbody parts.
4.Tightenallclampnutsto54Nꞏm(40ft.lbs.)
torque.
5. Check the exhaust system for contact with the
body panels. A minimum of 25 mm (1.0 in.) is
required between the exhaust system components
and body/frame parts. Make the necessary adjust-
ments, if needed.
6. Lower the vehicle.
7. Start the engine and inspect for exhaust leaks.
Repair exhaust leaks as necessary.
Page 2159 of 5267
5.9L DIESEL
1. Install the tailpipe into the muffler.
2. Install the tailpipe hanger rods into the isolators
3. Install the exhaust clamp, align the exhaust sys-
tem, and tighten the clamp 48 Nꞏm (35 ft. lbs.)
torque.
4. Check the exhaust system for contact with the
body panels. A minimum of 25 mm (1.0 in.) is
required between the exhaust system components
and body/frame parts. Make the necessary adjust-
ments, if needed.
5. Lower the vehicle.
6. Connect the battery negative cables.
7. Start the engine and inspect for exhaust leaks.
Repair exhaust leaks as necessary.
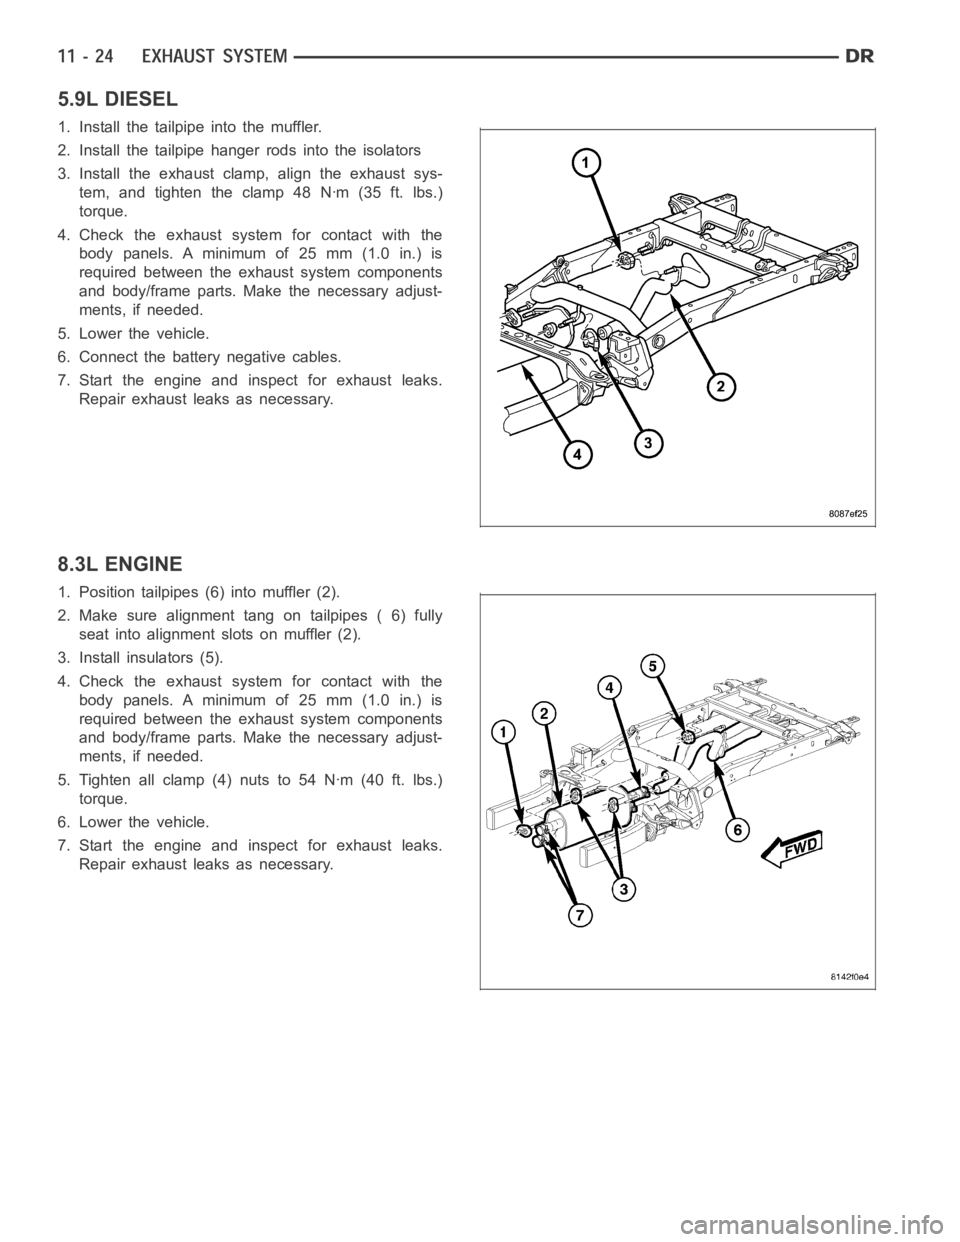
8.3L ENGINE
1. Position tailpipes (6) into muffler (2).
2. Make sure alignment tang on tailpipes ( 6) fully
seat into alignment slots on muffler (2).
3. Install insulators (5).
4. Check the exhaust system for contact with the
body panels. A minimum of 25 mm (1.0 in.) is
required between the exhaust system components
and body/frame parts. Make the necessary adjust-
ments, if needed.
5. Tighten all clamp (4) nuts to 54 Nꞏm (40 ft. lbs.)
torque.
6. Lower the vehicle.
7. Start the engine and inspect for exhaust leaks.
Repair exhaust leaks as necessary.
Page 2160 of 5267
TURBOCHARGER SYSTEM
DIAGNOSIS AND TESTING
TURBOCHARGER BOOST PRESSURE
Low turbocharger boost pressure can cause poor engine performance and driveability concerns. The following pro-
cedure will test the turbocharger boost pressure.
Causes of low boost pressure include the following:
Restricted air inlet system
Leak in charge air cooler system
Restricted/high pressure drop across charge air cooler
Damaged turbocharger compressor wheel housing
Turbocharger wastegate stuck open
Excessive exhaust restriction
Causes of excessively high boost pressure include:
Turbocharger wastegate stuck closed
Turbocharger wastegate signal line leaking or damaged
Damaged wastegate command valve O-rings
Wastegate command valve mechanically stuck in actuated position
Several Diagnostic Trouble Codes (DTCs) can be set that will indicate highor low system boost levels. There is a
DTC for circuit faults relating to the electronically controlled wastegate command valve.
(Refer to 11 - EXHAUST SYSTEM/TURBOCHARGER SYSTEM/CHARGE AIR COOLER AND PLUMBING - DIAG-
NOSIS AND TESTING) for diagnosing of low or high boost pressure due to leaks.
NOTE: If oil is present on either the inlet or exhaust side of the turbo charger, check the charge air cooler
for evidence of oil. Clean charge air cooler of any oil before starting the engine. Failure to do this can result
in severe engine damage.
Page 2161 of 5267
TURBOCHARGER
DESCRIPTION
The turbocharger is an exhaust-driven supercharger
which increases the pressure and density of the air
entering the engine. With the increase of air entering
the engine, more fuel can be injected into the cylin-
ders, which creates more power during combustion.
The turbocharger assembly consists of eight (8) com-
ponent systems :
1-Turbinesection(1)
2 - Exhaust stream into turbine (2 )
3-Bearinghousing(3)
4 - Compressor housing (4 )
5 - Clean air inlet (5 )
6 - Compressor section (6 )
7 - Exhaust stream into turbine (7 )
8 - Exhaust gas to Exhaust Pipe (8 )
The turbocharger wastegate assembly consists of two
(2) major component systems :
1 - Command Passage (1)
2 - Electronically controlled wastegate command
valve (2)
Page 2162 of 5267
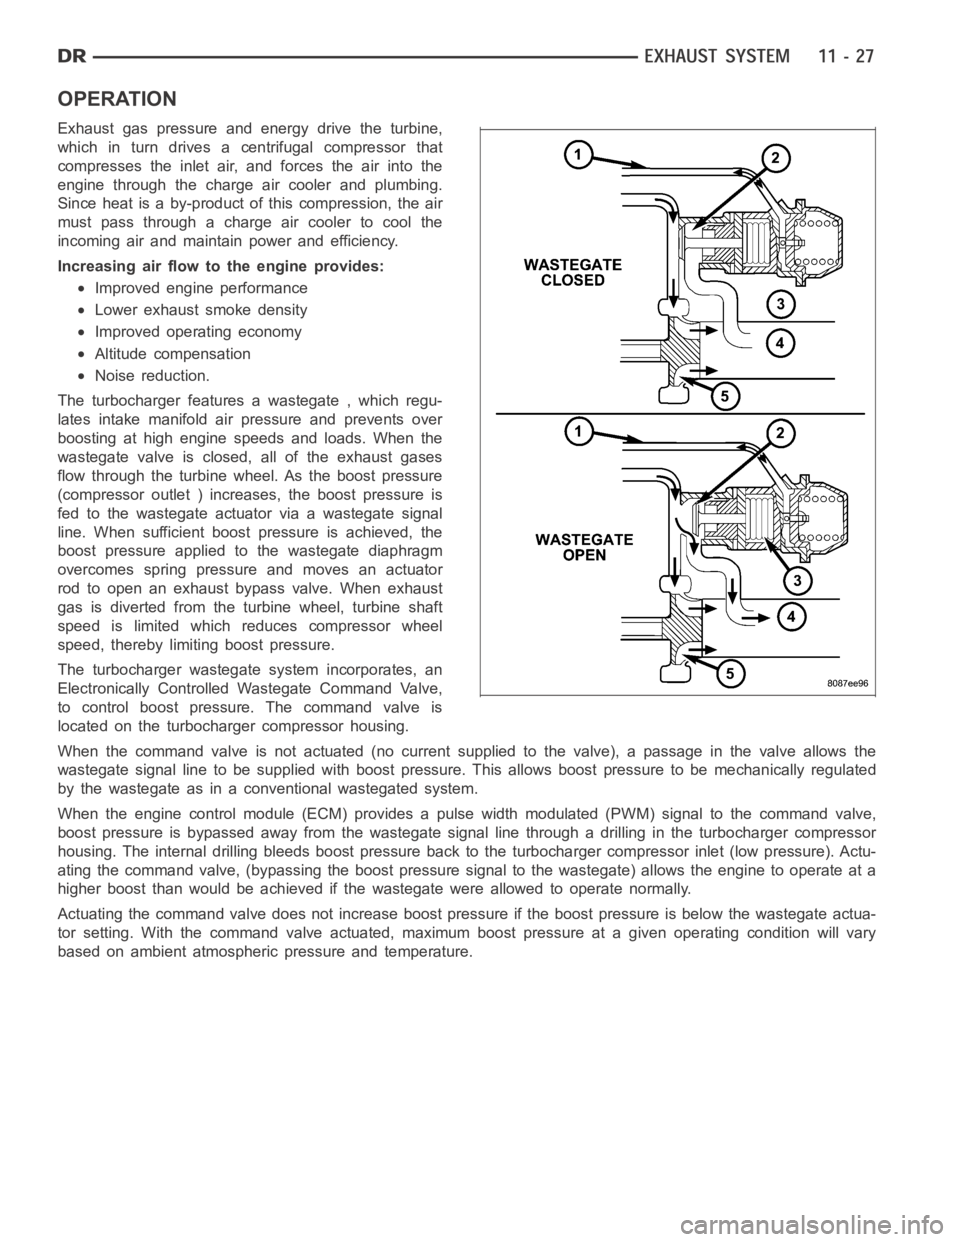
OPERATION
Exhaust gas pressure and energy drive the turbine,
which in turn drives a centrifugal compressor that
compresses the inlet air, and forces the air into the
engine through the charge air cooler and plumbing.
Since heat is a by-product of this compression, the air
must pass through a charge air cooler to cool the
incoming air and maintain power and efficiency.
Increasing air flow to the engine provides:
Improved engine performance
Lower exhaust smoke density
Improved operating economy
Altitude compensation
Noise reduction.
The turbocharger features a wastegate , which regu-
lates intake manifold air pressure and prevents over
boosting at high engine speeds and loads. When the
wastegate valve is closed, all of the exhaust gases
flow through the turbine wheel. As the boost pressure
(compressor outlet ) increases, the boost pressure is
fed to the wastegate actuator via a wastegate signal
line. When sufficient boost pressure is achieved, the
boost pressure applied to the wastegate diaphragm
overcomes spring pressure and moves an actuator
rod to open an exhaust bypass valve. When exhaust
gas is diverted from the turbine wheel, turbine shaft
speed is limited which reduces compressor wheel
speed, thereby limiting boost pressure.
The turbocharger wastegate system incorporates, an
Electronically Controlled Wastegate Command Valve,
to control boost pressure. The command valve is
located on the turbocharger compressor housing.
When the command valve is not actuated (no current supplied to the valve), apassage in the valve allows the
wastegate signal line to be supplied with boost pressure. This allows boost pressure to be mechanically regulated
by the wastegate as in a conventional wastegated system.
When the engine control module (ECM) provides a pulse width modulated (PWM) signal to the command valve,
boost pressure is bypassed away from the wastegate signal line through a drilling in the turbocharger compressor
housing. The internal drilling bleeds boost pressure back to the turbocharger compressor inlet (low pressure). Actu-
ating the command valve, (bypassing the boost pressure signal to the wastegate) allows the engine to operate at a
higher boost than would be achieved if the wastegate were allowed to operate normally.
Actuating the command valve does not increase boost pressure if the boost pressure is below the wastegate actua-
tor setting. With the command valve actuated, maximum boost pressure at a given operating condition will vary
based on ambient atmospheric pressure and temperature.
Page 2163 of 5267
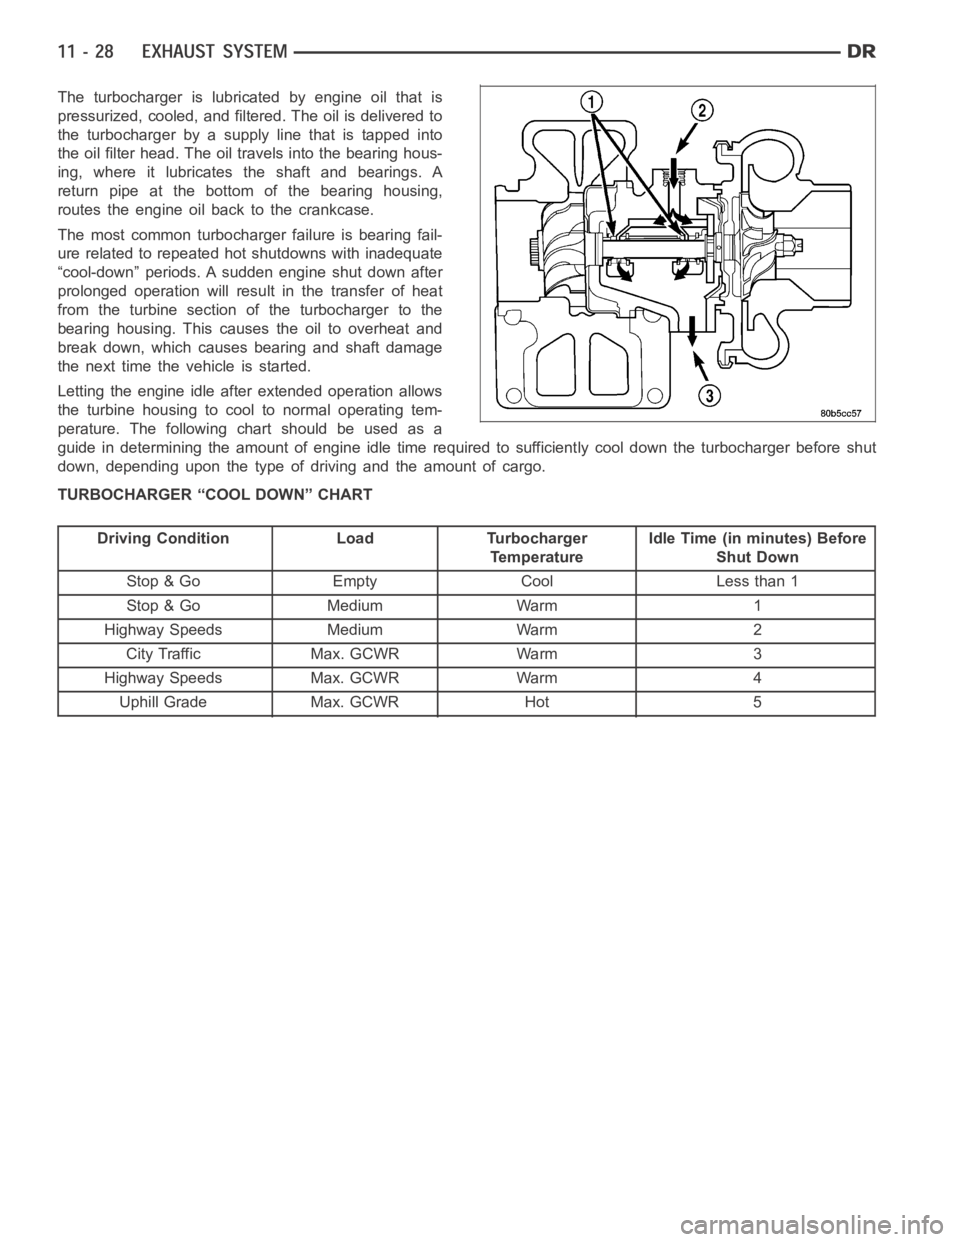
The turbocharger is lubricated by engine oil that is
pressurized, cooled, and filtered. The oil is delivered to
the turbocharger by a supply line that is tapped into
the oil filter head. The oil travels into the bearing hous-
ing, where it lubricates the shaft and bearings. A
return pipe at the bottom of the bearing housing,
routes the engine oil back to the crankcase.
The most common turbocharger failure is bearing fail-
ure related to repeated hot shutdowns with inadequate
“cool-down” periods. A sudden engine shut down after
prolonged operation will result in the transfer of heat
from the turbine section of the turbocharger to the
bearing housing. This causes the oil to overheat and
break down, which causes bearing and shaft damage
thenexttimethevehicleisstarted.
Letting the engine idle after extended operation allows
the turbine housing to cool to normal operating tem-
perature. The following chart should be used as a
guide in determining the amount of engine idle time required to sufficiently cool down the turbocharger before shut
down, depending upon the type of driving and the amount of cargo.
TURBOCHARGER “COOL DOWN” CHART
Driving Condition Load Turbocharger
TemperatureIdle Time (in minutes) Before
Shut Down
Stop & Go Empty Cool Less than 1
Stop & Go Medium Warm 1
Highway Speeds Medium Warm 2
City Traffic Max. GCWR Warm 3
Highway Speeds Max. GCWR Warm 4
Uphill Grade Max. GCWR Hot 5