Page 2262 of 5267
1. Remove fuel tank filler tube cap.
2. Perform fuel system pressure release procedure.
(Refer to 14 - FUEL SYSTEM/FUEL DELIVERY -
STANDARD PROCEDURE)
3. Remove negative battery cable at battery.
4. Remove flex tube (air cleaner housing to engine).
5. Remove air resonator box at throttle body.
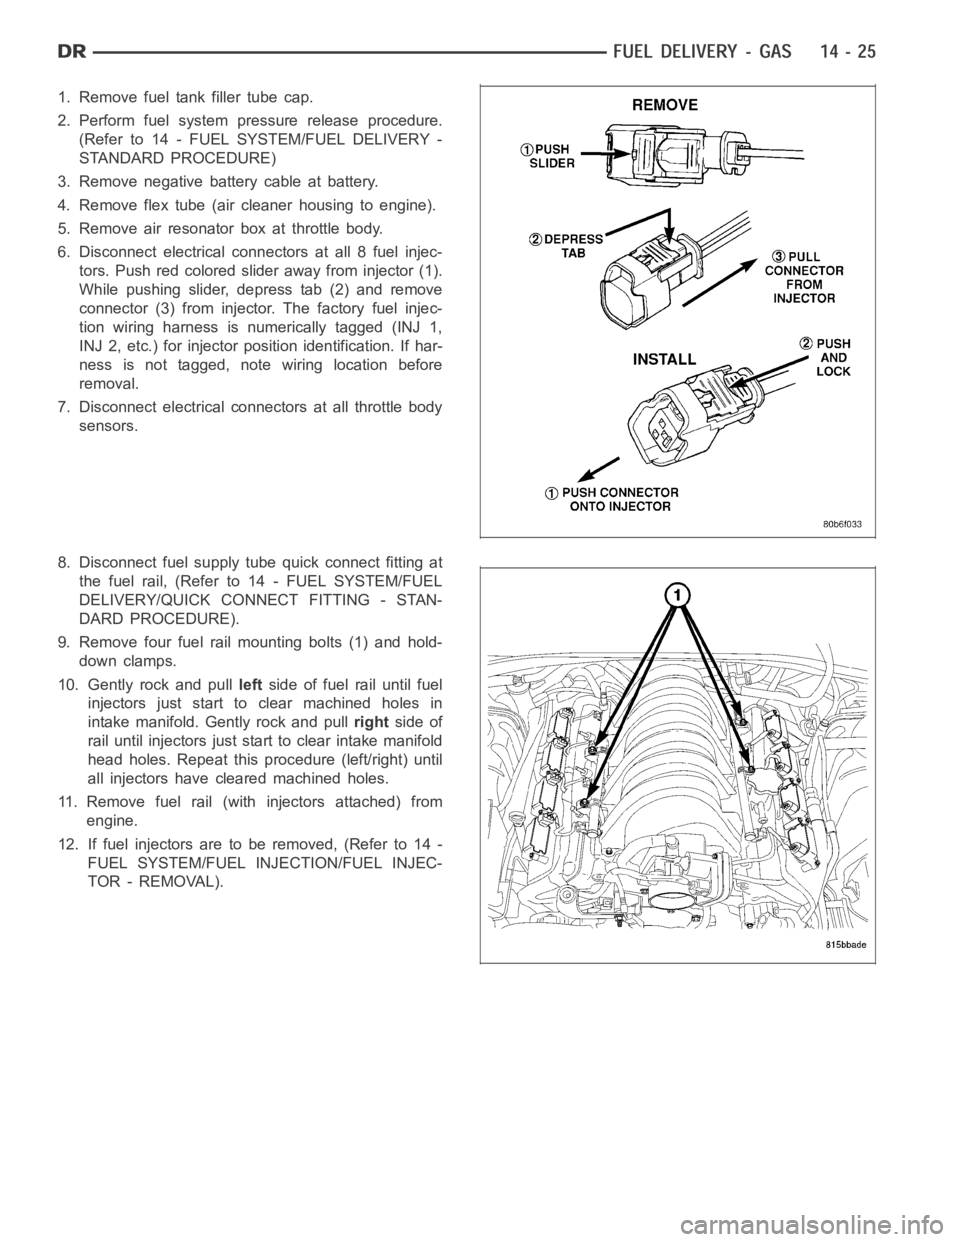
6. Disconnect electrical connectors at all 8 fuel injec-
tors. Push red colored slider away from injector (1).
While pushing slider, depress tab (2) and remove
connector (3) from injector. The factory fuel injec-
tion wiring harness is numerically tagged (INJ 1,
INJ 2, etc.) for injector position identification. If har-
ness is not tagged, note wiring location before
removal.
7. Disconnect electrical connectors at all throttle body
sensors.
8. Disconnect fuel supply tube quick connect fitting at
the fuel rail, (Refer to14 - FUEL SYSTEM/FUEL
DELIVERY/QUICK CONNECT FITTING - STAN-
DARD PROCEDURE).
9. Remove four fuel rail mounting bolts (1) and hold-
down clamps.
10. Gently rock and pullleftside of fuel rail until fuel
injectors just start to clear machined holes in
intake manifold. Gently rock and pullrightside of
rail until injectors just start to clear intake manifold
head holes. Repeat this procedure (left/right) until
all injectors have cleared machined holes.
11. Remove fuel rail (with injectors attached) from
engine.
12. If fuel injectors are to be removed, (Refer to 14 -
FUEL SYSTEM/FUEL INJECTION/FUEL INJEC-
TOR - REMOVAL).
Page 2263 of 5267
8.3L - SRT-10
1. Disconnect the electrical connector to the MAP
sensor (2) and Coolant Temperature sensor (3).
2. Release fuel system pressure. Refer to Fuel Pres-
sure Release Procedure in this section.
3. Disconnect negative battery cable.
4. Remove the air cleaner assembly, refer to the
Engine/Air Intake System/Air Cleaner Housing for
more information.
5. Disconnect the electrical connector to the TPS (1)
and Idle Air Control.
Page 2267 of 5267
INSTALLATION
3.7L
1. If fuel injectors are to be installed, (Refer to 14 -
FUEL SYSTEM/FUEL INJECTION/FUEL INJEC-
TOR - INSTALLATION).
2. Clean out fuel injector machined bores in intake
manifold.
3. Apply a small amount of engine oil to each fuel
injector O-ring. This will helpin fuel rail installation.
4. Position fuel rail/fuel injector assembly to machined
injector openings in cylinder head.
5. Guide each injector into cylinder head. Be careful
not to tear injector O-rings.
6. Pushrightside of fuel rail down until fuel injectors
have bottomed on cylinder head shoulder. Push
leftfuel rail down until injectors have bottomed on
cylinder head shoulder.
7. Install 4 fuel rail mounting bolts and tighten. (Refer
to 14 - FUEL SYSTEM/FUEL DELIVERY - SPECI-
FICATIONS)
8. Install 6 ignition coils. (Refer to 8 - ELECTRICAL/
IGNITION CONTROL/IGNITION COIL - INSTALLA-
TION)
9. Connect electrical connectors to throttle body.
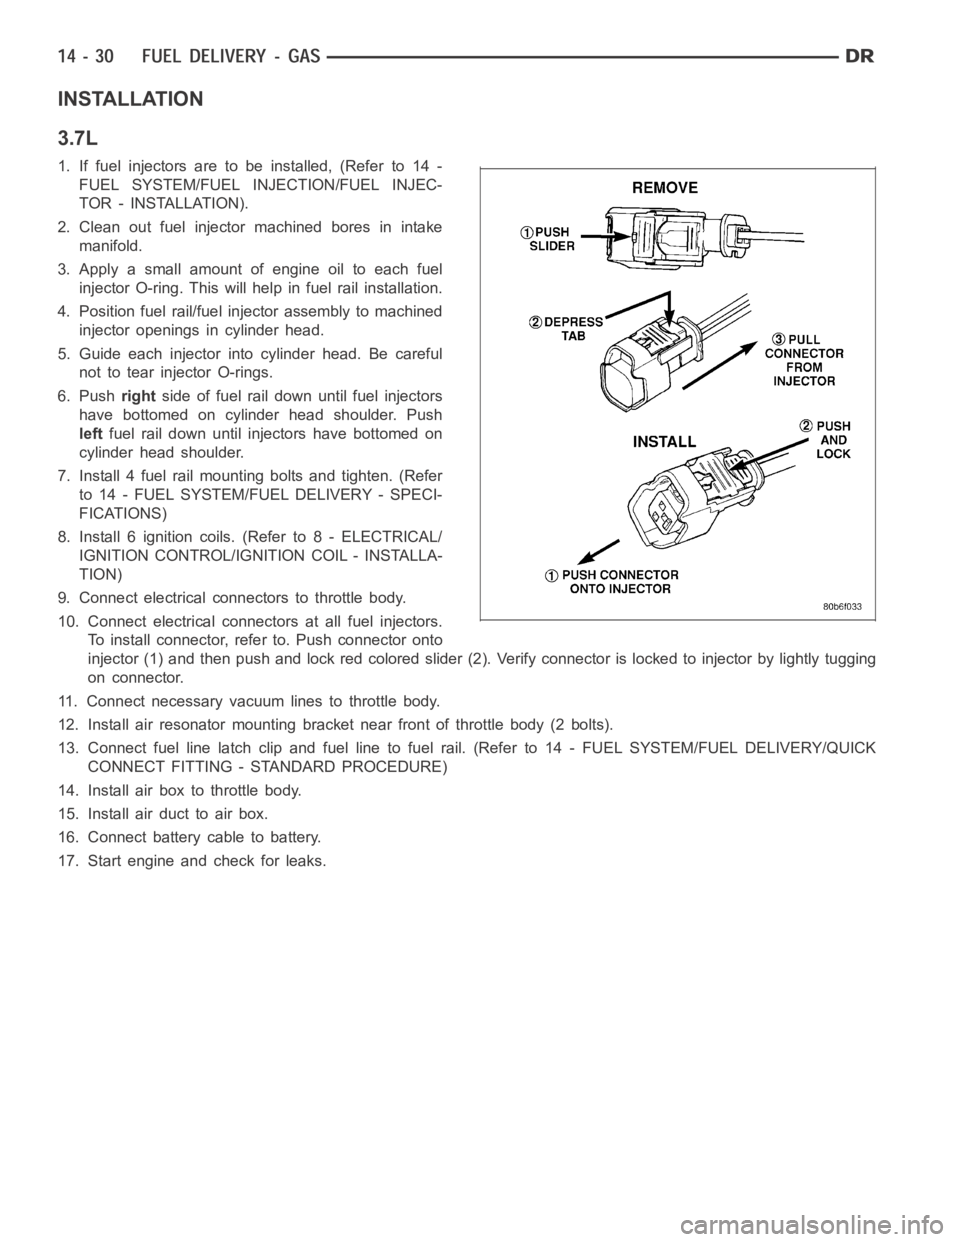
10. Connect electrical connectors at all fuel injectors.
To install connector, refer to. Push connector onto
injector (1) and then push and lock red colored slider (2). Verify connector is locked to injector by lightly tugging
on connector.
11. Connect necessary vacuum lines to throttle body.
12. Install air resonator mounting bracket near front of throttle body (2 bolts).
13. Connect fuel line latch clip and fuel line to fuel rail. (Refer to 14 - FUEL SYSTEM/FUEL DELIVERY/QUICK
CONNECT FITTING - STANDARD PROCEDURE)
14. Install air box to throttle body.
15. Install air duct to air box.
16. Connect battery cable to battery.
17. Start engine and check for leaks.
Page 2268 of 5267
4.7L
1. If fuel injectors are to be installed, (Refer to 14 -
FUEL SYSTEM/FUEL INJECTION/FUEL INJEC-
TOR - INSTALLATION).
2. Clean out fuel injector machined bores in intake
manifold.
3. Apply a small amount of engine oil to each fuel
injector O-ring. This will helpin fuel rail installation.
4. Position fuel rail/fuel injector assembly to machined
injector openings in cylinder head.
5. Guide each injector into cylinder head. Be careful
not to tear injector O-rings.
6. Pushrightside of fuel rail down until fuel injectors
have bottomed on cylinder head shoulder. Push
leftfuel rail down until injectors have bottomed on
cylinder head shoulder.
7. Install 4 fuel rail mounting bolts and tighten. (Refer
to 14 - FUEL SYSTEM/FUEL DELIVERY - SPECI-
FICATIONS)
8. Install 8 ignition coils. (Refer to 8 - ELECTRICAL/
IGNITION CONTROL/IGNITION COIL - INSTALLA-
TION)
9. Connect electrical connectors to throttle body.
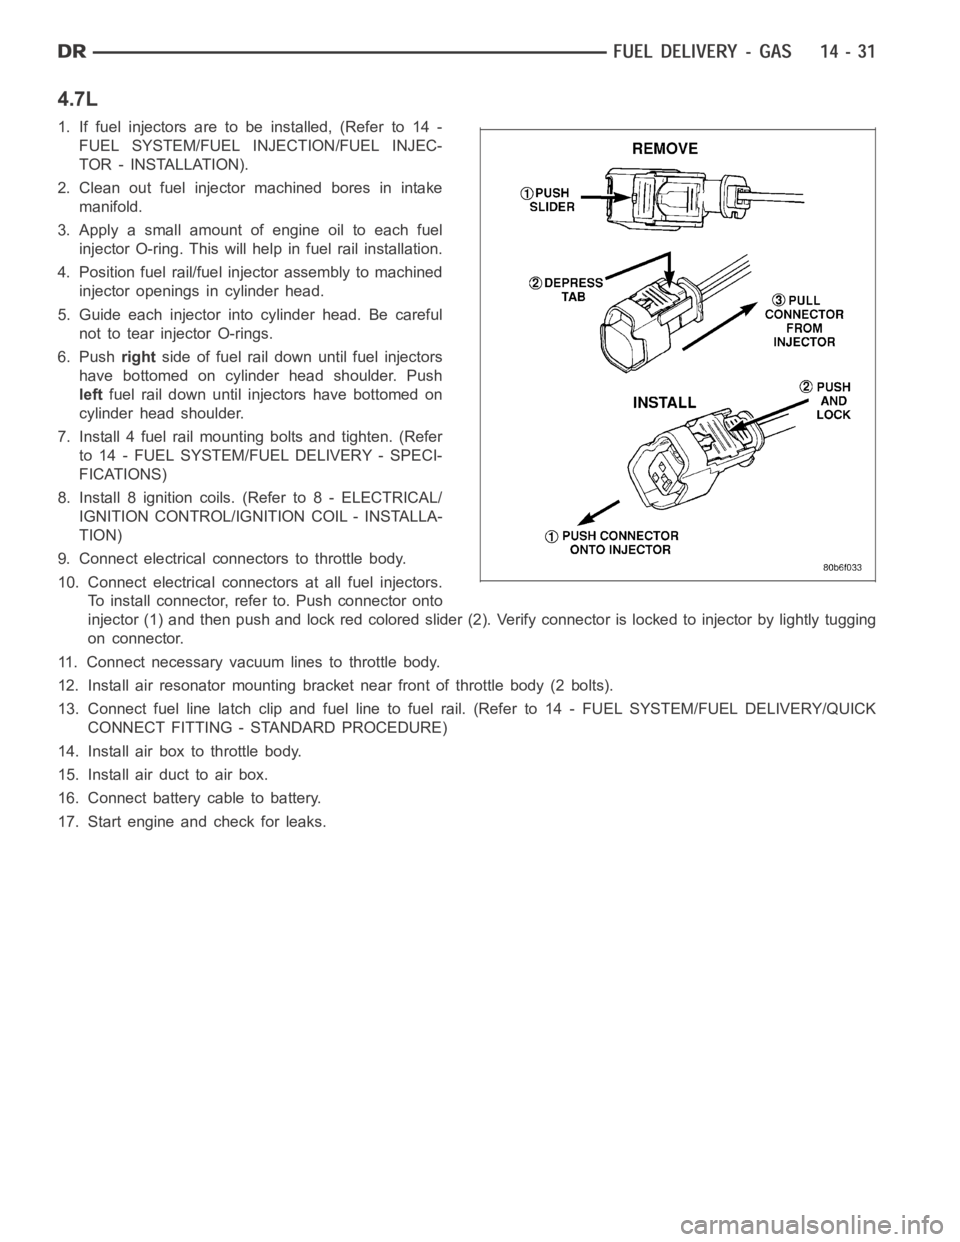
10. Connect electrical connectors at all fuel injectors.
To install connector, refer to. Push connector onto
injector (1) and then push and lock red colored slider (2). Verify connector is locked to injector by lightly tugging
on connector.
11. Connect necessary vacuum lines to throttle body.
12. Install air resonator mounting bracket near front of throttle body (2 bolts).
13. Connect fuel line latch clip and fuel line to fuel rail. (Refer to 14 - FUEL SYSTEM/FUEL DELIVERY/QUICK
CONNECT FITTING - STANDARD PROCEDURE)
14. Install air box to throttle body.
15. Install air duct to air box.
16. Connect battery cable to battery.
17. Start engine and check for leaks.
Page 2269 of 5267
5.7L
1. If fuel injectors are to be installed, (Refer to 14 -
FUEL SYSTEM/FUEL INJECTION/FUEL INJEC-
TOR - INSTALLATION).
2. Clean out fuel injector machined bores in intake
manifold.
3. Apply a small amount of engine oil to each fuel
injector O-ring. This will helpin fuel rail installation.
4. Position fuel rail/fuel injector assembly to machined
injector openings in intake manifold.
5. Guide each injector into intake manifold. Be careful
not to tear injector O-rings.
6. Pushrightside of fuel rail down until fuel injectors
have bottomed on shoulders. Pushleftfuel rail
down until injectors have bottomed on shoulders.
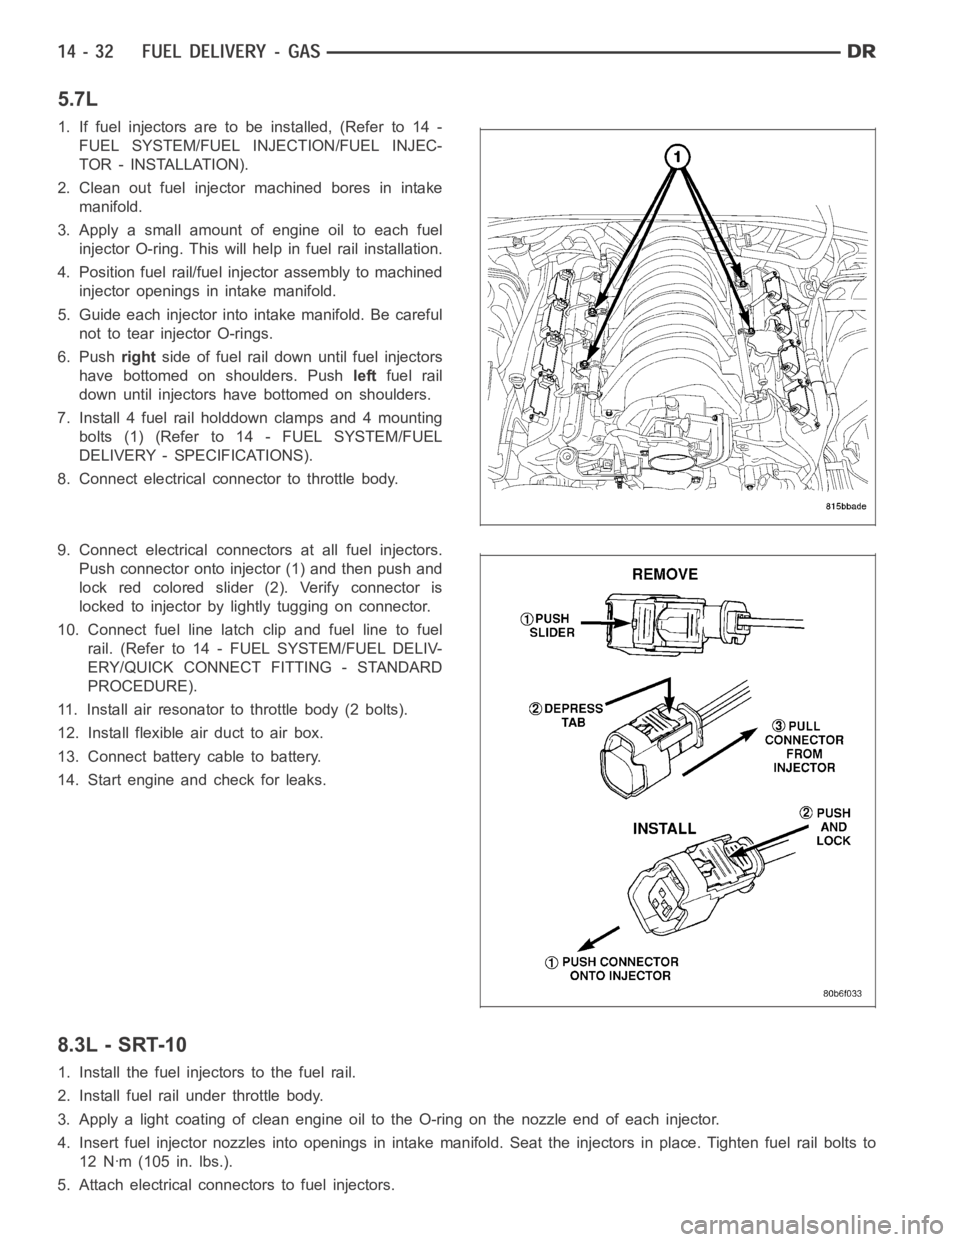
7. Install 4 fuel rail holddown clamps and 4 mounting
bolts (1) (Refer to 14 - FUEL SYSTEM/FUEL
DELIVERY - SPECIFICATIONS).
8. Connect electrical connector to throttle body.
9. Connect electrical connectors at all fuel injectors.
Push connector onto injector (1) and then push and
lock red colored slider (2). Verify connector is
locked to injector by lightly tugging on connector.
10. Connect fuel line latch clip and fuel line to fuel
rail. (Refer to 14 - FUEL SYSTEM/FUEL DELIV-
ERY/QUICK CONNECT FITTING - STANDARD
PROCEDURE).
11. Install air resonator to throttle body (2 bolts).
12. Install flexible air duct to air box.
13. Connect battery cable to battery.
14. Start engine and check for leaks.
8.3L - SRT-10
1. Install the fuel injectors to the fuel rail.
2. Install fuel rail under throttle body.
3. Apply a light coating of clean engine oiltotheO-ringonthenozzleendofeach injector.
4. Insert fuel injector nozzles into openings in intake manifold. Seat theinjectors in place. Tighten fuel rail bolts to
12 Nꞏm (105 in. lbs.).
5. Attach electrical connectors to fuel injectors.
Page 2270 of 5267
6. Connect the electrical connector to the MAP sensor and Coolant Temperature sensor.
7. Connect the electrical connector to the TPS and Idle Air Control.
8. Install the wiring harness to the wiring clips under the throttle body.
9. Connect fuel supply tube to fuel rail. Refer to Quick Connect Fittings inthe Fuel Delivery section.
10. Install the negative battery cable.
11. Install the air cleaner assembly, refer to the Engine/Air Intake System/Air Cleaner Housing for more information.
12. Use the DRBIII
scan tool ASD Fuel System Test to pressurize the fuel system. Check for leaks.
Page 2271 of 5267
TA N K - F U E L
DESCRIPTION
The fuel tank is constructed of a plastic material. Its main functions are for fuel storage and for placement of the fuel
pump module, and (if equipped) certain ORVR components.
OPERATION
All models pass a full 360 degree rollover test without fuel leakage. To accomplish this, fuel and vapor flow controls
are required for all fuel tank connections.
Two check (control) valves are mounted into the top of the fuel tank. Refer to Fuel Tank Check Valve for additional
information.
An evaporation control system is connected to the fuel tank to reduce emissions of fuel vapors into the atmosphere.
When fuel evaporates from the fuel tank, vapors pass through vent hoses or tubes to a charcoal canister where
they are temporarily held. When the engine is running, the vapors are drawninto the intake manifold. Certain mod-
els are also equipped with a self-diagnosing system using a Leak DetectionPump (LDP) or NVLD Pump, and/or an
On-Board Refueling Vapor Recovery (ORVR) system. Refer to Emission Control System for additional information.
REMOVAL- EXCEPT DIESEL
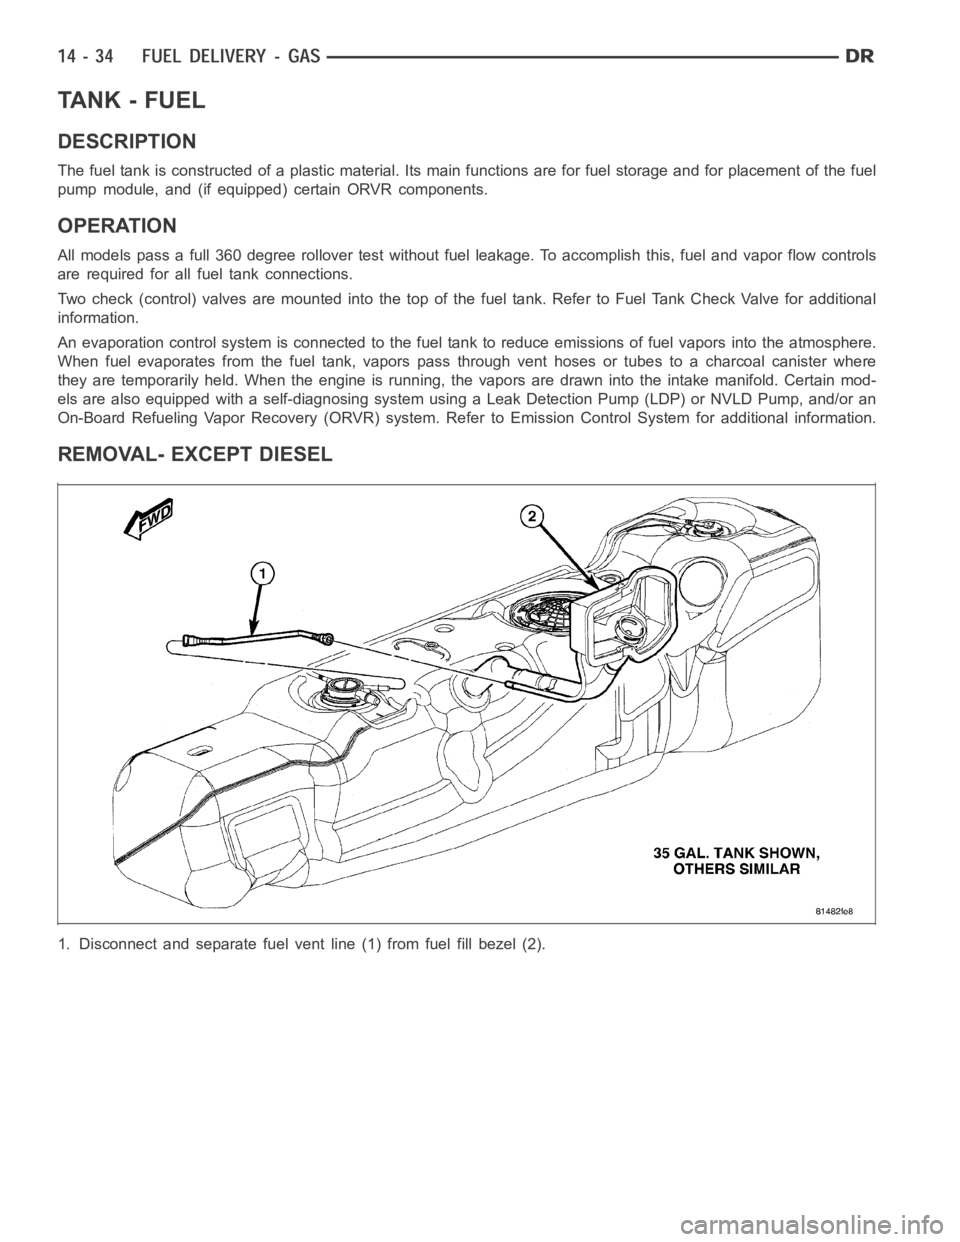
1. Disconnect and separate fuel vent line (1) from fuel fill bezel (2).
Page 2279 of 5267
8. Connect electrical connector to top of fuel pump module.
9. Connect necessary emission vent lines to leak pump and EVAP canister (4)and/or (5).
10. Connect fuel supply line (2) to fuel pump module (1).
11. Connect necessary emission vent lines from check valves (3) and/or (7)at top of tank.
12. Connect fuel vent line (1) to fuel fill bezel (2).
13. Fill fuel tank with fuel.
14. Start engine and check for fuel leaks near top of module.