Page 1564 of 3171
FFD-18
FRONT FINAL DRIVE ASSEMBLY
ASSEMBLY INSPECTION AND ADJUSTMENT
lBefore inspection and adjustment, drain gear oil.
Total Preload Torque
1. Rotate drive pinion back and forth 2 to 3 times to check for unusual noise and rotation malfunction.
2. Rotate drive pinion at least 20 times to check for smooth opera-
tion of the bearing.
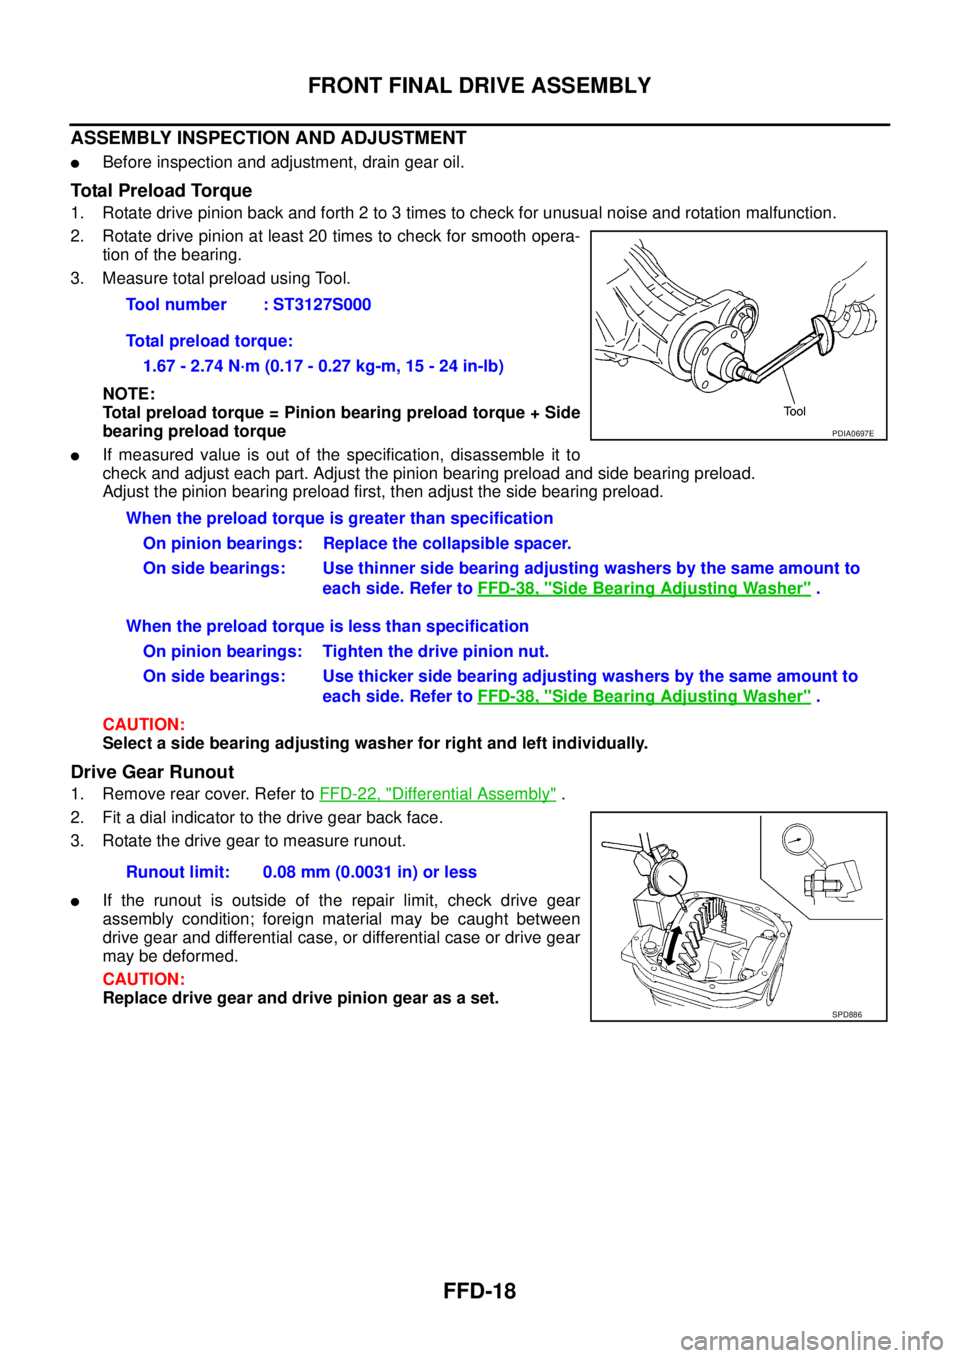
3. Measure total preload using Tool.
NOTE:
Total preload torque = Pinion bearing preload torque + Side
bearing preload torque
lIf measured value is out of the specification, disassemble it to
check and adjust each part. Adjust the pinion bearing preload and side bearing preload.
Adjust the pinion bearing preload first, then adjust the side bearing preload.
CAUTION:
Select a side bearing adjusting washer for right and left individually.
Drive Gear Runout
1. Remove rear cover. Refer toFFD-22, "Differential Assembly".
2. Fit a dial indicator to the drive gear back face.
3. Rotate the drive gear to measure runout.
lIf the runout is outside of the repair limit, check drive gear
assembly condition; foreign material may be caught between
drive gear and differential case, or differential case or drive gear
may be deformed.
CAUTION:
Replace drive gear and drive pinion gear as a set.Tool number : ST3127S000
Total preload torque:
1.67 - 2.74 N·m (0.17 - 0.27 kg-m, 15 - 24 in-lb)
PDIA0697E
When the preload torque is greater than specification
On pinion bearings: Replace the collapsible spacer.
On side bearings: Use thinner side bearing adjusting washers by the same amount to
each side. Refer toFFD-38, "
Side Bearing Adjusting Washer".
When the preload torque is less than specification
On pinion bearings: Tighten the drive pinion nut.
On side bearings: Use thicker side bearing adjusting washers by the same amount to
each side. Refer toFFD-38, "
Side Bearing Adjusting Washer".
Runout limit: 0.08 mm (0.0031 in) or less
SPD886
Page 1576 of 3171
FFD-30
FRONT FINAL DRIVE ASSEMBLY
e. Temporarily tighten removed drive pinon nut to drive pinion.
NOTE:
Use removed drive pinon nut only for the preload measurement.
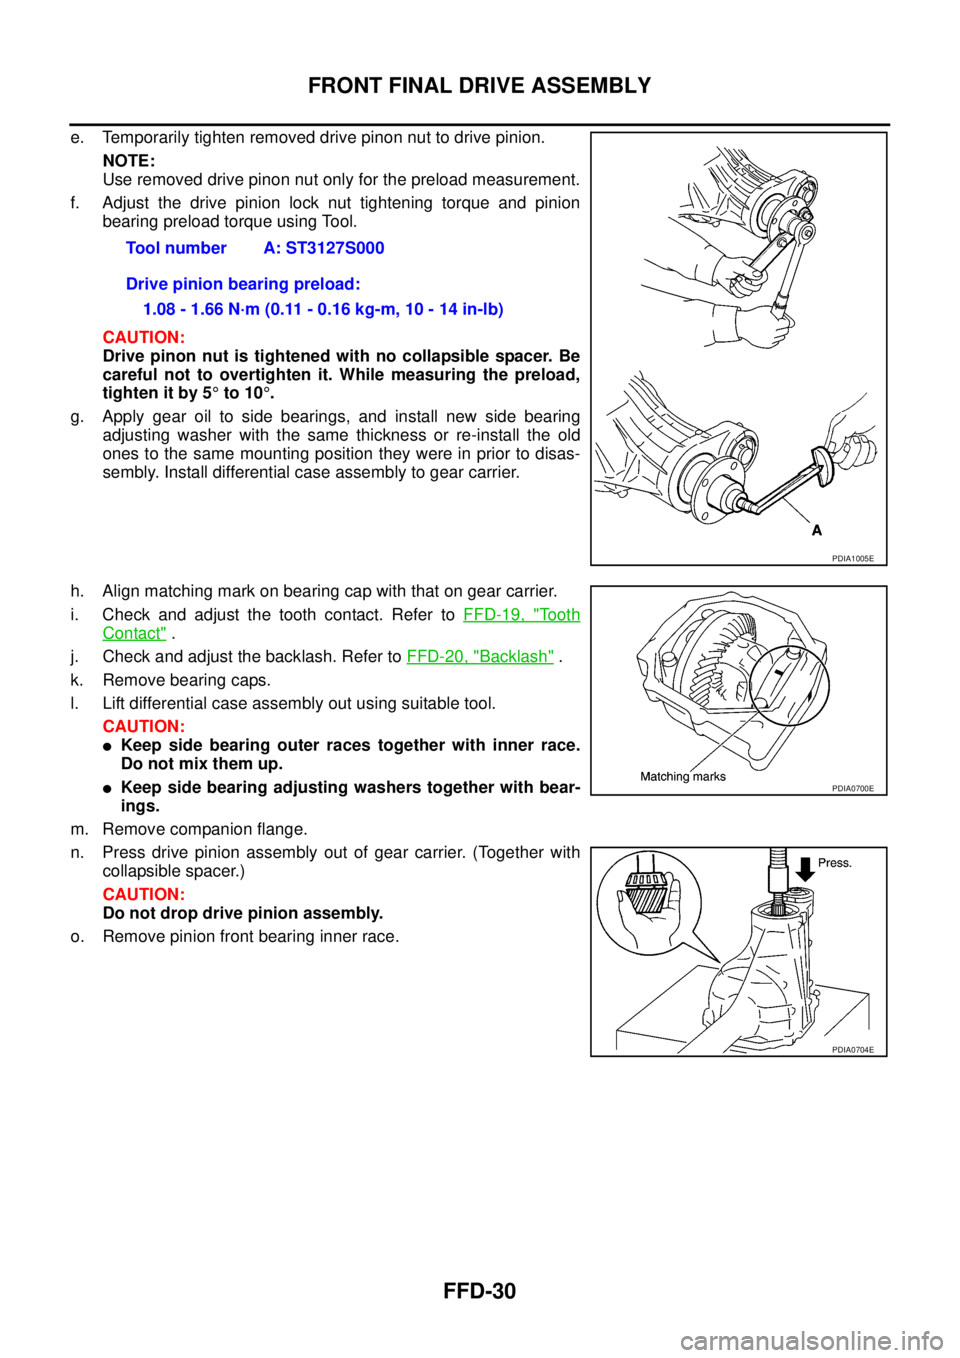
f. Adjust the drive pinion lock nut tightening torque and pinion
bearing preload torque using Tool.
CAUTION:
Drive pinon nut is tightened with no collapsible spacer. Be
careful not to overtighten it. While measuring the preload,
tighten it by 5°to 10°.
g. Apply gear oil to side bearings, and install new side bearing
adjusting washer with the same thickness or re-install the old
ones to the same mounting position they were in prior to disas-
sembly. Install differential case assembly to gear carrier.
h. Align matching mark on bearing cap with that on gear carrier.
i. Check and adjust the tooth contact. Refer toFFD-19, "
To o t h
Contact".
j. Check and adjust the backlash. Refer toFFD-20, "
Backlash".
k. Remove bearing caps.
l. Lift differential case assembly out using suitable tool.
CAUTION:
lKeep side bearing outer races together with inner race.
Do not mix them up.
lKeep side bearing adjusting washers together with bear-
ings.
m. Remove companion flange.
n. Press drive pinion assembly out of gear carrier. (Together with
collapsible spacer.)
CAUTION:
Do not drop drive pinion assembly.
o. Remove pinion front bearing inner race.Tool number A: ST3127S000
Drive pinion bearing preload:
1.08 - 1.66 N·m (0.11 - 0.16 kg-m, 10 - 14 in-lb)
PDIA1005E
PDIA0700E
PDIA0704E
Page 1578 of 3171
FFD-32
FRONT FINAL DRIVE ASSEMBLY
11. Apply anti-corrosive oil to the thread and seat of drive pinion
lock nut, and temporarily tighten drive pinion lock nut to drive
pinion.
CAUTION:
Do not reuse drive pinion lock nut.
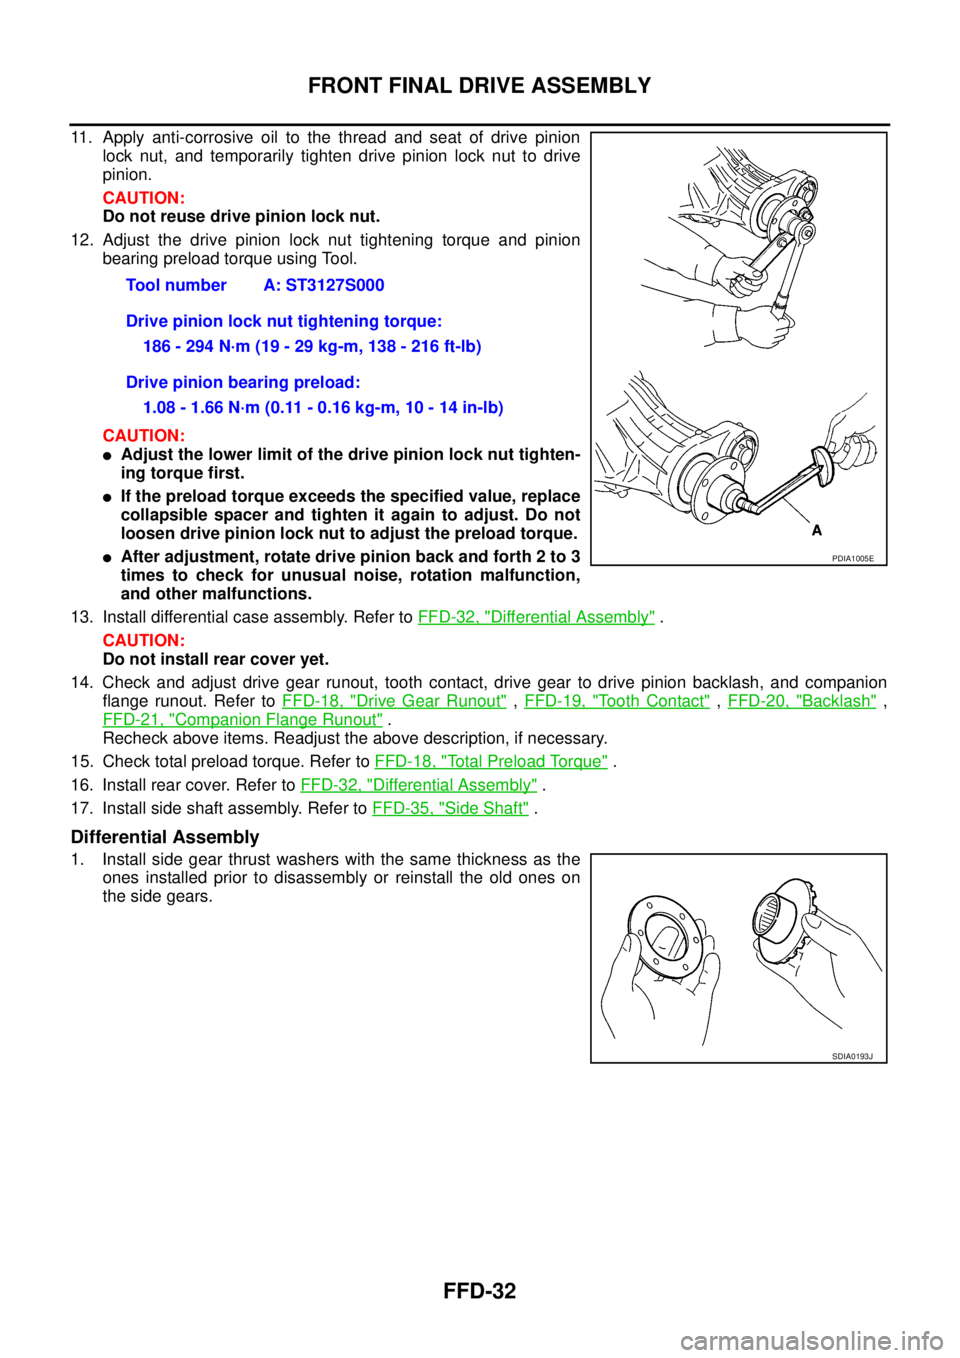
12. Adjust the drive pinion lock nut tightening torque and pinion
bearing preload torque using Tool.
CAUTION:
lAdjust the lower limit of the drive pinion lock nut tighten-
ing torque first.
lIf the preload torque exceeds the specified value, replace
collapsible spacer and tighten it again to adjust. Do not
loosen drive pinion lock nut to adjust the preload torque.
lAfter adjustment, rotate drive pinion back and forth 2 to 3
times to check for unusual noise, rotation malfunction,
and other malfunctions.
13. Install differential case assembly. Refer toFFD-32, "
Differential Assembly".
CAUTION:
Do not install rear cover yet.
14. Check and adjust drive gear runout, tooth contact, drive gear to drive pinion backlash, and companion
flange runout. Refer toFFD-18, "
Drive Gear Runout",FFD-19, "To o t h C o n t a c t",FFD-20, "Backlash",
FFD-21, "
Companion Flange Runout".
Recheck above items. Readjust the above description, if necessary.
15. Check total preload torque. Refer toFFD-18, "
Total Preload Torque".
16. Install rear cover. Refer toFFD-32, "
Differential Assembly".
17. Install side shaft assembly. Refer toFFD-35, "
Side Shaft".
Differential Assembly
1. Install side gear thrust washers with the same thickness as the
ones installed prior to disassembly or reinstall the old ones on
the side gears.Tool number A: ST3127S000
Drive pinion lock nut tightening torque:
186 - 294 N·m (19 - 29 kg-m, 138 - 216 ft-lb)
Drive pinion bearing preload:
1.08 - 1.66 N·m (0.11 - 0.16 kg-m, 10 - 14 in-lb)
PDIA1005E
SDIA0193J
Page 1580 of 3171
FFD-34
FRONT FINAL DRIVE ASSEMBLY
9. Install drive gear on the bolts, and then tighten to the specified
torque. Refer toFFD-17, "
COMPONENTS".
CAUTION:
lTighten bolts in a crisscross pattern.
lAfter tightening the bolts to the specified torque, tighten
the bolts additionally by turning the bolts 34 to 39
degrees.
10. Press side bearing inner races to differential case, using Tools.
CAUTION:
Do not reuse side bearing inner race.
11. Install housing spacer.
12. Apply gear oil to side bearings, and install differential case
assembly with side bearing outer races into gear carrier.
13. Insert left and right original side bearing adjusting washers in
place between side bearings and gear carrier, using Tool.
SDIA0247J
Tool number A: ST33230000
B: ST33061000
SPD353
SPD527
Tool number : KV38100600
PDIA0706E
Page 1581 of 3171
FRONT FINAL DRIVE ASSEMBLY
FFD-35
C
E
F
G
H
I
J
K
L
MA
B
FFD
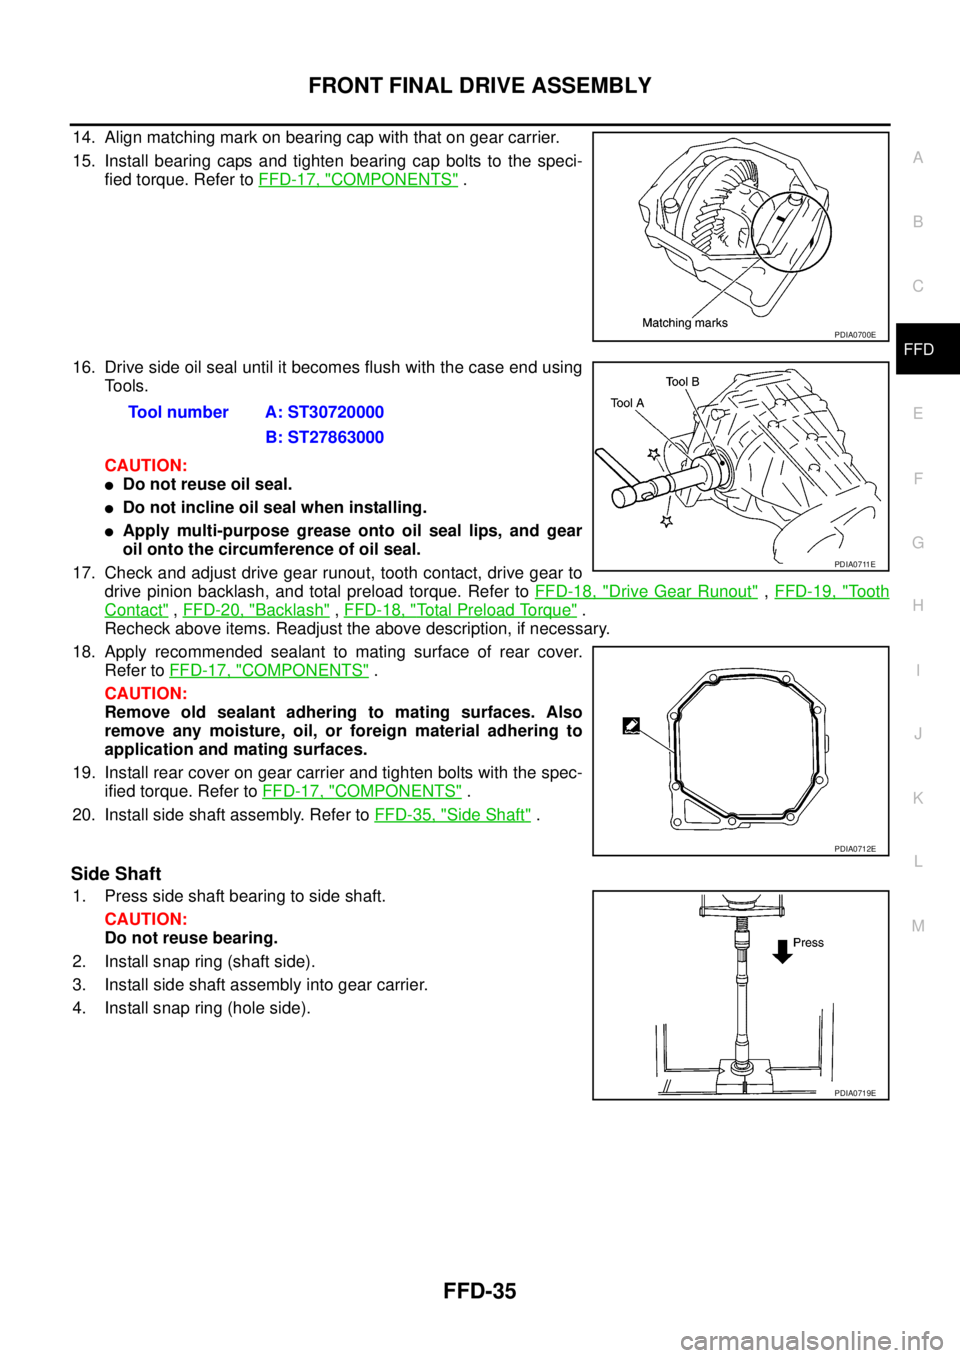
14. Alignmatchingmarkonbearingcapwiththatongearcarrier.
15. Install bearing caps and tighten bearing cap bolts to the speci-
fied torque. Refer toFFD-17, "
COMPONENTS".
16. Drive side oil seal until it becomes flush with the case end using
Tools.
CAUTION:
lDo not reuse oil seal.
lDo not incline oil seal when installing.
lApply multi-purpose grease onto oil seal lips, and gear
oil onto the circumference of oil seal.
17. Check and adjust drive gear runout, tooth contact, drive gear to
drive pinion backlash, and total preload torque. Refer toFFD-18, "
Drive Gear Runout",FFD-19, "To o t h
Contact",FFD-20, "Backlash",FFD-18, "Total Preload Torque".
Recheck above items. Readjust the above description, if necessary.
18. Apply recommended sealant to mating surface of rear cover.
Refer toFFD-17, "
COMPONENTS".
CAUTION:
Remove old sealant adhering to mating surfaces. Also
remove any moisture, oil, or foreign material adhering to
application and mating surfaces.
19. Install rear cover on gear carrier and tighten bolts with the spec-
ified torque. Refer toFFD-17, "
COMPONENTS".
20. Install side shaft assembly. Refer toFFD-35, "
Side Shaft".
Side Shaft
1. Press side shaft bearing to side shaft.
CAUTION:
Do not reuse bearing.
2. Install snap ring (shaft side).
3. Install side shaft assembly into gear carrier.
4. Install snap ring (hole side).
PDIA0700E
Tool number A: ST30720000
B: ST27863000
PDIA0711E
PDIA0712E
PDIA0719E
Page 1583 of 3171
SERVICE DATA AND SPECIFICATIONS (SDS)
FFD-37
C
E
F
G
H
I
J
K
L
MA
B
FFD
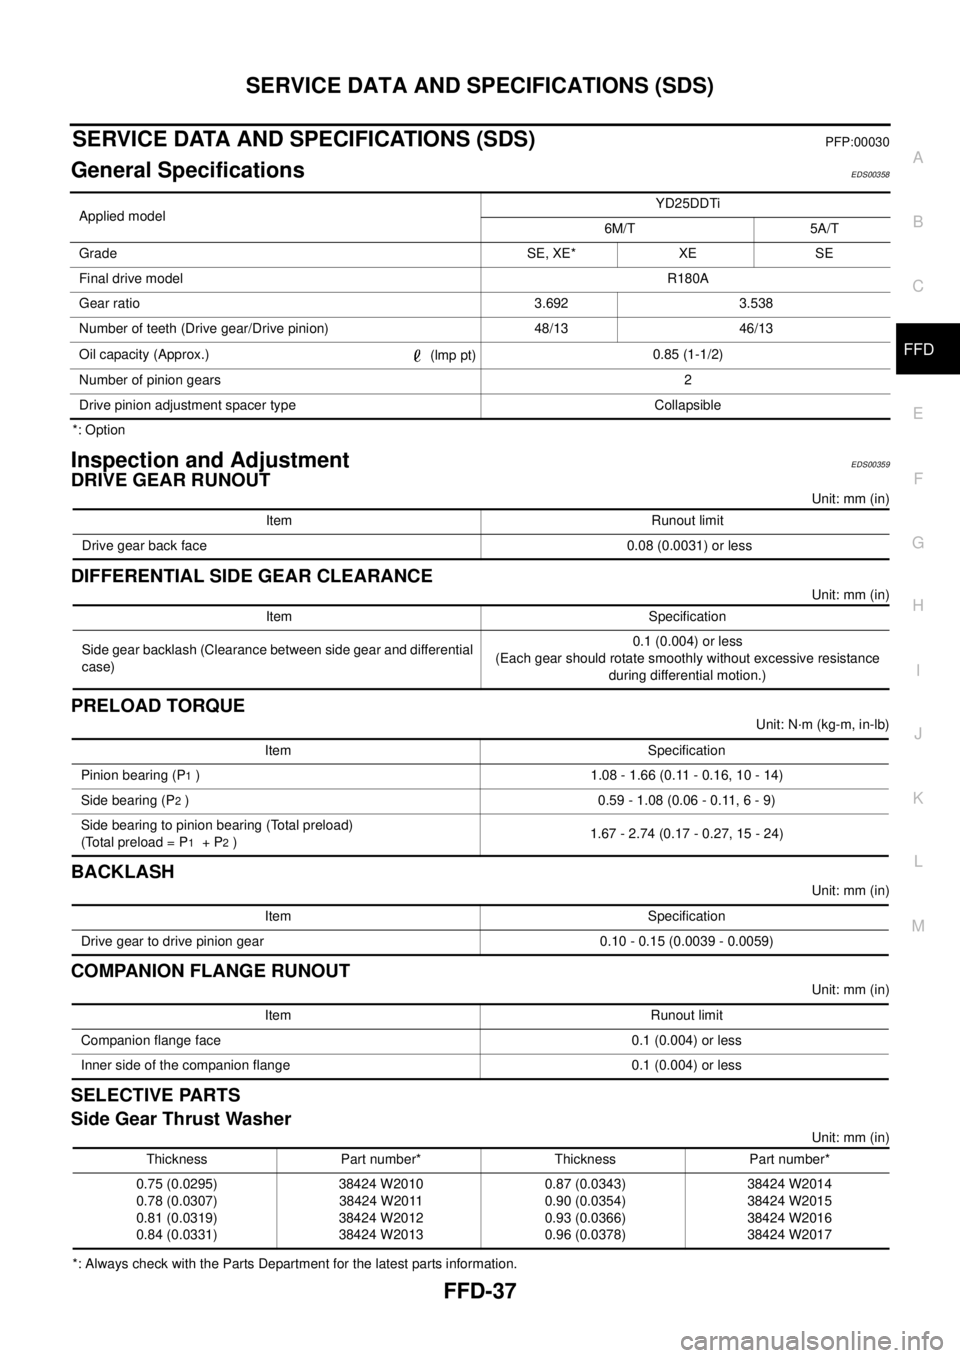
SERVICE DATA AND SPECIFICATIONS (SDS)PFP:00030
General SpecificationsEDS00358
*: Option
Inspection and AdjustmentEDS00359
DRIVE GEAR RUNOUT
Unit: mm (in)
DIFFERENTIAL SIDE GEAR CLEARANCE
Unit: mm (in)
PRELOAD TORQUE
Unit: N·m (kg-m, in-lb)
BACKLASH
Unit: mm (in)
COMPANION FLANGE RUNOUT
Unit: mm (in)
SELECTIVE PARTS
Side Gear Thrust Washer
Unit: mm (in)
*: Always check with the Parts Department for the latest parts information.Applied modelYD25DDTi
6M/T 5A/T
Grade SE, XE* XE SE
Final drive modelR180A
Gear ratio 3.692 3.538
Number of teeth (Drive gear/Drive pinion) 48/13 46/13
Oil capacity (Approx.)
(lmp pt)0.85 (1-1/2)
Number of pinion gears2
Drive pinion adjustment spacer type Collapsible
Item Runout limit
Drive gear back face 0.08 (0.0031) or less
Item Specification
Side gear backlash (Clearance between side gear and differential
case)0.1 (0.004) or less
(Each gear should rotate smoothly without excessive resistance
during differential motion.)
Item Specification
Pinion bearing (P
1) 1.08 - 1.66 (0.11 - 0.16, 10 - 14)
Side bearing (P
2) 0.59 - 1.08 (0.06 - 0.11, 6 - 9)
Side bearing to pinion bearing (Total preload)
(Total preload = P
1+P2)1.67 - 2.74 (0.17 - 0.27, 15 - 24)
Item Specification
Drive gear to drive pinion gear 0.10 - 0.15 (0.0039 - 0.0059)
Item Runout limit
Companion flange face 0.1 (0.004) or less
Inner side of the companion flange 0.1 (0.004) or less
Thickness Part number* Thickness Part number*
0.75 (0.0295)
0.78 (0.0307)
0.81 (0.0319)
0.84 (0.0331)38424 W2010
38424 W2011
38424 W2012
38424 W20130.87 (0.0343)
0.90 (0.0354)
0.93 (0.0366)
0.96 (0.0378)38424 W2014
38424 W2015
38424 W2016
38424 W2017
Page 1589 of 3171
FUEL FILTER
FL-5
C
D
E
F
G
H
I
J
K
L
MA
FL
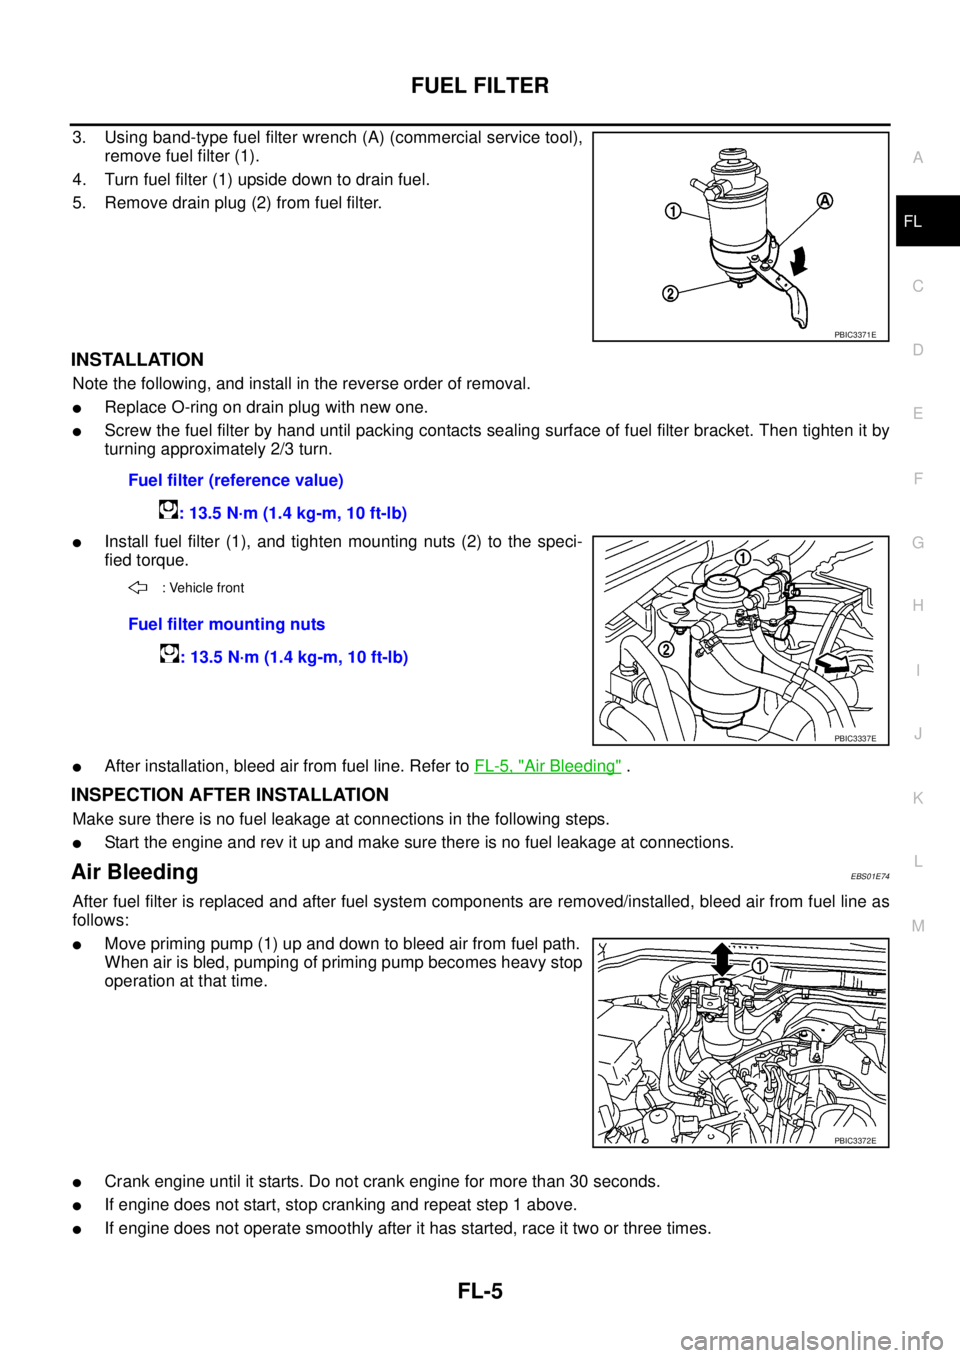
3. Using band-type fuel filter wrench (A) (commercial service tool),
remove fuel filter (1).
4. Turn fuel filter (1) upside down to drain fuel.
5. Remove drain plug (2) from fuel filter.
INSTALLATION
Note the following, and install in the reverse order of removal.
lReplace O-ring on drain plug with new one.
lScrew the fuel filter by hand until packing contacts sealing surface of fuel filter bracket. Then tighten it by
turning approximately 2/3 turn.
lInstall fuel filter (1), and tighten mounting nuts (2) to the speci-
fied torque.
lAfter installation, bleed air from fuel line. Refer toFL-5, "Air Bleeding".
INSPECTION AFTER INSTALLATION
Make sure there is no fuel leakage at connections in the following steps.
lStart the engine and rev it up and make sure there is no fuel leakage at connections.
Air BleedingEBS01E74
After fuel filter is replaced and after fuel system components are removed/installed, bleed air from fuel line as
follows:
lMove priming pump (1) up and down to bleed air from fuel path.
When air is bled, pumping of priming pump becomes heavy stop
operation at that time.
lCrank engine until it starts. Do not crank engine for more than 30 seconds.
lIf engine does not start, stop cranking and repeat step 1 above.
lIf engine does not operate smoothly after it has started, race it two or three times.
PBIC3371E
Fuel filter (reference value)
: 13.5 N·m (1.4 kg-m, 10 ft-lb)
: Vehicle front
Fuel filter mounting nuts
: 13.5 N·m (1.4 kg-m, 10 ft-lb)
PBIC3337E
PBIC3372E
Page 1590 of 3171

FL-6
FUEL FILTER
lIf air cannot be bled easily (pumping of priming pump does not become heavy), disconnect feed-side of
hose between fuel filter and electronically controlled fuel pump. After that, operate priming pump and con-
firm that fuel comes out.
CAUTION:
Prepare a tray to collect fuel. Prevent fuel from adhering to rubber parts, especially the engine
mounting insulator.
Draining Water from Fuel FilterEBS01E75
1. Prepare a tray (A) under the drain plug (1).
2. Loosen drain plug (1), and operate priming pump (2) to drain
water from fuel filter.
CAUTION:
lWater in filter is drained with fuel. Prepare larger capacity
pan than fuel filter volume.
lDrained water is mixed with fuel. Prevent fuel from adher-
ing to rubber parts such as engine mounting insulator.
3. Replace O-ring on drain plug with new one.
4. After draining, close drain plug to specified torque.
CAUTION:
If drain plug is tightened excessively, it may be damaged and fuel will leak.
5. Bleed air in fuel piping. Refer toFL-5, "
Air Bleeding".
6. Start engine and make sure there is no fuel leakage.Drain plug
: 1.3 N·m (0.13 kg-m, 12 in-lb)
PBIC3373E