Page 2549 of 5267

CLEANING
Clean gears, shafts, shift components and transmission housings with a standard parts cleaning solvent. Do not use
acid or corrosive base solvents. Dry all parts except bearings with compressed air.
Clean shaft bearings with a mild solvent such as MOPAR
degreasing solvent, Gunkor similar solvents. Do not
dry the bearings with compressed air. Allow the bearings to either air dry or wipe them dry with clean shop towels.
INSPECTION
NOTE: Minor corrosion, nicks, or pitting can be
smoothed with 400 grit emery and polished out
with crocus cloth.
Bearings:Inspect for worn, chipped, cracked, flat-
spotted or brinnelled.
Gears:Inspect for worn, chipped or cracked teeth.
Inspect bearing surfaces for wear or flat-spotted.
Mainshaft:Inspect for worn splines, snap ring
grooves and threads.
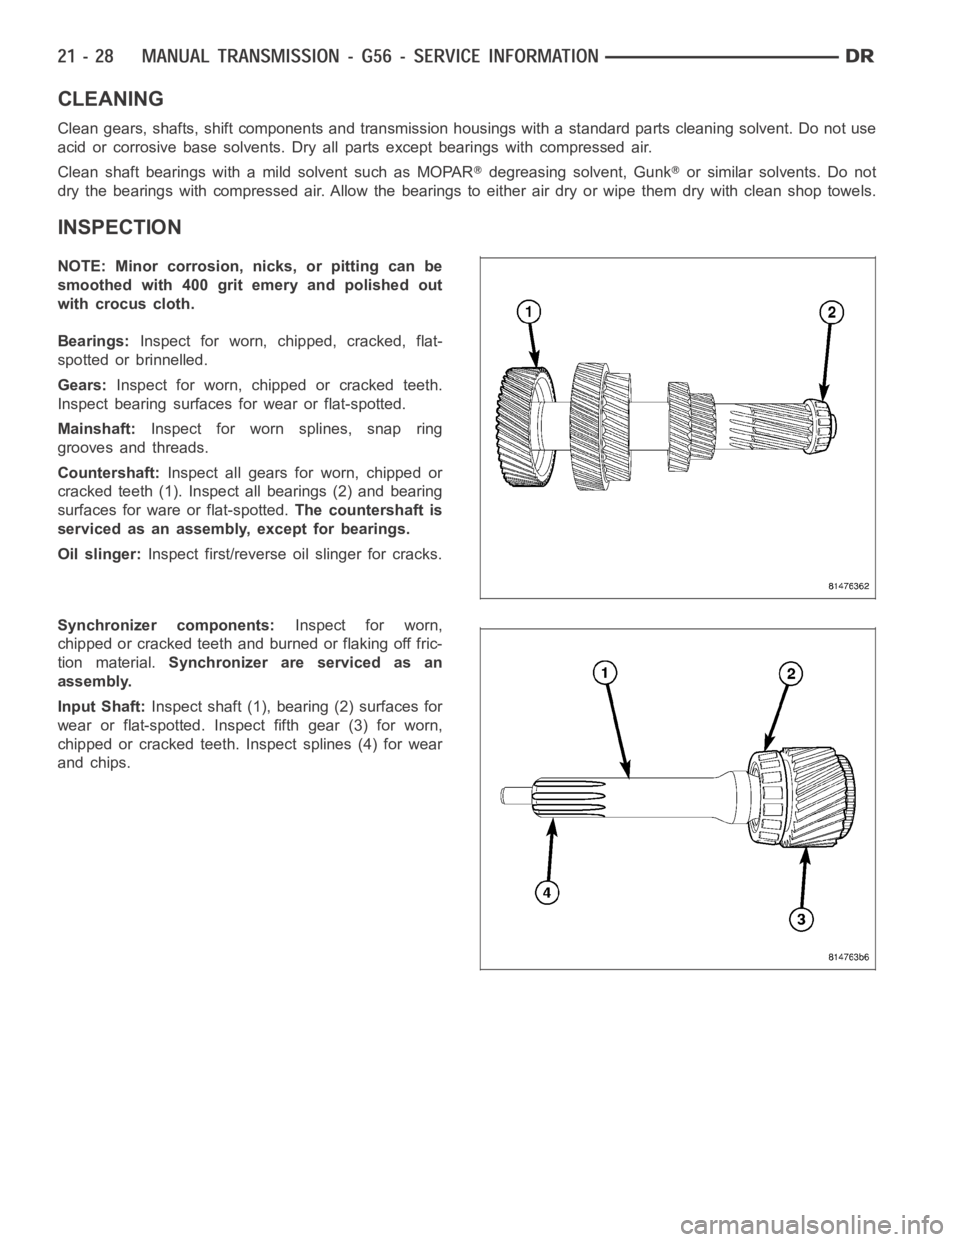
Countershaft:Inspect all gears for worn, chipped or
cracked teeth (1). Inspect all bearings (2) and bearing
surfaces for ware or flat-spotted.The countershaft is
serviced as an assembly, except for bearings.
Oil slinger:Inspect first/reverse oil slinger for cracks.
Synchronizer components:Inspect for worn,
chipped or cracked teeth and burned or flaking off fric-
tion material.Synchronizer are serviced as an
assembly.
Input Shaft:Inspect shaft (1), bearing (2) surfaces for
wear or flat-spotted. Inspect fifth gear (3) for worn,
chipped or cracked teeth. Inspect splines (4) for wear
and chips.
Page 2578 of 5267
7. Apply Mopar™ Gasket Maker to the rear housing
sealing surface.
8. Install front housing (1) onto the rear housing (2).
9. Install housing bolts and tighten to 58 Nꞏm (43 ft.
lbs.).
10. Install 5-6 shift fork pins (1) into housing and
tighten to 58 Nꞏm (43 ft. lbs.).
11. Push shift tower boot (1) onto shift tower (2).
Page 2579 of 5267
12. Remove shift fork tie strap.
13. Apply Mopar™ Gasket Maker to the shift tower
opening.
14. Install shift tower (2) and tighten bolts (1) to 23
Nꞏm (17 ft. lbs.).
15. Install back up lamp switch (1) and bolt (2).
INSTALLATION
1. Clean transmission front housing mounting surface.
2. Apply light coat of Mopar high temperature bearing
grease or equivalent to contact surfaces of follow-
ing components:
release fork (1) ball stud (2)
release bearing slide surface (3)
input shaft splines (4)
release bearing bore (5)
propeller shaft slip yoke.
Page 2583 of 5267

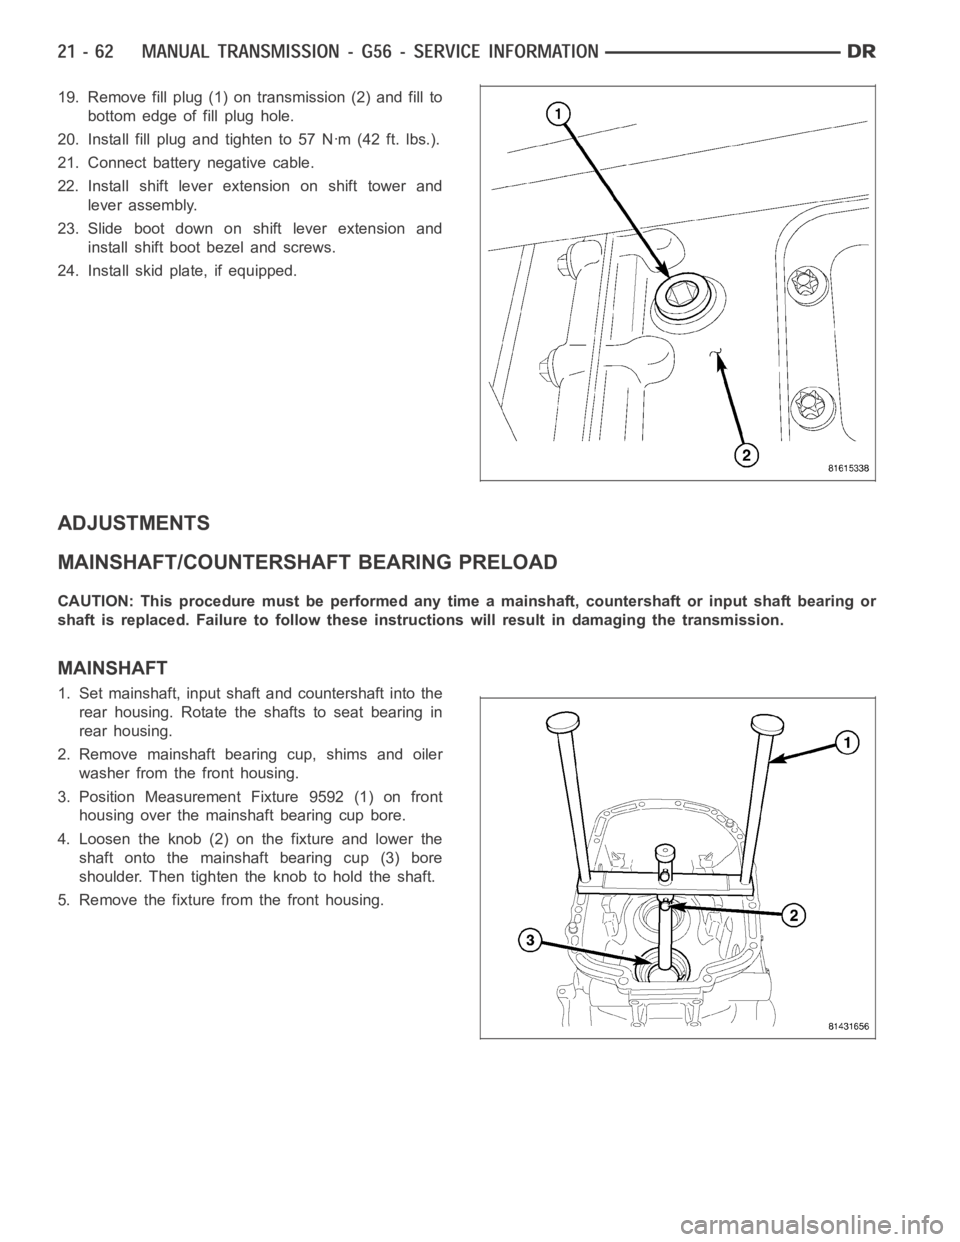
19. Remove fill plug (1) on transmission (2) and fill to
bottom edge of fill plug hole.
20. Install fill plug and tighten to 57 Nꞏm (42 ft. lbs.).
21. Connect battery negative cable.
22. Install shift lever extension on shift tower and
lever assembly.
23. Slide boot down on shift lever extension and
install shift boot bezel and screws.
24. Install skid plate, if equipped.
ADJUSTMENTS
MAINSHAFT/COUNTERSHAFT BEARING PRELOAD
CAUTION: This procedure must be performed any time a mainshaft, countershaft or input shaft bearing or
shaft is replaced. Failure to follow these instructions will result in damaging the transmission.
MAINSHAFT
1. Set mainshaft, input shaft and countershaft into the
rear housing. Rotate the shafts to seat bearing in
rear housing.
2. Remove mainshaft bearing cup, shims and oiler
washer from the front housing.
3. Position Measurement Fixture 9592 (1) on front
housing over the mainshaft bearing cup bore.
4. Loosen the knob (2) on the fixture and lower the
shaft onto the mainshaft bearing cup (3) bore
shoulder. Then tighten the knob to hold the shaft.
5. Remove the fixture from the front housing.
Page 2586 of 5267
8. Measure the gap (1) between the fixture shaft (2)
and the fixture plunger (3). Repeat measurement
on the opposite side of the countershaft cup and
bearing. The average of the two measurements,
will be the size of the countershaft select shim.
9. Install select shim in front housing countershaft
bearing cup bore and install bearing cup.
SPECIFICATIONS
MANUAL TRANSMISSION-G56
TORQUE SPECIFICATIONS
DESCRIPTION Nꞏm Ft. Lbs. In. Lbs.
Fill Plug 57 42 -
Drain Plug 57 42 -
Front to Rear Housing
Bolts58 43 -
Input Shaft Retainer Bolts 23 17 -
Shift Tower bolts 23 17 -
5-6 Shift Fork Bolts 58 43 -
Shift Rail Support bolts 58 43 -
Reverse Idler Gear Shaft
Bolt58 43 -
P.T.O. Cover Bolts 58 43 -
Clutch Release Pivot Ball 22 16 -
Page 2593 of 5267
4. Remove fill plug (1) from side of transmission (2).
5. Fill transmission even with the bottom of the fill
hole.
6. Install fill plug and tighten to 50 Nꞏm (37 ft. lbs.).
REMOVAL
1. With vehicle in neutral, position vehicle on hoist.
2. Disconnect battery negative cable.
3. Remove shift boot bezel screws and slide boot
upward on shift lever extension.
4. Remove shift lever extension from the shift tower
and lever assembly.
5. Remove 4WD shift boot if equipped and remove
floor console.
6. Remove skid plate, if equipped.
7. Remove drain plug (1) from rear housing (2) and
drain fluid.
8. Mark propeller shaft/shafts and companion flange
yoke/yokes for installation reference and remove
propeller shaft/shafts.
9. Disconnect harness from clips on transmission
housing.
10. Remove transfer case linkage if equipped.
11. Remove transfer case mounting nuts and remove
transfer case if equipped.
12. Remove slave cylinder (2) mounting nut (1) and
remove cylinder.
Page 2621 of 5267

10. Remove shift rail roller bearing from rear housing
(3) with Puller 9609 (1) and Slide Hammer C-637
(2).
CLEANING
Clean gears, shafts, shift components and transmission housings with a standard parts cleaning solvent. Do not use
acid or corrosive base solvents. Dry all parts except bearings with compressed air.
Clean shaft bearings with a mild solvent such as MOPAR
degreasing solvent, Gunkor similar solvents. Do not
dry the bearings with compressed air. Allow the bearings to either air dry or wipe them dry with clean shop towels.
INSPECTION
NOTE: Minor corrosion, nicks, or pitting can be
smoothed with 400 grit emery and polished out
with crocus cloth.
Bearings:Inspect roller bearings for wear, chips,
cracks, flat-spots or brinnelling. Inspect sealed bear-
ings, and verify bearings roll smoothly.
Gears:Inspect for worn, chipped, or cracked teeth.
Inspect bearing surfaces for wear or flat-spots.
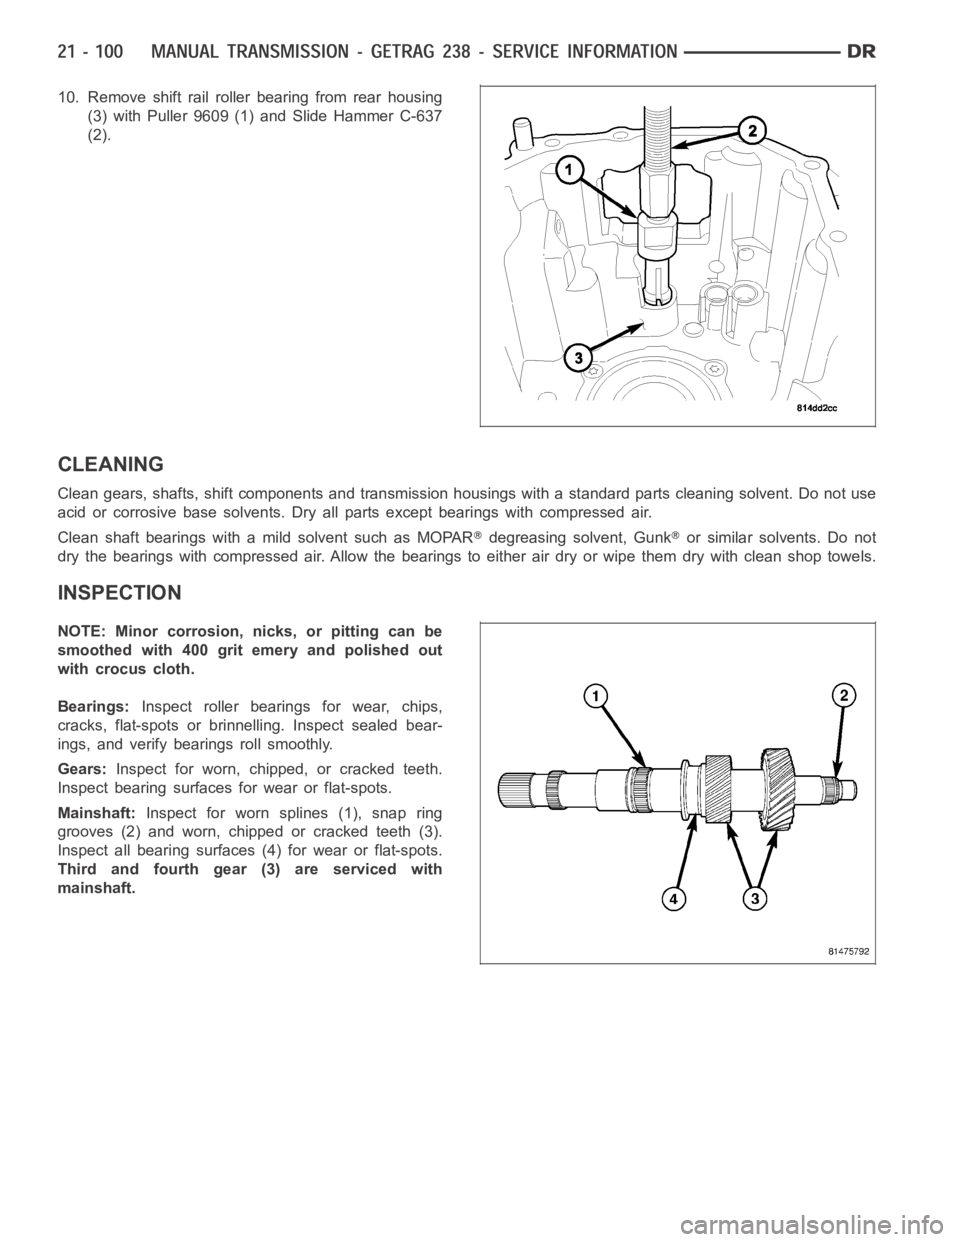
Mainshaft:Inspect for worn splines (1), snap ring
grooves (2) and worn, chipped or cracked teeth (3).
Inspect all bearing surfaces (4) for wear or flat-spots.
Third and fourth gear (3) are serviced with
mainshaft.
Page 2655 of 5267
50. Install countershaft bolt (1) in front housing.
Tighten bolt (1) to 90 Nꞏm (66 ft. lbs.).
51. Install countershaft plug in front housing (1) with
Installer 9622 (2) and Handle C-4171.
52. Install the cover plate for the second shift tower
location, if necessary.
53. Apply Mopar
Lock & Seal or equivalent to shifter
socket threads and install shifter socket (1).