Page 2113 of 5267

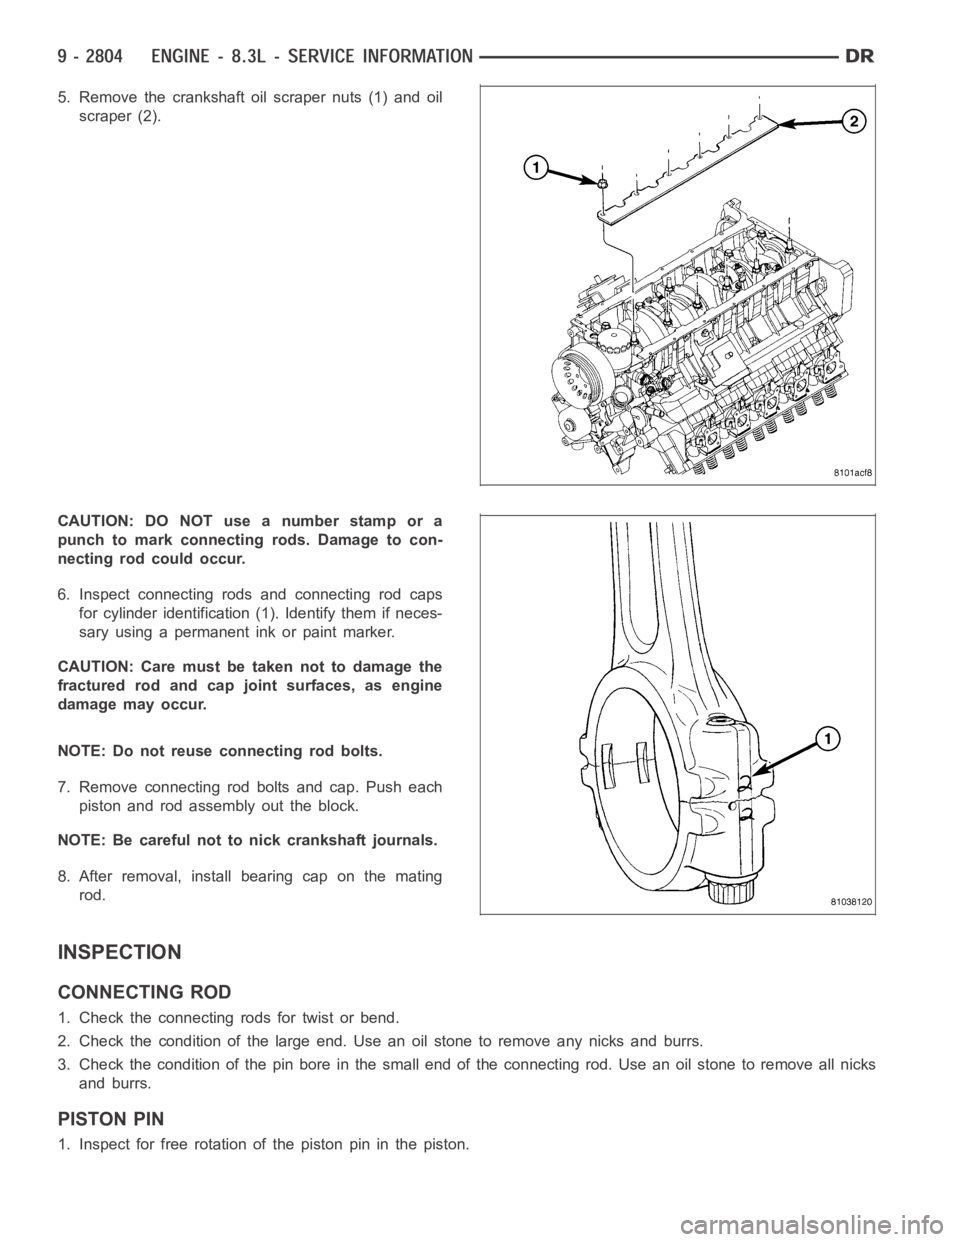
5. Remove the crankshaft oil scraper nuts (1) and oil
scraper (2).
CAUTION: DO NOT use a number stamp or a
punch to mark connecting rods. Damage to con-
necting rod could occur.
6. Inspect connecting rods and connecting rod caps
for cylinder identification (1). Identify them if neces-
sary using a permanent ink or paint marker.
CAUTION: Care must be taken not to damage the
fractured rod and cap joint surfaces, as engine
damage may occur.
NOTE: Do not reuse connecting rod bolts.
7. Remove connecting rod bolts and cap. Push each
piston and rod assembly out the block.
NOTE: Be careful not to nick crankshaft journals.
8. After removal, install bearing cap on the mating
rod.
INSPECTION
CONNECTING ROD
1. Check the connecting rods for twist or bend.
2. Check the condition of the large end. Use an oil stone to remove any nicks and burrs.
3. Check the condition of the pin bore in the small end of the connecting rod.Useanoilstonetoremoveallnicks
and burrs.
PISTON PIN
1. Inspect for free rotation of the piston pin in the piston.
Page 2114 of 5267

PISTON
1. Inspect all piston surfaces for nicks and scuffs.
2. Inspect piston and ring grooves for wear.
INSTALLATION
NOTE: Pistons and connecting rods are serviced
as an assembly. Left bank pistons are labeled
“ODD”. Right bank pistons are labeled “EVEN”.
1. Install piston rings (Refer to 9 - ENGINE/ENGINE
BLOCK/PISTON RINGS - INSTALLATION).
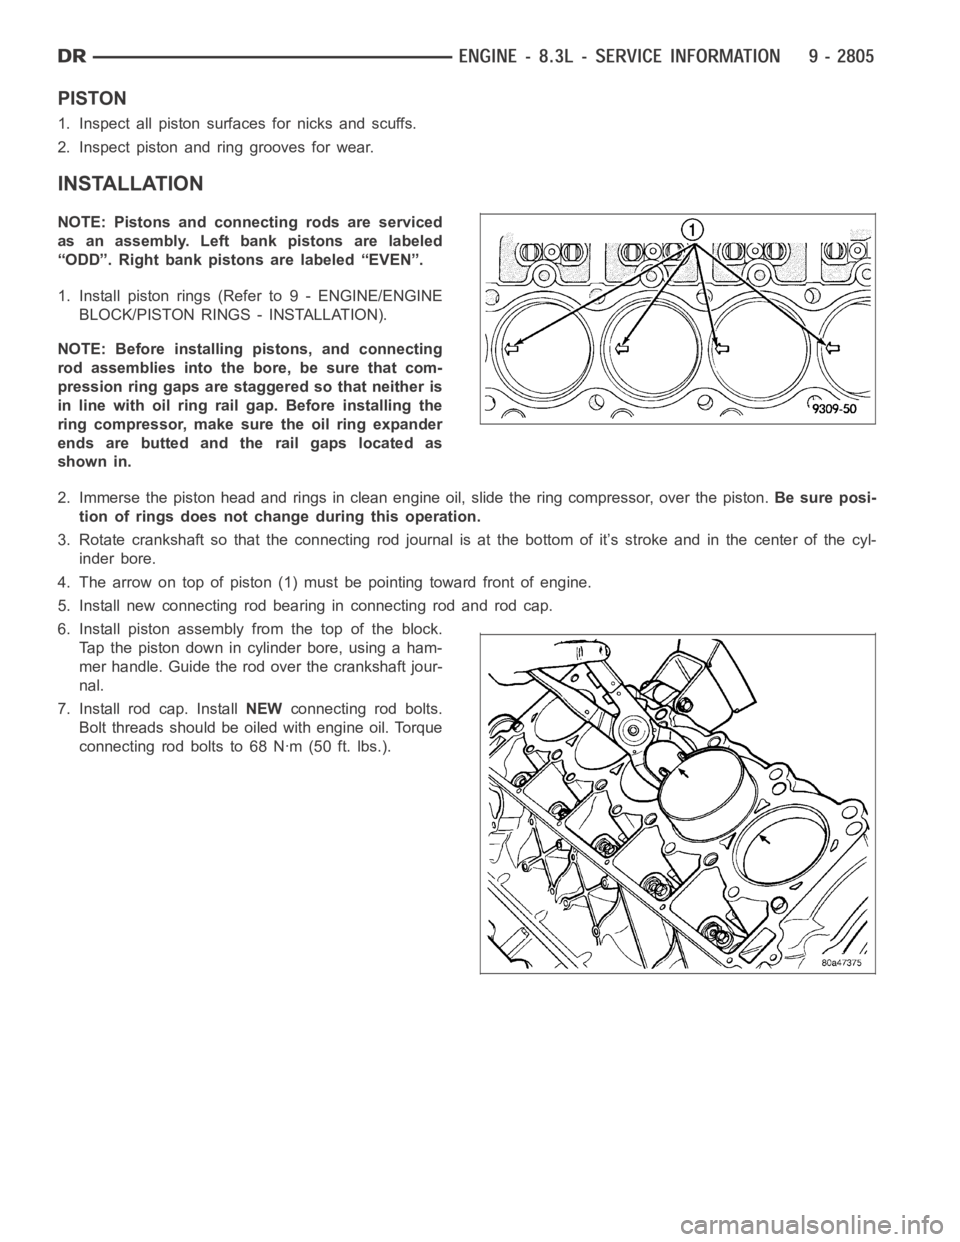
NOTE: Before installing pistons, and connecting
rod assemblies into the bore, be sure that com-
pression ring gaps are staggered so that neither is
in line with oil ring rail gap. Before installing the
ring compressor, make sure the oil ring expander
ends are butted and the rail gaps located as
shown in.
2. Immerse the piston head and rings in clean engine oil, slide the ring compressor, over the piston.Be sure posi-
tion of rings does not change during this operation.
3. Rotate crankshaft so that the connecting rod journal is at the bottom of it’s stroke and in the center of the cyl-
inder bore.
4. The arrow on top of piston (1) must be pointing toward front of engine.
5. Install new connecting rod bearing in connecting rod and rod cap.
6. Install piston assembly from the top of the block.
Tap the piston down in cylinder bore, using a ham-
mer handle. Guide the rod over the crankshaft jour-
nal.
7. Install rod cap. InstallNEWconnecting rod bolts.
Bolt threads should be oiled with engine oil. Torque
connecting rod bolts to 68 Nꞏm (50 ft. lbs.).
Page 2119 of 5267

BEARINGS-CONNECTING ROD
DESCRIPTION
The bearing caps are not interchangeable and should be paint marked or scribed at removal to insure correct
assembly.
The bearing shells must be installed so that the tangs are in the machined grooves in the rods and caps.
Limits of taper or out-of-round on any crankshaft journals should be held to 0.013 mm (0.0005 in.). Bearings are
available in 0.025 mm (0.001 in.), 0.051 mm (0.002 in.), 0.076 mm (0.003 in.), 0.254 mm (0.010 in.) and 0.305 mm
(0.012 in.) undersize.Install the bearings in pairs. Do not use a new bearing half with an old bearing half. Do
not file the rods or bearing caps.
STANDARD PROCEDURE
CONNECTING ROD BEARING - FITTING
Fit all rods on one bank until complete. Do not alternate from one bank to another, because when the rods are
assembled to pistons correctly, they are not interchangeable from one bank to another.
The bearing caps are not interchangeable and should be marked at removal toinsure correct assembly.
The bearing shells must be installed so that the tangs are in the machined grooves in the rods and caps.
Limits of taper or out-of-round on any crankshaft journals should be held to 0.013 mm (0.0005 in.). Bearings are
available in 0.025 mm (0.001 in.), 0.051 mm (0.002 in.), 0.076 mm (0.003 in.), 0.254 mm (0.010 in.) and 0.305 mm
(0.012 in.) undersize.Install the bearings in pairs. Do not use a new bearing half with an old bearing half. Do
not file the rods or bearing caps.
1. (Refer to 9 - ENGINE/ENGINE BLOCK/CONNECTING ROD BEARINGS - STANDARD PROCEDURE) - Mea-
suring Connecting Rod Bearing Clearance to determine bearing clearance.
2. Before installing the connecting rod cap bolts, the bolt threads shouldbe oiled with engine oil.
3. Install bolts finger tight, then alternately torque each bolt to assemble the cap properly.
4. Tighten the connecting rod bolts to 68 Nꞏm (50 ft. lbs.).
MEASURING CONNECTING ROD BEARING CLEARANCE
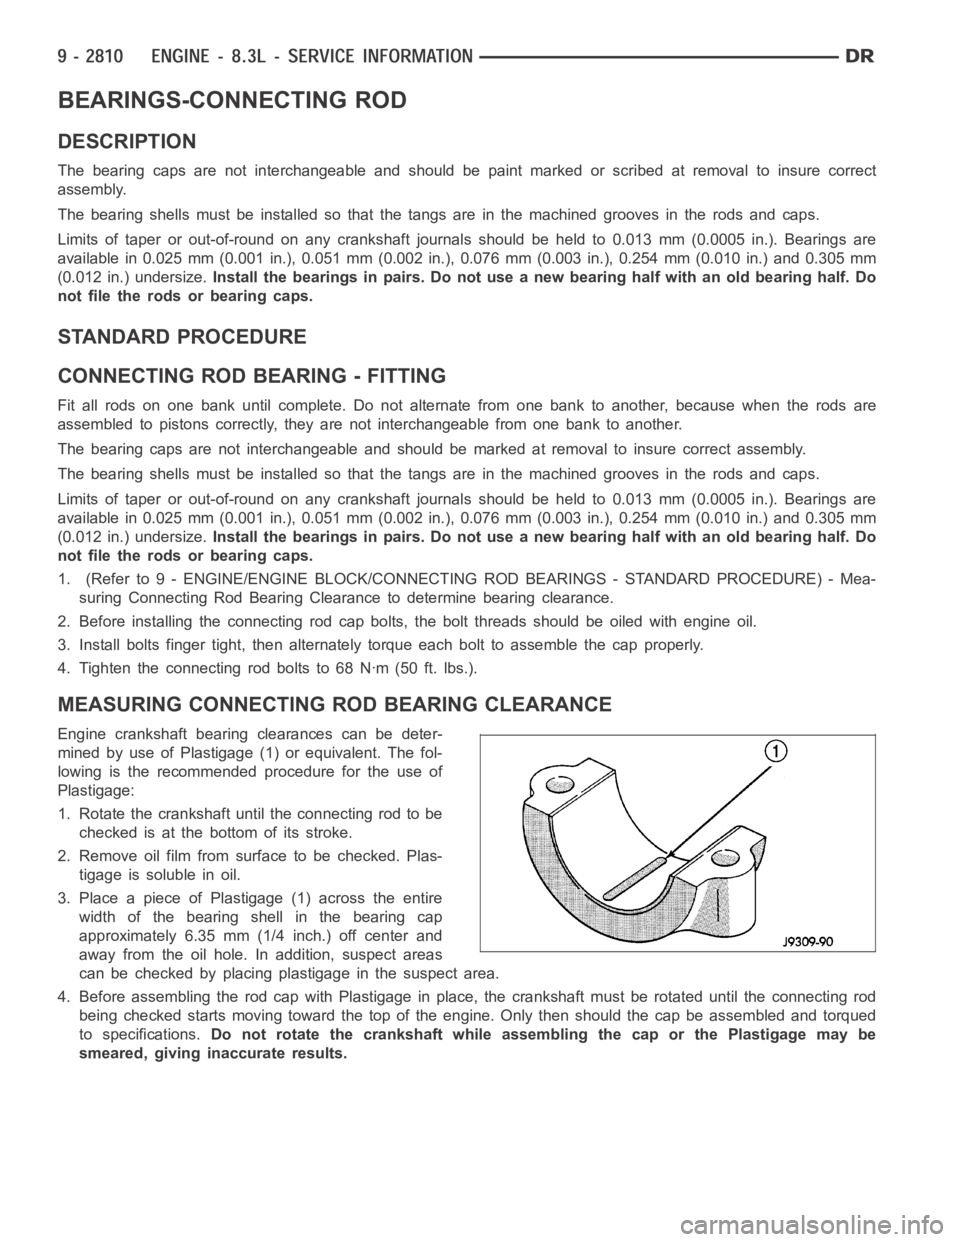
Engine crankshaft bearing clearances can be deter-
mined by use of Plastigage (1) or equivalent. The fol-
lowing is the recommended procedure for the use of
Plastigage:
1. Rotate the crankshaft until the connecting rod to be
checked is at the bottom of its stroke.
2. Remove oil film from surface to be checked. Plas-
tigage is soluble in oil.
3. Place a piece of Plastigage (1) across the entire
width of the bearing shell in the bearing cap
approximately 6.35 mm (1/4 inch.) off center and
away from the oil hole. In addition, suspect areas
can be checked by placing plastigage in the suspect area.
4. Before assembling the rod cap with Plastigage in place, the crankshaft must be rotated until the connecting rod
being checked starts moving toward the top of the engine. Only then should the cap be assembled and torqued
to specifications.Do not rotate the crankshaft while assembling the cap or the Plastigage maybe
smeared, giving inaccurate results.
Page 2123 of 5267
SEAL-CRANKSHAFT OIL- FRONT
REMOVAL
1. Disconnect the air inlet duct, IAT sensor, CCV hose
at the throttle body, and remove the air cleaner
housing cover.
2. Remove accessory drive belt (Refer to 7 - COOL-
ING/ACCESSORY DRIVE/DRIVE BELTS -
REMOVAL).
3. Remove crankshaft damper (Refer to 9 - ENGINE/
ENGINE BLOCK/CRANKSHAFT DAMPER -
REMOVAL).
4. Use Special Tool C-4679A (1) to remove crankshaft
oil seal. Be careful not to damage the crankshaft
seal surface of cover.
INSTALLATION
1. Install the new seal by using Special Tool MD
998306 (2).
2. Place seal into opening with seal spring towards
the inside of engine. Install seal until it bottoms out
in timing chain cover.
3. Install crankshaft damper (Refer to 9 - ENGINE/
ENGINE BLOCK/VIBRATION DAMPER - INSTAL-
LATION).
4. Install accessory drive belt (Refer to 7 - COOLING/
ACCESSORY DRIVE/DRIVE BELTS - INSTALLA-
TION).
5. Install air cleaner cover connecting the CVV hose,
IAT sensor, and air duct to the throttle body
housing.
Page 2124 of 5267
SEAL-OIL-REAR-CRANK AND RETAINER
REMOVAL
1. Remove transmission (Refer to 21 - TRANSMIS-
SION/TRANSAXLE/MANUAL - REMOVAL).
2. Remove clutch and flywheel (Refer to 6 - CLUTCH/
CLUTCH DISC - REMOVAL).
NOTE: The oil seal and retainer are serviced as an
assembly.
3. Remove the seal retainer bolts from cylinder block
and oil pan.
4. Remove the oil seal and retainer (1) assembly.
INSTALLATION
1. Clean the engine block and retainer. Make sure
surfaces are clean and free of oil.
2. Install Special Tool 9060 (1) (seal guide) onto end
of crankshaft. Align hole in tool with dowel pin on
crankshaft.
Page 2125 of 5267
3. Carefully position retainer/oil seal (1) to block.
Tighten the retainer bolts to 11 Nꞏm (95 in. lbs.).
4. Install flywheel and clutch (Refer to 6 - CLUTCH/
CLUTCH DISC - INSTALLATION).
5. Install transmission (Refer to 21 - TRANSMISSION/
TRANSAXLE/MANUAL - INSTALLATION).
Page 2129 of 5267
REMOVAL
1. Remove engine assembly from vehicle (Refer to 9
- ENGINE - REMOVAL).
2. Mount engine on a suitable repair stand.
3. Remove oil pan (Refer to 9 - ENGINE/LUBRICA-
TION/OIL PAN - REMOVAL).
4. Remove crankshaft rear oil seal retainer (Refer to 9
- ENGINE/ENGINE BLOCK/CRANKSHAFT REAR
OIL SEAL RETAINER - REMOVAL).
5. Remove crankshaft pulley and damper (Refer to 9 -
ENGINE/ENGINE BLOCK/VIBRATION DAMPER -
REMOVAL).
6. Remove timing chain cover (Refer to 9 - ENGINE/
VALVE TIMING/TIMING CHAIN COVER -
REMOVAL).
7. Remove timing chain and crankshaft sprocket.
(Refer to 9 - ENGINE/VALVE TIMING/TIMING
CHAIN AND SPROCKETS - REMOVAL).
8. Remove oil pump pick up tube (2).
9. Remove crankshaft oil scraper (2).
Page 2130 of 5267
CAUTION: DO NOT use a number stamp or a
punch to mark connecting rods. Damage to con-
necting rod could occur.
10. Inspect connecting rods and connecting rod caps
for cylinder identification(1). Identify them if nec-
essary using a permanent ink or paint marker.
CAUTION: Care must be taken not to damage the
fractured rod and cap joint surfaces, as engine
damage many occur.
NOTE: Do not reuse connecting rod bolts.
11. Remove connecting rod bolts (1) and caps.
12. Main bearing caps are not interchangeable and
should be marked before removal to ensure cor-
rect reassembly.
13. Remove the side main bearing cap bolts and
main bearing cap bolts.
14. Remove the main bearing caps.
15. When removing the crankshaft, it should be lifted
straight out of the engine block. This will prevent
any damage to the engine and crankshaft.