Page 976 of 1640
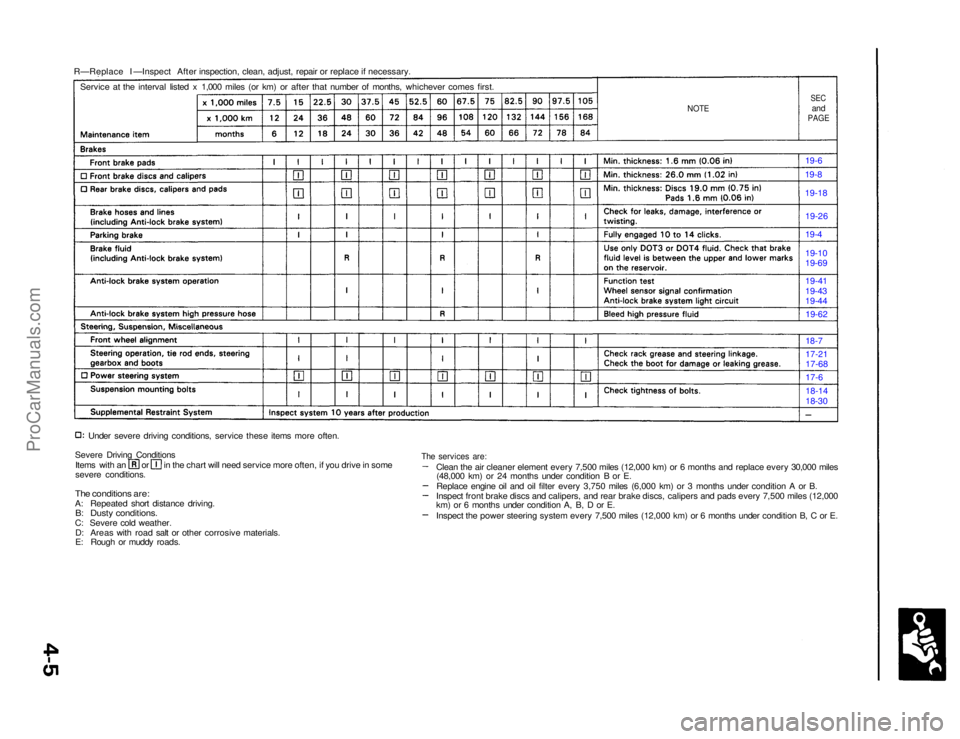
R—Replace I —Inspect After inspection, clean, adjust, repair or replace if necessary.
NOTE
SEC
and
PAGE
Service at the interval listed x 1,000 miles (or km) or after that number of months, whichever comes first.
19-6
19-8
19-18
Under severe driving conditions, service these items more often.
Severe Driving Conditions Items with an or in the chart will need service more often, if you drive in some
severe conditions.
The conditions are:
A: Repeated short distance driving.
B: Dusty conditions.
C: Severe cold weather. D: Areas with road salt or other corrosive materials.
E: Rough or muddy roads. 18-14
18-30
17-6
17-21
17-68
18-7
19-62
19-41
19-43
19-44 19-10
19-69 19-4
19-26
The services are:
Clean the air cleaner element every 7,500 miles (12,000 km) or 6 months and replace every 30,000 miles(48,000 km) or 24 months under condition B or E.
Replace engine oil and oil filter every 3,750 miles (6,000 km) or 3 months under condition A or B.
Inspect front brake discs and calipers, and rear brake discs, calipers and pads every 7,500 miles (12,000
km) or 6 months under condition A, B, D or E.
Inspect the power steering system every 7,500 miles (12,000 km) or 6 months under condition B, C or E.ProCarManuals.com
Page 1023 of 1640
Rocker Arms and Shafts
Clearance
Measure both the intake rocker shafts and exhaust rocker
shafts.
1. Measure diameter of shaft at first rocker location.
MICROMETER
Surface should be smooth.
2. Zero gauge to shaft diameter.
MICROMETER
CYLINDER BORE
GAUGE
Inspect rocker arm
face for wear.
Repeat for all rockers.
3. Measure inside diameter of rocker arm and check for
out-of-round condition.
Rocker Arm-to-Shaft Clearance (IN and EX):
Standard (New):
Primary and Secondary:
0.025-0.052 mm (0.0010-0.0020 in)
Mid:
0.024-0.053 mm (0.0009-0.0021 in)
Service Limit: 0.08 mm (0.003 in)
If over limit, replace rocker shaft and all over-
tolerance rocker arms.
NOTE: If any rocker arm needs replacement, replace
all three rocker arms in that set (primary, mid, and secondary).ProCarManuals.com
Page 1024 of 1640
Camshafts
Inspection
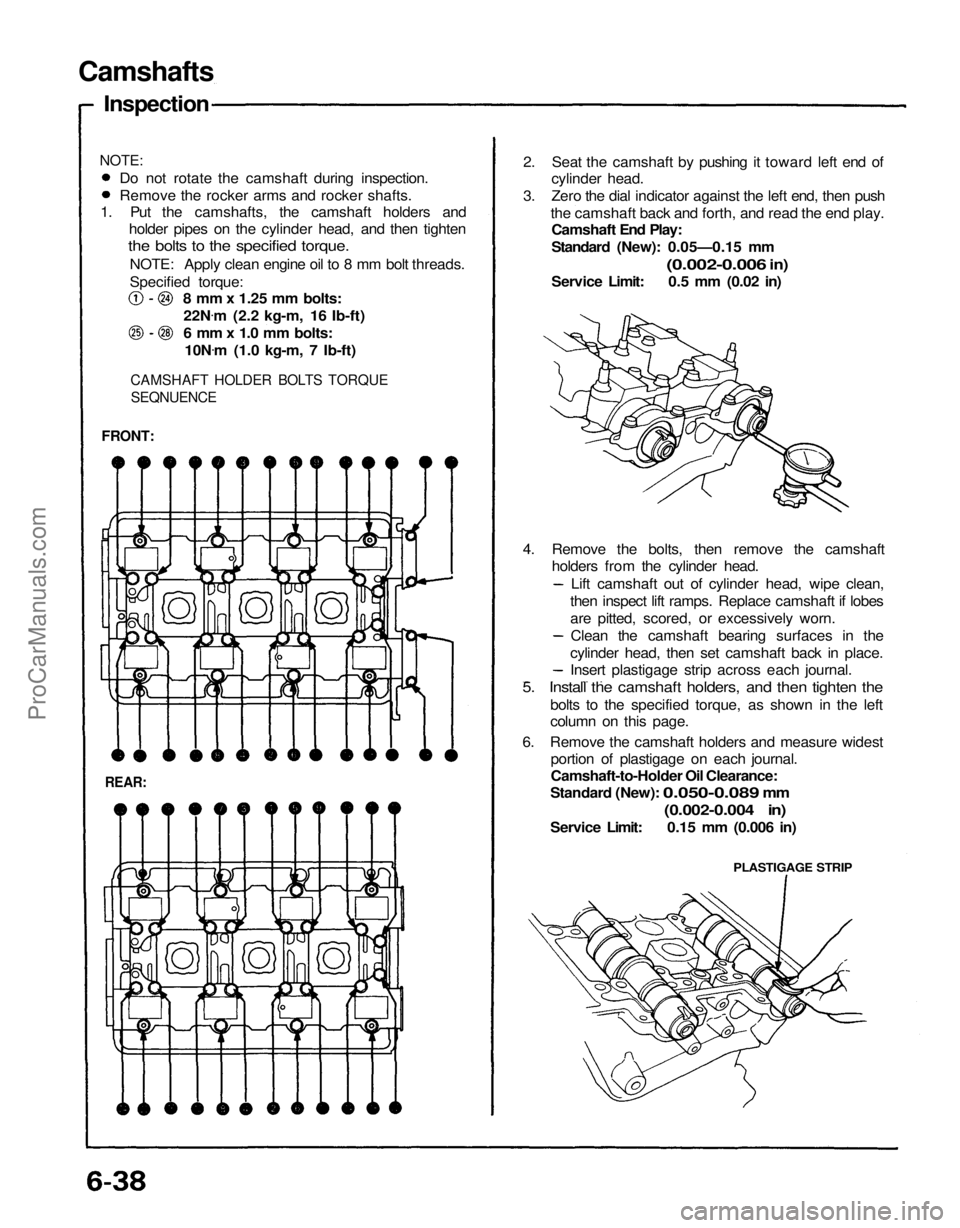
1. Put the camshafts, the camshaft holders and holder pipes on the cylinder head, and then tighten
the bolts to the specified torque.
NOTE: Apply clean engine oil to 8 mm bolt threads.
Specified torque: 8 mm x 1.25 mm bolts:
22N .
m (2.2 kg-m, 16 Ib-ft)
6 mm x 1.0 mm bolts: 10N .
m (1.0 kg-m, 7 Ib-ft)
CAMSHAFT HOLDER BOLTS TORQUE
SEQNUENCE
FRONT:
REAR:
PLASTIGAGE STRIP
2. Seat the camshaft by pushing it toward left end of
cylinder head.
3. Zero the dial indicator against the left end, then push the camshaft back and forth, and read the end play.Camshaft End Play:
Standard (New): 0.05—0.15 mm
(0.002-0.006
in)
Service Limit: 0.5 mm (0.02 in)
4. Remove the bolts, then remove the camshaft holders from the cylinder head.
Do not rotate the camshaft during inspection.
Remove the rocker arms and rocker shafts.
NOTE:
Lift camshaft out of cylinder head, wipe clean,
then inspect lift ramps. Replace camshaft if lobes
are pitted, scored, or excessively worn. Clean the camshaft bearing surfaces in the
cylinder head, then set camshaft back in place.
Insert plastigage strip across each journal.
5. Install the camshaft holders, and then tighten the
bolts to the specified torque, as shown in the left
column on this page.
6. Remove the camshaft holders and measure widest portion of plastigage on each journal.
Camshaft-to-Holder Oil Clearance:
Standard (New):
0.050-0.089
mm
(0.002-0.004 in)
Service Limit: 0.15 mm (0.006 in)ProCarManuals.com
Page 1025 of 1640
7. If camshaft-to-holder oil clearance is out of
tolerance:
Rotate camshaft
while measuring
8. Check cam lobe height wear.
Cam Lobe Height Standard (New):
M/T
A/T
EXHAUST
INTAKE
CYLINDER
NUMBER
REAR BANK
INTAKE
FRONT BANK
CYLINDER
NUMBER
EXHAUST
Check this area for wear.
Cam position
P: Primary M: Mid S: Secondary
And camshaft has already been replaced, you
must replace the cylinder head.
If camshaft has not been replaced, first check to-
tal runout with the camshaft supported on V-
blocks.
Camshaft Total Runout:
Standard (New): 0.03 mm (0.0012 in)
Service Limit: 0.06 mm (0.0024 in)
If tne total runout of the camshaft is within toler-
ance, replace the cylinder head.
If the total runout is out of tolerance, replace the
camshaft and recheck. If the bearing clearance
is still out of tolerance, replace the cylinder head.ProCarManuals.com
Page 1027 of 1640

Intake Valve Dimensions
A Standard (New): 34.9 — 35.1 mm
(1.374-1.382 in)
B
Standard (New):
111.05-111.40
mm
(4.372-4.386 in)
C Standard (New): 5.475—5.485 mm
(0.2156-0.2159 in)
C Service Limit: 5.445 mm (0.2144 in)
D Standard (New): 1.05—1.35 mm
(0.041-0.053 in)
D Service Limit: 0.85 mm (0.033 in)
Exhaust Valve Dimensions
A Standard (New): 29.9—30.1 mm
(1.177-1.185 in)
B Standard (New): 109.60-109.90 mm
(4.315-4.327 in)
C Standard (New): 5.45-5.46 mm
(0.2146-0.2150 in)
C Service Limit: 5.42 mm (0.2134 in)
D Standard (New): 1.65—1.95 mm
(0.065-0.077 in)
D Service Limit: 1.45 mm (0.057 in)
Cylinder Head Height;
Standard (New): 150.95-151.05
(5.943-5.947 in)
Service Limit: 150.8 mm (5.937 in) Measure along edges, and 3 ways across center.
NOTE: If camshaft-to-holder oil clearances (page 6-38)
are not within specification, the head cannot be
resurfaced.
If camshaft-to-holder oil clearances are within
specifications, check the head for warpage.
Cylinder Heads
Warpage
If warpage is less than 0.05 mm (0.002 in) cylinder
head resurfacing is not required.If warpage is between 0.05 mm (0.002 in) and 0.2
mm (0.008 in), resurface cylinder head.
Maximum resurface limit is 0.2 mm (0.008 in) based
on a height of 151 mm (5.945 in).
PRECISION STRAIGHT EDGEProCarManuals.com
Page 1028 of 1640
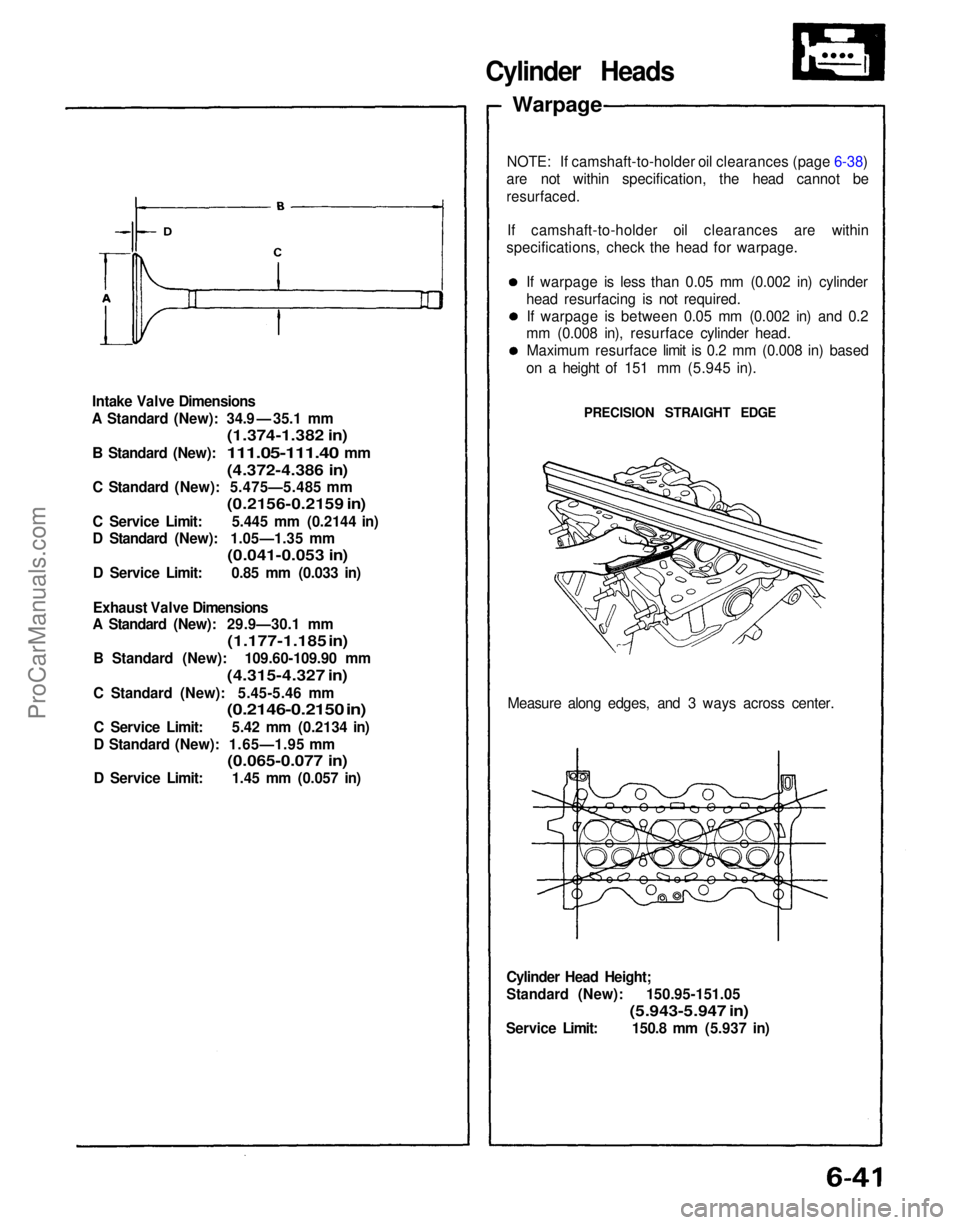
Intake Valve Dimensions
A Standard (New): 34.9 — 35.1 mm
(1.374-1.382 in)
B
Standard (New):
111.05-111.40
mm
(4.372-4.386 in)
C Standard (New): 5.475—5.485 mm
(0.2156-0.2159 in)
C Service Limit: 5.445 mm (0.2144 in)
D Standard (New): 1.05—1.35 mm
(0.041-0.053 in)
D Service Limit: 0.85 mm (0.033 in)
Exhaust Valve Dimensions
A Standard (New): 29.9—30.1 mm
(1.177-1.185 in)
B Standard (New): 109.60-109.90 mm
(4.315-4.327 in)
C Standard (New): 5.45-5.46 mm
(0.2146-0.2150 in)
C Service Limit: 5.42 mm (0.2134 in)
D Standard (New): 1.65—1.95 mm
(0.065-0.077 in)
D Service Limit: 1.45 mm (0.057 in)
Cylinder Head Height;
Standard (New): 150.95-151.05
(5.943-5.947 in)
Service Limit: 150.8 mm (5.937 in) Measure along edges, and 3 ways across center.
NOTE: If camshaft-to-holder oil clearances (page 6-38)
are not within specification, the head cannot be
resurfaced.
If camshaft-to-holder oil clearances are within
specifications, check the head for warpage.
Cylinder Heads
Warpage
If warpage is less than 0.05 mm (0.002 in) cylinder
head resurfacing is not required.If warpage is between 0.05 mm (0.002 in) and 0.2
mm (0.008 in), resurface cylinder head.
Maximum resurface limit is 0.2 mm (0.008 in) based
on a height of 151 mm (5.945 in).
PRECISION STRAIGHT EDGEProCarManuals.com
Page 1029 of 1640
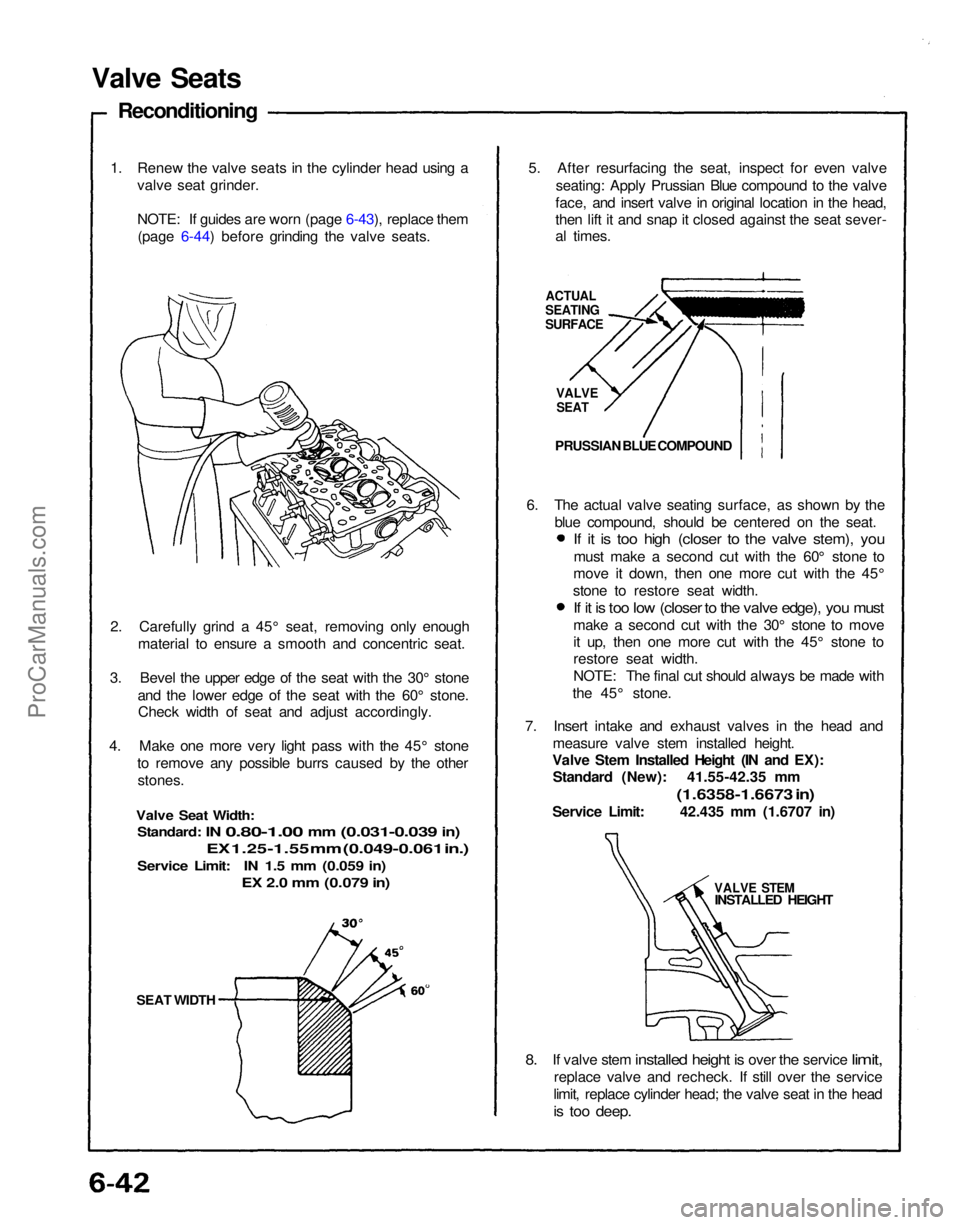
SEAT WIDTH
2. Carefully grind a 45° seat, removing only enough
material to ensure a smooth and concentric seat.
3. Bevel the upper edge of the seat with the 30° stone and the lower edge of the seat with the 60° stone.Check width of seat and adjust accordingly.
4. Make one more very light pass with the 45° stone to remove any possible burrs caused by the otherstones.
Valve Seat Width:
Standard:
IN
0.80-1.00
mm
(0.031-0.039
in)
EX 1.25-1.55 mm (0.049-0.061 in.)
Service Limit: IN 1.5 mm (0.059 in)
EX 2.0 mm (0.079 in)
1. Renew the valve seats in the cylinder head using a
valve seat grinder.
NOTE: If guides are worn (page 6-43), replace them(page 6-44) before grinding the valve seats.
Valve Seats
Reconditioning
5. After resurfacing the seat, inspect for even valveseating: Apply Prussian Blue compound to the valve
face, and insert valve in original location in the head,
then lift it and snap it closed against the seat sever-
al times.
ACTUAL
SEATING
SURFACE
VALVE
SEAT
PRUSSIAN BLUE COMPOUND
7. Insert intake and exhaust valves in the head and measure valve stem installed height.
Valve Stem Installed Height (IN and EX): Standard (New): 41.55-42.35 mm
(1.6358-1.6673 in)
Service Limit: 42.435 mm (1.6707 in)
VALVE STEM
INSTALLED HEIGHT
8. If
valve stem
installed
height
is
over
the
service
limit,
replace valve and recheck. If still over the service
limit, replace cylinder head; the valve seat in the head
is too deep.
6. The actual valve seating surface, as shown by the
blue compound, should be centered on the seat.
If it is too high (closer to the valve stem), you
must make a second cut with the 60° stone to
move it down, then one more cut with the 45°
stone to restore seat width.
If it is too low (closer to the valve edge), you must
make a second cut with the 30° stone to move
it up, then one more cut with the 45° stone to
restore seat width.
NOTE: The final cut should always be made with
the 45° stone.ProCarManuals.com
Page 1030 of 1640
Valve Guides
Valve Movement
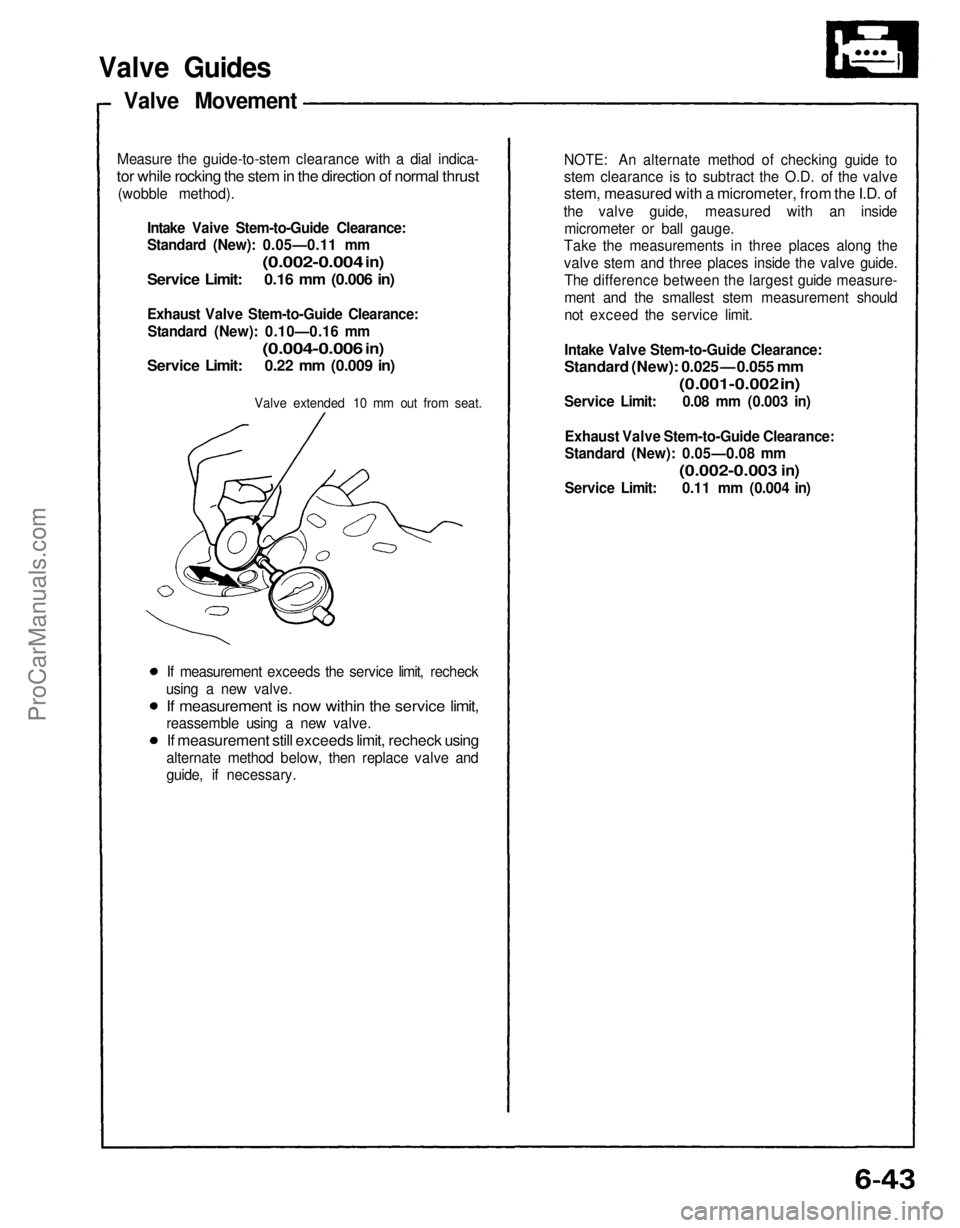
Measure the guide-to-stem clearance with a dial indica-
tor while rocking the stem in the direction of normal thrust
(wobble method).
Intake Vaive Stem-to-Guide Clearance:
Standard (New): 0.05—0.11 mm
(0.002-0.004
in)
Service Limit: 0.16 mm (0.006 in)
Exhaust Valve Stem-to-Guide Clearance:
Standard (New): 0.10—0.16 mm
(0.004-0.006
in)
Service Limit: 0.22 mm (0.009 in)
Valve extended 10 mm out from seat.
If measurement exceeds the service limit, recheck
using a new valve.
If measurement is now within the service limit,
reassemble using a new valve.
If measurement still exceeds limit, recheck using
alternate method below, then replace valve and
guide, if necessary.
NOTE: An alternate method of checking guide to
stem clearance is to subtract the O.D. of the valve
stem, measured with a micrometer, from the I.D. of
the valve guide, measured with an inside
micrometer or ball gauge.
Take the measurements in three places along the
valve stem and three places inside the valve guide.
The difference between the largest guide measure-
ment and the smallest stem measurement should
not exceed the service limit.
Intake Valve Stem-to-Guide Clearance:
Standard (New): 0.025 — 0.055 mm
(0.001-0.002 in)
Service Limit: 0.08 mm (0.003 in)
Exhaust Valve Stem-to-Guide Clearance:
Standard (New): 0.05—0.08 mm
(0.002-0.003
in)
Service Limit: 0.11 mm (0.004 in)ProCarManuals.com