Page 80 of 1640

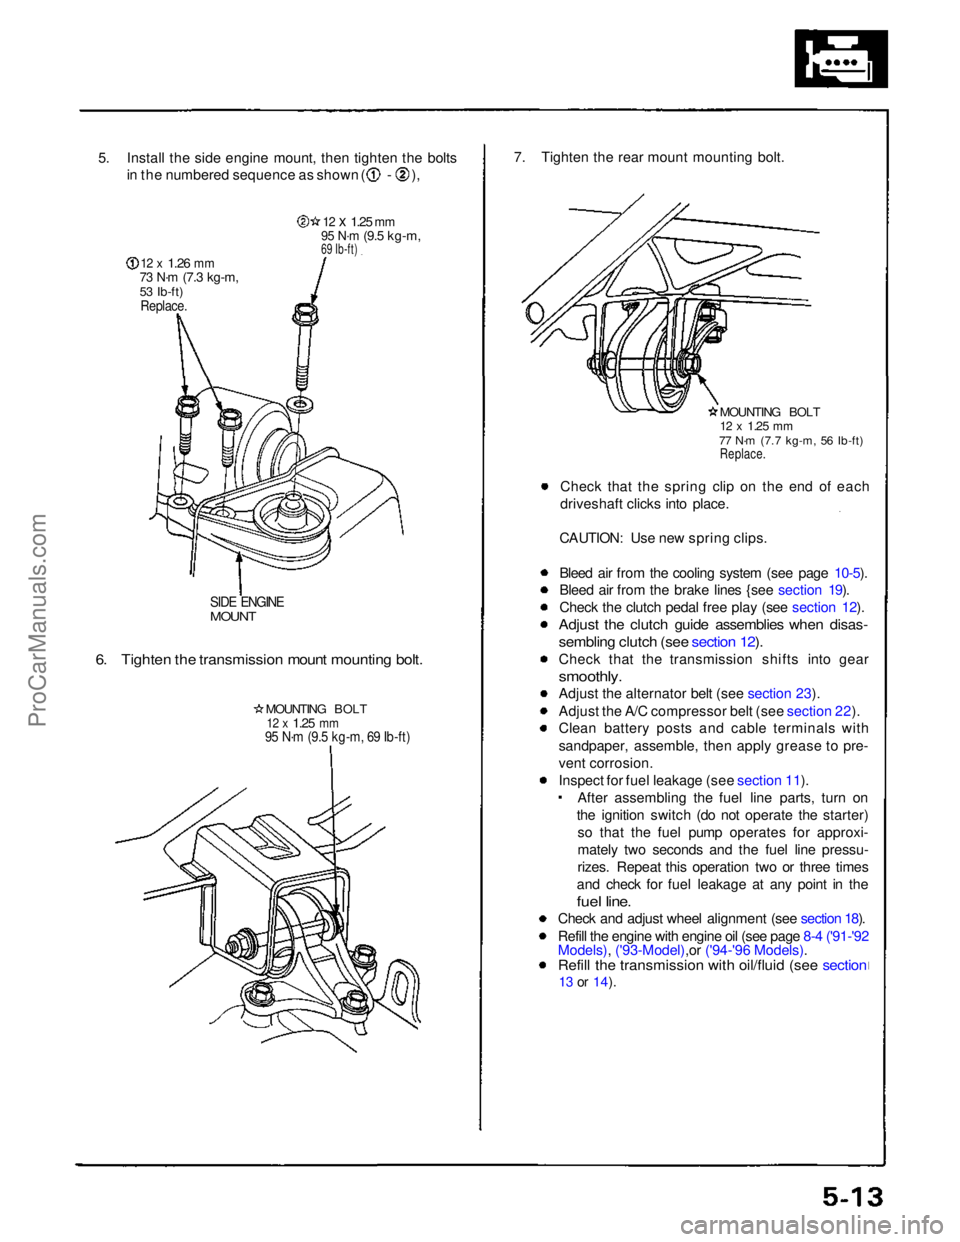
5. Install the side engine mount, then tighten the bolts
in the numbered sequence as shown ( - ),
12 x
1.26
mm
73 N·m
(7.3 kg-m,
53 Ib-ft)
Replace.
12 x
1.25
mm
95 N·m
(9.5 kg-m,
69 Ib-ft)
SIDE ENGINE
MOUNT
6. Tighten the transmission mount mounting bolt.
MOUNTING BOLT
12 x
1.25
mm
95 N·m (9.5 kg-m, 69 Ib-ft)
7. Tighten the rear mount mounting bolt.
MOUNTING BOLT
12 x
1.25
mm
77 N·m (7.7 kg-m, 56 Ib-ft)
Replace.
Check that the spring clip on the end of each
driveshaft clicks into place.
CAUTION: Use new spring clips.
Bleed air from the cooling system (see page 10-5).
Bleed air from the brake lines {see section 19).
Check the clutch pedal free play (see section 12).
Adjust the clutch guide assemblies when disas-
sembling clutch (see section 12).
Check that the transmission shifts into gear
smoothly.
Adjust the alternator belt (see section 23).
Adjust the A/C compressor belt (see section 22).
Clean battery posts and cable terminals with
sandpaper, assemble, then apply grease to pre-
vent corrosion.
Inspect for fuel leakage (see section 11). After assembling the fuel line parts, turn on
the ignition switch (do not operate the starter) so that the fuel pump operates for approxi-
mately two seconds and the fuel line pressu-
rizes. Repeat this operation two or three times
and check for fuel leakage at any point in the
fuel line.
Check and adjust wheel alignment (see section 18).
Refill the engine with engine oil (see page 8-4 ('91-'92
Models), ('93-Model),or ('94-'96 Models).
Refill the transmission with oil/fluid (see section
13 or
14).ProCarManuals.com
Page 83 of 1640

Rocker Arms
Manual Inspection
1. Remove the ignition coil covers (see page 6-15 ('91-'93) or ('94-'96)
2. Remove the ignition coils (see page 6-15 ('91-'93)or ('94-'96).
3. Remove the cylinder head covers.
NOTE: Refer to pages 6-47 ('91-'93)
or ('94-'96) ,48 ('91-'93)
or ('94-'96) when installing the cylinder head cover.
4. Set the No. 1 piston at top dead center (TDC) (see
page 6-19 ('91-'93)
or ('94-'96).
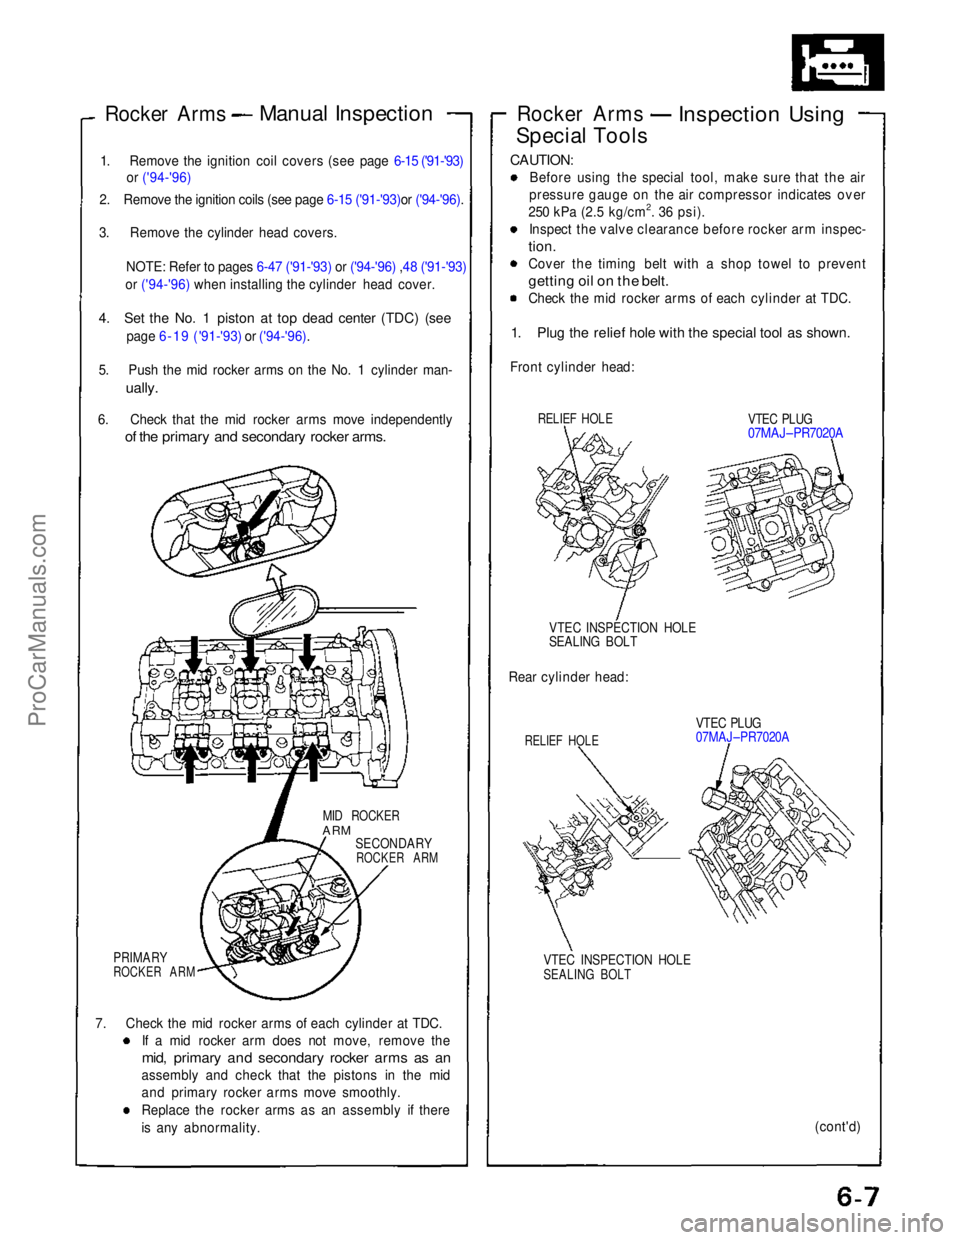
5. Push the mid rocker arms on the No. 1 cylinder man-
ually.
6. Check that the mid rocker arms move independently
of the primary and secondary rocker arms.
MID ROCKER
ARM
SECONDARY
ROCKER ARM
PRIMARY
ROCKER ARM
7. Check the mid rocker arms of each cylinder at TDC. If a mid rocker arm does not move, remove the
mid, primary and secondary rocker arms as an
assembly and check that the pistons in the mid
and primary rocker arms move smoothly.
Replace the rocker arms as an assembly if there
is any abnormality. Rocker Arms
Inspection Using
Special Tools
CAUTION:
Before using the special tool, make sure that the air
pressure gauge on the air compressor indicates over
250 kPa (2.5 kg/cm2. 36 psi). Inspect the valve clearance before rocker arm inspec-
tion.
Cover the timing belt with a shop towel to prevent
getting oil on the belt.
Check the mid rocker arms of each cylinder at TDC.
1. Plug the relief hole with the special tool as shown.
Front cylinder head:
RELIEF HOLE
VTEC PLUG
07MAJ–PR7020A
VTEC INSPECTION HOLE
SEALING BOLT
Rear cylinder head:
RELIEF HOLE
VTEC PLUG
07MAJ–PR7020A
VTEC INSPECTION HOLE
SEALING BOLT
(cont'd)ProCarManuals.com
Page 110 of 1640
7. If camshaft-to-holder oil clearance is out of
tolerance:
— And camshaft has already been replaced, you
must replace the cylinder head.
— If camshaft has not been replaced, first check to-
tal runout with the camshaft supported on V-
blocks.
Camshaft Total Runout:
Standard (New): 0.03 mm (0.0012 in) max.
Service Limit: 0.04 mm (0.0016 in)
Rotate camshaft
while measuring
— If the total runout of the camshaft is within toler-
ance, replace the cylinder head.
— If the total runout is out of tolerance, replace the
camshaft and recheck. If the oil clearance is still
out of tolerance, replace the cylinder head.
8. Check cam lobe height wear.
Cam Lobe Height Standard (New):
M/T
A/T
Check this area for wear.
Cam position
P: Primary M: Mid S: Secondary
FRONT BANK
REAR BANK
CYLINDER
NUMBER
EXHAUST
INTAKE
CYLINDER
NUMBER
INTAKE
EXHAUSTProCarManuals.com
Page 149 of 1640
Engine Oil
Inspection
1. Check engine oil with the engine off and the car
parked on level ground.
2. Make certain that the oil level indicated on the
dipstick is between the upper and lower marks.
3. If the level has dropped close to the lower mark,
add oil until it reaches the upper mark.
CAUTION: Insert the dipstick carefully to avoid
bending it.ProCarManuals.com
Page 151 of 1640
Oil Pressur e
Testing
If th e oi l pressur e warnin g ligh t stay s o n wit h th e engin e
running , chec k th e engin e oi l level . I f th e oi l leve l i s
correct :
1 . Remov e th e engin e oi l pressur e switch , an d instal l
a n oi l pressur e gauge .
2. Star t th e engine . Shu t i t of f immediatel y i f th e
gaug e register s n o oi l pressure . Repai r th e proble m
befor e continuing .
3 . Allo w th e engin e t o reac h operatin g temperatur e
(fa n come s o n a t leas t twice) . Th e pressur e shoul d
be:
Engin e Oi l Pressure :
A t Idle : 7 0 kP a (0. 7 kg/cm2, 1 0 psi )
minimu m
At 3,00 0 rpm : 35 0 kP a (3. 5 kg/cm2, 5 0 psi )
minimu m
• I f oi l pressur e i s
within specifications , replac e th e
oi l pressur e sende r an d recheck .
• I f oi l pressur e i s NO T withi n specifications , inspec t
th e oi l pum p (se e pag e 8-8) .
ENGIN E OI L PRESSUR ESWITCHMOUNTIN G HOL E
OIL PRESSUR E GAUG E ADAPTO R
(1/8 " - 28 , BSPT )
ProCarManuals.com
Page 153 of 1640
Oil Pump
Removal/lnspection/lnstallation
1. Drain the engine oil. 2. Remove the timing belt (see page 6-15('91-'93)or('94-'96)).
3. Remove the dipstick and the pipe.
4. Remove the oil filter assembly.
5. Remove the oil pan.
6. Remove the oil screen.
7. Remove the baffle plate,
8. Remove the oil pass
pipe and the joint.
9. Remove the mounting bolts and the oil pump
assembly.
Replace.
O-RINGS
Replace.
OIL SCREEN OIL PASS PIPE
AND JOINT
BAFFLE PLATE
OIL PUMP
10. Remove the nine screws from the pump housing,
then separate the housing and cover.
11. Check the inner-to-outer rotor radial clearance.
Inner-to-Outer Rotor Radial Clearance
Standard (New): 0.05 – 0.21 mm (0.002 – 0.008 in)
Service Limit: 0.23 mm (0.009 in)
OUTER ROTOR
INNER ROTOR
12. Check the housing-to-rotor axial clearance. Housing-to-Rotor Axial Clearance
Standard (New): 0.02 – 0.07 mm
(0.001 – 0.003 in)
Service Limit: 0.12 mm (0.005 in)
PUMP HOUSING
OUTER ROTORProCarManuals.com
Page 230 of 1640

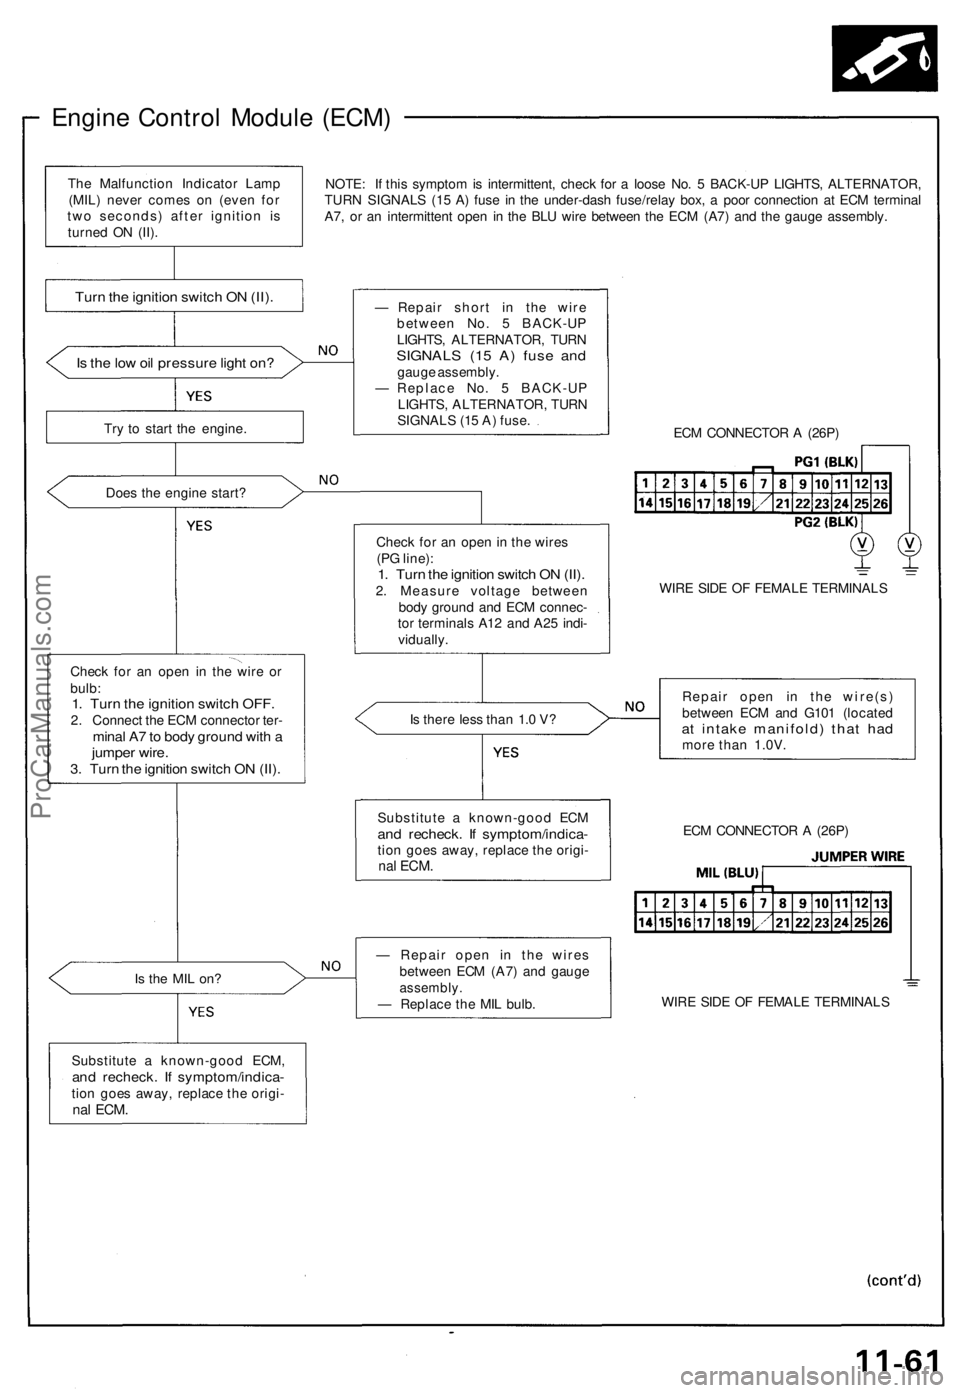
Engine Control Module (ECM)
NOTE: If this symptom is intermittent, check for a loose No. 5 BACK-UP LIGHTS, ALTERNATOR,
TURN SIGNALS (15 A) fuse in the under-dash fuse/relay box, a poor connection at ECM terminal
A7, or an intermittent open in the BLU wire between the ECM (A7) and the gauge assembly.
Is the low oil pressure light on?
Try to start the engine.
Does the engine start?
Check for an open in the wire or
bulb:
1. Turn the ignition switch OFF.
2. Connect the ECM connector ter-
minal A7 to body ground with a
jumper wire.
3. Turn the ignition switch ON (II).
Is the MIL on?
Substitute a known-good ECM,
and recheck. If symptom/indica-
tion goes away, replace the origi-
nal
ECM.
— Repair short in the wire
between No. 5 BACK-UP
LIGHTS, ALTERNATOR, TURN
SIGNALS (15 A) fuse and
gauge assembly.
— Replace No. 5 BACK-UP
LIGHTS, ALTERNATOR, TURN
SIGNALS (15 A) fuse.
ECM CONNECTOR A (26P)
Check for an open in the wires
(PG line):
1. Turn the ignition switch ON (II).
2. Measure voltage between
body ground and ECM connec-
tor terminals A12 and A25 indi-
vidually.
WIRE SIDE OF FEMALE TERMINALS
Is there less than 1.0 V?
Repair open in the wire(s)
between ECM and G101 (located
at intake manifold) that had
more than 1.0V.
— Repair open in the wires
between ECM (A7) and gauge
assembly.
— Replace the MIL bulb.
WIRE SIDE OF FEMALE TERMINALS
ECM CONNECTOR A (26P)
Substitute a known-good ECM
and recheck. If symptom/indica-
tion goes away, replace the origi-
nal
ECM.
Turn the ignition switch ON (II).
The Malfunction Indicator Lamp
(MIL) never comes on (even for
two seconds) after ignition is
turned ON (II).ProCarManuals.com
Page 255 of 1640
Fuel Supply System
Fuel Injector Resistor
Description
The fuel injector resistor lowers the current supplied to
the fuel injectors to prevent damage to the fuel injector
coils. This allows a faster response time of the fuel injec-
tors.
Testing
1. Disconnect the fuel injector resistor connector.
2. Check for resistance between each of the fuel injec-
tor resistor terminals (2, 3, 4, 6, 7 and 8) and the
power terminal (5).
Resistance should be: 5 - 7
TERMINAL SIDE OF MALE TERMINALS
Replace the fuel injector resistor with a new one
if any of the resistances are outside of the speci-
fication.ProCarManuals.com