Page 855 of 1640

Ceiling/Courtesy/Trunk Light s
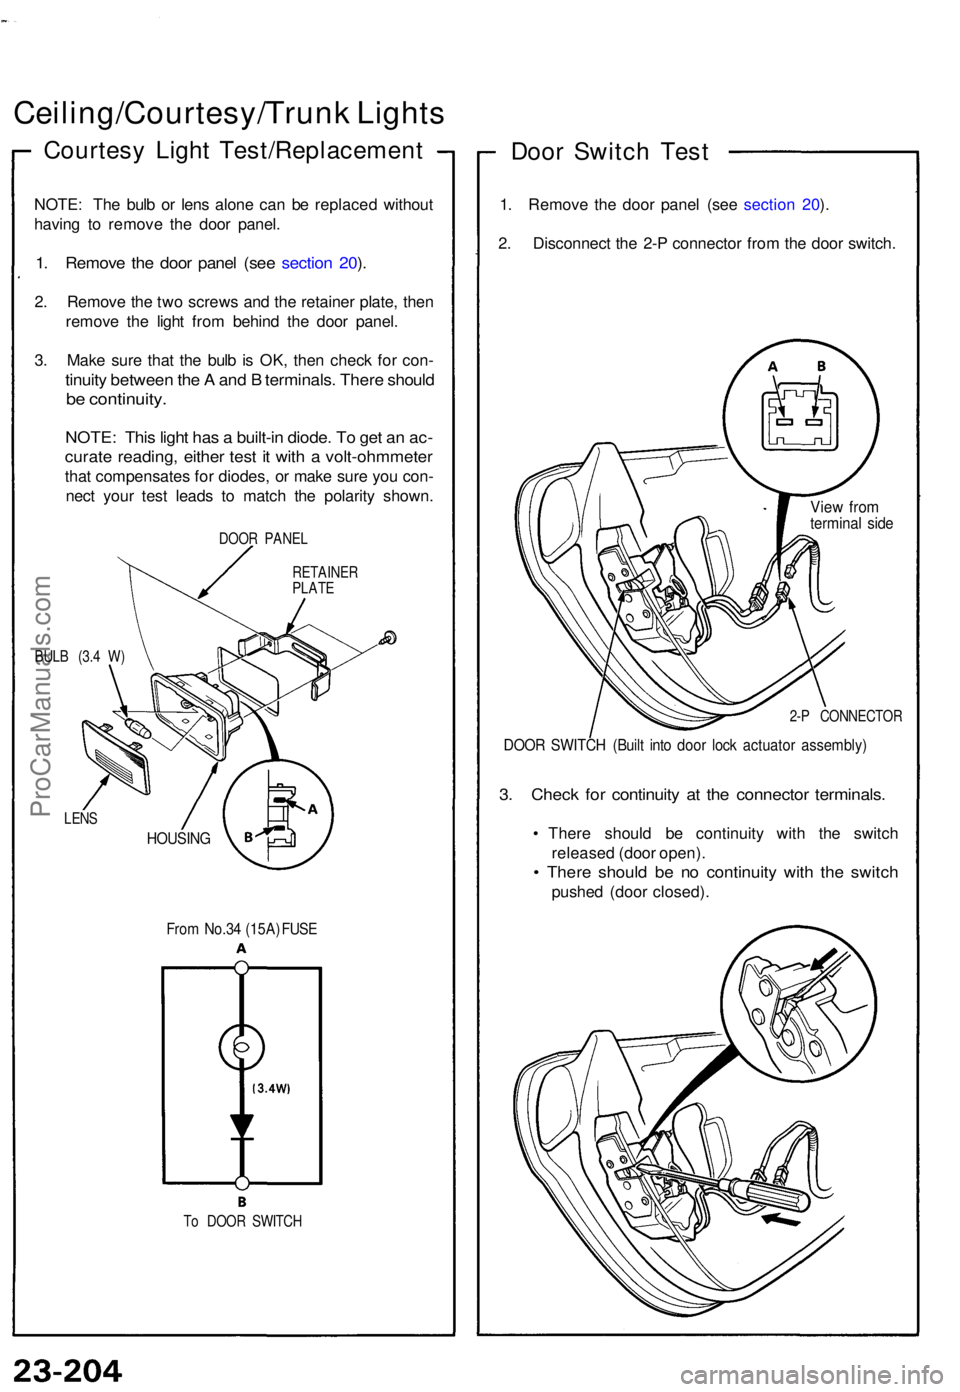
Courtes y Ligh t Test/Replacemen t
NOTE: Th e bul b o r len s alon e ca n b e replace d withou t
havin g t o remov e th e doo r panel .
1. Remov e th e doo r pane l (se e sectio n 20 ).
2 . Remov e th e tw o screw s an d th e retaine r plate , the n
remov e th e ligh t fro m behin d th e doo r panel .
3 . Mak e sur e tha t th e bul b i s OK , the n chec k fo r con -
tinuity betwee n th e A an d B terminals . Ther e shoul d
be continuity .
NOTE: Thi s ligh t ha s a built-i n diode . T o ge t a n ac -
curat e reading , eithe r tes t i t wit h a volt-ohmmete r
that compensate s fo r diodes , o r mak e sur e yo u con -
nec t you r tes t lead s t o matc h th e polarit y shown .
DOOR PANE L
RETAINE R
PLAT E
BUL B (3. 4 W )
LEN S
From No.3 4 (15A ) FUS E
To DOO R SWITC H
Door Switc h Tes t
1. Remov e th e doo r pane l (se e sectio n 20 ).
2 . Disconnec t th e 2- P connecto r fro m th e doo r switch .
View fro mtermina l sid e
2-P CONNECTO R
DOOR SWITC H (Buil t int o doo r loc k actuato r assembly )
3. Chec k fo r continuit y a t th e connecto r terminals .
• Ther e shoul d b e continuit y wit h th e switc h
release d (doo r open) .
• Ther e shoul d b e n o continuit y wit h th e switc h
pushe d (doo r closed) .
HOUSIN G
ProCarManuals.com
Page 895 of 1640
Trunk Opener
Opener Switch Test
1. Remove the driver's door panel, then push the switch
out of the door panel as shown.
2. Check for continuity between the terminals.
• There should be continuity between the A and B
terminals when the switch is pushed.
• There should be no continuity when the switch
is released.
Solenoid Test/Replacement
1. Open the trunk lid, and remove the trunk side trim
panel.
2. Disconnect the 2-P connector from the solenoid
assembly, and test solenoid operation by connec-
ting battery power and ground to the A and B ter-
minals momentarily.
SOLENOID
ASSEMBLY
TRUNK LATCH
TRUNK OPENER
CABLE
BRACKET
BOLT
3. To remove the solenoid, remove the two bolts, then
disconnect the trunk opener cable from the
solenoid assembly.
OPENER CABLE
SOLENOID
ASSEMBLY
4. Install in the reverse order of removal.
BRACKET
View from
terminal side
DOOR
PANELProCarManuals.com
Page 955 of 1640
Security Alar m Syste m
Indicato r Replacemen t
1. Remov e th e doo r pane l (se e sectio n 20 ).
2 . Remov e th e tw o screw s fro m th e indicator .
3 . Remov e th e indicato r fro m th e doo r panel .
5-P CONNECTO RINDICATO
R
DOOR PANE L
Trunk Ke y Cylinde r Switc h Tes t
1. Ope n th e trun k li d an d remov e th e trun k rea r panel .
2 . Disconnec t th e 2- P connecto r fro m th e trun k ke y
cylinde r switch .
3 . Chec k continuit y a t th e switc h connecto r terminals .
• Ther e shoul d b e continuit y betwee n th e terminal s
whe n th e trun k loc k i s turne d t o UNLOC K wit h
the key .
• Ther e shoul d b e n o continuit y whe n th e loc k i s
released .
TRUNK KE Y
CYLINDE R SWITC H
2-PCONNECTO RTRUN
K KE Y
CYLINDE R
ProCarManuals.com
Page 973 of 1640

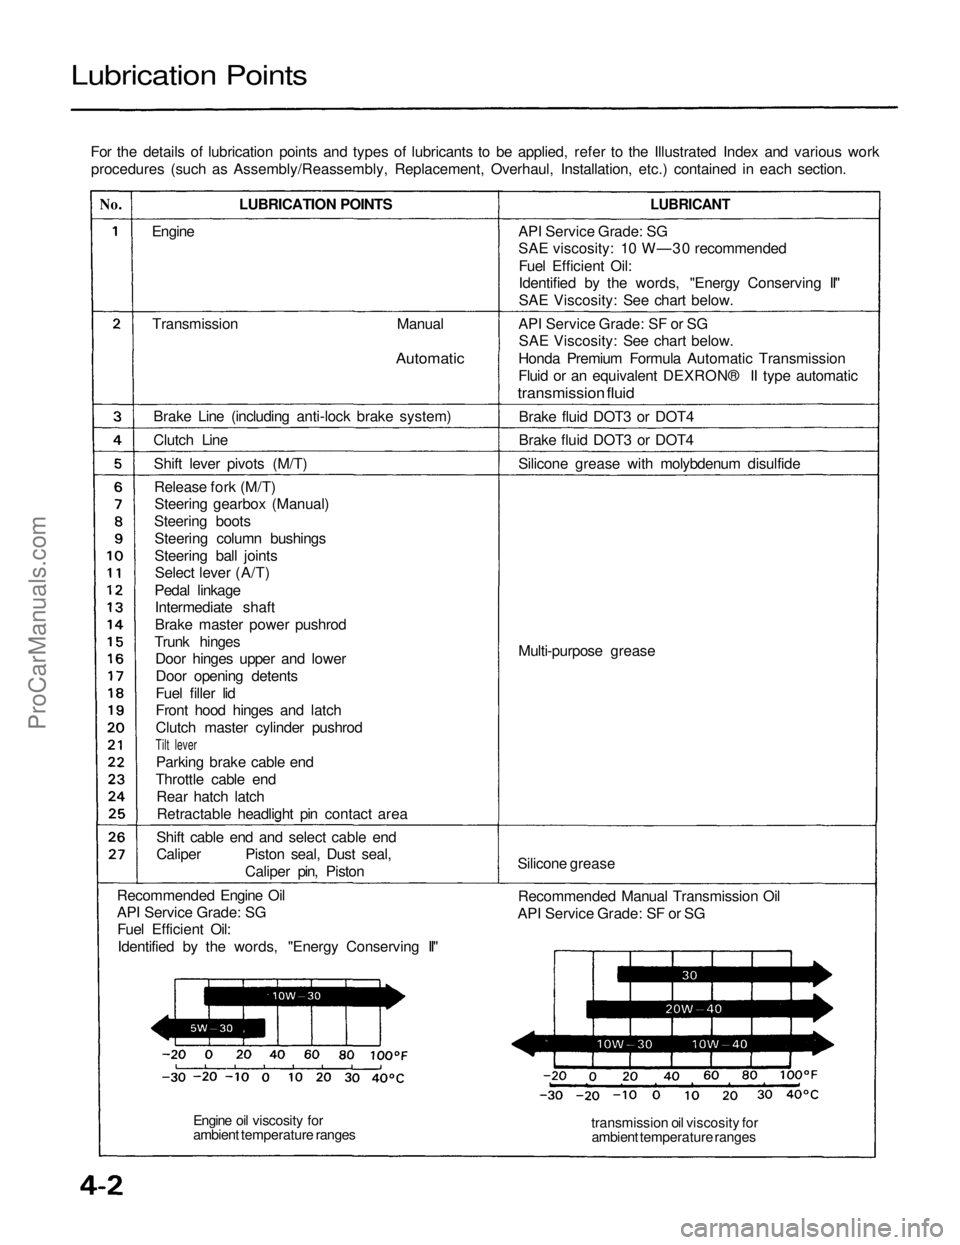
Lubrication Points
For the details of lubrication points and types of lubricants to be applied, refer to the Illustrated Index and various workprocedures (such as Assembly/Reassembly, Replacement, Overhaul, Installation, etc.) contained in each section.
No.
LUBRICATION POINTS
LUBRICANT
Engine
Transmission
Manual
Automatic
Brake Line (including anti-lock brake system)
Clutch Line Shift lever pivots (M/T)Release fork (M/T)Steering gearbox (Manual)
Steering boots Steering column bushings
Steering ball jointsSelect lever (A/T)
Pedal linkage Intermediate shaft
Brake master power pushrod
Trunk hinges Door hinges upper and lower
Door opening detents
Fuel filler lid
Front hood hinges and latch
Clutch master cylinder pushrod
Tilt lever
Parking brake cable end
Throttle cable end Rear hatch latchRetractable headlight pin contact area
Shift cable end and select cable end
Caliper Piston seal, Dust seal, Caliper pin, Piston
Recommended Engine Oil
API Service Grade: SG Fuel Efficient Oil:
Identified by the words, "Energy Conserving II" API Service Grade: SG
SAE viscosity: 10 W—30 recommended
Fuel Efficient Oil:
Identified by the words, "Energy Conserving II"
SAE Viscosity: See chart below.
API Service Grade: SF or SG SAE Viscosity: See chart below.
Honda Premium Formula Automatic Transmission
Fluid or an equivalent DEXRON® II type automatic
transmission fluid
Brake fluid DOT3 or DOT4
Brake fluid DOT3 or DOT4
Silicone grease with molybdenum disulfide
Multi-purpose grease
Silicone grease Recommended Manual Transmission Oil
API Service Grade: SF or SG
transmission oil viscosity forambient temperature ranges
Engine oil viscosity for
ambient temperature rangesProCarManuals.com