1991 ACURA NSX charging
[x] Cancel search: chargingPage 238 of 1640
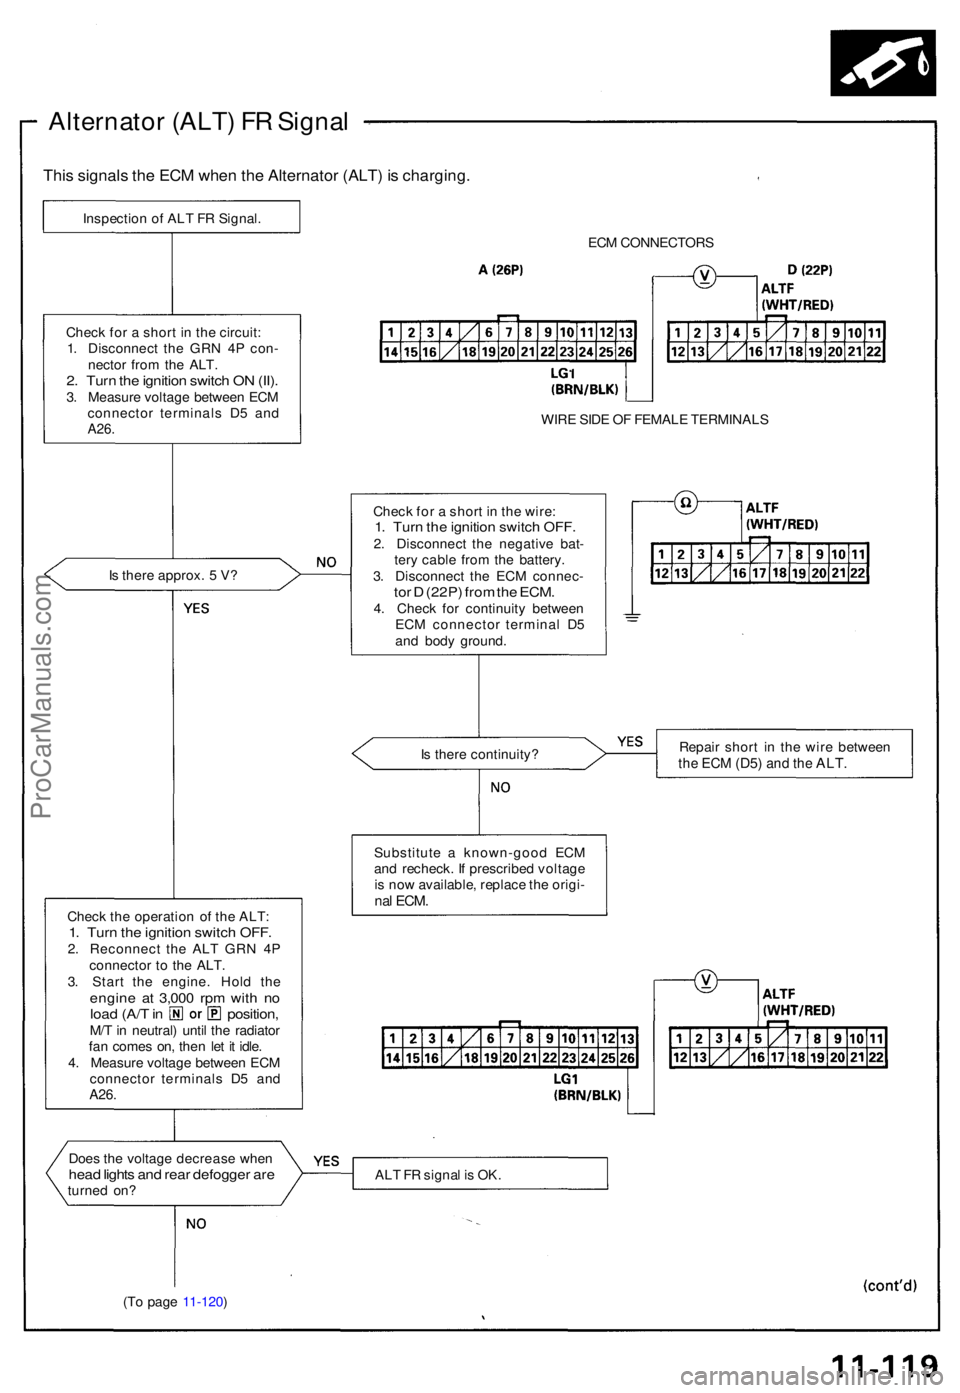
Alternator (ALT ) F R Signa l
This signal s th e EC M whe n th e Alternato r (ALT ) i s charging .
Inspection o f AL T F R Signal .
ECM CONNECTOR S
WIR E SID E O F FEMAL E TERMINAL S
Chec k fo r a shor t i n th e wire :
1. Tur n th e ignitio n switc h OFF .2. Disconnec t th e negativ e bat -
ter y cabl e fro m th e battery .
3 . Disconnec t th e EC M connec -
tor D (22P ) fro m th e ECM .4. Chec k fo r continuit y betwee n
EC M connecto r termina l D 5
an d bod y ground .
I
s ther e approx . 5 V ?
Chec
k fo r a shor t i n th e circuit :
1 . Disconnec t th e GR N 4 P con -
necto r fro m th e ALT .
2. Tur n th e ignitio n switc h O N (II) .3. Measur e voltag e betwee n EC M
connecto r terminal s D 5 an d
A26 .
Is ther e continuity ? Repai
r shor t i n th e wir e betwee nthe EC M (D5 ) and th e ALT .
Substitut e a known-goo d EC M
an d recheck . I f prescribe d voltag e
i s no w available , replac e th e origi -
nal ECM .Chec k th e operatio n o f th e ALT :1. Tur n th e ignitio n switc h OFF .2. Reconnec t th e AL T GR N 4 P
connecto r t o th e ALT .
3 . Star t th e engine . Hol d th e
engin e a t 3,00 0 rp m wit h n oloa d (A/ T in position ,M/T in neutral ) unti l th e radiato r
fa n come s on , the n le t i t idle .
4 . Measur e voltag e betwee n EC M
connecto r terminal s D 5 an d
A26.
Doe s th e voltag e decreas e whe nhead light s an d rea r defogge r ar eturne d on ? AL
T F R signa l i s OK .
(T o pag e 11-120 )
ProCarManuals.com
Page 708 of 1640
Recovery
Only use service equipment that is U.L.-listed and is cer-
tified to meet the requirements of SAE J2210 to remove
HFC-134a (R-134a) from the air conditioning system.
CAUTION: Exposure to air conditioner refrigerant
and lubricant vapor or mist can irritate eyes, nose
and throat. Avoid breathing the air conditioner
refrigerant and lubricant vapor or mist.
If accidental system discharge occurs, ventilate work
area before resuming service.
R-134a service equipment or vehicle air conditioning sys-
tem should not be pressure tested or leak tested with
compressed air.
Some mixtures of air and R-134a have
been shown to be combustible at elevated pressures
and can result in fire or explosion causing injury or
property damage. Never use compressed air to pres-
sure test R-134a service equipment or vehicle air
conditioning systems.
Additional health and safety information may be obtained
from the refrigerant and lubricant manufactures.
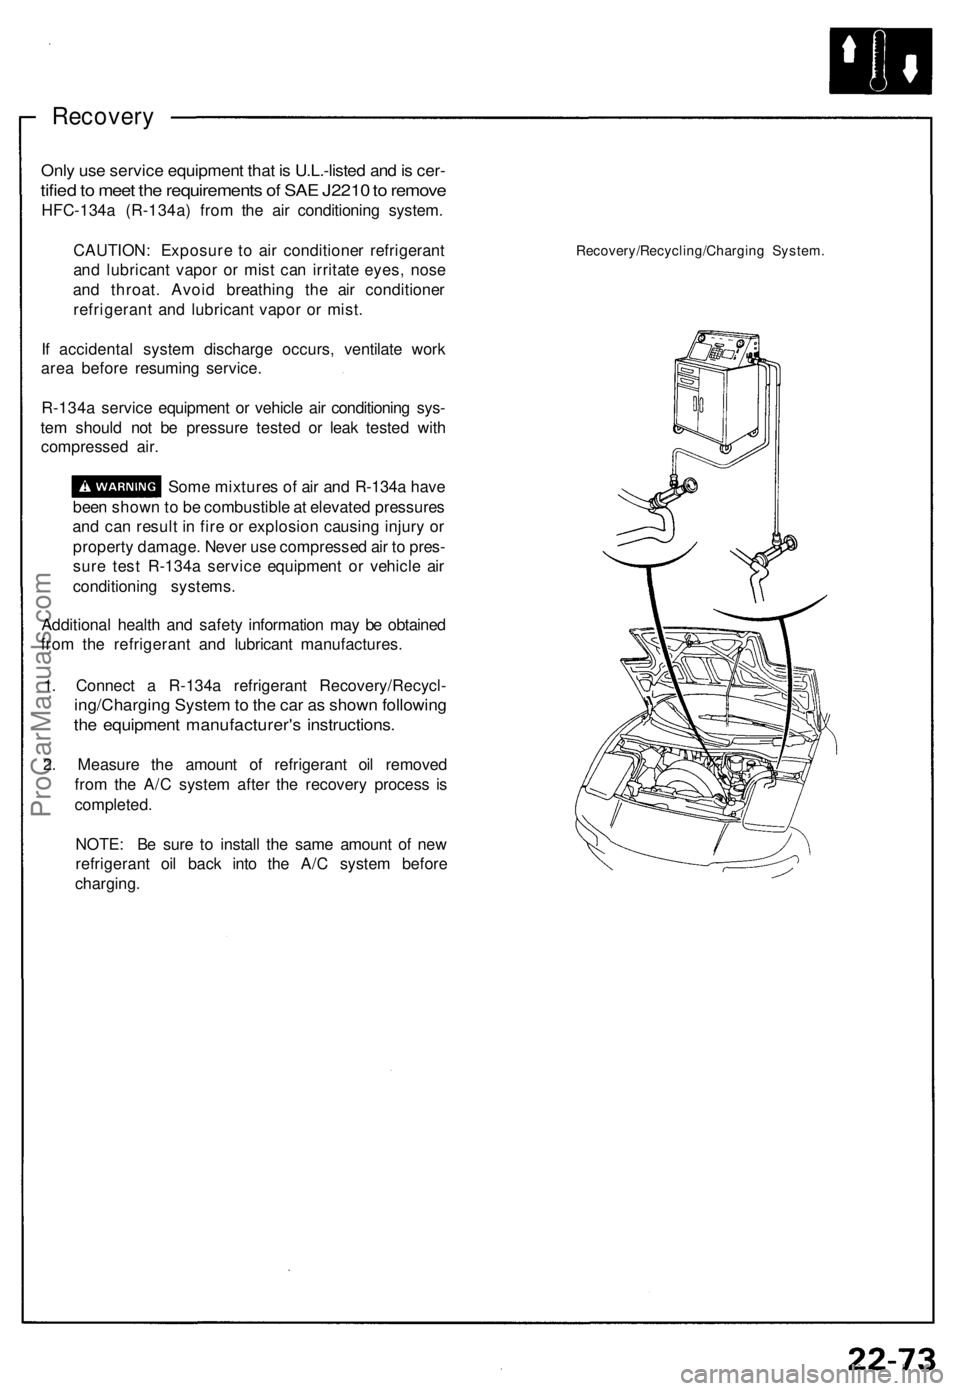
1. Connect a R-134a refrigerant Recovery/Recycl-
ing/Charging System to the car as shown following
the equipment manufacturer's instructions.
2. Measure the amount of refrigerant oil removed
from the A/C system after the recovery process is
completed.
NOTE: Be sure to install the same amount of new
refrigerant oil back into the A/C system before
charging.
Recovery/Recycling/Charging System.ProCarManuals.com
Page 709 of 1640
Heater-Evaporator Unit
Replacement
SRS components are located in this area. Review the SRS
component locations, precautions, and procedures in the
SRS section (24) before performing repairs or service.
1.
Remove
the
blower
unit
(see
page
22-67 ('93-'96),
63('91-'92)).
2. When the engine is cool, drain the engine coolant from the radiator (see section 10).
Do not remove the radiator cap when
the engine is hot; the engine coolant is under
pressure and could severely scald you.
CAUTION: Engine coolant will damage paint. Quick-
ly rinse any spilled engine coolant off painted sur-
faces.
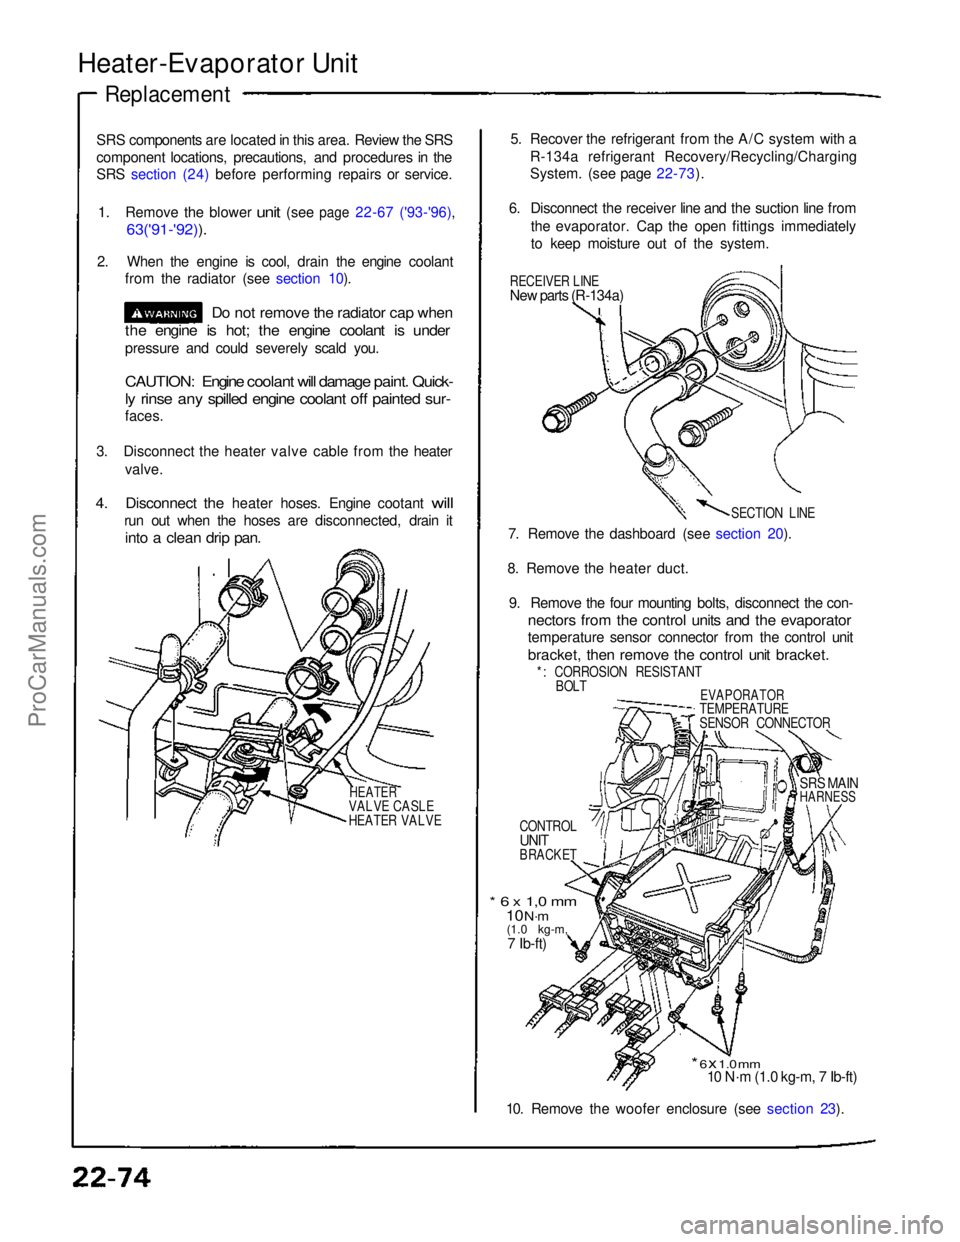
3. Disconnect the heater valve cable from the heater valve.
4.
Disconnect
the
heater hoses. Engine cootant
will
run out when the hoses are disconnected, drain it
into a clean drip pan.
HEATER
VALVE CASLE
HEATER VALVE
5. Recover the refrigerant from the A/C system with a
R-134a refrigerant Recovery/Recycling/Charging
System. (see page 22-73).
6. Disconnect the receiver line and the suction line from the evaporator. Cap the open fittings immediately
to keep moisture out of the system.
RECEIVER LINE
New parts (R-134a)
SECTION LINE
7. Remove the dashboard (see section 20).
8. Remove the heater duct. 9. Remove the four mounting bolts, disconnect the con-
nectors from the control units and the evaporator
temperature sensor connector from the control unit
bracket, then remove the control unit bracket.
*: CORROSION RESISTANT BOLT
EVAPORATOR
TEMPERATURE
SENSOR CONNECTOR
CONTROL
UNIT
BRACKET
SRS MAIN
HARNESS
* 6 x 1,0 mm
10 N·m
(1.0 kg-m,
7 Ib-ft)
* 6 x 1.0 mm
10 N·m (1.0 kg-m, 7 Ib-ft)
10. Remove the woofer enclosure (see section 23).ProCarManuals.com
Page 714 of 1640
Replacement
1. Disconnect the negative cable from the battery.
2. Remove the from bumper (see section 20).
3. Recover the refrigerant using a R-134a refrigerant Recover/Recycling/Charging System (see page
22-73).
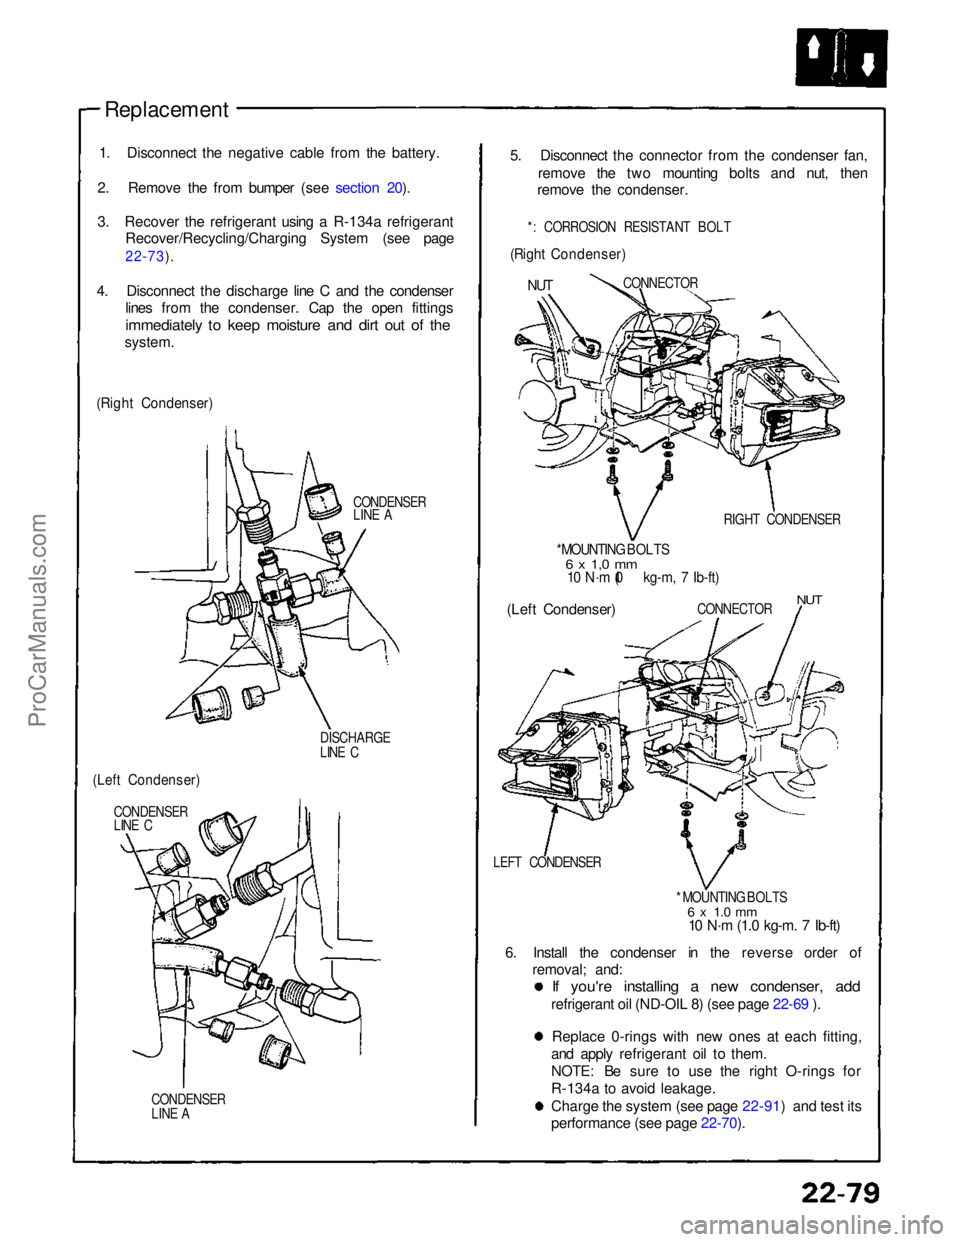
4. Disconnect the discharge line C and the condenser lines from the condenser. Cap the open fittings
immediately to keep moisture and dirt out of the
system.
(Right Condenser)
CONDENSER
LINE A
DISCHARGE
LINE C
(Left Condenser)
CONDENSER
LINE C
CONDENSER
LINE A
5. Disconnect the connector from the condenser fan,
remove the two mounting bolts and nut, then
remove the condenser.
*: CORROSION RESISTANT BOLT
(Right Condenser)
NUT
CONNECTOR
RIGHT CONDENSER
* MOUNTING BOLTS
6 x 1,0 mm
10 N·m (1.0 kg-m, 7 Ib-ft)
(Left Condenser)
CONNECTOR
NUT
LEFT CONDENSER * MOUNTING BOLTS
6 x 1.0 mm
10 N·m (1.0 kg-m. 7 Ib-ft)
6. Install the condenser in the reverse order of removal; and:
If you're installing a new condenser, add
refrigerant oil (ND-OIL 8) (see page 22-69 ).
Replace 0-rings with new ones at each fitting,
and apply refrigerant oil to them.
NOTE: Be sure to use the right O-rings for
R-134a to avoid leakage. Charge the system (see page 22-91) and test its
performance (see page 22-70).
ProCarManuals.com
Page 725 of 1640
A/C System Service
Evacuation
Only use service equipment that is U.L.-listed and is cer-
tified to meet the requirements of SAE J2210 to remove
HFC-134a (R-134a) from the air conditioning system.
CAUTION: Exposure to air conditioner refrigerant
and lubricant vapor or mist can irritate eyes, nose
and throat. Avoid breathing the air conditioner
refrigerant and lubricant vapor or mist.
If accidental system discharge occurs, ventilate work
area before resuming service.
R-134a service equipment or vehicle air conditioning sys-
tem should not be pressure tested or leak tested with
compressed air.
Some mixtures of air and R-134a have
been shown to be combustible at elevated pressures
and can result in fire or explosion causing injury or
property damage. Never use compressed air to pres-
sure test R-134a service equipment or vehicle air
conditioning systems.
Additional health and safety information may be obtained
from the refrigerant and lubricant manufacturers.
1. When an A/C System has been opened to the at-
mosphere, such as during installation or repair, it
must be evacuated using a R-134a refrigerant
Recovery/Recycling/Charging System. (If the
system has been open for several days, the
receiver/dryer should be replaced).
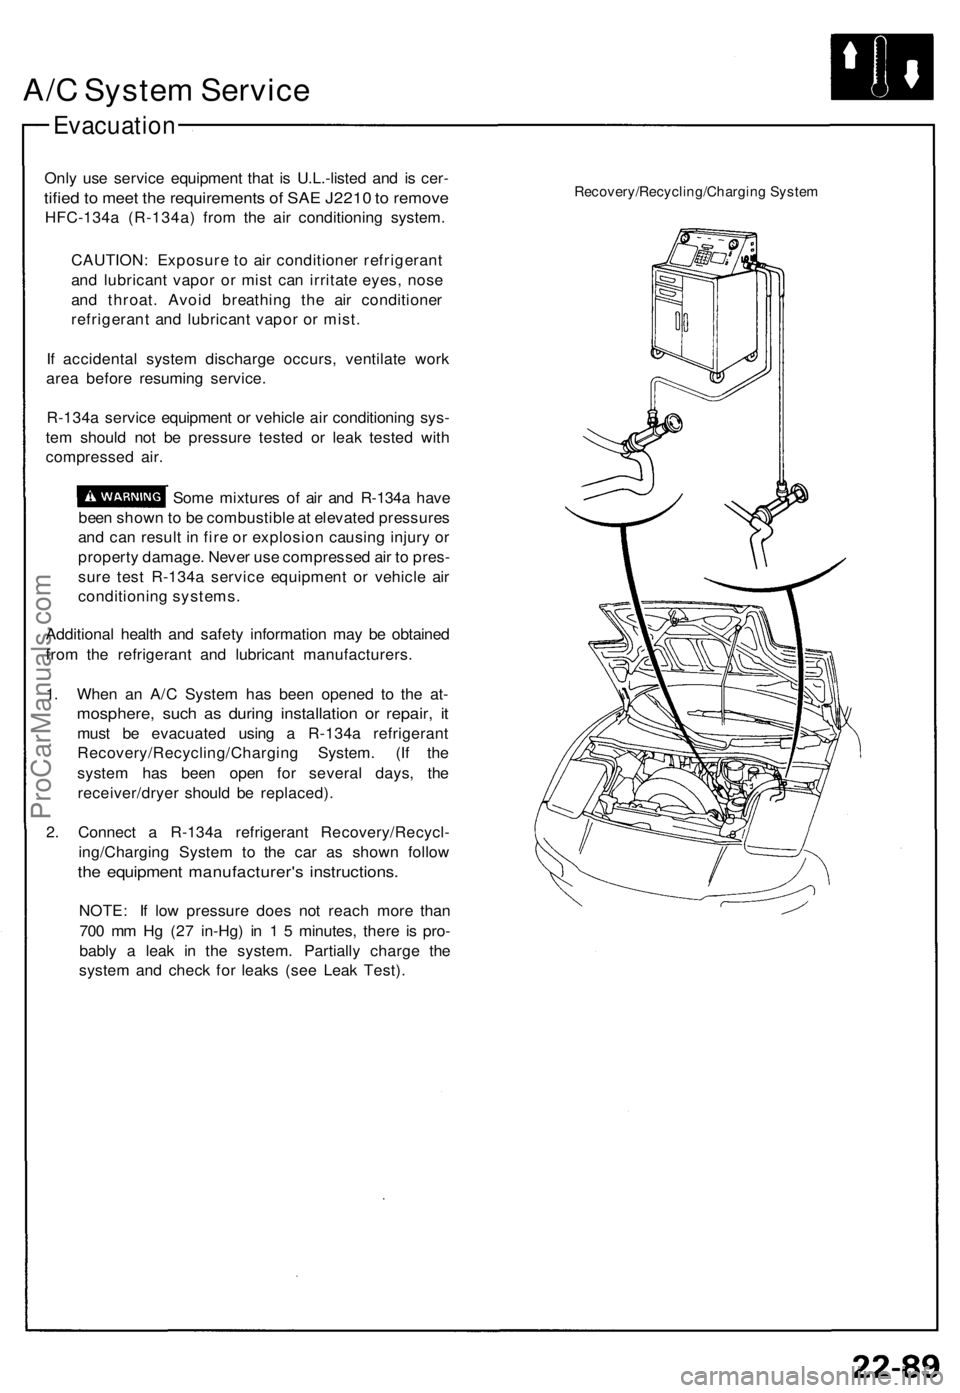
2. Connect a R-134a refrigerant Recovery/Recycl-
ing/Charging System to the car as shown follow
the equipment manufacturer's instructions.
NOTE: If low pressure does not reach more than
700 mm Hg (27 in-Hg) in 1 5 minutes, there is pro-
bably a leak in the system. Partially charge the
system and check for leaks (see Leak Test).
Recovery/Recycling/Charging SystemProCarManuals.com
Page 726 of 1640
A/C Syste m Servic e
Leak Tes t
Only us e servic e equipmen t tha t i s U.L.-liste d an d is cer -
tified to mee t th e requirement s o f SA E J221 0 to remov e
HFC-134 a (R-134a ) fro m th e ai r conditionin g system .
CAUTION : Exposur e t o ai r conditione r refrigeran t
an d lubrican t vapo r o r mis t ca n irritat e eyes , nos e
an d throat . Avoi d breathin g th e ai r conditione r
refrigeran t an d lubrican t vapo r o r mist .
I f accidenta l syste m discharg e occurs , ventilat e wor k
are a befor e resumin g service .
R-134 a servic e equipmen t o r vehicl e ai r conditionin g sys -
te m shoul d no t b e pressur e teste d o r lea k teste d wit h
compresse d air .
Som e mixture s o f ai r an d R-134 a hav e
bee n show n to b e combustibl e a t elevate d pressure s
an d ca n resul t i n fir e o r explosio n causin g injur y o r
propert y damage . Neve r us e compresse d ai r t o pres -
sur e tes t R-134 a servic e equipmen t o r vehicl e ai r
conditione r systems.
Additiona l healt h an d safet y informatio n ma y b e obtaine d
fro m th e refrigeran t an d lubrican t manufacturers .
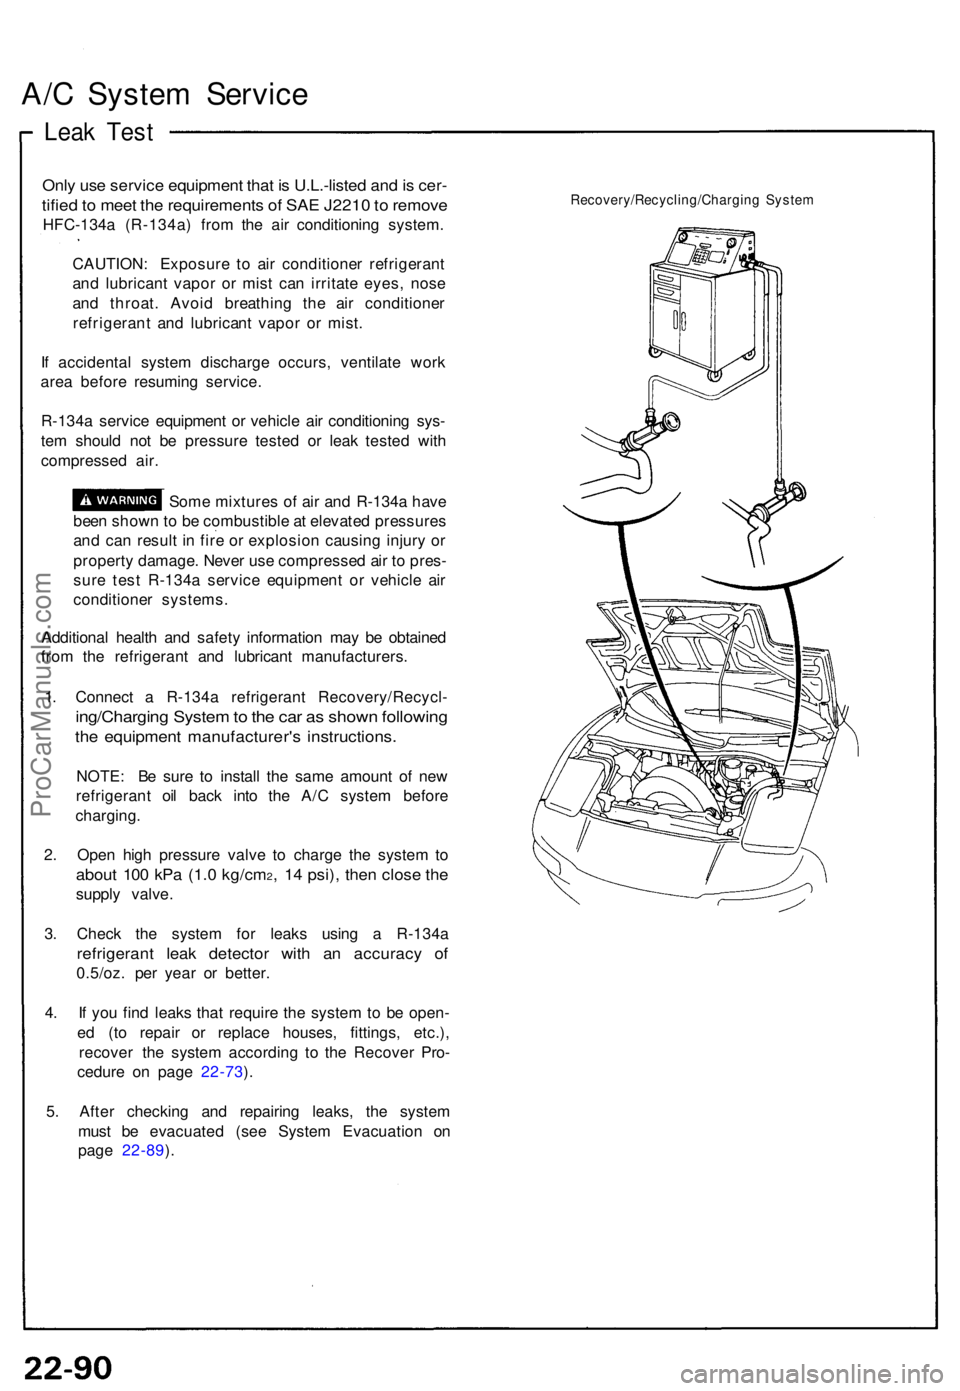
1 . Connec t a R-134 a refrigeran t Recovery/Recycl -
ing/Charging Syste m to th e ca r a s show n followin g
the equipmen t manufacturer' s instructions .
NOTE: B e sur e t o instal l th e sam e amoun t o f ne w
refrigeran t oi l bac k int o th e A/ C syste m befor e
charging .
2 . Ope n hig h pressur e valv e t o charg e th e syste m to
abou t 10 0 kP a (1. 0 kg/cm2, 1 4 psi) , the n clos e th e
suppl y valve .
3 . Chec k th e syste m fo r leak s usin g a R-134 a
refrigeran t lea k detecto r wit h a n accurac y o f
0.5/oz . pe r yea r o r better .
4 . I f yo u fin d leak s tha t requir e th e syste m to b e open -
e d (t o repai r o r replac e houses , fittings , etc.) ,
recove r th e syste m accordin g t o th e Recove r Pro -
cedur e o n pag e 22-73 ).
5 . Afte r checkin g an d repairin g leaks , th e syste m
mus t b e evacuate d (se e Syste m Evacuatio n o n
pag e 22-89 ).
Recovery/Recycling/Chargin g Syste m
ProCarManuals.com
Page 727 of 1640
Charging
Only us e servic e equipmen t tha t i s U.L.-liste d an d i s
certifie d t o mee t th e requirement s o f SA E J221 0 t o
remov e HFC-134 a (R-134a ) fro m th e ai r conditione r
system .
CAUTION : Exposur e t o ai r conditione r refrigeran t
an d lubrican t vapo r o r mis t ca n irritat e eyes , nos e
an d throat .
Avoi d breathin g th e ai r conditione r refrigeran t an d
lubrican t vapo r o r mist .
I f accidenta l syste m discharg e occurs , ventilat e wor k
are a befor e resumin g service . Additiona l healt h an d safe -
t y informatio n ma y b e obtaine d fro m th e refrigeran t an d
lubrican t manufacturers .
Refrigeran t capacity : 800-85 0 g (28-3 0 oz )
CAUTION : D o no t overcharg e th e system ; th e
compresso r wil l b e damaged .
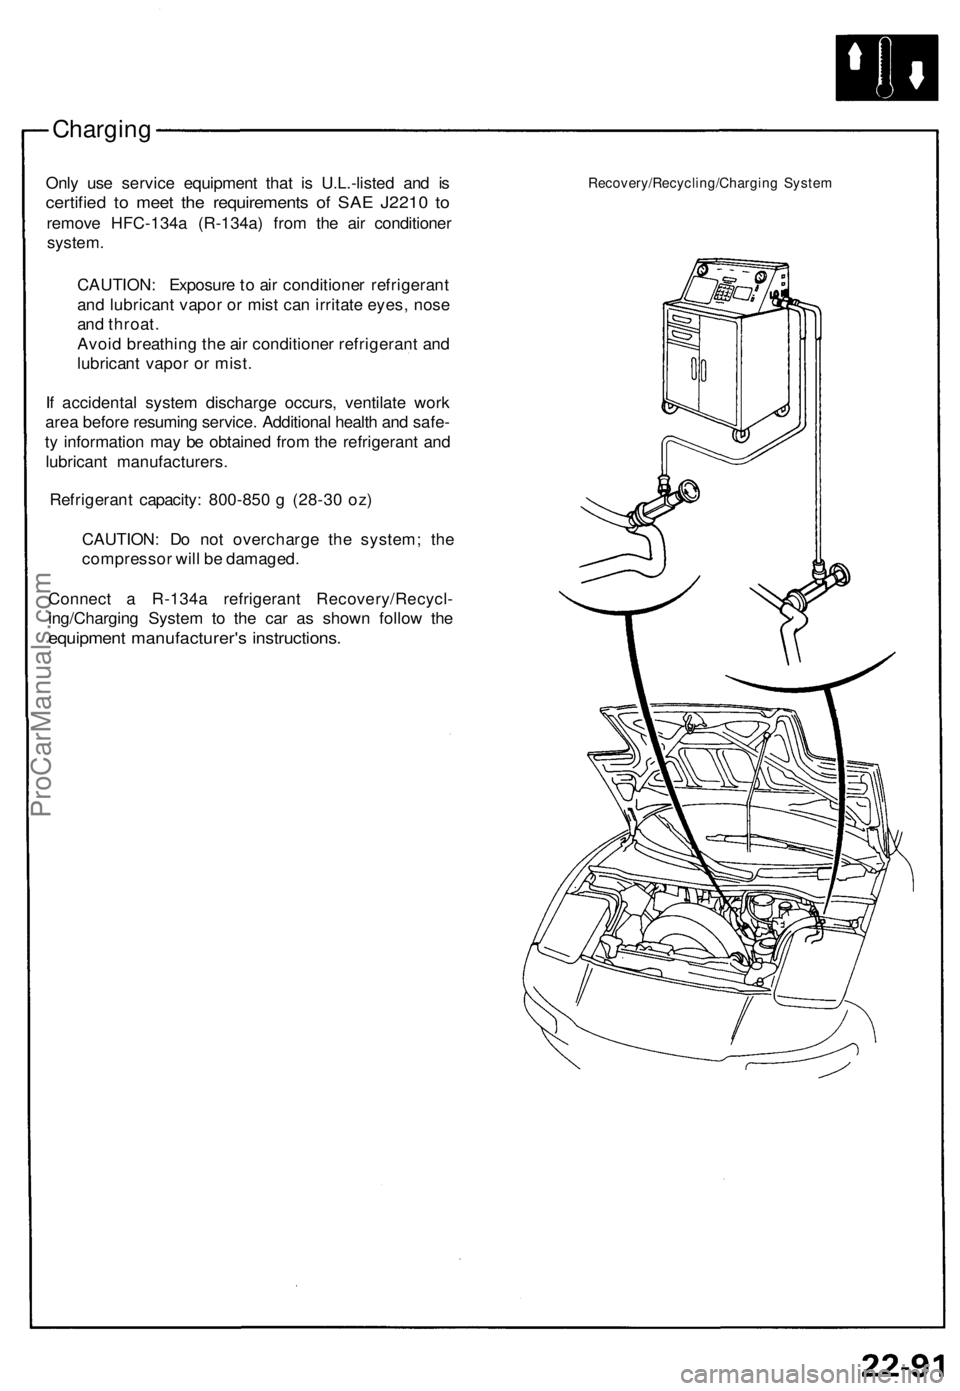
Connec t a R-134 a refrigeran t Recovery/Recycl -
ing/Chargin g Syste m to th e ca r a s show n follo w th e
equipmen t manufacturer' s instructions .
Recovery/Recycling/Chargin g Syste m
ProCarManuals.com
Page 739 of 1640
Battery
Test
• Battery fluid (electrolyte) contains sulfuric acid. It may cause severe burns if it gets on your skin or in your eyes.
Wear protective clothing and a face shield.
— If electrolyte gets on your skin or clothes, rinse it off with water immediately.
— If electrolyte gets in your eyes, flush it out by splashing water in your eyes for at least 15 minutes; call a physician
immediately.
• A battery gives off hydrogen gas. If ignited, the hydrogen will explode and could crack the battery case and splatter
acid on you. Keep sparks, flames, and cigarettes away from the battery.
• Overcharging will raise the temperature of the electrolyte. This may force electrolyte to spray out of the battery vents.
Follow the charger manufacturer's instructions and charge the battery at a proper rate.
Use either a JCI or Bear ARBST tester, and follow the manufacturer's procedures. If you don't have one of these com-
puterized testers, follow this conventional test procedure:
To get accurate results, the temperature of the electrolyte must be between 70°F (21 °C) and 100°F (38°C).
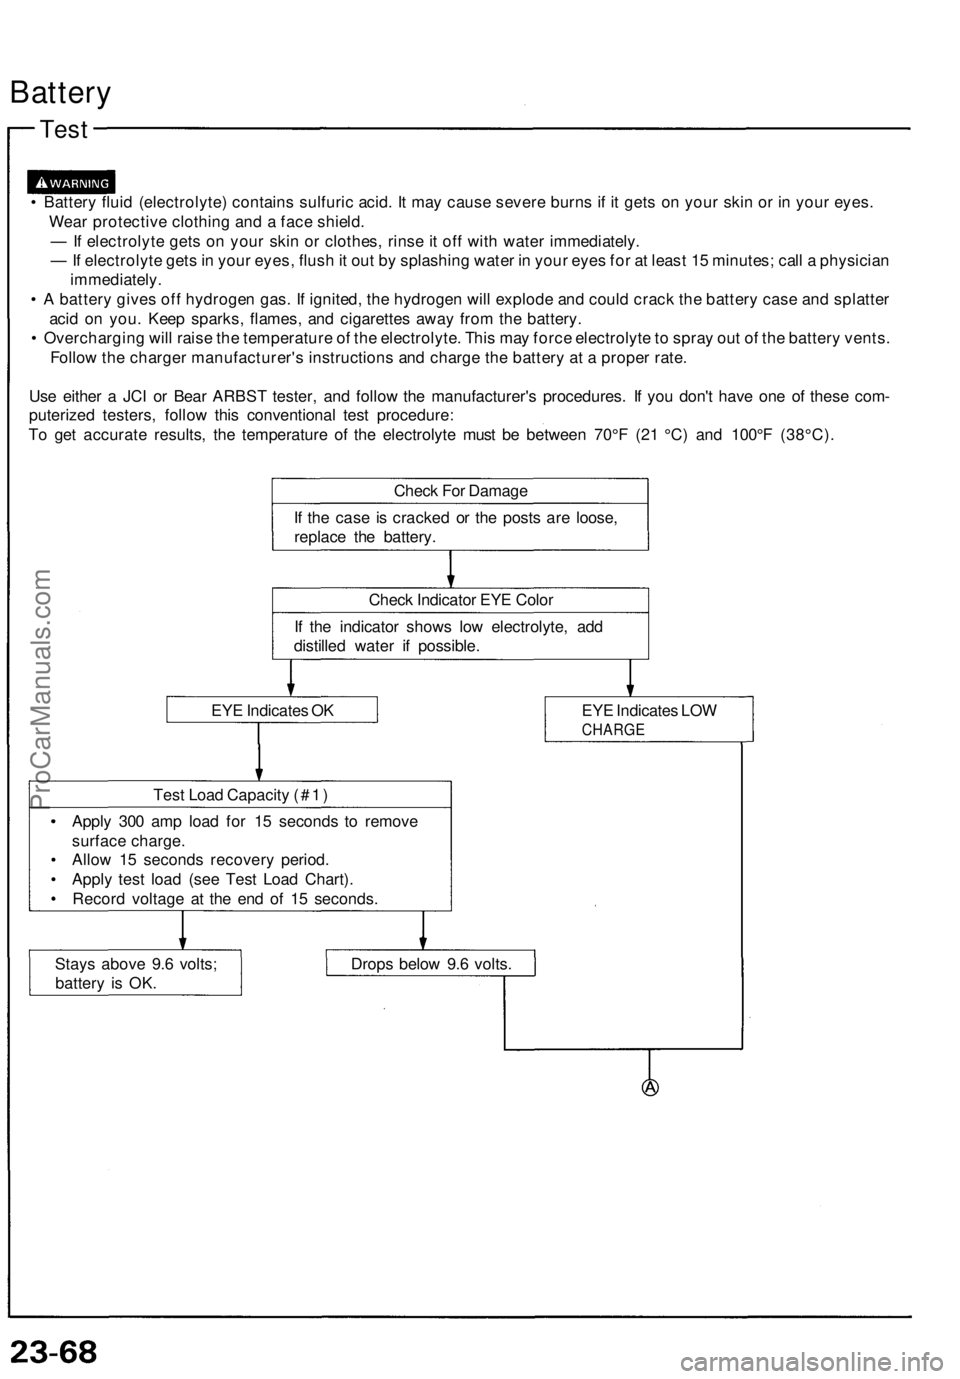
Check For Damage
If the case is cracked or the posts are loose,
replace the battery.
Check Indicator EYE Color
If the indicator shows low electrolyte, add
distilled water if possible.
EYE Indicates OK
EYE Indicates LOW
CHARGE
Test Load Capacity (#1)
Apply 300 amp load for 15 seconds to remove
surface charge.
Allow 15 seconds recovery period.
Apply test load (see Test Load Chart).
Record voltage at the end of 15 seconds.
Stays above 9.6 volts;
battery is OK.
Drops below 9.6 volts.ProCarManuals.com