1991 ACURA NSX ground clearance
[x] Cancel search: ground clearancePage 11 of 1640
Towing
If th e ca r need s t o b e towed , cal l a professiona l towin g
service . Neve r to w th e ca r behin d anothe r ca r wit h jus t
a rop e o r chain . I t i s ver y dangerous .
Ther e ar e thre e widel y use d method s o f towin g a car :
Flat-be d Equipmen t — Th e operato r load s th e ca r o n th e
bac k o f a truck . Thi s i s th e onl y recommende d wa y o f
towin g th e NS X & NSX-T .
Whee l Lif t Equipment— The to w truc k drive r use s tw o
pivotin g arm s whic h g o unde r th e tire s (fron t o r rear ) an d
lif t the m of f th e ground . Th e othe r tw o wheel s remai n
o n th e ground . Thi s towin g metho d i s no t recommend -
ed . Becaus e o f th e NS X & NSX-T' s lo w groun d clearance ,
th e bod y ca n b e damage d goin g ove r larg e bump s o r u p
inclines .
Sling-typ e Equipment— The tow truc k use s meta l chain s
wit h hook s o n th e ends . Thes e hook s g o aroun d part s
of th e fram e or suspensio n and th e cable s lift tha t end
of th e ca r of f th e ground . Damag e t o th e car' s suspen -
sio n an d bod y i s almos t certai n if thi s metho d o f towin g
i s attempted .
I f th e NS X & NSX- T canno t b e towe d b y flat-bed , i t
shoul d b e towe d wit h th e rea r wheel s of f th e ground .
If , du e t o damage , th e ca r mus t b e towe d wit h th e rea r
wheel s o n th e ground , d o th e following :
Manual Transmissio n
• Releas e th e parkin g brak e
• Shif t th e transmissio n t o Neutra l
Automati c Transmissio n
• Releas e th e parkin g brak e
• Star t th e engin e
• Shif t t o position , the n t o positio n
• Tur n of f th e engin e
NOTICE :
• Imprope r towin g preparatio n wil l damag e th e trans -
mission . Follo w th e abov e procedur e exactly . Th e ca r
mus t b e towe d o n a fla t be d if th e engin e wil l no t star t
o r th e transmissio n wil l no t shift .
• I t i s bes t t o to w th e ca r n o farthe r tha n 5 0 mile s (8 0
km) , an d kee p th e spee d belo w 3 5 mp h (5 5 km/h) .
• Tryin g t o lif t o r to w th e ca r b y th e bumper s wil l caus e
seriou s damage . Th e bumper s ar e no t designe d to sup -
por t th e car' s weight .
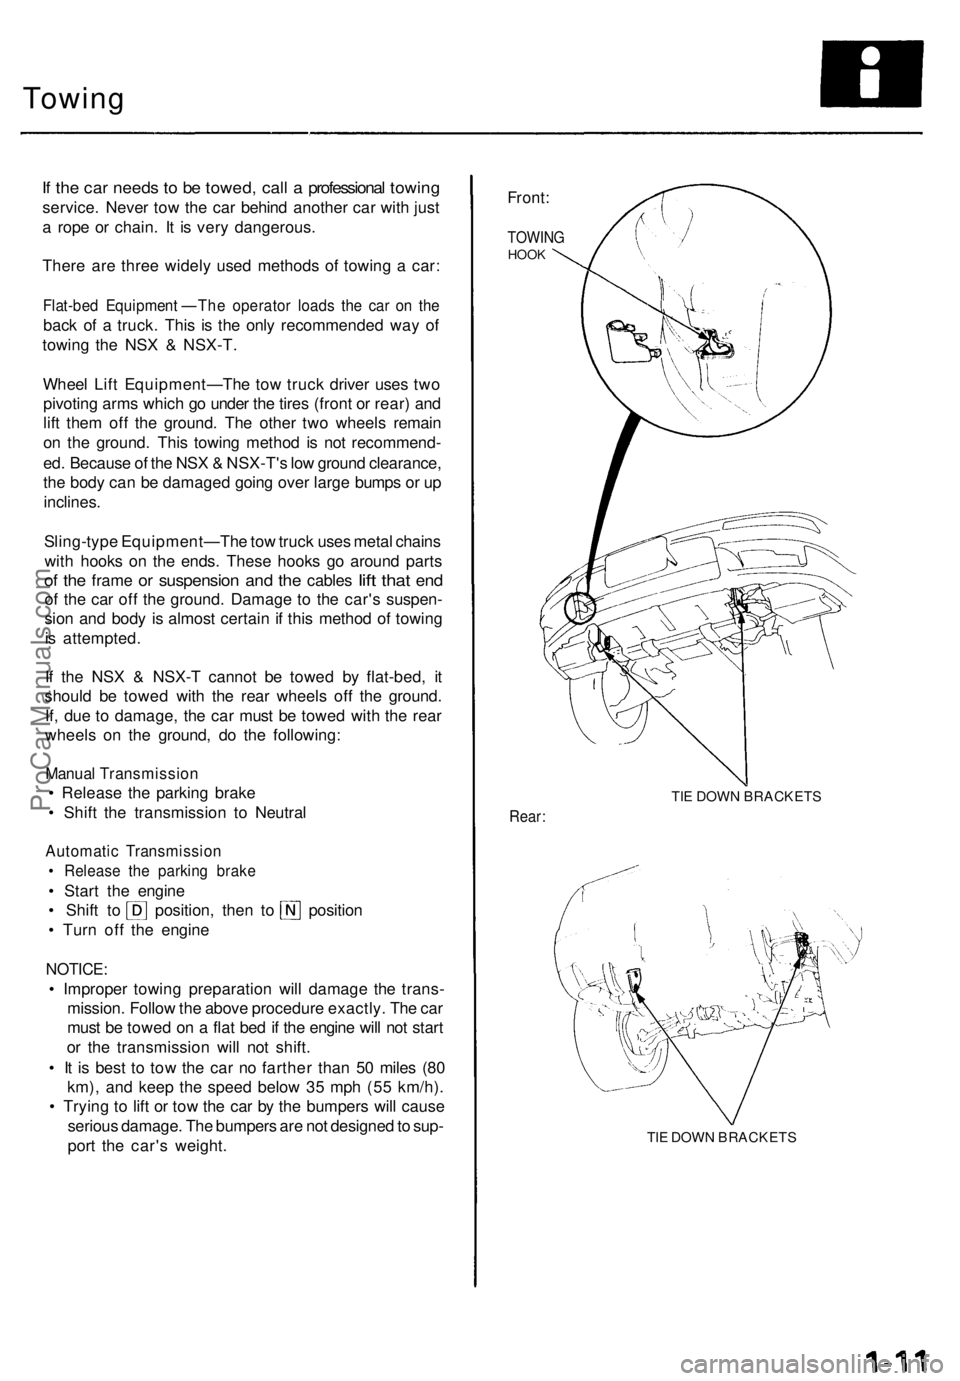
Front:
TOWIN GHOOK
TIE DOW N BRACKET S
Rear:
TIE DOW N BRACKET S
ProCarManuals.com
Page 44 of 1640
Towing
If th e ca r need s t o b e towed , cal l a professiona l towin g
service . Neve r to w th e ca r behin d anothe r ca r wit h jus t
a rop e o r chain . I t i s ver y dangerous .
Ther e ar e thre e widel y use d method s o f towin g a car :
Flat-be d Equipment—Th e operato r load s th e ca r o n th e
bac k o f a truck . This is th e onl y recommende d wa y o f
towin g th e NS X & NSX-T .
Whee l Lif t Equipment—Th e to w truc k drive r use s tw o
pivotin g arm s whic h g o unde r th e tire s (fron t o r rear ) an d
lif t the m of f th e ground . Th e othe r tw o wheel s remai n
o n th e ground . Thi s towin g metho d i s no t recommend -
ed . Becaus e o f th e NS X & NSX-T' s lo w groun d clearance ,
th e bod y ca n b e damage d goin g ove r larg e bump s o r u p
inclines .
Sling-typ e Equipment—Th e to w truc k use s meta l chain s
wit h hooks on th e ends . Thes e hook s g o aroun d part s
o f th e fram e o r suspensio n an d th e cable s lif t tha t en d
o f th e ca r of f th e ground . Damag e t o th e car' s suspen -
sio n an d bod y i s almos t certai n if thi s metho d o f towin g
i s attempted .
I f th e NS X & NSX- T canno t b e towe d b y flat-bed , i t
shoul d b e towe d wit h th e rea r wheel s of f th e ground .
If , du e t o damage , th e ca r mus t b e towe d wit h th e rea r
wheel s o n th e ground , d o th e following :
Manual Transmissio n
Release th e parkin g brak e
Shift th e transmissio n t o Neutra l
Automati c Transmissio n
Releas e th e parkin g brak e
Star t th e engin e
Shift t o position , the n t o positio n
Tur n of f th e engin e
NOTICE :
Improper towin g preparatio n wil l damag e th e trans -
mission . Follo w th e abov e procedur e exactly . Th e ca r
mus t b e towe d o n a fla t be d if th e engin e wil l no t star t
or th e transmissio n wil l no t shift .
It i s bes t t o to w th e ca r n o farthe r tha n 5 0 mile s (8 0
km) , an d kee p th e spee d belo w 3 5 mp h (5 5 km/h) .
Tryin g t o lif t o r to w th e ca r b y th e bumper s wil l caus e
seriou s damage . Th e bumper s ar e no t designe d to sup -
por t th e car' s weight .
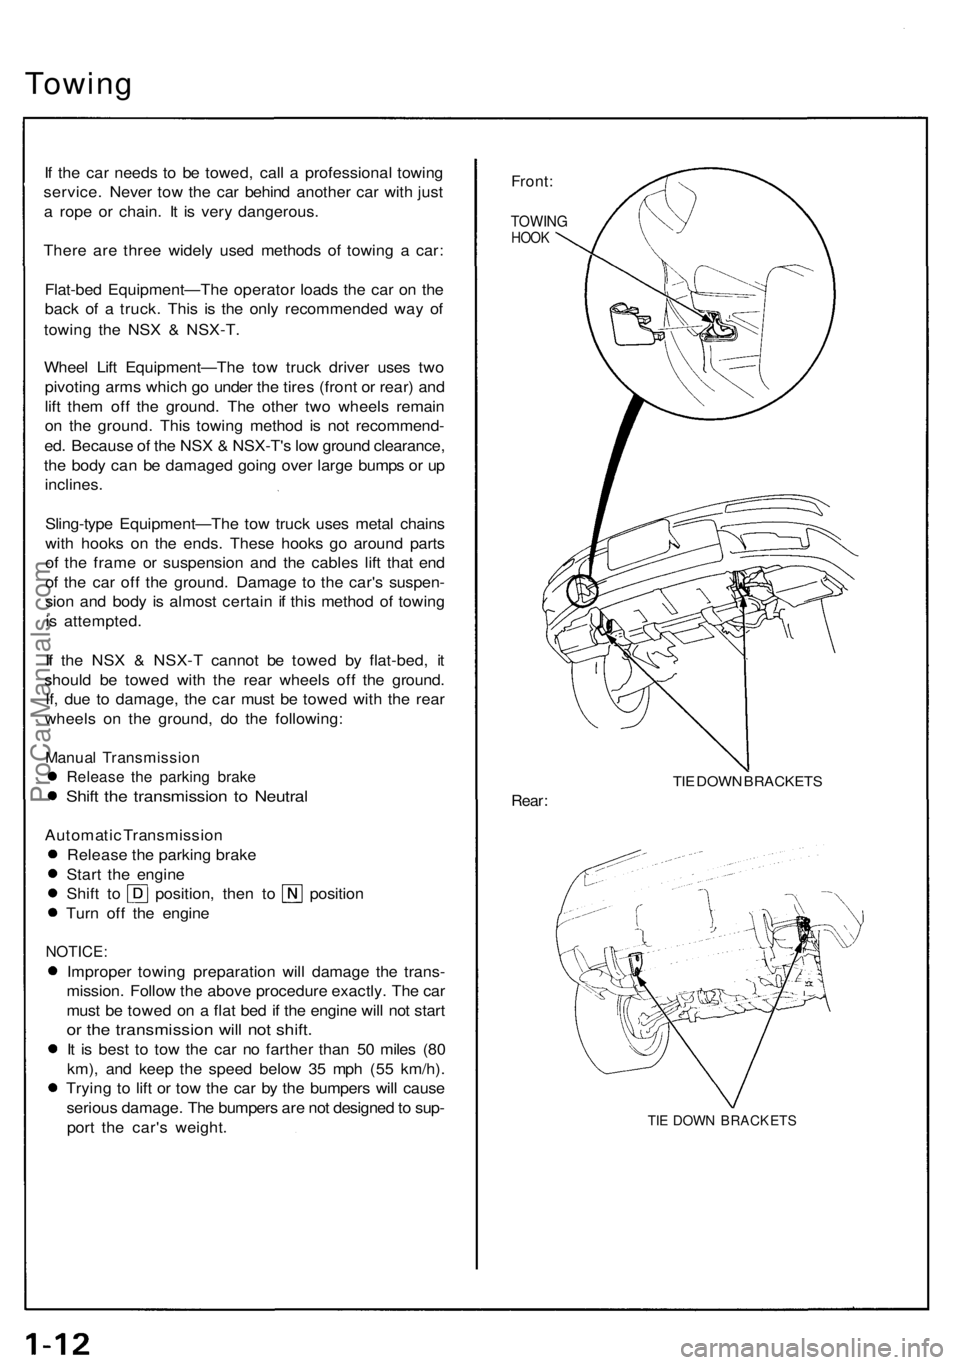
Front:
TOWIN GHOOK
TIE DOW N BRACKET S
Rear:
TIE DOW N BRACKET S
ProCarManuals.com
Page 451 of 1640
Wheel Alignment
Height
NSX/NSX-T four wheel alignment requires the use of equipment designed specifically for four wheel independent
suspensions and capable of immediate feedback.
NOTE: For proper inspection/adjustment of the wheel alignment, check and adjust the following before checking
the alignment.
• Check that the suspension is not modified.
• Check the tire size and tire pressure.
• Check the runout of the wheels and tires.
• Check the suspension ball joints. (Hold a wheel with your hands, then move the wheel up and down and right
and left to check for wobbling.)
• Check the height of each suspension (see below).
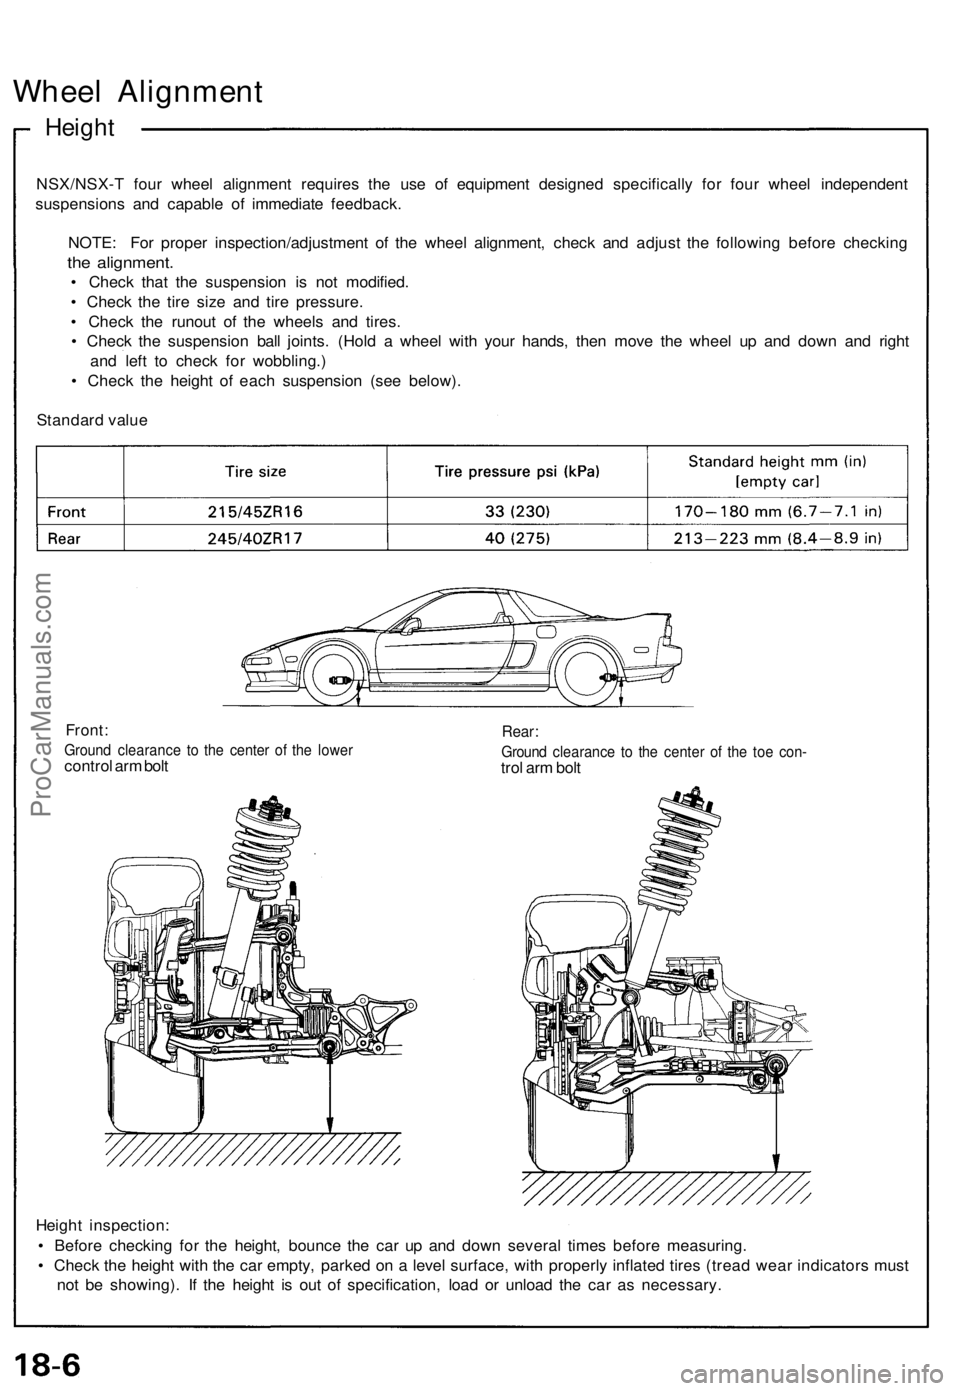
Standard value
Front:
Ground clearance to the center of the lower
control arm bolt
Rear:
Ground clearance to the center of the toe con-
trol arm bolt
Height inspection:
• Before checking for the height, bounce the car up and down several times before measuring.
• Check the height with the car empty, parked on a level surface, with properly inflated tires (tread wear indicators must
not be showing). If the height is out of specification, load or unload the car as necessary.ProCarManuals.com
Page 804 of 1640
Interlock System
Shift Lock Solenoid Test/Replacement
Test:
1. Remove the console, then disconnect the 3-P con-
nector of the shift lock solenoid from the floor wire
harness.
NOTE: This solenoid has a diode in it. To get an
accurate reading, either test it with a volt-ohmmeter
that compensates for diodes, or make sure you con-
nect your test leads to match the polarity shown.
2. Connect battery power to the A terminal and
ground to the B terminal momentarily, and check to
see if the solenoid works.
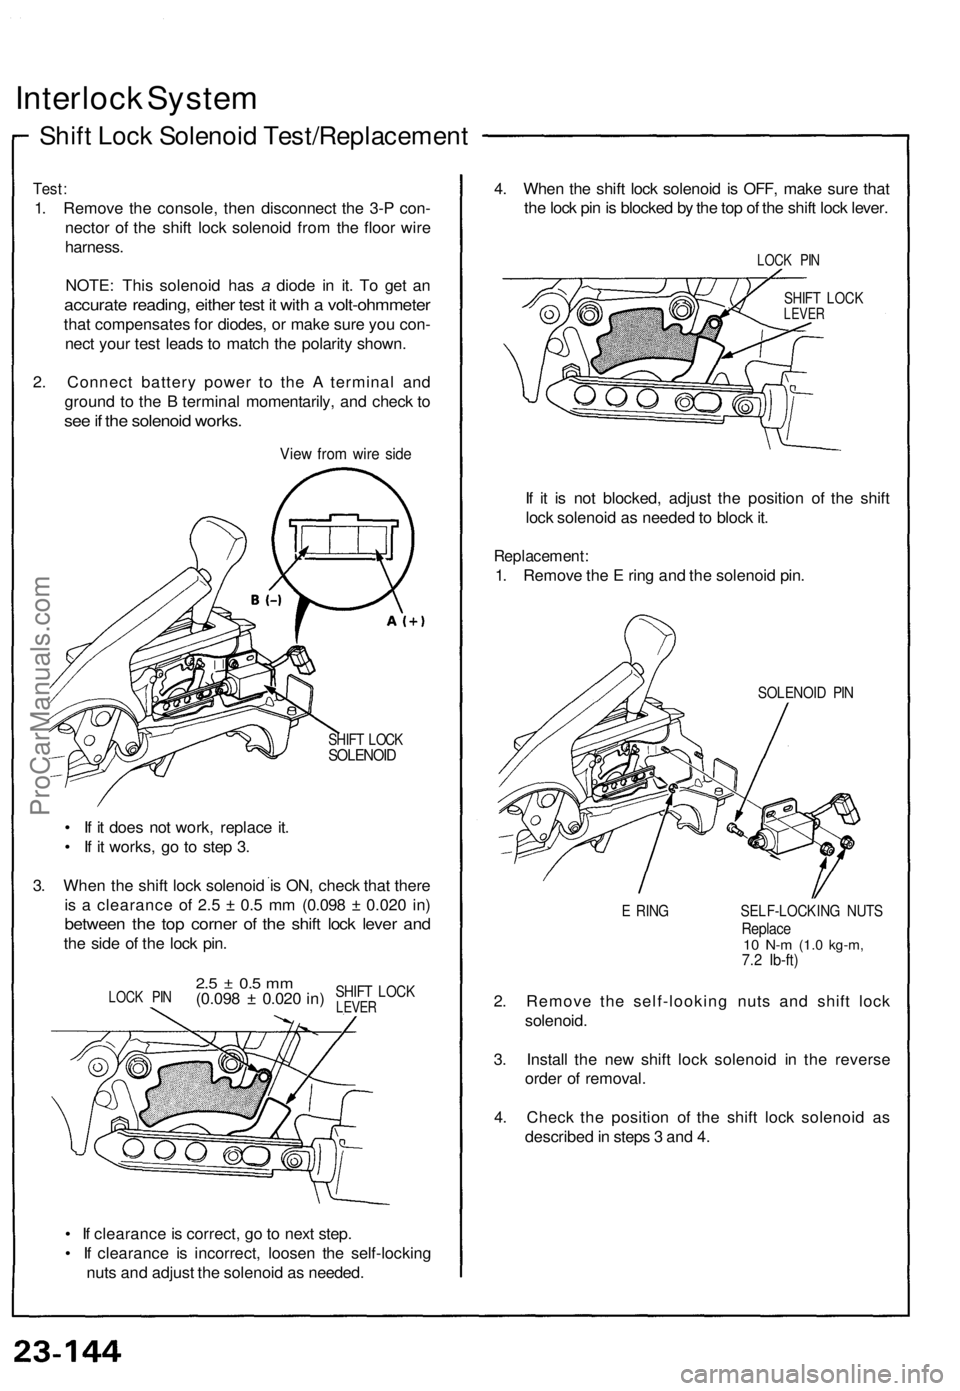
View from wire side
SHIFT LOCK
SOLENOID
• If it does not work, replace it.
• If it works, go to step 3.
3. When the shift lock solenoid is ON, check that there
is a clearance of 2.5 ± 0.5 mm (0.098 ± 0.020 in)
between the top corner of the shift lock lever and
the side of the lock pin.
• If clearance is correct, go to next step.
• If clearance is incorrect, loosen the self-locking
nuts and adjust the solenoid as needed.
4. When the shift lock solenoid is OFF, make sure that
the lock pin is blocked by the top of the shift lock lever.
LOCK PIN
SHIFT LOCK
LEVER
If it is not blocked, adjust the position of the shift
lock solenoid as needed to block it.
Replacement:
1. Remove the E ring and the solenoid pin.
SOLENOID PIN
E RING SELF-LOCKING NUTS
Replace
10 N-m
(1.0 kg-m,
7.2 Ib-ft)
2. Remove the self-looking nuts and shift lock
solenoid.
3. Install the new shift lock solenoid in the reverse
order of removal.
4. Check the position of the shift lock solenoid as
described in steps 3 and 4.
LOCK PIN
2.5 ± 0.5 mm
(0.098 ± 0.020 in)
SHIFT LOCK
LEVERProCarManuals.com
Page 986 of 1640
Engine Removal/Installation
Make sure jacks and safety stands are placed proper-ly and hoist brackets are attached to the correct
positions on the engine (see section 1).
Make sure the car will not roll off stands and fall
while you are working under it. 3. Remove the expansion tank cap to speed draining.
Use care when removing the expan-
sion tank cap to avoid scalding by hot engine
coolant or steam.
4. Raise the hoist to full height.
5. Drain the engine coolant (see section 10).
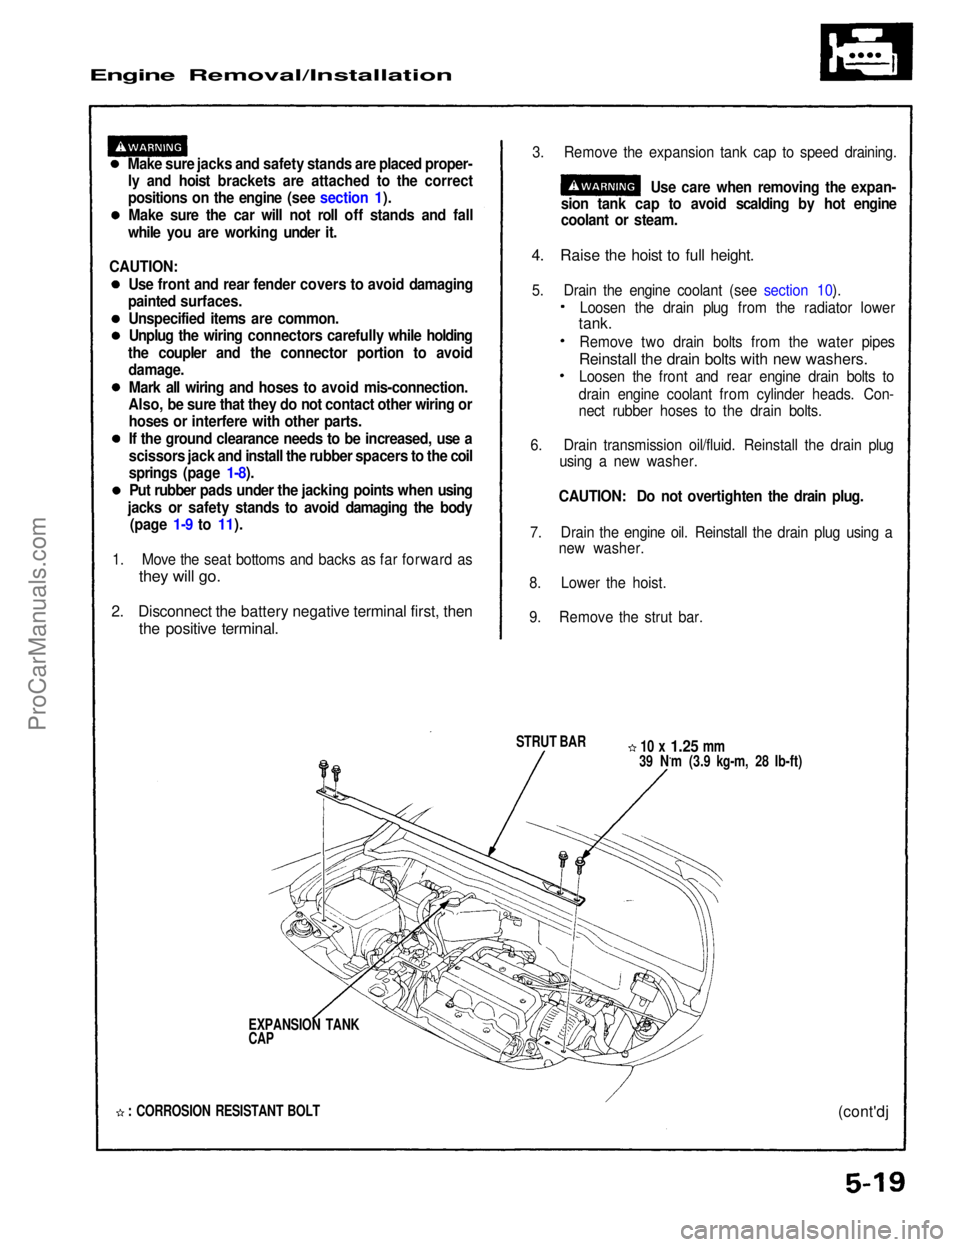
STRUT BAR
10 x
1.25
mm
39 N.m (3.9 kg-m, 28 Ib-ft)
EXPANSION TANK
CAP
: CORROSION RESISTANT BOLT
(cont'dj
1. Move the seat bottoms and backs as far forward as
they will go.
2. Disconnect the battery negative terminal first, then
the positive terminal.
Loosen the drain plug from the radiator lower
tank.
Remove two drain bolts from the water pipes
Reinstall the drain bolts with new washers.
Loosen the front and rear engine drain bolts to
drain engine coolant from cylinder heads. Con-
nect rubber hoses to the drain bolts.
6. Drain transmission oil/fluid. Reinstall the drain plug using a new washer.
CAUTION: Do not overtighten the drain plug.
7. Drain the engine oil. Reinstall the drain plug using a new washer.
8. Lower the hoist.
9. Remove the strut bar.
CAUTION:
Use front and rear fender covers to avoid damaging
painted surfaces.
Unspecified items are common.Unplug the wiring connectors carefully while holding
the coupler and the connector portion to avoid damage.
Mark all wiring and hoses to avoid mis-connection.
Also, be sure that they do not contact other wiring or hoses or interfere with other parts.
If the ground clearance needs to be increased, use a
scissors jack and install the rubber spacers to the coil
springs (page 1-8).
Put rubber pads under the jacking points when using
jacks or safety stands to avoid damaging the body (page 1-9 to 11).ProCarManuals.com