Page 57 of 255
camshaft sprocket, aligning the marks made
previously on the chain and the sprocket.
40Fit the sprocket to the inlet camshaft, with
the camshaft in the TDC position (ie with the
inlet camshaft sprocket timing mark in line
with the top edge of the cylinder head,
pointing to the inlet side of the engine see
paragraph 4). Again, turn the camshaft if
necessary to enable the sprocket to be fitted.
41With the sprocket fitted, fit the distributor
rotor shaft to the end of the camshaft, and
tighten the securing bolt finger-tight. Note that
it is acceptable for the timing chain to sag
slightly between the two pulleys.
42Fit a new upper timing chain guide to the
plate at the front of the cylinder head.
43Turn the crankshaft clockwise until the
inlet camshaft begins to turn.
44If the chain tensioner plunger piston
protrudes from the cylinder, unlatch the piston by
pressing the chain tensioner arm down by hand.
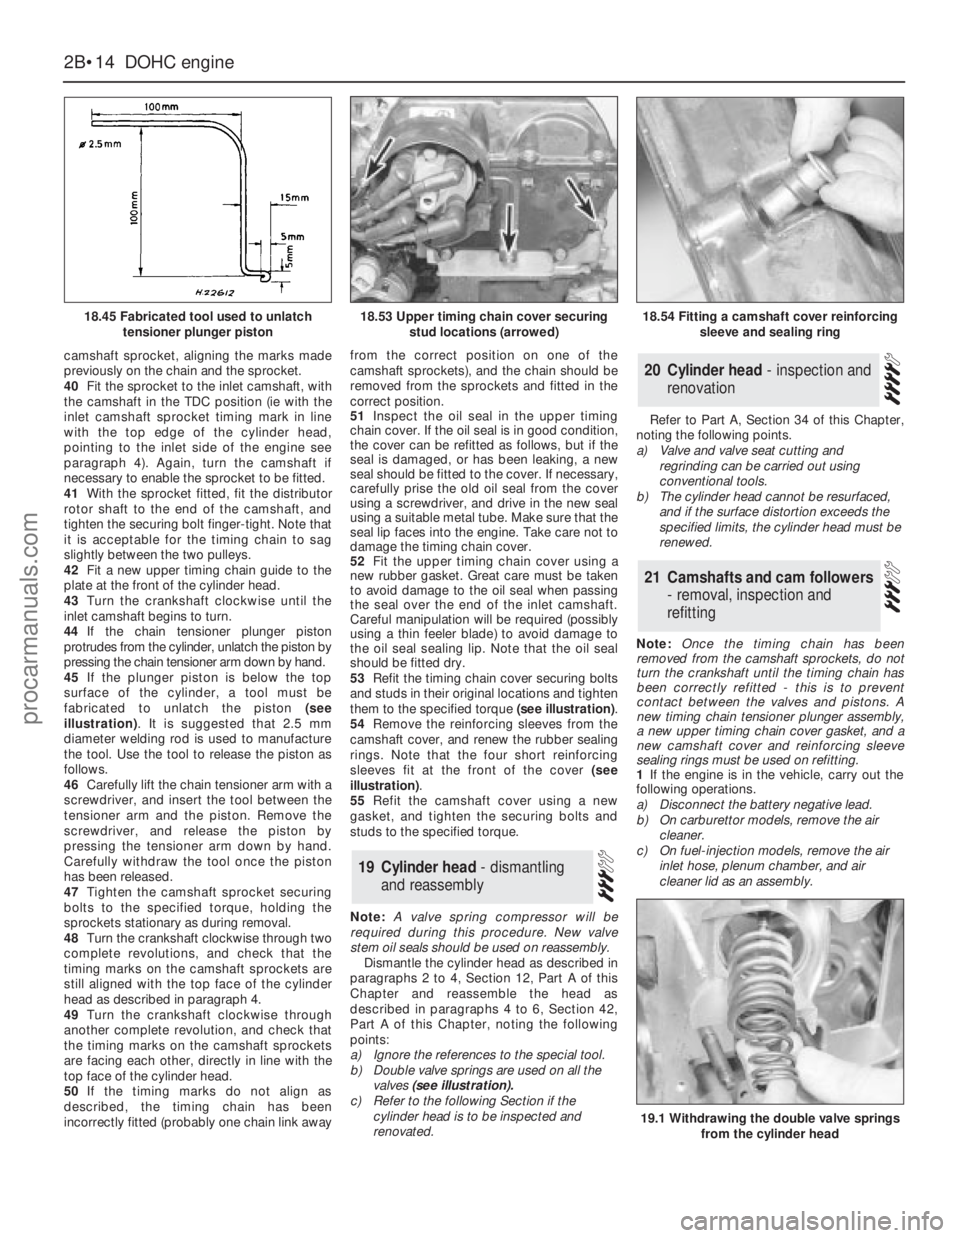
45If the plunger piston is below the top
surface of the cylinder, a tool must be
fabricated to unlatch the piston (see
illustration). It is suggested that 2.5 mm
diameter welding rod is used to manufacture
the tool. Use the tool to release the piston as
follows.
46Carefully lift the chain tensioner arm with a
screwdriver, and insert the tool between the
tensioner arm and the piston. Remove the
screwdriver, and release the piston by
pressing the tensioner arm down by hand.
Carefully withdraw the tool once the piston
has been released.
47Tighten the camshaft sprocket securing
bolts to the specified torque, holding the
sprockets stationary as during removal.
48Turn the crankshaft clockwise through two
complete revolutions, and check that the
timing marks on the camshaft sprockets are
still aligned with the top face of the cylinder
head as described in paragraph 4.
49Turn the crankshaft clockwise through
another complete revolution, and check that
the timing marks on the camshaft sprockets
are facing each other, directly in line with the
top face of the cylinder head.
50If the timing marks do not align as
described, the timing chain has been
incorrectly fitted (probably one chain link awayfrom the correct position on one of the
camshaft sprockets), and the chain should be
removed from the sprockets and fitted in the
correct position.
51Inspect the oil seal in the upper timing
chain cover. If the oil seal is in good condition,
the cover can be refitted as follows, but if the
seal is damaged, or has been leaking, a new
seal should be fitted to the cover. If necessary,
carefully prise the old oil seal from the cover
using a screwdriver, and drive in the new seal
using a suitable metal tube. Make sure that the
seal lip faces into the engine. Take care not to
damage the timing chain cover.
52Fit the upper timing chain cover using a
new rubber gasket. Great care must be taken
to avoid damage to the oil seal when passing
the seal over the end of the inlet camshaft.
Careful manipulation will be required (possibly
using a thin feeler blade) to avoid damage to
the oil seal sealing lip. Note that the oil seal
should be fitted dry.
53Refit the timing chain cover securing bolts
and studs in their original locations and tighten
them to the specified torque (see illustration).
54Remove the reinforcing sleeves from the
camshaft cover, and renew the rubber sealing
rings. Note that the four short reinforcing
sleeves fit at the front of the cover (see
illustration).
55Refit the camshaft cover using a new
gasket, and tighten the securing bolts and
studs to the specified torque.
Note: A valve spring compressor will be
required during this procedure. New valve
stem oil seals should be used on reassembly.
Dismantle the cylinder head as described in
paragraphs 2 to 4, Section 12, PartA of this
Chapterand reassemble the head as
described in paragraphs 4 to 6, Section 42,
Part A of this Chapter, noting the following
points:
a)Ignore the references to the special tool.
b)Double valve springs are used on all the
valves (see illustration).
c)Refer to the following Section if the
cylinder head is to be inspected and
renovated.Refer to Part A, Section 34 of this Chapter,
noting the following points.
a)Valve and valve seat cutting and
regrinding can be carried out using
conventional tools.
b)The cylinder head cannot be resurfaced,
and if the surface distortion exceeds the
specified limits, the cylinder head must be
renewed.
Note: Once the timing chain has been
removed from the camshaft sprockets, do not
turn the crankshaft until the timing chain has
been correctly refitted - this is to prevent
contact between the valves and pistons. A
new timing chain tensioner plunger assembly,
a new upper timing chain cover gasket, and a
new camshaft cover and reinforcing sleeve
sealing rings must be used on refitting.
1If the engine is in the vehicle, carry out the
following operations.
a)Disconnect the battery negative lead.
b)On carburettor models, remove the air
cleaner.
c)On fuel-injection models, remove the air
inlet hose, plenum chamber, and air
cleaner lid as an assembly.
21Camshafts and cam followers
- removal, inspection and
refitting
20Cylinder head - inspection and
renovation
19Cylinder head - dismantling
and reassembly
2B•14DOHCengine
18.45 Fabricated tool used to unlatch
tensioner plunger piston
19.1 Withdrawing the double valve springs
from the cylinder head
18.53 Upper timing chain cover securing
stud locations (arrowed)18.54 Fitting a camshaft cover reinforcing
sleeve and sealing ring
procarmanuals.com
Page 58 of 255
d)Disconnect the breather hose from the
camshaft cover.
e)Remove the distributor cap and HT leads,
and the rotor arm and housing. If
necessary, mark the HT leads to aid
refitting.
2Proceed as described in paragraphs 2 to 15
inclusive of Section 18.
3Examine the surfaces of the camshaft
journals and lobes and the contact surfaces of
the cam followers for wear. If wear is
excessive, considerable noise would have
been noticed from the top of the engine when
running, and new camshafts and followers
must be fitted. It is unlikely that this level of
wear will occur unless a considerable mileage
has been covered. Note that the cam followers
cannot be dismantled for renewal of individual
components.
4Check the camshaft bearing surfaces in the
cylinder head and the bearing caps for wear. If
excessive wear is evident, the only course of
action available is to renew the cylinder head
complete with bearing caps.
5Check the cam follower bores in the
cylinder head for wear. If excessive wear is
evident, the cylinder head must be renewed.
6Check the cam follower oil grooves and the
oil ports in the cylinder head for obstructions.
7Refit the cam followers and the camshafts as
described in paragraphs 27 to 55 of Section 18.
8If the engine is in the vehicle, reverse the
operations given in paragraph 1.
Refer to Part A, Section 15 of this Chapter,
noting the following points.
a)If the engine is in the car, refer to Chapter
6 when removing and refitting the clutch,
where applicable.
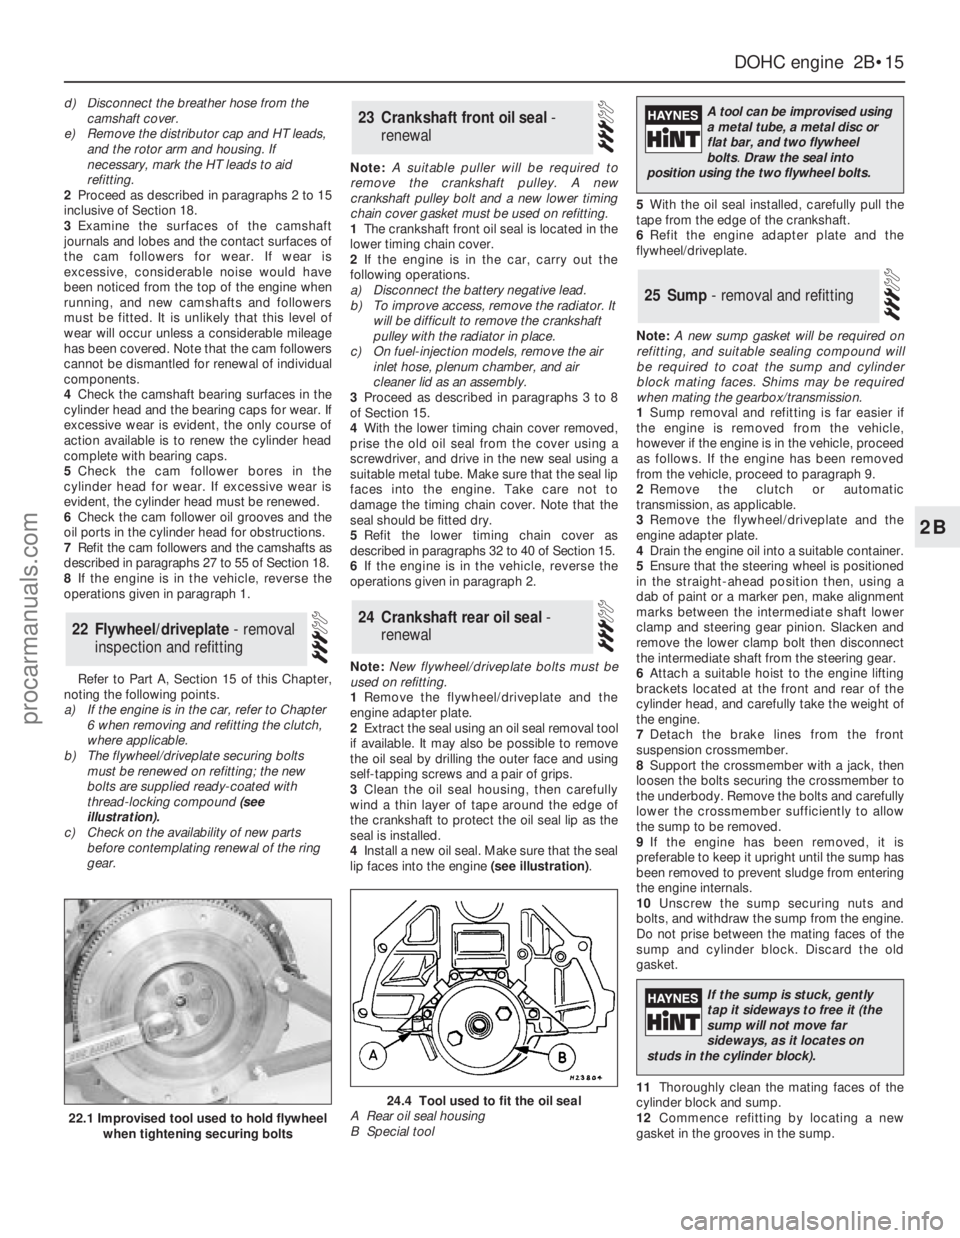
b)The flywheel/driveplate securing bolts
must be renewed on refitting; the new
bolts are supplied ready-coated with
thread-locking compound (see
illustration).
c)Check on the availability of new parts
before contemplating renewal of the ring
gear.Note: A suitable puller will be required to
remove the crankshaft pulley. A new
crankshaft pulley bolt and a new lower timing
chain cover gasket must be used on refitting.
1The crankshaft front oil seal is located in the
lower timing chain cover.
2If the engine is in the car, carry out the
following operations.
a)Disconnect the battery negative lead.
b)To improve access, remove the radiator. It
will be difficult to remove the crankshaft
pulley with the radiator in place.
c)On fuel-injection models, remove the air
inlet hose, plenum chamber, and air
cleaner lid as an assembly.
3Proceed as described in paragraphs 3 to 8
of Section 15.
4With the lower timing chain cover removed,
prise the old oil seal from the cover using a
screwdriver, and drive in the new seal using a
suitable metal tube. Make sure that the seal lip
faces into the engine. Take care not to
damage the timing chain cover. Note that the
seal should be fitted dry.
5Refit the lower timing chain cover as
described in paragraphs 32 to 40 of Section 15.
6If the engine is in the vehicle, reverse the
operations given in paragraph 2.
Note: New flywheel/driveplate bolts must be
used on refitting.
1Remove the flywheel/driveplate and the
engine adapter plate.
2Extract the seal using an oil seal removal tool
if available. It may also be possible to remove
the oil seal by drilling the outer face and using
self-tapping screws and a pair of grips.
3Clean the oil seal housing, then carefully
wind a thin layer of tape around the edge of
the crankshaft to protect the oil seal lip as the
seal is installed.
4Install a new oil seal. Make sure that the seal
lip faces into the engine (see illustration).5With the oil seal installed, carefully pull the
tape from the edge of the crankshaft.
6Refit the engine adapter plate and the
flywheel/driveplate.
Note: A new sump gasket will be required on
refitting, and suitable sealing compound will
be required to coat the sump and cylinder
block mating faces. Shims may be required
when mating the gearbox/transmission.
1Sump removal and refitting is far easier if
the engine is removed from the vehicle,
however if the engine is in the vehicle, proceed
as follows. If the engine has been removed
from the vehicle, proceed to paragraph 9.
2Remove the clutch or automatic
transmission, as applicable.
3Remove the flywheel/driveplate and the
engine adapter plate.
4Drain the engine oil into a suitable container.
5Ensure that the steering wheel is positioned
in the straight-ahead position then, using a
dab of paint or a marker pen, make alignment
marks between the intermediate shaft lower
clamp and steering gear pinion. Slacken and
remove the lower clamp bolt then disconnect
the intermediate shaft from the steering gear.
6Attach a suitable hoist to the engine lifting
brackets located at the front and rear of the
cylinder head, and carefully take the weight of
the engine.
7Detach the brake lines from the front
suspension crossmember.
8Support the crossmember with a jack, then
loosen the bolts securing the crossmember to
the underbody. Remove the bolts and carefully
lower the crossmember sufficiently to allow
the sump to be removed.
9If the engine has been removed, it is
preferable to keep it upright until the sump has
been removed to prevent sludge from entering
the engine internals.
10Unscrew the sump securing nuts and
bolts, and withdraw the sump from the engine.
Do not prise between the mating faces of the
sump and cylinder block. Discard the old
gasket.
11Thoroughly clean the mating faces of the
cylinder block and sump.
12Commence refitting by locating a new
gasket in the grooves in the sump.
25Sump - removal and refitting
24Crankshaft rear oil seal -
renewal
23Crankshaft front oil seal -
renewal
22Flywheel/driveplate - removal
inspection and refitting
DOHCengine 2B•15
2B
22.1 Improvised tool used to hold flywheel
when tightening securing bolts
24.4 Tool used to fit the oil seal
A Rear oil seal housing
B Special tool
A tool can be improvised using
a metal tube, a metal disc or
flat bar, and two flywheel
bolts.Draw the seal into
position using the two flywheel bolts.
If the sump is stuck, gently
tap it sideways to free it (the
sump will not move far
sideways, as it locates on
studs in the cylinder block).
procarmanuals.com
Page 59 of 255
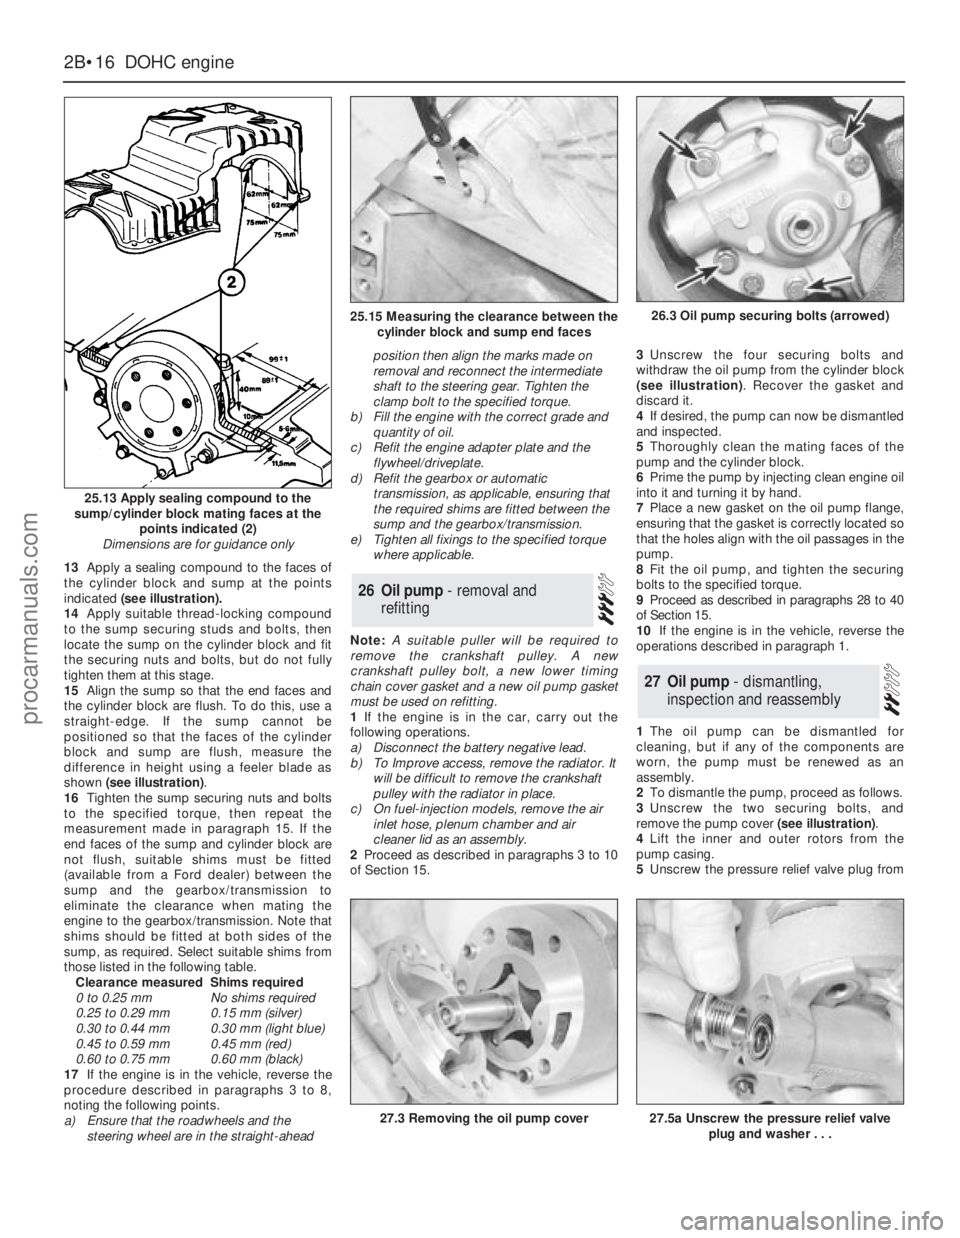
13Apply a sealing compound to the faces of
the cylinder block and sump at the points
indicated(see illustration).
14Apply suitable thread-locking compound
to the sump securing studs and bolts, then
locate the sump on the cylinder block and fit
the securing nuts and bolts, but do not fully
tighten them at this stage.
15Align the sump so that the end faces and
the cylinder block are flush. To do this, use a
straight-edge. If the sump cannot be
positioned so that the faces of the cylinder
block and sump are flush, measure the
difference in height using a feeler blade as
shown (see illustration).
16Tighten the sump securing nuts and bolts
to the specified torque, then repeat the
measurement made in paragraph 15. If the
end faces of the sump and cylinder block are
not flush, suitable shims must be fitted
(available from a Ford dealer) between the
sump and the gearbox/transmission to
eliminate the clearance when mating the
engine to the gearbox/transmission. Note that
shims should be fitted at both sides of the
sump, as required. Select suitable shims from
those listed in the following table.
Clearance measuredShims required
0 to 0.25 mmNo shims required
0.25 to 0.29 mm0.15 mm (silver)
0.30 to 0.44 mm0.30 mm (light blue)
0.45 to 0.59 mm0.45 mm (red)
0.60 to 0.75 mm0.60 mm (black)
17If the engine is in the vehicle, reverse the
procedure described in paragraphs 3 to 8,
noting the following points.
a)Ensure that the roadwheels and the
steering wheel are in the straight-aheadposition then align the marks made on
removal and reconnect the intermediate
shaft to the steering gear. Tighten the
clamp bolt to the specified torque.
b)Fill the engine with the correct grade and
quantity of oil.
c)Refit the engine adapter plate and the
flywheel/driveplate.
d)Refit the gearbox or automatic
transmission, as applicable, ensuring that
the required shims are fitted between the
sump and the gearbox/transmission.
e)Tighten all fixings to the specified torque
where applicable.
Note: A suitable puller will be required to
remove the crankshaft pulley. A new
crankshaft pulley bolt, a new lower timing
chain cover gasket and a new oil pump gasket
must be used on refitting.
1If the engine is in the car, carry out the
following operations.
a)Disconnect the battery negative lead.
b)To Improve access, remove the radiator. It
will be difficult to remove the crankshaft
pulley with the radiator in place.
c)On fuel-injection models, remove the air
inlet hose, plenum chamber and air
cleaner lid as an assembly.
2Proceed as described in paragraphs 3 to 10
of Section 15.3Unscrew the four securing bolts and
withdraw the oil pump from the cylinder block
(see illustration). Recover the gasket and
discard it.
4If desired, the pump can now be dismantled
and inspected.
5Thoroughly clean the mating faces of the
pump and the cylinder block.
6Prime the pump by injecting clean engine oil
into it and turning it by hand.
7Place a new gasket on the oil pump flange,
ensuring that the gasket is correctly located so
that the holes align with the oil passages in the
pump.
8Fit the oil pump, and tighten the securing
bolts to the specified torque.
9Proceed as described in paragraphs 28 to 40
of Section 15.
10If the engine is in the vehicle, reverse the
operations described in paragraph 1.
1The oil pump can be dismantled for
cleaning, but if any of the components are
worn, the pump must be renewed as an
assembly.
2To dismantle the pump, proceed as follows.
3Unscrew the two securing bolts, and
remove the pump cover (see illustration).
4Lift the inner and outer rotors from the
pump casing.
5Unscrew the pressure relief valve plug from
27Oil pump - dismantling,
inspection and reassembly
26Oil pump - removal and
refitting
2B•16DOHCengine
25.13 Apply sealing compound to the
sump/cylinder block mating faces at the
points indicated (2)
Dimensions are for guidance only
27.3 Removing the oil pump cover27.5a Unscrew the pressure relief valve
plug and washer . . .
25.15 Measuring the clearance between the
cylinder block and sump end faces26.3 Oil pump securing bolts (arrowed)
procarmanuals.com
Page 60 of 255
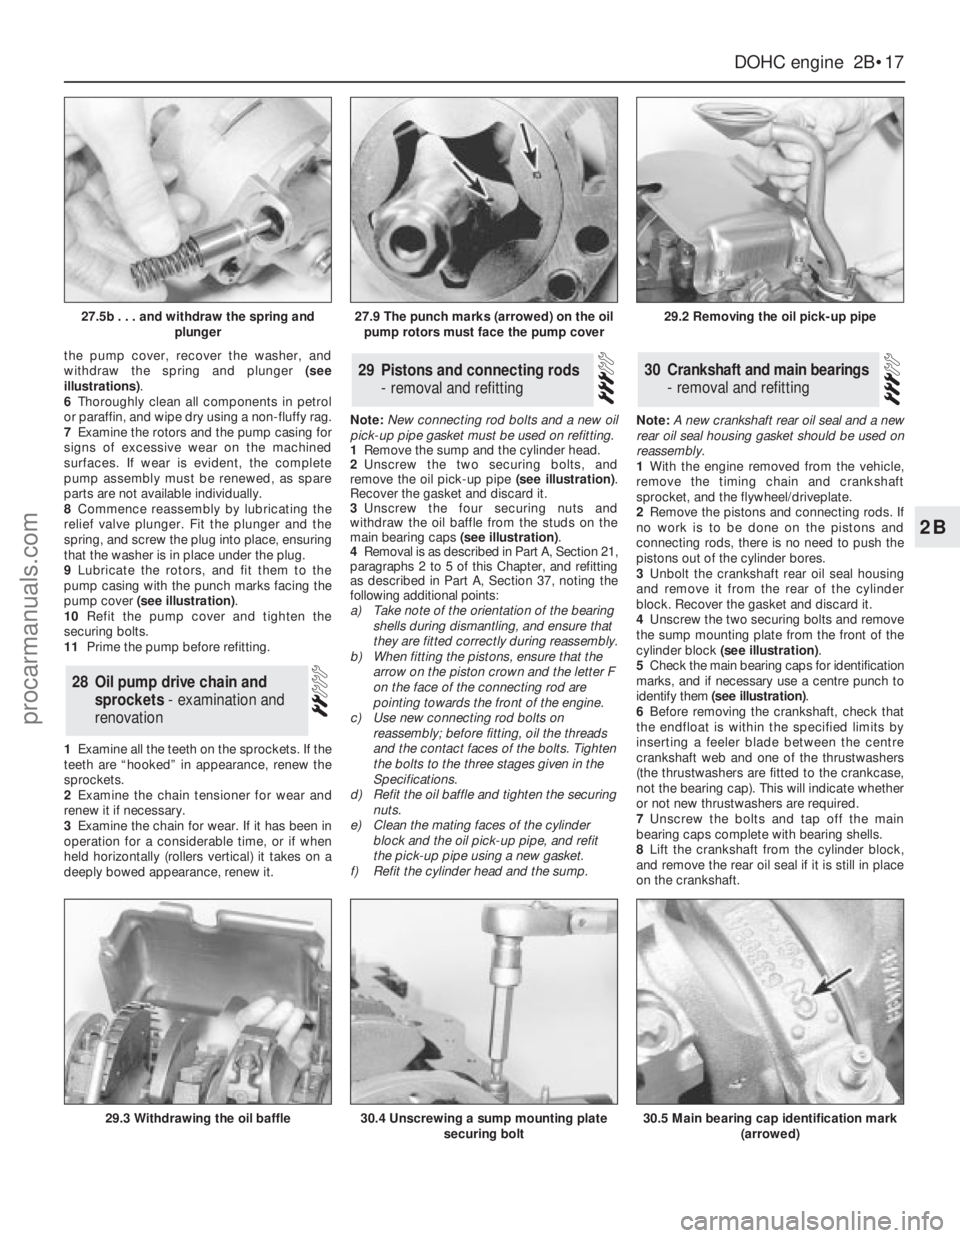
the pump cover, recover the washer, and
withdraw the spring and plunger (see
illustrations).
6Thoroughly clean all components in petrol
or paraffin, and wipe dry using a non-fluffy rag.
7Examine the rotors and the pump casing for
signs of excessive wear on the machined
surfaces. If wear is evident, the complete
pump assembly must be renewed, as spare
parts are not available individually.
8Commence reassembly by lubricating the
relief valve plunger. Fit the plunger and the
spring, and screw the plug into place, ensuring
that the washer is in place under the plug.
9Lubricate the rotors, and fit them to the
pump casing with the punch marks facing the
pump cover (see illustration).
10Refit the pump cover and tighten the
securing bolts.
11Prime the pump before refitting.
1Examine all the teeth on the sprockets. If the
teeth are “hooked” in appearance, renew the
sprockets.
2Examine the chain tensioner for wear and
renew it if necessary.
3Examine the chain for wear. If it has been in
operation for a considerable time, or if when
held horizontally (rollers vertical) it takes on a
deeply bowed appearance, renew it.Note: New connecting rod bolts and a new oil
pick-up pipe gasket must be used on refitting.
1Remove the sump and the cylinder head.
2Unscrew the two securing bolts, and
remove the oil pick-up pipe (see illustration).
Recover the gasket and discard it.
3Unscrew the four securing nuts and
withdraw the oil baffle from the studs on the
main bearing caps (see illustration).
4Removal is as described in Part A, Section 21,
paragraphs 2 to 5 of this Chapter, and refitting
as described in Part A, Section 37, noting the
following additional points:
a)Take note of the orientation of the bearing
shells during dismantling, and ensure that
they are fitted correctly during reassembly.
b)When fitting the pistons, ensure that the
arrow on the piston crown and the letter F
on the face of the connecting rod are
pointing towards the front of the engine.
c)Use new connecting rod bolts on
reassembly; before fitting, oil the threads
and the contact faces of the bolts. Tighten
the bolts to the three stages given in the
Specifications.
d)Refit the oil baffle and tighten the securing
nuts.
e)Clean the mating faces of the cylinder
block and the oil pick-up pipe, and refit
the pick-up pipe using a new gasket.
f)Refit the cylinder head and the sump.Note: A new crankshaft rear oil seal and a new
rear oil seal housing gasket should be used on
reassembly.
1With the engine removed from the vehicle,
remove the timing chain and crankshaft
sprocket, and the flywheel/driveplate.
2Remove the pistons and connecting rods. If
no work is to be done on the pistons and
connecting rods, there is no need to push the
pistons out of the cylinder bores.
3Unbolt the crankshaft rear oil seal housing
and remove it from the rear of the cylinder
block. Recover the gasket and discard it.
4Unscrew the two securing bolts and remove
the sump mounting plate from the front of the
cylinder block (see illustration).
5Check the main bearing caps for identification
marks, and if necessary use a centre punch to
identify them (see illustration).
6Before removing the crankshaft, check that
the endfloat is within the specified limits by
inserting a feeler blade between the centre
crankshaft web and one of the thrustwashers
(the thrustwashers are fitted to the crankcase,
not the bearing cap). This will indicate whether
or not new thrustwashers are required.
7Unscrew the bolts and tap off the main
bearing caps complete with bearing shells.
8Lift the crankshaft from the cylinder block,
and remove the rear oil seal if it is still in place
on the crankshaft.30Crankshaft and main bearings
- removal and refitting29Pistons and connecting rods
- removal and refitting
28Oil pump drive chain and
sprockets - examination and
renovation
DOHCengine 2B•17
2B
27.5b . . . and withdraw the spring and
plunger27.9 The punch marks (arrowed) on the oil
pump rotors must face the pump cover29.2 Removing the oil pick-up pipe
29.3 Withdrawing the oil baffle30.4 Unscrewing a sump mounting plate
securing bolt30.5 Main bearing cap identification mark
(arrowed)
procarmanuals.com
Page 61 of 255
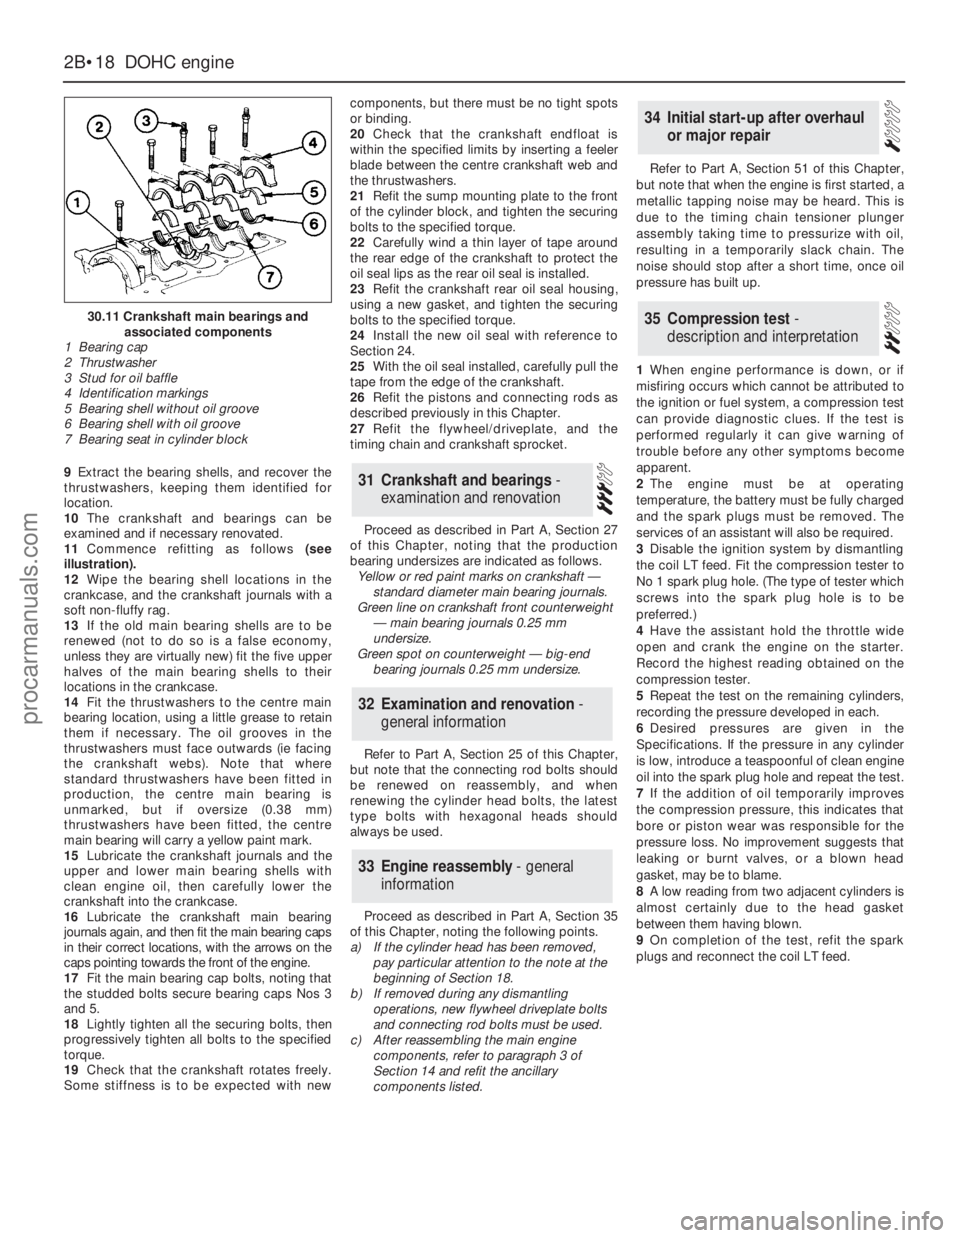
9Extract the bearing shells, and recover the
thrustwashers, keeping them identified for
location.
10The crankshaft and bearings can be
examined and if necessary renovated.
11Commence refitting as follows(see
illustration).
12Wipe the bearing shell locations in the
crankcase, and the crankshaft journals with a
soft non-fluffy rag.
13If the old main bearing shells are to be
renewed (not to do so is a false economy,
unless they are virtually new) fit the five upper
halves of the main bearing shells to their
locations in the crankcase.
14Fit the thrustwashers to the centre main
bearing location, using a little grease to retain
them if necessary. The oil grooves in the
thrustwashers must face outwards (ie facing
the crankshaft webs). Note that where
standard thrustwashers have been fitted in
production, the centre main bearing is
unmarked, but if oversize (0.38 mm)
thrustwashers have been fitted, the centre
main bearing will carry a yellow paint mark.
15Lubricate the crankshaft journals and the
upper and lower main bearing shells with
clean engine oil, then carefully lower the
crankshaft into the crankcase.
16Lubricate the crankshaft main bearing
journals again, and then fit the main bearing caps
in their correct locations, with the arrows on the
caps pointing towards the front of the engine.
17Fit the main bearing cap bolts, noting that
the studded bolts secure bearing caps Nos 3
and 5.
18Lightly tighten all the securing bolts, then
progressively tighten all bolts to the specified
torque.
19Check that the crankshaft rotates freely.
Some stiffness is to be expected with newcomponents, but there must be no tight spots
or binding.
20Check that the crankshaft endfloat is
within the specified limits by inserting a feeler
blade between the centre crankshaft web and
the thrustwashers.
21Refit the sump mounting plate to the front
of the cylinder block, and tighten the securing
bolts to the specified torque.
22Carefully wind a thin layer of tape around
the rear edge of the crankshaft to protect the
oil seal lips as the rear oil seal is installed.
23Refit the crankshaft rear oil seal housing,
using a new gasket, and tighten the securing
bolts to the specified torque.
24Install the new oil seal with reference to
Section 24.
25With the oil seal installed, carefully pull the
tape from the edge of the crankshaft.
26Refit the pistons and connecting rods as
described previously in this Chapter.
27Refit the flywheel/driveplate, and the
timing chain and crankshaft sprocket.
Proceed as described in Part A, Section 27
of this Chapter, noting that the production
bearing undersizes are indicated as follows.
Yellow or red paint marks on crankshaft —
standard diameter main bearing journals.
Green line on crankshaft front counterweight
— main bearing journals 0.25 mm
undersize.
Green spot on counterweight — big-end
bearing journals 0.25 mm undersize.
Refer to Part A, Section 25 of this Chapter,
but note that the connecting rod bolts should
be renewed on reassembly, and when
renewing the cylinder head bolts, the latest
type bolts with hexagonal heads should
always be used.
Proceed as described in Part A, Section 35
of this Chapter, noting the following points.
a)If the cylinder head has been removed,
pay particular attention to the note at the
beginning of Section 18.
b)If removed during any dismantling
operations, new flywheel driveplate bolts
and connecting rod bolts must be used.
c)After reassembling the main engine
components, refer to paragraph 3 of
Section 14 and refit the ancillary
components listed.Refer to Part A, Section 51 of this Chapter,
but note that when the engine is first started, a
metallic tapping noise may be heard. This is
due to the timing chain tensioner plunger
assembly taking time to pressurize with oil,
resulting in a temporarily slack chain. The
noise should stop after a short time, once oil
pressure has built up.
1When engine performance is down, or if
misfiring occurs which cannot be attributed to
the ignition or fuel system, a compression test
can provide diagnostic clues. If the test is
performed regularly it can give warning of
trouble before any other symptoms become
apparent.
2The engine must be at operating
temperature, the battery must be fully charged
and the spark plugs must be removed. The
services of an assistant will also be required.
3Disable the ignition system by dismantling
the coil LT feed. Fit the compression tester to
No 1 spark plug hole. (The type of tester which
screws into the spark plug hole is to be
preferred.)
4Have the assistant hold the throttle wide
open and crank the engine on the starter.
Record the highest reading obtained on the
compression tester.
5Repeat the test on the remaining cylinders,
recording the pressure developed in each.
6Desired pressures are given in the
Specifications. If the pressure in any cylinder
is low, introduce a teaspoonful of clean engine
oil into the spark plug hole and repeat the test.
7If the addition of oil temporarily improves
the compression pressure, this indicates that
bore or piston wear was responsible for the
pressure loss. No improvement suggests that
leaking or burnt valves, or a blown head
gasket, may be to blame.
8A low reading from two adjacent cylinders is
almost certainly due to the head gasket
between them having blown.
9On completion of the test, refit the spark
plugs and reconnect the coil LT feed.
35Compression test -
description and interpretation
34Initial start-up after overhaul
or major repair
33Engine reassembly - general
information
32Examination and renovation -
general information
31Crankshaft and bearings -
examination and renovation
2B•18DOHCengine
30.11 Crankshaft main bearings and
associated components
1 Bearing cap
2 Thrustwasher
3 Stud for oil baffle
4 Identification markings
5 Bearing shell without oil groove
6 Bearing shell with oil groove
7 Bearing seat in cylinder block
procarmanuals.com
Page 62 of 255
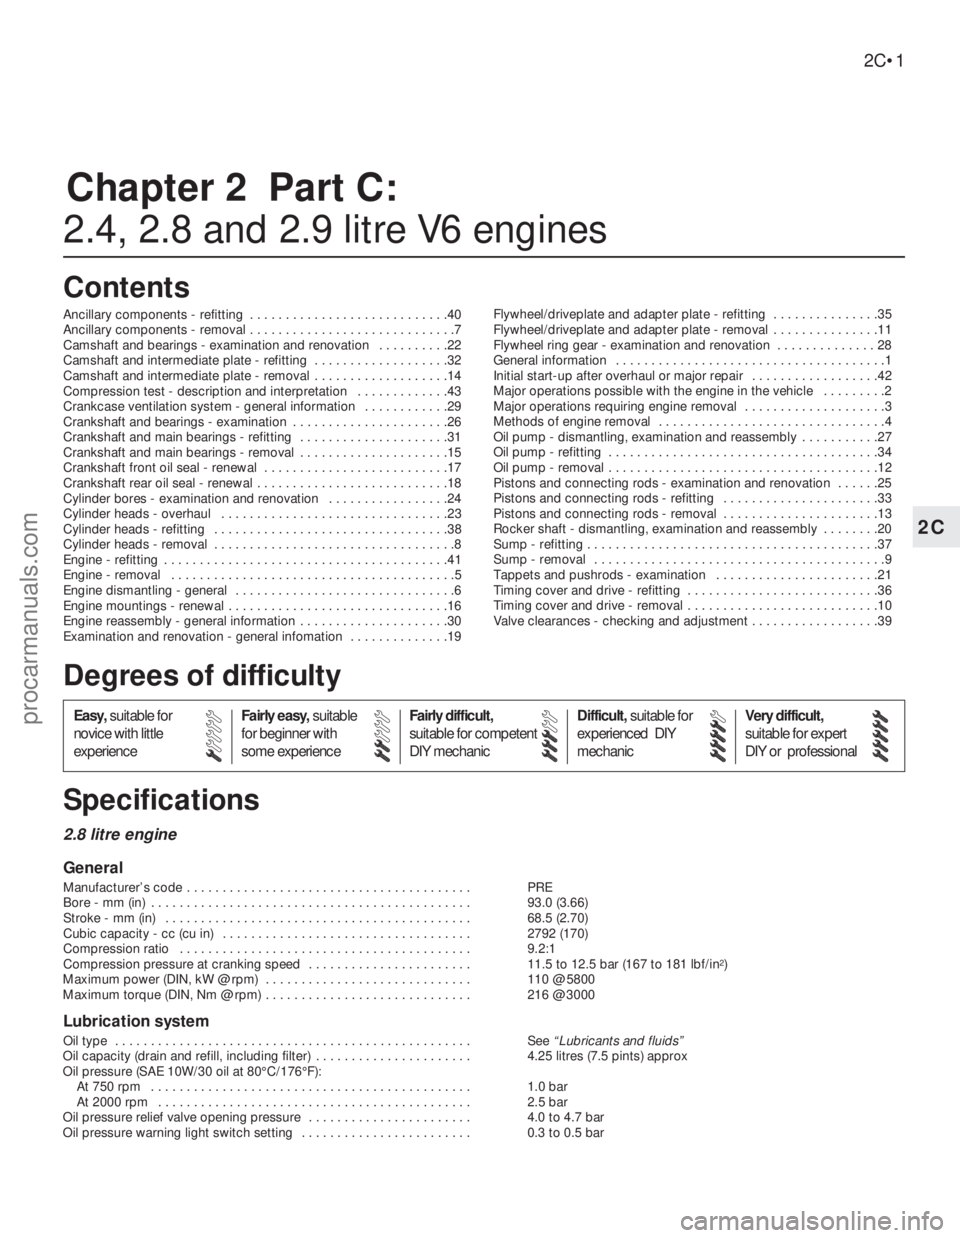
Chapter 2 Part C:
2.4, 2.8 and 2.9 litre V6 engines
Ancillary components - refitting . . . . . . . . . . . . . . . . . . . . . . . . . . . .40
Ancillary components - removal . . . . . . . . . . . . . . . . . . . . . . . . . . . . .7
Camshaft and bearings - examination and renovation . . . . . . . . . .22
Camshaft and intermediate plate - refitting . . . . . . . . . . . . . . . . . . .32
Camshaft and intermediate plate - removal . . . . . . . . . . . . . . . . . . .14
Compression test - description and interpretation . . . . . . . . . . . . .43
Crankcase ventilation system - general information . . . . . . . . . . . .29
Crankshaft and bearings - examination . . . . . . . . . . . . . . . . . . . . . .26
Crankshaft and main bearings - refitting . . . . . . . . . . . . . . . . . . . . .31
Crankshaft and main bearings - removal . . . . . . . . . . . . . . . . . . . . .15
Crankshaft front oil seal - renewal . . . . . . . . . . . . . . . . . . . . . . . . . .17
Crankshaft rear oil seal - renewal . . . . . . . . . . . . . . . . . . . . . . . . . . .18
Cylinder bores - examination and renovation . . . . . . . . . . . . . . . . .24
Cylinder heads - overhaul . . . . . . . . . . . . . . . . . . . . . . . . . . . . . . . .23
Cylinder heads - refitting . . . . . . . . . . . . . . . . . . . . . . . . . . . . . . . . .38
Cylinder heads - removal . . . . . . . . . . . . . . . . . . . . . . . . . . . . . . . . . .8
Engine - refitting . . . . . . . . . . . . . . . . . . . . . . . . . . . . . . . . . . . . . . . .41
Engine - removal . . . . . . . . . . . . . . . . . . . . . . . . . . . . . . . . . . . . . . . .5
Engine dismantling - general . . . . . . . . . . . . . . . . . . . . . . . . . . . . . . .6
Engine mountings - renewal . . . . . . . . . . . . . . . . . . . . . . . . . . . . . . .16
Engine reassembly - general information . . . . . . . . . . . . . . . . . . . . .30
Examination and renovation - general infomation . . . . . . . . . . . . . .19Flywheel/driveplate and adapter plate - refitting . . . . . . . . . . . . . . .35
Flywheel/driveplate and adapter plate - removal . . . . . . . . . . . . . . .11
Flywheel ring gear - examination and renovation . . . . . . . . . . . . . . 28
General information . . . . . . . . . . . . . . . . . . . . . . . . . . . . . . . . . . . . . .1
Initial start-up after overhaul or major repair . . . . . . . . . . . . . . . . . .42
Major operations possible with the engine in the vehicle . . . . . . . . .2
Major operations requiring engine removal . . . . . . . . . . . . . . . . . . . .3
Methods of engine removal . . . . . . . . . . . . . . . . . . . . . . . . . . . . . . . .4
Oil pump - dismantling, examination and reassembly . . . . . . . . . . .27
Oil pump - refitting . . . . . . . . . . . . . . . . . . . . . . . . . . . . . . . . . . . . . .34
Oil pump - removal . . . . . . . . . . . . . . . . . . . . . . . . . . . . . . . . . . . . . .12
Pistons and connecting rods - examination and renovation . . . . . .25
Pistons and connecting rods - refitting . . . . . . . . . . . . . . . . . . . . . .33
Pistons and connecting rods - removal . . . . . . . . . . . . . . . . . . . . . .13
Rocker shaft - dismantling, examination and reassembly . . . . . . . .20
Sump - refitting . . . . . . . . . . . . . . . . . . . . . . . . . . . . . . . . . . . . . . . . .37
Sump - removal . . . . . . . . . . . . . . . . . . . . . . . . . . . . . . . . . . . . . . . . .9
Tappets and pushrods - examination . . . . . . . . . . . . . . . . . . . . . . .21
Timing cover and drive - refitting . . . . . . . . . . . . . . . . . . . . . . . . . . .36
Timing cover and drive - removal . . . . . . . . . . . . . . . . . . . . . . . . . . .10
Valve clearances - checking and adjustment . . . . . . . . . . . . . . . . . .39
2.8 litre engine
General
Manufacturer’s code . . . . . . . . . . . . . . . . . . . . . . . . . . . . . . . . . . . . . . . . PRE
Bore - mm (in) . . . . . . . . . . . . . . . . . . . . . . . . . . . . . . . . . . . . . . . . . . . . . 93.0 (3.66)
Stroke - mm (in) . . . . . . . . . . . . . . . . . . . . . . . . . . . . . . . . . . . . . . . . . . . 68.5 (2.70)
Cubic capacity - cc (cu in) . . . . . . . . . . . . . . . . . . . . . . . . . . . . . . . . . . . 2792 (170)
Compression ratio . . . . . . . . . . . . . . . . . . . . . . . . . . . . . . . . . . . . . . . . . 9.2:1
Compression pressure at cranking speed . . . . . . . . . . . . . . . . . . . . . . . 11.5 to 12.5 bar (167 to 181 lbf/in
2)
Maximum power (DIN, kW @ rpm) . . . . . . . . . . . . . . . . . . . . . . . . . . . . . 110 @ 5800
Maximum torque (DIN, Nm @ rpm) . . . . . . . . . . . . . . . . . . . . . . . . . . . . . 216 @ 3000
Lubrication system
Oil type . . . . . . . . . . . . . . . . . . . . . . . . . . . . . . . . . . . . . . . . . . . . . . . . . . See “Lubricants and fluids”
Oil capacity (drain and refill, including filter) . . . . . . . . . . . . . . . . . . . . . . 4.25 litres (7.5 pints) approx
Oil pressure (SAE 10W/30 oil at 80°C/176°F):
At 750 rpm . . . . . . . . . . . . . . . . . . . . . . . . . . . . . . . . . . . . . . . . . . . . . 1.0 bar
At 2000 rpm . . . . . . . . . . . . . . . . . . . . . . . . . . . . . . . . . . . . . . . . . . . . 2.5 bar
Oil pressure relief valve opening pressure . . . . . . . . . . . . . . . . . . . . . . . 4.0 to 4.7 bar
Oil pressure warning light switch setting . . . . . . . . . . . . . . . . . . . . . . . . 0.3 to 0.5 bar
2C•1
Easy,suitable for
novice with little
experienceFairly easy,suitable
for beginner with
some experienceFairly difficult,
suitable for competent
DIY mechanicDifficult,suitable for
experienced DIY
mechanicVery difficult,
suitable for expert
DIY or professional
Degrees of difficulty
Specifications Contents
2C
procarmanuals.com
Page 63 of 255
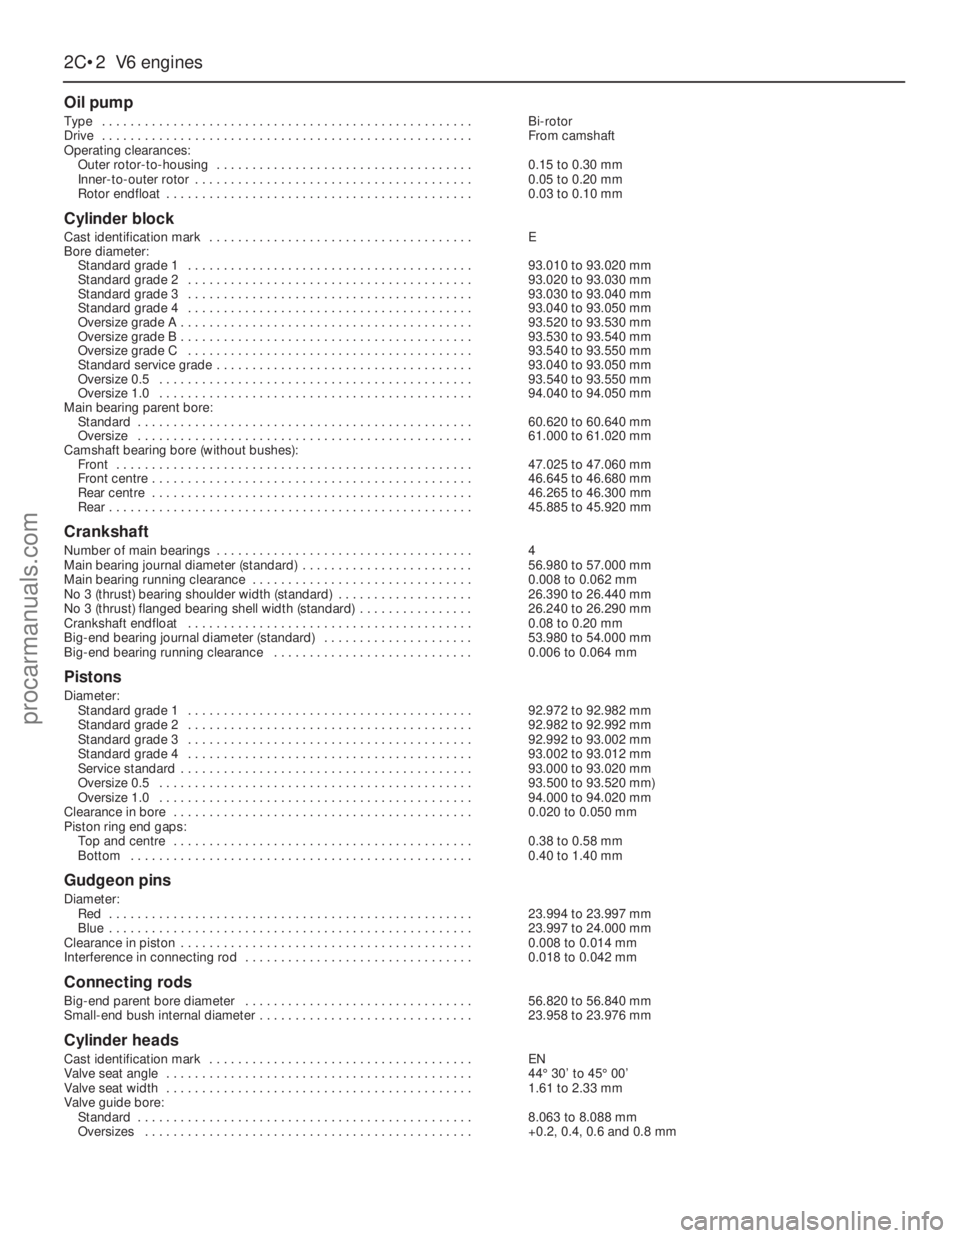
2C•2V6 engines
Oil pump
Type . . . . . . . . . . . . . . . . . . . . . . . . . . . . . . . . . . . . . . . . . . . . . . . . . . . .Bi-rotor
Drive . . . . . . . . . . . . . . . . . . . . . . . . . . . . . . . . . . . . . . . . . . . . . . . . . . . .From camshaft
Operating clearances:
Outer rotor-to-housing . . . . . . . . . . . . . . . . . . . . . . . . . . . . . . . . . . . .0.15 to 0.30 mm
Inner-to-outer rotor . . . . . . . . . . . . . . . . . . . . . . . . . . . . . . . . . . . . . . .0.05 to 0.20 mm
Rotor endfloat . . . . . . . . . . . . . . . . . . . . . . . . . . . . . . . . . . . . . . . . . . .0.03 to 0.10 mm
Cylinder block
Cast identification mark . . . . . . . . . . . . . . . . . . . . . . . . . . . . . . . . . . . . .E
Bore diameter:
Standard grade 1 . . . . . . . . . . . . . . . . . . . . . . . . . . . . . . . . . . . . . . . .93.010 to 93.020 mm
Standard grade 2 . . . . . . . . . . . . . . . . . . . . . . . . . . . . . . . . . . . . . . . .93.020 to 93.030 mm
Standard grade 3 . . . . . . . . . . . . . . . . . . . . . . . . . . . . . . . . . . . . . . . .93.030 to 93.040 mm
Standard grade 4 . . . . . . . . . . . . . . . . . . . . . . . . . . . . . . . . . . . . . . . .93.040 to 93.050 mm
Oversize grade A . . . . . . . . . . . . . . . . . . . . . . . . . . . . . . . . . . . . . . . . .93.520 to 93.530 mm
Oversize grade B . . . . . . . . . . . . . . . . . . . . . . . . . . . . . . . . . . . . . . . . .93.530 to 93.540 mm
Oversize grade C . . . . . . . . . . . . . . . . . . . . . . . . . . . . . . . . . . . . . . . .93.540 to 93.550 mm
Standard service grade . . . . . . . . . . . . . . . . . . . . . . . . . . . . . . . . . . . .93.040 to 93.050 mm
Oversize 0.5 . . . . . . . . . . . . . . . . . . . . . . . . . . . . . . . . . . . . . . . . . . . .93.540 to 93.550 mm
Oversize 1.0 . . . . . . . . . . . . . . . . . . . . . . . . . . . . . . . . . . . . . . . . . . . .94.040 to 94.050 mm
Main bearing parent bore:
Standard . . . . . . . . . . . . . . . . . . . . . . . . . . . . . . . . . . . . . . . . . . . . . . .60.620 to 60.640 mm
Oversize . . . . . . . . . . . . . . . . . . . . . . . . . . . . . . . . . . . . . . . . . . . . . . .61.000 to 61.020 mm
Camshaft bearing bore (without bushes):
Front . . . . . . . . . . . . . . . . . . . . . . . . . . . . . . . . . . . . . . . . . . . . . . . . . .47.025 to 47.060 mm
Front centre . . . . . . . . . . . . . . . . . . . . . . . . . . . . . . . . . . . . . . . . . . . . .46.645 to 46.680 mm
Rear centre . . . . . . . . . . . . . . . . . . . . . . . . . . . . . . . . . . . . . . . . . . . . .46.265 to 46.300 mm
Rear . . . . . . . . . . . . . . . . . . . . . . . . . . . . . . . . . . . . . . . . . . . . . . . . . . .45.885 to 45.920 mm
Crankshaft
Number of main bearings . . . . . . . . . . . . . . . . . . . . . . . . . . . . . . . . . . . .4
Main bearing journal diameter (standard) . . . . . . . . . . . . . . . . . . . . . . . .56.980 to 57.000 mm
Main bearing running clearance . . . . . . . . . . . . . . . . . . . . . . . . . . . . . . .0.008 to 0.062 mm
No 3 (thrust) bearing shoulder width (standard) . . . . . . . . . . . . . . . . . . .26.390 to 26.440 mm
No 3 (thrust) flanged bearing shell width (standard) . . . . . . . . . . . . . . . .26.240 to 26.290 mm
Crankshaft endfloat . . . . . . . . . . . . . . . . . . . . . . . . . . . . . . . . . . . . . . . .0.08 to 0.20 mm
Big-end bearing journal diameter (standard) . . . . . . . . . . . . . . . . . . . . .53.980 to 54.000 mm
Big-end bearing running clearance . . . . . . . . . . . . . . . . . . . . . . . . . . . .0.006 to0.064 mm
Pistons
Diameter:
Standard grade 1 . . . . . . . . . . . . . . . . . . . . . . . . . . . . . . . . . . . . . . . .92.972 to 92.982 mm
Standard grade 2 . . . . . . . . . . . . . . . . . . . . . . . . . . . . . . . . . . . . . . . .92.982 to 92.992 mm
Standard grade 3 . . . . . . . . . . . . . . . . . . . . . . . . . . . . . . . . . . . . . . . .92.992 to 93.002 mm
Standard grade 4 . . . . . . . . . . . . . . . . . . . . . . . . . . . . . . . . . . . . . . . .93.002 to 93.012 mm
Service standard . . . . . . . . . . . . . . . . . . . . . . . . . . . . . . . . . . . . . . . . .93.000 to 93.020 mm
Oversize 0.5 . . . . . . . . . . . . . . . . . . . . . . . . . . . . . . . . . . . . . . . . . . . .93.500 to 93.520 mm)
Oversize 1.0 . . . . . . . . . . . . . . . . . . . . . . . . . . . . . . . . . . . . . . . . . . . .94.000 to 94.020 mm
Clearance in bore . . . . . . . . . . . . . . . . . . . . . . . . . . . . . . . . . . . . . . . . . .0.020 to 0.050 mm
Piston ring end gaps:
Top and centre . . . . . . . . . . . . . . . . . . . . . . . . . . . . . . . . . . . . . . . . . .0.38 to 0.58 mm
Bottom . . . . . . . . . . . . . . . . . . . . . . . . . . . . . . . . . . . . . . . . . . . . . . . .0.40 to 1.40 mm
Gudgeon pins
Diameter:
Red . . . . . . . . . . . . . . . . . . . . . . . . . . . . . . . . . . . . . . . . . . . . . . . . . . .23.994 to 23.997 mm
Blue . . . . . . . . . . . . . . . . . . . . . . . . . . . . . . . . . . . . . . . . . . . . . . . . . . .23.997 to 24.000 mm
Clearance in piston . . . . . . . . . . . . . . . . . . . . . . . . . . . . . . . . . . . . . . . . .0.008 to 0.014 mm
Interference in connecting rod . . . . . . . . . . . . . . . . . . . . . . . . . . . . . . . .0.018 to 0.042 mm
Connecting rods
Big-end parent bore diameter . . . . . . . . . . . . . . . . . . . . . . . . . . . . . . . .56.820 to 56.840 mm
Small-end bush internal diameter . . . . . . . . . . . . . . . . . . . . . . . . . . . . . .23.958 to 23.976 mm
Cylinder heads
Cast identification mark . . . . . . . . . . . . . . . . . . . . . . . . . . . . . . . . . . . . .EN
Valve seat angle . . . . . . . . . . . . . . . . . . . . . . . . . . . . . . . . . . . . . . . . . . .44°30’ to 45°00’
Valve seat width . . . . . . . . . . . . . . . . . . . . . . . . . . . . . . . . . . . . . . . . . . .1.61 to 2.33 mm
Valve guide bore:
Standard . . . . . . . . . . . . . . . . . . . . . . . . . . . . . . . . . . . . . . . . . . . . . . .8.063 to 8.088 mm
Oversizes . . . . . . . . . . . . . . . . . . . . . . . . . . . . . . . . . . . . . . . . . . . . . .+0.2, 0.4, 0.6 and 0.8 mm
procarmanuals.com
Page 64 of 255
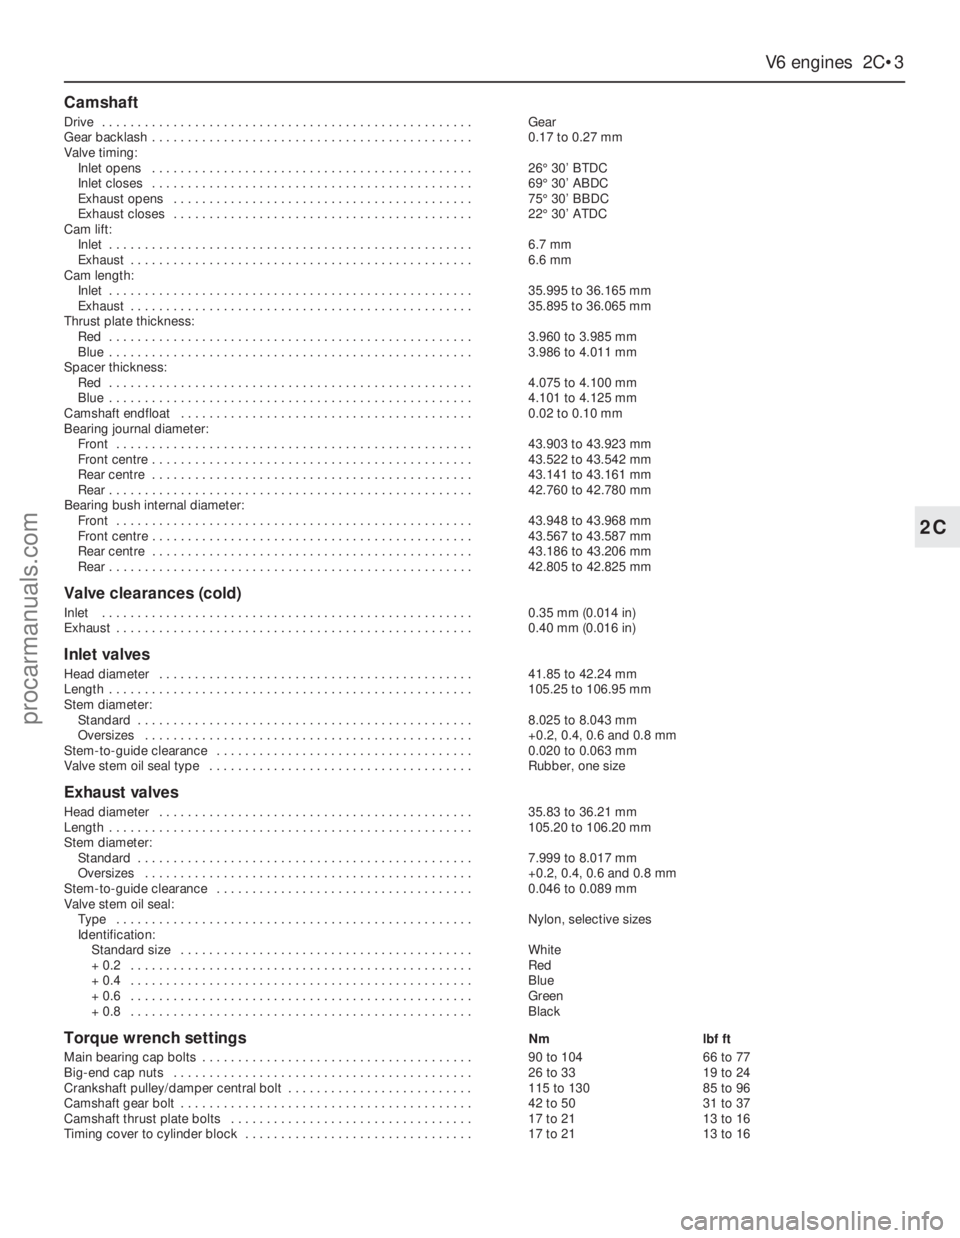
V6 engines 2C•3
2C
Camshaft
Drive . . . . . . . . . . . . . . . . . . . . . . . . . . . . . . . . . . . . . . . . . . . . . . . . . . . .Gear
Gear backlash . . . . . . . . . . . . . . . . . . . . . . . . . . . . . . . . . . . . . . . . . . . . .0.17 to 0.27 mm
Valve timing:
Inlet opens . . . . . . . . . . . . . . . . . . . . . . . . . . . . . . . . . . . . . . . . . . . . .26°30’ BTDC
Inlet closes . . . . . . . . . . . . . . . . . . . . . . . . . . . . . . . . . . . . . . . . . . . . .69°30’ ABDC
Exhaust opens . . . . . . . . . . . . . . . . . . . . . . . . . . . . . . . . . . . . . . . . . .75°30’ BBDC
Exhaust closes . . . . . . . . . . . . . . . . . . . . . . . . . . . . . . . . . . . . . . . . . .22°30’ ATDC
Cam lift:
Inlet . . . . . . . . . . . . . . . . . . . . . . . . . . . . . . . . . . . . . . . . . . . . . . . . . . .6.7 mm
Exhaust . . . . . . . . . . . . . . . . . . . . . . . . . . . . . . . . . . . . . . . . . . . . . . . .6.6 mm
Cam length:
Inlet . . . . . . . . . . . . . . . . . . . . . . . . . . . . . . . . . . . . . . . . . . . . . . . . . . .35.995 to 36.165 mm
Exhaust . . . . . . . . . . . . . . . . . . . . . . . . . . . . . . . . . . . . . . . . . . . . . . . .35.895 to 36.065 mm
Thrust plate thickness:
Red . . . . . . . . . . . . . . . . . . . . . . . . . . . . . . . . . . . . . . . . . . . . . . . . . . .3.960 to 3.985 mm
Blue . . . . . . . . . . . . . . . . . . . . . . . . . . . . . . . . . . . . . . . . . . . . . . . . . . .3.986 to 4.011 mm
Spacer thickness:
Red . . . . . . . . . . . . . . . . . . . . . . . . . . . . . . . . . . . . . . . . . . . . . . . . . . .4.075 to 4.100 mm
Blue . . . . . . . . . . . . . . . . . . . . . . . . . . . . . . . . . . . . . . . . . . . . . . . . . . .4.101 to 4.125 mm
Camshaft endfloat . . . . . . . . . . . . . . . . . . . . . . . . . . . . . . . . . . . . . . . . .0.02 to 0.10 mm
Bearing journal diameter:
Front . . . . . . . . . . . . . . . . . . . . . . . . . . . . . . . . . . . . . . . . . . . . . . . . . .43.903 to 43.923 mm
Front centre . . . . . . . . . . . . . . . . . . . . . . . . . . . . . . . . . . . . . . . . . . . . .43.522 to 43.542 mm
Rear centre . . . . . . . . . . . . . . . . . . . . . . . . . . . . . . . . . . . . . . . . . . . . .43.141 to 43.161 mm
Rear . . . . . . . . . . . . . . . . . . . . . . . . . . . . . . . . . . . . . . . . . . . . . . . . . . .42.760 to 42.780 mm
Bearing bush internal diameter:
Front . . . . . . . . . . . . . . . . . . . . . . . . . . . . . . . . . . . . . . . . . . . . . . . . . .43.948 to 43.968 mm
Front centre . . . . . . . . . . . . . . . . . . . . . . . . . . . . . . . . . . . . . . . . . . . . .43.567 to 43.587 mm
Rear centre . . . . . . . . . . . . . . . . . . . . . . . . . . . . . . . . . . . . . . . . . . . . .43.186 to 43.206 mm
Rear . . . . . . . . . . . . . . . . . . . . . . . . . . . . . . . . . . . . . . . . . . . . . . . . . . .42.805 to 42.825 mm
Valve clearances (cold)
Inlet . . . . . . . . . . . . . . . . . . . . . . . . . . . . . . . . . . . . . . . . . . . . . . . . . . . .0.35 mm (0.014 in)
Exhaust . . . . . . . . . . . . . . . . . . . . . . . . . . . . . . . . . . . . . . . . . . . . . . . . . .0.40 mm (0.016 in)
Inlet valves
Head diameter . . . . . . . . . . . . . . . . . . . . . . . . . . . . . . . . . . . . . . . . . . . .41.85 to 42.24 mm
Length . . . . . . . . . . . . . . . . . . . . . . . . . . . . . . . . . . . . . . . . . . . . . . . . . . .105.25 to 106.95 mm
Stem diameter:
Standard . . . . . . . . . . . . . . . . . . . . . . . . . . . . . . . . . . . . . . . . . . . . . . .8.025 to 8.043 mm
Oversizes . . . . . . . . . . . . . . . . . . . . . . . . . . . . . . . . . . . . . . . . . . . . . .+0.2, 0.4, 0.6 and 0.8 mm
Stem-to-guide clearance . . . . . . . . . . . . . . . . . . . . . . . . . . . . . . . . . . . .0.020 to 0.063 mm
Valve stem oil seal type . . . . . . . . . . . . . . . . . . . . . . . . . . . . . . . . . . . . .Rubber, one size
Exhaust valves
Head diameter . . . . . . . . . . . . . . . . . . . . . . . . . . . . . . . . . . . . . . . . . . . .35.83 to 36.21 mm
Length . . . . . . . . . . . . . . . . . . . . . . . . . . . . . . . . . . . . . . . . . . . . . . . . . . .105.20 to 106.20 mm
Stem diameter:
Standard . . . . . . . . . . . . . . . . . . . . . . . . . . . . . . . . . . . . . . . . . . . . . . .7.999 to 8.017 mm
Oversizes . . . . . . . . . . . . . . . . . . . . . . . . . . . . . . . . . . . . . . . . . . . . . .+0.2, 0.4, 0.6 and 0.8 mm
Stem-to-guide clearance . . . . . . . . . . . . . . . . . . . . . . . . . . . . . . . . . . . .0.046 to 0.089 mm
Valve stem oil seal:
Type . . . . . . . . . . . . . . . . . . . . . . . . . . . . . . . . . . . . . . . . . . . . . . . . . .Nylon, selective sizes
Identification:
Standard size . . . . . . . . . . . . . . . . . . . . . . . . . . . . . . . . . . . . . . . . .White
+ 0.2 . . . . . . . . . . . . . . . . . . . . . . . . . . . . . . . . . . . . . . . . . . . . . . . .Red
+ 0.4 . . . . . . . . . . . . . . . . . . . . . . . . . . . . . . . . . . . . . . . . . . . . . . . .Blue
+ 0.6 . . . . . . . . . . . . . . . . . . . . . . . . . . . . . . . . . . . . . . . . . . . . . . . .Green
+ 0.8 . . . . . . . . . . . . . . . . . . . . . . . . . . . . . . . . . . . . . . . . . . . . . . . .Black
Torque wrench settingsNmlbf ft
Main bearing cap bolts . . . . . . . . . . . . . . . . . . . . . . . . . . . . . . . . . . . . . .90 to 10466 to 77
Big-end cap nuts . . . . . . . . . . . . . . . . . . . . . . . . . . . . . . . . . . . . . . . . . .26 to 3319 to 24
Crankshaft pulley/damper central bolt . . . . . . . . . . . . . . . . . . . . . . . . . .115 to 13085 to 96
Camshaft gear bolt . . . . . . . . . . . . . . . . . . . . . . . . . . . . . . . . . . . . . . . . .42 to 5031 to 37
Camshaft thrust plate bolts . . . . . . . . . . . . . . . . . . . . . . . . . . . . . . . . . .17 to 2113 to 16
Timing cover to cylinder block . . . . . . . . . . . . . . . . . . . . . . . . . . . . . . . .17 to 2113 to 16
procarmanuals.com
 1
1 2
2 3
3 4
4 5
5 6
6 7
7 8
8 9
9 10
10 11
11 12
12 13
13 14
14 15
15 16
16 17
17 18
18 19
19 20
20 21
21 22
22 23
23 24
24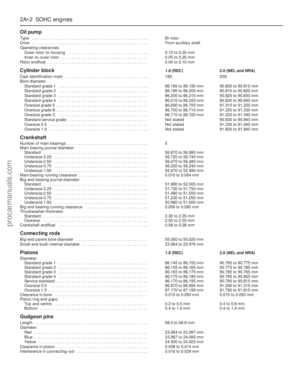 25
25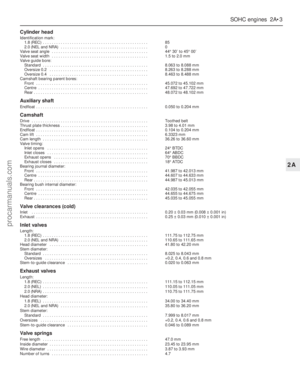 26
26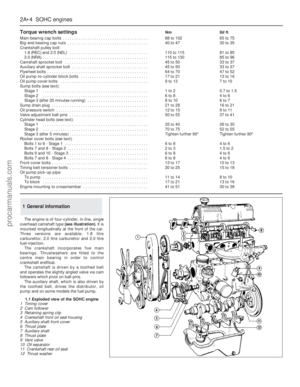 27
27 28
28 29
29 30
30 31
31 32
32 33
33 34
34 35
35 36
36 37
37 38
38 39
39 40
40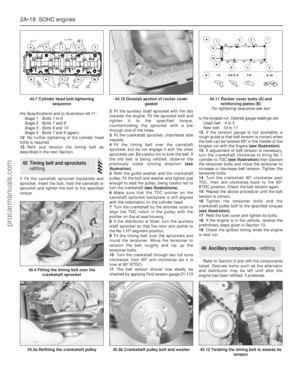 41
41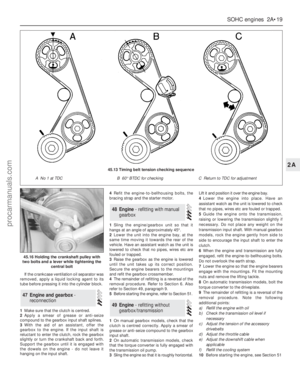 42
42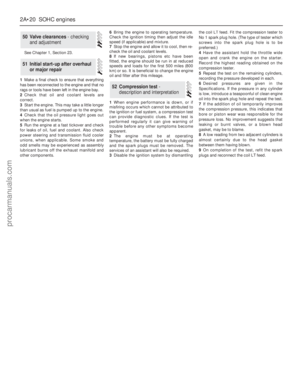 43
43 44
44 45
45 46
46 47
47 48
48 49
49 50
50 51
51 52
52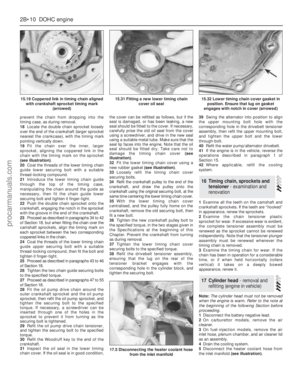 53
53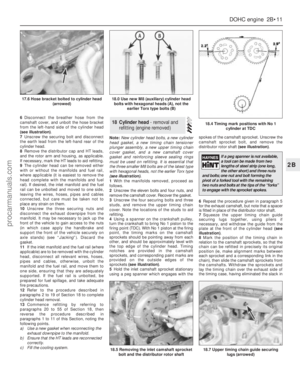 54
54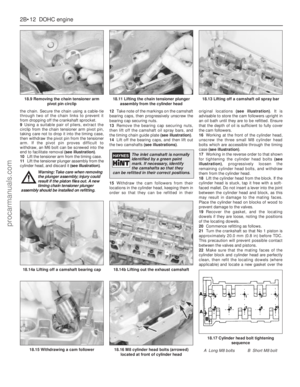 55
55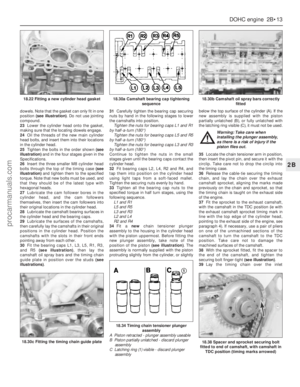 56
56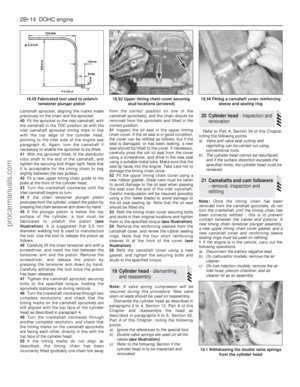 57
57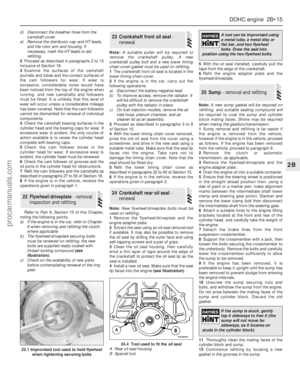 58
58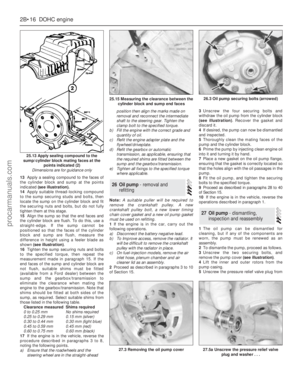 59
59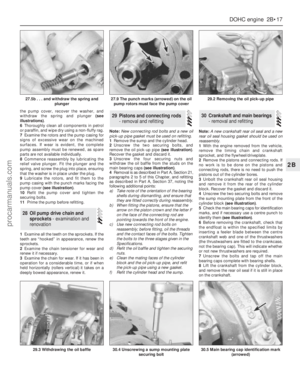 60
60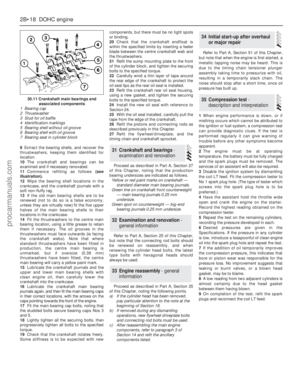 61
61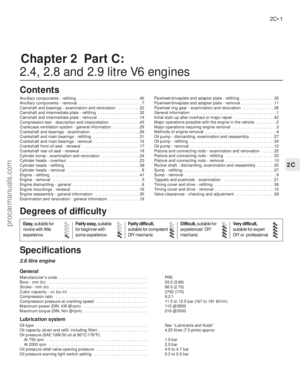 62
62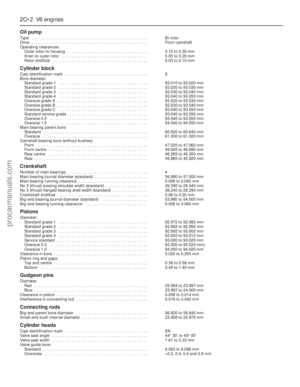 63
63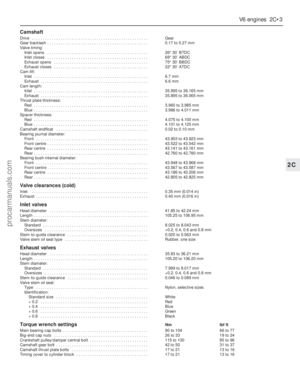 64
64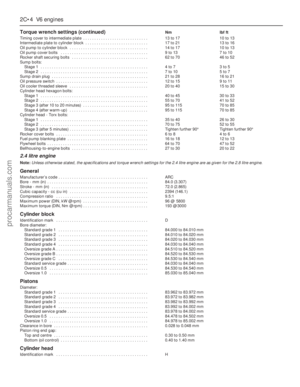 65
65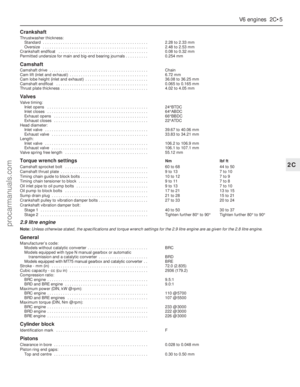 66
66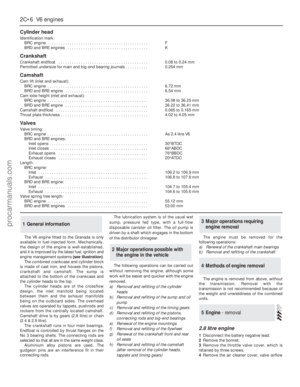 67
67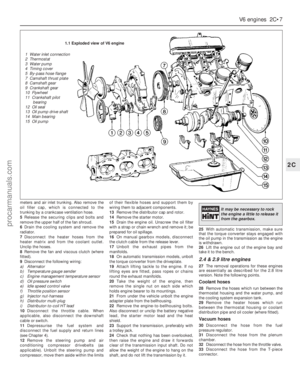 68
68 69
69 70
70 71
71 72
72 73
73 74
74 75
75 76
76 77
77 78
78 79
79 80
80 81
81 82
82 83
83 84
84 85
85 86
86 87
87 88
88 89
89 90
90 91
91 92
92 93
93 94
94 95
95 96
96 97
97 98
98 99
99 100
100 101
101 102
102 103
103 104
104 105
105 106
106 107
107 108
108 109
109 110
110 111
111 112
112 113
113 114
114 115
115 116
116 117
117 118
118 119
119 120
120 121
121 122
122 123
123 124
124 125
125 126
126 127
127 128
128 129
129 130
130 131
131 132
132 133
133 134
134 135
135 136
136 137
137 138
138 139
139 140
140 141
141 142
142 143
143 144
144 145
145 146
146 147
147 148
148 149
149 150
150 151
151 152
152 153
153 154
154 155
155 156
156 157
157 158
158 159
159 160
160 161
161 162
162 163
163 164
164 165
165 166
166 167
167 168
168 169
169 170
170 171
171 172
172 173
173 174
174 175
175 176
176 177
177 178
178 179
179 180
180 181
181 182
182 183
183 184
184 185
185 186
186 187
187 188
188 189
189 190
190 191
191 192
192 193
193 194
194 195
195 196
196 197
197 198
198 199
199 200
200 201
201 202
202 203
203 204
204 205
205 206
206 207
207 208
208 209
209 210
210 211
211 212
212 213
213 214
214 215
215 216
216 217
217 218
218 219
219 220
220 221
221 222
222 223
223 224
224 225
225 226
226 227
227 228
228 229
229 230
230 231
231 232
232 233
233 234
234 235
235 236
236 237
237 238
238 239
239 240
240 241
241 242
242 243
243 244
244 245
245 246
246 247
247 248
248 249
249 250
250 251
251 252
252 253
253 254
254


