Page 257 of 446
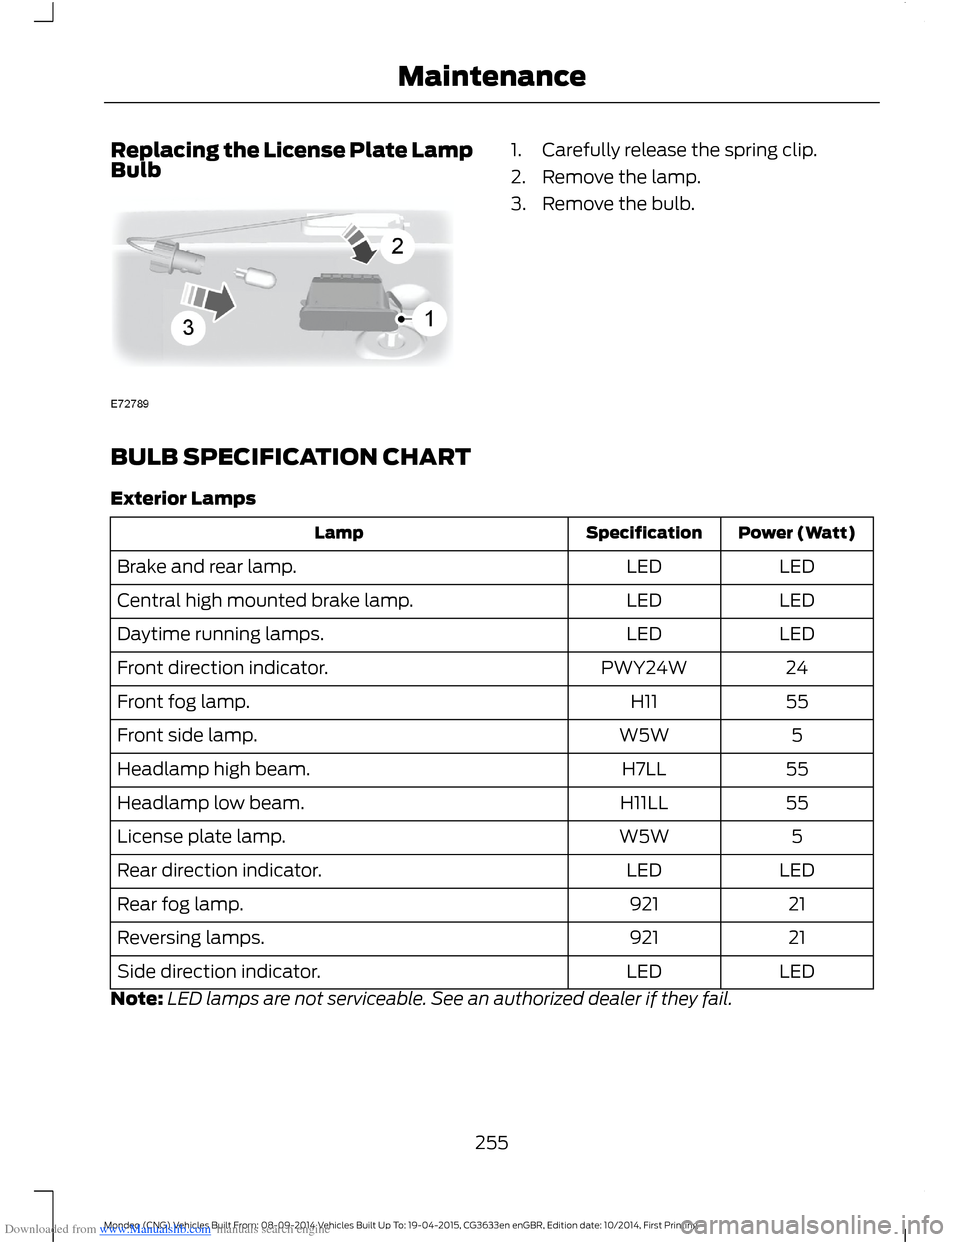
Downloaded from www.Manualslib.com manuals search engine Replacing the License Plate LampBulb1.Carefully release the spring clip.
2.Remove the lamp.
3.Remove the bulb.
BULB SPECIFICATION CHART
Exterior Lamps
Power (Watt)SpecificationLamp
LEDLEDBrake and rear lamp.
LEDLEDCentral high mounted brake lamp.
LEDLEDDaytime running lamps.
24PWY24WFront direction indicator.
55H11Front fog lamp.
5W5WFront side lamp.
55H7LLHeadlamp high beam.
55H11LLHeadlamp low beam.
5W5WLicense plate lamp.
LEDLEDRear direction indicator.
21921Rear fog lamp.
21921Reversing lamps.
LEDLEDSide direction indicator.
Note:LED lamps are not serviceable. See an authorized dealer if they fail.
255Mondeo (CNG) Vehicles Built From: 08-09-2014 Vehicles Built Up To: 19-04-2015, CG3633en enGBR, Edition date: 10/2014, First PrintingMaintenance
Page 258 of 446
Downloaded from www.Manualslib.com manuals search engine Interior Lamps
Power (Watt)SpecificationLamp
LEDLEDInterior lamp.
5W5WLuggage compartment lamp.
LEDLEDMap lamp.
Note:LED lamps are not serviceable. See an authorized dealer if they fail.
256Mondeo (CNG) Vehicles Built From: 08-09-2014 Vehicles Built Up To: 19-04-2015, CG3633en enGBR, Edition date: 10/2014, First PrintingMaintenance
Page 259 of 446

Downloaded from www.Manualslib.com manuals search engine CLEANING THE EXTERIOR
Note:If you use a car wash with a waxingcycle, make sure that you remove the waxfrom the windshield and the wiper blades.
Note:Prior to using a car wash facilitycheck the suitability of it for your vehicle.
Note:Some car washes use water at highpressure. Due to this, water droplets mayenter inside your vehicle and could alsodamage certain parts of your vehicle.
Note:Remove the aerial before using anautomatic car wash.
Note:Switch the heater blower off toprevent contamination of the fresh air filter.
We recommend that you wash your vehiclewith a sponge and lukewarm watercontaining a car shampoo.
Cleaning the Headlamps
Note:Do not scrape the headlamp lensesor use abrasives, alcoholic solvents orchemical solvents to clean them.
Note:Do not wipe the headlamps whenthey are dry.
Cleaning the Rear Window
Note:Do not scrape the inside of the rearwindow or use abrasives or chemicalsolvents to clean it.
Use a clean, lint free cloth or a dampchamois leather to clean the inside of therear window.
Cleaning the Chrome Trim
Note:Do not use abrasives or chemicalsolvents. Use soapy water.
Note:Do not apply cleaning product to hotsurfaces and do not leave cleaning producton chrome surfaces for a period of timeexceeding that which is recommended.
Note:Industrial-strength (heavy-duty)cleaners, or cleaning chemicals, may causedamage over a period of time.
Body Paintwork Preservation
WARNINGS
Do not polish your vehicle in strongsunshine.
Do not allow polish to touch plasticsurfaces. It could be difficult toremove.
Do not apply polish to the windshieldor rear window. This could cause thewipers to become noisy and theymay not clear the window properly.
We recommend that you wax thepaintwork once or twice a year.
CLEANING THE WINDOWS AND
WIPER BLADES
Car wash chemicals and environmentalfallout can result in windshield and wiperblade contamination. Dirty windshield andwipers will result in poor windshield wiperoperation. Keep the windshield and wiperblades clean to maintain windshield wiperperformance.
To clean the windshield and wiper blades:
•Clean the windshield with anon-abrasive glass cleaner.
•For windshields contaminated withtree sap, chemicals, wax or bugs, cleanthe entire windshield using steel wool(no greater than 0000 grade) in acircular motion and rinse with water.
•Clean the wiper blades with isopropylrubbing alcohol or windshield washerconcentrate.
257Mondeo (CNG) Vehicles Built From: 08-09-2014 Vehicles Built Up To: 19-04-2015, CG3633en enGBR, Edition date: 10/2014, First PrintingVehicle Care
Page 260 of 446

Downloaded from www.Manualslib.com manuals search engine Note: Do not use razor blades or othersharp objects to clean or remove decalsfrom the inside of the heated rear window.The vehicle warranty does not coverdamage caused to the heated rear windowgrid lines.
CLEANING THE INTERIOR
Note:Do not allow air fresheners and handsanitizers to spill on interior surfaces. If aspill occurs, wipe off immediately. Damagemay not be covered by your warranty.
Safety Belts
Note:Do not use abrasives, or chemicalsolvents to clean them.
Note:Do not allow moisture to penetratethe safety belt retractor mechanism.
Clean them with interior cleaner or waterapplied with a soft sponge. Let them drynaturally, away from artificial heat.
Instrument Cluster Screens, LCDScreens and Radio Screens
Note:Do not use abrasives, alcoholicsolvents or chemical solvents to clean them.
Rear Windows
Note:Do not use any abrasive materials toclean the interior of the rear windows.
Note:Do not install stickers or labels to theinterior of the rear windows.
REPAIRING MINOR PAINT
DAMAGE
You should repair paintwork damagecaused by stones from the road or minorscratches as soon as possible. A choice ofproducts are available from an authorizeddealer.
Remove particles such as bird droppings,tree sap, insect deposits, tar spots, roadsalt and industrial fallout before repairingpaint chips.
Always read and follow the manufacturer’sinstructions before using the products.
CLEANING THE ALLOY
WHEELS
Note:Do not apply a cleaning chemical towarm or hot wheel rims and covers.
Note:Industrial-strength (heavy-duty)cleaners, or cleaning chemicals, incombination with brush agitation to removebrake dust and dirt, could wear away theclear coat finish over a period of time.
Note:Do not use hydrofluoric acid-basedor high caustic-based wheel cleaners, steelwool, fuels or strong household detergent.
Note:If you intend parking your vehicle foran extended period after cleaning thewheels with a wheel cleaner, drive yourvehicle for a few minutes before doing so.This will reduce the risk of increasedcorrosion of the brake discs, brake pads andlinings.
Note:Some automatic car washes maycause damage to the finish on your wheelrims and covers.
Alloy wheels and wheel covers are coatedwith a clear coat paint finish. To maintaintheir condition we recommend that you:
•Clean them weekly with therecommended wheel and tire cleaner.
•Use a sponge to remove heavydeposits of dirt and brake dustaccumulation.
•Rinse them thoroughly with apressurized stream of water when youhave completed the cleaning process.
258Mondeo (CNG) Vehicles Built From: 08-09-2014 Vehicles Built Up To: 19-04-2015, CG3633en enGBR, Edition date: 10/2014, First PrintingVehicle Care
Page 261 of 446
Downloaded from www.Manualslib.com manuals search engine We recommend that you use Ford servicewheel cleaner. Make sure that you readand follow the manufacturer’s instructions.
Using other non-recommended cleaningproducts can result in severe andpermanent cosmetic damage.
259Mondeo (CNG) Vehicles Built From: 08-09-2014 Vehicles Built Up To: 19-04-2015, CG3633en enGBR, Edition date: 10/2014, First PrintingVehicle Care
Page 262 of 446

Downloaded from www.Manualslib.com manuals search engine GENERAL INFORMATION
A decal with tire pressure data is locatedin the driver’s door opening.
Check and set the tire pressure at theambient temperature in which you areintending to drive your vehicle and whenthe tires are cold.
Note:Check your tire pressures regularly tooptimize fuel economy.
Note:Use only approved wheel and tiresizes. Using other sizes could damage yourvehicle and will make the National TypeApproval invalid.
Note:If you change the diameter of the tiresfrom that fitted at the factory, thespeedometer may not display the correctspeed. Take your vehicle to an authorizeddealer to have the engine managementsystem reprogrammed.
Note:If you intend to change the size of thewheels from that fitted at the factory, checkthe suitability with an authorized dealer.
TEMPORARY MOBILITY KIT
Your vehicle may not have a spare wheeland tire. In these cases it will be suppliedwith a temporary mobility kit which willonly repair one damaged tire.
The kit is located in the spare wheel well.
General Information
WARNINGS
Depending on the type and extent oftire damage, some tires can only bepartially sealed or not sealed at all.Loss of tire pressure can affect vehiclehandling, leading to loss of vehicle control.
Do not use the temporary mobilitykit on a previously damaged tire. Forexample, when a tire has been drivenunder inflated.
WARNINGS
Do not use the temporary mobilitykit on run flat tires.
Do not use the temporary mobilitykit to repair the sidewall of adamaged tire.
The temporary mobility kit seals most tirepunctures with a diameter of up to ¼ in (6mm) to temporarily restore mobility.
You must observe the following rules whenusing the temporary mobility kit:
•Drive with caution and avoid makingsudden steering or driving manoeuvresespecially if your vehicle is heavilyloaded or towing a trailer.
•Only continue your journey to the nextvehicle or tire dealer or drive amaximum distance of 125 mi (200 km).
•Do not exceed a maximum speed of50 mph (80 km/h).
•Keep the temporary mobility kit out ofthe reach of children.
•Only use the temporary mobility kitwhen the ambient temperature isbetween -30° and 70° C (-22° and158° F).
Using the Temporary Mobility Kit
WARNINGS
Park your vehicle so that you do notobstruct the flow of traffic or placeyourself in any danger and set up awarning triangle.
Compressed air can act as anexplosive or propellant.
Never leave the temporary mobilitykit unattended while in use.
Do not keep the compressoroperating for longer than 10 minutes.
260Mondeo (CNG) Vehicles Built From: 08-09-2014 Vehicles Built Up To: 19-04-2015, CG3633en enGBR, Edition date: 10/2014, First PrintingWheels and Tires
Page 263 of 446

Downloaded from www.Manualslib.com manuals search engine WARNINGS
You must only use the temporarymobility kit for the vehicle with whichit was supplied.
Before you use the temporary mobility kit:
•Apply the parking brake.
•Do not attempt to remove foreignmaterial that is penetrating the tire, forexample, nails or screws.
•Leave the engine running while thetemporary mobility kit is in use. If yourvehicle is in an enclosed or poorlyventilated area use the temporarymobility kit with the engine switchedoff.
•You must replace the sealant bottlewith a new one before the expiry datewhich is printed on the top of sealantbottle.
•Inform all vehicle users that a tire hasbeen repaired using the temporarymobility kit. Make them aware of thespecial driving conditions that apply.
Inflating the Tire
WARNINGS
Check the sidewall of the tire prior tousing the temporary mobility kit. Ifthere are any cracks, bumps orsimilar damage do not attempt to inflatethe tire.
Do not stand directly beside the tirewhile the compressor is operating.
Watch the sidewall of the tire. If anycracks, bumps or similar damageappears, switch off the compressorimmediately and deflate the tire using thepressure relief valve B.
WARNINGS
The sealant contains natural rubberlatex. Avoid contact with skin orclothing. If this happens, rinse theaffected areas immediately with plenty ofwater and contact a physician.
If the tire inflation pressure does notreach the recommended pressurewithin 10 minutes, the tire may havesuffered excessive damage, making atemporary repair impossible. Do notcontinue driving with this tire.
Screwing the sealant bottle onto thebottle holder will pierce the seal ofthe sealant bottle. Do not unscrewthe sealant bottle from the bottle holderprior to completing a temporary repair asthe sealant will escape.
If you experience heavy vibrations,unsteady steering behavior or noiseswhile driving, reduce your speed anddrive with caution to a place where it issafe for you to stop your vehicle. Recheckthe tire and its pressure. If the tire pressureis less than 45 psi (3 bar) or if there are anycracks, bumps or similar damage visible,do not continue driving with this tire.
261Mondeo (CNG) Vehicles Built From: 08-09-2014 Vehicles Built Up To: 19-04-2015, CG3633en enGBR, Edition date: 10/2014, First PrintingWheels and Tires
Page 264 of 446

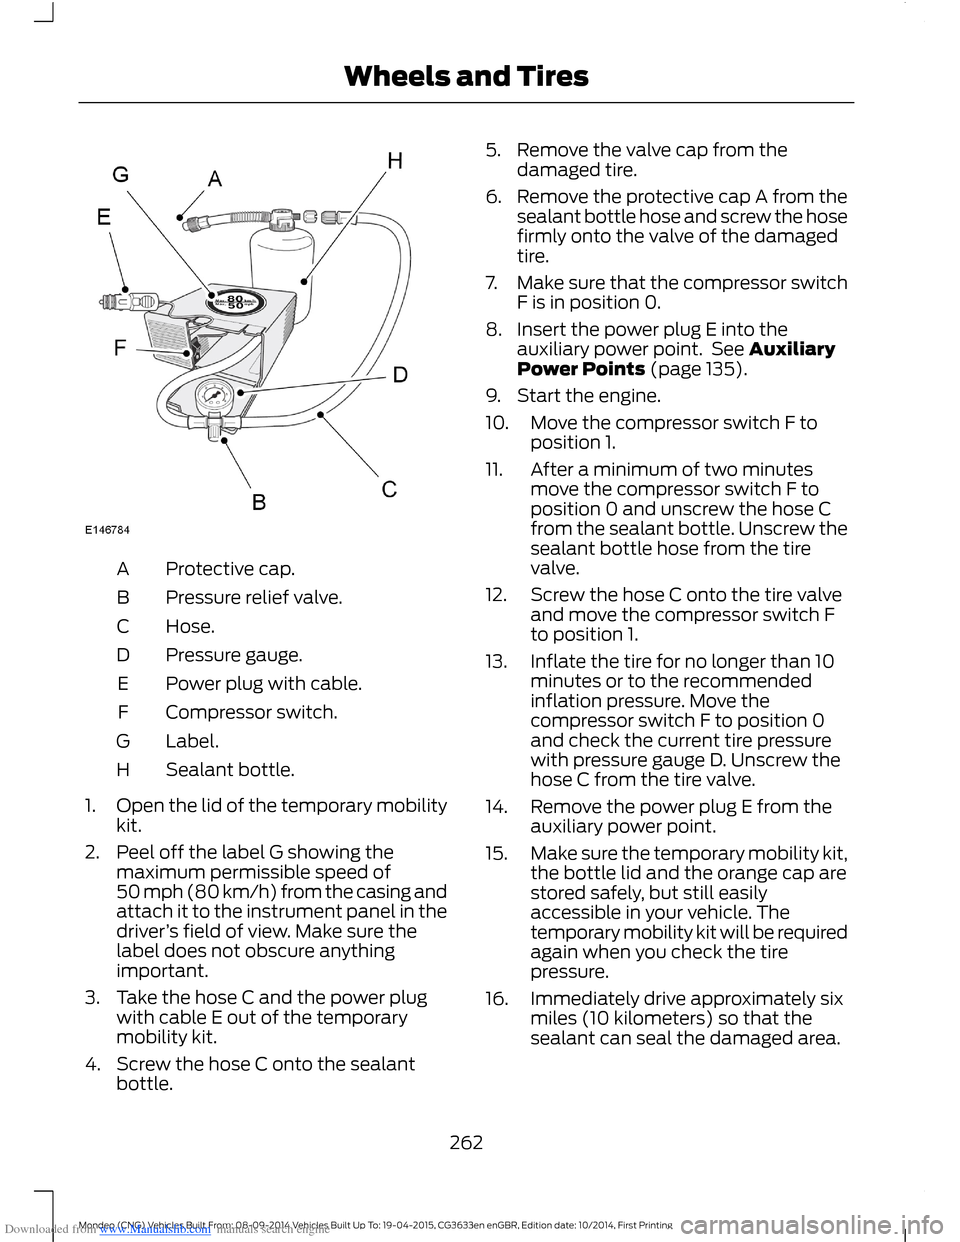
Downloaded from www.Manualslib.com manuals search engine Protective cap.A
Pressure relief valve.B
Hose.C
Pressure gauge.D
Power plug with cable.E
Compressor switch.F
Label.G
Sealant bottle.H
1.Open the lid of the temporary mobilitykit.
2.Peel off the label G showing themaximum permissible speed of50 mph (80 km/h) from the casing andattach it to the instrument panel in thedriver’s field of view. Make sure thelabel does not obscure anythingimportant.
3.Take the hose C and the power plugwith cable E out of the temporarymobility kit.
4.Screw the hose C onto the sealantbottle.
5.Remove the valve cap from thedamaged tire.
6.Remove the protective cap A from thesealant bottle hose and screw the hosefirmly onto the valve of the damagedtire.
7.Make sure that the compressor switchF is in position 0.
8.Insert the power plug E into theauxiliary power point. See AuxiliaryPower Points (page 135).
9.Start the engine.
10.Move the compressor switch F toposition 1.
11.After a minimum of two minutesmove the compressor switch F toposition 0 and unscrew the hose Cfrom the sealant bottle. Unscrew thesealant bottle hose from the tirevalve.
12.Screw the hose C onto the tire valveand move the compressor switch Fto position 1.
13.Inflate the tire for no longer than 10minutes or to the recommendedinflation pressure. Move thecompressor switch F to position 0and check the current tire pressurewith pressure gauge D. Unscrew thehose C from the tire valve.
14.Remove the power plug E from theauxiliary power point.
15.Make sure the temporary mobility kit,the bottle lid and the orange cap arestored safely, but still easilyaccessible in your vehicle. Thetemporary mobility kit will be requiredagain when you check the tirepressure.
16.Immediately drive approximately sixmiles (10 kilometers) so that thesealant can seal the damaged area.
262Mondeo (CNG) Vehicles Built From: 08-09-2014 Vehicles Built Up To: 19-04-2015, CG3633en enGBR, Edition date: 10/2014, First PrintingWheels and Tires