2007 TOYOTA SIENNA rear wheel
[x] Cancel search: rear wheelPage 2255 of 3000
TW–4TIRE AND WHEEL – TIRE AND WHEEL SYSTEM
TW
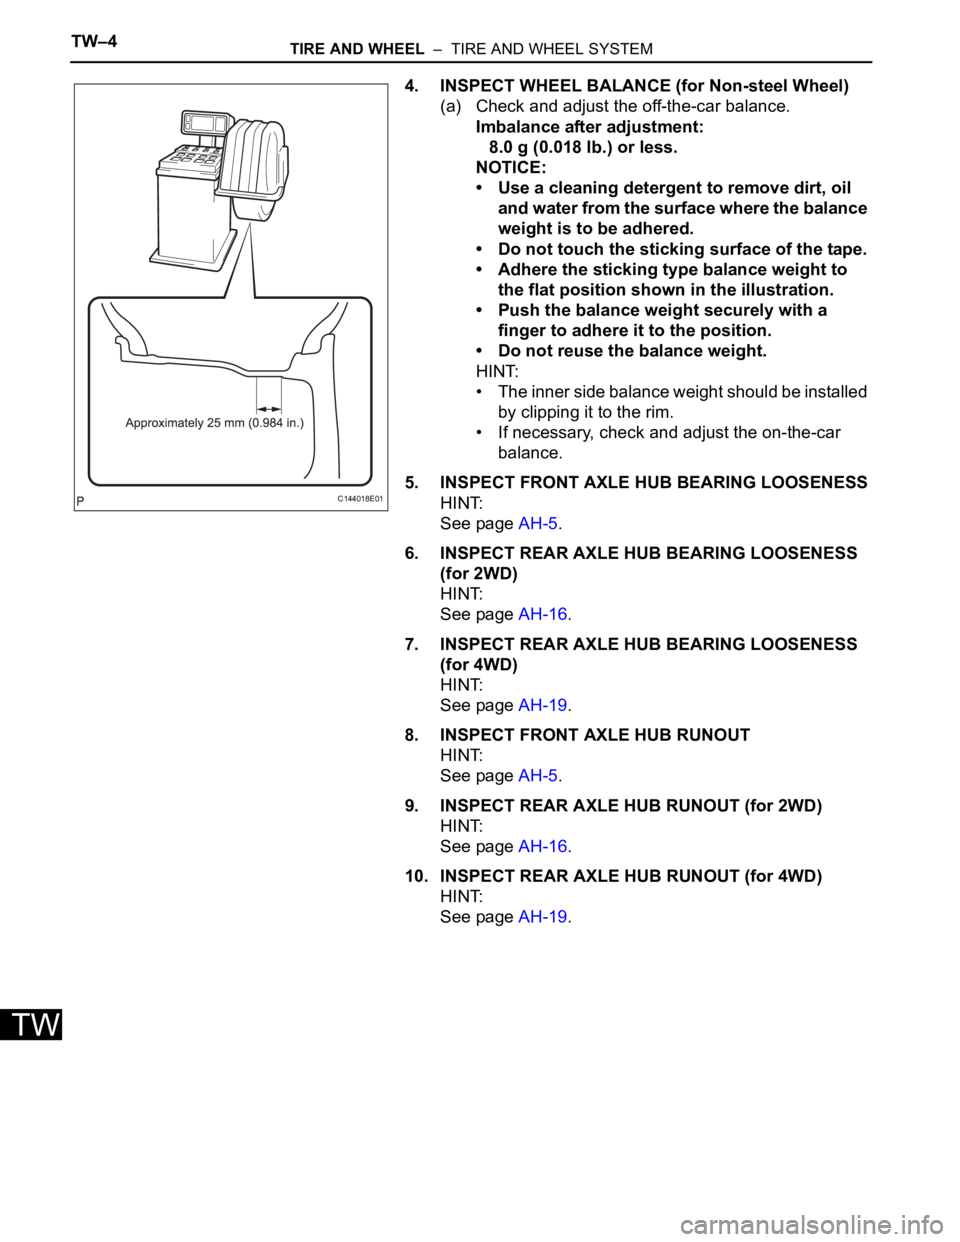
4. INSPECT WHEEL BALANCE (for Non-steel Wheel)
(a) Check and adjust the off-the-car balance.
Imbalance after adjustment:
8.0 g (0.018 lb.) or less.
NOTICE:
• Use a cleaning detergent to remove dirt, oil
and water from the surface where the balance
weight is to be adhered.
• Do not touch the sticking surface of the tape.
• Adhere the sticking type balance weight to
the flat position shown in the illustration.
• Push the balance weight securely with a
finger to adhere it to the position.
• Do not reuse the balance weight.
HINT:
• The inner side balance weight should be installed
by clipping it to the rim.
• If necessary, check and adjust the on-the-car
balance.
5. INSPECT FRONT AXLE HUB BEARING LOOSENESS
HINT:
See page AH-5.
6. INSPECT REAR AXLE HUB BEARING LOOSENESS
(for 2WD)
HINT:
See page AH-16.
7. INSPECT REAR AXLE HUB BEARING LOOSENESS
(for 4WD)
HINT:
See page AH-19.
8. INSPECT FRONT AXLE HUB RUNOUT
HINT:
See page AH-5.
9. INSPECT REAR AXLE HUB RUNOUT (for 2WD)
HINT:
See page AH-16.
10. INSPECT REAR AXLE HUB RUNOUT (for 4WD)
HINT:
See page AH-19.
C144018E01
Page 2336 of 3000
TW–84TIRE AND WHEEL – TIRE PRESSURE WARNING VALVE AND TRANSMITTER
TW
REMOVAL
1. REMOVE FRONT WHEEL
2. REMOVE REAR WHEEL
3. REMOVE TIRE PRESSURE WARNING VALVE AND
TRANSMITTER
(a) Remove the valve core and cap, and release the air
from the tire.
(b) After ensuring that a sufficient amount of air has
been released, remove the nut and washer that are
used to secure the tire pressure warning valve and
transmitter. Drop the tire pressure warning valve
and transmitter inside the tire.
HINT:
Keep the removed cap, valve core, nut, and washer.
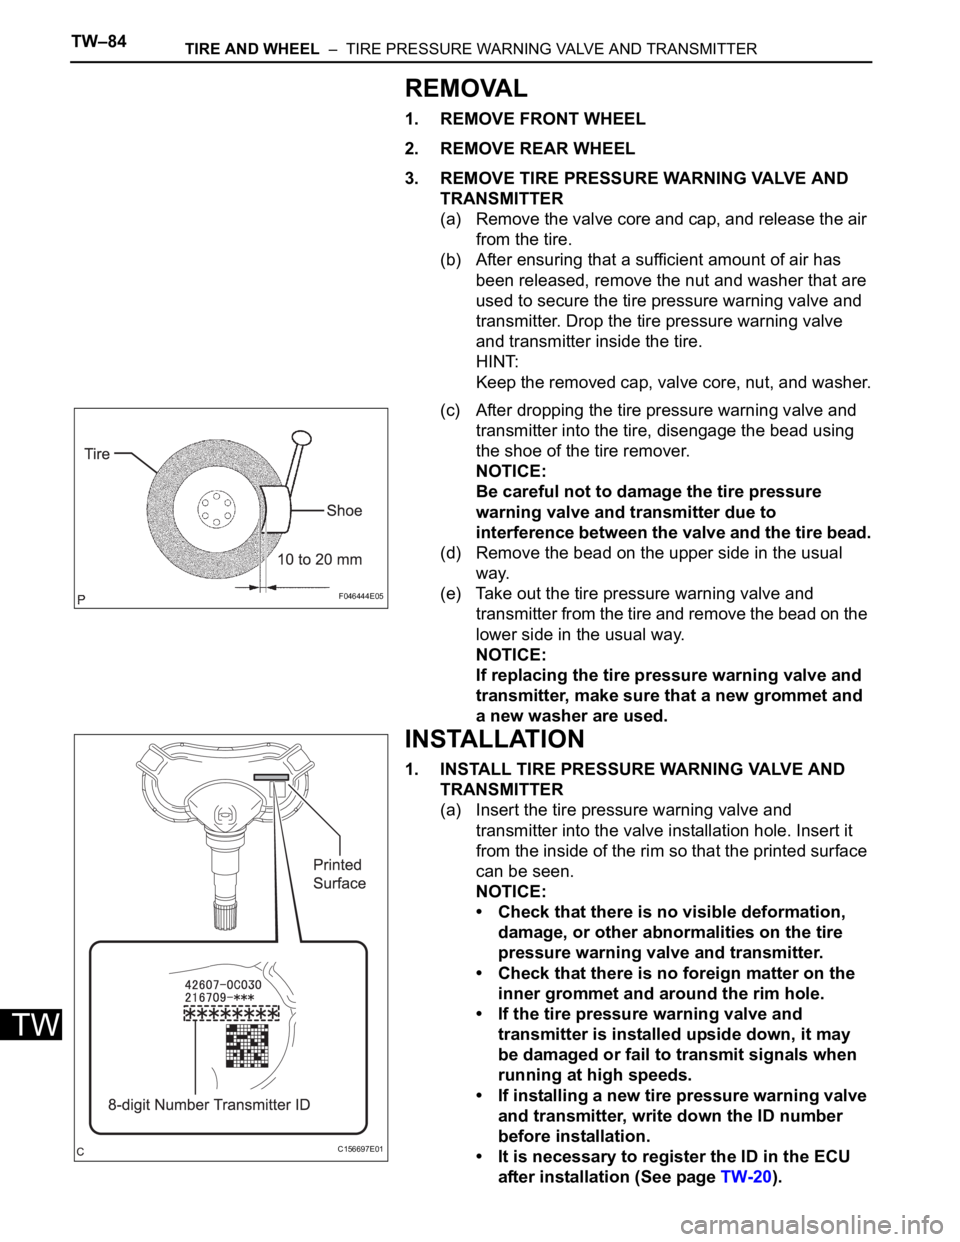
(c) After dropping the tire pressure warning valve and
transmitter into the tire, disengage the bead using
the shoe of the tire remover.
NOTICE:
Be careful not to damage the tire pressure
warning valve and transmitter due to
interference between the valve and the tire bead.
(d) Remove the bead on the upper side in the usual
way.
(e) Take out the tire pressure warning valve and
transmitter from the tire and remove the bead on the
lower side in the usual way.
NOTICE:
If replacing the tire pressure warning valve and
transmitter, make sure that a new grommet and
a new washer are used.
INSTALLATION
1. INSTALL TIRE PRESSURE WARNING VALVE AND
TRANSMITTER
(a) Insert the tire pressure warning valve and
transmitter into the valve installation hole. Insert it
from the inside of the rim so that the printed surface
can be seen.
NOTICE:
• Check that there is no visible deformation,
damage, or other abnormalities on the tire
pressure warning valve and transmitter.
• Check that there is no foreign matter on the
inner grommet and around the rim hole.
• If the tire pressure warning valve and
transmitter is installed upside down, it may
be damaged or fail to transmit signals when
running at high speeds.
• If installing a new tire pressure warning valve
and transmitter, write down the ID number
before installation.
• It is necessary to register the ID in the ECU
after installation (See page TW-20).
F046444E05
C156697E01
Page 2337 of 3000
TIRE AND WHEEL – TIRE PRESSURE WARNING VALVE AND TRANSMITTERTW–85
TW
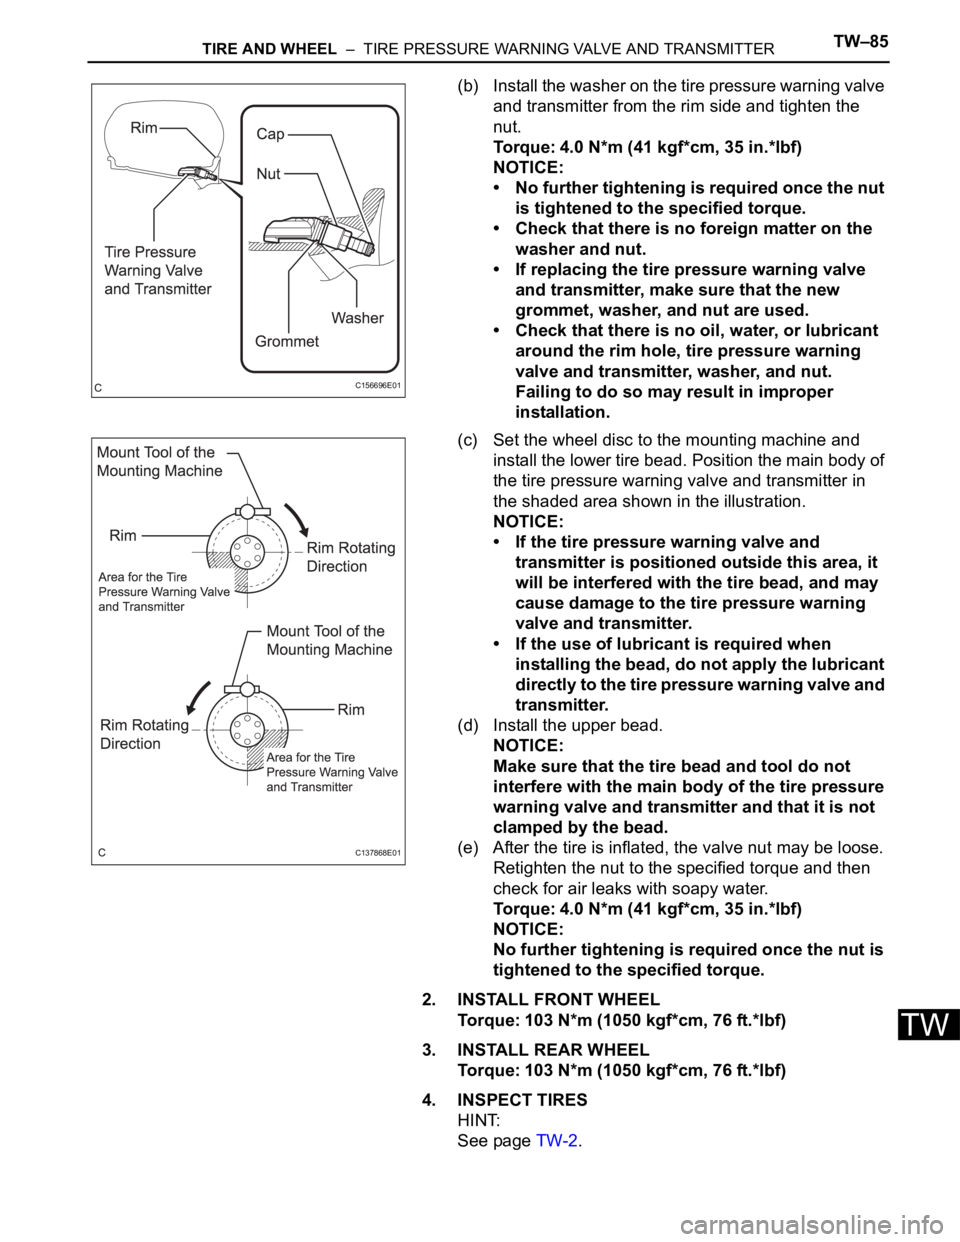
(b) Install the washer on the tire pressure warning valve
and transmitter from the rim side and tighten the
nut.
Torque: 4.0 N*m (41 kgf*cm, 35 in.*lbf)
NOTICE:
• No further tightening is required once the nut
is tightened to the specified torque.
• Check that there is no foreign matter on the
washer and nut.
• If replacing the tire pressure warning valve
and transmitter, make sure that the new
grommet, washer, and nut are used.
• Check that there is no oil, water, or lubricant
around the rim hole, tire pressure warning
valve and transmitter, washer, and nut.
Failing to do so may result in improper
installation.
(c) Set the wheel disc to the mounting machine and
install the lower tire bead. Position the main body of
the tire pressure warning valve and transmitter in
the shaded area shown in the illustration.
NOTICE:
• If the tire pressure warning valve and
transmitter is positioned outside this area, it
will be interfered with the tire bead, and may
cause damage to the tire pressure warning
valve and transmitter.
• If the use of lubricant is required when
installing the bead, do not apply the lubricant
directly to the tire pressure warning valve and
transmitter.
(d) Install the upper bead.
NOTICE:
Make sure that the tire bead and tool do not
interfere with the main body of the tire pressure
warning valve and transmitter and that it is not
clamped by the bead.
(e) After the tire is inflated, the valve nut may be loose.
Retighten the nut to the specified torque and then
check for air leaks with soapy water.
Torque: 4.0 N*m (41 kgf*cm, 35 in.*lbf)
NOTICE:
No further tightening is required once the nut is
tightened to the specified torque.
2. INSTALL FRONT WHEEL
Torque: 103 N*m (1050 kgf*cm, 76 ft.*lbf)
3. INSTALL REAR WHEEL
Torque: 103 N*m (1050 kgf*cm, 76 ft.*lbf)
4. INSPECT TIRES
HINT:
See page TW-2.
C156696E01
C137868E01
Page 2370 of 3000
BC–6BRAKE CONTROL – ANTI-LOCK BRAKE SYSTEM
BC
HINT:
The codes in this table are output only in Test Mode
(signal check).
4. SPEED SENSOR SIGNAL CHECK (WHEN USING
INTELLIGENT TESTER):
HINT:
• If the ignition switch is turned from the ON to the ACC
or LOCK position during Test Mode, DTCs of the
signal check function will be erased.
• During Test Mode, the ECU records all DTCs of the
signal check function. By performing the signal check,
the codes are erased if normality is confirmed. The
remaining codes are the codes where an abnormality
was found.
(a) Turn the ignition switch off.
(b) Check that the steering wheel is in the straight-
ahead position.
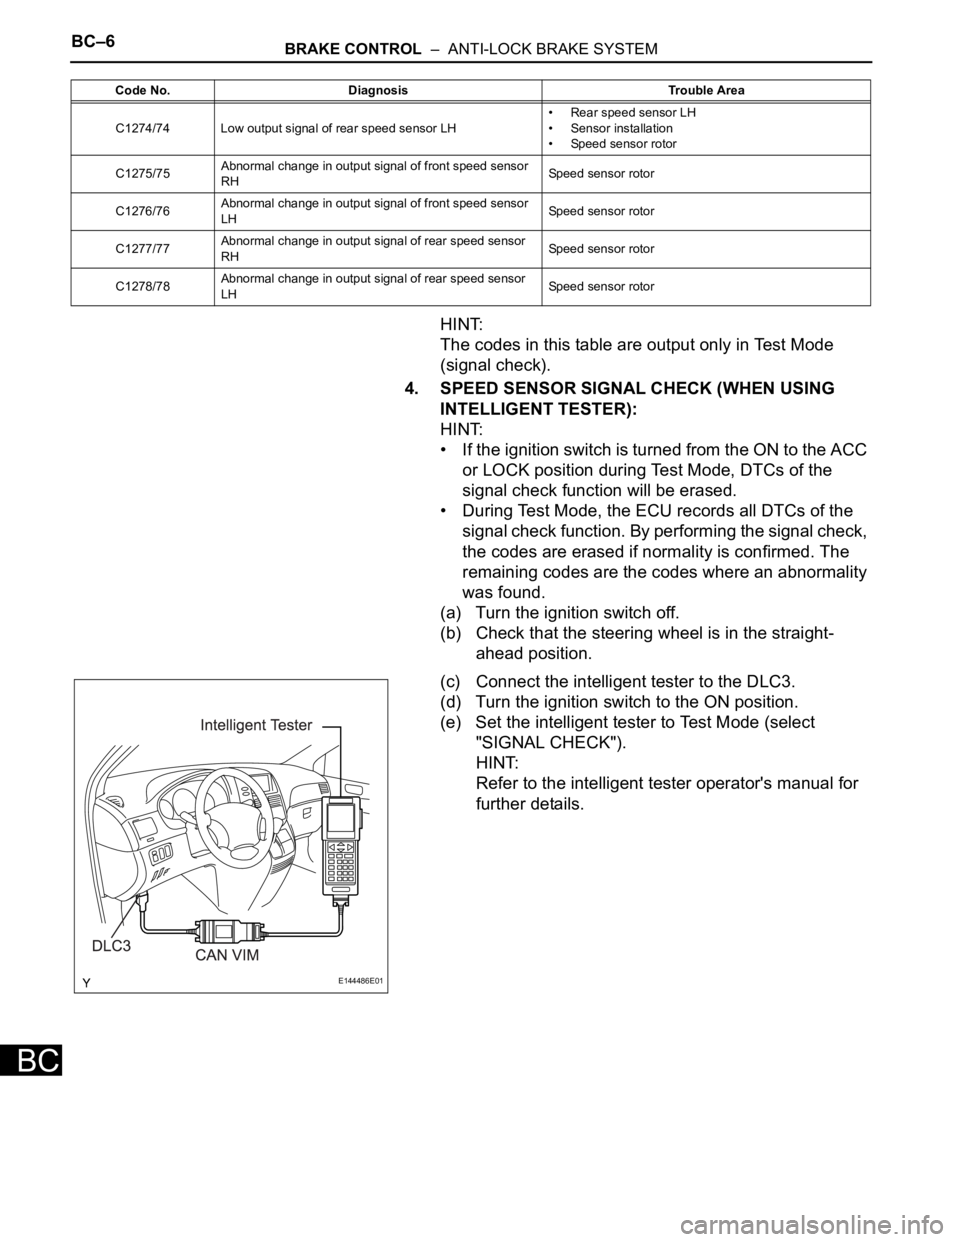
(c) Connect the intelligent tester to the DLC3.
(d) Turn the ignition switch to the ON position.
(e) Set the intelligent tester to Test Mode (select
"SIGNAL CHECK").
HINT:
Refer to the intelligent tester operator's manual for
further details.
C1274/74 Low output signal of rear speed sensor LH• Rear speed sensor LH
• Sensor installation
• Speed sensor rotor
C1275/75Abnormal change in output signal of front speed sensor
RHSpeed sensor rotor
C1276/76Abnormal change in output signal of front speed sensor
LHSpeed sensor rotor
C1277/77Abnormal change in output signal of rear speed sensor
RHSpeed sensor rotor
C1278/78Abnormal change in output signal of rear speed sensor
LHSpeed sensor rotor Code No. Diagnosis Trouble Area
E144486E01
Page 2371 of 3000
BRAKE CONTROL – ANTI-LOCK BRAKE SYSTEMBC–7
BC
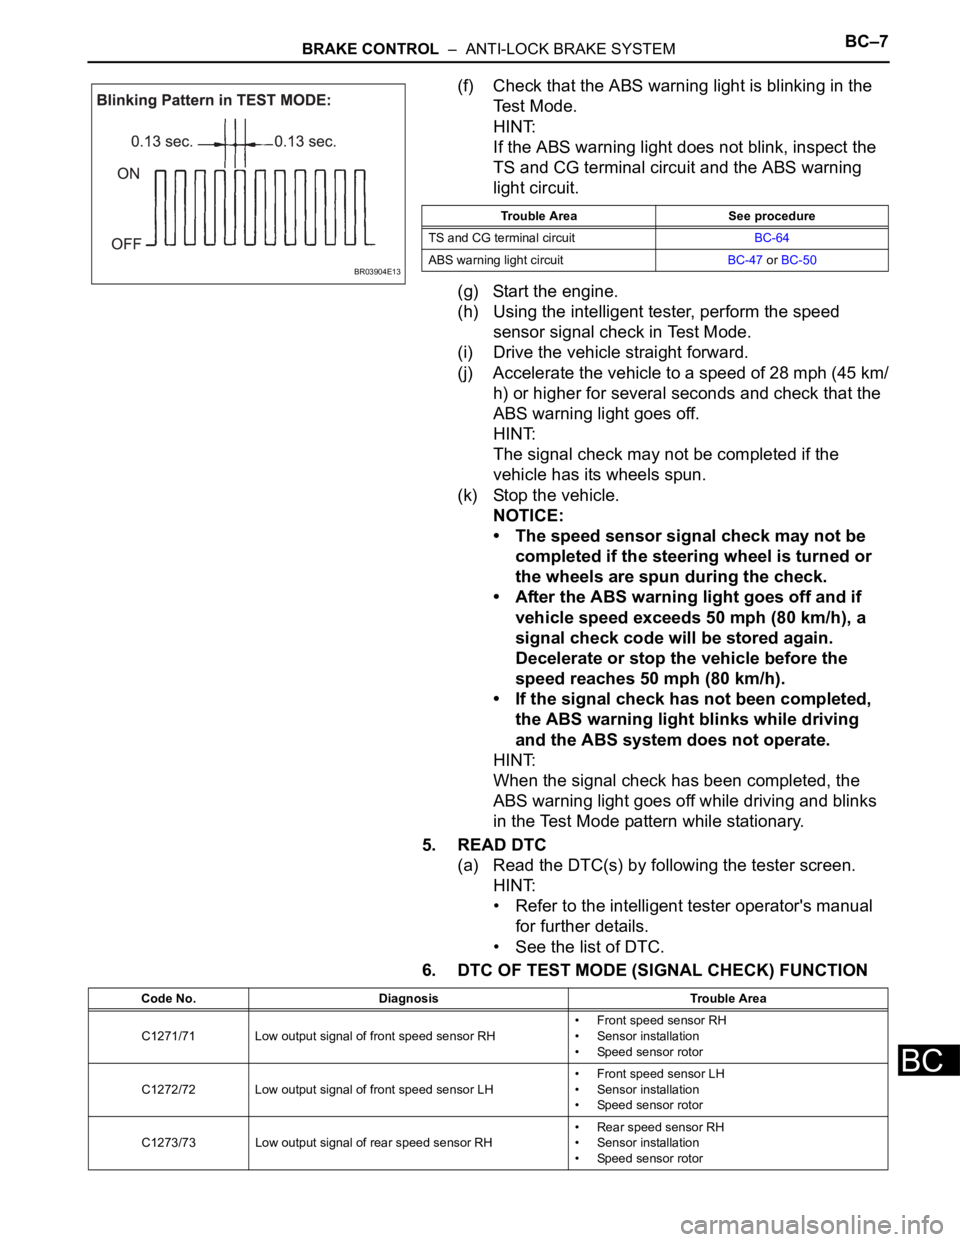
(f) Check that the ABS warning light is blinking in the
Test Mode.
HINT:
If the ABS warning light does not blink, inspect the
TS and CG terminal circuit and the ABS warning
light circuit.
(g) Start the engine.
(h) Using the intelligent tester, perform the speed
sensor signal check in Test Mode.
(i) Drive the vehicle straight forward.
(j) Accelerate the vehicle to a speed of 28 mph (45 km/
h) or higher for several seconds and check that the
ABS warning light goes off.
HINT:
The signal check may not be completed if the
vehicle has its wheels spun.
(k) Stop the vehicle.
NOTICE:
• The speed sensor signal check may not be
completed if the steering wheel is turned or
the wheels are spun during the check.
• After the ABS warning light goes off and if
vehicle speed exceeds 50 mph (80 km/h), a
signal check code will be stored again.
Decelerate or stop the vehicle before the
speed reaches 50 mph (80 km/h).
• If the signal check has not been completed,
the ABS warning light blinks while driving
and the ABS system does not operate.
HINT:
When the signal check has been completed, the
ABS warning light goes off while driving and blinks
in the Test Mode pattern while stationary.
5. READ DTC
(a) Read the DTC(s) by following the tester screen.
HINT:
• Refer to the intelligent tester operator's manual
for further details.
• See the list of DTC.
6. DTC OF TEST MODE (SIGNAL CHECK) FUNCTION
BR03904E13
Trouble Area See procedure
TS and CG terminal circuitBC-64
ABS warning light circuitBC-47 or BC-50
Code No. Diagnosis Trouble Area
C1271/71 Low output signal of front speed sensor RH• Front speed sensor RH
• Sensor installation
• Speed sensor rotor
C1272/72 Low output signal of front speed sensor LH• Front speed sensor LH
• Sensor installation
• Speed sensor rotor
C1273/73 Low output signal of rear speed sensor RH• Rear speed sensor RH
• Sensor installation
• Speed sensor rotor
Page 2373 of 3000

BRAKE CONTROL – ANTI-LOCK BRAKE SYSTEMBC–25
BC
DESCRIPTION
Refer to DTCs C0200/31, C0205/32, C1235/35, and C1236/36 (See page BC-17).
DTCs C1273/73 to C1278/78 can be deleted when the speed sensor sends a vehicle speed signal or the
Test Mode ends. DTCs C1273/73 to C1278/78 are output only in the Test Mode.
HINT:
• DTC C0210/33 and C1238/38 are for the rear speed sensor RH.
• DTC C0215/34 and C1239/39 are for the rear speed sensor LH.
DTC C0210/33 Rear Speed Sensor RH Circuit
DTC C0215/34 Rear Speed Sensor LH Circuit
DTC C1238/38Foreign Object is Attached on Tip of Rear
Speed Sensor RH
DTC C1239/39Foreign Object is Attached on Tip of Rear
Speed Sensor LH
DTC C1273/73Low Output Signal of Rear Speed Sensor RH
(Test Mode DTC)
DTC C1274/74Low Output Signal of Rear Speed Sensor LH
(Test Mode DTC)
DTC C1277/77Abnormal Change in Output Signal of Rear
Speed Sensor RH (Test Mode DTC)
DTC C1278/78Abnormal Change in Output Signal of Rear
Speed Sensor LH (Test Mode DTC)
DTC No. DTC Detection Condition Trouble Area
C0210/33
C0215/34With vehicle speed at 10 km/h (6 mph) or more, sensor
signal circuit of faulty wheel is open or short for 1
second or more.
• Momentary interruption of sensor signal of faulty
wheel has occurred 7 times or more.
• Sensor signal circuit is open for 0.5 seconds or
more.• Rear speed sensor RH/LH
• Rear speed sensor RH/LH circuit
• Speed sensor rotor
• Sensor installation
• Brake actuator assembly
C1238/38
C1239/39At vehicle speed of 20 km/h (12 mph) or more, condition
that noise is included in speed sensor signal continues
for 5 seconds or more.• Rear speed sensor RH/LH
• Speed sensor rotor
• Sensor installation
• Brake actuator assembly
Page 2374 of 3000
BC–26BRAKE CONTROL – ANTI-LOCK BRAKE SYSTEM
BC
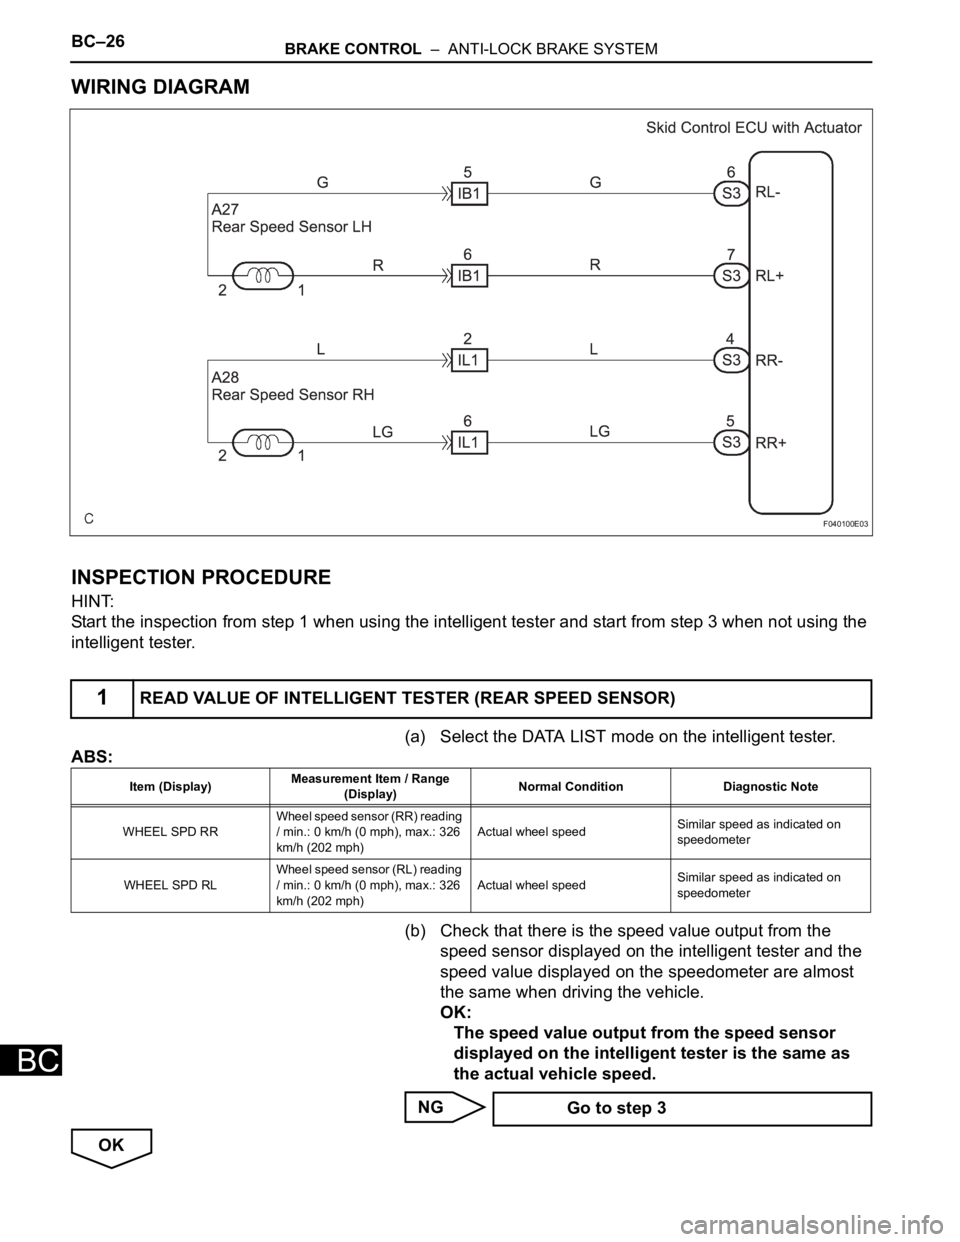
WIRING DIAGRAM
INSPECTION PROCEDURE
HINT:
Start the inspection from step 1 when using the intelligent tester and start from step 3 when not using the
intelligent tester.
(a) Select the DATA LIST mode on the intelligent tester.
ABS:
(b) Check that there is the speed value output from the
speed sensor displayed on the intelligent tester and the
speed value displayed on the speedometer are almost
the same when driving the vehicle.
OK:
The speed value output from the speed sensor
displayed on the intelligent tester is the same as
the actual vehicle speed.
NG
OK
1READ VALUE OF INTELLIGENT TESTER (REAR SPEED SENSOR)
F040100E03
Item (Display)Measurement Item / Range
(Display)Normal Condition Diagnostic Note
WHEEL SPD RRWheel speed sensor (RR) reading
/ min.: 0 km/h (0 mph), max.: 326
km/h (202 mph)Actual wheel speedSimilar speed as indicated on
speedometer
WHEEL SPD RLWheel speed sensor (RL) reading
/ min.: 0 km/h (0 mph), max.: 326
km/h (202 mph)Actual wheel speedSimilar speed as indicated on
speedometer
Go to step 3
Page 2377 of 3000
BRAKE CONTROL – ANTI-LOCK BRAKE SYSTEMBC–29
BC
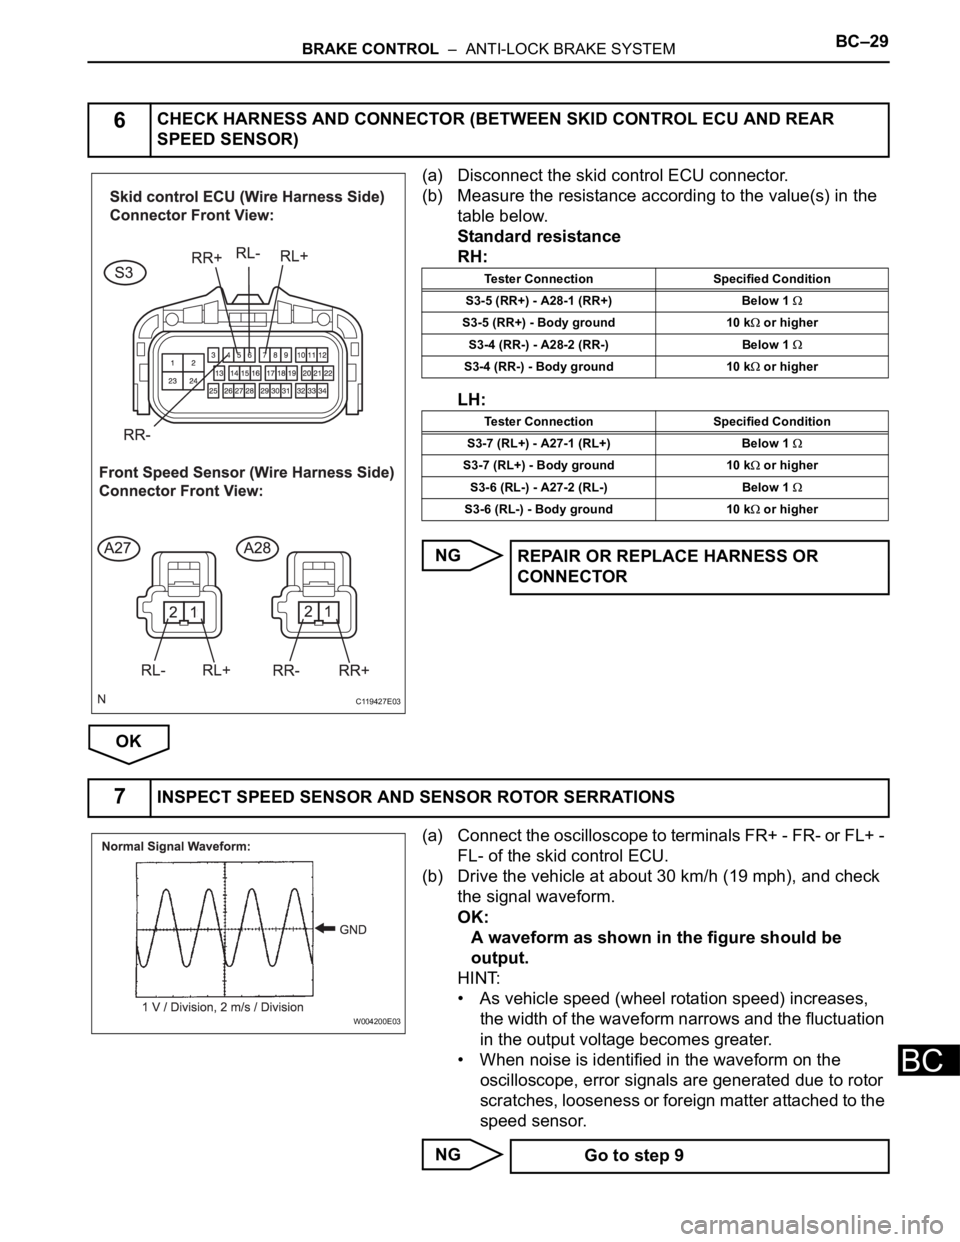
(a) Disconnect the skid control ECU connector.
(b) Measure the resistance according to the value(s) in the
table below.
Standard resistance
RH:
LH:
NG
OK
(a) Connect the oscilloscope to terminals FR+ - FR- or FL+ -
FL- of the skid control ECU.
(b) Drive the vehicle at about 30 km/h (19 mph), and check
the signal waveform.
OK:
A waveform as shown in the figure should be
output.
HINT:
• As vehicle speed (wheel rotation speed) increases,
the width of the waveform narrows and the fluctuation
in the output voltage becomes greater.
• When noise is identified in the waveform on the
oscilloscope, error signals are generated due to rotor
scratches, looseness or foreign matter attached to the
speed sensor.
NG
6CHECK HARNESS AND CONNECTOR (BETWEEN SKID CONTROL ECU AND REAR
SPEED SENSOR)
C119427E03
Tester Connection Specified Condition
S3-5 (RR+) - A28-1 (RR+) Below 1
S3-5 (RR+) - Body ground 10 k or higher
S3-4 (RR-) - A28-2 (RR-) Below 1
S3-4 (RR-) - Body ground 10 k or higher
Tester Connection Specified Condition
S3-7 (RL+) - A27-1 (RL+) Below 1
S3-7 (RL+) - Body ground 10 k or higher
S3-6 (RL-) - A27-2 (RL-) Below 1
S3-6 (RL-) - Body ground 10 k or higher
REPAIR OR REPLACE HARNESS OR
CONNECTOR
7INSPECT SPEED SENSOR AND SENSOR ROTOR SERRATIONS
W004200E03
Go to step 9