2006 LAND ROVER FRELANDER 2 ECU
[x] Cancel search: ECUPage 2022 of 3229
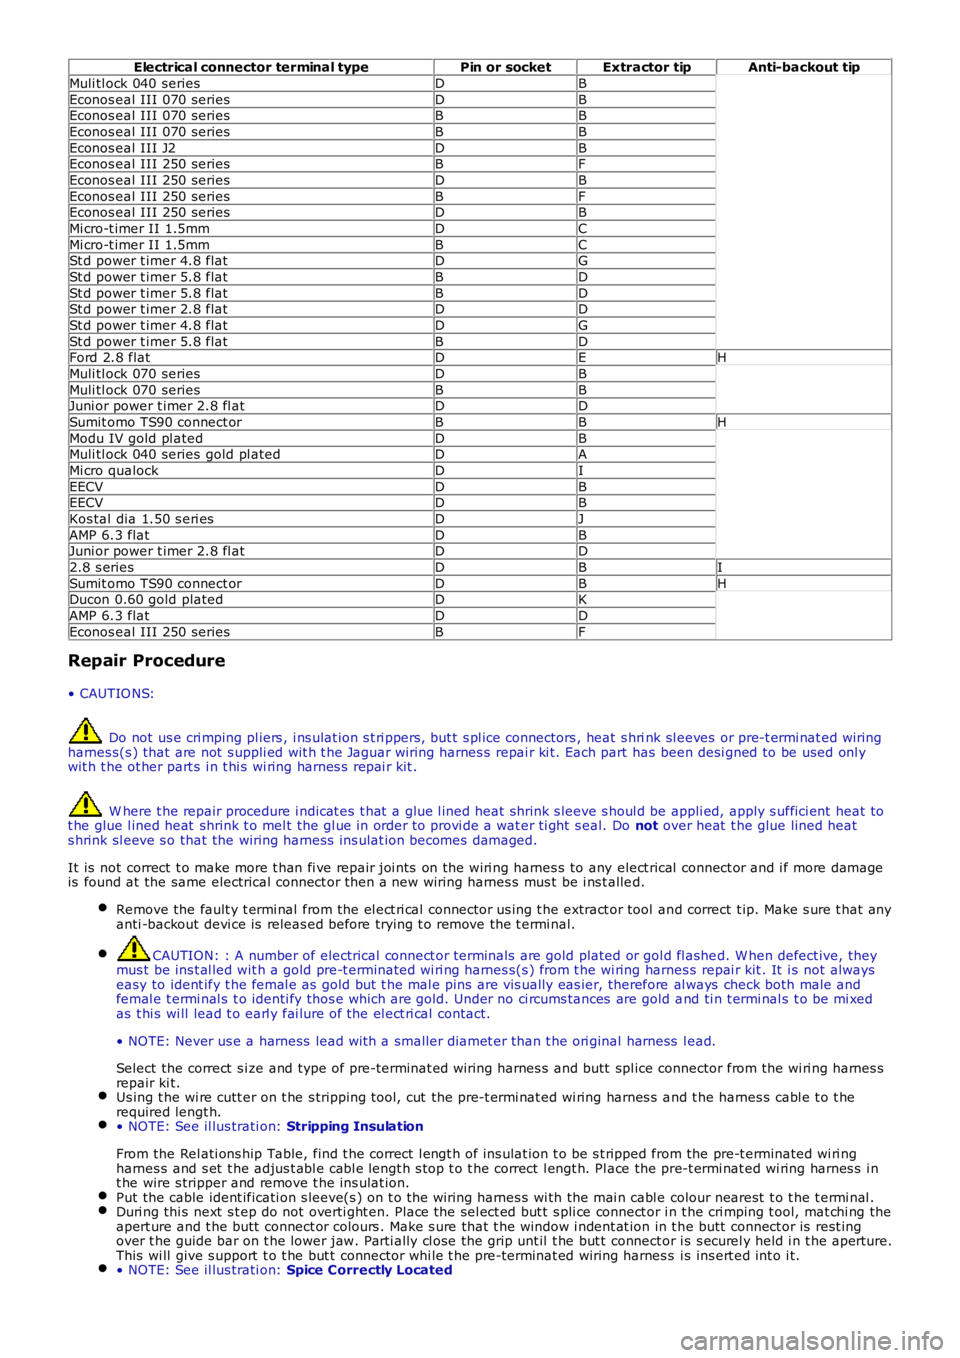
Electrical connector terminal typePin or socketExtractor tipAnti-backout tip
Muli tl ock 040 seriesDB
Econos eal III 070 seriesDBEconos eal III 070 seriesBB
Econos eal III 070 seriesBB
Econos eal III J2DBEconos eal III 250 seriesBF
Econos eal III 250 seriesDB
Econos eal III 250 seriesBFEconos eal III 250 seriesDB
Mi cro-t imer II 1.5mmDC
Mi cro-t imer II 1.5mmBCSt d power t imer 4.8 flatDG
St d power t imer 5.8 flatBD
St d power t imer 5.8 flatBDSt d power t imer 2.8 flatDD
St d power t imer 4.8 flatDG
St d power t imer 5.8 flatBDFord 2.8 flatDEH
Muli tl ock 070 seriesDB
Muli tl ock 070 seriesBBJuni or power t imer 2.8 fl atDD
Sumit omo TS90 connect orBBH
Modu IV gold pl atedDBMuli tl ock 040 series gold pl atedDA
Mi cro qualockDI
EECVDBEECVDB
Kos tal dia 1.50 s eri esDJ
AMP 6.3 flatDBJuni or power t imer 2.8 fl atDD
2.8 s eriesDBI
Sumit omo TS90 connect orDBHDucon 0.60 gold platedDK
AMP 6.3 flatDD
Econos eal III 250 seriesBF
Repair Procedure
• CAUTIO NS:
Do not us e cri mping pl iers , i ns ulat ion s t ri ppers, but t s pl ice connectors , heat s hrink sl eeves or pre-t ermi nat ed wiringharnes s(s ) that are not s uppli ed wit h t he Jaguar wiring harnes s repai r ki t. Each part has been desi gned to be used onl ywit h t he ot her part s i n t hi s wi ring harnes s repai r kit .
W here t he repair procedure i ndicat es t hat a glue l ined heat shrink s leeve s houl d be appli ed, apply s uffici ent heat tot he glue l ined heat shrink t o mel t the gl ue in order to provi de a wat er ti ght s eal. Do not over heat t he glue lined heats hrink sl eeve s o that the wiring harnes s ins ulat ion becomes damaged.
It is not correct t o make more t han fi ve repair joi nts on the wiri ng harnes s to any elect rical connect or and i f more damageis found at the same electrical connect or then a new wiring harnes s mus t be i ns t alled.
Remove the fault y t ermi nal from the el ect ri cal connector us ing t he extract or tool and correct t ip. Make s ure t hat anyanti -backout devi ce is releas ed before trying t o remove the t ermi nal.
CAUTION: : A number of electrical connect or terminals are gold plated or gol d fl ashed. W hen defect ive, theymus t be ins t al led wit h a gold pre-t erminated wi ri ng harnes s(s ) from t he wi ring harnes s repai r kit . It i s not alwayseasy to ident ify t he femal e as gold but t he mal e pins are vis ually eas ier, therefore al ways check both male andfemal e t ermi nal s t o identi fy thos e which are gold. Under no ci rcums tances are gold and ti n t ermi nal s t o be mi xedas t hi s wi ll lead t o earl y fai lure of the el ect ri cal contact.
• NOTE: Never us e a harness lead wit h a smaller diamet er than t he ori ginal harness lead.
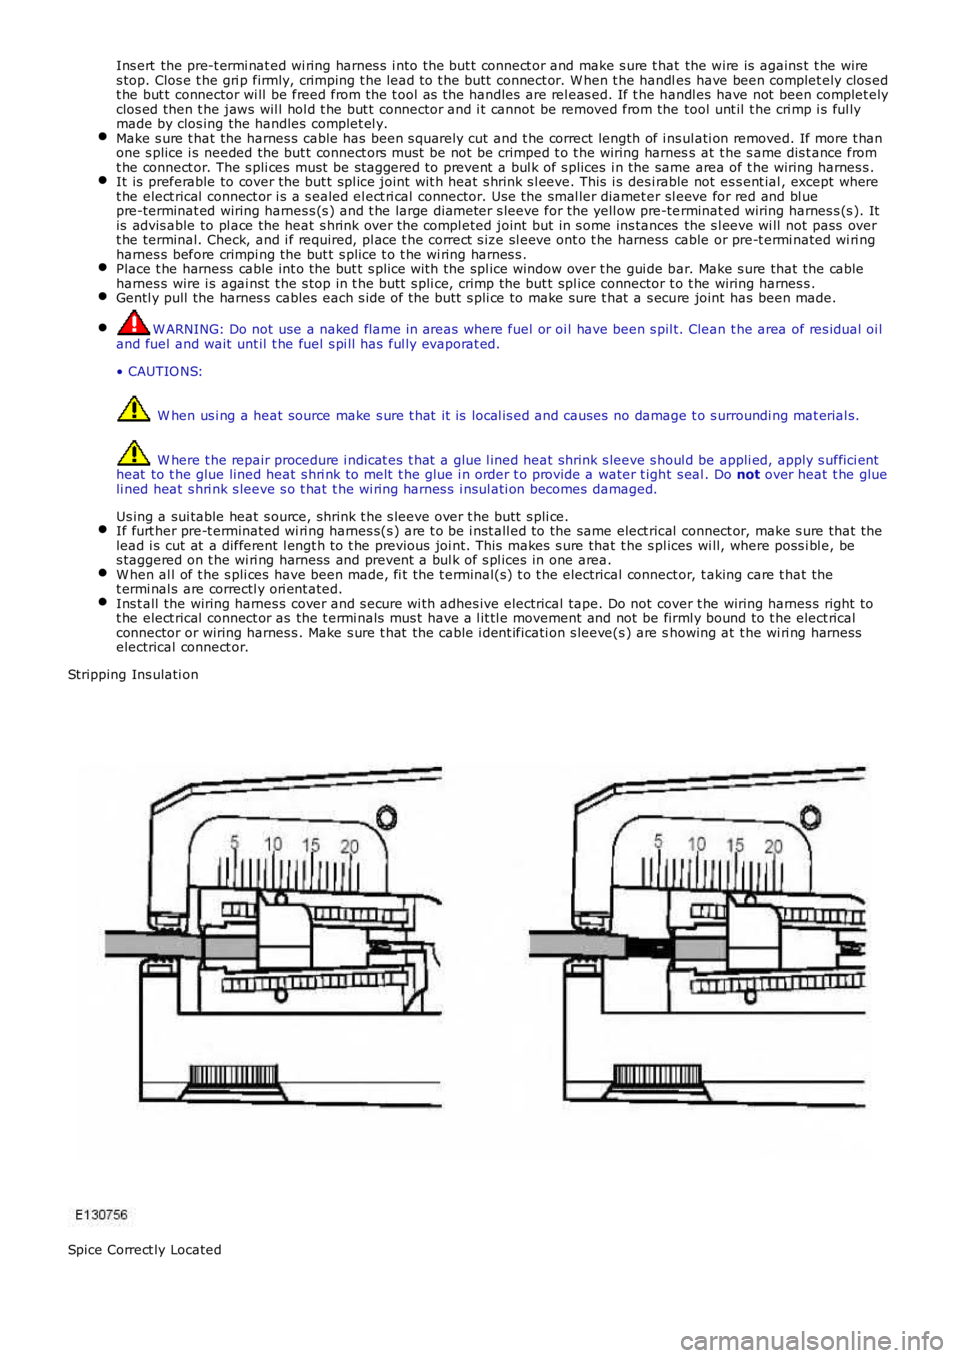
Select the correct s i ze and type of pre-terminat ed wiring harnes s and butt spl ice connector from the wi ri ng harnes srepair ki t.Us ing t he wi re cutt er on t he s tripping t ool, cut the pre-t ermi nat ed wi ring harnes s and t he harnes s cabl e t o t herequired lengt h.• NOTE: See il lus trati on: Stripping Insulation
From the Rel ati ons hip Table, find t he correct l engt h of ins ulat ion t o be s t ripped from the pre-t erminated wi ri ngharnes s and s et t he adjus t abl e cabl e lengt h s top t o t he correct l engt h. Pl ace the pre-t ermi nat ed wi ring harnes s i nt he wire s tripper and remove t he ins ulat ion.Put the cable ident ificati on s leeve(s ) on t o t he wiring harnes s wi th the mai n cabl e colour nearest t o t he t ermi nal .Duri ng thi s next s t ep do not overti ght en. Place the sel ect ed but t s pli ce connect or in t he cri mping t ool, mat chi ng theapert ure and t he butt connect or colours . Make s ure that t he window i ndent at ion in t he butt connect or is rest ingover t he guide bar on t he lower jaw. Parti ally cl ose the grip unt il t he but t connector i s s ecurel y held i n t he aperture.This wi ll give s upport t o t he but t connector whi le t he pre-terminat ed wiring harnes s i s ins ert ed int o i t.• NOTE: See il lus trati on: Spice Correctly Located
Page 2023 of 3229
Ins ert the pre-t ermi nat ed wi ring harnes s i nto the but t connect or and make s ure t hat the wire is agains t t he wires top. Clos e t he gri p firmly, crimping t he lead t o t he butt connect or. W hen t he handles have been complet ely clos edt he but t connector wi ll be freed from the t ool as the handles are rel eas ed. If t he handl es have not been complet elyclos ed then t he jaws wil l hol d t he but t connector and i t cannot be removed from the tool unt il t he cri mp i s ful lymade by clos ing the handles complet el y.Make s ure t hat the harnes s cable has been s quarely cut and t he correct length of i nsul ati on removed. If more t hanone s plice i s needed the but t connect ors must be not be crimped t o t he wiring harness at t he s ame dis t ance fromt he connect or. The s pli ces must be st aggered to prevent a bul k of s plices i n the same area of t he wiring harnes s .It is preferable to cover the but t s pl ice joint wit h heat s hrink s l eeve. This i s desi rable not es s ent ial , except wheret he elect rical connect or i s a s ealed el ect ri cal connector. Use the smal ler diamet er sl eeve for red and bl uepre-terminat ed wiring harnes s (s ) and t he large diameter s leeve for the yell ow pre-terminat ed wiring harnes s (s ). Itis advis able to pl ace the heat s hrink over t he compl eted joint but in s ome ins tances the s l eeve wi ll not pass overt he terminal. Check, and i f required, pl ace t he correct s ize sl eeve ont o t he harness cable or pre-t ermi nated wi ri ngharnes s before crimpi ng the but t s plice t o t he wi ring harnes s .Place t he harness cable int o the but t s plice wi th the spl ice window over t he gui de bar. Make s ure that the cableharnes s wire i s agai nst t he s top in t he butt s pli ce, crimp the but t spl ice connector t o t he wiring harnes s .Gentl y pull the harnes s cables each s ide of t he butt s pli ce to make sure t hat a s ecure joint has been made.
W ARNING: Do not use a naked flame in areas where fuel or oi l have been s pil t. Clean t he area of res idual oi land fuel and wait unt il t he fuel s pi ll has ful ly evaporat ed.
• CAUTIO NS:
W hen us i ng a heat source make s ure t hat it is local is ed and causes no damage t o s urroundi ng mat erial s.
W here t he repair procedure i ndicat es t hat a glue l ined heat shrink s leeve s houl d be appli ed, apply s uffici entheat to t he glue lined heat s hri nk to melt t he glue i n order t o provide a water t ight s eal . Do not over heat t he glueli ned heat s hri nk s leeve s o t hat t he wi ring harnes s i nsul ati on becomes damaged.
Us ing a sui table heat s ource, shrink t he s leeve over t he butt s pli ce.If furt her pre-t erminated wi ri ng harnes s(s ) are t o be i nst all ed to the same elect rical connect or, make s ure that thelead i s cut at a different l engt h t o t he previous joi nt. This makes s ure that t he s pl ices wi ll, where poss i bl e, bes taggered on t he wi ri ng harness and prevent a bul k of s pl ices in one area.W hen al l of t he s pli ces have been made, fi t the t erminal(s) t o t he electrical connect or, t aking care t hat thet ermi nal s are correctl y ori ent ated.Ins t all the wiring harnes s cover and s ecure wi th adhes ive electrical tape. Do not cover t he wiring harnes s right tot he elect rical connect or as the t ermi nals mus t have a l it tl e movement and not be firml y bound to t he elect ricalconnector or wiring harnes s . Make s ure t hat the cable i dent ificati on s leeve(s ) are showing at t he wi ri ng harnesselectrical connect or.
Stripping Ins ulati on
Spice Correct ly Located
Page 2034 of 3229
T orque:
10 Nm Connect t he CKP s ens or electrical connect or.
12.
Connect t he generator electrical connect or.
T orque: 10 Nm 13.
Connect t he KS electrical connect ors .
14.
Connect and s ecure t he ECT s ens or electrical connect or.
15.
Connect t he fuel inject or el ect ri cal connect ors .
16.
Connect t he coi l-on-plug el ect ri cal connectors.
17.
Di sconnect t he variable cams haft t iming s olenoids .
18.
Connect t he HO2S electrical connect ors .
19.
Connect t he ECM elect rical connectors .
20.
Inst all t he engi ne mount.
Refer t o: Engi ne Mount RH (303-01A Engi ne - I6 3.2L Petrol,
Removal and Ins tall ati on).
21.
Inst all t he int ake mani fol d.
Refer t o: Int ake Mani fol d (303-01A Engi ne - I6 3.2L Petrol, Removal
and Inst all at ion).
22.
Inst all t he air int ake plenum.
Refer t o: Plenum Chamber (412-01 Cl imat e Control, Removal and
Inst all at ion).
23.
Inst all t he bat t ery t ray.
Refer t o: Bat t ery Tray (414-01 Bat tery, Mount ing and Cables ,
Removal and Ins tall ati on).
24.
Connect t he batt ery ground cable and ins tall t he cover.
Refer t o: Specificati ons (414-00 Bat tery and Charging Sys tem -
General Informat ion, Specificati ons).
25.
Page 2048 of 3229
The act ive ant i-theft sys tem monit ors the hi nged panels for unaut horized openi ng. In s ome markets the ant i-theft s ys temals o i ncorporates moni tori ng of the vehicl e int erior and vehicle ti lt s ens i ng.
The act ive ant i-theft al arm s ys t em i s cont rol led by t he fol lowi ng body sys tem cont rol modules :
CJBLeft Hand (LH) and Ri ght Hand (RH) front and rear door modul esIns t rument clus ter.
The CJB is the mai n cont rol ler in the sys tem. The CJB controls t he fol lowi ng securi ty funct ions , in addit ion to ot her vehicl efuncti ons :
Locking, doubl e l ocking and unlockingMonit oring of hi nged panel micros wi tches and panel ajar s t at esInt rus ion det ect ion modul eBatt ery backed sounder or vehicle hornsPass i ve armi ng and dis armi ngPani c alarm funct ionRemote hands et trans ponder readi ngInt eri or light ing.
Two l evels of vehicle ant i-t heft alarm are avai lable; peri meter mode moni tors all openi ng panel s and volumet ric mode (i ffi tt ed) monit ors t he vehi cle i nteri or for int rus ion and, in certai n market s, i t als o i ncorporates a ti lt s ens or t o monit or if t hevehi cl e i s being moved.
• NOTE: Volumet ri c mode and t ilt sens ing are not avai lable i n cert ain market s .
• NOTE: Volumet ri c mode is cancelled if t he vehi cl e is locked wit h any window or roof opening panel not clos ed t o avoi dinadvert ent al arm act ivati on.
The remot e handset provi des the followi ng functi onal it y:
Unlock (central unl ock or s i ngl e point entry)Lock and double lockLiftgate rel eas eApproach li ght ingPani c alarm.
The unlock and lock butt ons als o cont rol a 'lazy' l ock and unl ock feature which wi ll automat icall y cl ose or open t he wi ndowswit h an ext ended press of t he applicable but ton. This feature is onl y avai lable i n cert ain markets and i s cont rol led i nconjuct ion wit h the door modules .
W ARNING: Never doubl e l ock t he vehi cle wi th any pers on or ani mal ins ide.
• NOTE: Double l ocking is only avail abl e i n cert ai n market s .
The remot e handset contains an emergency access key. This can be us ed in the event of fail ure of t he remot e handset ort he vehi cl e batt ery t o unlock t he vehi cl e. The LH door handle contai ns a concealed mechanical key barrel which can beus ed wit h t he emergency key to acces s t he vehicle. This wi ll not dis able t he peri meter or int eri or al arm sys t ems which wi llbe acti vat ed when t he door i s opened. To cancel the al arm, t he remote hands et must be ins ert ed in t he s lot i n t he s tartcont rol module and the s t op/s tart but t on mus t be pres sed.
The remot e handset i s fi tt ed wi th an int egral vanadium lit hium rechargeabl e batt ery. The batt ery i s charged when it isins ert ed int o t he s lot in the st art control modul e.
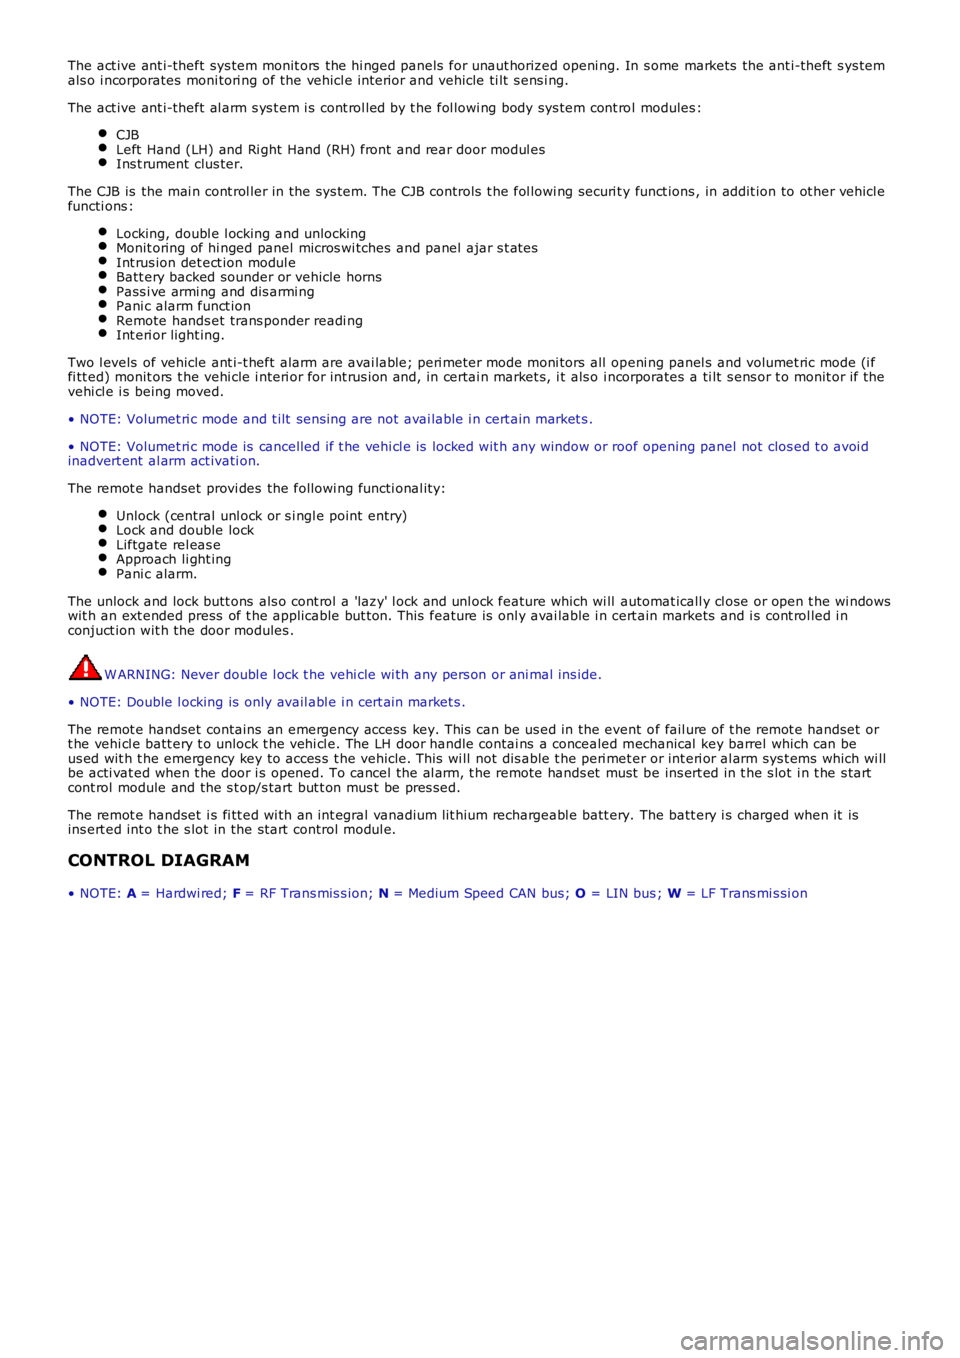
CONTROL DIAGRAM
• NOTE: A = Hardwi red; F = RF Trans mis s ion; N = Medium Speed CAN bus; O = LIN bus ; W = LF Trans mi s si on
Page 2058 of 3229
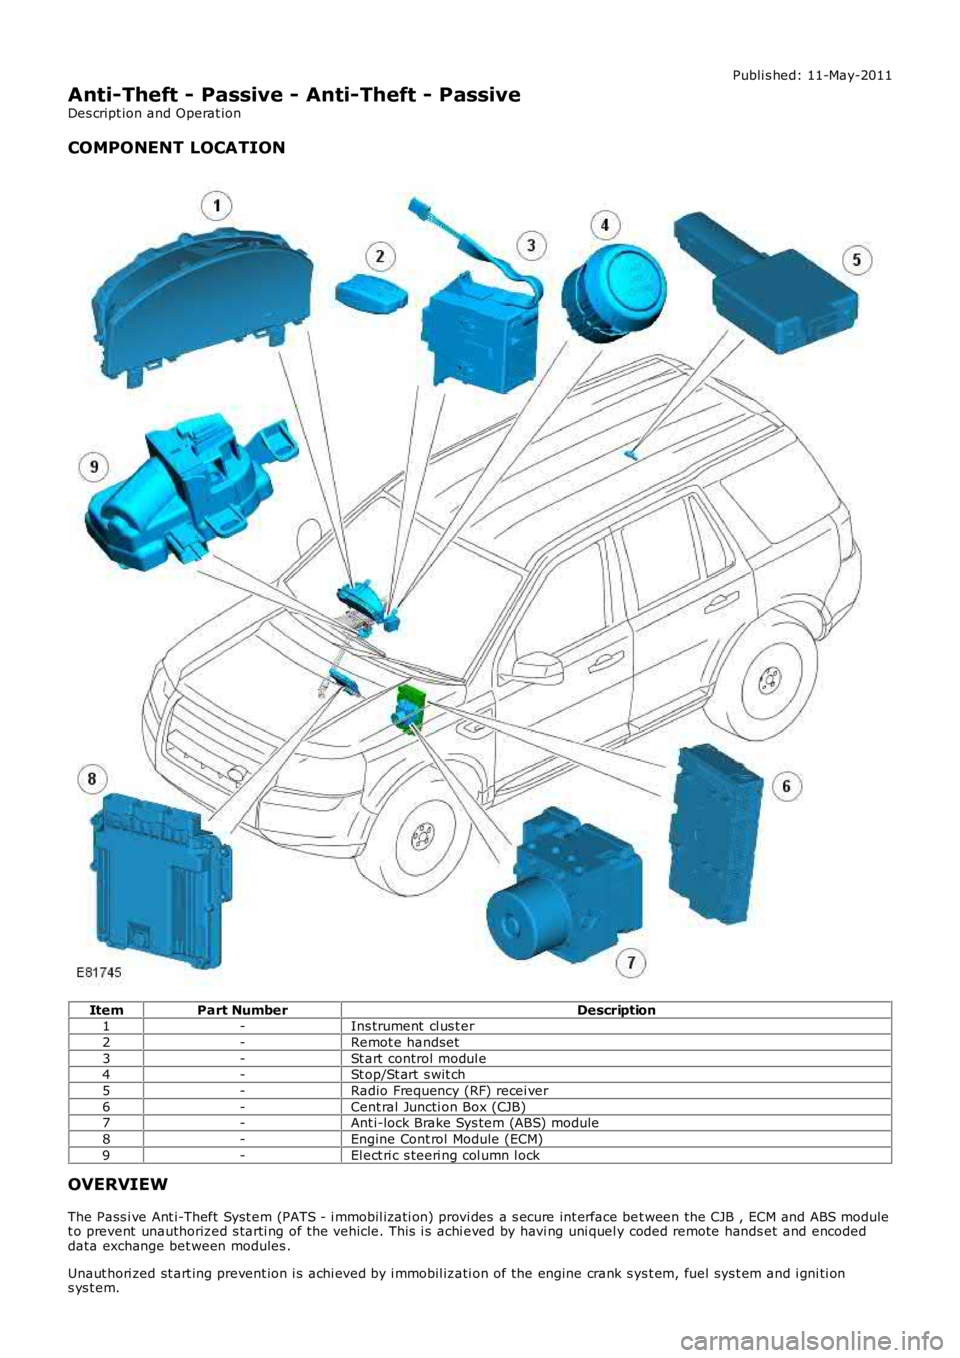
Publi s hed: 11-May-2011
Anti-Theft - Passive - Anti-Theft - Passive
Des cript ion and Operat ion
COMPONENT LOCATION
ItemPart NumberDescription1-Ins trument cl us t er
2-Remot e handset
3-St art control modul e4-St op/St art s wit ch
5-Radio Frequency (RF) recei ver
6-Cent ral Juncti on Box (CJB)7-Ant i-lock Brake Sys tem (ABS) module
8-Engine Cont rol Module (ECM)
9-El ect ri c s teeri ng col umn l ock
OVERVIEW
The Pass i ve Ant i-Theft Syst em (PATS - i mmobil izati on) provi des a s ecure int erface bet ween the CJB , ECM and ABS modulet o prevent unauthorized s tarti ng of the vehicle. This i s achi eved by havi ng uni quel y coded remote hands et and encodeddata exchange bet ween modules .
Unaut hori zed st art ing prevent ion i s achi eved by i mmobil izati on of the engine crank sys t em, fuel sys t em and i gni ti ons ys t em.
Page 2096 of 3229
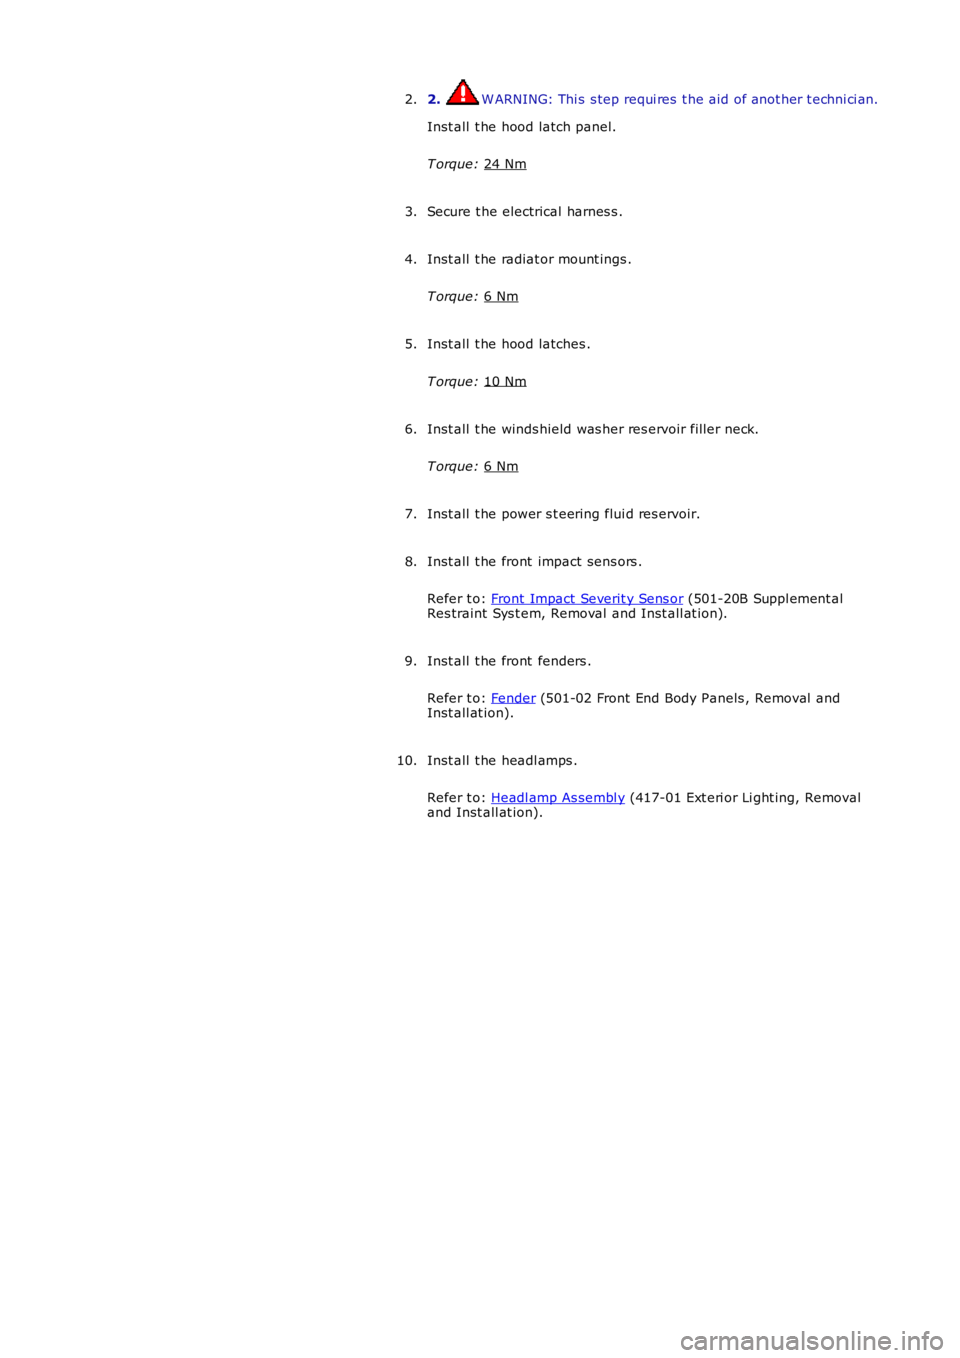
2. W ARNING: Thi s s tep requi res t he aid of anot her t echni ci an.
Inst all t he hood latch panel.
T orque: 24 Nm 2.
Secure t he electrical harnes s .
3.
Inst all t he radiat or mount ings .
T orque: 6 Nm 4.
Inst all t he hood latches .
T orque: 10 Nm 5.
Inst all t he winds hield was her res ervoir fil ler neck.
T orque: 6 Nm 6.
Inst all t he power s t eering flui d res ervoir.
7.
Inst all t he front impact sens ors .
Refer t o: Front Impact Severit y Sens or (501-20B Suppl ement al
Res traint Sys t em, Removal and Inst all at ion).
8.
Inst all t he front fenders .
Refer t o: Fender (501-02 Front End Body Panels , Removal and
Inst all at ion).
9.
Inst all t he headl amps .
Refer t o: Headl amp As sembl y (417-01 Ext eri or Li ght ing, Removal
and Inst all at ion).
10.
Page 2109 of 3229

Publi s hed: 11-May-2011
Interior Trim and Ornamentation -
Torque SpecificationsDescriptionNmlb-ft
A-pi ll ar trim panel Torx s crew32
A-pi ll ar ai rbag defl ect or bracket bolt s97B-pi ll ar trim panel upper Torx bol t2518
C-pi ll ar upper trim panel Torx s crew32
Engine cover 2.2 Dies el107Liftgat e t rim panel11
Loads pace s ecuri ng ri ng2518
Pas senger as s is t handles21Sunvi s ors21
Page 2118 of 3229
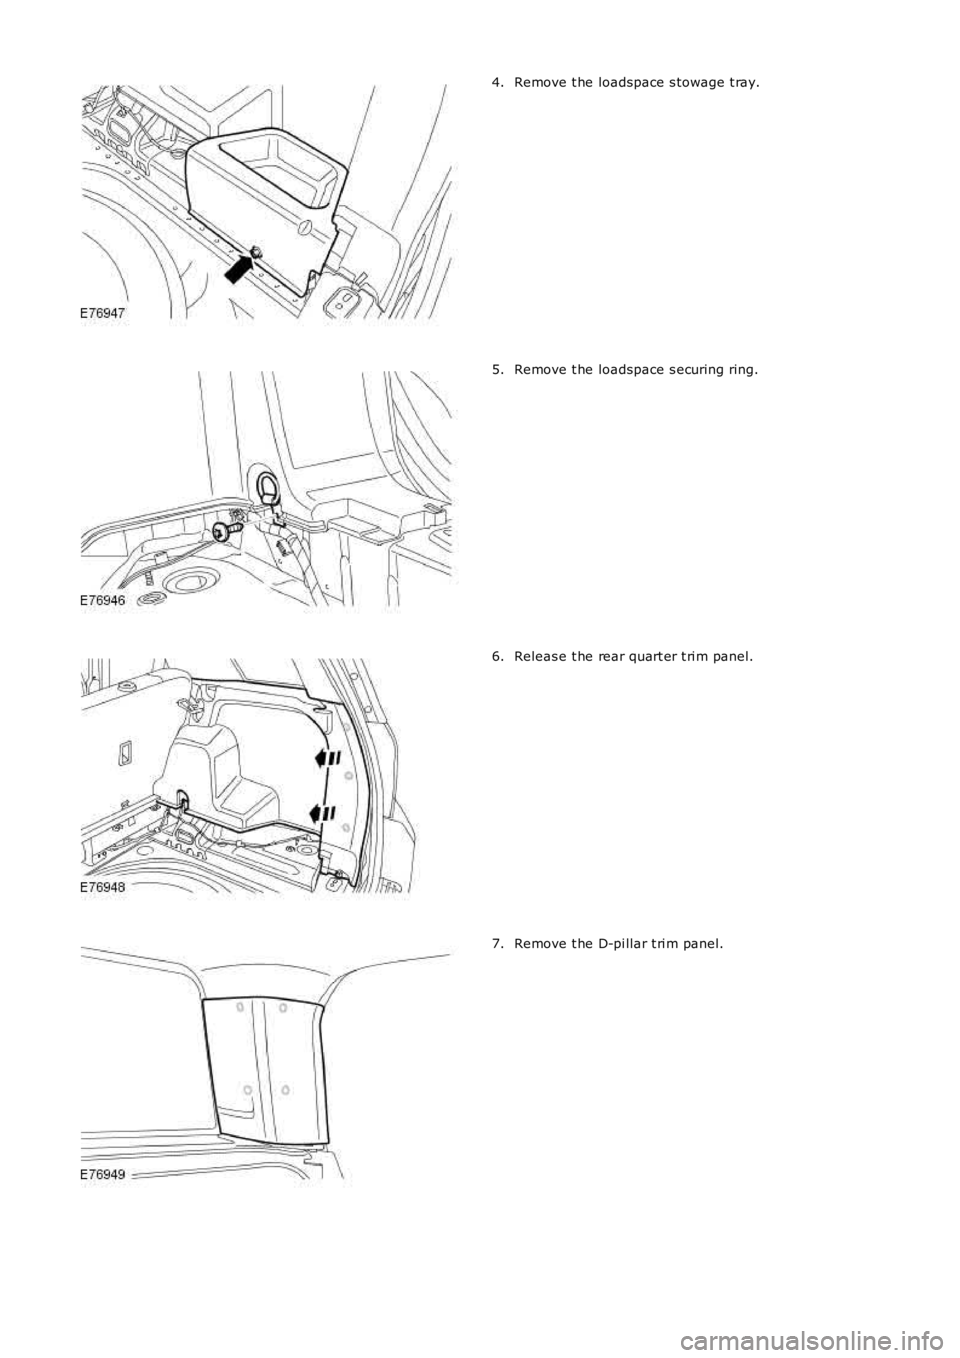
Remove t he loadspace s towage t ray.4.
Remove t he loadspace s ecuring ring.5.
Releas e t he rear quart er t ri m panel.6.
Remove t he D-pi llar t ri m panel.7.