Page 2246 of 3229
s hake out t he crys tal s and fi t the cartridge t o t he appl icatorgun.Modify t he nozzle to achieve a bead s ecti on in the s hape of aright angl e t ri angle wit h a bas e of 8 mm and a verti cal heightof 12 mm.
Apply a cont inuous bead of s ealant to the gl ass .6.
W it h ass i st ance, i ns t all the window glas s .Light ly pres s t he wi ndow glas s to seat t he s eal er.Secure t he rear quart er window glas s i n posi ti on usi ng t ape.
7.
Tes t the s ealer for l eaks , appl y addit ional s ealer i f necess ary. Ifwat er i s us ed, al low s ealer t o dry before t es ti ng. Spray wat er aroundt he glas s and check for leaks . Mark any area t hat leaks . Dry theglas s and s ealer then apply addi ti onal s eal er.
8.
Connect t he heat ed rear wi ndow electrical connect ors .9.
Inst all t he rear window wiper motor.
Refer t o: Rear W indow W iper Motor (501-16 W i pers and W as hers ,Removal and Ins tall ati on).
10.
Page 2248 of 3229

Apply acti vat or over t he old sealant on t he wi nds hiel d glas s andall ow t o cure.4.
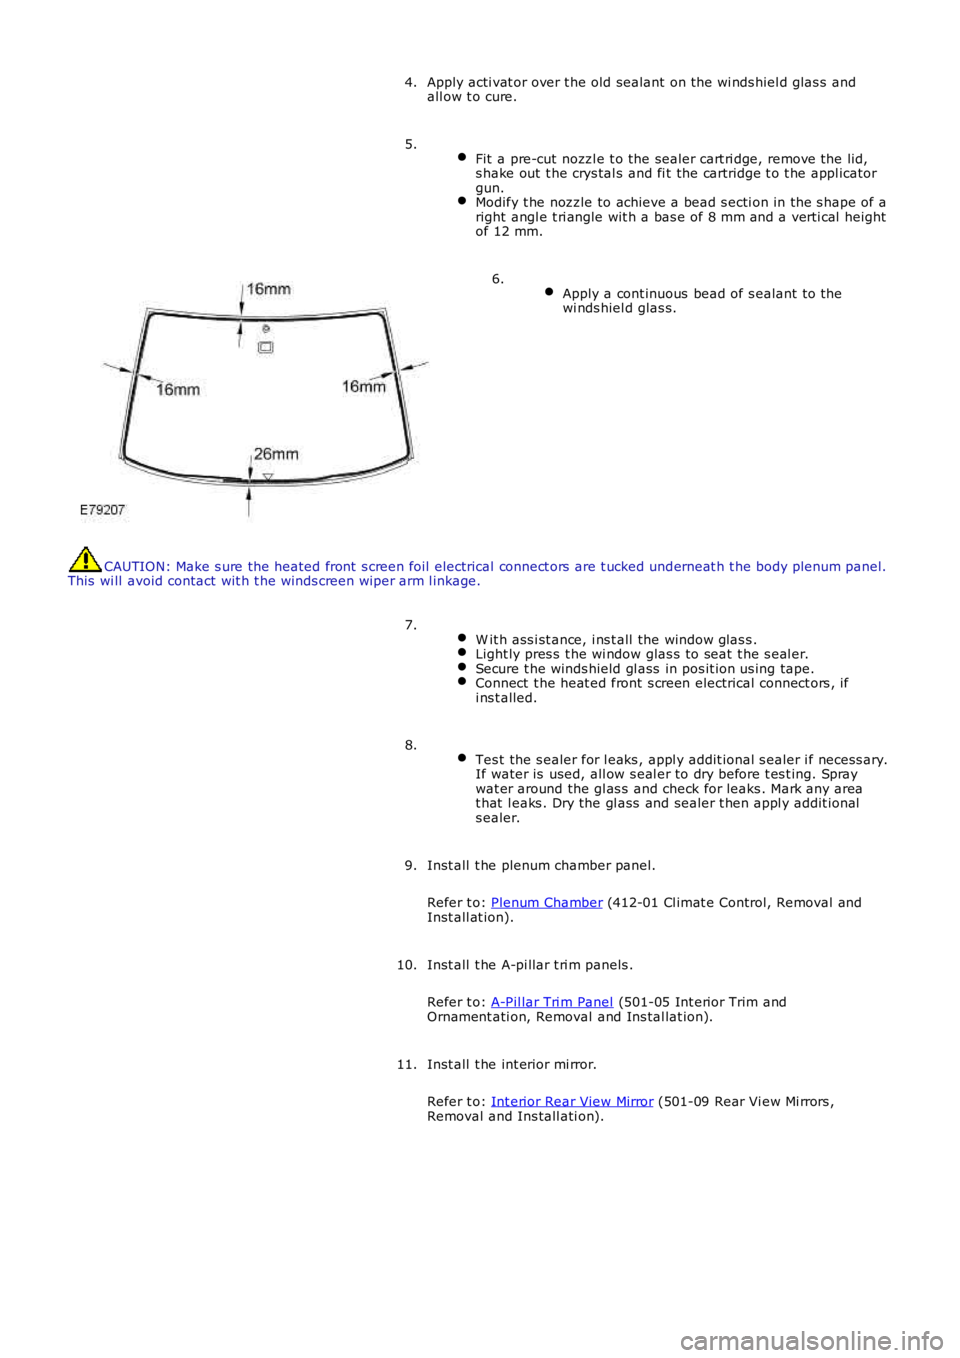
Fit a pre-cut nozzl e t o the sealer cart ri dge, remove the lid,s hake out t he crys tal s and fi t the cartridge t o t he appl icatorgun.Modify t he nozzle to achieve a bead s ecti on in the s hape of aright angl e t ri angle wit h a bas e of 8 mm and a verti cal heightof 12 mm.
5.
Apply a cont inuous bead of s ealant to thewi nds hiel d glas s.
6.
CAUTION: Make s ure the heated front s creen foil electrical connect ors are t ucked underneat h t he body plenum panel.This wi ll avoid contact wit h t he winds creen wi per arm l inkage.
W it h ass i st ance, i ns t all the window glas s .Light ly pres s t he wi ndow glas s to seat t he s eal er.Secure t he winds hield gl ass in pos it ion us ing tape.Connect t he heat ed front s creen electrical connect ors , ifi ns t alled.
7.
Tes t the s ealer for l eaks , appl y addit ional s ealer i f necess ary.If water is used, all ow s eal er to dry before t es t ing. Spraywat er around the gl as s and check for leaks . Mark any areat hat l eaks . Dry the gl ass and sealer t hen appl y addit ionals ealer.
8.
Inst all t he plenum chamber panel.
Refer t o: Plenum Chamber (412-01 Cl imat e Control, Removal andInst all at ion).
9.
Inst all t he A-pi llar t ri m panels .
Refer t o: A-Pil lar Tri m Panel (501-05 Int erior Trim andOrnament ati on, Removal and Ins tal lat ion).
10.
Inst all t he int erior mi rror.
Refer t o: Int erior Rear View Mirror (501-09 Rear Vi ew Mi rrors ,Removal and Ins tall ati on).
11.
Page 2249 of 3229
Publi s hed: 11-May-2011
Glass, Frames and Mechanisms - Front Door Window Regulator and Motor
Removal and Inst all ati on
Special T ool(s) 501-114
Releas e Lever, Door Glas s
Removal
• NOTE: If pos s ible, l ower t he wi ndow glas s by approximat el y one t hird of it s travel .
Di sconnect t he bat t ery ground cable.
Refer t o: Specificati ons (414-00 Bat tery and Charging Sys tem -
General Informat ion, Specificati ons).
1.
Remove t he front door s peaker.
Refer t o: Front Door Speaker (415-01 Informat ion and Ent ert ainment
Syst em, Removal and Ins tall ati on).
2. Carefully remove t he outer wais t s eal.
3. Releas e t he door wi ndow glas s from the wi ndow li ft
mechani s m. Rais e t he glas s and s ecure it t o t he t op of
t he door frame.
Speci al Tool (s ): 501-114 4.
Page 2251 of 3229
T orque:
10 Nm Inst all t he door control modul e.
2.
Inst all t he glas s guide channel and li ning. Ti ghten t he bolt .
T orque: 10 Nm 3.
Secure t he door wi ndow glas s t o t he window l ift mechanis m.
4.
Inst all t he out er wais t s eal and s ecure wi th the Torx s crew.
5.
Inst all t he front door s peaker.
Refer t o: Front Door Speaker (415-01 Informat ion and Ent ert ainment
Syst em, Removal and Ins tall ati on).
6.
Connect t he batt ery ground cable.
Refer t o: Specificati ons (414-00 Bat tery and Charging Sys tem -
General Informat ion, Specificati ons).
7.
Page 2253 of 3229
Releas e t he door wi ndow glas s from the wi ndow
l ift mechanis m. Rais e t he glas s and s ecure i t to
t he top of t he door frame.
Speci al Tool (s ): 501-114 4.
Secure t he glas s t o the top of t he frame.
5.
Page 2254 of 3229
Remove t he window mot or and regulat or
as sembl y. Rotat e t he as sembl y wit hin the door through 90
degrees and remove the upper edge from t he
apert ure firs t. 6.
Installation Inst all t he window mot or and regulat or as s embly. Tighten the nut s
and t he bolt s.
T orque: 10 Nm 1.
Secure t he door wi ndow glas s t o t he window l ift mechanis m.
2.
Inst all t he out er wais t s eal and s ecure wi th the Torx s crew.
3.
Inst all t he rear door modul e.
Refer t o: Rear Door Module (RDM) (419-10 Mult ifunct ion Electronic
Modules , Removal and Ins t allat ion).
4.
Connect t he batt ery ground cable.
Refer t o: Specificati ons (414-00 Bat tery and Charging Sys tem -
General Informat ion, Specificati ons).
5.
Page 2260 of 3229

Publi s hed: 11-May-2011
Instrument Panel and Console - Instrument Panel
Des cript ion and Operat ion
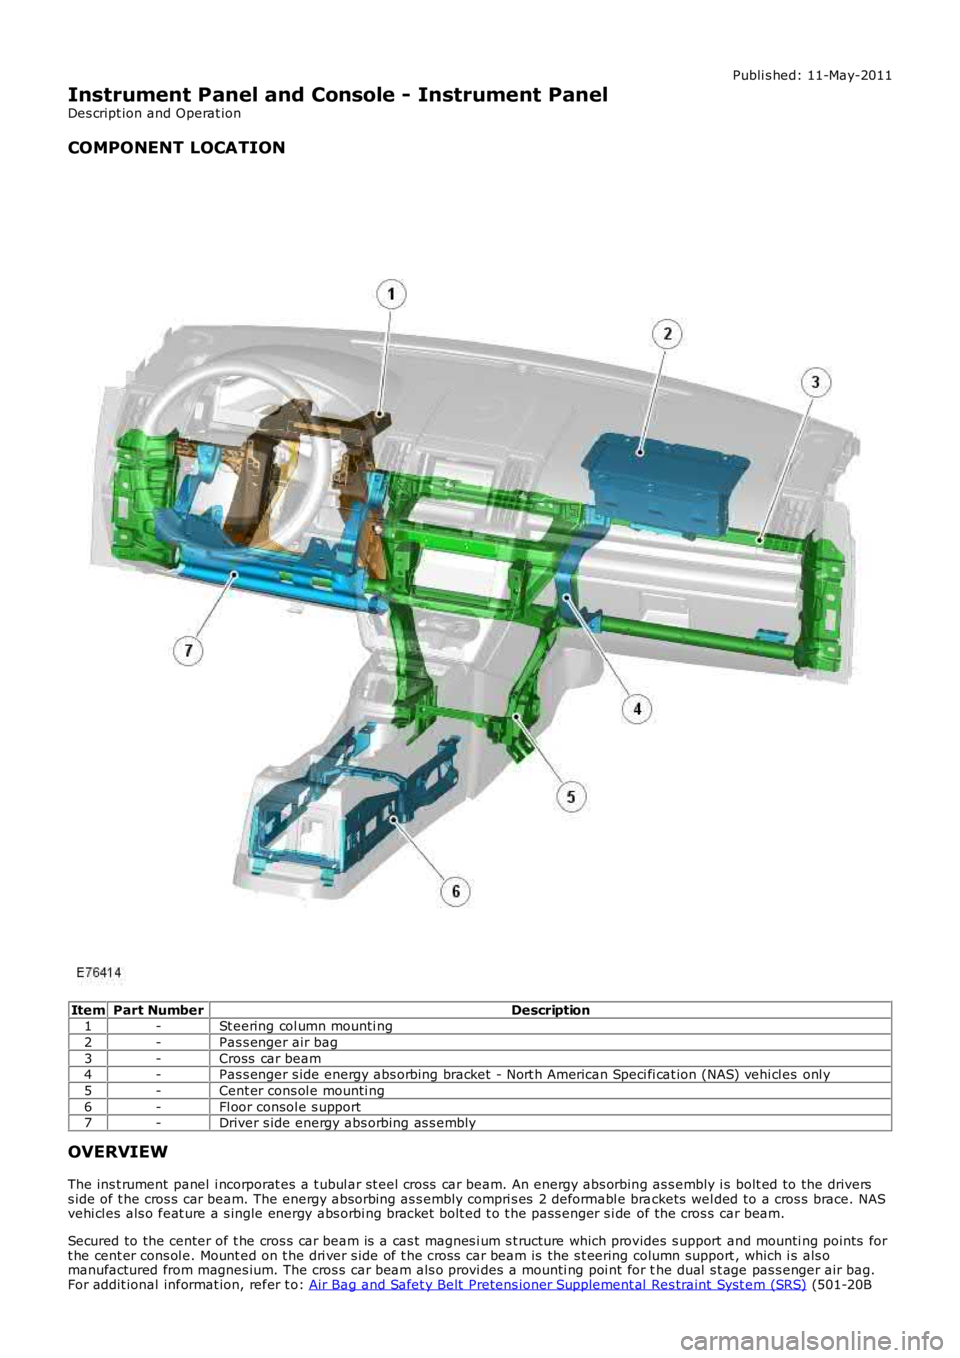
COMPONENT LOCATION
ItemPart NumberDescription1-St eering col umn mounti ng
2-Pas s enger air bag
3-Cross car beam4-Pas s enger s ide energy abs orbing bracket - Nort h American Speci fi cat ion (NAS) vehi cl es onl y
5-Cent er cons ol e mounti ng
6-Fl oor consol e s upport7-Driver s ide energy abs orbing as s embly
OVERVIEW
The ins t rument panel i ncorporat es a t ubul ar st eel cross car beam. An energy abs orbing as s embly i s bolt ed to the driverss ide of t he cros s car beam. The energy abs orbing as s embly compri s es 2 deformabl e brackets wel ded to a cros s brace. NASvehi cl es als o feat ure a s ingle energy abs orbi ng bracket bolt ed t o t he pass enger s i de of the cros s car beam.
Secured to the center of t he cros s car beam is a cas t magnes i um s t ructure which provides s upport and mounti ng points fort he cent er cons ol e. Mount ed on t he dri ver s ide of t he cros s car beam is the s t eering column support , which i s als omanufactured from magnes ium. The cros s car beam als o provi des a mounti ng poi nt for the dual s t age pas s enger air bag.For addit ional informat ion, refer t o: Air Bag and Safet y Belt Pretens ioner Supplement al Res traint Syst em (SRS) (501-20B
Page 2269 of 3229

Remove t he cool ant hos e clamps .
5.
Connect t he A/C pipes t o the TXV and ti ght en t he M6 nut .
T orque: 10 Nm 6.
Inst all t he ECM bracket as s embly and ti ght en t he nut s .
T orque: 10 Nm 7.
Connect t he ECM elect rical connectors .
8.
9. W ARNING: Make sure t hat a new bolt i s ins tal led.
Connect t he s teeri ng col umn l ower s haft and t ight en the bol t.
T orque: 25 Nm 9.
Connect t he drain tube t o t he heater hous i ng.
10.
Connect t he electric boos ter heat er core.
11.
Inst all t he cent er, lower ducts t o t he heater hous i ng.
12.
Inst all t he NVH pad.
13.
Inst all t he ins trument panel wiring harnes s .
14.
Inst all t he auxi liary juncti on box acces s cover.
15.
Secure t he ins trument panel harnes s to the trans mi ss i on tunnel.
16.
Secure and t ighten the eart h l ead.
T orque: 10 Nm 17.
Connect t he body harnes s t o t he i ns t rument panel .
18.
Inst all t he fl oor consol e extens ions.
19.
Inst all t he s el ect or lever mount ing bracket.
20.
Inst all t he transmis si on s elector lever.
Refer t o: Sel ect or Lever As sembl y (307-05 Aut omat ic
Trans mi ss ion/Transaxle Ext ernal Cont rol s , Removal and
Inst all at ion).
21.
Inst all t he LH front s eat .
Refer t o: Front Seat (501-10 Seati ng, Removal and Ins tal lati on).
22.
Inst all both cowl s ide t rim panels .
Refer t o: Cowl Si de Tri m Panel (501-05 Interior Tri m and
Ornament ati on, Removal and Ins tal lat ion).
23.
Secure both scuff pl ate t rim panels .
24.
Inst all t he A-pi llar center t rim panels .
25.